USER MANUAL Kaltar 500W EQUATION
| Modèle/Modelo/Modello/
Movtéλo/Model/mondén | EAN |
| Kaltar 500 | 82736026 | 3276007181098 |
| Kaltar 750 | 82735970 | 3276007181067 |
| Kaltar 500C | 82736027 | 3276007181104 |
| Kaltar 750C | 82735971 | 3276007181074 |
FR Manuel d'utilisation
IT Manuale di Istruzioni
UA KepiBnucTbo IIO 36ipci i Eeknnyataqii
ES Manual de Instrucciones
EL Evyειρίδιο Μδηγιών
RO Manual de Instrucioni
PT Manual de Instruções
PL Instrukcia Obstugi
EN Utilisation Manual

FR: Mentions Legales & Consignes de Sécurité 3
ES: Instrucciones Legales y de Seguidad 17
PT: Avisos Legais e Instruções de Segança 31
IT: Istruzioni Legali e di Sicureza 45
EL: Nouko onuieiwa kaI oNviEc aOaiaac 59
PL:Uwagi Prawne i Instrukcja Bezpieczestewa 73
UA: KepiBnTBo 3 TexHikn Be3neKn i IpaBOvM HopMaM 87
RO: Manual privind sigurantha sl aspectele juridice. 101
EN: Legal & Safety Instructions 115
FR: Branchement 6
ES: Conexión 20
PT: Ligação 34
IT: Connessione 48
EL: v 62
PL: Podłaczenia 76
UA: PiiKJIuOeHn.. 90
RO: Racordare. 104
EN: Connection 118

FR: Utilisation 7
ES: Utilación 21
PT: Utilização 35
IT: Uso. 49
EL: Xpno 63
PL: Uzytkowanie. 77
UA: BnKopncTaHn.. 91
RO: Utilizare 105
EN: Use 119

FR: Entretien - Dépannage 13
ES: Mantenimiento - Reparacion de averias 27
PT: Manutenção - Solutação de problemas 41
IT: Manutenzione - Risoluzione problemi 55
EL: Suvntnpn - Avtmuewion npoBlambdaaw 69
PL: Konserwacja - Rozwiȩzywanie problemów 83
UA: DOrIaD - yCyHeHnH HeCnpaBHOCTeI. 97
RO: Ingrijire - Depanare 111
EN: Care - Troubleshooting. 125

ATTENTION!
9- Pnntote to nhtkpo yia eipbepaiwn.

Ia va nepaote ynpovota touc apioouc, naonote npataeva to nknro

Ia va byeite ano to uevou, nahtoe napateaetava to nAHTPO
Flapadevya: oipouooc otic 4:30 m.u. nTv Tepa.

Avtoxian eno npoypaatoc e ka8e npa tnc 860a6ac.
1- Pnirjnte nolAec fopoe cto nllktpo yia va e nlaEETe Tn aeitoupyia pO8muonc 0--O-- O PROG , eufavicetai to oubpolo - .
2- Patjote 2o foepcs to nAiktpo yia va eufavioetie to
3- PntoTe to nIkypto yia va emuaviotei n npwnt nupea. Emuaviizetai o apiBmuoc tnc nuépaac
4- Entéξετηνημεραχρομισοιοιωντα τηλίκηκρα και.
5- Pnto to nAikpo , aovaoobrievoi o apiouos tsnc npaeac 1ek nepiutponnc me to poypauma .
6- OpiTe to npóvypaμa μe ta πλικτρα kal
7- Pntnote to nhtkpo yia eipbetaaiwn. Emuavicetai n erouevn npepa.
8- Enavaaβεε anó to Μηεio 4 γia καδε μia anó tις unóoioiες Μηερε.
Papabvma: Ev epyaouat TetapcKai 0w oipow to npovpaua P6 yia auty nny nepa (d3).
$$
\bigcirc \rightarrow - \rightarrow \bigcirc \bigcirc \rightarrow \neg d \rightarrow \bigcirc \rightarrow d \mapsto \bigcirc \rightarrow d \exists \rightarrow \bigcirc \rightarrow d \exists P \mapsto \bigcirc \rightarrow d \exists P E \rightarrow \bigcirc \rightarrow d 4
$$
Meta ano 1Aeio aobpveiaC, nOvab6a Byaivei autoujata ano Tn aeoupyia pOu8uonC.
Alambda'tou eupocxovou o ev npovpaum
1- Pnntote nolalec foepc to nllktpo yia va enlalecte t neiitoupyia pudmuoc 0--O-- OPROG , eufavicetai to oubo
2- Pnthe tpeic ophioc to pia kto yia va eauovstei to
3 - Pntotet o nhtpo yia va ephiaviotei to npwto npoypaum. Ephiavzetai o apidoc tou npoypamatoc
4- Opiote to npoypauma nou 8eAe va tponoonoioe e ta niktpa kal
5- Natnate , avaobnvei npwtn wpa 0ek nepipponc me to eloc tou eupouc E -
6- Opiate tvu npou deaetve tpoonnoihoetme ta nktpa kal
7 - Παπησετηλλές φορές το πλήκτρο γιαν εἰπιλέξετε το εἰδός του εύρους (Comfort, Eco, απενεργοποιησ).
8- Pnathote to nAikto, eouavctai n enoueyn wpa.
9- Enavaaβεετο οημειδεγα καδε μia αοῦτις ḅδεσις ὄρας,
10-MetayvTeAutaiawa(23),EmuaviCetai to
11 - Patae to nAkepo kai ta to nAkepo yia va emiopepete otn Aota npoypaumatw.
12 - Etnavaλβεε Απο το σημεί 4 γι καδε ενα Απο τα προγράματα πος τροποποίησ.
Iapab6iyu: Oa h8eLa va tponoiohaw to npypama P6, wote va elvai anevepyoinievo oto diostma 0 nμ. euc 4 nμ. kai va npooaepei 8epukpacia Comfort oto diostma 9 nμ. euc 1 μ. kai 7 μ. euc 9 μ. Ipenei, loiov, va terpaow ta eupn oto diostma 0 nμ. euc 4 nμ. ano Eco oe anevepyoinieva, va aalaxw to eupoc oto diostma 8 nμ. euc 9 nμ. ano Comfort oEco, va alaxw to eupoc oto diostma 12 nμ. euc 1 μ. ano Eco oE comfort kai va alaxw to eupoc, oto diostma 6 μμ. euc 7 μμ. ano Comfort oE eco.


MeTao1o 1eTto aBpaveiaoc, n Movad8a Byaivei autouata an o T Heitoupyia pubuaonc.

Mea ano diakonn' peuatoC, o pu8muic diatnpovtai, aAlambdawC xpeiaotei va pu8muotovxavad n mepa kai wpa.
3a3eMJIeHHa 3a60pOHeHo
- YKUO yCTaHOBbO OCHaUeHa 3a3eMnIOUHm IPOBOOM, NOrO Hi B YAKOMy pa3i He MoXHa 3'EDHyBaTn 3 IPOBOOM padiaTopa. BiH NobuHEn 6Byt iOJIbOBaHIM, Uo6 yHNKHyTN bdy-ba-KORO KOHTaKTy 3 IHUIMN IPOBOdAmN.
EJemeHTynpabHnHa Ta yHKuii
BctaHOBLeHHHaCy TaIHaTnXHHa
Пд ча залуску ппеладу вальвов стоюнч aci.deь тnxня.e.
$$
\begin{array}{c}\text {H H} \underset {\text {三}} {\odot} \underset {\odot} {\odot} \rightarrow \underset {\circ} {\odot} \rightarrow \underset {\text {五}} {\odot} \underset {\odot} {\odot} \rightarrow \underset {\circ} {\odot} \rightarrow \underset {\text {一}} {\odot} \underset {\circ} {\odot} \rightarrow \underset {\circ} {\odot}\end{array}
$$
IIndkaia
BctaHOBLeHHaCy Ta dHaTnKHN
1- HataNCHITb 日ekilbka pa3iB, ⅢO6 Bn6paTn peKIM HaIaWtYBaHHa npaMeTpib PROG 3'YBNTbCnMB0J--.
2-HaTnCHiTb,山06BnBeCtHaekpaH-
3-HatncHtB >,uO6 BnBecTeHa ekpan roDInHy.CmB0J {i roDInHa nooHytbo No cep3i 6IIMaTIn.
4-BCTaHOBIb foINHy 3a donomOroIO KhoNOK i
5-HatncHtB 1,IO6 BnBeCTn Ha ekpan XBnInn.CmB0n iXBnInn IooHyb IIO cep3i 6nMaTn.
6-BctaHObITb XBnJIHH 3a DOJONOMOROK KOHOK
7-HaTnchItb ,IIO6 BvBecTu Ha eKpaH DeH TIXKH.CmB0J iDeHb NoCHyTB no cep3i 6nIMATN.
8-BctaHObitb DeHb TnKHN3a DOnOMOIOK HONOK
| d1 | d2 | d3 | d4 | d5 | d6 | d7 |
| пенидок | віторok | серда | сетевр | п'tяпшицă | субота | нени |
9-Hamuchimb 已 ,u06 niðmeepóumu.
Tpueane HamuckanHn Khonok a6o 03e0JcE wBudko npokpyyeamu uOphiu. Tpuane HamuckanHa > 03e0JcE bumu 3 MeHIO.
PnKnla:IIO6 BCTaHOBuTn cepedy,16:30.
→→→HR→H12→x4→HH16→x→n00→x30→
Pn3HaueHn nporpaMn KoxKHomy dHIO TnxKHe.
1-HaTnchIb 2deKilbKa pa3iB,506 Bn6paTn peXIM HaIaStYBaHna npaMeTpib O--O--PROG 3'ABNTbCra CmB0J--.
2-DbivHaNTCHiTb,Uo6BvBecTNHaekpan
3-HaTnchItb ,Uo6BvBeCTnHaekpaHnePshn deHb.BiOobpaKaetbcHomep dH
4-BiB6epiTbIeHb,JaNIOPTpi6HO BCTaHOBTu,3aOIOMOrOHO KHOIOK i
5-HatncHtBHa ,Homep dHn a i nporpaMa ; nochnyb no uepi6nmuTn.
6- HanaaHTyTe nporpaMy 3a dOnomOrHO KhoNOK i
7-HatncHtB ,uO6 niTBePdntn.BiO6paKaεTbcHaCTyHnI DeHb.
8-BuKoHaIe Ii,poNuHaOu34-To npHKrTy,IaN KoXHoRo HaCTyHnHO DnH.
PnKnaJr He npaHIOBcepey,ToM y xOuy np3HaunITn pOgpaM y P6 Ha ceJ deHb (d3).
$$
\bigcirc \rightarrow - \rightarrow \bigcirc \bigcirc \rightarrow \neg d \rightarrow \bigcirc \rightarrow d \mapsto \bigcirc \xrightarrow {\wedge} \rightarrow d \exists \rightarrow \bigcirc \rightarrow d \exists P \mapsto \bigcirc \xrightarrow {\wedge} d \exists P E \rightarrow \bigcirc \rightarrow d
$$
Yepe3 1xueunuhy be3dijbHocmi modynb aemomamuHHOe3 pekumy hanaawmyaahnnapamempie.
3mHa yacobnx iHTepbanib nporpaMn
1- Hamuchimb 0 dekeinbka pa3ie, u6o bupamu pexkum HanaawmyaHnna napamempie O--O--- PROG 3'abmbc cumeon--.
2 - Hamuchimb 3 pa3u Ha , uo6 eueecmu ha ekpan P
3 - Hamuchimb, uo6 bueecmu Ha ekpan nepw npo2pamy. Bido6pa3umbc8 homep npo2pamu
4-Bubepimb npoepamy, kynompio 3mHmu, 3a donomozoo KhONOK i
5 - Hamuchimb ~一~ , nepwa zoduna i mun iHmepeany E nochymb no cepz6numamu.
6-Bubepimb 2oodyu, kynompio 3miHmu, 3a donoMo2oK hONOK i
7 - Hamuchimb dekiibka pa3ie Ha 已 , uo6 eubpamu mun iHmpeany (KoMphiopm, Eko, Bumk).
8 - Hamuchimb , ha ekpahi biðópbazumbcj HacmynHa zóðuHa.
9 - Bukohaime dii, nouhaou 3 6-20 nykmy, din KoKhozo yacoozo iHmepeany.
10-Пися османьоюн (23)Ha ekpani biodobpaKaembca 8.
11-Hamuchimb 品 ,nomim ,uo6 nooephymucya do cnucky npoepam.
12 - Bukohaime dii, nouhaoucu 3 4-20 nyHKmy, din KoKHO npo2pamu, kny nompi6ho 3mHumu.
Приклад:Яхув breectи 3mHINВ nporpamy P6,цбо VAHA BIMNKaIacn 3 00.0do 4.00,Та 3a6e3neuByaTemaTpepaTyB pexkmi «KoMΦoP» 3 9:00do13:00 ta 3 19:00do21:00.Ing ly BoTo Heo6xioHepeMKHyTu INTEPBan 3 00:00do 04:00 3 pexkmy «Eko» Ha «BIMKHN«,iHTepBaI 3 08:00do 09:00-3 pexkmy «KoMΦoP» Ha «Eko»,iHTepBaI 3 12:00 do 13:00-3 pexkmy «Eko» Ha «KoMΦoP» ,a iHTepBaI 3 18:00do 19:00-3 pexkmy «KoMΦoP» Ha «Eko」
$$
\begin{array}{c c c c c c c c c c c c c c c c c c} \text {P 6} & \frac {\text {C o}}{\text {E c}} & \frac {\text {C o}}{\text {O h}} & \frac {\text {C o}}{\text {O h}} & \frac {\text {C o}}{\text {O h}} & \frac {\text {C o}}{\text {O h}} & \frac {\text {C o}}{\text {O h}} & \frac {\text {C o}}{\text {O h}} & \frac {\text {C o}}{\text {O h}} & \frac {\text {C o} _ {1} ^ {2}}{\text {O h} ^ {2}} & \frac {\text {C o} _ {2} ^ {2}}{\text {O h} ^ {2}} & \frac {\text {C o} _ {3} ^ {2}}{\text {O h} ^ {2}} & \frac {\text {C o} _ {4} ^ {2}}{\text {O h} ^ {2}} & \frac {\text {C o} _ {5} ^ {2}}{\text {O h} ^ {2}} & \frac {\text {C o} _ {6} ^ {2}}{\text {O h} ^ {2}} \ \hline \text {P 6} & \frac {\text {C o}}{\text {E c}} & \frac {\text {C o}}{\text {O f}} & \frac {\text {C o}}{\text {O h}} & \frac {\text {C o}}{\text {O h}} & \frac {\text {C o}}{\text {O h}} & \frac {\text {C o}}{\text {O h}} & \frac {\text {C o}}{\text {O h}} & \frac {\text {C o} _ {1} ^ {2}}{\text {O h} _ {1} ^ {2}} & \frac {\text {C o} _ {2} ^ {2}}{\text {O h} _ {2} ^ {2}} & \frac {\text {C o} _ {3} ^ {2}}{\text {O h} _ {3} ^ {2}} & \frac {\text {C o} _ {4} ^ {2}}{\text {O h} _ {4} ^ {2}} & \frac {\text {C o} _ {5} ^ {2}}{\text {O h} _ {5} ^ {2}} \ \hline \end{array}
$$
$$
\begin{array}{l}\boxed {\times_ {3} \rightarrow - \rightarrow \boxed {\times_ {5}} \rightarrow \boxed {\times_ {6}} \rightarrow \boxed {\times_ {7}}}\\rightarrow \boxed {\times_ {2}} \rightarrow \boxed {\times_ {1}} \rightarrow \boxed {\times_ {4}} \rightarrow \boxed {\times_ {3}} \rightarrow \boxed {\times_ {2}} \rightarrow \boxed {\times_ {1}} \rightarrow \boxed {\times_ {4}} \rightarrow \boxed {\times_ {3}} \rightarrow \boxed {\times_ {2}} \rightarrow \boxed {\times_ {1}}\\rightarrow \boxed {\times_ {4}} \rightarrow \boxed {\times_ {3}} \rightarrow \boxed {\times_ {4}} \rightarrow \boxed {\times_ {5}} \rightarrow \boxed {\times_ {6}} \rightarrow \boxed {\times_ {7}}\\rightarrow \boxed {\times_ {6}} \rightarrow \boxed {\times_ {5}} \rightarrow \boxed {\times_ {4}} \rightarrow \boxed {\times_ {3}} \rightarrow \boxed {\times_ {2}} \rightarrow \boxed {\times_ {1}}\\end{array}
$$
UCYHEHHH HECPAPABHOCTI
HecnpabHocti yacTo BVnHKaIOb uepe3 He3NaHHi npuHH; nepe3 3BepHeHHm Do cepBicHOi cnJy6n noNtBcra HnKHeHabeDeHy Ta6nio. Lc do3Bolntb 3aoaadTn BaU ca i yHNKHyTu 3aBnx BvtpaT.
| Пюоблеса | Прочини, сношу усанения. |
| Бл_OK керванье и Вимkaевс. | Прострии знaxodиньс в рекими очіквань.Натиспь 6дь-як Кногки, поб akтувати диспей. Пеконайся, по пострии правлиьно підікію龟ен do elektrompeşени. Пеконайся, по Вимкач знхodиньс в пооженни. |
| Иndиatingop haripibanha He CBITbcs. | Иndikatop haripibanha CBITbcs liime todi, koju ha onip podaetbca happya. Пеконайся, по he 6byv bіdklouheni indikatop b peximoi ochivyanhna (pozdiin «PozshinpeliiФункци). |
| КIMнathа Tempepatура BiDri3n8eTbcB iD Sempeatypu, zuo BiDobpaXaTbcS Na pricstpoi. | Notri6no nocekatni He meHsme 6 rodyin, suo6 tempepatуca Stabiiziybanacb.Можна habaltsybatn 3adany tempepatуb vidynbiodno do tempepatyrn, BmiprahoiВ npimiiueHHI (DNB.«Kani6pyBaHNHa»В pozdiini «PozshinpeliiФункци). |
| Пюстрии не haripibac. | У рекими prorpamvayhanrpekoahai teb, suo padiaot 3haxodntbcs b uacobomny iInterbani «Komfopt'. Пекерiteе elektrpoxivchennna (Вимькau). Пекерite КIMнathу tempepatур: якшо boha 3ahandto Bvocka B nopibraynhi 3 zadahoTotempepatуpoio, npinlad He 6dye Haripibatsc. |
| Пюстрии nochиму haripibac. | Пекерite prorpamvayhanr. Пеконайся, suo prostrii He 3haxodntbcs Ha npotayi (napuy vidykrpiTiDbepi, xolodne nobitpr nahdoxinb tyepe3 3'edhyBaIbHy kopr6ky B 3adni chactnhi pristcpoiu, ceHTparilizobana mexanichha bentnlaizia) abo suo halaStyBaHNr Tempepatури He 3miHOBaIOsc. Y pazi BiNnKHeHnry pro6bemn (TePMocstat 3abokovabnH ToTO), BiDkiLoytith JxWBlennny pristcpoiu (3ao6bIXHK, automatunnH B VIMkaH) npin6n3Ho Ha 10xbnHn, a notim yBIMKnHbYBoTO 3HOBy. |
| Пюстрии недостаиму haripibac. | 36lbuHbTb 3adany Tempepatур.Якшо Bvctablenhe Maksimалынe 3nauchennH, BVKOnai TeHactynHnpepebIKn: . Пекерite, чи hemaeВ поrimiцehnH iHswOdoJkepeRaN OANeHnN. . Пеконайся, suo npinlad onaplioue liime epinni OpaniHn (dbei prakrti). . Пеконайся, suo notykhnicb prinladu bIDnobiidae po3mipy prinmiiüeHn (Mn pekomehduyEmoB 125 Bt/M2 npin Bincoti steni 2,50 M).. |
| Пюстрииdoesro haripibac. | Еlectrvnihn onip haripibac piDinyu, aka noctynobO i npinrodHm ChINOM nochnaeцrkynluBAtn BCEpOHI nOncnHnE TpnepepAtpaNopeKulIOBAtn BCEpOHI nOncnHnE TpnepepAtpaNopeKulIOBAtn BCEpOHI nOncnHnE TpnepepAtpaNopeKulIOBAtn BCEpOHI nOncnHnE TpnepepAtpaNopeKulIOBAtn BCEpOHI nOncnHnE TpnepePApaNopeKulIOBAtn BCEpOHI nOncnHnE TpnepePApaNopeKulIOBAtn BCEpOHI nOncnHnE TpnepePApaNopeKulIOBAtn BCEpOHI nOncnHnE TpnepePApaNopeKulIOBAtn BCEpOHI nOncnHnE TgPpOHI nOncnHnE TpnepePApaNopeKulIOBAtn BCEpOHI nOncnHnE TpnepePApaNopeKulIOBAtn BCEpOHI nOncnHnE TpnepePApaNopeKulIOBAtn BCEpOHI nOncnHnE TpnepePApaNopeKulIIbBnOyBcBnOyBcBnOyBcBnOyBcBnOyBcBnOyBcBnOyBcBnOyBcBnOyBcBnOyBcBnOyBcBnOyBcBnOyBcBnOyBcBnOyBcBnOyBcBnOyBcBnOYBcBnOyBcBnOyBcBnOyBcBnOyBcBnOyBcBnOyBcBnOyBcBnOyBcBnOyBcBnOyBcBnOyBcBnOyBcBnOyBcBnOyBcBnOyBcBnOyBcBbBnOyBcBnOyBcBnOyBcBnOyBcBnOyBcBnOyBcBnOyBcBnOyBcBnOyBcBnOyBcBnOyBcBnOyBcBnOyBcBnOyBcBnOyBcBnOyBcBn0yBcBnOyBcBnOyBcBnOyBcBnOyBcBnOyBcBnOyBcBnOyBcBnOyBcBnOyBcBnOyBcBnOyBcBnOyBcBnOyBcBnOyBcBnOyBcBnOyBcCnBuHnOeTbBcBnOyBcBnOyBcBnOyBcBnOyBcBnOyBcBnOyBcBnOyBcBnOyBcBnOyBcBnOyBcBnOyBcBnOyBcBnOyBcBnOyBcBnOyBcBnOyBcBcBnOyBcBnOyBcBnOyBcBnOyBcBnOyBcBnOyBcBnOyBcBnOyBcBnOyBcBnOyBcBnOyBcBnOyBcBnOyBcBnOyBcBnOyBcBnOyBcBngHnOeTbBcBnOyBcBnOyBcBnOyBcBnOyBcBnOyBcBnOyBcBnOyBcBnOyBcBnOyBcBnOyBcBnOyBcBnOyBcBnOyBcBnOyBcBnOyBcBngHnOeTtBcBnOyBcBnOyBcBnOyBcBnOyBcBnOyBcBnOyBcBnOyBcBnOyBcBnOyBcBnOyBcBnOyBcBnOyBcBnOyBcBnOyBcBnOyBcBnOyBcBnxOuHnOeTbBcBnOyBcBnOyBcBnOyBcBnOyBcBnOyBcBnOyBcBnOyBcBnOyBcBnOyBcBnOyBcBnOyBcBnOyBcBnOyBcBnOyBcBnOyBcBnxOuHnOcBiHnOeTbBcBnOyBcBnOyBcBnOyBcBnOyBcBnOyBcBnOyBcBnOyBcBnOyBcBnOyBcBnOyBcBnOyBcBnOyBcBnOyBcBnOyBcBnOyBcBbBnOyBbCnBuHnOeTbBcBnOyBcBnOyBcBnOyBcBnOyBcBnOyBcBnOyBcBnOyBcBnOyBcBnOyBcBnOyBcBnOyBcBnOyBcBnOyBcBnOyBcBnOy BcBnOyBcBnOyBcBnOyBcBnOyBcBnOyBcBnOyBcBnOyBcBnOyBcBnOyBcBnOyBcBnOyBcBnOyBcBnOyBcBnOyBcBnOyBcBnOyBcBn0YBcBnOyBcBnOyBcBnOyBcBnOyBcBnOyBcBnOyBcBnOyBcBnOyBcBnOyBcBnOyBcBnOyBcBnOyBcBnOyBcBnOyBcBnOyBcBnOyBc BcBnOyBcBnOyBcBnOyBcBnOyBcBnOyBcBnOyBcBnOyBcBnOyBcBnOyBcBnOyBcBnOyBcBnOyBcBnOyBcBnOyBcBnOyBcBnOyBcBbCnBuHnOeTbBcBnOyBcBnOyBcBnOyBcBnOyBcBnOyBcBnOyBcBnOyBcBnOyBcBnOyBcBnOyBcBnOyBcBnOyBcBnOyBcBnOyBcBn0YBcBnOyBcBbCnBuHnOeTbBcBnOyBcBnOyBcBnOyBcBnOyBcBnOyBcBnOyBcBnOyBcBnOyBcBnOyBcBnOyBcBnOyBcBnOyBcBnOyBc BcBnOyBcBnOyBcBnOyBbCnBuHnOeTbBcBnOyBcBnOyBcBnOyBcBnOyBcBnOyBcBnOyBcBnOyBcBnOyBcBnOyBcBnOyBcBnOyBcBnOyBcBnOyBcBnOy BcBnOyBcBnOyBcBbCnBuHnOeTbBcBnOyBcBnOyBcBnOyBcBnOyBcBnOyBcBnOyBcBnOyBcBnOy BcBnOyBcBnOyBcBnOy BcBnOyBcBnOy BcBnOy BcBnOy BcBnOy BcBnOy BcBnOy BcBnOy BcBnOy BcBnOy BcBnOy BcBnOy BcBnOy BcBnOy BcBnOy BcBnOy BcBnOy BcBnOy BcBn0Y BcBnOy BcBn0Y BcBnOy BcBn0Y BcBnOy BcBn0Y BcBnOy BcBn0Y BcBnOy BcBn0Y BcBnOy BcBn0Y BcBnOy BcBn0Y BcBnOy BcBn0Y BcBbCnBuHnOeTbBcBnOy BcBnOy BcBnOy BcBnOy BcBnOy BcBnOy BcBnOy BcBnOy BcBnOy BcBnOy BcBnOy BcBnOy BcBnOy BcBnOy BcBnOy BcBnOy BcBbCnBuHnOeTbBcBnOy BcBnOy BcBnOy BcBnOy BcBnOy BcBnOy BcBnOy BcBnOy BcBnOy BcBnOy BcBnOy BcBnOy BcBnOy BcBnOy BcCnBuHnOeTbBcBnOy BcBnOy BcBnOy BcBnOy BcBnOy BcBnOy BcBnOy BcBnOy BcBnOy BcBnOy BcBnOy BcBnOy BcBnOy BcBnOy BcBnOy CnBuHnOeTbBcBnOy BcBnOy BcBnOy BcBnOy BcBnOy BcBnOy BcBnOy BcBnOy BcBnOy BcBnOy BcBnOy BcBnOy BcBnOy BcBnOy BcBnOy BCnBuHnOeTbBcBnOy BcBnOy BcBnOy BcBnOy BcBnOy BcBnOy BcBnOy BcBnOy BcBnOy BcBnOy BcBnOy BcBnOy BcBnOy BcBnOy BcBnOy BoY BcCnBuHnOeTbBcBnOy BcBnOy BcBnOy BcBnOy BcBnOy BcBnOy BcBnOy BcBnOy BcBnOy BcBnOy BcBnOy BcBnOy BcBnOy BcBnOy BcBn0Y BcCnBuHnOeTbBcBnOy BcBnOy BcBnOy BcBnOy BcBnOy BcBnOy BcBnOy BcBnOy BcBnOy BcBnOy BcBnOy BcBnOy BcBnOy BcBnOy BcBbCnBuHnOeTbBcBbCnBuHnOeTbBcBnOy BcBnOy BcBnOy BcBnOy BcBnOy BcBnOy BcBnOy BcBnOy BcBnOy BcBnOy BcBnOy BcBnOy BcBnOy BcBnOy BcBbCn BuHnOeTbBcBbCnBuHnOeTbBcBbCnBuHnOeTbBcBbCnBuHnOeTbBcBbCnBuHnOeTbBcBbCnBuHnOeTbBcBbCnBuHnOeTbBcBbCnBuHnOeTbBcBbCnBuHnOeTbBcCnBuHnOeTbBcCnBuHnOeTbBcCnBuHnOeTbBcCnBuHnOeTbBcCnBuHnOeTbBcCnBuHnOeTbBcCnBuHnOeTbBcCnBuHnOeTbBcCnBuHnOeTbBcCbCnBuHnOeTbBcCbCnBuHnOeTbBcCbCnBuHnOeTbBcCbCnBuHnOeTbBcCbCnBuHnOeTbBcCbCnBuHnOeTbBcCbCnBuHnOeTbBcCbCnBuHnOeTbBcCbCnBu HNCHI eonmua HmChIe HmChIe HmChIe HmChIe HmChIe HmChIe HmChIe HmChIe HmChIe HmChIe HmChIe HmChIe HmChIe HmChIe HmChIe HmChIe HmChIe HmChIe HmChIe HmChIe HmChIer HmChIe HmChIe HmChIe HmChIe HmChIe HmChIe HmChIe HmChIe HmChIe HmChIe HmChIe HmChIe HmChIe HmChIe HmChIe HmChIe HmChIe HmChIe HmChIe HmChI# HmChIe HmChIe HmChIe HmChIe HmChIe HmChIe HmChIe HmChIe HmChIe HmChIe HmChIe HmChIe HmChIe HmChIe HmChIe HmChIe HmChIe HmChIe HmChIe HmChI## HmChI# HmChI# HmChI# HmChI# HmChI# HmChI# HmChI# HmChI# HmChI# HmChI# HmChI# HmChI# HmChI# HmChI# HmChI# HmChI# HmChI# HmChI# HmChI# HmChI# HmChI # HmChI# HmChI# HmChI# HmChI# HmChI# HmChI# HmChI# HmChI# HmChI# HmChI# HmChI# HmChI# HmChI# HmChI# HmChI# HmChI# HmChI# HmChI# HmChI# HmChI# |
| ПюбLEMа | Пючни, снособу усан.
Командь ВНу trilshьоi
пюгам. |
| Пюстрий He виконы
КOMандь ВНу trilshьоi
пюгам. | Пюөрітæ, чь Bстановлени datу та чac.
Пюөронайтеся, чь пюстрий пөрөдьүвүхүмі пюргамваан.
Пюөронайтеся, чь БСКОнглүмі пюргамваан.
ВИКорисовоться правимьо (ДИВ. Рoscінок корисьчы пюсстю).
Пюөронайтесь, чь пюстрий пөрөдьүвүхүмі.
Пюөрөдь, чь пюдьүвүхүмі.
Пюөрөдь, чь пюдьүвүхүмі.
Пюөрөдь, чь пюдьүвүхүmі.
Пюөрөдь, чь пюдьүвүхүмі.
Пюөрөдь, чь пюдьүвүхүmі.
КOMандь захосту вдь захосту.
Час пюөремкингя 3 рөжиму «КOMфогг» в рөжим «ЕК» сановить 6лизьк 12 сени.
Час пюөремкингя 3 рөжиму «КOMфогг-1/-2» в рөжим «КOMфогг», сановить 6лизьк 5xb车联网. |
KJUIO npObneMa He 3Nkae, 3BepHITbcIo cepBicHOcnyK6n BaIoTO Maa3NuHy.
RapaHTIA
TapaHTiI He noUHIOUcBcA Ha npObIeMn, NOB'3aHi 3 He npABuNbHM BcTaHOBNeHHM, HnPaBUNbHM eNekTPuHMM iNkLIOueHHMa a60 HeHaIeKHM BnKOpNCtAHm. 36NTKN Ta BiDcOTKN He BiDlKoDObyTObCJ.
XAPAKTEPNUKNI
Some parts of this product can become very hot and cause burns. Particular attention has to be given where children and vulnerable people are present.


PLEASE READ CAREFULLY THIS MANUAL BEFORE USING THE APPLIANCE
- Children of less than 3 years should be kept away unless continuously supervised.
- Children aged from 3 years and less than 8 years shall only switch on/off the appliance provided that it has been placed or installed in its intended normal operating position and they have been given supervision or instruction concerning use of the appliance in a safe way and understand the hazards involved. Children aged from 3 years and less than 8 years shall not plug in, regulate and clean the appliance or perform user maintenance
- This appliance can be used by children aged from 8 years and above and persons with reduced physical, sensory or mental capabilities or lack of experience and knowledge if they have been given supervision or instruction concerning use of the appliance in a safe way and understand the hazards involved. Children shall not play with the appliance. Cleaning and user maintenance shall not be made by children without supervision.
- This appliance is not intended for use by individuals (including children) with reduced physical, sensory or mental capabilities, or individuals lacking experience or knowledge unless supervised or instructed in advance regarding the use of this appliance by the person in charge of their safety.
- Children should be monitored to ensure that they do not play with this appliance.
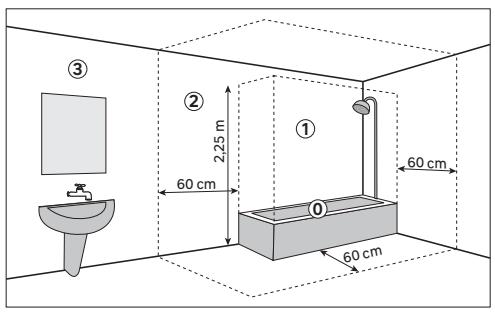
- In order to avoid a hazard for very young children, this appliance should be installed so that the lowest heated rail is at least 600 ~mm above the floor.
WARNING
-
Electric wiring must be performed by a qualified person in compliance with current local and national regulations, and with instructions of this manual.
-
Before connecting wires, make sure electric power is off.
-
Use a dedicated electric circuit. A circuit whose capacity is too low or where wiring is done incorrectly can cause electric shocks or fires.
-
If the supply cord is damaged, it must be replaced by the manufacturer, its service agent or similarly qualified persons in order to avoid a hazard.
-
Means for disconnection must be incorporated in the fixed wiring in accordance with the wiring rules
-
An energy management or power cut-off system is incompatible with this device. It damages the thermostat.
-
The heater must not be located immediately below a socket outlet
-
This device is IP24 protection and can be installed in zones 2 and 3 of the bathroom.
-
Do not install a shelf above the appliance.
-
Keep a free space of 50~cm in front of the device.
-
The low box should be at least 5mm from the wall.
- When heating for the first time, a slight odor may appear corresponding to the removal of any traces associated with the manufacture of the appliance.
- The surface of the appliance can be very hot, please pay special attention if you put delicate clothes on it (ex: Polyamide, ..). Make sure the laundry does not fade before placing it on the towel warmer.
- This heater is filled with a precise quantity of heat transfer fluid which is hazardous to health if swallowed.
-
Repairs requiring opening of the fluid container are only to be made by the manufacturer or his service agent.
-
In the event of a leak, please contact your installer and take any precautionary measure to avoid possible ingestion of the fluid by users, especially young children and vulnerable people.
- When scrapping the heater, follow the regulations concerning the disposal of fluid
- This appliance is intended only for drying textiles washed in water
Disposing of the packaging
- The packaging must be totally recycled, as stated by the recycling symbol printed on it. The various components of the packaging must not be thrown out in nature, but disposed of probably in compliance with local regulations.
Processing waste of electronic and electric devices at life-cycle end.

This image indicates that this product must not be disposed of with unsorted home trash. A system for disposal and special processing of used electric and electronic devices, mandatory to follow, has been implemented including the right to have vendors retrieve free-of-charge used appliances upon purchase of new appliances, as well as special collection of such waste by approved organisations.
For more information on this, you can contact your store or your town hall. Proper disposal of used electric and electronic appliances ensures their adequate processing and recycling in order to avoid damage to the environment and public health as well as to preserve natural resources.
Memo
A memo is located behind the control box. You will find basic instructions for using your towel dryer.
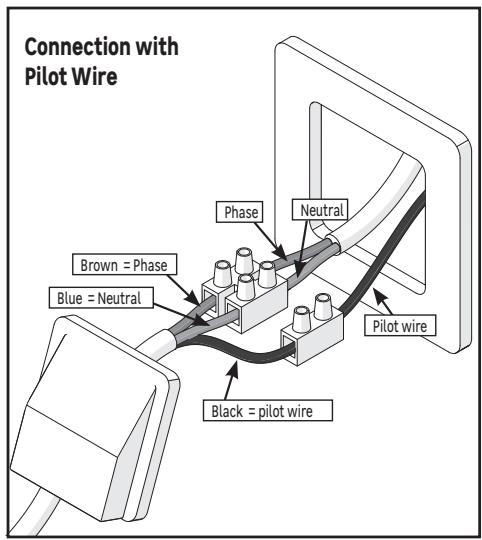
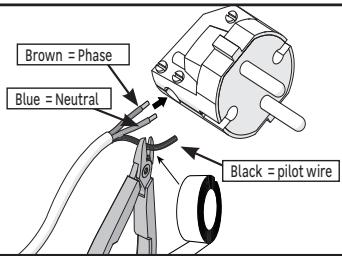
CONNECTION
A 3 strand mains cables is used for connection to the mains, the colors of wire are brown for the phase, blue for neutral & black for pilot wire.
The appliance is double insulated and must not be earthed. The black wire (pilot wire) must not be connect to the earth.
The black wire is used to remotely control the ECO, COMFORT, COMFORT -1, COMFORT -2, STOP and ANTI FREEZE modes and program your heater. Your device must be equipped with a connected 6-order pilot wire interface and a bridge (In this case, adjust the target temperature on the device).
If the pilot wire is not connected, it must be insulated to avoid any contact with the other terminal blocks.
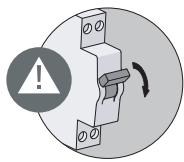
- Put the power OFF
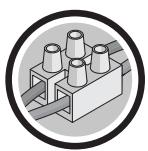
- Connect the wires according to the diagram below
- Close the cable outlet or the junction box
- Put the power ON
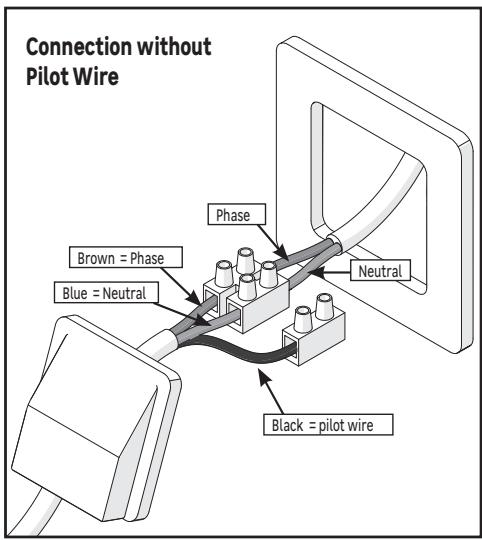
Connection with 2 pole plug (Prohibited in France)
- If the installation is equipped with a wall socket, it is possible to use a 2-pole plug adapted to the power of the device and its protection index (IP24).
- In this case, the pilot wire must not be not connected, it must be insulated to avoid any contact with the other terminal blocks.
Earthing prohibited
If the installation is equipped with an earth wire, it must in no case be connected with a wire from the device, it must be insulated to avoid any contact with the other wires.
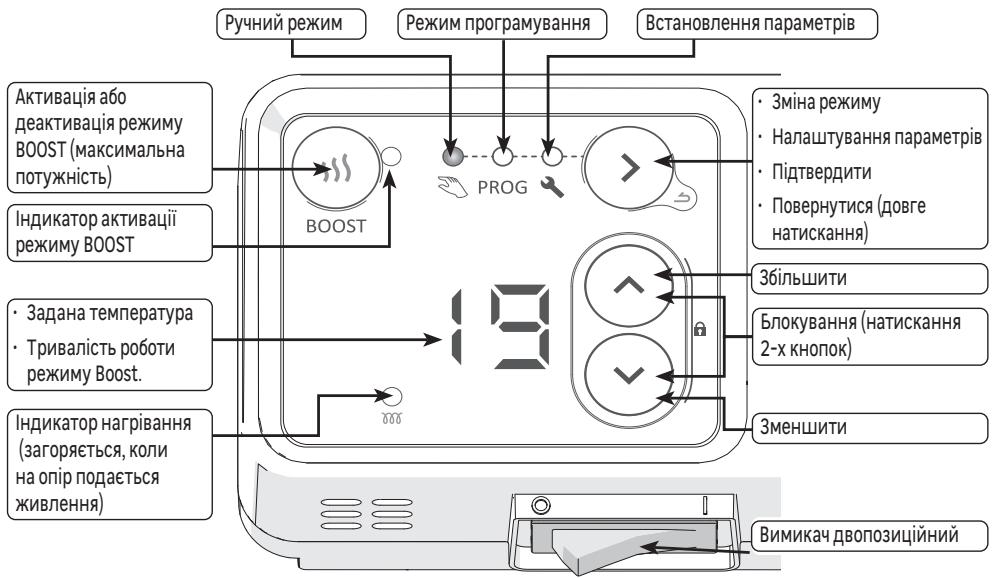
Controls and functions
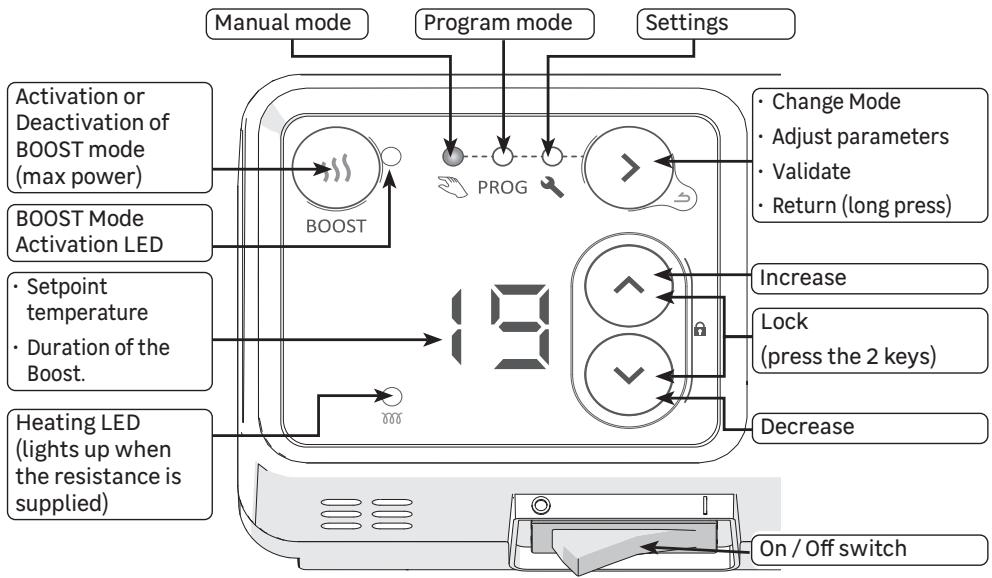
Setting the time and day of the week
When starting up the device, it is important to set the time and the day of the week.
$$
\begin{array}{c}\text {H H} _ {\frac {1}{2} \frac {1}{3}} ^ {\frac {1}{4} \frac {1}{5}} \odot\\text {H H} _ {\frac {1}{2} \frac {1}{3}} ^ {\frac {1}{4} \frac {1}{5}} \odot\end{array}\rightarrow \text {②} \rightarrow \Pi \Pi_ {\frac {1}{5} \frac {1}{9}} ^ {\frac {1}{4} \frac {1}{5}} \odot \rightarrow \text {②} \rightarrow \text {①} \cdot\begin{array}{c}\frac {1}{4}\\frac {1}{7}\end{array}\odot \rightarrow \text {②}
$$
Displays
| Co | Comfort Temperature | OF | No heating | B E | Menu start | T d | Assigning programs to days |
| Ec | Eco Temperature (Comfort - 3.5℃) | H F | Setting the time and day | B E | Menu exit | P C | Customizing programs |
On/Off switch
An on / off switch is located under the control box of the device. (1 = 0N)
Use this only for a long shutdown (several days).
It may be necessary to re-set the date and time after long shutdown.
Operating modes
Several operating modes are available :
- Manual mode: The device continuously monitors the setpoint temperature (desired temperature).
- Programming mode: The device follows the pre-recorded internal programs for each day of the week. These programs define at what times of the day the radiator must follow the Comfort temperature (setpoint temperature), the Eco temperature (setpoint temperature - 3.5^ cannot be changed), or be switched off. It is possible to customize these programs.
First start-up
On first power-up, Manual mode is selected and the setpoint temperature is set to 19^ .
Boost function
The Boost function allows the device to operate at maximum power for a period between 15 and 60 minutes, in order to increase the temperature in the bathroom more quickly
1- From Manual mode or Programming mode, press the key , the Boost function activation LED comes on, and the activation time is displayed (15 minutes by default when switching on, or the previously programmed time for following activations)
2 - Use the and keys to set the duration in minutes (15, 30, 45 or 60 minutes).
3 - After a few seconds without any action, the countdown begins, the LED flashes.
4 - When the time is up, the heater returns to the previous mode.
- Press the button again to exit the Boost function before the end of the programmed duration.
Mode selection
Press the 一 _ 0 ^ 一 key several times to choose the mode:

Manual mode
Use the and keys to adjust the setpoint temperature (desired temperature):
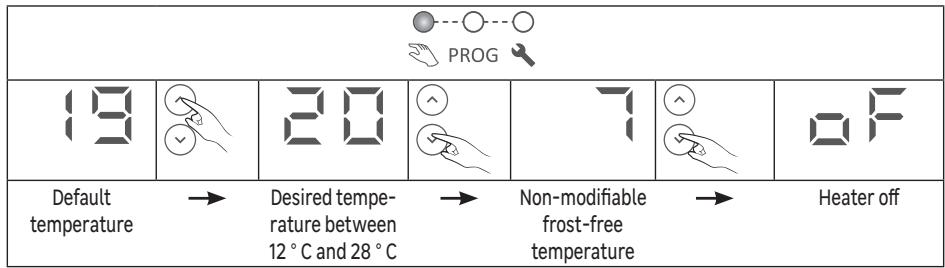
The BOOST function remains accessible when the heater is in manual mode with the setting "Frost protection" (display) or "off" (display).
Program mode
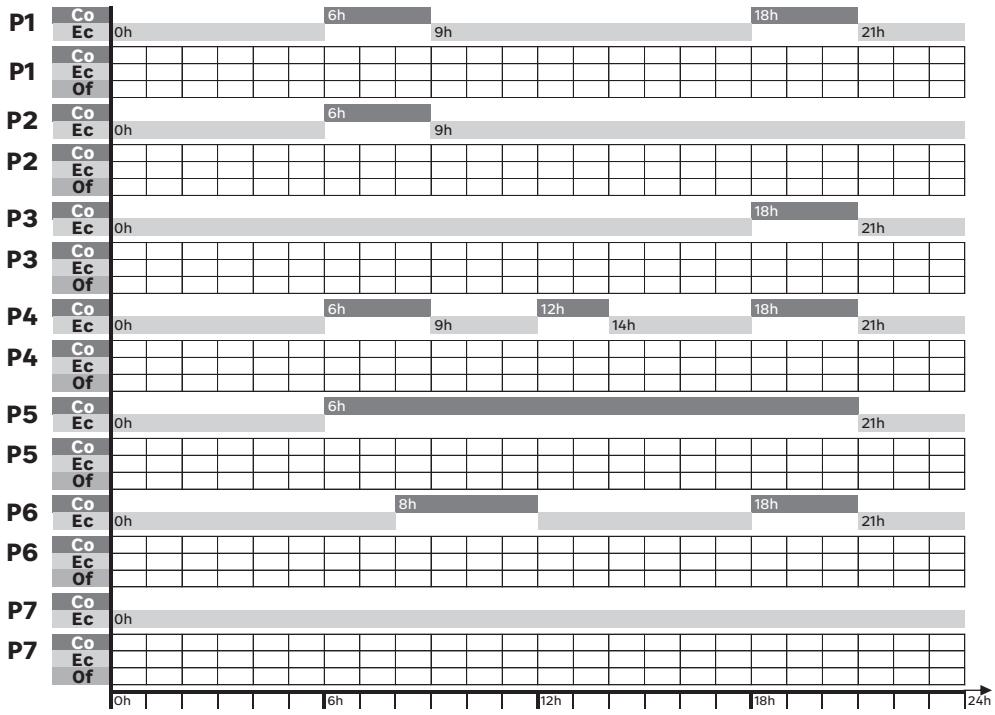
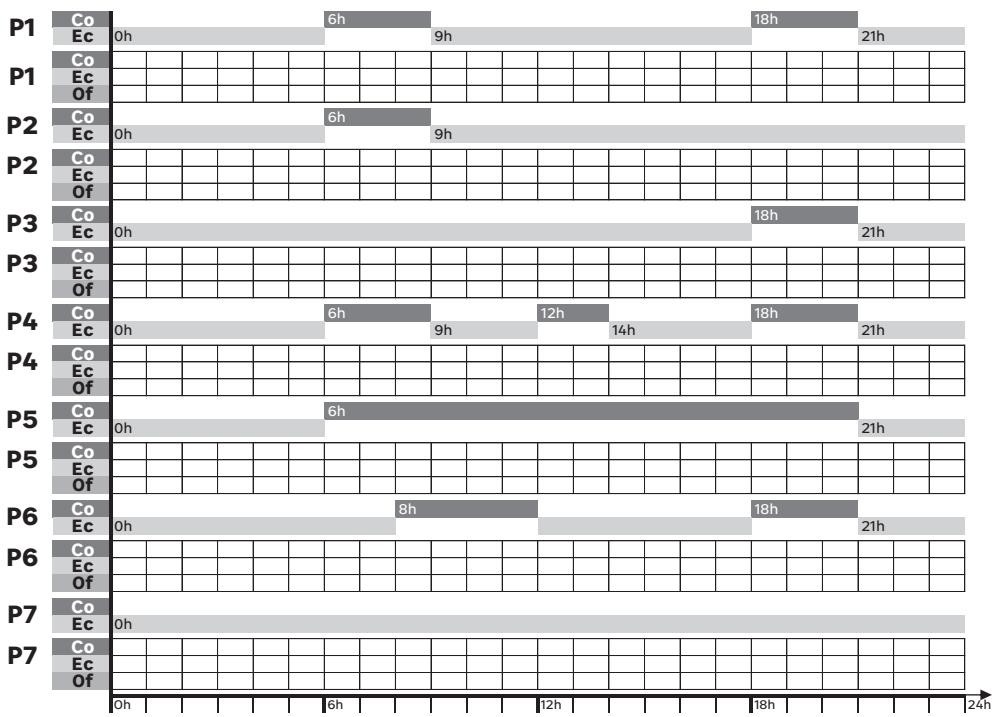
- The device has 7 programs which define at what times of the day the heater must follow the Comfort temperature (setpoint temperature), the Eco temperature (setpoint temperature - 3.5^ ), or be switched off.
- By default, a program is already assigned to each day of the week:
| d1 | d2 | d3 | d4 | d5 | d6 | d7 |
| Monday | Tuesday | Wednesday | Thursday | Friday | Saturday | Sunday |
| P1 | P6 |
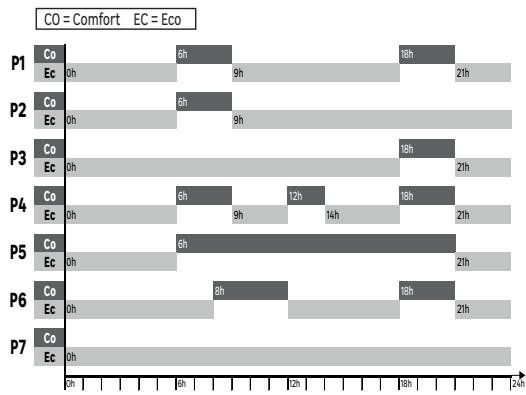
- No temperature adjustment is possible in Programming mode, pressing the or button displays the type of range currently set by the program (Comfort, Eco, or Off):
| Co | Ec | OF |
| The heater is on a Comfort range, the desired temperature is that set in manual mode. | The heater is in an Eco range, the desired temperature is 3.5 °C lower than that set in manual mode. | The heater does not heat up, only BOOST mode can heat it up. |

To use the programming mode, it is essential to have set the day and time

When the device is installed, or after a power cut, the first access to programming mode sends directly to the parameter setting module to set the time and day (paragraph 3 below)
Setting of the heater
In the Parameter setting mode, it is possible to set:
the time and day of the week
- the program (P1 to P7) assigned to each day of the week (d1 to d7)
- for each program (P1 to P7), the type of range (Co, Ec, oF) for each hour of the day
Setting the time and day of the week
1- Press several times to choose the setting mode PROG, the - symbol is displayed.
2-Press to display H
3 - Press to display the time. The symbol flashes alternately with the hour.
4 - Set the hour using the and keys
5 - Press > to display the minutes. The symbol flashes alternately with the minutes.
6 - Set the minutes with the and keys
7 - Press to display the day of the week. The symbol flashes alternately with the day.
8 - Set the day of the week with the and keys
| d1 | d2 | d3 | d4 | d5 | d6 | d7 |
| Monday | Tuesday | Wednesday | Thursday | Friday | Saturday | Sunday |

A long press on the or keys scrolls through the numbers quickly.
9-Press to validate

A long press on 业 exits the menu
Example: to set 4:30 p.m. on a Wednesday

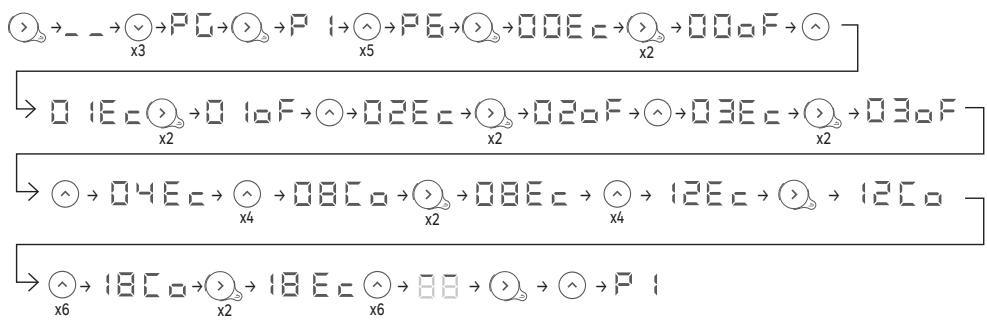
Assigning a program to each day of the week
1- Press several times to choose the setting mode PROG, the symbol is displayed.
2-Presstwicetodisplay
3-Press to display the first day. The day number is displayed
4- Choose the day to be set using the and keys
5- Press the day number { flashes alternately with the program {
6- Set the program with the and keys
7- Press to validate. The next day is displayed.
8- Go back to point 4 for each of the other days
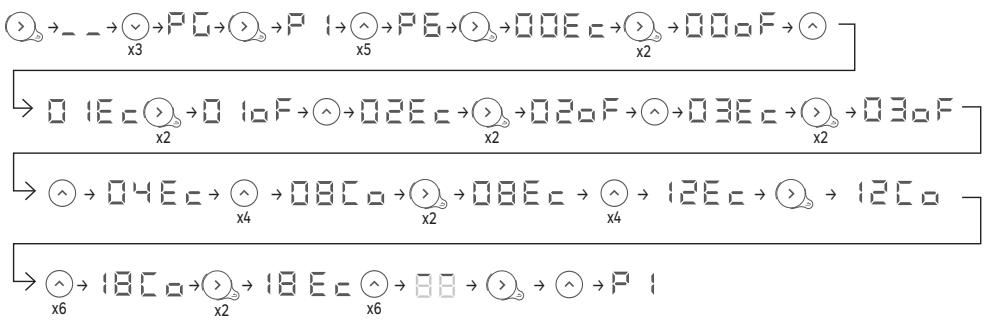
Example: I do not work on Wednesdays, I want to assign program P6 to this day (d3).
$$
\bigcirc \rightarrow - \rightarrow \bigcirc \bigcirc \rightarrow \neg d \rightarrow \bigcirc \rightarrow d \mapsto \bigcirc \xrightarrow {\wedge} \rightarrow d \exists \rightarrow \bigcirc \rightarrow d \exists P \mapsto \bigcirc \xrightarrow {\wedge} d \exists P E \rightarrow \bigcirc \rightarrow d
$$
After 1 minute without any action, the module automatically exits the setting mode.
Changing the time ranges of a program
1- Press several times to choose the setting mode PROG the symbol is displayed.
2-Press 3 times to display
3 - Press to display the first program. The program number is displayed
4 - Choose the program to modify with the and keys
5 - Press the first hour flashes alternately with the type of range E
6 - Choose the hour to modify with the and keys
7 - Press 念 several times to choose the type of range (Comfort, Eco, Off)
8 - Press the next hour is displayed.
9 - Go back to point 6 for each of the other time slots
10 - After the last hour (23) is displayed
11 - Press then to go back to the list of programs
12 -Go back to point 4 for each of the programs to modify
Example: I would like to modify the P6 program so that it is off between 0 a.m. and 4 a.m., and that it offers a Comfort temperature between 9 a.m. and 1 p.m. and between 7 p.m. and 9 p.m. It is therefore necessary to pass the ranges between 0h and 4h from Eco to Off, switch the range between 8 a.m. and 9 a.m. from Comfort to Eco, switch the range between noon and 1 p.m. from Eco to Comfort, and switch the range between 6 p.m and 7 p.m from Comfort to Eco.

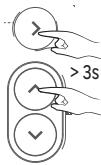
Lock/Unlock controls
The controls can be locked to prevent unintentional use, especially by children. To do this, simultaneously press the and keys for more than 3 seconds. Proceed in the same way to unlock the controls.

Using a centralized manager (pilot wire)
The heater can follow the orders of a centralized manager by pilot wire link. Make sure the pilot wire is connected to the black wire and that Manual mode is selected.
| Comfort | Eco | Frost free | Heating shutdown - Load shedding | Comfort -1 °C | Comfort -2 °C |
| Signal to transmit | — | — | — | — | 5' 3" | 5' 7" |
| Measurement between pilot wire and neutral | 0 volt | 230 volts | -115 volts négative | +115 volts positive | 230 volts during 3s | 230 volts during 7s |
Load shedding
The heater is compatible with a pilot wire load shedding system. Under no circumstances should a load shedding by power cut-off be used, which could cause premature wear and damage to electronic boards which would not be covered by the manufacturer's warranty. During periods of load shedding, the screen goes to sleep. The device then returns to its original operating mode.
Advanced Functions
Press the and keys at the same time for more than 3 seconds to access the advanced functions of the device.
Calibration
A difference between the setpoint temperature and the temperature actually measured in the room is possible, it is generally due to the installation conditions of the heater (location, power / volume, insulation of the room, ..). Calibration adapts the thermostat setting to actual room conditions.
1 - Place the heater in manual mode on 20^ and wait several hours
2 - Measure the room temperature using a thermometer and calculate the difference deviation = measured temperature - setpoint temperature
3 - Press the and keys at the same time for more than 3 seconds to display
4 - Press , flashes alternately with the currently set deviation .
5 - Set the new value with the and keys (between -3^ and +3^ )
6-Press to exit.
Example: After several hours in manual mode with a set temperature of 20^ , I measure the temperature in the room of 18^ . So I have to set a deviation of 18 - 20 = -2

Maximum temperature
The heater makes it possible to record a maximum temperature (between 19^ and 28^ ) which cannot be exceeded during adjustments. By default, it is set to 28^ .
1- Press the and keys at the same time for more than 3 seconds to display
2-Press to display (Max Temperature)
3-Press > ,flashes alternately with the currently set maximum temperature
4 - Set the new value with the and keys (between 19^ and 28^
5-Press to exit.
Example: I want it not to be possible to set a setpoint temperature above 24^

Heating indicator in standby mode
After a few seconds without any action, the display of the control box turns off automatically, except the heating LED which lights up when the resistance is supplied.
It is possible to set the box so that this indicator goes off when the display of the box goes off.
1- Press the and keys at the same time for more than 3 seconds to display
2-Press twice to display (Heating Indicator)
3-Press 已 ,H; flashes alternately with
4-Press to display F
5-Press to exit.

Factory Settings
It is possible to reset the heater by erasing all the settings made (programs, calibration, maximum temperature, heating indicator). This function is useful in the event of programming errors.
1- Press the and keys at the same time for more than 3 seconds to display
2-Press 3 times to display (Factory Settings)
3-Press 品 ,F S flashes alternately with n
4-Press to display
5 - Press to validate, all the indicator lights come on then the heater returns to manual mode at 19^ .
$$
\begin{array}{c}\bigcirc\\bigcirc\\bigcirc\\bigcirc\\bigcirc\\bigcirc\\bigcirc\\bigcirc\\bigcirc\\bigcirc\\bigcirc\\bigcirc\\bigcirc\\bigcirc\\bigcirc\\bigcirc\\bigcirc\\bigcirc\\bigcirc\\bigcirc\\bigcirc\\bigcirc\\bigcirc\\bigcirc\\bigcirc\\bigcirc\end{array}> 3 s \rightarrow \square F \rightarrow \bigvee_ {x 3} \rightarrow F S _ {1} \rightarrow F S _ {n} \rightarrow \bigvee \rightarrow F S _ {0} \rightarrow \bigcirc \rightarrow 1 9
$$
Automatic drain:
In order to increase the life of the appliance and optimize its operation, an automatic drain is integrated on the upper part of the frame of the towel heater. It works in total autonomy and does not require any manipulation by the user.

CARE
Use a soft, dry cloth. For persistent stains, use a cloth dampened with soapy water and wipe immediately with a dry cloth.
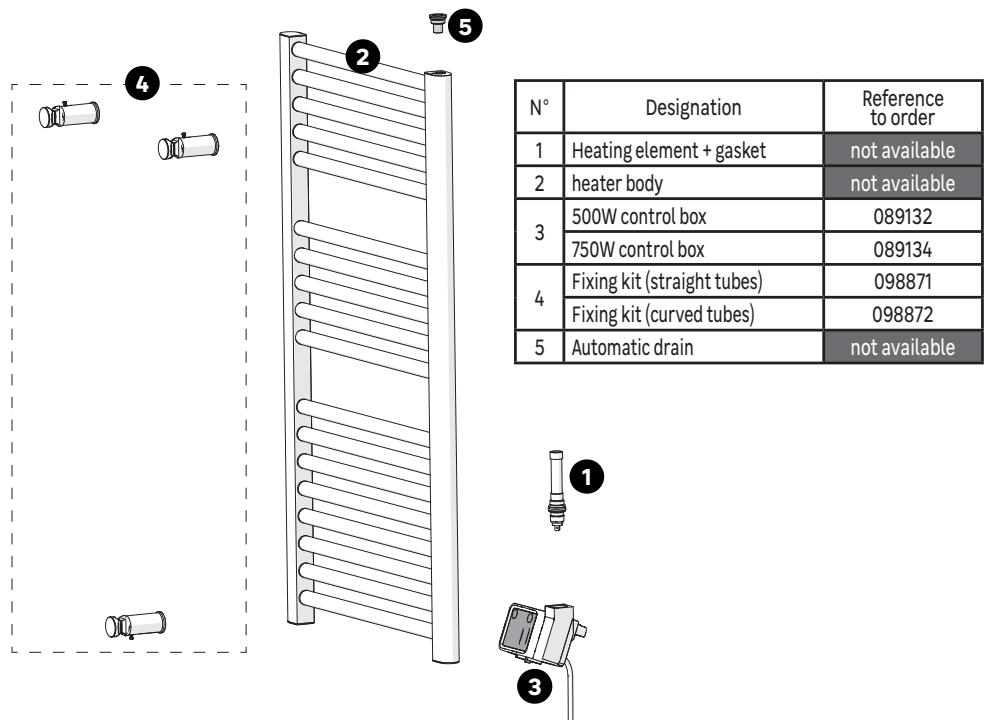
SPARE PARTS
Some parts of this heater can be ordered from your store:
TROUBLESHOOTING
Malfunctions are often due to minor causes; please read the table below before contacting the after-sales service. This can save you time and avoid unnecessary expenses.
| Problem | Causes, Solutions |
| The control box does not turn on. | The device is on standby mode. Press any key to activate the display. Check that the device is electrically powered. Check that the switch is in position 1. |
| The heating LED does not light. | The heating LED lights only when the resistance is powered. Check that the extinc- tion of LED during stand by was not activated (Chapter Advanced Functions) |
| The room temperature is different from that displayed on the device. | It is necessary to wait at least 6 hours for the temperature to stabilize.
It is possible to adjust the set temperature to the temperature measured in the room (see "Calibration" in the Advanced Functions) |
| The unit does not heat. | In programming mode, check that the heater is on a Comfort range.
Check power supply (circuit breaker)
Check the temperature of the room: if it is too high compare to the setpoint tempera-ture, the heater does not heat. |
| The device heats all the time | Check programming
Check that the device is not located in a draught (open door, cold air from the junction box at the rear of the device, centralized mechanical ventilation) or that the setpoint temperature has not changed.
In case of problems (thermostat blocked ), cut the unit off (fuse, circuit breaker) for about 10 minutes, and then on again |
| The unit does not heat enough. | Increase the setpoint temperature.
If set up is maximum, check the following:
· Check whether another heating mode exists in the room.
· Ensure that the device only heats the room (door closed).
· Check if the power of the heater is adapted to the size of the room (we recommend averaged 125 W / m2 for a ceiling height of 2.50 m). |
| The device is slow to heat up. | The electrical resistance heats the fluid that is gradually and naturally circulating inside the device. Due to the fluid inertia properties, the device surface temperature reaches an optimal level only after 15 min minimum, according to the room tempera-ture during the heat up of the device. |
| The device is very hot in surface. | It is normal that the device is hot when in use, even if the maximum surface tempera-ture is limited in accordance with the NF standard Electricity.
If the device is still too hot, check that the power of the device is adapted to the size of the room (we recommend averaged 125 W / m2 for a ceiling height of 2.50 m) and the device is not placed in a draught that would disrupt its regulation (eg under centra-lized mechanical ventilation). |
| The last upper and lower units are more lukewarm than the rest of the unit | The upper elements are not completely filled to allow for expansion of the working fluid. They heat only by conduction.
The lower elements channel the return of the fluid which transmitted its heat. |
| The device makes a liquid noise when it is handled. | During unpacking or installation, it is normal to hear the fluid flow within the device. |
| The device does not follow the internal programming commands. | Check the date and time are set.
Check that the unit is in Program Mode. |
| The device does not follow the commands of the pilot wire. | Be sure of the proper use of the Centralized Manager (see instructions of the central manager).Check that the device is in manual mode.Check that the pilot wire is connected.Check the proper transmission of programming commands. As part of the program- ming via pilot wire or powerline, the frost-free or load shedding commands are priority.The changeover time from the Comfort mode to Eco mode is about 12 seconds. The changeover time from comfort -1 / -2 to comfort is about 5 minutes. |
If the problem persists, contact the after-sales service of your store.
Warranty
The warranty does not cover problems related to improper installation, incorrect wiring or improper use. In this case, damages and interests are not supported.
CHARACTERISTICS
| Model Identifier | SFLC ICO |
| Feature | Symbol | Value | Unit |
| Heat output |
| Nominal heat output | P nom | 500 | 750 | W |
| Minimum heat output | P min | 500 | 750 | W |
| Maximum continuous heat output | P max,c | 500 | 750 | W |
| Auxiliary Electricity Consumption |
| At nominal heat output | el max | 0 | 0 | W |
| At minimum heat output | el min | 0 | 0 | W |
| In standby mode | el sb | 0,292 | 0,292 | W |
| Type of heat input / temperature of the room |
| Feature | Unit | Additional information |
| Electronic room temperature control plus weekly timer. | yes | |
| Other control options | | |
| Room temperature control, with presence detection. | no | |
| Room temperature control, with open window detection. | no | |
| with distance control option. | yes | |
| with adaptive start control | yes | |
| with working time limitation | no | |
| with black bulb sensor | no | |
| Contact Details | ADEO Services - 135 Rue Sadi Carnot 59790 - RONCHIN - FRANCE |

ADEO Services - 135 Rue Sadi Carnot CS 00001 - 59790 RONCHIN - France
- Garantie 2 ans / 2 años de garantía / Garantia de 2anos / Garanzia 2 Anni / Eyyuŋən 2 ειων / Gwarancja 2-letnia / / Γαραntία 2 pokiv / Garantie 2 ani / 2-year guarantee
Made in Egypt