EZ942H - Deep fryer MOULINEX - Free user manual and instructions
Find the device manual for free EZ942H MOULINEX in PDF.
User questions about EZ942H MOULINEX
0 question about this device. Answer the ones you know or ask your own.
Ask a new question about this device
Download the instructions for your Deep fryer in PDF format for free! Find your manual EZ942H - MOULINEX and take your electronic device back in hand. On this page are published all the documents necessary for the use of your device. EZ942H by MOULINEX.
USER MANUAL EZ942H MOULINEX
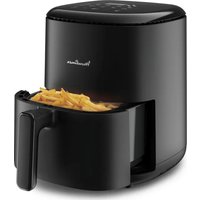
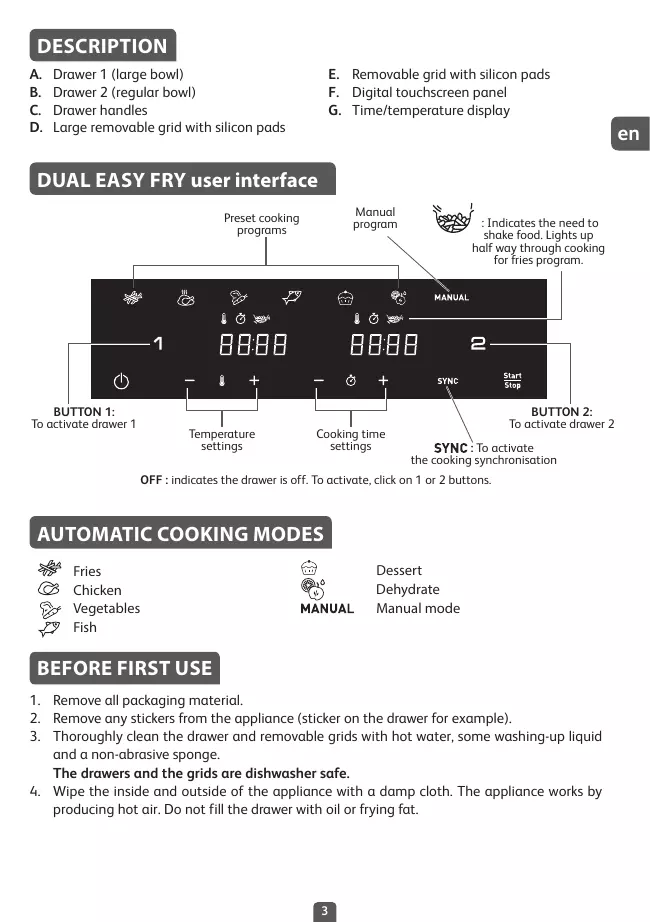
A.Drawer 1 (large bowl)
B.Drawer 2(regular bowl)
C. Drawer handles
D. Large removable grid with silicon pads
E. Removable grid with silicon pads
F. Digital touchscreen panel
G. Time/temperature display
DUAL EASY FRY user interface

OFF : indicates the drawer is off. To activate, click on 1 or 2 buttons.
AUTOMATIC COOKING MODES

Fries
Chicken

Vegetables
Fish

MANUAL
Dessert
Dehydrate
Manual mode
BEFORE FIRST USE
- Remove all packaging material.
- Remove any stickers from the appliance (sticker on the drawer for example).
- Thoroughly clean the drawer and removable grids with hot water, some washing-up liquid and a non-abrasive sponge.
The drawers and the grids are dishwasher safe.
- Wipe the inside and outside of the appliance with a damp cloth. The appliance works by producing hot air. Do not fill the drawer with oil or frying fat.
PREPARING FOR USE
- Place the appliance on a flat, stable, heat-resistant work surface away from water splashes.
- Do not fill the drawer with oil or any other liquid.
Do not put anything on top of the appliance. This disrupts the airflow and affects the hot air frying result.
IMPORTANT: To prevent the appliance from overheating, do not place it in a corner or below a wall cupboard. A gap of at least 15cm should be left around the appliance to allow air to circulate.
- Press to switch on the appliance.
- Fries mode is displayed as default for drawer 1 while OFF is displayed on the screen for drawer 2.
- Any drawer can be activated for selection by pressing '1' or '2' button. (To cancel the selection, press again '1' or '2' button, the drawer will be OFF and cancelled).
Note: Never exceed the maximum amount indicated in the table (see section 'Cooking Guide'), as this could affect the quality of the end result.
- Always place the suitable grids in the drawers before cooking for optimal cooking results.
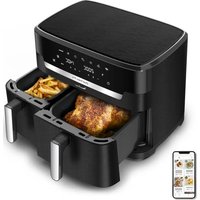
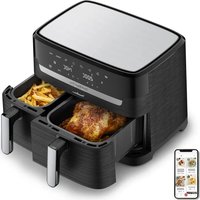
USING BOTH DRAWERS ON SYNCHRONISATION MODE (DUAL COOKING)
Cook 2 different types of food at the same time thanks to both drawers and SYNC Mode.
- Press to switch on the appliance. Fries mode is displayed as default for drawer 1 while OFF is displayed on the screen for drawer 2.
- Press the desired cooking mode and adjust timing and temperature if different to the pre-set settings (by pressing + and -) The settings are saved.
- Place your first food in the drawer 1 (left drawer). Slide the drawer back into the appliance.
Note : When the screen displays "Add" and if there is no action for 10 minutes, the program stops and the screen returns to display "START/STOP". You will need to re-select to restart cooking.
- To activate drawer 2, press '2'.
- Press the second desired cooking mode and adjust timing and temperature if different to the pre-set settings (by pressing + and -).
- Place your second food in the drawer 2 (right drawer). Slide the drawer back into the appliance.
- Press SYNC in order to get the two foods ready at the same time. If the two cooking modes selected have different cooking times, 'HOLD' appears on the screen for the shortest cooking mode (for the food which needs less time to cook). It means the appliance delays the cooking launch in order to have the two types of food ready at the same time.
- Press Start Stop to begin cooking.
- The appliance beeps when the food is ready, at the same time.
- When the food is cooked, take out the drawer. To remove food, use a pair of tongs to lift the food out of the drawer.
Caution: After hot frying, the grids and the food are very hot.
Note: During cooking, if you remove one of the drawers and you do not slide it back within 5 minutes, this drawer panel will display 'OFF'. The other drawer keeps running, but it ends 'SYNC' program.
USING ONLY ONE DRAWER OF THE APPLIANCE
- Press (1) to switch on the appliance.
- Fries mode is displayed as default for drawer 1 while OFF is displayed on the screen for drawer 2.
- Any drawer can be activated by pressing '1' or '2' button. The other drawer remains OFF (To cancel the selection, press again '1' or '2' button).
-
To begin cooking, you can select between the preset cooking mode or the manual settings. a. If choosing preset cooking mode:
-
Select the desired cooking mode by pressing the icon corresponding on the touchscreen panel (these modes are described in detail in the "Cooking guide" section).
- Confirm the cooking mode by pressing the button. This will launch the cooking process.
- Cooking starts. The remaining cooking time is displayed on the screen.
b. If choosing manual settings:
- Press MANUAL mode.
- Adjust the temperature with the + and - buttons on the digital screen. The thermostat varies from 40-200°C.
- Then set the desired cooking time by pressing the + and - buttons. The timer can be set for between 0 and 60 minutes.
-
Press the button to begin cooking with the selected temperature and time settings. Cooking starts. The remaining cooking time is displayed on the screen.
-
Excess oil from the food is collected in the bottom of the drawer.
- Some food will require shaking halfway through the cooking time for optimal cooking results. (see section 'Cooking Guide'). To shake the food, pull the drawer out of the appliance by the handle and shake it. Then slide the drawer back into the appliance and the cooking restarts automatically.

-
During Fries cooking mode, this pictogram flashes half way through cooking. It indicates the need to shake the fries for even cooking and browning.
-
When you hear the timer sound, the cooking time set has finished. Pull the drawer out of the appliance and place it on a heat-resistant surface.
- Check if the food is ready.
If the food is not ready yet, simply slide the drawer back into the appliance and set the timer for a few extra minutes.
- When the food is cooked, take out the drawer. To remove food, use a pair of tongs to lift the food out of the drawer.
Caution: The drawer should never be turn up side down with the grid.
After cooking, the drawer, the grid and the food are very hot.
- When a batch of food is ready, the appliance is instantly ready for preparing another batch of food.
COOKING GUIDE
The table below helps you to select the basic settings for the food you want to prepare.
Note: The cooking times below are only a guide and may vary according to the variety and batch of potatoes used. For other food the size, shape and brand may affect results. Therefore, you may need to adjust the cooking time slightly.
| Quantity | Approx. Time(min) | Temperature | Cooking mode | Shake | Extra information | ||
| Potatoes & fries | |||||||
| Frozen fries(10 mm x 10 mm standard thickness) | Drawer 1 | 900 - 1500 g | 30 - 50 min | 180°C | # | x3 | |
| Drawer 2 | 500 - 1000 g | 35 - 50 min | x3 | ||||
| Homemade fries(8 mm x 8 mm) | Drawer 1 | 900 g | 45 min | 180°C | # | x4 | Dry it by towel before cooking |
| Drawer 2 | 500 g | 35 min | x4 | ||||
| Frozen potato wedges | Drawer 1 | 900 - 1500 g | 30 - 50 min | 180°C | # | x3 | |
| Drawer 2 | 500 - 1000 g | 35 - 50 min | x3 | ||||
| Meat & Poultry | |||||||
| Frozen beef burgers | Drawer 1 | up to 5 pieces | 15 min | 200°C | MANUAL | x1 flip | |
| Drawer 2 | up to 3 pieces | 15 min | |||||
| Chicken breast fillets (boneless) | Drawer 1 | up to 5 pieces | 20 min | 200°C | # | x1 flip | |
| Drawer 2 | up to 3 pieces | 20 min | 200°C | # | |||
| Chicken whole | Drawer 1 | up to 1500 g | 55 min | 160°C | # | Drawer 1 only | |
| Snacks | |||||||
| Chicken nuggets | Drawer 1 | up to 600 g | 15 min | 200°C | # | x1 | |
| Drawer 2 | up to 400 g | 15 min | 200°C | ||||
| Chicken wings | Drawer 1 | up to 1.2 kg | 16 min | 200°C | # | x1 | |
| Drawer 2 | up to 600 g | 16 min | 200°C | ||||
| Snacks | |||||||
| Pizza | Drawer 1 | up to 5 slices | 8 min | 200°C | MANUAL | ||
| Drawer 2 | up to 3 slices | 8 min | 200°C | MANUAL | |||
| Zucchini | Drawer 1 | up to 1.2 kg | 14 min | 200°C | ◇ | x4 | |
| Drawer 2 | 600 g | 14 min | 200°C | x4 | |||
| Fish | |||||||
| Salmon fillet | Drawer 1 | up to 5 pieces | 12 - 14 min | 200°C | ◇ | ||
| Drawer 2 | up to 3 pieces | 12 - 14 min | 200°C | ||||
| Prawns | Drawer 1 | up to 600 g | 8 - 10 min | 140°C | x1 | ||
| Drawer 2 | up to 450 g | 8 - 10 min | 140°C | x1 | |||
| Baking | |||||||
| Muffins | Drawer 1 | up to 8/9 pieces | 16 min | 160°C | ◇ | ||
| Drawer 2 | up to 4 pieces | 16 min | 160°C | ||||
| Cake | Drawer 1 | 18 cm diameter | 50 - 55 min | 160°C | |||
| Dehydrate | |||||||
| Sliced Apple | Drawer 1 | 1 piece | 4h | 70°C | ◇ | ||
| Drawer 2 | 1/2 piece | 4h | 70°C | ||||
TIPS
- Smaller foods usually require a slightly shorter cooking time than larger size foods.
- Shaking smaller size foods halfway through the cooking time improves the end result and can help prevent uneven cooking.
- To make your potatoes extra crispy, try adding a small amount of oil before cooking and shake to evenly cover. We recommend 14ml of oil (1 tablespoon).
Snacks that can be cooked in an oven can also be cooked in the appliance.
The optimal recommended quantity for cooking fries is 1600 grams (1000g in drawer 1 and 600g in drawer 2). - Use ready made puff and shortcrust pastry to make filled snacks quickly and easily.
- Place an oven dish in the appliance's bowl if you want to bake a cake or quiche or if you want to fry delicate ingredients or filled ingredients. You can use an oven dish in silicon, stainless steel, aluminium, terracotta.
- You can also use the appliance to reheat food. To reheat food, set the temperature to 160^ for up to 10 minutes. Cooking time could be adjusted depending on food quantity in order to fully reheat the food.
CLEANING
Clean the appliance after every use.
The bowl and the grid have a non-stick coating. Do not use metal kitchen utensils or abrasive cleaning materials to clean them, as this may damage the nonstick coating.
- Remove the mains plug from the wall socket and let the appliance cool down. Note: Remove the bowl to let the appliance cool down more quickly.
- Wipe the outside of the appliance with a damp cloth.
- Clean the bowl and grid with hot water, some washing-up liquid andnda non-abrasive sponge. You can use a degreasing liquid to remove any remaining dirt.
Note : the bowl and the grid are dishwasher safe.
Tip: If food debris/residue is stuck at the bottom of the bowl and the grid, fill them with hot water and some washing-up liquid. Let the bowl and the grid soak for approximately 10 minutes. Then rinse clean and dry.
- Wipe inside of the appliance with hot water and a damp cloth.
- Clean the heating element with a dry, cleaning brush to remove any food residues.
- Do not immerse the appliance in water or any other liquid.
STORAGE
- Unplug the appliance and let it cool down.
- Make sure all parts are clean and dry.
GUARANTEE AND SERVICE
If you need service or information or if you have a problem, please visit the brand website or contact the brand Consumer Care Centre in your country. You can find the phone number in the worldwide guarantee leaflet. If there is no Consumer Care Centre in your country, go to your local brand dealer.
TROUBLESHOOTING
If you encounter problems with the appliance, visit the brand website (see cover page on this manual) for a list of frequently asked questions or contact the Consumer Care Centre in your country.
DESCRIPTION
IPIN ANO THN INPQTH XPHZH
Meta to payeipepa, okaol, oXapc kai to qaynto kaive.
Dehydration (Cyuene)
Pexim Manual (PbUHO npuTBeHe)
PPEDNITbPBA YNOTPBEA
- OtctpaHete BCnUKN ONaKOBbUHN MaTePnaJIN.
- OtrtpaHete BCnUckn CTnKepe n OT ypea (HaNPmep CTnKepe Bbpxy OTdJeHeHneTo).
3.Поисте Te Добр отделенгети и повнжнite peшetknс ropeца Вoga,Малко ппорapat 3a Мпe He Na CBdoBe И Hea6pa3nBHa r6a.
OTdeneHnraTpeWetKnteMoraTdaCemNtBcDomnHaMaunHa.
4.ИЗБьшeteуpeаOTbTpEиOTBbNcВlaЖнaКьрп.УpeДТ pa6OТ,кATO npOu3Bexda ropeu Bb3dYx.He nblHETe OTdeJeHnTo CОJIO nIIMa3HnHa 3a nbpXhe.
IODIOTOBKA 3A YIOTPEBA
POKNYNA PRIPRAVU POKRMOV
Tabulka nizsie vam pomoze vybrat zakladne nestavenia pre Jedlo, ktorc chete pripravit. Poznamka: Casy varenia nizsie sul len orientacne a mozu sa listv zavisiosti od druhu a mnozstva pouzitych zemiakov. Pri inych jedlacke moze yvesledky ovplyvnit veilkost, tvar a zncka. Preto mozo bude potrebne mierne upravit cas varenia.
| Množstvo | Pribljný Čas | Teplota | Režim varenia | Pretriast | Čalášie informácie | ||
| Zemiaky a hranolky | |||||||
| M razené hranolčeky (10 mm x 10 mm) | Zásuvka 1 | 900 - 1500 g | 30 - 50 min | 180°C | * | x3 | |
| Zásuvka 2 | 500 - 1000 g | 35 - 50 min | x3 | ||||
| Domáce hranolčeky (8 mm x 8 mm) | Zásuvka 1 | 900 g | 45 min | 180°C | * | x4 | Pred varením osušte utierkou |
| Zásuvka 2 | 500 g | 35 min | x4 | ||||
| Mrazené americké zemiaky | Zásuvka 1 | 900 - 1500 g | 30 - 50 min | 180°C | * | x3 | |
| Zásuvka 2 | 500 - 1000 g | 35 - 50 min | x3 | ||||
| Māsə a hydina | |||||||
| Mrazený steak | Zásuvka 1 | do 5 kusov | 15 min | 200°C | MANUAL | x1 | |
| Zásuvka 2 | do 3 kusov | 15 min | |||||
| Filey z kuracich prís (bez kosti) | Zásuvka 1 | do 5 kusov | 20 min | 200°C | * | x1 | |
| Zásuvka 2 | do 3 kusov | 20 min | 200°C | * | |||
| Celé kura | Zásuvka 1 | do 1500 g | 55 min | 160°C | * | Len miska 1 | |
| Chutovky | |||||||
| Kuracie nugetky | Zásuvka 1 | do 600 g | 15 min | 200°C | * | x1 | |
| Zásuvka 2 | do 400 g | 15 min | 200°C | ||||
| Kuracie krédelká | Zásuvka 1 | do 1.2 kg | 16 min | 200°C | * | x1 | |
| Zásuvka 2 | do 600 g | 16 min | 200°C | ||||
sk
| Množstvo | Približný Čas | Teplota | Režim varenia | Pretriast' | Dalšie informácie | ||
| Chuťovky | |||||||
| Pizza | Zăsuvka 1 | do 5 plátky | 8 min | 200°C | MANUAL | ||
| Zăsuvka 2 | do 3 plátky | 8 min | 200°C | MANUAL | |||
| Cuketové | Zăsuvka 1 | do 1.2 kg | 14 min | 200°C | ◇ | x4 | |
| Zăsuvka 2 | 600 g | 14 min | 200°C | x4 | |||
| Ryba | |||||||
| Flet z lososa | Zăsuvka 1 | do 5 kusov | 12 - 14 min | 200°C | ◇ | ||
| Zăsuvka 2 | do 3 kusov | 12 - 14 min | 200°C | ||||
| Krevety | Zăsuvka 1 | 600 g | 8 - 10 min | 140°C | x1 | ||
| Zăsuvka 2 | do 450 g | 8 - 10 min | 140°C | x1 | |||
| Pečenie (koláće) | |||||||
| Muffiny | Zăsuvka 1 | do 8/9 kusov | 16 min | 160°C | ◇ | ||
| Zăsuvka 2 | do 4 kusov | 16 min | 160°C | ||||
| Čokolálové koláće | Zăsuvka 1 | 1 okruhla tortová forma | 50 - 55 min | 160°C | |||
| Dehydratácia | |||||||
| Jablíká na platyk | Zăsuvka 1 | 1 kus | 4h | 70°C | ◇ | ||
| Zăsuvka 2 | 1/2 kus | 4h | 70°C | ||||
RADY
- Cas potrebny na prijavu mensich potravin blya zvycajne o nieko kratsi ak pri vacsih potravinach.
- Ak joledo s mensou ve kostou v polovici pripravy premiešate, dosiachnete lepsie yvstedky a predidete nerovnomernemu uvarueni.
- Ak chcete, aby boli vase zemiaky mimoradine thrumkave, skuste pred varenim pridat trosku oleja a potraste, aby sa rovnomerne Rozmiestnil. Odporucame pouit 14 ml oleja. Po pridani lyzice oleja pripravte zemiaky v priebehu niekolkych minut.
V toto spotrebici mozete uvarit aj jegla,ktore daju pripravovat v rure.
Optimalne odporucane mnozstvo na priaprav hranolcekov je 1600 gramov (Zasuvka 1: 1000 g + Zasuvka 2: 600 g) - Použite pripravené listkove a krehné cesto na rychlu priapravu plnenych pochú'tok.
- Ak chete piect kolac alebo quiche, alebo ak chete pripravit jemne alebo plnene prisady, vozte do misky spotrebica zapekaci misku. Mozete pouzit zapekaci misku zo sikonu, nehrdavagejucej ocele, hlinika alebo terakoty.
- Spotrebic mozete pouzit aj na opatovne zohriatie jedla, Ak chcete znovu zohriat jeglo, nastavte teptolu na 160 °C na maximaln 10 minut. Cas varenia je mozne upravit v zavisirol od mnozstva jedla, aby sa jeglo znovu upnle zohrialo.
CISTENIE
Spotrebič po kazdom použití ochistite.
Miska a mrieżka maju neprilnavy povrch. Na cistenie nepouzivaj kovovekuchynske nacinie ani abrazvne cistiace materialy, ktore by mohl poshodit neprilnavy povrchov upravu.
- Odpjote zastrcku zo sietovej zasuvky a nechajte spotrebi vychladnut.
Poznámka: Vyberte misku, aby sa spotrebic rychlejsie ochladil. - Pretrite vonkajsiu ccast spotrebica vlhkou handrickou.
- Ycistite misku a mriezku horucou dovou, trochou prostreidku na umyvanie riadu a jemnou spongiou. Na ostradenienie zvyskov neiost moteze pouiz odmatovač.
Vystraha: miska a mriezká su vhodné do umyvačky riadu.
Tip: Ak sa necistoty prilegia v spodnej ācasti misky a mriežky, naplnte ich horucou vodou s trochoun priopravku na umyvanie radu. Nechajte misku a mriežku pribljne 10 minut odmočit. Potom oplachnite Čstou vodou a osuste. - Vnútro spotrebica utrite horucou vodou vlhkou handrickou.
- Ohrevne teleso očistite suchou Čiastiacou kefkou, aby ste odstranili zvyšky Jedla.
- Spotrebič neponárajte do vody ani do inych kvapalin.
USKLADNENIE
- Odpjte spotrebič zo siete a nechajte ho vychladnút.
- Skontrolujte, cisu vsetky casti ciste a suche.
ZÁRUKA A SERVIS
ABTOMATUHECKNE IPOPTPAMMBI


KaptoΦeBbΦpn
Kypuna
Obouni
Pb16a


MANUAL
DecepTbi
Cyuoka
Puyhnoi pexim
PENEI PEPBbIM INCIOJIb3OBAHNEM
- YdaJInte BCE ynaKOBOuHbIe MaTePnAJIbI.
- YdaInte c np6opBa BCE HaKLeiKn (HaInpMep, HaKNeIky Ha ChaSe).
- TuaTeIbHO ONUCTNIE Yauy I CbeMhIbepeuETKn B rOpueH BOeC nOmoUbHo He6oJIbUoro KOJInuChEBA MOUeTO cpeDCTBA I y6Kn 6e3 abpa3uBHorO nOKpbTnA. TaunI pueETKO MOnKMO bITb B NOcYDoMoEOuHOM MaunHe.
4.Пуртпгte BHTPENHIOи BHeuHIO NOBepxHocb ПИбОрь BlaJHOn TkaHbI.ПИбОр roTOBNT eYc nmoosbI rOpyero BO3dyxa. He 3aJIINBaIte B cauSy macNo mIn Jxnp dIg JxapKn.
ПОДГOTOBКИСПОЛБ3OBAHNIO
- Tomecnte np6bop Ha nlocko, yctounboi n kaponpoohn pa6oey nOBepxhoCTBdaJIN O6pb3r B0dbI.
- He haIbaiTe B aUyH MaCIO nII ppyrme KndKoCTn. Huyero He CTabBe Ha np6Op. 3To npBOuNT K hApyuWeHIO NOTOKA BO3dyXa N Blnre Ha pe3yIbTat JxapKnROPraYIM BO3dyXOM.
- HaxMMTe KhoNky (CTapr/CTon), YTO6bY BKNIOUChTb npu6Op.
- Pexim npriroTOBJIeHnA KapToΦeIaФprO oTo6paKaTeCЯNo yMOnuAnHIOДЯчSiN1,aHa 3KpaHc YeAaSiN2 oTo6paKaTeC«OFF»(BblKJI.).
- JIO6yU OaUy MoJHO Bb6paTb HaxaTIeM KHNKU 11> IuN 2.(YTO6bI OTMeHNTb Bb6Op, CHOBA HAKMITE KHNKU 11> IuN 2), Ya7a 6yETBbIKIOHeHa NTMeHEHa).
PpimueaHne. HnKoIa He nppeBbIaIte MAckcMaIbIy UpyoBeH, Yka3aHHbI B Ta6bnIe (cm. B pa3dene «Ta6bnIa npriTOBNeHN 6IOJ), TAK KAK TO MOKET NOBIAHTb HA kaueCTBO KOHeuHORO pe3ynbTata npriTOBNeHN.
Tb5nua PnIROTOBNEHNA BLOD
Ta6nua Hnxe NOMOxET Bam BbIbpaTb OCHOBHbIe HAcTpoiKn IJ nprirotobneHn 6IIOJa.
PpimueaHHe. Bapnhtb BpeMeHN nprirotobHeNn pndctabHeB kAqueCTbe opneHTnpa MOryt n3MeHHTcB a3BNCUMOCTo cOpTa N konMecTb KaKToΦeJIa. Pa3mep, fOpMa mMapa Dpyrnx npodkTOB moryn To KHOeHnb pe3yIbTat nprirotobHeHn. Bo3MOxHo, BAM notpe6yetc HEMHoro OTperynipOBaT BPem nprirotobHeHn.
| Колиchestvo | Проб.В徕я | Tempepatуа | Рек immПрилесья | П配电�цья | Дов.Информатия | ||
| Картофальский картофальский (10mmx10mm) | Чаша 1 | 900-1500g | 30-50min | 180°C | x3 | ||
| Чаша 2 | 500-1000g | 35-50min | x3 | ||||
| Домашний karтофальский (8mmx8mm) | Чаша 1 | 900g | 45 min | 180°C | x4 | Перед прилесьяпим几乎所有 постениem | |
| Чаша 2 | 500g | 35 min | x4 | ||||
| 3амороженные karтофальский дolyык | Чаша 1 | 900-1500g | 30-50min | 180°C | x3 | ||
| Чаша 2 | 500-1000g | 35-50min | x3 | ||||
| Масу и птуca | |||||||
| 3амороженный сөдөд | Чаша 1 | do 5 shук | 15 min | 200°C | MANUAL | x1 | |
| Чаша 2 | do 3 shук | 15 min | |||||
| Фille kuracyний груdkи (бez костей) | Чаша 1 | do 5 shук | 20 min | 200°C | x1 | ||
| Чаша 2 | do 3 shук | 20 min | 200°C | ||||
| Куршиц (целая) | Чаша 1 | do 1500g | 55 min | 160°C | x1 | Тлько чаша 1 | |
| Зakuscny | |||||||
| Куршиные нагетслы | Чаша 1 | do 600g | 15 min | 200°C | x1 | ||
| Чаша 2 | do 400g | 15 min | 200°C | ||||
| Куршиные Кръяя | Чаша 1 | do 1.2kg | 16 min | 200°C | x1 | ||
| Чаша 2 | do 600g | 16 min | 200°C | ||||
| КолочECTBO | Прибл.В薪水(min) | TempepaТура | Рек immпригOTOBлия | Претeшать | Дог.Информачи | ||
| Зakugskii | |||||||
| Пица | Чаша 1 | do 5 ЛомтINKOB | 8 min | 200°C | MANUAL | ||
| Чаша 2 | do 3 ЛомтINKOB | 8 min | 200°C | MANUAL | |||
| Кабачok | Чаша1 | do 1.2 kg | 14 min | 200°C | # | x4 | |
| Чаша 2 | 600 g | 14 min | 200°C | x4 | |||
| Рыба | |||||||
| Фille сemги | Чаша1 | do 5 shук | 12 - 14 min | 200°C | # | ||
| Чаша2 | do 3 shук | 12 - 14 min | 200°C | ||||
| Кревetedи | Чаша 1 | 600 g | 8 - 10 min | 140°C | x1 | ||
| Чаша 2 | do 450 g | 8 - 10 min | 140°C | x1 | |||
| Выrchewska | |||||||
| Мафхинь | Чаша 1 | do 8/9 shук | 16 min | 160°C | # | ||
| Чаша 2 | do 4 shук | 16 min | 160°C | ||||
| ШокалдныеTopсы | Чаша 1 | 1 крачаяформашикаkeksa | 50 - 55 min | 160°C | |||
| Сушka | |||||||
| ЛомтINKЯбLOK | Чаша 1 | 1 ксok | 4h | 70°C | # | ||
| Чаша 2 | 1/2 ксok | 4h | 70°C | ||||
COBETbl
IpoJyKbI He6oBtO Oa3mepa Tpe6yOt MehBtO BpEmeH npiroTOBnEHH, cM npOyKbI 6oBtO Oa3mepa.
- IpeMeuBHe He6oBbIoo KOnuYeCTBa npOyKTOB NO ICTeUHm NOnOBnHb BPeMeHH npRTOBHeHn yLyUwaeT pe3yIbTaI nNo3BOJrT peDToBpATnH hepABHomepHO npRTOBHeHne OIoJa.
- Tó6bI cπeNaT b KaptoΦenb Ooc6eHNO xpyctraHMM, nonpObyte Do6aBnTb He6oBlsOe KOniueCTBO MaCa nepeh NaHApOM npIroTOBHeNHa paBHOmePHO paCnpEeNtB erno BCemy katoΦenIO. PeKoMeHdyetcTcdoBaJbNT4 1Mn MaCa.
3akyckn, KOtOpbIe MoXHO rOToBnT b DuxOBKe, TaXke NOxOaT dIra npuROToBHeHn B np6ope.
OttimamlbHoe peKoMeHnDyEmoe KOINueCTBO KApTOeJIa PpI COCTABJrE1600 rpaMM (Ha#a:1000g+Ha#a2600g)
- TtO6bIb 6bIcTPO nPpOCTO pnproTOBnTb 3aKcyn C hauHHKO, iNcNoJIb3yIte rToTOBE cNoEHOe nNEcOHyTOE TcTO.
- EcnBbXOTnE NcneYb NpOr NmN KmU, NmN o6Kapntb HexHbIe NHRpeJeHTb NmN nHPRdMeHTb C hauHHKo, NoCTabte fOpmy JnA Blynecku B aUy np6opa. MoxHO nCNoIb3OBaTb fOpmy JnA DyXOBKn U3 pa3HOrO MaTePnAna: CInIKoH, HepKaeIoJuae CTaN, AnOMMHn IIN KePAMkA.
- Pn60p TAKXe MOxHO IcIbIb3ObAITB dNar paoRgBaP npOyKTOB. JIaI 3oRo Ha 10 MInHTY ytaHOBITE Temnepatyp 160°C. BpeM npriroTobEnHIO MOxHO n3MeHnITB b 3abCmOCtN o8bema 6JIoDa, YTObI sTuatelbHO noDorpetbERO.
OuHCTKA
Oueta Te np6op nocne kaxdoro nCnoJb3ObaHna.
YaHa n CetKa MneOt aHtInpnraphoe NOKpbItnue. He nCOnb3ayTe dIra OuCTKm MetaJInueCKHe KxOHnBe npHaIaNkHexHOITnN abpa3INBHe YcTnTnE cpeCTBa, TAK KA 30 MoKet NOBpeDHTb aHtInpnraphoe NOKpbITnE.
- OToCoeHnHTe Ka6enb nHTaHnO T3JeKTPocEtN daTne np6OpOy OCTbITb.
PpimueaHne. 4To6bI npi6Op octbIb 6bICTpee, n3BNeKeKte aay. - PpOtpnte BHeuHIO NOBepxHOCTb np6opa BnaJHO TKAHBIO.
- OuchTHe Taayu npelteKTu ropueHou BOOJ, He6oBbIMn KOnUeCTBOM MOIOUeTO CpECTBA n Hea6p3aNBHO rY6KOJ. DnI ydaJIeHNc OCTabWIXc 3aqrpa3HeHm MoXHO IVCIOJIb3OBATb XIKIOKTb dnn o63xKnBAHIN.
BhimaHne! uuy npeweKy moXHO mbITb B nocydomoeHou MaunHe.
Cobet. Ecln B HxHKeH qactn ChuHn n peueTkn 3aCTpna rpa3b, HaneIte ropeuB BObl n MOUeue cpeCTBO BHTpb, n 3aMOUHe pnpMePHO ha 10 MInyT. 3aTe mnpOMte n BbCYUITE.
- Inpotnne BHTypeHHIO NOBepxHOCTb pnp60pa BnaKHOI TKAHbO, 3apaHe CMOeHHOB B ropaue BOe.
- Ounchnte Ha rpeBaTeIbHbI ηIeMeHT cyXoI ueTko, yTO6bI ydaJIITb OCTaTkn NIIuN.
6.He norpykaTe npu6Op B Body nIIN dpyrne KnKocTn.
XPAHEHNE
- Otkljuoyte npu6op ot 3jektpocetn daTe emy octbItb.
- Y6eJntEcB, yTO Bce qactn npi6opa OunuJeHbI N BbCyUHeHbI.
TAPAHTN I OBCJUYXUBAHNE
Ecni B am Tpe6yetcA obCnykunBaHne iNn HnFopMaun iNn ecni y Bac 03HNKIn npo6nEmbl, nocTeTBe 6e-caiB 6peHda iNn o6patntecB erO eHTnp OndepkKn nOtp6bntenB BAwei cTaPae. Homep TepeFOHa Yka3aH Ma MeJdyHapAoHm RapaTNIHm TanoHe. Ecni B aWei cTpaH eH tceHTpna OndepkKn Onp6tBuIeN, o6patntecB K MecTHOMy dInepy 6peHda.
YCTPAHEHNE HENOLADOK
EcnI y BacO3HnKHYT npO6NMeB C npO6OpM, NOcETe B6-CaHT 6peHa d (Cm. TtynbHyo CTpaHcy B DAHOM pyKOBOCTBE), YTObI NCMOTpeB CNICOK qACTO 3aDaAebMx BOIPPOCB INOBpOITecB U CEHTP NOdJeKKN NOTPe6NIETe B BAWeI cTPAe.
ONMC
A. KoHTeINHeP 1 (BENIka YaHa)
B. KoHTeINHeP 2 (BeNka yaa)
C. Pуки Контейнеров
D. Béniika 3zhimha peujiItka i3 cunikiHOBUMn npOKlaJaKaMn
E. 3Himha pewiTka i3 cnliKHOBUMn npOKJaKaMn
F. Lünpöba cehcopha naheNb
G. DicnneB ViobopaxeHna yacy/tempeaTpyn
uk
IHTepoic Kopnctybaa DUAL EASY FRY

OFF (Bumk.): yka3y e Ha Te, 10 KOHTeHep BmKHeNo. 1o6 aKTHByBaTn, HATNCihtb KhONky 1 a6o KhONky 2.
ABTOMATUHI PEXKUMI PUNIGOTYBAHNR CTPAB

Φpi

Kypka

Oboqi

Pn6a

MANUAL
DecepT
Deriipatauaia
Puynnpexkm
PENEI PEPUIM BVKOPUCTAHHAM
- NobHicTIO 3HIMITb naKyBaHHa npnlaNy.
- 3Himits i3 npnady BcHaKneiKn (HaKneiKy Ha KOnTeHepi TToO).
- PeTeNbHO OuNCTbTe KOHTeHepn N 3HIMH peSiITKN, BnKOpNCTOBvOuN rApABy BoNy, MInOChN 3acio Ta Hea6pa3aNbHy ry6Ky.
KohteHepu nppeiTkn MoXHa MNTB NocydomnHiMaunHi.
- Ipoptipb BNYtpiHIO Ta 30BHIHIO qactHHN npnnaDy BOLOIO raHcIPKOIO. Pid cac p6oBtnpnnaDy TBOPIOE rapue NOBITp. He naOBHIOte KOHTeHep OIeO HxJxPOM DnA CMAKeHHA.
PoznohebcnpoecnpiroToybaHn.Yac npiroToybaHn, 30 3aIinBcB, BIO6paXa€TbcHa ekpani.
- 3aIIuok oIi iu xiny 3 iXi HakoNuyETbCBAHn3y KOHTHeHa
6.Дядякхстарпд acn pnprotybaHH Heo6xHne nepemiybaHH, lo6 3a6e3neHTN onTMMaBnpeybIst (dM.b.pozdi«PekomEnHaqii 3 nprotybaHH).Lo6 nepemiuatnyi, bntraHtib yauy 3 npyaKy noTpycitb II. Ntotim BCTahOBiTB aauy ha3ad y npinaI, i npriotrybaHH abOTAMTuHO BIDHOBtCBs.

Y pexmimpirotybaHHA ura niktorpama 6nmae ha cepedni npoecy npirotoybaHHa. Boha Bka3ye Ha te, 0o IpnipbHOMipHoro npirotoybaHHB pexmmpijxnynprihO nepemiutn.
- Kolni BiDTPBOPHOCTBc3ByKOBm CnHnTaN TaMepa, Ze O3HaaE, 10O cac pIurTOyBaHHa 3aBepuINIOb. BnIMtB NaUy 3 npuJadny NOMICTiB II Ha JxapOTPNBky NOBepxHIO.
- Ipebeipte roTOBhICTb CTpaBN.
KaIOO CTaBa 3e O RoTObA, pIOCTO BCTAOHOBIT aUHy Ha3ay y npIiAad Ta BCTAOHOBIT h TaMEPI KINbKa DOdAIOKTHXxBYNIH.
- Kolni ika 6yde roTOBa, BnIMtB yauy. Uo6 BnHrtN ixy 3 aui, cKOpncTaeTecraunpmaM.
Ybara! 3a kOdHnx yMOB He nepeBepTaIe KOThEHe i3 pewiKoIO DorOpn dHOM.
PnnpurotybannKohteHepn,pewiKu Ta iKa dYke rapaui. - Kolni naptiio iki npirotoBoHo, npilad opa3y roToBn do npirotoBaHnHa cTynHOi napTii.
PEKOMEHDAaI3 IPINIGOTYBAHHJIXI
Y ta6nzi HnXue HaBeJeH OCHOBHHaHaaHTyBaHHaI npriOTyBaHHa CtpaB.
PpimtKa. Yac npirotybaHHa HnKxue Bk3aHO Lmwe B IHOpMaTHBHX xinX Ta MoKe 3minIObAunC BInOBiINO do cOpTy u NapTl Kaptonni, 0u BHKOpNCTOBytsc. Ha pe3yIbTat npirotybaHHa npOyKTIB IHmX pOzMpIb MOKe BnIMBaTixHxH oFpMaTa coT. Toym, MoxKnBO, Bam Notpi6Ho 6yde TroxN cOpNryBAtu cac npirotybaHHa.
| КльькICTь | Приблеленчес (min) | Температуа | Рекиим рind�отувашия | Стошувая | Добачковая инорmaцья | ||
| Картолгф�рí | |||||||
| Заморожения karтолгфо(10mmx10mm) | Контейнор 1 | 900 - 1500 g | 30 - 50 min | 180°C | x3 | ||
| Контейнор 2 | 500 - 1000 g | 35 - 50 min | x3 | ||||
| Домашия karтолгфо(8mmx8mm) | Контейнор 1 | 900 g | 45 min | 180°C | x4 | Параед пind�отувашия дайся висхуну на ручнику | |
| Контейнор 2 | 500 g | 35 min | x4 | ||||
| Частник заморожения karтол徂 | Контейнор 1 | 900 - 1500 g | 30 - 50 min | 180°C | x3 | ||
| Контейнор 2 | 500 - 1000 g | 35 - 50 min | x3 | ||||
| M'ясо та птуaria | |||||||
| Заморожения сөдik | Контейнор 1 | do 5 sht | 15 min | 200°C | MANUAL | x1 | |
| Контейнор 2 | do 3 sht | 15 min | |||||
| Курач diel (6e3 kictok) | Контейнор 1 | do 5 sht | 20 min | 200°C | x1 | ||
| Контейнор 2 | do 3 sht | 20 min | 200°C | ||||
| Кypka (цILA) | Контейнор 1 | do 1500 g | 55 min | 160°C | Tыкuni чаша 1 | ||
| Зakussкii | |||||||
| Заморожения крачни hareетсi | Контейнор 1 | do 600 g | 15 min | 200°C | x1 | ||
| Контейнор 2 | do 400 g | 15 min | 200°C | ||||
| Курач кральца | Контейнор 1 | do 1.2 kg | 16 min | 200°C | x1 | ||
| Контейнор 2 | do 600 g | 16 min | 200°C | ||||
| Кинькість | Приблелен час (min) | Tempepatура | РекIM Притotува��я | Сtrушива��я | Доботкова iNформачия | ||
| Зakувсян | |||||||
| Пица | Контунер 1 | do 5 ск brigочok | 8 min | 200°C | MANUAL | ||
| Контунер 2 | do 3 ск brigочok | 8 min | 200°C | MANUAL | |||
| Кабачки | Контунер 1 | do 1.2 kg | 14 min | 200°C | # | x4 | |
| Контунер 2 | 600 g | 14 min | 200°C | x4 | |||
| Риба | |||||||
| Філіносяя | Контунер 1 | do 5 sht | 12 - 14 min | 200°C | # | ||
| Контунер 2 | do 3 sht | 12 - 14 min | 200°C | ||||
| Кревetedи | Контунер 1 | 600 g | 8 - 10 min | 140°C | x1 | ||
| Контунер 2 | do 450 g | 8 - 10 min | 140°C | x1 | |||
| Вulinіkanінna | |||||||
| Мафіни | Контунер 1 | do 8/9 sht | 16 min | 160°C | # | ||
| Контунер 2 | do 4 sht | 16 min | 160°C | ||||
| Школадный торг | Контунер 1 | 1 крагал форma对其进行 торga | 50 - 55 min | 160°C | |||
| Дерідраетіа | |||||||
| Сkinьочи ябуч | Контунер 1 | 1 sht | 4h | 70°C | # | ||
| Контунер 2 | 1/2 sht | 4h | 70°C | ||||
IOPAДN
- Дя пиготуванг MaHux 3a po3mipom Ctpab 3a3Bvauh Heo6xidno MeHwe acy, HIX dЯ BENKnx.
CtpyuBAAHNA MEnoJ KJIbKoTI iX BcepeNHI cNkU pnyrTOyBAHHN OKpAaUc KInueBnyeBtAT I MOE 3AnO6IriTH HEPBIOMHPOY pnyrTOyBAHHIO iX. - RaIIO nOri6HIO 3pO6HTn KAPOTIIIO OOC6NIO XpycTkoIO, CnpO6yIe DoaTN TpiIKK ONIINpeed npRTOYBAHHM I CTPYCHN, Uo6 BOHa pIBHOMIPHO NOKPINA cTpABy. PekOMEHyEMOdoBaATN 14 Ml ONII. PICIA DoaBAHHN IOKKN ONI II ObCMaKyte KAPOTIIIO pOTRAKOJIbKxXBUNH.
3akyckn, kki MOxHa nprirotybatn B dyXOBci, TAKoK MoxHa nprirotybatn B cblomy npniladi.
Ottmmalba peKMOHDoBAI KInbICTb KaptonnI dnnprrotyBaHnA KaptonnI fpi - 1600 rpaBIM (KoHTeINep 1:1000 g + KOTHeINep 2:600 g)
BnokopnoBte roTOBE nIcTkoB E nIOOHe TCTO, 0o6 wBnDKo TA IeRKO npriroTyBATN 3aKyCKn 3 hauHKnIO.
Pomictb Nocyd dny dxyOBHN Baaynpnndy pnnrOtyBHHN npora qan aHAnHKo 6abo nIcMCAHN DnKATMHN IHrpdeiHTIB cH INRPdeiHTIB i3 hauHHKO. MoKHa BHKOPCTOBYBATN NOH dny dxyOBKN I CNIHKOH, HEPXABIOHO CTAI, anOMHiO, TepAKOTi. - PnIaId TAKoK MoKHb BnOKOpHOByBAtn dIy po3iRipBaHHa Iki. PO3iRipBaIe Iky npOTAROM MAKCHMv 10 XbIMn 3a TempepaTyH 160°C. Yac npHrOryBaHHa MOKHa peryJIOBaTHA ZAEHXMy BID KINkBoCTi Iki, IIO6 NOBHCTO pO3iRIPITN CTpABY.
OuHJHH
BnKohyTe uHcHnHa npuIaNy nicJ KoxHoro BnKOpncTaHHa.
YaHaI PeWitKa MaOtB aHTnnprraphe NOKpTTra. He BnKOpCTOByTne Metanebe KkyoHHe npUaJa DN a6pa3NBH MIOUc 3acoBu dOn ouNueHH npUaLy, ockInbKu ce MoKe np3BcTeNo doNtKOdXeHH aHTnnprrapHO NOKpTTra.
- BnmiB bnky 3 po3ekn i daTe npunaO oxoIoHyTu.
Ppimitka.3HimItb yawy,uo6 npnnaad wBnDwe oxoJohyB. - PpOtpiB Kopnyc npuIady BOIoroIO raHupkoIO.
- Nompitne haayu' neiykTuR gapeoYBOdoO, BnOKpOCTBOyUO mnoHOni 3ac1i Heab6pA3BHy rSy6K. DIna BnIaJIeHNH 3aIIMKUB 6bpyU MoKHa BnIKOPCTBOyBuTn 3exHpiOIOU pIrkD 3ac6.
PonepeJxHnHa: yauy npewitky moXHa MNTu B nocydomnHi MaunHi.
Topada. KaHIO Na HNI Ta HAI peWitUc 3aJIuINBcB 6pU, ZaJIInTe IX rApRIOO BODIO Ta IdoAITE TPOXN MIOUOrO 3aco6y. 3aJIuTte AuaI y peWITKpy npri6bIMHO Ha 10 XbUNH, Uo6 BOHN BiDMOKnI. PToT nPOMInE N BCyuBt IB.
- Ipnptb npnlaud ycepeunhi raHupkoIO, 3moueHOI rapaOIO BOIOJ.
- BndaJIb 6yNb-aki 3aIIuIeKni iXi 3 HarpIbaIbHoro eJeMeHTa cyXIO uITKOIO.
- He 3aHpyIOte npnlaY bOy u iHpy piINHy.
36EPITAHH
- BiD'EnaHai Te npuiaD BiD xKepeNa XnBHeHHi daIte Nomy OxOHOHTN.
- NepekoHaTeCs, 0o BcI cactHn npnnaDy nCti Ta cyXi.
TAPAHTI TA OBCJLYTOBYBAHHA
Kaio bam NotpiBHe 06cbnyBOBAHna 60 hOpmaJia YN KaIO y BAC BNHNka npObEma, BiDjaIeTc aat KOMnAHI-BiPouHbKa 60 3BePHTbc DO LcETpy 06cbNyBOAHBaCnOxNBaUHy CBOI KpAIHi. Homep TeleOHO MyKHAITn B rapaTIHOMy NmCTI, 1o pO3NOBcOJXqEyTCBa Hc BCI kpaHH. KaIO y Baui KpaJIH HemaE LcETpy 06cbNyBOAHBaNCHoXNBaUH, 3BePHTbc DO MlCeuBO Dunepa KOMnAHI-BiPouHbKa
UCYHEHHA HECNPABHOCTE
KJIOu y BAC NHNKNI PNOBIIEMN 3 pnpIaNOM, BiBDiJaTae CaIT KOMnAHII-BINPO6HnKa (DNIBtCBaO6KnADnky cIbO nocIbHnKa) O3NaOHOMeHn3I cIcNKOM hAINOWpeHIINx 3aIHTABh a60 3BeHPtCBaO IeCHTuPcNOyOBaHHN cOnKImaUbY CboiKpAlH.
DESCRIERE
A. Cos 1 (bol mare)
B. Cos 2 (bol standard)
C. Manerele cosului
D. Plita turnata, mare, detasabila, cu portiuni de garnitura d in silicon
gll gll lall glll glll glll glll glll glll glll glll glll glll glll glll glll glll glll glll glll glll glll glll glll glll glll glll glll glll glll glll
Jolulpablil 100sloj pablal 5d lslal gall 3g j
#
.3y jgljg jglblll l 1
a 1 a
.2
jglalilj lslw pluulwl dks. alw n aociaowg bblll jniln no jao g jolll stbly kwl lgll 3
aLgJgJy
. jzssall allw s 1jwul jioI aJswll oegll: yj
a aae aee bga jolll lgljg jol jol jol jol jol
pLb lyai yj alljy ai bia oia aia 5
j^2 15w( y y) ( z) ( z) y
#
.3ydsjgljglal
1.4a.20g ghal 5 a.3u 2u 2
aIalgl Jlal
a 154 154 a 154 a 154 a 154 a 154 a 154 a 154 a 154 a 154 a 154 a 154 a 154 a 154 a 154 a 154 a 154 a 154 a 154 a 154 a 154 a 154
LJGLdJIyJGALJg
1
ally 15d Jgol (Jlll lio d cokai gol) ayolal aoalg ego yj j Laoi jaoi o
A
aLalglgabla gaaalccg
.5
(a)abjlaJgaoUgabgao 6
10 10 10 10 10 10 10 10 10 10 10 10
lalali gabll aol oolg l aagw gjol
a a 1
yabu yabu yabu jao aolal gag yabla
aag jglal no 1gll g.1bgaab yall agglul ugy cgtl lue
.0j00gglaozbaowd
1.5g p2b1 j5 151 lo gao
aolalglg aai jaoagjaoall oololcogll oolcogl ool
.9
dsu 15uJ uJ uJ uJ uJ uJ uJ uJ uJ uJ uJ uJ uJ uJ uJ uJ uJ uJ uJ uJ uJ uJ uJ uJ uJ uJ uJ uJ uJ uJ uJ uJ uJ uJ uJ uJ uJ uJ uJ uJ uJ uJ uJ u
aiee eae eae eae eae eae eae eae eae eae eae eae eae eae eae eae eae eae eae eae eae eae eae eae eae eae eae eae eae eae eae eae eae eae eae eae eae eae eae eae eae eae eae eae eae eae eae eae eae
.5d 1 a d 1 1 1 1 1 1 1 1 1 1 1 1 1 1 1 1 1 1 1 1 .10
1.
.1J 1Jg jj Jj Jj
.1JLgIyIaI IaI aai 3i jy yIgIyIaI gai yIgIyIaI gai yIgIyIaI
j. ( a + b) ( a^2 - ab + b^2) = a^3 + b^3 .
.2JwAawll 1 OFF wol 1 JwWgol gS AaIbI bIbI gg
oJbI JdJI (1)J.2gJfJ 11JzJzJzJzJzJzJzJzJzJzJzJzJzJzJzJzJzJzJz
A. a1a111 10000000000000000000000000000000000
aBg 152 1000 1000 1000 1000
(2gdojol) aiojol g o g jn J 15 plo
.SYNC gogg jnll L aaiy cagll 1aiaaa g g paleil no iiaia aegi gab elie
J 1
.2 w d o OFF
1111111111111111111111111111111 2
C. l,1,2,3,4,5,6,7,8,9,10,11,12,13,14,15,16,17,18,19,20
.3
golal 10 do yj! g dL sKg «Add» aLwJyai loic: abgolo
allll llllll 1! jLioo. *START/STOP" oJ Ll aaiil
.2"Jb0j.2JUJ 4
J 5
(-g+)b2a11()abgab11
.6