USER MANUAL PAIN DORE 1kg OW21 MOULINEX
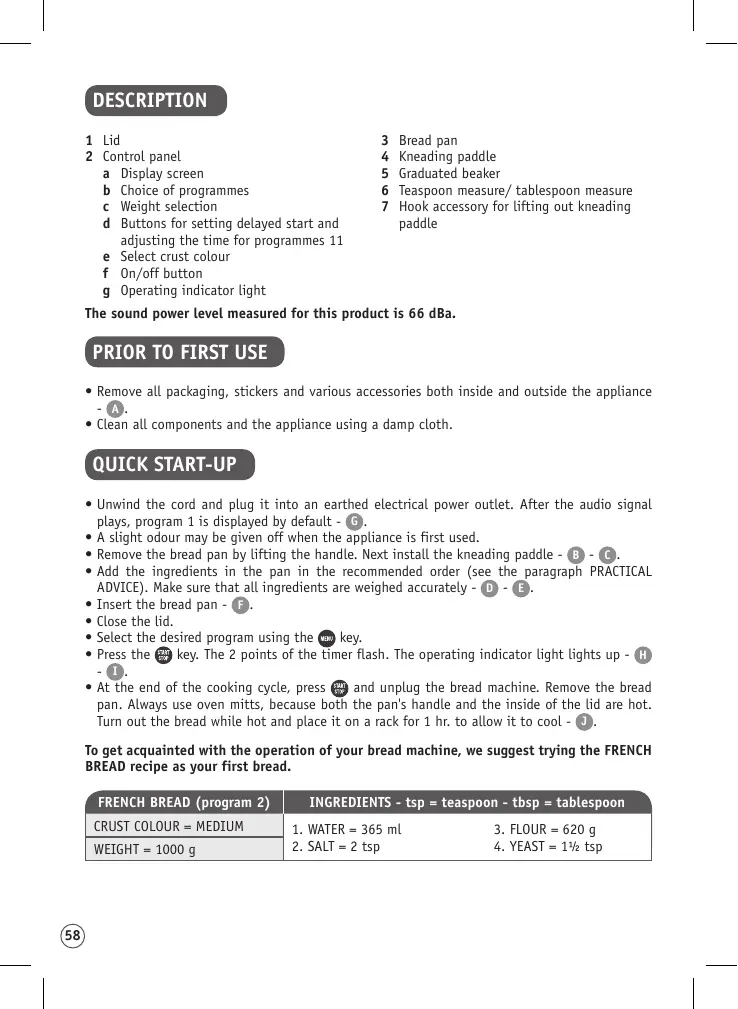
1 Lid
2 Control panel
a Display screen
b Choice of programmes
c Weight selection
d Buttons for setting delayed start and adjusting the time for programmes 11
e Select crust colour
f On/off button
g Operating indicator light
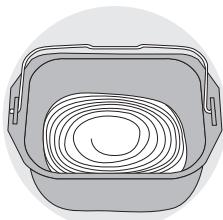
3 Bread pan
4 Kneading paddle
5 Graduated beaker
6 Teaspoon measure/ tablespoon measure
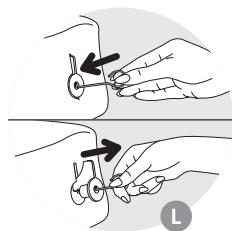
7 Hook accessory for lifting out kneading paddle
The sound power level measured for this product is 66 dBA.
PRIOR TO FIRST USE
- Remove all packaging, stickers and various accessories both inside and outside the appliance
- A.
- Clean all components and the appliance using a damp cloth.
QUICK START-UP
- Unwind the cord and plug it into an earthed electrical power outlet. After the audio signal plays, program 1 is displayed by default - G.
- A slight odour may be given off when the appliance is first used.
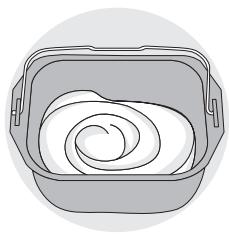
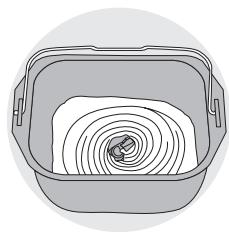
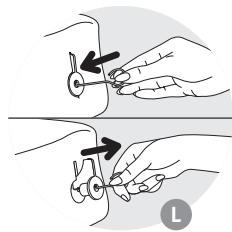
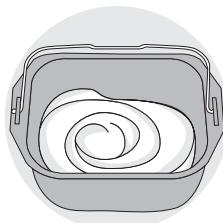
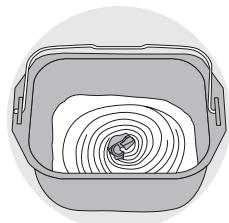
- Remove the bread pan by lifting the handle. Next install the kneading paddle - B - C.
- Add the ingredients in the pan in the recommended order (see the paragraph PRACTICAL ADVICE). Make sure that all ingredients are weighed accurately - D - E.
- Insert the bread pan - F.
- Close the lid.
- Select the desired program using the MENU key.
- Press the key. The 2 points of the timer flash. The operating indicator light lights up - H - I.
- At the end of the cooking cycle, press and unplug the bread machine. Remove the bread pan. Always use oven mitts, because both the pan's handle and the inside of the lid are hot. Turn out the bread while hot and place it on a rack for 1 hr. to allow it to cool -
To get acquainted with the operation of your bread machine, we suggest trying the FRENCH BREAD recipe as your first bread.
| FRENCH BREAD (program 2) | INGREDIENTS - tsp = teaspoon - tbsp = tablespoon |
| CRUST COLOUR = MEDIUM | 1. WATER = 365 ml | 3. FLOUR = 620 g |
| WEIGHT = 1000 g | 2. SALT = 2 tsp | 4. YEAST = 1½ tsp |
Selection of a program

Use the menu key to select the desired program. Each time that you press the menu key, the number on the display screen goes to the next program.

- Basic Bread. Use this program to make a sandwich loaf type white bread recipe.

- French Bread. Use this program to make a traditional French white bread recipe with a thicker crust.

- Sweet Bread. This program is suitable for brioche type recipes that contain more fat and sugar. If you use ready-to-use preparations, do not exceed 750 g of dough in total.

- Quick Bread. Use this program for the most quickly baked white breads. Breads made using this program have a denser texture that breads made using other programs.

- Whole grain bread. Select this program when using whole grain flour.

- Gluten-free bread. We recommend using a ready-to-use mix. For this program, only the 1000g setting is accessible (see warnings for the use of the gluten-free programs).

- Rye bread. Select this program when using a large quantity of rye flour or other cereals of this type (e.g. buckwheat, spelt).

- Cooking only. Use this program to cook for 10 to 70 min. It can be selected on its own and be used:

a) after completion of the Leavened Dough program,
b) to reheat or crisp the surface of already cooked breads that have cooled,
c) to finish cooking in the event of a prolonged power outage during a bread cycle.
- Leavened Dough. Use this program to make recipes for pizza dough, bread dough and waffle dough. This program does not cook food.

- Cake. Use this program to make cakes using baking powder. Only the 750g setting is accessible for this program.

- Porridge. Use this program to make porridge and rice pudding recipes.

- Jam. Use this program to make home-made jams. When using programs 11 and 12, be careful of steam jets and the release of hot air when opening the lid.
Selecting the bread weight
Press the key to set the weight selected - 500 g, 750 g or 1000 g. The indicator light lights up opposite the selected setting. The weight is provided for information purposes only. For some programs, it is not possible to select the weight. Please refer to the cycle chart at the end of the instruction manual.
Selecting the crust colour
Three choices are available: light / medium / dark. If you wish to modify the default setting, press the key until the indicator light lights up opposite the selected setting. For some programs, it is not possible to select the crust colour. Please refer to the cycle chart at the end of the instruction manual.
Start/Stop
Press the start key to turn on the appliance. The countdown starts. To stop the program or cancel the programmed delayed start, press the start key for 3 seconds.
The cycle chart (see the end of the instruction manual) indicates the breakdown of the various steps, according to the selected program. An indicator light indicates which step is currently under way.
1. Kneading
Use this program to form the structure of the dough and its ability to rise properly.
During this cycle, you may add ingredients: dried fruits, olives, etc. An audio signal indicates when to do so.
Please refer to the cycle chart (see the end of the instruction manual) and to the "extra" column. This column indicates the time that will be displayed on your appliance's screen when the audio signal is emitted.
2. Rest
Allows the dough to expand to improve the quality of the kneading.
3. Rise
Time during which the yeast works to leaven the bread and develop its aroma.
4.Cooking
Transforms the dough into a loaf and ensures the desired crust colour and crispness level.
5. Keep warm
Keeps the bread warm for 1 hour after cooking. It is nonetheless recommended to turn out the bread once cooking is done.
The display screen continues to display "0:00" during the hour-long "Keep warm" cycle. At the end of the cycle, the appliance stops automatically after producing several audio signals.
DELAYED START PROGRAM
You may program the appliance to ensure that your preparation is ready at the time of your choice, up to 15 hrs. in advance. Please refer to the cycle chart (see the end of the instruction manual).
This step occurs after having selected the program, the crust colour and the weight. The program time is displayed. To adjust the delayed start time, press + and - . The machine displays the total duration prior to the end of cooking. The lights up. Press to launch the delayed start program.
If you make a mistake or wish to modify the time setting, hold down the key until it emits an audio signal. The default time is displayed. Start the operation again.
Some ingredients are perishable. Don't use the delayed start program for recipes containing: raw milk, eggs, yoghurt, cheese, fresh fruit.
PRACTICAL ADVICE
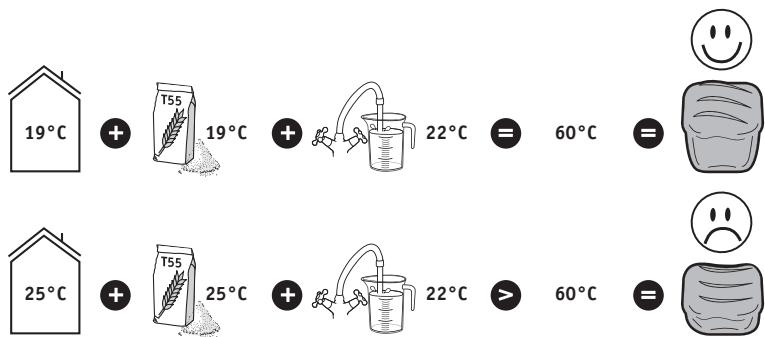
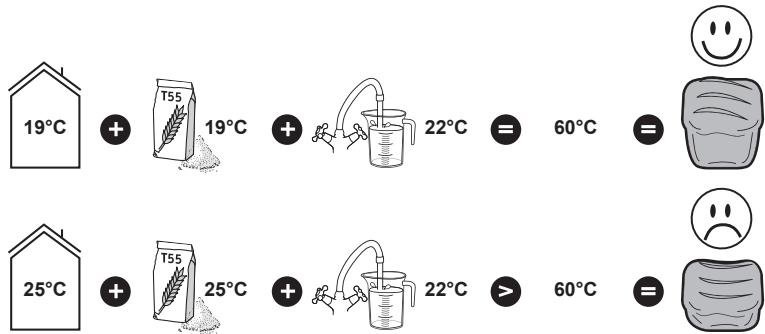
- All ingredients used must be at room temperature (unless otherwise indicated), and must be weighed accurately. Measure the liquids using the graduated cup provided. Use the spoon provided to measure tablespoons on one side and teaspoons on the other. Inaccurate measurements will yield bad results. Bread preparation is very sensitive to temperature and humidity conditions. During hot weather, it is recommended to use cooler liquids than usual. Likewise, during cold weather, it may be necessary to warm the water or milk (never exceed 35^ ).
- Use ingredients prior to their best-before date and keep them in a cool, dry place.
- The flour must be weighed accurately using a kitchen scale. Use active dry baker's yeast (in pouches).
- Avoid opening the lid during use (unless otherwise indicated).
- Follow the exact order of the ingredients and the quantities indicated in the recipes. First the liquids, and then the solids. The yeast must not come into contact with the liquids or with the salt. Too much yeast weakens the dough structure, which will rise a lot and will subsequently sag during cooking.
General order to follow:
Warnings for the use of gluten-free programs
- Blends of flour types must be sifted with the yeast to prevent lumps.
- When the program is launched, it is necessary to assist the kneading process: scrape down any unmixed ingredients on the sides towards the centre of the pan using a non-metallic spatula.
- Gluten-free bread cannot rise as much as a traditional bread. It will be of a denser consistency and lighter colour than normal bread.
- All premix brands do not yield the same results: the recipes may have to be adjusted. It is therefore recommended to conduct some tests (see example below).
Example: adjust the quantity of liquid.

Too liquid
OK
Too dry
Exception: cake batter must remain quite liquid.
Yeast: Bread is made using baker's yeast. This type of yeast is sold in several forms: small cubes of compressed yeast, active dry yeast to be rehydrated or instant dry yeast. Yeast is sold in supermarkets (bakery or fresh foods departments), but you can also buy compressed yeast from your baker.
The yeast must be directly incorporated in your machine's pan with the other ingredients. Nonetheless consider thoroughly crumbling the compressed yeast between your fingers to facilitate its dispersion.
Follow the recommended amounts (see the equivalences chart below).
Quantity/weight equivalences between dry yeast and compressed yeast:
| Dry yeast (in tsp) | 1 | 1.5 | 2 | 2.5 | 3 | 3.5 | 4 | 4.5 | 5 |
| Compressed yeast (in g) | 9 | 13 | 18 | 22 | 25 | 31 | 36 | 40 | 45 |
Flours: Using T55 flour is recommended, unless otherwise indicated in the recipes. When using mixes of special flour types for bread, brioche or milk bread, do not exceed 750g of dough in total (flour + water).
Depending on the quality of the flour, the bread making results may also vary.
- Keep flour in a hermetically sealed container, since flour reacts to fluctuations in climate conditions (humidity). Adding oats, bran, wheat germ, rye or whole grains to the bread dough, will produce a bread that is denser and less fluffy.
- The more a flour is based on whole grains, that is, containing a part of the outer layers of a wheat grain (T > 55) , the less the dough will rise and the denser the bread will be.
- You will also find commercially available ready-to-use preparations for breads. Please refer to the manufacturer's recommendations for the use of these preparations.
Gluten-free flour: Using large quantities of these flour types to make bread calls for the use of the gluten-free bread program. There is a large number of flour types that do not contain any gluten. The best known are buckwheat flour, rice flour (either white or whole grain), quinoa flour, corn flour, chestnut flour, millet flour and sorghum flour.
For gluten-free breads, in order to try to recreate the elasticity of gluten, it is essential to mix several types of non bread making flours and to add thickening agents.
Thickening agents for gluten-free breads: To obtain a proper consistency and to attempt to imitate the elasticity of gluten, you may add some xanthan gum and/or guar gum to your preparations.
Ready-to-use gluten-free preparations: They make it easier to make gluten-free bread since they contain thickeners and have the advantage of being completely guaranteed to be gluten-free — some are also organic.
All brands of ready-to-use gluten-free preparations do not yield the same results.
Sugar: Don't use sugar lumps. Sugar feeds the yeast, gives a good flavour to the bread and improves the crust colour.
Salt: It regulates the activity of the yeast and gives flavour to bread.
It must not come into contact with the yeast prior to the start of the preparation.
It also improve the structure of the dough.
Water: Water rehydrates and activates the yeast. It also hydrates the flour's starch and enables the loaf to be formed. Water may be replaced, in whole or in part, by milk or other liquids. Use liquids at room temperature, except for gluten-free breads, which require the use of warm water (approximately 35^ ).
Fats and oils: Fats make the bread fluffier. It will also keep better and longer. Too much fat slows the rise of the dough. If you use butter, crumble it into small pieces or soften it. Do not incorporate melted butter. Prevent the fat from coming into contact with the yeast, since the fat could prevent the yeast from rehydrating.
Eggs: They improve the bread's colour and favour good development of the loaf. If you use eggs, reduce the quantity of liquid accordingly. Break the egg and add the necessary liquid until you obtain the quantity of liquid indicated in the recipe.
The recipes have been designed for a medium-sized egg of 50g , if the eggs are larger, add some flour; if the eggs are smaller, add a little less flour.
Milk: Milk has an emulsifying effect that leads to the creation of more regular cells, and therefore an attractive loaf appearance. You may use fresh milk or powdered milk. If you use powdered milk, add the quantity of water initially reserved for milk: the total volume must be equal to the volume indicated in the recipe.
CLEANING AND MAINTENANCE
- Unplug the appliance and wait for it to cool down completely.
- Wash the pan and the kneading paddle using hot soapy water. If the kneading paddle stays in the pan, soak it for 5 to 10 min.
- Clean the other components with a damp sponge. Dry thoroughly.
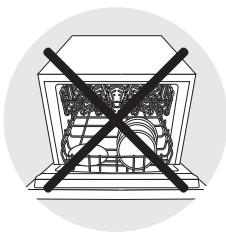
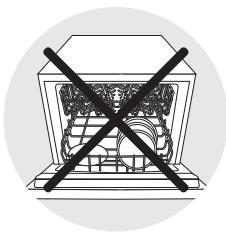
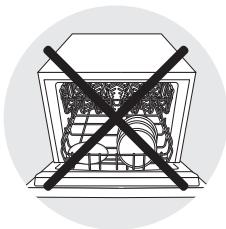
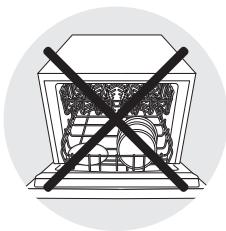
- No part whatsoever is machine washable - K.
- Don't use any household cleanser, abrasive pads or alcohol. Use a soft, damp cloth.
- Never submerge the appliance's body or the lid.
TROUBLESHOOTING GUIDE TO IMPROVE YOUR RECIPES
| Not getting the expected results? This table will help you. | Bread rises too much | Bread falls after rising too much | Bread does not rise enough | Crust not golden enough | Sides brown but bread not fully cooked | Top and sides floury |
| | | | | |
| The button was pressed during baking. | | | | ● | | |
| Not enough flour. | | ● | | | | |
| Too much flour. | | | ● | | | ● |
| Not enough yeast. | | | ● | | | |
| Too much yeast. | | ● | | ● | | |
| Not enough water. | | | ● | | | ● |
| Too much water. | | ● | | | ● | |
| Not enough sugar. | | | ● | | | |
| Poor quality flour. | | | ● | ● | | |
| Wrong proportions of ingredients (too much). | ● | | | | | |
| Water too hot. | | ● | | | | |
| Water too cold. | | | ● | | | |
| Wrong programme. | | | ● | ● | | |
TECHNICAL TROUBLESHOOTING GUIDE
| PROBLEMS | CAUSES - SOLUTIONS |
| The kneading paddle is stuck in the pan. | • Let it soak before removing it. |
| After pressing on Ⓒnothing happens. | • E01 is displayed and flashes on the screen, the appliance beeps: the appliance is too hot. Wait 1 hour between 2 cycles.
• E00 is displayed and flashes on the screen, the appliance beeps: the appliance is too cold. Wait for it to reach room temperature.
• HHH or EEE is displayed and flashes on the screen, the appliance beeps: malfunction. The machine must be serviced by authorised personnel.
• A delayed start has been programmed. |
| After pressing on Ⓒthe motor is on but no kneading takes place. | • The pan has not been correctly inserted.
• Kneading paddle missing or not installed properly.
In the two cases cited above, stop the appliance manually with a long press on the Ⓒ button. Start the recipe again from the beginning. |
| After a delayed start, the bread has not risen enough or nothing happens. | • You forgot to press on Ⓒafter programming the delayed start programme.
• The yeast has come into contact with salt and/or water.
• Kneading paddle missing. |
| Burnt smell. | • Some of the ingredients have fallen outside the pan: unplug the appliance, let it cool down, then clean the inside with a damp sponge and without any cleaning product.
• The preparation has overflowed: the quantity of ingredients used is too great, notably liquid. Follow the proportions given in the recipe. |
| JLGLL-AL-AL-AL | |
| laJIJIJIJIJIJIJIJIJIJIJIJIJIJIJIJIJIJIJIJIJIJIJIJIJIJIJIJIJIJIJIJIJIJIJIJIJIJIJIJIJIJIJIJIJIJIJIJIJIJIJIJIJIJIJIJIJIJIJIJIJIJIJIJIJIJIJIJIJIJIJIJIJIJIJIJIJIJIJIJIJIJIJIJIJIJIJIJIJIJIJIJIJIJIJIJIJIJIJIJIJJIJIJIJIJIJIJIJIJIJIJIJIJIJIJIJIJIJIJIJIJIJIJIJIJIJIJIJIJIJIJIJIJIJIJIJIJIJIJIJIJIJIJIJIJIJIJIJIJIJIJIJIJIJIJIJIJIJIJIJIJIJIJIJIJIJIJIJIJIJIJIJIJIJIJIJIJIJIJIJIJIJIJIJIJIJIJIJIJIJIJIJIJIJIJIJIJIJIJIJPJIJIJIJIJIJIJIJIJIJIJIJIJIJIJIJIJIJIJIJIJIJIJIJIJIJIJIJIJIJIJIJIJIJIJIJIJIJIJIJIJIJIJIJIJIJIJIJIJIJIJIJIJIJIJIJIJIJIJIJIJIJIJIJIJIJIJIJIJIJIJIJIJIJIJIJIJIJIJIJIJIJIJIJIJIJIJIJIJIJIJIJIJIJIJIJIJIJIJIajiJIJIJIJIJIJIJIJIJIJIJIJIJIJIJIJIJIJIJIJIJIJIJIJIJIJIJIJIJIJIJIJIJIJIJIJIJIJIJIJIJIJIJIJIJIJIJIJIJIJIJIJIJIJIJIJIJIJIJIJIJIJIJIJIJIJIJIJIJIJIJIJIJIJIJIJIJIJIJIJIJIJIJIJIJIJIJIJIJIJIJIJIJIJIJIJIJIJIJIJJJIJIJIJIJIJIJIJIJIJIJIJIJIJIJIJIJIJIJIJIJIJIJIJIJIJIJIJIJIJIJIJIJIJIJIJIJIJIJIJIJIJIJIJIJIJIJIJIJIJIJIJIJIJIJIJIJIJIJIJIJIJIJIJIJIJIJIJIJIJIJIJIJIJIJIJIJIJIJIJIJIJIJIJIJIJIJIJIJIJIJIJIJIJIJIJIJIJIJIJS | |
| |
| |
| |
| |
| |
| |
| |
| |
| |
| |
| |
| |
| |
| |
| |
| |
| |
| |
| |
| |
| |
| |
| |
| |
| |
J 1 J 1 J 1 J 1 J 1 J 1 J 1 J 1 J 1 J 1 J 1 J 1 J 1 J 1 J 1 J 1 J 1 J 1 J 1 J 1 J 1 J 1 J 1 J 1 J 1 J 1 J 1 J 1 J 1 J 1 J 1 J 1 J 1 J 1 J
aagol
50 50 50
aabll jbae Jdall aLay. 100000000000000000000000000000000000000
Ll 11111111111111111111111111111111111111111111111
aJg

.
-
-
-
-
-
-
-
-
-
-
-
- 0.
100 6 Lg 10
.
aJ 1
K
Jgssllg ad aodoll oal y gadjolglgdo
a.b.aaalil
- Di Ii 1000 1000 1000 1000
joo 1000000000000000000000000000000000000000000000000000
gawll cIoo aol oal eL aayall aol all oal g Lgbj oLcy alaill aol all aol all abgabbl
jLl j a bgsb 0x0011 g Lg Lg (a jll aabbl cIoo g Jzal) CJy
aIolj j 10gababol oal cllg .Jglal g 5gLg 5g
Lgjgl
(ol)jlll (j) (j) (j)
:abgszblg 0j0sllg 0jglll jglwia ijgl1 / a
= 0, = 0, = 0, = 0, = 0,1,0,1,0,1,0,1,0,1,0,1,0,1,0,1,0,1,0,1,0,1,0,1,0,1,0,1,0,1,0,1,0,1,0,1,0,1,0,1,0,1,0,1,0,1,0,1,0,1,0,1,1.5,1.5,1.5,1.5,1.5,1.5,1.5,1.5,1.5,1.5,1.5,1.5,1.5,1.5,1.5,1.5,1.5,1.5,1.5,1.5,1.5,1.5,1.5,1.5,1.5,1.5,
(3) = , =
30 31 32 33 34 35 36 37 38 39 40 41 42 43 44 45 46 47 48 49
EgjI Joo Llalpluulwue.LJyLdlaaggl JLoT55nabllpuaa:
Jgjg jglj gjjl jll jll jll jll jll jll jll jll jll jll jll
aagaiol algjio Lai jyll Laqae - jglal no Lolo Loglo aiaao Lgfo oLgcl Ltao
aaii iiaaiy jiljglaln jaijaiuuiuuiuuiuuiuuiuuiuuiuuiuuiuuiuuiuuiuuiuuiuuiuuiuuiuuiuuiuuiuuiuuiuuiuuiuuiuuiuuiuuiuuiuuiuuiuuiuuiuuiuuiuuiuuiuuiuuiuuiuuiuuiuuiuuiuuiuuiuuiuuiuuiuuiu
.0aall jg jao g jao ll jao ab aai gao gaoal g iay Ssw. Ssw 15 paa y:
. 1201
a a a a a a a a a a a a a a a a a a
jaiy jaiy jaiy jaiy jaiy
Jus s. 1s. 1s. 1s. 1s. 1s. 1s. 1s. 1s. 1s. 1s. 1s. 1s. 1s. 1s. 1s. 1s. 1s. 1s. 1s. 1s. 1s. 1s. 1s. 1s.
gogLiLdLW. cLao gll Laiy ygrall no yk s: jllll ss a Jyolll Laloll g a
.(oljJljj)
.4a aaa aaaa jaaai gill
a a a a a a a a a a a a a a a a a a a a a
.
.1dolSul gssuusab uusuausususususususususususususususususususususususususususususususus
alil 1 y. gill jol jolal jjki Joo oai .
(1)
gJglgLgl 0 1 2 3 4 5 6 7
jll jgogcagoo gaioljI Jia JaoaJ.11
oljy j.12 g 11 oaljll laoi wic .g jki bai jai jai jai jai jai .12
.111 111 111 111


$$
j _ {n} ^ {\prime} \text {d e l l s c g 3}
$$
$$
j \in \text {a l l} j \notin 4
$$
$$
w l a l l \text {c i t} \cup s 5
$$
$$
\omega_ {a} \omega_ {b} \omega_ {c} \delta_ {a b c} S \delta_ {a a c} \delta_ {b c d} \delta_ {c a d} \delta_ {d a c} 6
$$
$$
\therefore \text {j a n s t} \text {i g} \text {j e l s t} \text {i f} \text {a l l} \text {g a l o} 7
$$
$$
\begin{array}{c c} \hline \text {上 文} & 1 \ \hline \end{array}
$$
$$
\left. \right.\left. \right.\left. \right.\left. \right.\left. \right.\left. \right.\left. \right.\left.\left.\left.\left.\left.\left.\left.\left.\left.\left.\left.\left.\left.\left.\left.\left.\left.\left.\left.\left.\left.\left.\left.\left.\left.\left.\left.\right.\right.\right.\right.\right.\right.\right.\right.\right.\right.\right.\right.\right.\right.\right.\right.\right.\right.\right.\right.\right.\right.\right.\right.\right.\right.\right. 2
$$
$$
\dot {a} \dot {a} \dot {a} \dot {a} \dot {a} a
$$
$$
\begin{array}{c} \text {g a m m a} \ \text {b} \end{array}
$$
$$
j j g l \quad \text {a} \quad c
$$
$$
\ddot {a} \dot {b} g _ {j} \dot {c} \dot {d} g _ {j} \dot {c} \dot {d} g _ {j} \dot {c} \dot {d} g _ {j} \dot {c} \dot {d} g _ {j} \dot {c} \dot {d} g _ {j} \dot {c} \dot {d} g _ {j} \dot {c} \dot {d} g _ {j} \dot {d} g _ {j} \dot {d} g _ {j} \dot {d} g _ {j} \dot {d} g _ {j} \dot {d} g _ {j} \dot {d} g _ {j} \dot {d} g _ {j} \dot {d} g _ {j} \dot {d} g _ {j} \dot {d} g _ {i j}
$$
$$
1 1 \text {c o l} _ {\mathcal {U}}
$$
$$
\left. \int_ {a} ^ {b} f (x) d x = \int_ {a} ^ {b} f (x) d x\right)
$$
$$
\dot {a} \dot {a} \dot {g} / \left(\sum_ {j = 1} ^ {n} a _ {j} \dot {a} \dot {a} j\right) f
$$
$$
\int_ {0} ^ {1} \frac {\sin x}{x + 1} d x = \int_ {0} ^ {1} \frac {\sin x}{x + 1} d x = \int_ {0} ^ {1} \frac {\sin x}{x + 1} d x = \int_ {0} ^ {1} \frac {\sin x}{x + 1} d x = \int_ {0} ^ {1} \frac {\sin x}{x + 1} d x = \int_ {1} ^ {2} \frac {\sin x}{x + 1} d x = \int_ {1} ^ {2} \frac {\sin x}{x + 1} d x
$$
Jus 17 yg jil ldo jolal ogall oag gina wla
jJyJyJUJyJU
A -gj 1 jg jn jnnn jn Jd d 1
aBj aabababwglg bbl lsllyy cbsb
a
aagaaagaaagaaagaaagaaagaaagaaagaaagaaagaaagaaagaaagaaagaaagaaagaaagaaagaaagaaagaaagaaagaaagaaagaaagaaagaaagaaagaaagaaagaaagaaagaaagaaagaaagaaagaaagaaagaaagaaagaaagaaagaaagaa
6 -1 1
.ajll ayal Juaaayi yie aaiy jno laall gubj jocu
C-B- jagallgdsuJdSg.
JySllgo.(aLae aaiai jgaii ci ci dai)Laie gaaibslally Lcgl liLgbl
.E-D-aaLgjjgJUaCllgslao
F -joll eeg Jd
.
1
I - H 1saxll galsl aay jaoogly cgb liai iui .
.1000000000000000000000000000000000000000
Loo oLe Lligy Lbou lwl yollyu Legg jy. JrJl J
0 1
$$
\therefore \angle B A G = \angle A C D + \angle j l
$$
$$
p _ {1} \geq 1 \dots = \dot {0} j g _ {1}
$$
| اللهُّلِيَةِ | اللهُّلِيَةِ |
| .اللهُّلِيَةِ بَعْدُّهُّةِ مَنَسَنَبَنَتُّهُّةِ مَنَسَنَبَنَتُّهُّةِ مَنَسَنَبَنَتُّهُّةِ مَنَسَنَبَنَتُّهُّةِ مَ�َرْحَمُّةِ مَ�َفَرِيرِّةِ مَ�َفَرِيرِّةِ مَ�َفَرِيرِّةِ مَ�َفَرِيرِّةِ مَ�َفَرِيرِّةِ مَ�َفَرِيرِّةِ مَ�َفَرِيرِّةِ مَ�َفَرِيرِّةِ مَ�َفْرِيرِّةِ مَ�َفَرِيرِّةِ مَ�َفَرِيرِّةِ مَ�َفَرِيرِّةِ مَ�َفَرِيرِّةِ مَ�َفَرِيرِّةِ مَ�َفَرِيرِّةِ مَ�َفَرِيرِّةِ م—"مَفَرِيرِّةِ مَ�َفَرِيرِّةِ مَ�َفَرِيرِّةِ مَ�َفَرِيرِّةِ مَ�َفَرِيرِّةِ مَ�َفَرِيرِّةِ مَ�َفَرِيرِّةِ مَ�َفَرِيرِّoce وَاللهُّلِيَةِ | .اللهُّلِيَةِ بَعْدُّهُّةِ مَ�َرْحِمُّةِ مَ�َفَرِيرِّةِ مَ�َفَرِيرِّةِ مَ�َfَرْحِمُّةِ مَ�َfَرْحِمُّةِ مَ�َfَرْحِمُّةِ مَ�َfَرْحِمُّةِ مَ�َfَرْحِمُّةِ مَ�َfَرْحِمُّةِ مَ�َfَرْحِمُّةِ مَ�َfَrْحِمُّةِ مَ�َfَrْحِمُّةِ m—"مَفَرِيرِّةِ مَ�َfَرْحِمُّةِ m—"مَfَrْحِمُّةِ m—"مَfَrْحِmُ" |
| .اللهُّلِيَةِ مَ�َفَرِيرِّةِ مَ�َفَرِيرِّةِ مَ�َfَرْحَمُّةِ مَ�َfَrْحَمُ" | .اللهُّلِيَةِ بَعْدُّهُّةِ مَ�َرْحِمُ" |
| .اللهُّلِيَةِ مَ�َfَرْحَمُ" | .اللهُّلِيَةِ بَعْدُ" |
| .اللهُّلِيَةِ مَ�َfَرْحَمُ" | .اللهُّلِيَةِ بَعْدُ" |
| .اللهُّلِيَةِ مَ�َfَرْحَمُ" | .اللهُّلِيَةِ b\( g \) " |
| .اللهُّلِيَةِ مَ�َfَرْحَمُ" | .اللهُّلِيَةِ b\( g \) " |
| .اللهُّلِيَةِ مَ�َfَرْحَمُ" | .اللهُّلِيَةِ b\( g \) " |
| .اللهُّلَيَةِ مَ�َfَرْحَمُ" | .اللهُّلِيَةِ b\( g \) " |
| .اللهُّلَيَةِ مَ�َfَرْحَمُ" | .اللهُّلِيَةِ b\( g \) " |
| .اللهُّلَيَةِ m\( g \) " | .اللهُّلِيَةِ b\( g \) " |
| .اللهُّلَيَةِ m\( g \) " | .اللهُّلِيَةِ b\( g \) " |
| .اللهُّلَيَةِ m\( g \) " | .اللهُّلِيَةِ b\( g \) " |
| .الialeُّلَيَةِ m\( g \) " | .الialeُّلَيَةِ m\( g \) " |
| .الialeُّلَيَةِ m\( g \) " | .الialeُّلَيَةِ m\( g \) " |
| .الialeُّلَيَةِ m\( g \) " | .الialeُّلَيَةِ m\( g \) " |
| .الialeُّلَيَةِ m\( g \)\( g \) " | .الialeُّلَيَةِ m\( g \) " |
| .الialeُّلَيَةِ m\( g \)\( g \) " | .الialeُّلَيَةِ m\( g \) " |
| .الialeُّلَيَةِ m\( g \)\( g \) " | .الialeُّلَيَte" |
| .الialeُّلَيَte" | .الialeُّلَte" |
llo 10000000000000000000000000000000000000000000
E-D 1000000000000000000000000000
F-
.
A 1000
I-H-2gJgJgJgJgJgJgJgJgJgJgJgJgJgJgJgJgJgJgJgJgJgJgJgJgJgJgJgJgJgJgJgJgJgJgJgJgJgJgJgJgJgJgJgJgJgJgJgJgJgJg
-3g Sli Jd j 4a 0 CcLw1 Cdo
Jgic 1 Jgssj j li c s Jaoalglss 45 p s g o j n li jn aol y Slae ly
.
gds tbsp - ggs
$$
\varrho \bar {S} \bar {r} \cdot = 2 \bar {J} - r
$$
$$
t s p 1, \Delta = y _ {0} + z _ {0} - P
$$
$$
\int_ {0} ^ {1} \omega \frac {1}{2} \cos 3 0 ^ {\circ} = \omega \sqrt {- 1}
$$
$$
\operatorname {t s p} \gamma = \sum_ {\delta} - \gamma
$$
(2 aolj) gsmil
$$
\angle B A G = \angle D A G + \angle S i j
$$
$$
p s 1 \dots = j s
$$
ONICAHNE
1 Kpbioka
2 Pnp6opna naheB
a Ducnnei
b Bb60 nporpaMM
c Bb6opBeca
d KhONKn HAcTPOKn OTCPOHeHHOro 3aYcKa N UCTaHOBKn BpeMeHN nI npOrpaMMbl Y
e Bb6op Tnna KopoouKn
f KHOKKa BKN/BBIKN
g INHdkaTop pa6oTbi
3 EMKoCTbIaXne6a
4 Ionactb dnia 3aMeunBaHn
5 CtaKaH cJeIeHnMaM
6 YaHnHa loXka / cToIobA noXka
7 KpOyOK nIaN3BHeueHnIJaonactn
HaBbicwn npoBeH akctuueckO moocn daHHoro n3denn coCTaBnE 66 d5a.
PENEI PEPBbIM INCIOJIb3OBAHHEM
C H M N T E B C E y nakobouhhe MaTePnAJIbI, H aKneKn I IIN pa3nUHbe akceccyapbl, paCNOJoxeHHBe KaC BHyTpeHHeN, TaK U C BHeUHeN CTOpOHbYCTPOHCTBA - A.
OuHCTnTE BCE 3JIeMeHTbI UyCTPOINCTBO pN I NOMOUN BnaJXHO TpRnKn.
BbICTPbIM 3ANYCK
- Packpynte npoBOuN BkIIOUHTe erO B 3a3EmNEHHyO 3JeKTPnueckyo po3eTky. Nocle toro KaK pa3dactc3BkoBoCnHaN, NO yMOJUcaHHo 6yDet 3aHa nporpaMMA 1 - G.
B npoece nepBoro nCnoIb3OBAHnO Tn3dJIa MOxET NCXoDITb JERKNI 3anax.
- BbItaunTe emKocTb dIy XIe6a, noDnHRe ee 3a pyUky. 3aTeM yctahOBInTe IOnacTb -B -C.
-Пложніte ИнгpeДиЕНтБВ EMKocTb B yKa3aHHOM nopJdKe (cM. naparpaФ ПОЛЕЗHbIE COBETbl). Y6eДИТсь,чTO Bce ИнгpeДиЕНтБВЗБeWe№Hb C TOnHOCtBu - D - E.
- Onyctnte emkoctb dans xle6a - F.
3aKpOte KpbIuKy.
- Пи поши Кногк Вьберпг Р Heo6xOIMyIpyngpamMy
- HaxMMTe Ha KhoNky 3aMnraHOT 2 ToUKN TaIMepa. 3aIropNTcH INDkaTOp pa60TbI - H - I.
IloOKOHaHINZIKNA npriFOToBHeHnHaKmHTe Ha KHOHcyN BbIKIOHNTe XNE6OHeKY. BbTaUHTE EMKOCTb IyXne6a.BcERda NcNOb3yte 3auHHtBE npCRATKn, NocKOBky pyuKa eMKoCTn,A tAKHe BHYtpENHRA NOBEXPOCTb KpbkUHrnpaue. BbInBe m3ΦOpMbI ropRyH nXe6 n NOMeCTHtEeroHa1 cua HpeWtKy, YTObbl OH OCTbl-
TtO6bI O3HaKOMITbcra C xIe6oNeUcKO, Mbl peKOMEnyEm Bam B nepBbI pa3 nonpo6oBaTB nCneuB PPAHUY3CKM XJIEB no npednoKeHHOMy 3decbpecnty.
| ФРАHLУЗСКМ XЛЕБ
(pnorpamma 2) | ИНГ佩ДUENTbl - ч.л. = чайна loжka - с.л. = столовая loжka |
| ТПЛ KOPOЧК = СРЕДнЯ | 1. BOДA = 365 мl | 3. MYKA = 620 r |
| ВEC = 1000 r | 2. COЛь = 2 ч.л. | 4. ДЮЖКИ = 1½ ч.л. |
MHCTPYKZIPO 3KCPJIYATAUIN XJIEBOIENECKI
Bb6op nporpaMMbl

Pn nomoOn KhoOnuHoro MeNo Bb MoKTe He6xOduMHy npOrpAMMy. KaKdy p3 np Na hakatni Ha KhoNky HNO, Homep Ha NHDkaTopHO nHaenI npExoDHT K cJeUoue npOrpAMMe.

- Knaccnueckn xne6. DAnHna nporpamma nO3BOLJeT BbIeKaTb 6JIbI xNe6 no TIny mKmUeBOrO xNe6a.

2.Фанузкm xne6.DaHnaI nporpmaMn PO3BOJrET BbIeKaTb TpaHUNHOHbI φpanu3ckm 6eblx xne6 c 60one nloTHoKOPKO.

- Cnaknn Xne6. DAnHaa nporpramma noXoDHTIa peuENTOB n TNY 6pnOSh, B KOTobpx coepjntc 60JIb xse JIOB n caxapA. PnHnCnOJb3OBAHIN rTOToBbIX CmecE He denaiTe tecto BECOM 60JIe 750r

- Xn66bIcTpoB bIeueKn, DaHHaNpOrpAmma N03BoJIeTe 6bIcTpeepnproTOBntb 6ebbl xnbE.yXn6a,b BlyeueHenoC rCNOnb3ObaHm dem aHNOH npOrpaaMbl, 6oene nnoTHa TeKCTpya, Yem pnpNcNOb3BOAHm dpynX npOrpAMM.

- Xne6 u3 uehno Mykn. DaHnyIO npoPammy CneyET BbIpaTb npu BblneKe xle6a cncnOJIb3OBAHmE uehHO3epHOBOMykn.

- Xne6 6e3 rIIOTeHa. PekOMeHnyETc IcNOnbOaBt roTOBYo CmEb. JIa T OToI npOrpAmMbI Bo3MOxHaT oToK hAtoPckKa 1000 r (cm. npdUnpyKeJednno no nCOnbOBAHIO npOrpAMM dnnprirTOBHeJIa Xne6 6e3 rIIOTeHa).

- PkaHOn Xne6. DAnHyIO npOrpAmMy CnEyET Bb6nPaTb npI NcNoB3ObaHN 6oJIbIoTO KOImUeCTBa PkaHOm MyKn IInI dpyrNx NpOo6hIx 3epHObBix (HaNP., rpeykN, nol6bl).

- Tolbo K BbIeKaHne. DAnHaa nporpamma npedHaHaueHa dJa BblKeHnna pOdoJIKtBbHObTbO TO 10 Do 70 MInHT. Ee MoJxHO mCIOJIb3OBaT bCKJIOnHTbHO: a) nocJe npOrpaMMbl dJa npiroTOBHeNHa DPOXKeBOrTOcta, b) YTo6bl NDoORpeBb IIN cDetaB XpyCTzIM Uyke 3aPeuHbI, HO OCTbIBShn XIe6, c) TTo6bl 3abePcHTb Ptocecc npriTOBHeNBA C Lyuea DInTEbHO rpe6oB J 3JIekTPOcHa6KeHHn B Ptocecc BbIEeKNxIe6a.

9.Држьею teTo.ДаннаяnporpmaMaNo3BOnaIeT npiroTOBnTbTeToДпгицы, TeToДЯВblneueKxIe6aИ TeToДЯBaΦeJIb.DanHnA nporpmaMe He Bblnekaet xNe6.

10.Пиор/KEK. ПОЗBOЯERT roTOBtB KeKcbl Cdo6ABNEHnEM XmMueckORo paRbIXNHTeIa Ira TcTa.ДЯ STOJ npOrpAMMbIOCTUHa TOJbKO NaCTPOKa B 750r.

- Kawa.Даннаяnporpamma NO3BOJAErTOBOTb Kaши n pnc Ha MONOKe.

- Bapehe/Jdxem, PO3BONJET ROTOBITb DOMAUNHE KOHΦIHTOpbl. PnI 3aIyckne nporpamM 11 n 62ybe tOcTOPOKxbl, noCKoNbKy npri OTKpbTm KpbIshk n3 EMKOCTN bIXoJRT CTpyn npa I rOpaYe 6pbIzRn.
Bb6op Beca xJe6a
HaKMMTe Ha KHOKNy UTO6bI Bb6paTb Bec - 500 r, 750 r nnn 1000 r. Bn3yAlhBnH iNdNkATOp 3aORPTcA PdOM C b6bPAHNO HAcPOTHIOK. Bec yka3AH opneHTnpOBuHO. B HEKOToPbIX npOrpamMax Bb6Op BeCA He npedycMOtpe. ObpatTEcB k Tabnue zHKIOB, paCnoJNoKeHNO B KOHe pYKOBOCTBa NO xKnIpyatauAn.
Bb6op Tnna KopoouKn
MoJxHO BbI6paTb TpN yOBoHn npOKeKaHn KOpOKn: IeKar / cpeHra / cnBHa. EcNl Bbl XOTNTe N3MeHNb 3aADHHyIO NO yMOUAnHIO HAcTPOKy, HAKMITE Ha KHONky , noka prAOM C bIbPAHNO HAcTPOKO He 3aOropntc Bn3yAlhBHy INDnKaTOP. B HEKOTOPbIX POrpAmMax BbI6p He npDeCMOTpeh. O6PaNTeCb K TabInce uKKnOB, paCnoLoXeHHo B KOHue pyKoBOdCTBa NO kCkPnYatau.
MHΦOPMAZIPO NHΓPEДNEHTAM
Дрожк: Дл порьдбгвх xлба He6xOdmbI xн6be9eapbIbe Dpoxk. OHI bIyNcAIOrT B p3aHbIX ΦopMax: CBEXHe B He6Oblnx K6bIkaX, AKTNBbIe cyXme, KOtOpBie He6xOdmo CoeINHTB C BOIo, ININ MOMeHTaIbHbIe cyXme.Дрожкп prodaOTc B 60blux paOHax (paONbI Xn6be9ekapen HII NIO HBle paioHbI), HO Bb MoKTe TAKKe KynITb CBexKe IdoxKу Y CBOero 6bUOnuHnka.
ДлжonsсгдуЕВТБОДпьн HeNOCPECTBENH B EMKOSTb XNe6BONECH NBMECTe CdpyHMn INHrpeJEnENTAM.NXopoши n3melenbHTe CBEXne DpOJxN MeJzdy NaIbZaMn, YTObIc snC06CbTOBbAT lyuShemy IXa pacnpedelenHIOB TceTe.
Co6IoudaIte npednncaHnyo do3npOBky (cM. npuBedeHHyO Hnke Ta6nuy 3KbNAeHTOB).
3KbubaneMbcoomHouenu Koluuecmba/beca cyxux u cbeux dpoxkkei:
| Cyhexe dpoxkku (8 u.n.) | 1 | 1,5 | 2 | 2,5 | 3 | 3,5 | 4 | 4,5 | 5 |
| Cbeexue dpoxkku (8 zpaammax) | 9 | 13 | 18 | 22 | 25 | 31 | 36 | 40 | 45 |
Myka: Ecnne He yka3aHO hOe, To b peentax peKomeHdyTcNNoNb3oBaTb NIIeHNHyIO Myk. B cnyae nCnnon3oBaHnI cKeuaanbHbIy MynbIX Cmeei IJI 6pnooe Hnn Dpyrto XNe6a, nepeBbIaIe O6ee ClonueCTBO Tecta 750 r (Myka + Boda).
B 3aBnCIMOCtN OT KOJIueCTBa MYK pe3yIbTaTb I BblneKu XLe6a TaKke MOrY TOTNIuATbcra.
XpaHNTe MyKy B repTeMTHUOM KOHTeHEPe, NOCKbKy OHaPearnpyT He N3MeHENH KImaTmUeCKNx UcNOBn (BaNaxJHoCTb).IpeIN DoabLaENHeN B TectO OBcA,OTpy6e,POCTKOB 3epHOBBx, PkRN INI cIeNbHbX 3epeh Xne6 6ydt BoJIee NIOThbIM u MeHec Bo3DyUHbIM.
- Yem 60lee ue celho3ephOBoi rBnIeTc Myka, t.e. coepjnt uactnbl o6oJouKIN xle6hbx 3epeH (T>55), tem MeHbwe 6ydt NpHIMaTbc TcTo, n Tem 60lee pIoTHbIM 6ydt XNe6.
B npodajke Bby taKxe o6hApyXitre roTobIe cMeCN IJNA BbIpeuKN XJIe6a. JIJI NCnOJIb3OBAHIN NOo6HbIX cMeCen 6opatntecb K peKOMeHJaauNIM pOn3BOJNTeJIa.
Be3nIOTeHOBA MyKA: Pn nCnObl3ObaHmB 60lbIuX KOnUeCTbax Tako MyKc CneyET BbIbPArT npOrpAmmy Dn BbIeNcKu 6e3rIIOteHOBO rXne6a.CyueCTBYET 60JIbOoe KOJIueCTBO BnIOB MyK, He copeJkaue I rIoTeH. CaMbIMn IBceCTHbIMn RABJIIOCTc rpeYHeBaMyA, pncOB MyKA (6eNaI NcIbHo3epHOBA), MyKa n3 KInHOa, KyKpy3HaJ, KaIaTHoBA, MyKA n3 npoca n3 copro.
Pn npoun3BovctBe 6e3rHIOTeHOBO Xe6a IJN BOCO3dHINI 3NaCTNUHOCTnIIOTeHa Heo6xOIMO CMeuAtb HEcKOBko BINOB HExe6HOMyK INo6aBNT3aYCTNI.
3aryctntennI py6e3nloTeHoBOrO xne6a: InyonuyeHn npabInbHO KOnHCnTeHcNn I Bocco3dAnH 3naCTnuHOCTN IJItoHeA, MOXHO do6abNTB C MceB KcaHTaHOByIO KameB n/nnI rAp.
TOTOBBE KYNOTPe6NeHIO 6e3IIOTeHOBbE CMeC: O6JIe4aIOT PnO3BOCTBO 6e3IIOTeHOBOrO Xne6a, nockoJbky copeKAT qa3YcTneI IN o6daIOT TepmIyueCTBOM, TTO a6COHTo Hc COpeKAT FIIOTEHa, A HEKOTOpBt I3 NIX HN MeIEOT BIoNIOUHeCKe OPiOMCXOXJEHnE.
TToOBbIe K yIpOte6JIeHIO 6e3rJIIOTeHOBbIe CMeCn pa3HbIX npOn3BOUInTeNe i daIOT pa3HbIype3yJbTaT.
Caxap: He nCnoB3yIe KcKOBoi caxap. Caxap nIaTe IpOxKn, npndaet XopoWn BKyc xIe6y u deJaT KOpOky 6oJee 30oTntoT.
Conb: no3BOLAeT perynipoBaT bAKTNBHOCTdpoxxKe n npndaet Xne6y Bkyc.
Iohauana npouecca npirotoBneHn Xn6a coNb He donxHa KOHTaKtIpOBaTb C npoxkamn.
Coi TaKxe ynyuwaet Ctpyktyp TeTa.
Boda: Boda yBnaJXHReT n AKTNbpyeT dpoKxN. OHa TAKKe yBnaJXHReT codepJaxuINcB Myke kPxAman I CnOc6ObTyBeT oBa3OBOAHn XNe6HOrO MAnIa. Body moKHO JNOHcTbO INI YactnHO 3aMeHNTb MOLOKOM INI DpyrIMN XnIKoCTMn. NcNoJIb3yIte XnIKoCTm KOMhTHOH TEMNEpatBy, 3a MCKNIouHeHM Be3RIIOteHOBOr Xne6a, IJN KOtOporo Heo6XODIMA TENNA Boda (pnp6n3ntelbHm 35°C).
KnpbI n paCTuTeNbHbIe Macna: XnpbI denaIOT xNe6 6Oone MArKnIM. BlaRoIapr IM xNe6 TAKKe IyUne IOnDbSe XpaHITcT. CNIuKOM 6BJbOoe KOJIeCtBO Xnpa3aMeDJIHeT PIObEM TectA. Ipn IcNpIb3OBAHm CInbOuHOro MaCna HapeXbTe ero Ha ManeHbKne KycOChn INn PAaMraHrnte ero. HE BVoDTaPacTONLeHHO CInbOuHOrE MaCNo. He OpyckaIe KOHTakTa XnpoB C DpOxKAMn, NocKOBky Xnp MOeT PomeMaTb YBlaXHeHIO DpOxxKei.
Yua: Ynuaatozt Xe6a n Cnooc6bTyOHT oFPmnpoBAnHIO xne6HOrO MAKnua. IpnI cNoJIb3OBAnHn ruiCOKaTInTe COOTBcTByIOUmm Opa2OM KOENCTBO KJNDKcTn. Pa36eHrTe RauO 106
Peuentbpa3pa6oTahbcyuetomcpedhero becaia50r.Ecnnna60nbwero pa3mepa, 0doabBeHEMHORO MyK;ecnnyaMeHbWero pa3mepa, cndyET doabNTb HMOHO MeHbIe MyK.
Monoko: Monoko OKa3bIaBET MmIbnIpyuOni 3o0eK, B pe3yIbTaTe cero npbl ctaHOBtca
Booee POBbIMn u Iynu7aetc BHEuHn BvM kNsi. Bbl MoKete nCIOJIb3OBaTb CBEeK
nIn cyOoe MONko. EcnB Bbl nCIOJIb3yeTe cyOoe MONKO, do6abTe Body B KOINueCTBe, B
KOTOpOM DoJHXo 6bITb Do6aJIeHO MONKO: o6UeM o6bEm dONKeH COOTBeCTBOBaTb O6bemy,
yKa3AHHom BypeuenTe.
UCTKA IN TEXOBCLNYXUBAHNE
BbKIOHHTe yCTPOIcTB O IOKApOHO NIOHOctbO octbHET.
BbIMoIe EMKoCTb N IOnaCTb TeNIOB MblHOB VDoI. ECJIb NIOACTb OCTaNaCb B EMKoCTn, B EMKoCTn, 3AMOHTe ee Ha nepiNoD 5 do 10 MNHyT.
OuHCTnTe DpyrIe 3JIeMeHTbI npN NOMoUIN BnaJxHO r6Kn. TuaTeNbHO BbCyUInTe.
He MoTe HnKaKne DeTaN B NocydomoENoH MaunHe - K.
- He nCπoIb3yIte XO3aIcTBeHbIe TOBapbl, a6pa3uVBIbe rγ6Kn
nll cnIpt. NcπoIb3yIte ToJIbKO MЯrKyIO BlaJxHyTOprNkY.
- Hikorda He noprjkaite Kopnyc yctpoiCTBa iIN KpbIshky B Body.
PYKOBODCTBO NO YCTPAHEHNIHO HNCNPAHBOCTEI
PENEI PEPUIM BUKOPUCTAHHAM
3HimtbycniNaKyBaJIbHI MaTePIaIi,EtIKeTkn i yci MoKJIuBi npUaIaIra,aki 3HaXoJaTbcBcepeunHi a6o Ha 3ObHIuHIOBepxHi npUaIaY (A).
Ouicttb Bci Detani Ta npnnaBONoroIraHcipkoIO.
WBIDKIM 3APYCK
- Po3MOTaIte 5Hyp i BBIMKHiTb 5TeKepe y 3a3eMneHy po3eKy. IicIa 3ByKObOro cInHaNoy 3a3MOBvUBaHN M bIo6paJaaEcbn pporpama 1 (G).
- Пи пэрочу ВИКОПИСТАНHI може ВИДЛЯТСА ЛERКИЗANAX.
BnmiMbΦopmyIaBnPiKaHHa,piHnBaWbIi3a pyuKy. Notim BCTaHOBIt 3aMiUBya (B-C).
-ДобаiteВформуИгрелі entи В рекомендоваи полідовсіті (ДИВ.po3дін «ПРAKТИЧИ ПОДАП»).Переконайтеся,ю Bci Игрелі entи 3вазебуTOчNO(D-E).
- YctahOBiB foMpMy dIy BUNiKaHnR (F).
3akpnTe KpnIky.
Bn6epitb Heo6xidHy nporpamy 3a donomoroIO KNONKIN
Ha KHONKY 2 no3HauKn TaMepa 6nMaHOb. yMkaetbcI HnKaTOp po60tn (H - I).
Плеся заBERшеницклу BИNIGAнHЯ HATINCHITb Ha TBA BMKNHb XJI6OJIчKy. BIMiTb φормд ДУВИКАнHЯ.ОБбяЗKOвОДаггп ЗАССЧУ рКУВИКУ, OCKIыКи рУСКУФсPOMI, aТAKOK BHYTpIshN NOBEPXHЯ KPNsKн DeKKн YAC ZaIIMsAIOBc RAрраIMM. BIMiTb rapaqun XJI6 i3 φОРМпТа NOKJaIbT bHoro Na 1 RoDInY Na rePitKry dAnOxONJdeHENH (
Ioo3nHaonomntnc 3i CBOeIO Xli6oNiyKOIO, peKomeHdyEmo Bam nlaNoaTky cnpo6yBaTu pecent «ΦPAHcy3bKIn XJIb」.
| ФАПЦУБКИ XЛБ
(nporpama 2) | IHГРЕДICTИ: ч. п. = чайна loхka; ст. п. = столoba loхka |
| ПИДРУМ'ЯНЮВАнHA = CEPEДнЕ | 1. BOДA = 365 мп | 3. БОPOШИо = 620 р |
| 2. СЛь = 2 ч. п. | 4. ДПИЖДЖI = 1½ ч. п. |
| ВАГА = 1000 r | | |
Bn6ip nporpamn

KhoNka MeHIO Do3B0JAE Bn6paTn Heo6xIDHy npOrpAmy. PIn KoxHOMy HaTnckaHHI KHOKNi HcNcNo Ha DnCnPeI 3MnHOETbCn, nepemKaOuHcB Ha NaCTynHpynpOrpAmy.

- 3BvauHm 6iHn xH6. Lp nporpaMa 3a6e3neuye npiroToyBaHHa 3a pecenTOM 3BvauHoro 6iNo rXn6a 6e3 ckopHNK.
- Φρaŋγεbκη xπi6. Ση προρama 3a 6e3neμεν πριròTyBaHnHa 3a peuεntOM TpaɪniŋHOrO φρaŋγεbKOrO 6jIOnO xJIδa 3 6jIbʌTobCTOIO cKOpɪnHkoI0.
- Conokn xni6. 1 nporpama npna3aeha dI npriroTybaHna 3e peentamn 3di6nHex bynok, kI MicTb 6ilbse XkpB i ckyP. kIIO Bn BnKOpNCTOBYe roTobciymi, TO cnIkyTe 3a TmM, 0o6 3araIbHa Bara Ticta He nepeBnuSyBaIa 750r.
- Xnio6 ubnkoro buinikha. Lp nporpaama 3abe3neuey 6bnu shbnke bnuhkanba 6noro xni6a. Xnio, BnueeHenn Ha ciu nporpaami, Ma 6bnu shiNbHy ctpkytpy npOBHHHNI 3 xni6om, BnueeEHm H anihux nporpaamx.
- Xnio 3 bopoSHA rpy6oro nomeny. IIO nporpaMy Heo6xidHO Bn6upaT npIN BnKOpncTaHHI bopOSHA rpy6oro nomely.
- Be3nIOTeHOBuXnI6. PeKoMeHEnyEMO BInKOpNcTOBByBatn ToRObTy CmUII. DnIyIeI nporpamn Ene3dauEHO mIoNe OHDhAtoPcyBAtn -1000 r (niv. npepeJeHNr IIODo BInKOpTcHAnHn nporpamnpriOtBuHnBe3gIIOTHOBuX BInPOB6).
- XKTHII xNl6. LIO nporpaMy Heo6xjHDo BnBupatn IJnI npriOtBuHHa XNl6a 3 BVCOKM BMICTOM XNtHBoro 60pouHa rpy6oR nomeny aO ha OchOnbi iHnx 3aNkIB (HanprkNlad, rpeuKn, nonb).
- Bunikannna nannu. Lp nporpama 3a6e3neuye Bnikanhnn npotrom 10-70xbunH.NIO nporpamy moHa Bn6paTn OkpeMo, a moHa 3aNyctnttN:
a)nicna nporpamn «TicTo»,
b)對於iindirpibAHHBAke roTOBORO/oxoIOnJKeHOro xni6a a6o InA CTBOpEHHa HbomyxpyctKoiCKOpINKN,
c)ДЯЗавершени Випійань,якso пriв ВИКонанhi zuKny npriroTuBaHnXJI6a HANOBro 3NKNLO eNeKTPOXJNBLeHn.
-
Ticto. Lpnporpaama 3a6e3neupe npirotybaHHa 3a taKIMPeueHTAMn, kTicTo dnniui, xni6 Ta BaΦeB. Lpnporpa HepnHaueHa dn BnikanHn.
-
KeKc. Do3BolnIe roTyBaTn KeKcN 3 DoJaBaHnHm Po3nyuByaHa dIy TictA. Dnla ciEi nporpaM npeD6aueHo IInIe Ondy HacToPoykBuRn -750 r.
- BibcHka. 3a6e3neyuE nprirotyBaHHra 3a TaKIMn peuNTamN, kB BicHka a6o pnc 3 MOJOKOM.
- Jxem. Do3b0aRe TORYBATn DomauHIN Jxem. PnB BkOpncTahHi nporpam 11 i 12 heo6xidno npo8BnIto nObepehNtcb: yepe3 oTBip KpuuKm OMe bXooDHTn CTpyMih Nap, a ToKoK naprai 6p3Kn.
Bn6ip Baru xni6a
HaTnCHiB Ha KhoNky, 106 BCTaHOBtBu 500, 750 a6o 1000 r. HABnpOu Bn6paHoro 3AueHHy BBIMKHeTcB CbITNOBm IHINaTOp. Bary HabeDeHO B IAKOCTI DOIBIKOBoIHΦopMaJIi. DeKeI npOrpAm He nepeD6aauToB Bn6ip Barn. INB. TabNIzIO UIKNIB HanPnIKHJi I hCtpyKJIi 3 ekCnLnyataJIi.


Bn6ip ctyneH naipym'raHOBaHHa
MoKJIbI TpN BApiaHTN Niipym'HNIOBaHnR: IerKe/cepeHe/CunIbe. JAcIO Bu 6aKaTe 3MiHNTu HAcTPOyR 3a MoAOBvBAHHAM, HATNCaIte Ha KNOKY DOKO CBIITNOB INiNKatOp He BBIMKHeTBc HApBNrO To B6paHOro 3HaENeHJ. DeJe i nporpam He nepeD6aUaToB bVbip CTynEJI Niipym'HNIOBaHnR. DInb.Ta6PiQI zuKINb HAnPmKIni IICTpyKuii 3 EcknIyaTuaiqii.
yMnKaHHBmMkaHH
Hattnichb Ha KONky dJaB MmKAnHn npuIaNy. BdJIck Yacy pO3noHnaeTbCJ. 106 3ynHnHn nporpamy a6o BIdmiHnTn nporpamy 3aYncy 3aTpMkoIO, Hattnichb b I BTPMnyte npotrArom 3 cekynd Khonky
POBOTA XJIIBOPIUKN
Y tabuNi ciukNIB (hanpkiHciu i nctpyku3 ecknnyatau) oncani Bc etan npouecy npirotybAHnB 3aIeKxHocti BiD Bu6paHOi nporpamn. CbitnoBin dikatop yka3ye ha etan, 10 npuae.
1.3amiiyBaHHa
I03B0Jc cfoOpMyBatn npaBunbHy TeKctpy ticTa, BiNobiIdno, 3a6e3neyu noro 3dathicb do niHHTT.
BnpoD0Bx cboTo zKnly Bm MoKeTe DoDaBatn pi3Hi iHrpeiEHTn: cyxofoptykTn, MaCInHn ta iH. 3BykoBni CnHaI Bk3ye, KOJI NoTpi6HO BaWe BTPyHaHHa.
3araIbHa nocnIOBnICTb, kOoi Heo6xIdHO DotpmyBaTnca:
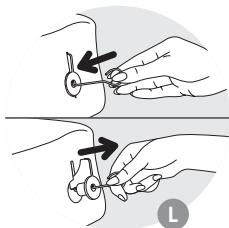
Дяцboro BCTaBTe rayok y Bicb 3amiyBaYa ta notarHitb noro do ce6e.
PonepeJxehnI 0oO BnKOpNCtAHN I nporpaM dIe63rIIOTeHOBnx Bnpo6iB
• Μιος γυπικητήν τγθυρερηνργούκθου, Μηοδχίδην ρετηλήν έροσίαιν δόροιηνήν γυμιαί 3 ἀπιχάλΜι.
Bidpaay ni cnaey nporpamn heo6xidno 3a6e3neuntnk paaue 3amiuybanha: BIDnilntn Henepeimaihi ihrpedientn Bi dtiHOK ofpmni, 3amiyyouyn ix y Hanpmy CEHTpy 3a donomoroo hemetaneboI loKKn.
- Be3rniToTeHOBn xJIi6 He nIiHImaTcBcra, kKKnacuHm. Bin Mae 6Inb u iinbHy ctpyKtpy Ta 6Inb u 6niiu konip y nopibHHHi 3i 3BvuaHm Xn16om.
- KIueBn peyubt Moxe BIDip3HNTNC B 3aJIeXHOCTi BiD MapKn roTOBO cyMIUI: MOKINBO, 3aIObOHTbcn deo 3mHNTn peuENTn. OTeX, peKOMeHnyEMO nOuaTn 3 npObo HOrn BnPiKaHn (dVb.npNkJaad NHXue).
Pnknad: biDperyIIOIte KInbKicTb piINH.
3aHaTo pike
HopMaJIbHe
3aHaTc cyx
BnHrTOK: ticTo dIa ticTeyOK NOOBHHO 3aIIuWATncA deIo pIKM.
OuHEnHry OBCnyTOBYAHNHY
Bidkliouitb npictriip BID eJektpomepexi Ta doyekaitecnyoro nobHoro oxoIodKeHHa.
- Ppommihe fOpMy ta 3amiuYbay u Teenni MNbHn BOdi. JkIoO 3amiyuBhye BiiDfOpMn, iI Heo6XiHO 3AmouHTn Ha 5-10 XbnHn.
OunctiB iHsi detani BONoroIy6koIO. PeTeNbHO npocuyiTb.
- He mniTe B nocydomnHm MaunHi JxOHy detaIb npnady (K).
- He BUKOPINCTOBYITE DЯ NÖUÇÜNEHN PIPNADY NOBJTOBI 3AC60NI Dny ONUÇÜNEHN, abp3aUNBHI rHybKN a6O cπnPT. BUKOPINCTOBYITE M'ky BOJORY cepBETKY.
- He 3aHypioTe B pIDHy KOpNy cnpnady a6o NiOro KpnIky.
IHCTPYKcii 3UCYHEHHIPOBJIEM TA NOKPAUeHHA
BAUINX PELCNTIB
| He moxete
docartni
6kaxanoro
pezulytaty?
Lia tablunia
PONINHA BAM
donomortn. | Xni6
cXOuITb
3aHaTTO
BvCoKO | PiCnla
CnIbHoro
niDnTtrn
XnI6
cnadae | Xni6
HeoCTaTHbo
cXoUITb | Scopinka
HeoCTaTHbo
niDpym'raHema | BoKu XnI6a
kopuynhebi,
ale cam biH ne
nponikci | Bepx Ta
60kn xnl6a
pokpri
60porohm |
| | | | | |
| Piadac
BnIIkAnHn
6ylo
natncHyto
KnOpKy | | | | ● | | |
| Heoctatmb
6oporusha | | ● | | | | |
| 3abarato
6oporusha | | | ● | | | ● |
| Heoctatmb
drIXdjiv | | | ● | | | |
| 3abarato
drIXdjiv | | ● | | ● | | |
| Heoctatmb
BOdi | | | ● | | | ● |
| 3abarato BOdi | | ● | | | ● | |
| Heoctatmb
Zukpy | | | ● | | | |
| Borouhno
HnIbkoJЯKOSTi | | | ● | ● | | |
| Inrpeidicntn
doIadoHb
HnepravilnbHnx
nponoprjx
(a6o y
3abelnikii
KIbKoSTi) | ● | | | | | |
| 3aHaTTO rapiya
BOda | | ● | | | | |
| 3aHaTTO
XoIodha BOda | | | ● | | | |
| Iporpama Ne
BvIIOBIAe
Bvro6by | | | ● | ● | | |
IHCTPYKlii 3 yCYHENHЯ TEXHIyHINX HECIpABHOCTeI
HAN PENSIH NAIДАЛAHY
BaFapJaMa TaHday

M3ip nepheciin H Kemerim KaKETI 6aFapnAmHb TaHaHb3. nephecih 6ackah caBih, 3kpaHdafbHemip Keneci 6aFapnAmara aybica#.

- KlaaccnkaJIbI KaH. ByI baFapnaMaHbI aK 6eKe HAn nicipy yuH naJaHaHaHbIb3.

2.Фануз haHBi.БyIbGarapamaHbKa6bIbI KaIbIH DecTyPnI φpanu3ak HaHBnicipy yuih naJaHaBHy3.

- Tārī nāh. Byīn 6aβapnama Maβi b MēH KaHTb i Keβipek Tokaù CnRAKbI peçentīnepre ākaɪáMb. Daɪbɪn KaMbɪp canaTbɪN 6oÇaNbɪs, 750 rpaMnH acbɪn KETneɪyɪn KaɪdəranaHbɪz.

- KblnamnicetIHn. ByIbIapnamamemeh Te3 nicetiH ak Hn aaiHnanaBly.ByIbIapnamamem nicKeH naHHbH TBfblDbfb6aca BaIbpamamemnicKeHderpeJXKofaBb6bnla.

- Bytin dHnepDen daBbHdAnFaH haN. Bytin dHnepDen TaTbIHaH yKockaHa, ocbi BaFapnaMaHb TaHaHa3.

- JIIOTeHcI HAn. DaaBbN KAmBpDn NaaDanaHFaN DpyIc. Byn 6aFapnamamEn 1000 rnapameTf npaHa IceTi (rJIOTeHcI HAn 6aFapnamamapbH naindaNaHy TpaBn EckePtynepi KePiH3).

- Kapabnai HaBly. Kapabnai yHbI HeMece yKcac daKbIaap (kapakmbk, 6opai bui) Kei KocatbH Ke3e, Ocbl SaFapnaMaHbTaHaB13.

- Tek nicipy. 5yn 6aftapnamamem 10-70 mHyT nicipyre 6oana. Onbl 6eek Taan: a) «Ausbtkan KaMbp» 6afnaplamacb 6iTkeh coH; a) nicKeHH KeIH, cybIn KaIfAH hNdb Jxblby Hemece Kbi3apTy ywiH; b) NaH nicin XkATKaHa, y3ak YakItka 3neKtp Kyatbl eWIn KaFah Ke3de, nicipy uKnblh anKTay yuH naDanahyfa 6oana.

- Adbitkah kambip kambip. Byl 6aIapnamameh niuca, Han xhe BaPNI kambipbH nIeYre 6oJaIb. ByI 6aIapnamamem TamaK niicpmei.i

- Bəniu/kec. Kɔncbɪtkbɪu Kocbɪnʌbɪh TopTapdɪ niçipyre aphʌfən 6aɪdapnʌmɑ. Byn 6afdapnʌmɑda 750 rnapameɪpɪ fana Kɔŋdaɪnbɪnʌdɪ.

- Botka. Byn 6aFapnama 6otka khe KpyiN nyDInHrTePi Nicipyre apHaJraH.

- Tocam/JeM. ByI 6aIapnAmamTo Tocan cnicipy 6oanaIb. 11 XeHe 12-6aIapnAmahb KockaHa, KaNaKtBuH cbIptbIH aBfTaBH XeHe aKhAda KeTePineTIn bCTbIK bdyan abai 6oNbIbI3.
HaH caJMaFbIH TaHday
NepheimcAImakTbI TaHaDbI3:500r,750rHemece 1000r.TaHaIraH napametprIH KaHbIHAn HINkAToPbIK uAM JxHaIbI. CaIMAK TEK aKnapat yuiH 6epinei.KeBip 6afApnAmanapda Caimak TaHaImaIbI. HcyKaynbIKtBIn COhDaft KaDamaq KececiH KepiH3.
KbI3apTy dəpejxcin TaHday
Uw dapekeci 6ab: xekin, optaia, kattb. Εdennki napameTpdi e3eprKtHi3 Kece, Tnicti napameTpdiH xahblDaftb HnDnKatopBbIK WAm XaHaHua NepHeciH bacbl TpybHbI3. Keib6ip 6ab4anamnapara b3apTy dapekeci TaHaJaMaJdb.HyckayblkTbH COhblDaftb Kaadamap Kecteci HKePiH3.
Icke Kocy XaHe eWipy
KpyblfnbHb Kocy yuH, nepHeciH bacbHb3. Kepi cahak bactanaBb. BaFdpnAmbIb TOKtAty Hemece keiH Kocy fyHKUcRbH eipipy uH, 3 cekyHd 6oBu nepHecH bacbIn typbHb13.
HAH NELIHH XYMbICBI
Kaadamap KeceTeiHHe (HcyayIbKtBIn COhblHa) TaHaIaFah 6aFdpNaMaRa Caike Tynl Kaadamap HAcTbInan Kepcetiren. HndkAtoPbIK WAm dEe Ka3ip Kai KaadamOpbIHAnXaTkaHbNKepeTei.
1. Kambip nley
Byn 6aerapnaamHbI kambipdbI nIey xhe aWbITy wih KOndaHbIHb3.
Byn barapnamaada Kenken KemieKnei-keek, 3aYTN, t.6. cnAkyta bocanb. Kocatbn Ke3e, db5bctkB ciHar 6epinedi.
Kaadamap KeceTeiH (HyckayIbIKbIH COhIH Da) XeHe «KocBIMHa» 6baHaBH KepiH3. Byn 6aFaHda DblbCTbIK CmHAn BeipInrReHHen KeiH KypbIbTIbIHbN EkpaHbIHDa KepcTeiNetIH yaKbIb SeipInreH.
2. NiH KaHdbIpy
Kambyipdbin H KaHdbipy yuih 6epinetih yaKbIT.
3. Awby
Ausbitkbj ecepineh kambip KeTepejin, nici wbiKkaHwa 6epinetih yaKbI.
4. Nicipipy
Kambyip 6eIke niwiHn aIbIn, KaXeTIT KbI3apTy XHe KblTpNay dApexKecine caiKec nicedi.
5. XbIyIbI caKray
NICKENHEN KeiH, HAI 1 carat 6oJIbI XblIbI 6OblIN TpyaIbI. DereHMeH, NICKENHEN KeiH, HAIdbI 6ipHeN TycipreH dypbc.
Bip carataK co3bIaTbH «KbIyDb cakay» KeaeHi 6abIcIbHa 3kpaHda «0.00» KepcetinIn Tpy bepedi. Byn keeH 6itKeHe, Kpyblfbi 6ipHeWe dbIbIcbTk CunHan Bepin, ABOTMaTbTI Tpyde ewei#.
KENIH KOCY BAFDAPLAMACbI
15 carat he oan a3 yaKbI 6ypbIH TamaKTbIH e3ip 6oNaTbIH yaKbITbIH TaHdAn KOHa 6oJaBbl. Kaamdp Kap Kectecih KepiH3 (HyckayNbIKTBn COhBHa).
ByamabafapnAmhbl,kbI3apTy dapexecih KHe CaImakTbTaHdaHaHH KeIH bIbIa. BafapnAmahbl yakblTb kepctinei.KeIH KOCY yakblTH pettey uih, XaHe 6acBhl3. EkaPdamaTAM icnic Bonfahra DeHn KanFah yakblKcpctinei. KaHaIb. KeIH Kocy 6afapnAmacbl Icke Kocy uH nepheci6 Bacbl3.
Yakbltka Te TaHan KoIcaHb3 Hemece Kai e3reptKl3 Ke nce, Dbl6bc1k CnHAn 5bIKKaHua, nepHeciH bacIn TybHb3. dEnki yaklt Kepcetinei. BacHah 6actaHb3. By3bln KetTeIH a3bIK-TyIikTeB ap. Unkci cyT, XymbIptKa, Iorypt, ipIMuik, Xemic-Xndek KocJfAH peentinep yuih Kein Kocy faDaplamacbi Japaamaibl.
ПАДАЛБI KEHECTEP
- CanbHrah a3bIK-TynikTepeBHe TemnepaTpyacbHa (Hyckay BacaJaa3bIMaca) 60nyi XHe dAn eIeHEnyKepeK CybIKbIKTapbI XNHaKATbI enWeeri CTakAHMeH enIeH3. XNHaKATbI KAcbIKbI Bip JxABf YNKeH KcBaIK, an EkiHwi XaFb Iwai KacbIK MEnsePimeh Bipde. Dypbc EneHBece, HtNke Dpybc IbTaNaiDb. Han TemnepaTyp Me bInFaIbnkbKaEe ce3iMTan KeJeI. BnMeHH iLi TbIM bCTbIK 60faHda, cybIKbIKTapdbCaKbIHDaTbIK KyHaf YDpybc. Con CImaKbTI cybIK Ke3Ze cybI Hemece CYTT Kblby (6ipak 35^ -Tah acbipyra BoNmaIbI) KaXet OByu MyMknH.
- A3bIK-TyIiKTePdi JkapAmdbIbIK Mep3iMi 6iTKeHWe KOJaHaBbHb3 XaHe caNkbH, KypraK JepDe caKaTaHb3.
- YHdbI acy Tapa3bIcBImeH dIeI eJIwey KaKeT. Kypfak aUbITKbI naJdaIaNbIHbI3 (naKeTke CanbIHfaH).
- IcTe TpyFaH KypblfBbHbK KaKnafBbH aWNaHb3 (Hyckay 60y KepeK 60nMaCa).
- A3bIK-TyIikTePdi peueiTne KepeCtiIReH MeIeepMeH KHe Tnict PeTneH CaIbIHbI3. AJdbIMeH CyBbIK, apTbIHaH KaTtBi 3aTatpDbI CaIbIHbI3. AusbTkCb cyBbIKbIka Hemece Ty3ra TikeJe TNmeyi Kepek. AusbTkBi TbIM Ken 60cona, KaMbp WeKeTH Tbc Ketepin, apTbIHaH Tycin Ketyi MymKIn.
A3bIK-TyniKTePdi canydbH xannbl peti:
-CyIbIK 3aTTap (KYMCAk MaN, CyIbIK MaN, KYMblpTKa, cy, cyT)
-Ty3
KaHT
-HHhBih6ip6eNiri
- YHTAK CYT
- KaTbI a3bIK-TyNikTeP
-HHbH ekihsi 6eNiri
-AWbITKbl
- 3eKtp Kyatb7 MnHyTTan a3 yaKbITka eUce, KaIra 6epiRtnHe, Kpyblfbl KoBblfah 6aRapnaMaHb I kaiFaTcbpaTd.
- Sip hAnDbi nicipl anraHHan KeiH, ekIHuicih CanMac 6byh1 1 cafTai Kyte Type KeK. Kymbciba A cepi Tmeyi yuH, canbHd anrAraHb Dpybc.
- HanbIb TeHKeprEHe, apanaactbIpaTbH KanaK HauHHbIH iHiHe KaIbIn KObIy MymKIn. OHbI inReKneH aKbIbpH bIbIapBn anblB13.
On yuin inrekti KaiaKtbH oyibfiba kipri3in, taptbn ubiFapbHb3.
ГлЮтehсiz hab 6aФдарламалapьн naДаныуkaKaТыICTbl eCKeptTyneP
Kambipda kecekep 60nMayby uuih, apalaackan Hndia aubitTkIme 6ipre eneKeTEN eTKi3y kepek.
- BaIapnama KocbIrfaHa, Temip eMec KacbIKneH WeTte TypbIn KaIraH 3aTApdbI TabaHbIn opTacbHa Kapai INtepiN Xi6epy KepeK.
- TnHOTehci3 Hau DeCTypni Hau CNaKtbl KaTbI KeTeepiImei. Kedimri HaHaKaPapaHaTaTbIfb3 epi akBbIb6oNabl.
Tpyni daibin kamblipnapdbi Hetnkepei de epr typi bola: peuentiinepdi beimdey kepe. CoNbIkTaH anDbimEn cbHaHKePren dypbc (TeMeHderi MbicanbIkaPaH3).
MbicaI: cybIKbIK MeJIeepiH 6eiIMdEy.
TbIM cyuBik
Dypbic
TbIM KOHO
EpeKwEniK: 6əniUtpe/KeKCTepdIn KamblpI KaDIMrIeN cybIK 6onybl KepeK.
A3bIK-TYJIIKTEP TYPAJIbI AKTIAPAT
AusbTkbl: Han aphahbl aubtkbimen daibihdana db. Ohdaa bttkbihmHaadayntopeipbola: cbfbfJraH aafbH KeceKTe, cyJBnTbIaTbH 6bceneHdi KpFak aubtkbjXhe ne3ik KpFak aubtkbj. AubtkbjdyKeHepDe catbJaDb (haybaixaha de Hemece a3bIK-TyNik dyKeHHde), bipak haybaaBldan cbfbfJraH aubtkbj Anca da obaIdb. Aubtktbblbba cka B3k-TyNikTepeMH biPre biPden KpbilfBhlbnihiHine cany Kepek. BiPkeni tapanybl yuiH, cbfbfJraH aubtktbHbKoImEHytin canFaH dpybc.
Mənlep tanaTapbHcKaTahbI3 (TeMeHderi caJIbICTbIpMa KcTeHi kapaHbI3).
KypraKxHe CbIfBnFah awbimkbl MeIWepi MeH cAnMaRbIHbIH caIbICMbPMcbl:
| Kyprak awbimkbl (w.k.) | 1 | 1,5 | 2 | 2,5 | 3 | 3,5 | 4 | 4,5 | 5 |
| Cbifbilaran awbimkbl (a) | 9 | 13 | 18 | 22 | 25 | 31 | 36 | 40 | 45 |
YH:Peuente 6ackaawa KepceTinmece,6naiy HbIH KondaHraH dypbic 6oanaBt. Tokaw (6pnoob) HeMece 6acka da HAn TpynePi niciPyre apHaanrH Tpyni yHaap KocnacbH naDanaHraHa, KaMbipdbH Xannbl CanMarbl (yH + cy) 750 rpaMaHaH acnabH xEH.
YHHbH CanacbHa 6aJIaHbIcTb NiKeH haHa aepKaJai 6oJaIbI.
Kopwarah optara (bifandbibk) 6aHnabctbl kacneTepi 3epin TpaTbHbIKTaH, yhbl aya etneint HcHTeHepde caTrafan dypbc. KaMbpra cbl, ke6ek, 6dain eckih, kapa6dua hemece 6yTH dAnepdi Kocbin xibepce, hAHbHb TbfIb3dbfbl apTbn, ynnIndek 60ImaBl.
YHHbH KpyPbHJaBb6yTIN dAnHepe MOnIepi HerypbIM kEN 60ncA, rHN bDnai DAnepinIH cbTpKb KaBbIbH Herypblm Ke6ipek KamTbica (T>55), KaMbp a3bpak Keetepin, TbIb3dIbIbApra TcyeDi.
- Dykehde catbIaNtbiH daBih Kambipbl naDanaHa hyra da 60aIbI. Ohdai KaMbpbl naDanaHaHa, Kybpflf bHdipyuicinH KeHecepIn Ha3apfa anlbH3.
TnIOTeHci3 yH Hah nicipy yuH Myndai YN Tpyneipi Kenten naJdaHaHaDa, nIIOteHc3 Hah nicipy 6aBapnamacbHOndany KepeK. TnIOTeH i KOK yHApdbH anayan Tpynici bOandaJI. OnapdbH en Xnii KeJeacedetIndepi: KapakMbIK yHbI, Kypiw yHbI (ak hemece 8yTH dAndi), kmoia yHbI, xyTrepi yHbI, taUdbH yHbI, taPb I yHbI, 6aN xyTrepi yHbI.
TnHn Hn icprHne, nHToH bepeH mInrIiTuKti KaMTaMaCb3 ety yuH eP Typni YHapbl apanaactbipbIN, KOIOHaNbIpBfBkOcyKaXET.
TIOIteHc13 HaHa aPHaHaH KOIOHaHbIbIbIbIbIbIbIbIbIbIbIbIbIbIbIbIbIbIbIbIbIbIbIbIbIbIbIbIbIbIbIbIbIbIbIbIbIbIbIbIbIbIbIbIbIbIbIbIbIbIbIH eHn iJIriiStirH bepy UsiH, KaMbIrpa KCAHTaH XeHe/HemecBe rAp yAaBipHy KocSyfa BoJaDa.
DaBHn IRIOTehC3 KAmBipnap: KypaMbHa KOHAnHbIbpfblITap KocbInaTbIHbIKTaH XKeHe rIIOTe H JOK eKHeJIe CHeIMDi BOA anatbIHbIKTah (kei6ipeyneepIHte TeK tabIFN 3aTTap KOnDAhBaIFraH), MyHdai KaMbIPr naDanaHAF nEt bHraIbI. DaBHn IRIOTehC3 KAmBipnap ep TpyPi BoaTHbIKTAh, nICKHeDe eApkana WbIraIbI.
KaHT: KaHT KeceKTePIH caMaHbI3. KaHTTah aUbTKbI eCIn, HAnHHbIH dAmi KaKcapaIbI, CbIPbI KbI3apbln nice#.
Ty3: AaBbIKbHbIH benceHdInirih petTe, hHaFa dAm bepeidi.
Kambyip nneydiH aIdbIHDa Tz3 aIbITkbIfa Tmeyi KepeK.
HaHHbH KypbIbIMbH XaKcapTaIbI.
Cy: AdbTkblbI cyaNHdbIpbn, 6bcNcHdipei. CoBIme bipre yHaDaI kpaXMaJIbI bceNcHdipin, KamblpDnB 6nke niiHInH anyiba XaJdai JkacaIbI CydbToIbIKaI Hemece XapTbIaN CYTNH Hemece BacaCykbTKbIKNeH AnMactbIpYfa 60ndaI CybIKbIKTap 6nme TempepatypacbHa D60nyI Kepe, Tck IHTOHeC3 HAn YuIH Fana XblbCy (WamAMen 35^) KaKET.
MaJnap: MaJdah HnH YIinldek 6oNaIbI. ¥3aYbIpaK caTaNAbI. MaJ TbIM KeN 6oNca, KaMbI bAp KETepineI. Capb MaJdbI KeceKTePRE Typan HeMece JxMcapTbIN cany KEpek. Epitin cainFaH jxH. AAsbTKbIHbH cyaNHybHa Keepri KeNTipetIHdkTeH, MaJ aAsbTKbHfa TiKeJe TImEly KEpeK.
KMybtpTkHa HNaHbI TycH JxHe MCh IH KxCapTadbl KaMbpDln HbH KaHbIpaBl.
KMybtpKa canFaHda, cyBkTBk MeIwepi a3aY Kepek. KMybtpKaHb I Kapbl, peueTIte KepcetinreH meIwepre XETKeHTHe, cyBkTBk KocBhl3.
Peuentepe 50 r optawa Jymbiptkana paphra, oan yken bocca, ynbikkebipek KocbHb3, oan kiwi bocca, ynbia a3bpak calbHb3.
Cyt: CytTtMnIbraIyIbK eepi 6ap, coHbIKTaH typaKbl JxacyuIaIap KbeipeK ty3in, BcENKeHH TyI JXkCapara Tycedi. CyBHK HeMeCE yHTaK CYT Kocya 6oNaIb. YHTAK CYT KOnJaHbIcna, TnICT cy MmIeepH KocblI3: XaNNbl MeIepe peeTeIe KepeTilReHMeB 6ipDe bOlyIkepeK.
TA3AJAY XOHE KYTIM
Kypblfblhlb Tok Ke3iHeh axbipatbln, TOnblk cybifaHwa kyTih3.
bIcTBk cabbHdb cyMeH NiuiHdi XHe apanaactbIpaTbIH KanaKtBj JyblH3. KaNak Tabada KaIca, 5-10 MInHy Tki6TIN KOJIbH3.
Backa 6eniktepih DbIMKbl ng6kameh Ta3anaHbI3. KaKcblanan KeTipiHj3.
- Eushai 60enirih bIdbc xyfbMaunHa fayfa 60nmaNbbl (K).
TpymbIcTBk XUMN, KblpFbIu XeKEnepDi XeHe CnPiPTti naaandahyfa 60mMaNbIb. JyMcaK, DblMbKnIy6peKePneH cypti3.
KypbIfblHbIe3iH HemeCe KaKaIbIh CyFa MaNyfa 60MaJdbI.
KK
AKAYIbIKTAPDbI XOIO HYCKAYIbIFbl
| Кутken
натхж
алыногх
хожа
ma
Mbna
кесе сиз
көмэн ушin
берлген. | Hан тьim
Ка综合体
Кетерл徳i | Hан коты
Көтэрл-
рүнэн көн
Түсin көт徳i | Hан
Дурьс
Кетерл-
мeйd i | Сырты
Дурьс
Кызар-
мaйд i | Бuyир яхтары
Коньлран-
ganызэн уш
дурьс nicneийd i | Бушир мөн
хогары
жak
бетернд
ун калды |
| | | | | |
| Пис
хотсан,
чу'mech
басыган. | | | | ● | | |
| Чьи a3. | | ● | | | | |
| Чьи кeн. | | | ● | | | ● |
| Ашытсысы
a3. | | | ● | | | |
| Ашытсысы
Кeн. | | ● | | ● | | |
| Сыз a3. | | | ● | | | ● |
| Сыз кeн. | | ● | | | ● | |
| Ка'tы a3. | | | ● | | | |
| YHHbɪn
саласы
нашар. | | | ● | ● | | |
| Косылган
Зattардиь
.apара'tынасы
Дурьсemeс
(Tыm кeн). | ● | | | | | |
| Сы Тьм
ыICTык. | | ● | | | | |
| Сы Тьм СыИK. | | | ● | | | |
| Багдагама
Дурьс
Тандаимаган. | | | ● | ● | | |
TEXHNIKAJIbIK AKAYIbIKTAPDbI XOIO HYCKAYIbIFbl
| MÖCEJIPE | CESEBJI - JUJUIMI |
| Арал actbyapbH kanaK tabaan h shknaiNbI. | •Су Киьл, кібітін КійынБ. |
| поронсin baskannda, ewtehe озreрмeид. | •Экранда «EO1» KATenik BeNtrici Kepcetinin,Жыныltыктайд, дыбіctык синан БеріneД: Крьлflыт btm bCTbIk. Ка'tа КОДану ушiн, 1 carat КУТу кадет.•Зранда «EOO» KATenik BeNtrici Kepcetinin,Жыныltыктайд, дыбіctык синан БеріneД: Крьлflыт btm cybɪn KeTkeH. Белme TempepatypacbHa deйнЖыltflaHaSHA KUTIH3.•Зранда «HHH» Hemece «EEE» Kepcetinin,Жыныltыктайд, дыбіctык синан БеріneД: Крьлflыt bsh3y3lnd. Крьлflын БуКINITIу MAMAndaprFа KepcETy kepek.•Кeин Кocy bafdapnamacbI koyiNbI. |
| Баackanda, козfaNTkblsh KoclbIaDbl, bipak kanaK icTeMeiDi. | •Пиш Дурьс canbHbSarah.•АралactbypTaBn Kanak Jokm Hemece dupyc canbHbSarAH.Жогарыda atanfah eki xagdaJa Dурьс bokhInbHb TymMeciHb BacbI n Tpy apkblb EoiipHiz. BaFdapnAmahb bacbHaHkoibHb3. |
| Kein H Kocy bafdaplamacbImen HAN dnybIc KETepiRhen jokm Hemece eшkandua aneket Boflan h JozK. | •Кeин Kocy bafdaplamacbH KОГFaHnH KeiH, nepheciH bacydI yMbItbN KeTIH3.•AusbIckbl TuzHa JxHe/Hemece cyfa TureH.•АралactbypTaBn Kanak JoxK. |
| KuYiren mic shbIaDbl. | •Kocblflan 3aTTapdbHbBipбeNirI tabaHbN sbIpbIha TycKeH: КрьlflbHbI Kyat Ke3iHEn AxbpTaBn, CbyfaHnHaKeiH, ta3anaftbIw 3at Kocnai, dibMkbI n Ry6kameh Ta3anaHaB3.•Kocblflan 3aTTapdbH, acipece cybIKbTKbTHmElIepi TbIM KEN. PecentiDE beipInren МeIeepdi caKtaHbI3. |
KK
TABLEAU DES CYCLES - TABLE DE CICLOS - TABELA DE CICLOS - TABELLA DI CICLI - CYCLI TABEL - ZYKLEN TABELLE - TABLE OF CYCLES - JUGUJURS - JUGUJURS - TABLIMZA UNKJIOB - TABLIMZRA UNKJIIB - KADAMDAP KECTECI
| FR | POIDS (g) | DORAGE | TEMPS TOTAL (h) | PREPARATION DE LA PATE (Péttrissage-Repos-Levée) (h) | CUISSON (h) | MAINTIEN AU CHAUD (h) | EXTRA (h) |
| ES | PESO (g) | DORADO | TIEMPO TOTAL (h) | PREPARACION DE LA MASA (Amasado-Repos-Rubido) (h) | COCCION (h) | MANTENIMIENTO EN CALIENTE (h) | EXTRA (h) |
| PT | PESO (g) | TOSTAGEM | TEMPO TOTAL (h) | PREPARACÇÃO DA MASSA (Amassadura-Repouso-Levadura) (h) | COZEDURA (h) | MANUTENÇAO DO CALOR (h) | EXTRA (h) |
| IT | QUANTITA (g) | DORATURA | TEMPO TOTALE (h) | PREPARAZIONE DELLA PASTA (Impasto-Riposo-Lievitazione) (h) | COTTURA (h) | MANTENIMENTO AL CALDO (h) | EXTRA (h) |
| NL | GEWICHT (g) | BRUINING | TOTAL TIJD (u) | VOORBEREIDING VAN HET DEEG (Kneden-Rust-Rijzen) (u) | BAKKEN (u) | WARMHOUDEN (u) | EXTRA (u) |
| DE | GEWICHT (g) | KRUSTE | TOTAL ZEIT (h) | TEIG ZUBEREITEN (Kreten-Ruhan-Gehen) (h) | BACKEN (h) | WARMHALTEN (h) | EXTRA (h) |
| EN | WEIGHT (g) | BROWNING | TOTAL TIME (h) | PREPARING THE DOUGH (Kneading-Rest-Rising) (h) | COOKING (h) | KEEP WARM (h) | EXTRA (h) |
| AR | jujull (p, j) | jujull | jujull jujull (a, a) | jujull (a, j) - jujull - jujull (a, a) | jujull (a, a) | jujull (a, a) - jujull (a, a) | lujss1 (a, a) |
| FA | jaj (p, s) | juj | jujujujuj (c, c) | - jujujujuj - jujujuj - jujujuj (c, c) | jujujujuj (c, c) | jujujujuj (c, c) | jujuj (c, c) |
| RU | BEC (r) | CTEIPENb IQJDPVNM-HNBAHNI | OBLIEE BPEMJI (q) | ПИПOTOBЛЕNHМЕТECTA (Зменивань-MOTSTAMВANHE-ПONDьEM) (q) | БblпЕКА (q) | ПОДЕРЖАМЕВТЕЛOM COCTОПНИ (q) | ДОПОЛH-NTIELBO (q) |
| UK | BATA (r) | ПДРУМ' RAHIOB-AHNY | 3AГАЛБИМ' UAC (rod) | ПИПOTΥВANHI TICTA (Заменивань/PОЗстгICAL/niДнЯТТA) (rod) | ВИПИК-AHNY (rod) | ПДПIGВ (rod) | ДОДАТ-KOBO (rod) |
| KK | CAJIIM-AFbl (r) | КызартуДДОЕ-JKECI | ЖAJIJIbI YAKIbIbI (car.) | Кавыр 03IPIEу (иney, мьн кандур, кетеріntу) (car.) | ПИСIPУ (car.) | Жыл'dуblI CAK'TAY (car.) | КOCsbl-MLIIa (car.) |
| 1 | 500g | 123 | 2:57 | 2:09 | 0:48 | 1:00 | 2:28 |
| 750g | 3:02 | 0:53 | 2:33 |
| 1000g | 3:07 | 0:58 | 2:38 |
| 2 | 500g | 123 | 2:55 | 2:05 | 0:50 | 1:00 | 2:33 |
| 750g | 3:00 | 0:55 | 2:38 |
| 1000g | 3:10 | 1:05 | 2:48 |
| 3 | 500g | 123 | 3:20 | 2:40 | 0:40 | 1:00 | 2:40 |
| 750g | 3:25 | 0:45 | 2:45 |
| 1000g | 3:30 | 0:50 | 2:50 |
| 4 | 500g | 123 | 1:25 | 0:40 | 0:45 | 1:00 | 1:17 |
| 750g | 1:30 | 0:50 | 1:22 |
| 1000g | 1:35 | 0:55 | 1:27 |
| 5 | 500g | 123 | 2:40 | 1:45 | 0:55 | 1:00 | 2:23 |
| 750g | 2:45 | 1:00 | 2:28 |
| 1000g | 2:50 | 1:05 | 2:33 |
| 6 | 1000g | 123 | 1:39 | 0:59 | 0:40 | 1:00 | 1:32 |
| 7 | 500g | 123 | 2:40 | 1:45 | 0:55 | 1:00 | 2:23 |
| 750g | 2:45 | 1:00 | 2:28 |
| 1000g | 2:50 | 1:05 | 2:33 |
| 8 | - | 123 | 0:10▼1:10 | - | 0:10▼1:10 | - | - |
| 9 | - | - | 1:09 | 1:09 | - | - | 0:30 |
| 10 | 1000g | 123 | 1:45 | 0:25 | 1:20 | 1:00 | - |
| 11 | - | - | 0:10▼0:45 | - | - | - | - |
| 12 | - | - | 0:50 | - | 0:50 | - | - |
1 LEGER-CLARO-CLARO-CHIARo-LICHT-HELL-LIGHT- -JrR-JEFKAR-JIETKE-JXEHJL
2 MOYEN-MEDIO-MEDIA-MEDIO-GEMIDDELD-MITTEL-MEDIUM-JSGO-JSGO-CPEIHJRA-CEPEDHE-OPTAUSA
3 FORT-SCURO-ESCURA-SCURO-DONKER-DUNKEL-DARK-JS-SCJIbHAR-CJlbHE-KATTBI
Comment: the total duration does not include warming time.
joo jao y aolly oobj:
JUg JUd JUaJ Uauu JuaJ uua:ju
PImeMHaHne: B o67yIO npOdoJXnTeJIbHOCT He BXoIT BpEMa NpOdEpkAHHxIe6a B TcNLOM COToTHHm.
3ayBaXeHHa:3aIalbHnX cac He BpaxOBy cac y pexKm i ndirpiBy.
Tycindpme: kajnbl yakltka kblby Ty ke3eni Kipmenni.
FR p. 4 - 12
ES p. 13 - 21
PT p. 22 - 30
IT p. 31 - 39
NL p. 40 - 48
DE p. 49 - 57
EN p. 58 - 66
AR p. 75 - 67
FA p. 84 - 76
RU p. 85 - 93
UK p. 94 - 102
KK p.103 - 111