
EVMSE08X - Microwaves ELECTROLUX - Free user manual and instructions
Find the device manual for free EVMSE08X ELECTROLUX in PDF.

| Product Type | Built-in Microwave |
| Brand | Electrolux |
| Model | EVMSE08X |
| Dimensions (H x W x D) | 455 x 595 x 567 mm |
| Built-in Dimensions (H x W x D) | 444 (460) x 560 x 550 (550) mm |
| Depth with door open | 882 mm |
| Power cord length | 1500 mm |
| Supply voltage | 230 V / 50 Hz |
| Max. microwave power | 1000 W |
| Microwave power levels | 100 - 1000 W |
| Cooking modes | Microwave, Grill, Grill + Microwave, Defrost, Melt, Reheat, Popcorn, Liquids |
| Grill intensity | Low (Lo) and High (Hi) |
| Display type | Color touch with cursor |
| Child safety | Yes, key lock |
| Key lock | Yes |
| Interior lighting | Yes, class G bulb |
| Turntable | Included (turntable set) |
| Grill rack provided | Yes (grill set) |
| Cleaning | Microfiber cloth, warm water and mild detergent |
| Prohibited cleaning products | Steam cleaner, abrasive products, metal scrapers |
| Repairability | Original spare parts, authorized after-sales service |
| Number of pages in the manual | 392 pages |
Frequently Asked Questions - EVMSE08X ELECTROLUX
User questions about EVMSE08X ELECTROLUX
0 question about this device. Answer the ones you know or ask your own.
Ask a new question about this device
Download the instructions for your Microwaves in PDF format for free! Find your manual EVMSE08X - ELECTROLUX and take your electronic device back in hand. On this page are published all the documents necessary for the use of your device. EVMSE08X by ELECTROLUX.
USER MANUAL EVMSE08X ELECTROLUX
To3n ypeI moKe da 6bJe n3NoJ3BaH OT deCa hAd 8- roDnSha Bb3pact, KaKTo N OT LnUca C HAmaJIeHN 0n3nueCKn, CETNBn I yMCTBeHn Bb3MOxHOCTn IIN OT LnUca 6e3 ONNT I NO3HaHnA, cAMO aKO Te Ca NOD
HabJIOHeHne HbTaHCTpyKtnpaHn OTHOCHO 6e3OpacHaT yNoTppeBa Ha ypeDa n pa3bnapBb3MOxHnTe pncOBe. Deza noid 8-roDmHa Bb3pact n Xopa c TeKKn HJI KOMPJIeKCHn YBpeXdAnHn Tp8Ba Da ce DbpxaT daJeU OT ypeDa, OCBeH aKO He ca noid NoCToAHNO HabJIOHeHne.
- DeçaTa TpЯБВa Да БДаТ пон HabлЮдене, 3a Дa ce rapaHTnpa, Ye He cn nIgparT C ypeDA.
- ДръжтЕ BCичКи ONaKOBКи дaJIeYe OT Deça и n3XbРЛeTe ONaKOBKITE NO MeCTHNTe npaBnJa.
- ПРЕДУПЕЖДЕНЕ: Урети и Heroитесoctыни частсе наюразьат по Враиме на употpeба. Пазete.Deцати Домашнite Лобимци далей OT урета, korato ce n3ползви Когато ce oxлajдa.
- Ako урedingима устюгову за detскабezонаноct, to Тразва за се akтувира.
- Deça He TpЯБа Да ИЗВьршВаТ почиствае Или РODдрьжka на урEDA, KOraTO ca 6e3 Надзор.
1.2 067a 6e3oNaChocT
To3n ypeI e npedHa3NaueH cAmO 3a rotBeHe.
To3n ypeE npedHa3NaueH 3a DomaunHa ynotpe6a B 3aTbOpEn NomeuHn.
To3n ypeJ moKe Da ce n3noJ3Ba B oOncn, CTaN B XOTeJ, CTaN B MOTeJ, KbUu 3a rOCTn I dpyrN pOIObHn MeCTa 3a HACTaHЯBaHe, KbTeTO TOBa n3noJ3BaHe He HaDbuShaBa (cpeJHo) HNBOTO Ha DomaUHa yNoTpe6a.
- Camo KBaJIncnIcnpaHO JInCe TpI6Ba Da INHCTaJInpa ypeDa N da CMeHn Ka6eNa.
He n3noJ3BaIte ypeJa, npeNi Da ro INHCTaIIpaTe BbB BrpaJeHaTa KOHCTpyKcIy.
- Прази ИЗВьршва themselves Ha KaKBaTo И за e подрьжka, ИЗКлючete ураза OTеелктpo3axpaHbaHeTO.
- Ako 3axpaHbauT ka6e e nobpeDeH, toi Tp8Ba da ce CMeHN OT npOn3BODHTeJIa, OT HeROB OTOpN3IpaH cepBn3EH ZENTbP nII NT KBaJIncuPaHO JInCe, 3a Da ce n36BerHe ONaCHOCT.
- ПЕДУПЕЖДЕНЕ: Уверете ce, чу уретe изклочen, празда смени лamпа差别, за дa избergete ebeHTyaелн TOKOB удар.
- ПЕДУПЕЖДЕНЕ: Урети和他的овпесьнчаси ce haropeeяват по врeme на уnotpe6a. Трава за ce BHMaBa Да He ce дOKOCВаТ HarpeBaTeJHnTe eJementи Или NOBbpxHOCTTa Na BbTpewHOCTTa Ha урета.
- Binhari n3noJI3BaIe pIbKaBnI 3a cypHa npI n3BaJdaHe IJI INOCTABJHe Ha akceCoapn IJI IN CbIOBe 3a neYeHe.
- Използваite самошиша и onopata My, КОТо са npedha3нayechи 3a TO3n урд.
He aKTbIpaIte MmKpOBbJHOBaTa yHKcIy, KOraTo ypeIbT e npa3eH. MetaJIHnTe qactN BvB BbTpEShHaTa qact MORaT Da Cb3dAaT eJeKtpUyecka Dbra. - MeTaJIHn KOHTeHepn 3a XpaHa n HaIITKn He ce pa3peJaaBaT 3a rOTBeHe B MmKpOBbJIHOBa. I3NcKBaHeTo He e npINIOxIMo, aKO pON3BOJNTeJI KOHKeTn3Ipa pa3Mep N φOpMa Ha MeTaJIHnte KOHTeHepn NOdXODaIu 3a MmKpOBbJIHOBa φypHa.
- ПЕДУПЕЖДECHNE: Ако враза та улл ультэнята на враза та с пореedingи, урдьт не Трава за paботи, дOKATO He Бде NonpaВен OT KBалифицерано Лице.
- ПЕДУПЕЖDEHNE: Camo KBaJIиФицИрно Лице можда ИЗВьрши КаКВATO Ида e СерВиЗна ИЛп ремоHTHAОпраця, КОТTO BKЛЮчВа OTСТранЯВаHe Ha KAnak, KOЛTO OсИгурЯВа 3aUNTa Cpeшу ИЗЛаГАнeHa MИКРБЛНоваЕнергия.
- ПЕДУПЕЖДЕHNE: He 3a rgяBaIte TeuHocTи I dpyrN xpaHn B 3aTbOpeHn CbDObE. Te MOraT da ekCnIOniPaT.
- Изполизваite само сбдове, контса похори 3a уnotpe6а в мнкровьлнови Фурни.
- Пи затонляне нахана в плacrмocви лихартуени onakobkn, поberpaite cheTo Фурнata, поади onaCHOCT OT 3anaLBaHe.
-Урет e ппдна3начен 3a 3aTOПЯн Ha xpaHn n haNTkn.СушениTo Ha xpaHa nIn Дрexn n HarpЯBaHeTo
Ha NODrpaun PNOJIOKKn, Yexn, r6n, BnaXn Kbpnn n Dpyn PNO6Hm MoKe Da IOBeDe Do pNc OT HapaHraHe, 3anaIbAne nn NOxap.
- Ako ce otdejЯ дIM, n3KJIoye Te ypeDa OT KOnyTe OJIN OT KOHTaKTa I npbXkTe BpaTaT aTBopeHa, 3a Da NOTuShIte ПлambUnte, aKO ИMa TAKnBa.
- МИКРОВБЛНовOTO 3aTOПЯне на habиТКИ мОже за довetedо за?
- Дд
- Тряба за с вимараз работа с контейнера.
- CbДьржанеTo Na 6byTnIckTe 3a xpaHene N 6byPkAnHe 3a 6be6eShka XpHa ce pa36bPkBa nIi pa3KnaUa, KaTO Tempepatypata Im Tpr6Ba Da ce npOBepn ppeDi KOHCyMaun, 3a Da ce n36ErHaT n3rApHn.
-Яиca c chepynka n ceJI N TBbRdo CBapeHn yIca He TpI6Ba Da ce 3aTOnPJIaT B UpeDa, TbN KaTO MOraT da EKcPINOJpaT, DOpN CJIeD PrNKJIIOUcBAHe Ha 3aRpRABaHTo B MNIKPOBbJIHOBaTaФурнa.
-Урени Трава за ce поства рedingно на за се OTстразиВат OCTaTbцпт ot xpaHa.
He nouchtaBai Te ypeDa c napouncTaUka.
He n3noJ3BaIte rpy6n, a6pa3nBn, nooNCTBaU npenapatn nnOcTpN, MeTaNHn CTbprAJIKN 3a NOuNCTBaHe Ha CtBKnOTO Ha Bpata, 3aIoTO Te MoRat Da NaDpaCKaT IOBbpxHOCTTa I TOBa Da DOBeDe Do CuynBaHe Ha CtBKnOTO. - HenoДьрЖаHeTo Ha ypeDa B YnCTO CbCTOЯHne MoKe Da IOBeHe Do BLOSHAbaHe Ha NOBbPxHOCTTa, KOEt O MoKe Da IOBIIaRe He6IaROpPraTHo Ha XINBOTa Ha ypeDa I eBEHTyaJIHo DA IOBeHe Do ONaCHA CNTyaZnI.
2. INHCTPYKUIN 3A BE3OPNACHOCT
2.1Инстацья

BHIMAHHE!
Camo KbaIinФицИрано Лице може д n3Bbprn MOtTaЖа на урета.
MaxheTe BCnKoNAKOBKn.
He moHTnpaIte n He n3noI3BaIte noBpeDeH ypeI.
CneDbaiTe uHCTpyKuInTe 3a HnctaInpaHe, npNIOKeHN KbM ypeJa.
BnHaRn BnHmAbaTe, KOraTo MecTneUpeDa, Tb' KaTo e TeKbK. BnHaRn
n3no3BaIte npeIa3Hn pBkABuIe I 3aTbOpEno6yBKn.
He IbprnTe ypea 3a npkKaTa.
- MoHTnpaIte ypeJa ha 6e3oNaCHO n NOxOJaIIO MRCTO, KOETO OTROBApra Ha MOHTaXHnTe N3NCKBaHnJ.
- TpЯбba Да спаЗВATE минимаЛHOTOPa3CTОнHe До дуги урedeni uystpoиCTBa.
- Празд моNTираTe урда, поверетe Далл врата My ce OTваря 6e3прблемно.
- YpeIbTe o60opyuBaH c eIeKtpnuecka cnCTema 3a oxJaXdaHe. Tp86Ba da ce n3noI3Ba C eIeKtpo3axpaHbaHeto.
BrgpaIeHnIypeI Tpr6Ba Ia OTroBapra Ha n3NcKBaHnIyTa 3a Cta6bNilHOCT Ha DIN 68930.
6. BCEKNДHEBHA YNOTPEBA

BHIMAHNE!
Bx. rnaBa "Be3onacnoct".
6.1 KaKa Da 3aJaTe Te ФункцяТа:Грп + MB,Грп
UpeT MoKe Ia n3daBa wym npn
I3no3BaHe Ha fynKcunra:TpIn + MB. ToBa
e HopMaHNo 3a Ta3n fynKcInr.
Korato e Bb3MOxHO, He NpOgPraBaiTe cyphata, npedn roTbeHe.
Korato npiroTbTe HAKoIKeCTnHaBeNbXk, CBekdaIte INTEpBaIInTe MExdyROTBeHeTO IM DO MNHIMYM.
TOrBeHe C n3KnUoYeHa JAmnUyKa
N3KnUoyTe JAmnUykata No BpeMe Ha
rotBeHe. BkIouyBaIte Ra camO, KOrato mMaTe
HxKda OT He.
14. CTPYKTPYA HA MEHIOTO
14.1 MeHIO
8. US DELS ACCESSORIS

AVIS!
Consulteuelscapitolsde seguretat.
8.1 Insercio d'accessoris
Welcome to Electrolux! Thank you for choosing our appliance.

Get usage advice, brochures, trouble shooter, service and repair information: www.electrolux.com/support
Subject to change without notice.
CONTENTS
1.SAFETY INFORMATION. 70
2.SAFETYINSTRUCTIONS 73
3.PRODUCT DESCRIPTION 76
4.CONTROL PANEL 77
5. BEFORE FIRST USE 78
6.DAILYUSE 78
7.CLOCK FUNCTIONS 81
8. USING THE ACCESSORIES 82
9. ADDITIONAL FUNCTIONS 83
10. HINTS AND TIPS 84
11.CARE AND CLEANING. 87
12.TROUBLESHOOTING 87
13. ENERGY EFFICIENCY 89
14.MENU STRUCTURE. 89
15. IT'S EASY! 90
16. ENVIRONMENTAL CONCERNS 91
1. SAFETY INFORMATION
Before the installation and use of the appliance, carefully read the supplied instructions. The manufacturer is not responsible for any injuries or damage that are the result of incorrect installation or usage. Always keep the instructions in a safe and accessible location for future reference.
1.1 Children and vulnerable people safety
- This appliance can be used by children aged from 8 years and above and persons with reduced physical, sensory or mental capabilities or lack of experience and knowledge if they have been given supervision or instruction concerning the use of the appliance in a safe way and understand the hazards involved. Children of less than 8 years of age and persons with very extensive and complex disabilities shall
be kept away from the appliance unless continuously supervised.
- Children should be supervised to ensure that they do not play with the appliance.
- Keep all packaging away from children and dispose of it appropriately.
- WARNING: The appliance and its accessible parts become hot during use. Keep children and pets away from the appliance when in use and when cooling down.
- If the appliance has a child safety device, it should be activated.
- Children shall not carry out cleaning and user maintenance of the appliance without supervision.
1.2 General Safety
- This appliance is for cooking purposes only.
- This appliance is designed for single household domestic use in an indoor environment.
- This appliance may be used in, offices, hotel guest rooms, bed & breakfast guest rooms, farm guest houses and other similar accommodation where such use does not exceed (average) domestic usage levels.
- Only a qualified person must install this appliance and replace the cable.
- Do not use the appliance before installing it in the built-in structure.
- Disconnect the appliance from the power supply before carrying out any maintenance.
- If the supply cord is damaged, it must be replaced by the manufacturer, its Authorised Service Centre or similarly qualified persons to avoid an electrical hazard.
- WARNING: Ensure that the appliance is switched off before replacing the lamp to avoid the possibility of electric shock.
-
WARNING: The appliance and its accessible parts become hot during use. Care should be taken to avoid touching heating elements or the surface of the appliance cavity.
-
Always use oven gloves to remove or insert accessories or ovenware.
- Use only the turntable and the turntable support designed for this appliance.
- Do not activate the microwave function when the appliance is empty. Metal parts inside the cavity can create electric arcing.
- Metallic containers for food and beverages are not allowed during microwave cooking. This requirement is not applicable if the manufacturer specifies size and shape of metallic containers suitable for microwave cooking.
- WARNING: If the door or door seals are damaged, the appliance must not be operated until it has been repaired by a qualified person.
- WARNING: Only a qualified person can carry out any service or repair operation that involves the removal of a cover which gives protection against exposure to microwave energy.
- WARNING: Do not heat liquids and other foods in sealed containers. They are liable to explode.
- Use only utensils that are suitable for use in microwave ovens.
- When heating food in plastic or paper containers, observe the appliance due to the possibility of ignition.
- The appliance is intended for heating food and beverages. Drying of food or clothing and heating of warming pads, slippers, sponges, damp cloth and similar may lead to risk of injury, ignition or fire.
- If smoke is emitted, switch off or unplug the appliance and keep the door closed in order to stifle any flames.
- Microwave heating of beverages can result in delayed eruptive boiling. Care must be taken when handling the container.
-
The contents of feeding bottles and baby food jars shall be stirred or shaken and the temperature checked before consumption, in order to avoid burns.
-
Eggs in their shell and whole hard-boiled eggs should not be heated in the appliance since they may explode, even after microwave heating has ended.
- The appliance should be cleaned regularly and any food deposits removed.
- Do not use a steam cleaner to clean the appliance.
- Do not use harsh abrasive cleaners or sharp metal scrapers to clean the glass door since they can scratch the surface, which may result in shattering of the glass.
- Failure to maintain the appliance in a clean condition could lead to deterioration of the surface that could adversely affect the life of the appliance and possibly result in a hazardous situation.
2. SAFETY INSTRUCTIONS
2.1 Installation

WARNING!
Only a qualified person must install this appliance.
- Remove all the packaging.
- Do not install or use a damaged appliance.
- Follow the installation instructions supplied with the appliance.
Always take care when moving the appliance as it is heavy. Always use safety gloves and enclosed footwear. - Do not pull the appliance by the handle.
Install the appliance in a safe and suitable place that meets installation requirements. - Keep the minimum distance from other appliances and units.
- Before mounting the appliance, check if the appliance door opens without restraint.
- The appliance is equipped with an electric cooling system. It must be operated with the electric power supply.
- The built-in unit must meet the stability requirements of DIN 68930.
Cabinet minimum height
444 (460) mm
(Cabinet under the worktop
minimum height)
| Cabinet width | 560 mm |
| Cabinet depth | 550 (550) mm |
| Height of the front of the appliance | 455 mm |
| Height of the back of the appliance | 440 mm |
| Width of the front of the appliance | 595 mm |
| Width of the back of the appliance | 559 mm |
| Depth of the appliance | 567 mm |
| Built in depth of the appliance | 546 mm |
| Depth with open door | 882 mm |
| Ventilation opening mini-mum size. Opening placed on the bottom rear side | 560x20 mm |
| Mains supply cable length. Cable is placed in the right corner of the back side | 1500 mm |
| Mounting screws | 3.5x25 mm |
2.2 Electrical connection

WARNING!
Risk of fire and electric shock.
- All electrical connections should be made by a qualified electrician.
- The appliance must be earthed.
- Make sure that the parameters on the rating plate are compatible with the electrical ratings of the mains power supply.
Always use a correctly installed shockproof socket. - Do not use multi-plug adapters and extension cables.
Make sure not to cause damage to the mains plug and to the mains cable. Should the mains cable need to be replaced, this must be carried out by our Authorised Service Centre. - Do not let mains cables touch or come near the appliance door or the niche below the appliance, especially when it operates or the door is hot.
- The shock protection of live and insulated parts must be fastened in such a way that it cannot be removed without tools.
- Connect the mains plug to the mains socket only at the end of the installation. Make sure that there is access to the mains plug after the installation.
- If the mains socket is loose, do not connect the mains plug.
- Do not pull the mains cable to disconnect the appliance. Always pull the mains plug.
- Use only correct isolation devices: line protecting cut-outs, fuses (screw type fuses removed from the holder), earth leakage trips and contactors.
- The electrical installation must have an isolation device which lets you disconnect the appliance from the mains at all poles. The isolation device must have a contact opening width of minimum 3 mm.
- This appliance is supplied with a main plug and a main cable.
2.3 Use

WARNING!
Risk of injury, burns and electric shock or explosion.
- Do not change the specification of this appliance.
Make sure that the ventilation openings are not blocked. - Do not let the appliance stay unattended during operation.
- Deactivate the appliance after each use.
- Be careful when you open the appliance door while the appliance is in operation. Hot air can release.
- Do not operate the appliance with wet hands or when it has contact with water.
- Do not apply pressure on the open door.
- Do not use the appliance as a work surface or as a storage surface.
- Open the appliance door carefully. The use of ingredients with alcohol can cause a mixture of alcohol and air.
- Do not let sparks or open flames to come in contact with the appliance when you open the door.
- Do not put flammable products or items that are wet with flammable products in, near or on the appliance.
- Do not use microwave function to preheat the appliance.

WARNING!
Risk of damage to the appliance.
-
To prevent damage or discoloration to the enamel:
-
do not put aluminium foil directly on the bottom of cavity of the appliance.
- do not put water directly into the hot appliance.
- do not keep moist dishes and food in the appliance after you finish the cooking.
-
be careful when you remove or install the accessories.
-
Discoloration of the enamel or stainless steel has no effect on the performance of the appliance.
Always cook with the appliance door closed. -
If the appliance is installed behind a furniture panel (e.g. a door) make sure the door is never closed when the appliance operates. Heat and moisture can build up behind a closed furniture panel and cause subsequent damage to the appliance, the housing unit or the floor. Do not close the furniture panel until the appliance has cooled down completely after use.
2.4 Care and cleaning

WARNING!
Risk of injury, fire, or damage to the appliance.
- Before maintenance, deactivate the appliance and disconnect the mains plug from the mains socket.
Make sure the appliance is cold. There is the risk that the glass panels can break. - Replace immediately the door glass panels when they are damaged. Contact the Authorised Service Centre.
- Be careful when you remove the door from the appliance. The door is heavy!
- Make sure the cavity, the turntable and the door are wiped dry after each use. Steam produced during the operation of the appliance condensates on cavity walls and can cause corrosion.
Clean regularly the appliance to prevent the deterioration of the surface material. - Fat and food remaining in the appliance can cause fire and electric arcing when the microwave function operates.
- Clean the appliance with a moist soft cloth. Use only neutral detergents. Do not use abrasive products, abrasive cleaning pads, solvents or metal objects.
If you use an oven spray, follow the safety instructions on its packaging.
2.5 Internal lighting

WARNING!
Risk of electric shock.
- Concerning the lamp(s) inside this product and spare part lamps sold separately: These lamps are intended to withstand extreme physical conditions in household appliances, such as temperature, vibration, humidity, or are intended to signal information about the operational status of the appliance. They are not intended to be used in other applications and are not suitable for household room illumination.
This product contains a light source of energy efficiency class G. - Use only lamps with the same specifications.
2.6 Service
To repair the appliance contact the Authorised Service Centre.
Use original spare parts only.
2.7 Disposal

WARNING!
Risk of injury or suffocation.
- Contact your municipal authority for information on how to dispose of the appliance.
- Disconnect the appliance from the mains supply.
- Cut off the mains electrical cable close to the appliance and dispose of it.
- Remove the door catch to prevent children or pets from becoming trapped in the appliance.
3. PRODUCT DESCRIPTION
3.1 General overview

1 Control panel
2 Display
3 Heating element
4 Microwave generator
5 Lamp
6 Turntable shaft
3.2 Accessories
Turntable set
To prepare food.
Grill rack set
To grill.
4. CONTROL PANEL
4.1 Control panel overview
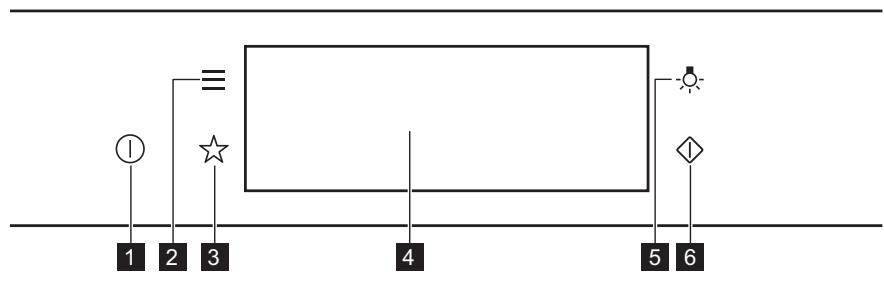
| 1 | ON / OFF | Press and hold to turn the appliance on and off. |
| 2 | Menu | Lists the appliance functions. |
| 3 | Favourites | Lists the favourite settings. |
| 4 | Display | Shows the current settings of the appliance. |
| 5 | Lamp switch | To turn the lamp on and off. |
| 6 | Microwave quick start | To turn on microwave function (1000 W and 30 seconds). |

Press
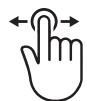
Move

Press and hold
Touch the surface with fingertip.
Slide fingertip over the surface.
Touch the surface for 3 seconds.
4.2 Display
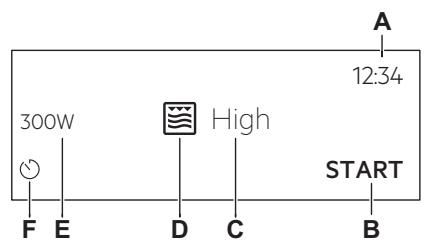
After turning on, the display shows the main screen with the function and the default grill intensity.
A. Time of Day
B. START/STOP
C. Grill intensity
D. Heating functions
E. Microwave power
F. Timer
Display indicators
| Basic indicators - to navigate on the display. | ||
| OK To confirm the selection / setting. | < To go one level back in the menu. | To undo the last action. |
| Sound Alarm function indicators - when the set time of cooking ends, the signal sounds. | ||
| The function is on. | STOP The function is on. Cooking stops automatically. | Sound alarm is off. |
| Timer indicators | ||
| To cancel the setting. | ||
5. BEFORE FIRST USE

WARNING!
Refer to Safety chapters.
5.1 Initial Cleaning
| Step 1 | Step 2 | Step 3 |
| Remove all accessories from the appliance. | Clean the appliance and the accessories only with a microfibre cloth, warm water and a mild detergent. | Place the accessories in the appliance. |
5.2 First connection
The display shows welcome message after the first connection.
You have to set: Language, Display Brightness, Key Tones, Buzzer Volume, Time of Day.
6. DAILY USE

WARNING!
Refer to Safety chapters.
6.1 How to set the function: Grill + MW, Grill
The appliance can make noises when using the function: Grill + MW. They are normal for this function.
| Setting the function: Grill + MW | ||
| Step 1 | Insert the low grill rack. | |
| Step 2 | Turn on the appliance. The display shows the default heating function. | |
| Step 3 | Press the symbol of the heating function to enter the submenu. | |
| Step 4 | Select the function: Press: OK. | |
| Step 5 | Select the grill intensity level. | |
| Function | Grill intensity level | |
| Lo | Low | |
| Hi | High | |
| Step 6 | Press: OK. | |
| Step 7 | Press: START. | |
| STOP - press to turn off the appliance. | ||
| Step 8 | Turn off the appliance. | |
Microwave power is limited to 500 W when you use the function: Grill + MW.
| Setting the function: Grill | |
| Step 1 | Insert the high grill rack. |
| Step 2 | Turn on the appliance. The display shows the default heating function. |
| Step 3 | Press the symbol of the heating function to enter the submenu. |
| Step 4 | Select the function: ☑. Press: OK. |
| Step 5 | Press: START . |
| STOP - press to turn off the function. | |
| Step 6 | Turn off the appliance. |
6.2 How to set: Microwave functions
| Step 1 | Turn on the appliance. |
| Step 2 | Press the symbol of the heating function to enter the submenu. |
| Step 3 | Select the microwave heating function and press: OK. The display shows: microwave power. |
| Step 4 | Set: microwave power. Press: OK. |
Step 5
Press: START.
STOP - press to turn off the function.
Step 6 Turn off the appliance.
The maximum time of microwave functions depends on microwave power you set:
| MICROWAVE POWER W | MAXIMUM TIME min |
| 100 - 500 | 59:55 |
| > 500 | 7 |
i
If you open the door, the function stops.
To start it again, press START.
6.3 How to use: Microwave quick start
Step 1
Press and hold:
The microwave runs for 30 s.
Step 2
To extend the cooking time:
Press on the run- Press +30 s.
ning time value to
go to the time
settings. Set the
cooking time.
The microwave can be switched on at any time with: Microwave quick start.
6.4 Heating functions
STANDARD
| Heating function | Application |
| Grill | To grill thin pieces of food and to toast bread. |
| Grill + MW | To cook food in a short time and to brown it. You can set 2 levels of grill intensity: low and high. |
| Microwave | Heating up, cooking, power range: 100 - 1000 W |
| Heating function | Application |
| Defrost | Defrosting meat, fish, cakes, power range: 100 - 200 W |
| Melting | Melting chocolate and but-ter, power range: 100 - 400 W |
| Reheat | Heating up pre-prepared meals and delicate food, power range: 300 - 700 W |
| Heating function | Application |
| Popcorn | Preparing popcorn, power range: 700 - 1000 W |
| Liquid | Heating up drinks and soups, power range: 800 - 1000 W |
7. CLOCK FUNCTIONS
7.1 Clock functions description
| Clock function | Application |
| Cooking time | To set the length of cooking. Maximum is 23 h 59 min. |
| End Action | To set what happens when the timer ends counting. |
| Time Extension | To extend cooking time. |
| Reminder | To set a countdown. Maximum is 23 h 59 min. This function has no effect on the operation of the appliance. |
7.2 How to set: Clock functions
| How to set the clock | |
| Step 1 | Turn on the oven. |
| Step 2 | Press: Time of Day. |
| Step 3 | Set the time. Press: OK. |
| How to set cooking time | |
| Step 1 | Choose the heating function. |
| Step 2 | Press: ⌒. |
| Step 3 | Set the time. Press: OK. |
| How to choose end option | |
| Step 1 | Choose the heating function. |
| Step 2 | Press: ⌒. |
| Step 3 | Set the cooking time. |
| Step 4 | Press: ⌒ ⌒ ⌒. |
| Step 5 | Press: End Action. |
| Step 6 | Choose the preferred: End Action. |
| Step 7 | Press: OK. Repeat the action until the display shows the main screen. |
| How to extend cooking time | |
| When 10% of cooking time is left and the food seems not to be ready, you can extend cooking time. You can also change the heating function. | |
| Press +1min to extend the cooking time. | |
| How to change timer settings | |
| Step 1 | Press: ⌒. |
| Step 2 | Set the timer value. |
| Step 3 | Press: OK. |
| You can change the set time during cooking at any time. | |
8. USING THE ACCESSORIES

WARNING!
Refer to Safety chapters.
8.1 Inserting accessories
Use only suitable cookware and material. Refer to "Hints and tips" chapter, Microwave suitable cookware and materials.
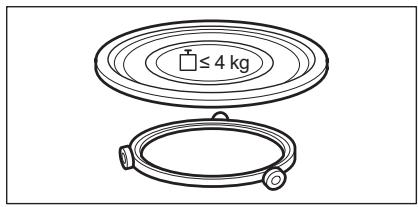
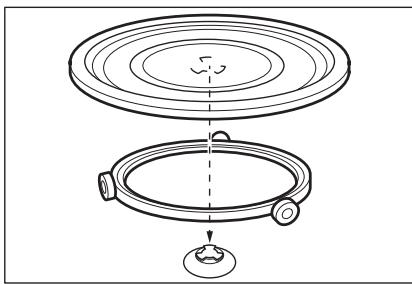
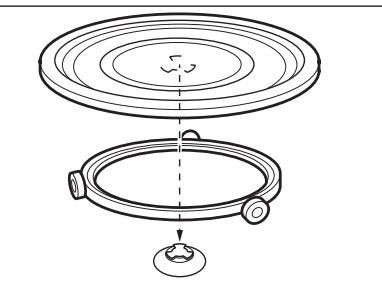
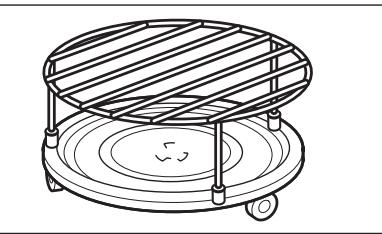
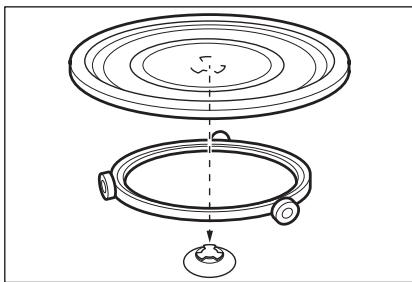
Turntable set:
Always cook food on the turntable set. Place the roller guide around the turntable shaft. Place the turntable glass on the roller guide. Use only the turntable set supplied with the appliance.
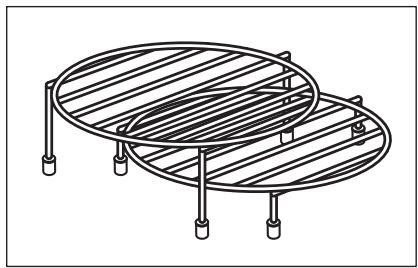
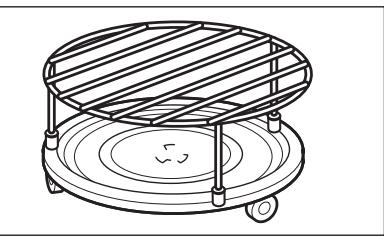
Grill rack set:
Place the grill rack with the silicon caps down on the turntable set.
9. ADDITIONAL FUNCTIONS
9.1 How to save: Favourites
You can save your favourite settings, such as the heating function, the cooking time or the cleaning function. You can save 3 favourite settings.
| Step 1 | Turn on the appliance. |
| Step 2 | Select the preferred setting. |
| Step 3 | Press: . Select: Favourites. |
| Step 4 | Select: Save current settings. |
| Step 5 | Press + to add the setting to the list of: Favourites. Press OK. |
- press to reset the setting.
- press to cancel the setting.
9.2 Function lock
This function prevents an accidental change of the heating function.
| Step 1 | Turn on the appliance. |
| Step 2 | Set a heating function. |
| Step 3 | - press at the same time to turn on the function. |
| To turn off the function repeat step 3. | |
9.3 Cooling fan
When the appliance operates, the cooling fan turns on automatically to keep the surfaces of
the appliance cool. If you turn off the appliance, the cooling fan can continue to operate until the appliance cools down.
10. HINTS AND TIPS
10.1 Cooking recommendations
i
The temperature and cooking times in the tables are guidelines only. They depend on the recipes and the quality and quantity of the ingredients used.
Your appliance may cook differently to the appliance you had before. The hints below show recommended heating functions and settings for cooking time for specific types of the food.
If you cannot find the settings for a special recipe, look for the similar one.
For more cooking recommendations refer to cooking tables on our website. To find the Cooking Hints, check the PNC number on the rating plate on the front frame of the appliance cavity.
10.2 Microwave recommendations
Let's cook!
Do not place the food directly on the turntable. Always use the microwave suitable cookware.
Place the cookware in the middle of the turntable.
Contact with too hot or too cold items can break the turntable.
Turn or stir the food halfway through the defrosting and cooking time.
Stir liquid dishes from time to time.
Stir the food before serving.
Cover the food for cooking and reheating.
Put the spoon to the bottle or glass when heating drinks to ensure better heat distribution.
Put the food into the appliance without packaging. The packaged ready meals can be put into the appliance only when the packaging is microwave safe (check information on the packaging).
Microwave cooking
Cook food covered. If you want to keep a crust cook food without a cover.
Do not overcook the dishes by setting the power and time too high. The food can dry out, burn or cause fire.
Do not use the appliance to cook eggs or snails in their shells, because they can burst. Pierce the yolk of fried egg before reheating it.
Pierce food with skin or peel several times before cooking.
Cut vegetables into similar-sized pieces.
After you turn off the appliance, take the food out and let it stand for a few minutes to allow the heat distribute evenly.
Microwave defrosting
Put the frozen, unwrapped food on a small upturned plate with a container below it, or on a defrosting rack or plastic sieve so that the defrosting liquid can leak out.
Remove defrosted pieces subsequently.
To cook fruit and vegetables without defrosting them first, you can use a higher microwave power.
10.3 Microwave suitable cookware and materials
For the microwave use only suitable cookware and materials. Use below table as a reference. Check the cookware / material specification before use.
| Cookware / Material | ||||
| Ovenproof glass and porcelain with no metal components, e.g. heat-proof glass | √ | √ | √ | √ |
| Non-ovenproof glass and porcelain without any silver, gold, platinum or other metal decorations | √ | X | X | X |
| Glass and glass ceramic made of ovenproof / frost-proof material | √ | √ | √ | √ |
| Ceramic and earthenware without any quartz or metal components and glazes which contain metal | √ | √ | X | X |
| Ceramic, porcelain and earthen-ware with unglazed bottom or with small holes, e.g. on handles | X | X | X | X |
| Heat-resistant plastic up to 200 °C | √ | √ | X | X |
| Cardboard, paper | √ | X | X | X |
| Microwave clingfilm | √ | X | X | X |
| Roasting film with microwave safe closure | √ | √ | X | X |
| Roasting dishes made of metal, e.g. enamel, cast iron | X | X | √ | X |
| Baking tins, black lacquer or sili-con-coated | X | X | √ | X |
| Cookware for microwave use, e.g. crisp pan | X | √ | X | X |
| Grill rack set | X | X | √ | √ |
10.4 Recommended power settings for different kinds of food
The data in the table is for guidance only.
| 800 - 1000 W | |
| Searing at the start of the cooking process | Heating liquids |
| 500 - 700 W | |||||
| Cooking vegetables | Cooking egg dishes | Simmering stews | Simmering rice | Heating one-plate meals | Defrosting and heating frozen meals |
| 300 - 400 W | |||||
| Melting cheese, chocolate, butter | Cooking / Heating delicate food | Continuing cooking | |||
| 100 - 200 W | |||||
| Defrosting bread | Defrosting fruit and cakes | Defrosting cheese, cream, butter | Defrosting meat, fish | Heating baby food | |
| 10.5 Cooking tables for test institutesInformation for test institutesTests according to IEC 60705. | Microwave functionUse wire shelf unless otherwise specified. | ||||
| Sponge cake | 600 | 0.475 | Turntable set | 5 - 7 | - |
| Meatloaf | 500 | 0.9 | Turntable set | 18 - 20 | - |
| Egg custard | 500 | 1 | Turntable set | 15 - 17 | - |
| Meat defrosting | 200 | 0.5 | Turntable set | 8 - 9 | - |
| Microwave Combi functionUse the function: Microwave grilling. | Use the low grill rack. | ||||
| MICROWAVE COMBI FUNCTION | POWERW | min | i | ||
| Potato gratin, 1.1 kg | 300 | low | 30 - 35 | - | |
| MICROWAVE COMBI FUNCTION | POWER W | min | i | ||
| Chicken, 1.1 kg | 300 | high | 30 - 35 | Put the meat in round glass container. | |
11. CARE AND CLEANING

WARNING!
Refer to Safety chapters.
11.1 Notes on cleaning
| Cleaning Agents | Clean the front of the appliance only with a microfibre cloth with warm water and a mild detergent. |
| Use a cleaning solution to clean metal surfaces. | |
| Clean stains with a mild detergent. | |
| Everyday Use | Clean the cavity after each use. Fat accumulation or other residue may cause fire. Clean the appliance ceiling carefully from residue and fat. |
| Do not store the food in the appliance for longer than 20 minutes. Dry the cavity only with a microfibre cloth after each use. | |
| Accessories | Clean all accessories after each use and let them dry. Before cleaning, wait until the turntable is cold. There is a risk that the turntable can break. Use only a microfibre cloth with warm water and a mild detergent. Do not clean the accessories in a dishwasher. |
| Do not clean the non-stick accessories using abrasive cleaner or sharp-edged objects. |
12. TROUBLESHOOTING

WARNING!
Refer to Safety chapters.
12.1 What to do if...
| The appliance does not turn on or does not heat up | |
| ?Possible cause | ?Remedy |
| The appliance is not connected to an electrical supply or it is connected incorrectly. | Check if the appliance is correctly connected to the electrical supply. |
| The clock is not set. | Set the clock, for details refer to Clock functions chapter, How to set: Clock functions. |
| The door is not closed correctly. | Fully close the door. |
| The fuse is blown. | Make sure the fuse is the cause of the problem. If the problem recurs, contact a qualified electrician. |
| The appliance Child Lock is on. | Refer to "Menu" chapter, Submenu for: Options. |
| Components | |
| ?Description | ?Remedy |
| The lamp is burnt out. | Replace the lamp, for details refer to "Care and Cleaning" chapter, How to replace: Lamp. |
| The turntable set makes noise. | There is food residue below the turntable set. |
12.2 How to manage: Error codes
When the software error occurs, the display shows error message.
In this section, you will find the list of the problems that you can handle on your own.
| Code and description | Remedy |
| F240, F439 - the touch fields on the display do not work properly. | Clean the surface of the display. Make sure there is no dirt on the touch fields. |
| F908 - the appliance system cannot connect with the control panel. | Turn the appliance off and on. |
12.3 Service data
If you cannot find a solution to the problem yourself, contact your dealer or an Authorised Service Centre.
The necessary data for the service centre is on the rating plate. The rating plate is on the front frame of the appliance cavity. Do not
remove the rating plate from the appliance cavity.
We recommend that you write the data here:
Model (MOD.)
Product number (PNC)
Serial number (S.N.)
13. ENERGY EFFICIENCY
13.1 Energy saving
Make sure that the appliance door is closed when the appliance operates. Do not open the appliance door too often during cooking. Keep the door gasket clean and make sure it is well fixed in its position.
When possible, do not preheat the appliance before cooking.
Keep breaks between baking as short as possible when you prepare a few dishes at one time.
Cooking with the lamp off
Turn off the lamp during cooking. Turn it on only when you need it.
14. MENU STRUCTURE
14.1 Menu
| Menu item | Application | |
| Favourites | Lists the favourite settings. | |
| Options | To set the appliance configuration. | |
| Settings | Setup | To set the appliance configuration. |
| Service | Shows the software version and configura- tion. | |
14.2 Submenu for: Options
| Submenu | Application |
| Light | Turns the lamp on and off. |
| Child Lock | Prevents accidental activation of the appliance. When the option is on, the text Child Lock appears in the display when you turn on the appliance. To enable the appliance use, choose the code letters in the alphabetical order. Access to the timer, the remote operation and the lamp is available with the option on. |
| Time Indication | Turns the clock on and off. |
| Digital Clock Style | Changes the format of the displayed time indication. |
14.3 Submenu for: Setup
| Submenu | Description |
| Language | Sets the appliance language. |
| Display Brightness | Sets the display brightness. |
| Key Tones | Turns the tone of the touch fields on and off. It is not possible to mute the tone for: ①. |
| Buzzer Volume | Sets the volume of key tones and signals. |
| Time of Day | Sets the current time and date. |
14.4 Submenu for: Service
| Submenu | Description |
| Demo Mode | Activation / deactivation code: 2468 |
| Software Version | Information about software version. |
| Reset All Settings | Restores factory settings. |
15. IT'S EASY!
| Before first use you have to set: | ||||
| Language | Display Brightness | Key Tones | Buzzer Volume | Time of Day |
| Familiarize yourself with the basic icons on the control panel and the display: | ||||
| ① ON / OFF | ≡ Menu | ☆ Favourites | ○ Timer | START / STOP |
| Start using the appliance | |
| MW quick start | Start Microwave at any time with default settings: 30 sec / 1000 W. Press: ⋅. |
| heating / cooking 100 - 1000 W | cooking / browning intensity: low / high | cooking / browning | heating liquids 800 - 1000 W |
| reheating 300 - 700 W | defrosting 100 - 200 W | melting 100 - 400 W | preparing popcorn 700 - 1000 W |
| Settings of the microwave | Microwave tips | |
| Microwave power: W | Maximum time min | Cover the food for cooking and reheating. Turn or stir the food halfway through the defrosting and cooking time. Put the spoon to the dish when heating liquids. Put the food into the appliance without packaging (only microwave safe). |
| 100 - 500 | 60 | |
| >500 | 7 | |
Start cooking
| Step 1 | Step 2 | Step 3 | Step 4 | Step 5 |
| ① - press to turn on the appliance. | ... - select the function. | sec - set the microwave power. | OK - press to confirm. | START - press to start cook- ing. |
Use quick functions to set the cooking time
10% Finish assist
Use 10% Finish assist to add extra time when 10% of the cooking time is left.
To extend the cooking time press +1min
16. ENVIRONMENTAL CONCERNS
Recycle materials with the symbol . Put the packaging in relevant containers to recycle it. Help protect the environment and human health by recycling waste of electrical and electronic appliances. Do not dispose of
appliances marked with the symbol with the household waste. Return the product to your local recycling facility or contact your municipal office.
Ensemble Plateau tournant:
1.1 Be3oNaChocTb DeTei n JIuC OrpaHnueHHbIMN BO3MOXHOCTaMn
CyueCTbyeTpck NOBpeKdEHHn np60pa.
-
IpynpexkdeHnOBpeKDeHnI n3MeHHeNcBeta 3MaJI.
-
He klaɪnte HeɪnocpeɪdCTBɛnHo ha ἀHɒ npɪbɒpa aʌlɒmɪnɪneByeH o φɔŋbʒy.
He 3aIINBaIte BOdy HEnocpeIcTBeHNO B rOpAynI npIbOp.
He xpaHnTe BnaXkHyo nocuDy n eDy B npi6ope nocne OKOHuaHnnprirotOBnEHH. - Co6IIOJaIte ocToPOxHocTb npn cn8rtn nIy uCTaHOBKe aKCEccyapOB.
I3MeHHe nBeta mAln INHepXkabeUe cTaIN He BnIeT Ha3ΦΦeKtNbHocTh pa6Otbl np6bopa.
Bcerda roTOBbTe npn 3aKpbToI dBepe npu6opa.
B cnyaee yctanobkn npnbopa 3a Me6eIbHoi naneJIbIO (Hanpimep, DBepcei) no3a60tBeTcB O TOM, YTO6bl BO BpeMra60tI np6bopa dBePca HN B KOEM cnyae He oka3bIbanaCb 3akpblToi. Tenno n Blara, o6pa3yUouneCra 3a 3akpblToI DBepceu nn Me6ebHoi naneJIbIO, MOrT npNBecTu K nocleduyocheMy nobpeXdEHHO npnbopa, MeCTA ero yCTaHOBKn IINn Iona. He 3akpbIbAIte DBepCu Me6eIN Do nONHoro OCTbIBAHn np6bopa nocne IcNOJIb3OBAHn.
2.4 YxOД n YnCTka

BHIMAHHE!
CyueTByeT pNCK NOpUeyHn TpaBmbl, BO3ropaHnI nn NobpeJeHn np6opa.
Tocne BkUHcHnHa HdCnIeep NoBHTCg rAaBHbI kPah C BblpaHHbIM pekmOM uYpOBHem INHTeHCNBOCTn rpnna NOyMOnuHnIO.
A. YctaHOBKa BpeMeHH CyTOK
B. NYCK/CTON
C. INHTEHCNBHOCTb rpnla
D. Pekimbl HarpeBa
E. MoiHocTb MIKPOBOJN
F. Taɪmep
HnDnKaToptb, OTO6paXaemblc Ha DnCnnee
OchOBhIe HnDnKaTOpbl-HabraZnaI NO DnCnJIeIO.
6.3ПриMuMeHHeNe:БыICTpbIy nyc MmKpOBoJHOBoI neu
War 1
Hakmte u ydepkuaBae: ①. MinkpOBoNHO8a o6paObKa 6ydet npoDOnKaTc8 30 cekyHd.
3aandaHoeBpemMOxHOuMHeHTbBOBpemPnpiroTOBneHnBJIIO6oMOMeHT.
8.ИСПОЛьЗOBAHNEДОПОЛHNTЕнБыIX ПИНHAДLEЖHOCTEN

BHIMAHHE!
Cm. rnaBb, coepkaune Cbeehnno texnke 6e3oNaChoctn.
8.1 YctaHOBka npHaJaIeKHOCTe
IcnoIb3yIteToJIbKO nOxOJyU NOcyU mATEpnaJIb. Cm. rnaBy «IpoJe3HbIe
coBeTbI》,pa3dien «Подхояша дЯ MнКрOBOLHOBОй obpa6OTkn kyxOHня nocуда n MaTePnAJIbI》.
Komnnekt Turntable:
Bcerda roToBbTe npOdykTbHa BpaZaIoUeMcnoDOnHe.
UctanobHTe polnKOByO HaprabJIOUy BOKpy BanaBpaaiooEoC noDOnHa. PomeCTte BpaaIOUsnc TcEKnHbNoDOn Ha polnKOByO HaprabNIOUyO.
IcnoJb3yIte TOnbKO KOMnJIeKT C BpaaIooImcMPOdIoHOM, NocTabJIeMbI BMecTe C npIbOpom.
Ha6op noctabok dЯ rpnj:
UctaHOBHTe NOCTaBky Iyra rpnna Hbpaauo- uINcRA POIOOH CINIKOOHBbIMN HOXkAMN BHn3.
9.3 BeHTnIaTOp oxJaXdHnA
Bo Bpemra p6oTbI np6bopa BeHTnJIaTOp aBTOMaTHueCKN BkHouaTeC7, YTo6bl OxJaKaTaB noBepXHoCTn np6bopa. Ppi
BbIKIIOUeHnnp6oBaBEHTINJTop npOIOJIkaET paOToTb DoTex nOp, noka np6oHneocTbIHET.
10. NOJ3HbIE COBETbl
10.1 Pekomehdaun no npirotoBneHHIO
①
PnBHeHHbIe B Tabmuax 3NaueHn TEmpeAtpyb I BpemeHn PnpiroTOBHeHn RaBJIaTc OpeHTnPOBOUHbIM. OHn 3aBNCrT OT peuNTa, a TaKKe OT KaueCTBa N KOJIuYeCTBa INCNoB3yEmbIX INHrpeJeHTOB.
Bau npib60 moket ottnuatbcs xapaKtepor npiroTOBnEHn OT npdeIyUeero. B peKoMeHdaunx HnKe npBO- dTcR peKoMeHdyEmble FyHKuHn HarpeBa n HaCTPOKn BpemeHN npiroTOBnEHn DnO npDeEneHbIX BnOB npOkyTob.
Ecnn haTn yctaHOBKnIy KOHKpeTHoro peeentHa ye ydaeTcN, noniHTne NOXOKn peeNT.
Bonee noPbO6HbIe peKoMeHNDaunOp No pRTOBOTNEHNO Bbl naTeB Ta bJnCax pRTOBOTNEHn PAu HA Na Hauem
Be6caTne. IaBbopa KNrHn peeETOB NOCMOTpNe To KOD n3dEINa Ha Ta bJnUKe C TeXNHueCKIMn DaHbIMn Ha nepeDnei pamKe BHyTpeHn KeMepbl npi6oba.
10.2 PeKoMeHndaun no NcNoJIb3OBAHnIO MmKpOBoJH
①Даразуготови!
He nomeuaTe npOdyTbI HenocpeDCTBeHHo Ha BpaaHouuCraNoDoH. Bcerda IcnoIb3ayTe nocUy, npiroHyIOIЯ 3KcPnyatauB MmKpOBJHOBOI neuN.
CTaBbTe nocuyu B ceHTp BpaauoioeOcnoDOna.
BcneCTBnKe KOthaTc a CnIuKOM ropyIMN IIN CInuKOM XOnOHybIM NpeDMeTaMn IOdON MOKeT TpeChYtB.
IpebeBaIbIe IINI nepeMeIbIe TnpOyKtI IO NCTeHnIOJOBInbI BpeMeHN npriTOBJIeHn IIN pa3MOpaxuBaHn.
Bpemr O T Bpemn IomEwBaIe XuKne 6JIouda.
IpepeMeuBaIte nIu nepeI noaueK cTOny.
Bo Bpem npirotoBleHn npa3orpeBa hakpbBaIte nuiy.
Pn HarpBe HAnITKOB DJIyUyUHeHn paCnpeDeIeHn TepNa IIOXKeTe B 6ytblKy nIcTcAkan IOxOJaYIO DJIa MKNpOBOLHOBOI Neu loKky.
Pomecnte npoDyKtB I npi6op 6ez ynaKOBKn. TOTObIe 6nIOda MOxHO NOMEuTaB B npi6op B ynaKOBKe TOnbKO ecn ynaKOBka npiroHa dJa nCNoJb3ObaHnB npi6ope (CM.CBeDeHnHa ynaKOBKe).
PnirroTOBJIeHne B MmKpOBoJHOBOI neu
HaKpbIbAaTe npOdykTb I XoJe npnroTOBNeHnE. Ecn Tpe6yETc co3daTb KOpouky, roTObBe, He HaKpbIBa.
He neperepeBaTe 6IIOda, yCTaHaBInBa
CINUKOM BbICOKyIO MOUHOCTb IN BpEmr.
PpoDyKtBI MOrYT NOTeRPTB Bnary, croPeTb
HJN CTaTB pInuHHoN IOxapa.
He nCnoJIb3yIte npIb6p IJn npIroTOBneHnaIaB CCKOpJLyne I MOJInOcKOB/yJInTOK, TAK KAc OHN MOrY B3PbIBaTBcR. IpeEi pa3OrpeBOM IpOTbKaIte KeJTKB YmHnIe.
IpeepnpiroTOBneHemCdeNaTe B KOxNue IIN KOKype npOdyKTOB HeCKOJIbKO OTBepCTn.
Hape3aIte OBOUH Na KycOuKN CxOJHOro pa3mepa.
Iocne BbIKJIOUeHn Ipn6opa BbIHbTe npOyKtI N OCTaBBTe Ha HeCKoJIbKO MmHYT dIpaBHomepHoropacPpeJeHn Tennla.
PazMopaxnBaHne B MmKpOBoNHOBOn neu
IonoKnte 3amopOKeHHbHepa3BepHyTbI npOyKT B He6oNbWOn nepeBepHyToI TaPeNke B KOHTeHep,HaNoDHoc dIra pa3MopaxKuBAHn IIN B pINaCTIKOBoe CNTO, YTObl o6pa3yUOaJcRpn pa3MopaxKuBaHn KJNDKOCtB MOrna CBO6OdHO CTeKaTb.
I3BVeKaIe I3 npi6opa pa3MOpO3nBUniecra npoDyKtbl.
10.3 Kyxohna nocya n MaTePnaIbI, NOxOJaIe IJIy NcNoJIb3OBaHnB MmKpOBoJHOBOI neu
ДлпnpiroTOBHeHnC MmKpOBONHamN IcNoIb3yIte ToIbKO IOdXoJyO Nocdy IMatepnalbl. BocnoIb3yIteCbIЯ CnpaBkn Ta6JIneH HIXe.
IpeepnOJIb3OBAHnEM KxOHHO Nocydb/MatepnaIOB CbepaTecb Cnx CTeuΦkaUnei.
10.4 PeKOMeHIOBaHHbIe ypOBHm MOUHOCTn IJIpa3JIuHbIX BnIOB npOdyKTob
OuIaIeTe IaTHa MraKIM MOIOUcIM CpeDCTBOM.
ExeHHeBHOe nCnOJIb3OBaHHe
BHytpReHHIO KAMEpy Heo6xoJIMIO MblTb Nocne kXzDOrO IcNOnb3OBaHnI. HakoPHe Jxpa IIN DpyrNIX OTNoKHeJMO MeKT npBecTeK N BO3pArOpAnHO. TuaTeBnO OuHsAaIte NOtJOLK pNb6opAOT cTAtKOB NIIuN Xkpa.
He depknte npdyktb IB np6ope doJbwe 20 MNHy.T. Pocne kajdoro nCOnIb3ObaHnKaMepy cneyuT Hacyo npotnpaTB ToNko TkaHbIO mKpOph6pbI.

Akecccyapbl
OuICTe BCE akceccyapbl nocne kaxdoro icnoIb3oBaHnI naaiTe IM BlycoXHyb. Npeed OcHTKo ndoQJntde, noka BpaauOuichm ndoHn He octbHET. BpaauOuichm ndoHn MOKET TpeCHytB. IcnoJIb3yIte ToJIbKO tKaHb N MkPoOΦmbpl, cMOyeHHyo B tenNoi BoDE C mKIMM MOUoiM cpeCTbOM. He Moite Akceccyapbl b noCyDomoeueHm MaunHe.
He nCnoJb3yIte IaI MaIbTbA kCeccCyapOB C aHTnIPnurapHbIM NOKpbITnEM a6pa3NHBle YNCTaIe CpeDCTBa IINI pIpeDMtBc O COTpbIM KpaAM.
12. ПОИСК И YYSTРАЕНUE HENСПAPВHOCTEД

BHIMAHHE!
Cm. rnaBb, coepkaune CbeHnno TeHNKe 6e3oNaCHOCTn.
12.1 YuTo DeJaTaB, ecJn...

Pp6op He BkIIOuaeTc nn He HArpeBaTeTc

Bo3mOxHna npuHa
Pnp6p H ne poknOeH K 3IeKtpoNtAHHIO, nIIN POKUChHe NpOn3BedeHO HeBepHO.
He yctaHOBneHO BpeM.
Дерца He зakpbita kak cneуT.
Cpa6oTan npedoxpahnteJIb.
Pπp6op 3aunTa dTeB BKJIIOueH.

Cnocob yctpaenn
PpOBeBte npaBnIbHocTb nOdkJIuOeHn npi6opa nHaIyHe HapJxKeHne B cTeN.
UctahOBInTe Yacbl,NoDpo6HcTn CM.B FyHKuIN YacOB rnaBe «KaK NaCTpOnTb: FyHKuIN YacOB.
TOnHocTbO 3aKpOte DBepeU.
IpoBepbTe, He yBaJIeTcT Ln npEdoXpaHntTe b npUHNo HcENpNaBHOCTN. B cHyae NOBtOPHOro BO3NHKOBeHHa HcENpPaBHOCTOn 6paTnTEcK KBaINΦuNPOBaHOMy 3NeKTpNKY.
Cm. rIaBy «MeHIO», NOdMeHIO: OIuzn.
PnB Bo3MOxHocTn He npOu3BOoHnTe
npEaBapnteIbHbI pa3OgpeB np6opa nepeD
pnpuroBJeHnEM.
Bo Bpem npirotoBneHn HeckoJbKnx 6IIOd 3a pa3 cBOInTe nepepbIBbMekdy BblNeuKOJ/ Japkoi K MmHmMy.
14. CTPYKTYPEPA MEHIO
14.1 MeHIO
2. BEZPEČNOSTNÉ POKNY
2.1 Montáz

VAROVANIE!
Tento spotrebičmöze nainstalovat'len kvalifikovaná osoba.
8.1 BCTaHOBJIeHHaKceCyapiB
BnKopncTobynte Iiue BIDNObiHn nocyd imatepiann. DnB. po3diN «Iocyd imatepiann, 10PiXoJrTa Iy mIKPOxBnJIb» rIaBN «Iopadn Ta peKOMeHdauii
Поворотнистл:
3aBxdi roTyTe iKy Ha nobOpOTHomy cTOnIKy.
PomictiHnapablanoyn polnk HbKOHO bana npNBOy. Po3mictiB nobOpOThe cKnO Ha nappabIIOHYOMy polnyk.
BVKopriCTOBuyTe JInse ToT nobOpOTnH cTOnIK, 10 noCTaayctbCBy B KOMPNeKTI 3 npINaDM.
KoHcTpykuipewiTknIaIrpui:
IOCTABTE NiDCTABKy rpnIa Ha NOBOPOTNI cTOnIK TAKIM YHOM, a6b CnIkiKOHOI hAcAkn 6yIi CNpRA MOBAHI DOHN3Y.

9.ДОДATKOBIФУHKUII
9.1Якзберети:Улоблесн.
Bn moxete 36epiratn cboi ynl0bnehi haIaIyBaHHa, k-OT yHKcij I harpiby, yac npiroTyBaHHa afo yHKciouHenn. MoXHa 36epeTn Tpr yIIObnehi HaIaIyBaHHa.
9.3 BeHTnIaTOp OxIoJxKeHHa
Пичacpo6obTu npuJaIy BeHTnIaTOp OxIOJKeHHA bOTMaTHUHO BMKAeTbCЯДЯ NiIDTpIMKn IOBepXOHb npOXOJOnHMn.JaKuo
BIMKHyTN pRnlaD, BENTNJTOp
PpOIOBxkyBaTMe PpaQOBaTN, DOKN pRnlaD
He OXJOnHe.
10. ПОРАДИ I PЕКOMEHДALI
10.1 Pekomehdauci odo npurotybaHHa
i
Y tabnqyx yka3aHO opiEHTOBHI 3naueHnemnepaTyra Yacy npiroTyBaHH.BoH 3anexKaTB bID peenTy, a TAKOX JKOCTI Ta KjIbKOcTI iHRpeiDHTIB, 0O BVKOPNCTOBYOTcbr.
V BAVOMU pnpnadi npnrtoTybaHHa CTpAB MOKE bIip3HmCEB IINpnoToYbAHHa y nopeDmMoEJI. HabeDeHI NHeKBE KBA3iBKN MCTB peKoMeHDoBaHl HalaWtYbAHn TEMnePaTpy, Yacy roTybaHHa Ta nOLOKeHHa nOIIuI dIy NEHN TINN pNDQkTB.
Якwoи He moxe 3naTn HanaTuBaHnДЯпевoro peuenty, ckopnstayTeCra HanaTuBaHnMn Дя aHaIorichoro peuenty.
DodatKoB peKOMeHdauii zoO nprirotybaHHn iXi HabeDeHb Tabniux roTybaHHn Ha hawomy Be6-caTi. 3naTn nopadu zio roTybaHH, 3bIPTeec3 Homepom PNC ha Ta5nucj3 texhuiHm DaHmPi, po3miueHn ha nepednn pami kamepn npinay.
10.2 PekomeHdacii 0dopekmy Mikpoxbnilb
①Даразуготувац!
He knaiItb npOdykTn 6e3nocepEdhBo Ha nobOpOTHn CTOnIK. 3aBxdi KOpNCtuyTeCe r nocyDom, pNdaTHmD nIy BnKOpNCtaHHa y mikpOxBnBObi nevi.
IocTaBTe nocyd y ueHtp nobOpOTHOcToJIka.
Yepe3 KOHTaKT i3 3aHaTTo rapAmm a60 3aHaTTo XOJIoDNHM NpeDMeTaM NOBOPOTHn CTOnIK MOKe NOJaMaTnCra.
Ipebepehntb a6o nepemiwaTe ctpaby nicn3aBepweHHn noIOBHNuacypO3MOPOKyBaHHn I roTyBaHHn.
Pomiiyte piinu hac BiD acy.
PomiiataTe cTpaBy neped noaJeO.
HakpmbaIte ctpaby nID yac npiroTybaHHn po3irpiBaHHn.
IocTaBTe IoxKyu npAky a6o ccknky npi nirdpirbAHn Hanoiv 3a6e3neueHH KpaUoro po3noDiny tenna.
PoklaɪtB npOdykTn B npɪlaɪd 6e3 ynaKOBKn.
Φacobani roTOBI cTpaBn MOxHa CTaBNTn B npɪlaɪd, nɪshe kʌŋo iXhry naKOBka
πiXoDntbДЯВNKOpNCTaHHy y MIKPOXBnIbOBI neyi (nepeBipTe iHΦopMaζio Ha yNaKOBci).
TOrTuBaHn3 BnKOpNCTaHHM MIKPOXBnIb
TOrTuIe CtpaBnPiKpUuKoH. JaKIo BxOChTe 36epertN cKOpHky, rOtuIe CtpaBy 6e3 KpUuKn.
He neperpiBaTe cTpaBn, BCTaHOBbUsh 3aHaTObTO BnCOky nOtJxHicThb i Yac. Ika MoKe Miczamn nepecoxHyTu, NiDropitu a6o 3aropitcra.
He BnKOpncToBvIe npnlad nI npriroTyBaHHraeYb y ukapayni a60 paBnIKIB y MyJnx, ockJIbKn icHye 3arpo3a ix po3pnbAHn. IpokoJItB kOBtOK reHi nepeid ii niirpibAHnM.
Iepw hix rotybaTn npodykTn 3i shkipkoIO, cnid kijbka pa3IB npokojIoTn ix.
Oboci cIi n hapizatn ha oHaKoBi 3a po3mipom uMaTkn.
IicnBvIMKHeHn npuNaDy BnMItb cTpaBy Ta daTe iN NoCToTn DeKiIbKa XBNiNH, 06 TeNIO pO3NoDiJInIOcR pIBHomipHO.
Po3MopoxyBaHHa 3 BnKOpNCtAHm MIKPOXBnJIb
BnKOpNCtOBynte KOM6iHOBaHny peWitKy, JaKIO He 3a3NaueHo iHne.
12. YCYHEHHI PPOBJEM

NONEPEDJEHHRA!
IINB. po3diin 3 iHΦopMauiéu 0oTo texhikn 6e3neKn.
12.1ДiВ pa3i BnHnKHeHH npo6JIem
BmKHiTb lammy nd yac roTyBaHHa.
BmkaIe II Inse 3a notpe6n.
14. CTPYKTYPEPA MEHIO
14.1 MeHIO
| Пун=kмю | Доратok |
| Улоблие | Перек улобlenixи налштуваь. |
| Опци | Налштуваня конфíгуразцп рраладу. |
| Налштуваня | Установka |
| Сер bic |
14.2Пдменидя:Опцii

- 067a 6e3oNaChocT
- INHCTPYKUIN 3A BE3OPNACHOCT
- 2.1Инстацья
- BHIMAHHE!
- BCEKNДHEBHA YNOTPEBA
- BHIMAHNE!
- KaKa Da 3aJaTe Te ФункцяТа:Грп + MB,Грп
- CTPYKTPYA HA MEHIOTO
- MeHIO
- US DELS ACCESSORIS
- AVIS!
- Insercio d'accessoris
- Welcome to Electrolux! Thank you for choosing our appliance.
- CONTENTS
- SAFETY INFORMATION
- Children and vulnerable people safety
- General Safety
- SAFETY INSTRUCTIONS
- Installation
- WARNING!
- Electrical connection
- Use
- Care and cleaning
- Internal lighting
- Service
- Disposal
- PRODUCT DESCRIPTION
- General overview
- Accessories
- CONTROL PANEL
- Control panel overview
- Display
- BEFORE FIRST USE
- First connection
- DAILY USE
- How to set the function: Grill + MW, Grill
- How to set: Microwave functions
- How to use: Microwave quick start
- Heating functions
- STANDARD
- CLOCK FUNCTIONS
- Clock functions description
- How to set: Clock functions
- USING THE ACCESSORIES
- Inserting accessories
- Turntable set:
- Grill rack set:
- ADDITIONAL FUNCTIONS
- How to save: Favourites
- Function lock
- Cooling fan
- HINTS AND TIPS
- Cooking recommendations
- i
- Microwave recommendations
- Let's cook!
- Microwave cooking
- Microwave defrosting
- Microwave suitable cookware and materials
- Recommended power settings for different kinds of food
- CARE AND CLEANING
- Notes on cleaning
- TROUBLESHOOTING
- What to do if...
- How to manage: Error codes
- Service data
- ENERGY EFFICIENCY
- Energy saving
- Cooking with the lamp off
- MENU STRUCTURE
- Menu
- Submenu for: Options
- Submenu for: Setup
- Submenu for: Service
- IT'S EASY!
- Use quick functions to set the cooking time
- ENVIRONMENTAL CONCERNS
- Ensemble Plateau tournant:
- Be3oNaChocTb DeTei n JIuC OrpaHnueHHbIMN BO3MOXHOCTaMn
- YxOД n YnCTka
- HnDnKaToptb, OTO6paXaemblc Ha DnCnnee
- 6.3ПриMuMeHHeNe:БыICTpbIy nyc MmKpOBoJHOBoI neu
- 8.ИСПОЛьЗOBAHNEДОПОЛHNTЕнБыIX ПИНHAДLEЖHOCTEN
- YctaHOBka npHaJaIeKHOCTe
- Komnnekt Turntable:
- Ha6op noctabok dЯ rpnj:
- BeHTnIaTOp oxJaXdHnA
- NOJ3HbIE COBETbl
- Pekomehdaun no npirotoBneHHIO
- ①
- PeKoMeHndaun no NcNoJIb3OBAHnIO MmKpOBoJH
- ①Даразуготови!
- PnirroTOBJIeHne B MmKpOBoJHOBOI neu
- PazMopaxnBaHne B MmKpOBoNHOBOn neu
- Kyxohna nocya n MaTePnaIbI, NOxOJaIe IJIy NcNoJIb3OBaHnB MmKpOBoJHOBOI neu
- PeKOMeHIOBaHHbIe ypOBHm MOUHOCTn IJIpa3JIuHbIX BnIOB npOdyKTob
- ПОИСК И YYSTРАЕНUE HENСПAPВHOCTEД
- YuTo DeJaTaB, ecJn...
- Pp6op He BkIIOuaeTc nn He HArpeBaTeTc
- Bo3mOxHna npuHa
- Cnocob yctpaenn
- CTPYKTYPEPA MEHIO
- BEZPEČNOSTNÉ POKNY
- Montáz
- VAROVANIE!
- BCTaHOBJIeHHaKceCyapiB
- Поворотнистл:
- KoHcTpykuipewiTknIaIrpui:
- 9.ДОДATKOBIФУHKUII
- 9.1Якзберети:Улоблесн.
- BeHTnIaTOp OxIoJxKeHHa
- ПОРАДИ I PЕКOMEHДALI
- Pekomehdauci odo npurotybaHHa
- PekomeHdacii 0dopekmy Mikpoxbnilb
- ①Даразуготувац!
- TOrTuBaHn3 BnKOpNCTaHHM MIKPOXBnIb
- Po3MopoxyBaHHa 3 BnKOpNCtAHm MIKPOXBnJIb
- YCYHEHHI PPOBJEM
- NONEPEDJEHHRA!
- 12.1ДiВ pa3i BnHnKHeHH npo6JIem
- 14.2Пдменидя:Опцii
Brand : ELECTROLUX
Model : EVMSE08X
Category : Microwaves