
KD8121 - Cooking TEFAL - Free user manual and instructions
Find the device manual for free KD8121 TEFAL in PDF.
| Brand | Tefal |
| Model | KD8121 |
| Product type | Multifunction cooking appliance |
| Power supply | Electric mains, grounded plug |
| Power | Not specified (estimated ~800-1200 W) |
| Dimensions (L x W x H) | Approx. 30 x 21 x 15 cm (compatible with 30x21 cm molds) |
| Weight | Approx. 2-3 kg |
| Functions | 5 automatic programs (cakes, individual, molten core, meringues, chocolate melting/dessert cream) + manual program with temperature and time adjustment |
| Display | Digital display with program selection, time and temperature |
| Included accessories | Non-stick aluminum mold, PROflex silicone molds (muffins, mini cakes), support, grid, glass jars with lids (depending on model) |
| Mold compatibility | Tefal PROflex molds (30x21 cm), Crispy Bake and Crea Bake compatible |
| Safety | Automatic shutdown at end of program, hot surfaces, do not immerse, do not use without molds |
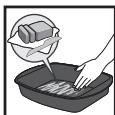
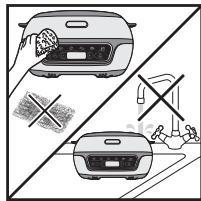
| Maintenance | Clean with sponge and dish soap. Aluminum and steel molds: dishwasher safe (except silicone). Do not immerse the appliance. |
| Repairability | Repair by approved center. Spare parts available (molds, etc.) |
| Warranty | Standard manufacturer warranty |
| Manual | 149-page user manual available online |
Frequently Asked Questions - KD8121 TEFAL
User questions about KD8121 TEFAL
0 question about this device. Answer the ones you know or ask your own.
Ask a new question about this device
Download the instructions for your Cooking in PDF format for free! Find your manual KD8121 - TEFAL and take your electronic device back in hand. On this page are published all the documents necessary for the use of your device. KD8121 by TEFAL.
USER MANUAL KD8121 TEFAL
- Safety Instructions 23
Description 27
Using the Moulds 28
Product Presentation 30
Preparation 30 - Installation and Connection 30
Presentation of the Programs 31
A.Choosing the Cooking Program 32
B.Using an Automatic Program 32
C.Using the Manual Program 33
D.End of a Program (Automatic or Manual) 34
E. Extend a Cooking Cycle (Automatic or Manual) 34
F.Relaunch the Same Program 35
G.Relaunch a Different Program 35 - Modifying the Time and the Program Under Way 36
- Maintenance and Cleaning 37
Cooking Guide 38 - Troubleshooting to achieve great results 39
- Troubleshooting Guide 40
Safety Instructions
IMPORTANT PRECAUTIONS
Product use, maintenance, cleaning and installation: for your safety, please read through all the sections in these instructions and pay attention to the corresponding pictograms.
This appliance is designed for indoor domestic household use only. In case of professional use, inappropriate use or failure to comply with the instructions, the manufacturer accepts no responsibility and the guarantee will not apply. This appliance should not be used outdoors. This appliance is intended for domestic household use only. It is not intended to be used in the following applications, and the guarantee will not apply for:
- Staff kitchen areas in shops, offices and other working environments;
- Farm houses;
- By clients in hotels, motels and other residential type environments;
- Bed and breakfast type environments.
Remove all packaging, stickers and various accessories from both the inside and outside of the appliance.
This appliance is not intended to be used by those (including children) with reduced physical, sensory or mental capabilities, or lack of experience and knowledge, unless they have been given supervision or instruction concerning use of the appliance by an adult responsible for their safety. Supervise children to ensure they do not play with the appliance or use it as a toy.
Never leave the appliance unattended when in use.
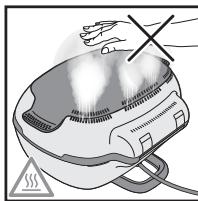
The temperature of accessible surfaces can be high when the appliance is in operation.
Do not touch hot surfaces of the appliance.
This appliance is not intended to be operated by means of an external timer or separate remote-control system.
Unwind the power cord fully before use.
If the supply cord is damaged, it must be replaced by the manufacturer, its service agent or similary qualified persons in order to avoid a hazard.
Do not use an extension lead. If you accept liability for doing so, only use an extension lead which is in good condition, has a plug with an earth connection and is suited to the power rating of the appliance. Take all necessary precautions to ensure that no one trips over the cord.
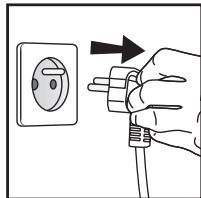
Always plug the appliance into a socket outlet with an earth connection.
Check that your mains supply voltage matches that indicated on the appliance data plate.
Never immerse the appliance or its power cord in water or any other liquid.
This appliance can be used by children 8 years of age and older and by persons with reduced physical, sensory or mental capabilities or lack of experience and knowledge if they have been given supervision or instruction concerning use of the appliance in a safe way and understand the hazards involved.
User cleaning and maintenance must not be carried out by children, unless they are over 8 years of age and under supervision.
Keep the appliance and its cord out of reach of children younger than 8 years old.
- If parts of the appliance should catch fire, never try to extinguish flames with water. Disconnect the appliance and smother the flames with a damp cloth.
- WARNING: Do not heat or preheat the product unless the cooking moulds are inside it.
Do
- Carefully read through these instructions and keep them to hand. They apply to all the different versions of this appliance, depending on the supplied accessories.
- In the event of an accident, immediately run cold water over the site of the burn and, if necessary, call a doctor.
- Position the power cord carefully to be free of working areas, whether an extension is used or not.
- Cooking smoke may be dangerous for animals with particularly sensitive respiratory systems, such as birds. We recommend that bird owners keep their birds away from the cooking area.
Always keep the appliance out of reach of children. - Prior to first use, wash the aluminium cooking mould or the steel moulds and wipe it using a soft cloth.
- If you are using the aluminum mould or the steel moulds *, butter your moulds before putting the preparation inside for better release.
- Prior to first use, wash the silicone moulds or the steel moulds, then wipe them using a soft cloth.
- Check that the cooking moulds have been properly cleaned after use.
- To avoid damaging the baking molds, use them only on the device for which they were designed (e.g. do not place them in the oven, on the hob or on a hot plate).
- Ensure that the cooking moulds are stable and correctly positioned on the appliance base. Only use cooking moulds provided or acquired from the authorised service centre.
- To preserve the cooking mould coating, always use a plastic or wooden spatula.
- Only use the accessories provided with the appliance or those purchased from an authorised service centre. Do not use them with other appliances.
- Use only PROflex Tefal, Crispy Bake Tefal and CreaBake* Tefal molds indicated as compatible.
- Use oven gloves to remove the moulds and the support frame when cooking is completed.
- When melting chocolate, use the Cake Factory non-stick aluminium mould or the PROflex chocolate melting mould (if included).
Do not
- Do not use the appliance outdoors.
- Never transport the product when it is hot or while in operation.
- Never plug the appliance in when it is not in use.
- To prevent the appliance from overheating, do not place it in a corner or against a wall.
- Never place your appliance directly on a fragile surface (e.g., glass table, tablecloth, varnished furniture, etc.) or a surface such as a plastic tablecloth.
- Do not place the appliance on or near slippery or hot surfaces, nor let the cord hang above a heat source (e.g., cook top, gas stove, etc.)
- Never place the appliance underneath a piece of furniture attached to a wall or a shelf or
beside flammable materials such as blinds, curtains or drapes.
- In order to prevent damage to the cooking surface (non-stick coating), never use a scouring pad or scouring powder.
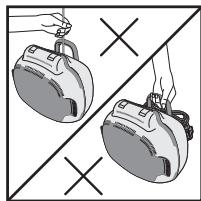
- Do not carry the appliance by the handle or the metal wires.
- Never use the appliance when empty.
- Do not place hot cooking moulds under water or on a fragile surface.
- To preserve the non-stick qualities of the coating and the silicone, do not heat the appliance when empty.
- The cooking moulds should never be handled when hot without oven mitts.
- Do not cook food in bags or parcels ("en papillote").
- To avoid damage to your appliance, never flambé food on it.
- Never put aluminium foil or any other object between the cooking moulds and the food to be cooked or between the cooking moulds and the elements.
- Do not cut directly on the cooking moulds.
- Do not heat the appliance unless the reflector and a cooking mould are inside it.
- Never heat or cook while in the "appliance open" position.
- To preserve the silicone's non-stick qualities, we recommend refraining from washing it in the dishwasher.
- To ensure the proper operation of your appliance, when filling the moulds, do not exceed the proportions indicated.
- Do not oil, butter or grease the silicone moulds.
- In case of an incident resulting in the breaking of a glass jar during the making of a recipe, the food in preparation should not be consumed and should be thrown away.
Glass jars should not be placed in the freezer. Do not put them in the microwave. Do not use a blowtorch. - Do not pour liquid at very high temperatures into the glass jars.
Recommendations/Information
- For your safety, this appliance complies with the applicable standards and regulations (directives regarding low voltage appliances, electromagnetic compatibility, materials in contact with foodstuffs, the environment, etc.).
- Thank you for choosing this appliance, designed for household use only.
- Our company reserves the right to change the characteristics or components of its products at any time, in the consumer's interest.
- When using the appliance for the first time, a slight odour and/or smoke may be emitted during the first minutes of use.
- Any solid or liquid foods that come into contact with parts marked with the × logo must not be consumed.
- To clean the cooking moulds, use a sponge, some hot water and some washing-up liquid.
- The element must not be washed. If it is really dirty, wait for it to cool completely and rub with a dry cloth.
Environment

Take part in environmental protection!
① Your appliance contains a number of recoverable or recyclable materials.
Leave it at a collection point for processing.
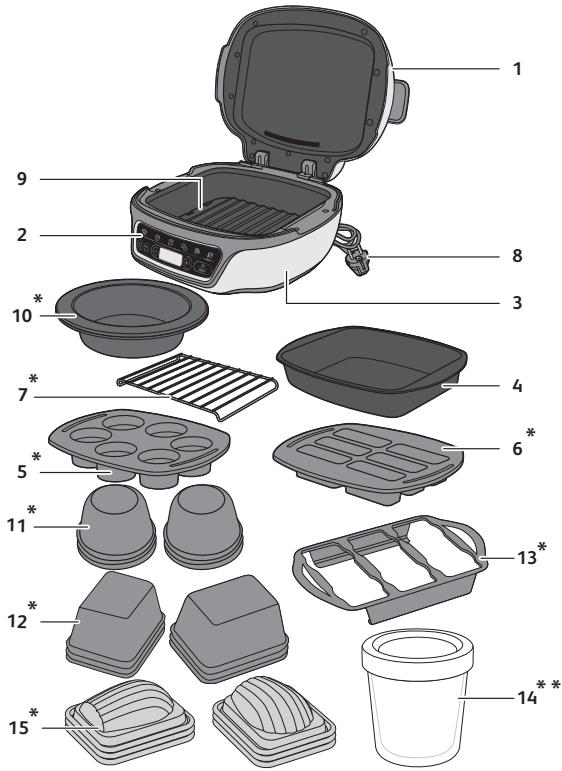
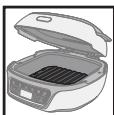
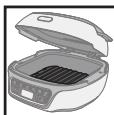
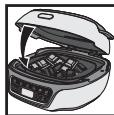
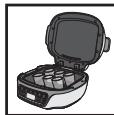
Description
| 1 | Lid | 9 | Black reflector |
| 2 | Control panel | *10 | PROflex silicone chocolate melting mould (depending on model) |
| 3 | Appliance base | ||
| 4 | Non-stick aluminum bowl | *11 | Muffin moulds made of steel |
| 5 | Silicone PROflex 6-muffin mould | *12 | Mini cake moulds made of steel |
| 6 | Silicone PROflex 6-mini-cake mould | *13 | Six-mould holder |
| 7 | Support grid for some PROflex moulds and for melting chocolate* or dairy desserts / moussees* | **14 | Glass pot + plastic lids Madeleines moulds made of steel |
| 8 | Power cord | **Depending on model, included or sold as additional accessories (pack of 6 with name "Cake Factory"). | |
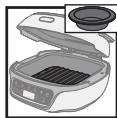
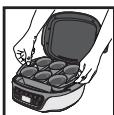
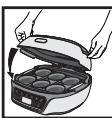
Using the Moulds
To ensure the proper operation of your appliance, when filling the moulds, do not exceed the proportions indicated.
Silicone PROflex Mould*
The Cake Factory is only compatible with moulds belonging to the Tefal PROflex range, dimensions 30 × 21 cm.
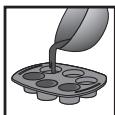
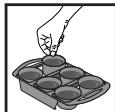
Pour into the mould
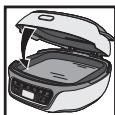
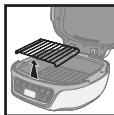
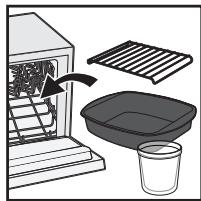
Remove the aluminium bowl
Ensure that the black reflector is properly in place and attached to the bottom of the appliance
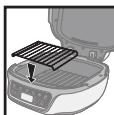
Place the grid on the reflector
Place the mould
Close
- To cook canelés or for any use of a mould taller than 4.5cm , directly place the PROflex mould in the Cake Factory without the support grid.
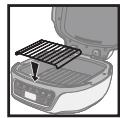
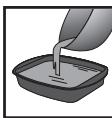
Non-stick aluminium bowl
Grease the bowl
Fill the bowl
Remove the grid*
Ensure that the black reflector is properly in place and attached to the bottom of the appliance
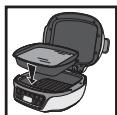
Insert the bowl
Close
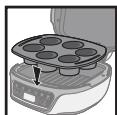
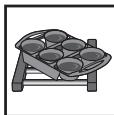
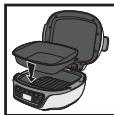
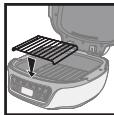
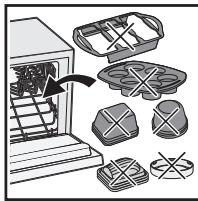
Steel moulds*
Fill the moulds up to 3/4.
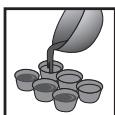
Pour into steel moulds

Place the moulds into the holder
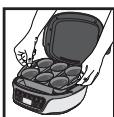
Put the holder into the device
Close
Mould shapes can be mixed if each of them respects same recipe and same quantity.
*Depending on model
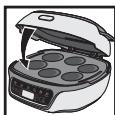
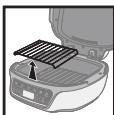
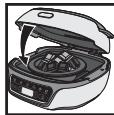
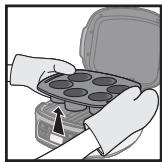
After cooking
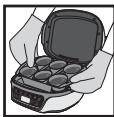

Allow to cool for a few minutes before removing from the mould.
Remove the support frame from the cake factory with oven gloves
Place the support frame on a surface suitable for heat
Remove the moulds from the support frame one by one
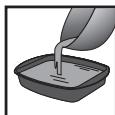
Melting chocolate*


Place the chocolate in the aluminium mould
Remove the grid
Close
Put chocolate in a suitable container
Place the grid on the reflector
Close
To melt chocolate, use the Cake Factory non-stick aluminium mould or the PROflex chocolate melting silicone mould (if included).
Individual dairy desserts/mousses\*\*\*
Do not put the lids on the glass pots during cooking.

Pour into the glass pots
Put the aluminium mould into the device
Put the glass pots in the aluminium mould

Close
Once the baking process is finished, remove the dish and the glass pots from the Cake Factory, still hot, with the help of a potholder and leave to cool for 10 minutes before putting the lids on. Let the jars cool down for 2 hours at room temperature before putting them in the refridgerator.
Dairy desserts/mousses to share*
Pour into the aluminium mould
Put the aluminium mould into the device
Close
*Depending on model
**Depending on model, included or sold separately (in a pack of 6, with mention "Cake Factroy").
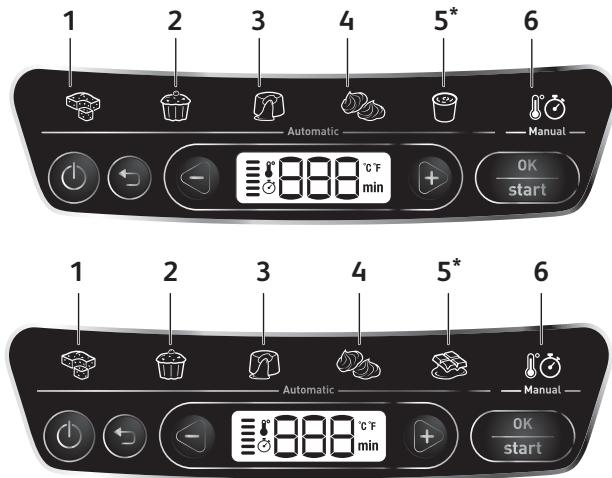
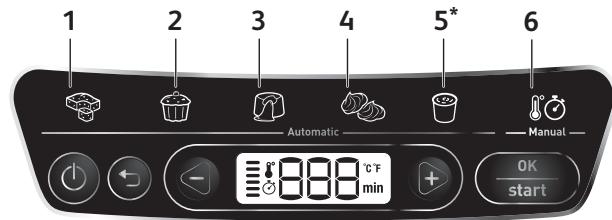
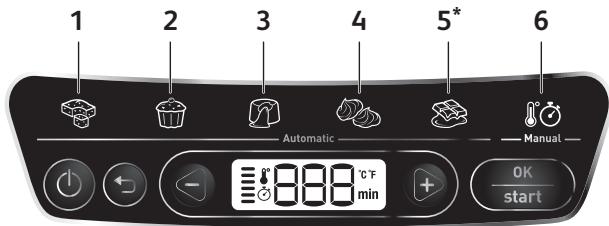
Product Presentation
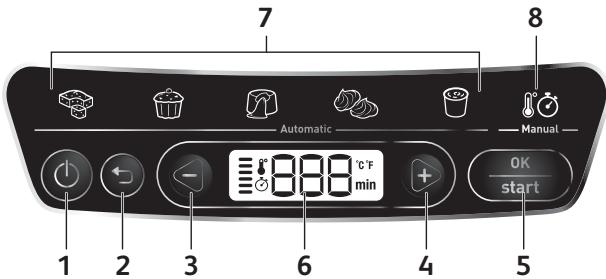
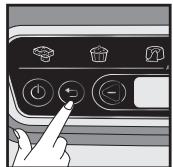
1 On/Off button
2 Back button
3 Minus button (-)
4 Plus button (+)
5 OK/Start button
6 Control panel
7 Automatic programs
8 Manual program
Preparation
- Remove all packaging, stickers and various accessories from both the inside and outside of the appliance.
- Before first use, carefully clean the different molds using some hot water and some washing-up liquid, carefully rinse and dry.
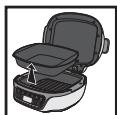
Installation and Connection
Appliance start-up applies to all programs
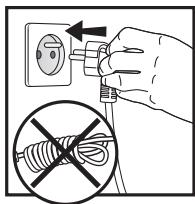
1
2
- Plug in your appliance.
- Next, wait a few seconds before pressing the On/Off button. The first program flashes, indicating the "Program Selection" mode.
3
Presentation of the Programs
If you are unsure of which cooking mode to use, please refer to the Cooking Guide, page 38.
5 Automatic Programs:
1 Cakes to share program
2 Individual cakes program
3 Lava cake program
4 Meringue program
5 Chocolate melting or dairy desserts/moussees programme
6 Manual program
Cooking Tip: There is a program suited for each recipe type. Depending on the selected program, a default cooking time is indicated. There are several recipes per program. For this reason, it may be necessary to adjust the time based on the chosen recipe (see the list of recommended times per recipe). Preheating is not required, and cooking starts when the program is launched, once the appliance is closed and start has been pressed.
Caution: To ensure best results, it is essential to follow the recipe and to respect the proportions.
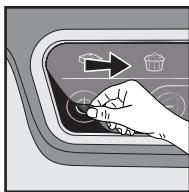
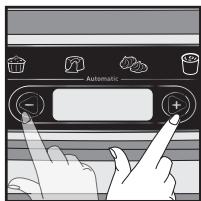
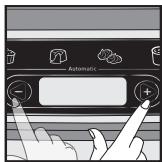
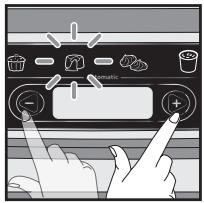
A. Choosing the Cooking Program
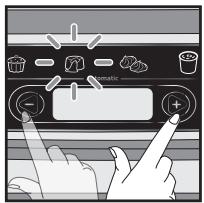
1

2
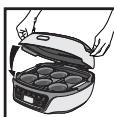
Once the preparation has been poured into the mould and the cover has been closed:
- Scroll through the cooking programs using the - and + buttons.
- The chosen pictogram flashes.
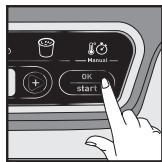
- Press the OK button to confirm.
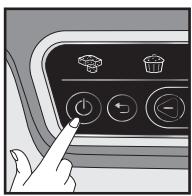
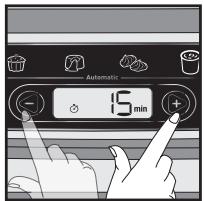
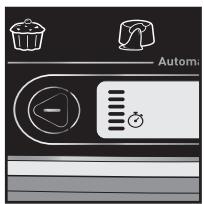
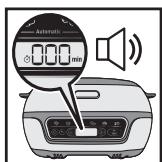
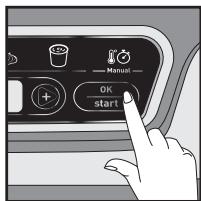
B. Using an Automatic Program
1

2
3
4
5

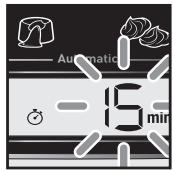
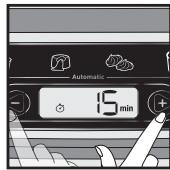
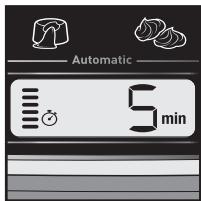
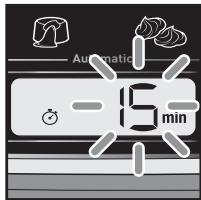
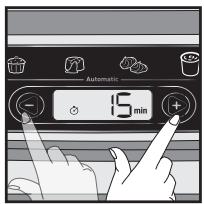
- Once the cooking program is selected, the corresponding indicator light is solidly lit.
- A default cooking time flashes.
- Press the + and - buttons to modify the time, if required.
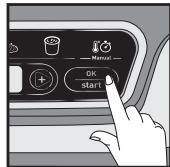
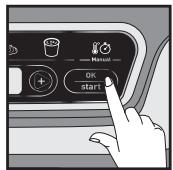
- Ensure that the lid is closed. Press the Start button to confirm and start cooking. The time display stops flashing.
- Cooking has started. The graphic on the screen's left indicates that a cooking cycle is under way and that the appliance is heating. The time counts down by the minute, and then by the second during the last minute.
Note: Each subsequent time the appliance is used, the time displayed defaults to the previous time used.
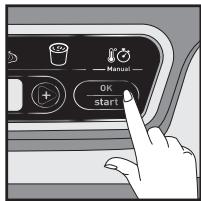
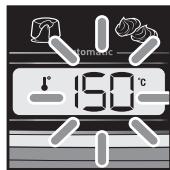
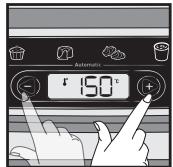
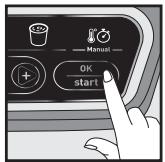
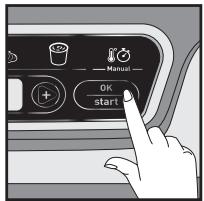
C. Using the Manual Program

1
2
3
4
5
6
7

8
9
- Once the cooking program is selected, the corresponding indicator light is solidly lit.
- A default temperature flashes.
- Press the + and - buttons to modify the temperature, if required.
- Press the OK button to confirm.
- A predefined cooking time flashes.
- Press the + and - buttons to modify the time, if required.
- Press the Start button to confirm and start cooking, and the time display will stop flashing.
- Cooking has started. The graphic on the screen's left indicates that a cooking cycle is underway and that the appliance is heating. The time counts down by the minute, and then by the second during the last minute.
- At any time, if necessary to adjust the time and/or the temperature, press the "back" key depending on model
- Press the OK button to confirm.
Note: Each subsequent time the appliance is used, the time and temperature displayed default to the previous time and temperature used.
D. End of a Program (Automatic or Manual)
1
2
3
- The time reaches 000 and the appliance beeps to signal the end of cooking.
- Press OK once to stop the ring, the display 000 flashes.
- The use of hand protection (oven glove) to prevent burns when handling hot dishes or moulds is necessary.
Caution: It is important to open the appliance and to quickly remove the cakes so that they do not continue to cook.
E. Extend a Cooking Cycle (Automatic or Manual)
1
2
3
- At the end of the program, in the event where the cake is undercooked, it is possible to increase the cooking time by directly pressing the + and - buttons. Close the cover again.
- Once the additional time has been entered, press Start to continue cooking.
- The time display stops flashing and the minute-by-minute countdown starts. Cooking continues. The graphic on the screen's left indicates that a cooking cycle is under way and that the appliance is heating.
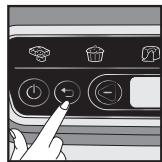
F. Relaunch the Same Program
Automatic and Manual
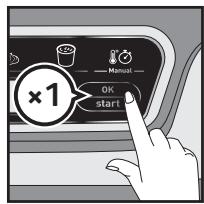
1
- After having turned off the beep, press the OK button a second time to display the time. The last cooking time used is displayed and flashes.
- Press OK to start the program.
G. Relaunch a Different Program
After an Automatic Program
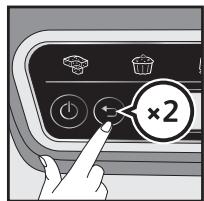
1
- After having turned off the beep, press the Back button to return to the program selection screen.
- Please refer to Part A to choose the program.
After a Manual Program

1
- After having turned off the beep, press the Back button to return to the program selection screen.
- Please refer to Part C to start the program.
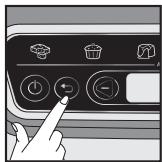
Modifying the Time and the Program Under Way
Caution: when the time is modified during cooking, the results can no longer be guaranteed. It is preferable to relaunch the full program.
Only possible if the elapsed cooking time < 2min
1
2
3
4
- Press the Back button to return to the time selection screen. The displayed time flashes.
- If required, press the Back button a second time to return to the program selection screen.
- Press the + and - buttons to choose a program again and/or to modify the time.
- Confirm by pressing Start to restart cooking.
Maintenance and Cleaning

1
2
- Press the ON/OFF button to turn off the appliance.
- Unplug the device.
- Let the Cake Factory cool for at least 2 hours.

3
4
6.
5
6
-
Do not touch the hot parts of the appliance when in use. Please keep hands and face away from steam releasing from the back of the appliance.
-
Do not carry or hang the appliance by it base or power cord. Be careful when moving the appliance. Regularly clean the outside of the appliance. After use, there may be a change in colour. This phenomenon is normal and linked to the temperatures required to cook food. Any yellowing is not a health hazard and does not change the appliance's operating qualities.
7
8
- Do not carry or hang the appliance by it base or power cord. Be careful when moving the appliance. Regularly clean the outside of the appliance. After use, there may be a change in colour. This phenomenon is normal and linked to the temperatures required to cook food. Any yellowing is not a health hazard and does not change the appliance's operating qualities.
Caution: All repairs must be done by an authorised service centre.
Cooking Guide
The cooking times are provided for information only.
| Dedicated Programs | Recipe | Time | Accessory |
| 1. Cakes to share | Sponge cake | 25 min | |
| Yoghurt cake | 35 min | ||
| 2. Individual cakes | Blueberry muffins | 34 min | |
| Cupcakes | 35 min | ||
| 3. Lava cakes | Chocolate | 17 min | |
| 4. Meringues | Swiss meringue | 105 min | |
| 5. Melting chocolate* | White or milk chocolate | 6 min/9 min | |
| Dark chocolate | 7 min/11 min | ||
| With the manual program, choose 140* and respect the same cooking times | Chocolate+butter | 8min | Non-stick aluminium mould |
| 5. Dairy desserts/mousses* | Crème brûlée | 100 min/120 min | |
| Chocolate mousse | 100 min/120 min |
Find complete recipes on our application.
*Depending on model
**Depending on model, included or sold separately
(in a pack of 6, with mention "Cake Factroy").
Troubleshooting to achieve great results
| Examples | Tips |
| Lava cakes will be undercooked if there is too much butter with respect to the recommended ingredient weight. Lava cakes will be overcooked if there is too much flour with respect to the recommended ingredient weight. | Carefully observe ingredient quantities. |
| Lava cakes or cakes will be overcooked if left in the Cake Factory after the ringing signal is produced at the end of cooking. | Carefully remove the mould at the end of cooking, as recommended in the guide. |
| Lava cakes will be overcooked if the batter has been beaten rather than simply stirred. | Carefully follow the actions recommended in the recipe. |
| Muffins will be crumbly when turned out if the ingredients are mixed indiscriminately. | Carefully follow the order of the steps for incorporating the recipe's ingredients. |
| The flavour and texture of my cakes are lacking. | To ensure optimal results, take care to check that the ingredients are of good quality and unexpired. |
| The bottom of the red berry lava cake will be undercooked if the fruit coulis centre is not placed in the freezer for 4 hours prior to baking. | Carefully observe the ingredient set-up times recommended in the recipe. |
Troubleshooting Guide
| Problem | Solution |
| Er00 or Er003 | Appliance failure: Unplug the appliance and contact your customer service or a repair centre. |
| Er01/Er02/Er04/Er05/Er06 | Unplug the appliance and wait a few minutes. Then plug in your appliance again and turn it on. If the problem persists, contact your customer service or a repair centre. |
| The displayed time flashes | If the displayed time is correct, press OK to confirm. |
| The displayed temperature flashes | If the displayed temperature is correct, press OK to confirm. |
| The illuminated program flashes | If the displayed program is correct, press OK to confirm. |
| The appliance does not close properly | Open the appliance, check that the support grid has not been left under the non-stick cooking mould. Check whether you are using a silicone mould taller than 4.5 cm. If this is the case: remove the support grating. The mould used is not suitable for this appliance: use a mould that conforms with this appliance's conditions for use. |
| The time has reached 000, but the level of cooking is insufficient | At the end of cooking, after having turned off the beep sound by pressing OK once, close the appliance again and add some time using the - and + buttons, then confirm by pressing OK. |
| During cooking, after a modification to the cooking time, the cooking time automatically returns to the initial time | After having modified the time, press OK to confirm. |
| After a cooking program has been launched, it is not possible to modify the cooking time | Wait for 2 minutes to elapse after the launch of the program to modify the time using the - and + buttons. |
INHALT
VOORZORGSGMAATREGELEN
F. Ponowne walks some go programu
Colque as formas no supporte
Colque o suporte no aparello
Feche
IOnucTBaHTo I NOpDpBxKkata OT NOpTeJIa He Tp8Ba Da ce 3BbPbWBat OT Deca, OCBeH aKO He ca Ha Bb3paCT OT HaI 8 roUHHn I rO npABT IOd H6IouHeH.
Ako He cte cnrypHn KOI peKIM Ha roTBeHe Da I3N013BaTe, MoJIA, HApPaBete CnpaBka cbc cTpaHnca 272 OT pbKOBOdCTBOtO 3a roTBeHe.
5 aTOMaTHn nporpaMn:
1 Pporgpama 3a KeKcyeTa B cbd 3a cnOedJeHe
2 Iporpama 3a einnn Hn Kekceta
3 Iporpama 3a Iaba KeiKobe
4 Iporpama 3a ueyBkn
5 Pnorpama 3a tonene Ha zoKoJa* nIN 3a nyINr OT Kpem*
6 Iporpama CpbHn HacTroKn
Cbbet 3a rotBeHe: Ima noIxOJaA npOrpama 3a BCEKn TnI peeNTa. B 3aBncmOCT ot n36paHata npOrpama Ce nOKa3Ba BVpeMe 3a rotBeHe nIO npOra3bnpaHe. Ima nno HnKoNkO peeNTn Ha npOrpama. Iopadn ta3n npuHaMoKe da e Heo6xoJIMo Da ce perynipa BpeMeTo B 3aBncmOCT ot n36paHata peeNTa (BnKte CnncbKa C npenOpbuaHn BVpeMeHa Ha peeNTa). He e Heo6xoJIMo PpeDbapTeHnO 3aRpaBaHe n RotBeHTo 3anOyBa, Korato nporpaMaTa CTapTnpa, cNe KaTO ypeDb t 3aTBOpEn H e HATNCHT 6yToHb 3a CTapt.
BHMaHHe: 3a da ce rapaHTnpaT haN-dO6pn pe3yntaTn, e ocObeHO BaxHo da ce cneBa peeENTATA n da ce cna3BaT nponopunite.
A.Избор на поррама за rotbehe
1
2
Cnei kaTO npiroTbeHata Cmec e n3cunapa BbB opMaTa N KaNaKbTe 3aTBOpEH:
- Ппемнене ппз програмпгte 3a roтвашику,并且可以使用。
2.ИЗбранатиKKTORpmaппрмгва. - HatncheTe 6yToHa OK, 3a da notBbprnTe.
B.ИЗнолзВанеHa aВТOMaTичHa nporpaMa

1
2
- Cnei KaTo 6bIe n36paHa npOrpamTa 3a roTBeHe, CbOTBeTHaI INdkaTOPHa JAMNtCA CBETn HENpeKbCHaTO.
- Пемигв Врeme 3a roTbeNe no noja36upaHe.
- HatncheTe 6ytoHnTe + n -, 3a da npomeHnTe BpemTo, aKO e Heo6xOIMO.
- YBepete ce, ue KanaKbTe e 3aTbOpEn. HATINCHETe 6byToHa 3a cTApT, 3a da nOTBbPdnte I da cTApTnpate roTBeHTo. INcInJeT 3a BVPemTO Cnnpa Da Mira.
- IpocebT Ha roTbeHe e cIaptnpA1. rpaKnata B IaBata qact Ha ekpaHa noka3Ba, ye e 3aOnuHaJI uKnbl Ha roTbeH Ne ypeBt 3arpaBA. BpeMeTo ce OT6porBa B MInHyTu, a CneTOBa B CekyHnI NO BpeMe Ha nocleHHaTa MNHyTa.
3

4
3a6eIekka: npn BCaKo CneIbAio n3IOJI3BaHe Ha ypeia NOKa3BaHOTo BpeMe ce BpIa IIOIpa3bIpaH eIo pIepNIshOTo n3IOJI3BaHO BpeMe.
5
E. YdblJkaBaHe Ha cnKbI Ha rotBeHe (aBtOMaTHUHO nIe C
pbuHn HacTpoKn)
1
2
3
- Korato Habtbn KpaT Ha nporpamata, B clyaay KeKcHTO e CypoB, e Bb3MOxHO da ce yBENuB PEmTO 3a rotBeHe DnpeKTHO Upe3 HATNCKaHTo HO 6yToHInTe + N-. 3aTBopete OTHOBOKanaKa.
- Cnei KaTo CTe BbBEnI OOnbHInTeHNO To BPeme, HATINCHETe 6yToHa 3a CTAP, 3a Da npOdbJIxN rOTBeHETO.
3.Дисплгета Времeto Cпра мИга Изапьа OTброгаытeto MнHyтЯ NO MнHyтЯ.TOTBEнTo npOдьлжава.TpaФикатa B ЛвataЧаЕКранa ПOKаЗВa, Ye e 3ANOчhalцКьнHa rotBeHe nYe ypeДТЗагРа.
F. Повторностартупане на сьцаТ npограмa
ABTomatmyHOn i c pbyHn HacTpoKn

1
- CnE kato Cte n3KIOUINI 3ByKOBUN CnHaN, HATNCHeTe 6yToHa OK BTOPI Tt, 3a Da ce NOKaKe BpeMeTo. Poka3Ba Ce NoCleJHO tN3PON3BaHO BpeMe 3a rotBeHe, KOeTo PpeMnRbA.
- Hatnche TE OK, 3a da cnapatne nporpaMaTa.
SMALL HOUSEHOLD APPLIANCES
www.tefal.com
| AE | \( \left. \begin{array}{l} {\mathrm{i}}_{\mathrm{{BUBUSUL}}} \\ {\mathrm{{ARMENIA}}} \end{array}\right\rbrack \) UAE | 8002272 | FR | FRANCE Continentale + Guadeloupe, Martinique, Réunion, St-Martin | 09 74 50 47 74 | NL | NEDERLAND The Netherlands | 0318 58 24 24 |
| AM | RUBUUSUL, ARMENIA | 011 900 800 | GR | ELLADA GREECE | 2106371251 | NO | NORGE NORWAY | 22 96 39 30 |
| AR | ARGENTINA | 0800-122-2732 | HK | 香港 HONG KONG | 8130 8998 | NZ | NEW ZEALAND | 0800 700 711 |
| AT | ÖSTERREICHI AUSTRIA | 01 890 3476 | HR | HRVATSKA CROATIA | 01 30 15 294 | OM | \( \downarrow \downarrow \downarrow \) OMAN | 24703471 |
| AU | AUSTRALIA | 1300307824 | HU | MAGYARORSZÄG HUNGARY | 06 1 801 8434 | PL | POLSKA POLAND | 801 300 420 koszt jak za polagczenie lokale |
| BA | BOSNA I HERCEGOVINA | Info-linja za potrodaše 033 207 781 | ID | INDONESIA | +62 21 6220 2288 | PT | PORTUGAL | 808 284 735 |
| BE | BELGIQUE BELGIE BELGIUM | 070 23 31 59 | IE | REPUBLIC OF IRELAND | 01 677 4003 | QA | \( \downarrow \downarrow \) QATAR | 44485555 |
| BG | Бъларий BULGARIA | 0700 10 330 | IN | INDIA | 8860555777 | RO | ROMANIA | 0 21 316 87 84 |
| BH | \( \downarrow \downarrow \downarrow \) BAHRAIN | 17716666 | IT | ITALIA ITALY | 199 207 354 | RS | SREBIJA SERBIA | 060 0 732 000 |
| BR | BRASIL BRAZIL | 11 2060 9777 | JO | \( \downarrow \downarrow \downarrow \) JORDAN | 5665505 | RU | POCCIM RUSIA | 495 213 32 30 |
| BY | BEJIAPYCb BELARUS | 37529 1597875 | JP | 日本 JAPAN | 0570-077772 | SA | \( \downarrow \downarrow \downarrow \) SAUDI ARABIA | 920023701 |
| CA | CANADA | 1-800-418-3325 | KR | 韩国 KOREA | 080-733-7878 | SE | SVERIGE SWEDEN | 08 629 25 00 |
| CH | SUSSE SCHWEIZ SWITZERLAND | 044 837 18 40 | KW | \( \downarrow \downarrow \downarrow \) KUWAIT | 180777 Ext 2104 | SG | SINGAPORE | 6550 8900 |
| CL | CHILE | 02 2 884 46 06 | KZ | KAZAKGTAH KAZAKHSTAN | 727 3977575 | SI | SLOVENJIA SLOVENIA | 02 234 94 90 |
| CO | COLOMBIA | 018000520022 | LB | \( \downarrow \downarrow \downarrow \) LEBANON | 4414727 | SK | SLOvensKIO SLOVAKIA | 232 199 930 |
| CZ | ČESKA REPUBLIKA CZECH REPUBLIC | 731 010 111 | LT | LIETUVA LITHUANIA | 5 214 0057 | TH | \( \downarrow \downarrow \downarrow \) TEURTE THAILAND | 02 765 6565 |
| DE | DEUTSCHLAND GERMANY | 0212 387 400 | LU | LUXEMBOURG | 0032 70 23 31 59 | TR | TÜRKIYE TURKEY | 444 40 50 |
| DK | DENMARK DENMARK | 43 350 350 | LV | LATVJA LATVIA | 6 616 3403 | UA | Yürgsina UKRAINE | 0800 308 083 |
| EE | EESTI ESTONIA | 668 1286 | MD | MOLDOVA | 22 224035 | UK | UNITED KINGDOM | 0345 602 1454 |
| EG | \( \downarrow \downarrow \downarrow \) EGYPT | 16622 | MK | CEBEPHA MAKEJODHJIA NORTH MACEDONIA | (02) 20 50 319 | US | U.S.A. | 800-395-8325 |
| ES | ESPANA SPAIN | 933 06 37 65 | MX | MEXICO | (55) 52839354 | VN | VIETNAM | 1800-555521 |
| FI | SUOMI FINLAND | 09 8946 150 | MY | MALAYSIA | 603 7802 3000 | 2021-07-01 | ||
TEFAL/T-FAL INTERNATIONAL GUARANTEE
Date of purchase / Date of achat / Feche de compra / Kebastia / Kjepiasta / Kjepsdato / Inkodspadum / Ostakupkelei / Priuma datumas / Data zakura / Datum izrocebla / Datum kopyine / Velasidas lata / Dachat zchieje / Daeta na xaynuynae / Daeta npoazna / Catzuaanr / Catzuaanr / Nen / Nen / Nen / Nen / Nen / Nen / Nen / Nen / Nen
P r t i t t t t t t t t t t t t t t t t t t t t t t t t t t t t t t t t t t t t t t t t t t t t t t t t t t 0
Ratner aee andore nme du revenrere ndory i mee dei minoriora forn rnrnnn rnrnne anr ades / Jlemmeynnn mni oia sone / Prodraran ng an od / Afojalrajnes nnn ach ors / Muija kuplaus j aedres / Veikula naokasns an radur / Paurozvets pavadinmas ir adras / Nazir aird spreadyow / Nazir aird srodnyp jmst / Nazir inaslrov trogine / Farogmalze ne vece / Neme si aedre vanzilutro / Txpnuu okef / Hana a aepc poaum / uquidulpum paulu uludmid l huaqh / Hamaene n aepc poaum / Carymanram arayaa met menkazai/ Baboyane,住所/ 1000000000000000000000000000000000000000000000000000000000000000
Distributer stam / Cach / Sello del distributer / Forender stemper / Jallesymmyi lea / Forender stemper / Aurofilaroarestensal / Timpost / Zimago / Antipausas / Piscagc pevzadry / Peat
FR 2-21
EN 22-40
DE 41-60
NL 61-80
ES 81-100
PL 101-120
PT 121-140
TR 141-159
ET 160-178
LV 179-197
LT 198-216
RO 217-235
BG 236-254
SL 255-273
HR 274-292
- Safety Instructions
- IMPORTANT PRECAUTIONS
- Do
- Do not
- Recommendations/Information
- Environment
- Description
- Using the Moulds
- Silicone PROflex Mould*
- Non-stick aluminium bowl
- Steel moulds*
- After cooking
- Melting chocolate*
- Individual dairy desserts/mousses\*\*\*
- Dairy desserts/mousses to share*
- Product Presentation
- Preparation
- Installation and Connection
- Presentation of the Programs
- Automatic Programs:
- Choosing the Cooking Program
- Using an Automatic Program
- Using the Manual Program
- End of a Program (Automatic or Manual)
- Extend a Cooking Cycle (Automatic or Manual)
- Relaunch the Same Program
- Automatic and Manual
- Relaunch a Different Program
- After an Automatic Program
- After a Manual Program
- Modifying the Time and the Program Under Way
- Only possible if the elapsed cooking time < 2min
- Maintenance and Cleaning
- Cooking Guide
- Troubleshooting to achieve great results
- Troubleshooting Guide
- INHALT
- VOORZORGSGMAATREGELEN
- Ponowne walks some go programu
- aTOMaTHn nporpaMn:
- A.Избор на поррама за rotbehe
- B.ИЗнолзВанеHa aВТOMaTичHa nporpaMa
- YdblJkaBaHe Ha cnKbI Ha rotBeHe (aBtOMaTHUHO nIe C
- pbuHn HacTpoKn)
- Повторностартупане на сьцаТ npограмa
- ABTomatmyHOn i c pbyHn HacTpoKn
- SMALL HOUSEHOLD APPLIANCES
- TEFAL/T-FAL INTERNATIONAL GUARANTEE
Brand : TEFAL
Model : KD8121
Category : Cooking