
ZFV919Y - Range hood ZANUSSI - Free user manual and instructions
Find the device manual for free ZFV919Y ZANUSSI in PDF.
 FR
FR
 AR
AR
 BG
BG
 CS
CS
 DA
DA
 DE
DE
 EL
EL
 EN
EN
 ES
ES
 ET
ET
 FI
FI
 HU
HU
 IT
IT
 KK
KK
 LT
LT
 LV
LV
 MK
MK
 NL
NL
 NO
NO
 PL
PL
 PT
PT
 RO
RO
 RU
RU
 SK
SK
 SL
SL
 SQ
SQ
 SR
SR
 SV
SV
 TR
TR
 UK
UK
| Brand | ZANUSSI |
| Model | ZFV919Y |
| Product type | Extractor hood |
| Control type | Touch panel |
| Motor speeds | 4 speeds (1, 2, 3, maximum speed) |
| Breeze function | Yes, cools the air after cooking (60 minutes) |
| Hob to Hood function | Yes, automatic connection with compatible hob |
| Lighting | LED |
| Grease filter type | Washable metal filter (in dishwasher or by hand) |
| Charcoal filter type | Non-washable charcoal filter, to be replaced every 4 months |
| Filter alarm | Yes, red light for grease filter (steady) and charcoal filter (flashing) |
| Maximum speed duration | 8 minutes before returning to previous setting |
| Maintenance | Monthly cleaning of grease filter, replacement of charcoal filter every 4 months |
| Bulb type | LED, replacement by a technician |
Frequently Asked Questions - ZFV919Y ZANUSSI
User questions about ZFV919Y ZANUSSI
0 question about this device. Answer the ones you know or ask your own.
Ask a new question about this device
Download the instructions for your Range hood in PDF format for free! Find your manual ZFV919Y - ZANUSSI and take your electronic device back in hand. On this page are published all the documents necessary for the use of your device. ZFV919Y by ZANUSSI.
USER MANUAL ZFV919Y ZANUSSI
WARNING! The charcoal filter can be damaged!
EXTRACTOR HOOD
Set the desired speed according to the table below.
SAFETY INFORMATION AND INSTALLATION

WARNING!
carefully read the Safety chapters before any use or maintenance of the appliance.
Refer to the separate Installation Instructions
booklet for Safety Information and Installation. Read
PRODUCT DESCRIPTION
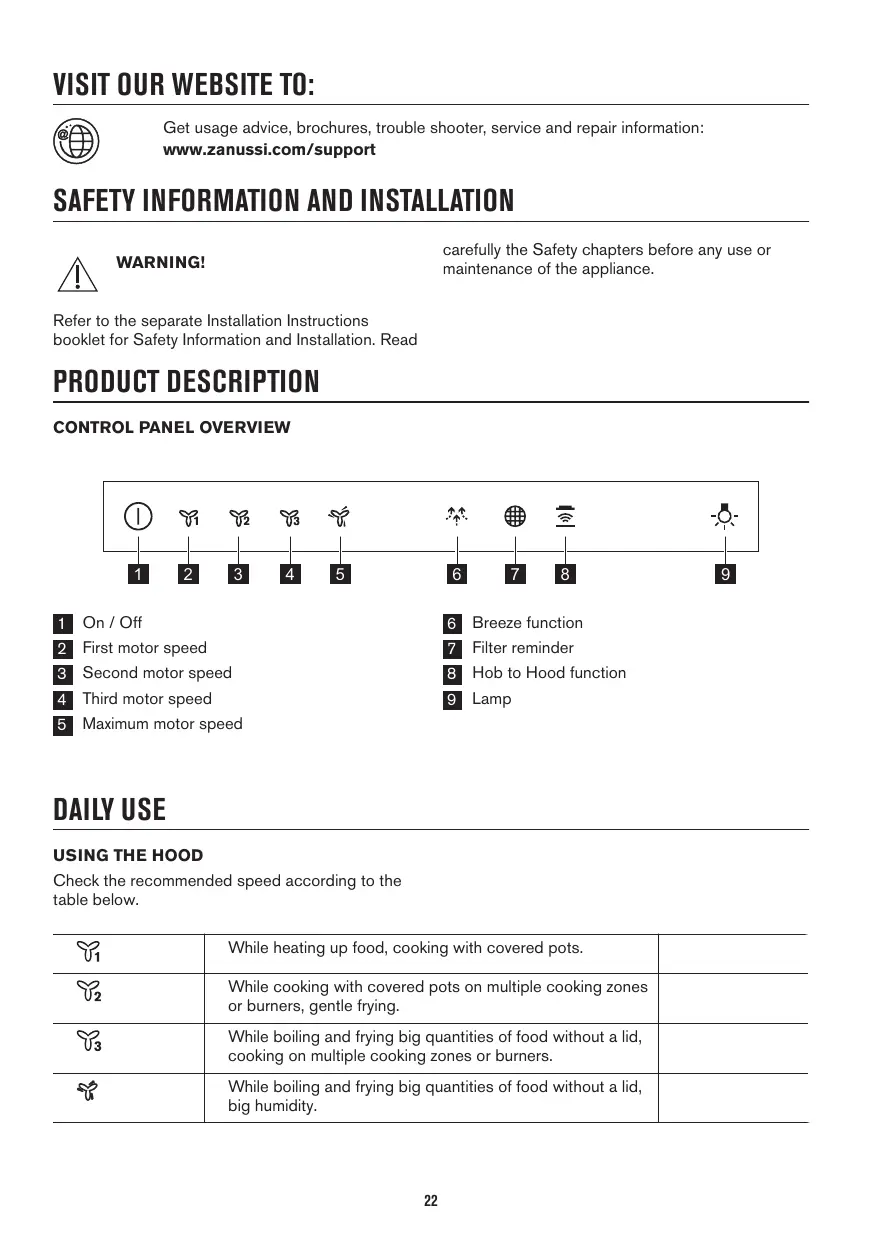
CONTROL PANEL OVERVIEW
1 On/Off 2 First motor speed 3 Second motor speed 4 Third motor speed 5 Maximum motor speed
6 Breeze function 7 Filter reminder 8 Hob to Hood function 9 Lamp
DAILY USE
USING THE HOOD
Check the recommended speed according to the
table below.
| U1 | While heating up food, cooking with covered pots. | |
| U2 | While cooking with covered pots on multiple cooking zones or burners, gentle frying. | |
| U3 | While boiling and frying big quantities of food without a lid, cooking on multiple cooking zones or burners. | |
| U4 | While boiling and frying big quantities of food without a lid, big humidity. |

It is recommended to leave the hood operating for approximately 15 minutes after cooking.

The control panel is a sensor field. Touch the symbols for 1 second to activate the functions.
To operate the hood:
- Turn on the appliance by pressing the ① symbol. You can now activate the functions.
- To activate the function, touch the symbol.
- If needed, touch the light symbol to illuminate the cooking surface.
To turn off the appliance, press the ① symbol again.
HOB TO HOOD FUNCTION
It is an automatic function which connects the hob with a hood. Both the hob and the hood have an infrared signal communicator. The speed of the fan is defined automatically based on the mode setting and the temperature of the hottest cookware on the hob. You can also operate the fan using the hob manually. The function can be activated from the panel of the hob.

For more information on how to use the function, refer to the hob user manual.
ACTIVATING MAXIMUM MOTOR SPEED
When you press the button, the Maximum Motor Speed starts to operate for 8 minutes. After
CARE AND CLEANING
CLEANING THE GREASE FILTER
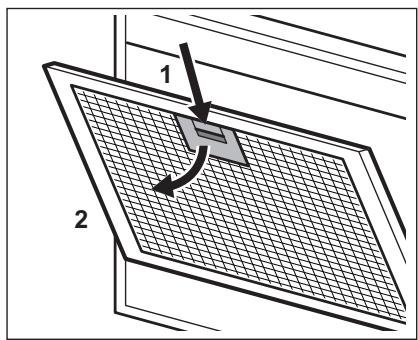
Each filter must be cleaned at least once a month. Filters are mounted with the use of clips and pins on the opposite side.
To clean the filter:
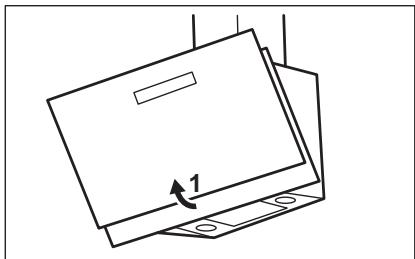
- Pull the cover to open it.
At that time, the appliance returns to its previous speed settings.

When the function is turned on, additional touch on the button does not have any effects.
ACTIVATING AND DEACTIVATING THE FILTER NOTIFICATION
Filter alarm reminds to change or clean the charcoal filter and clean the grease filter. The filter indicator is turned on (red) for 30 seconds if the grease filter must be cleaned. The filter indicator flashes (red) for 30 seconds if the charcoal filter must be replaced or cleaned.

Refer to filter alarm in care and cleaning chapter.
- Switch on the control panel.
- Make sure that the icons are turned off.
- To activate or deactivate the charcoal filter notification touch for 3 seconds.

If the charcoal filter notification is activated, the filter icon flashes (red) five times.

If the charcoal filter notification is deactivated, the filter icon flashes (red) three times.
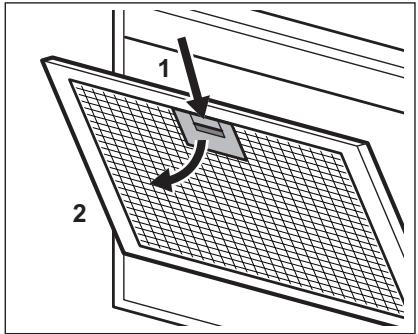
- Press the handle of the mounting clip on the filter panel underneath the hood (1).
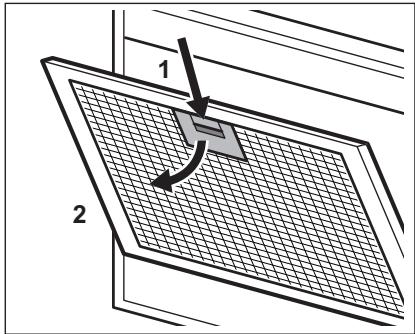
- Slightly tilt the front of the filter downwards (2), then pull.
Repeat the first two steps for all filters.
- Clean the filters using a sponge with non-abrasive detergents or in a dishwasher.

The dishwasher must be set to a low temperature and a short cycle. The grease filter may discolour, but this has no influence on the performance of the appliance.
- To mount the filters back, follow the first two steps in reverse order.
Repeat the steps for all filters if applicable.
REPLACING THE CHARCOAL FILTER

WARNING! The charcoal filter is non-washable!
The time of saturation of the charcoal filter varies depending on the type of cooking and the regularity of cleaning the grease filter.
To replace the filter:
- Remove the grease filters from the appliance. Refer to "Cleaning the grease filter" in this chapter.
- To install a new filter, perform the same steps in reverse order.
In any case, it is necessary to replace the filters at least every four months.
REPLACING THE CHARCOAL FILTER
The charcoal filter must be replaced if the filter alarm is on.

Refer to the filter alarm in this chapter.
The time of saturation of the charcoal filter varies depending on the type of cooking and the regularity of cleaning the grease filter.

WARNING! The charcoal filter is NON-washable! The filter cannot be regenerated!
To replace the charcoal filter:
- Remove the grease filters from the appliance. Refer to "Cleaning the grease filter" in this chapter.
- Turn the filter counterclockwise (1) and then pull (2).
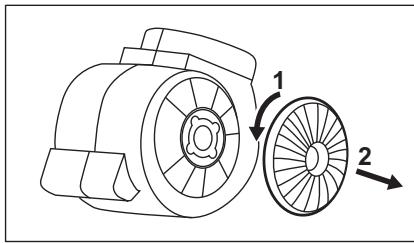
To mount the filters back follow the steps in reverse order.
FILTER ALARM

Refer to activating and deactivating the filter alarm in daily use chapter.

Refer to cleaning the grease filter in this chapter.

Refer to cleaning the charcoal filter or replacing the charcoal filter (depends on filter type).
To reset the alarm:
Touch the for 3 seconds.
REPLACING THE LAMP
This appliance is supplied with a LED lamp and separate control gear (LED driver). These parts can be replaced by a technician only. In case of any malfunction refer to "Service" in the "Safety Instructions" chapter.
Recycle materials with the symbol . Put the packaging in relevant containers to recycle it. Help protect the environment and human health by recycling waste of electrical and electronic appliances. Do not dispose of appliances marked
with the symbol with the household waste. Return the product to your local recycling facility or contact your municipal office.
WARNING! The grease filter is NOT washable!
HOB TO HOOD - FUNCTION
REPLACEMENT OF THE CHARCOAL FILTER

REPLACEMENT OF THE CHARCOAL FILTER
www.zanussi.com/support
SAFETY INSTRUCTIONS AND INSTALLATION

WARNING!
TURN ON THE HOB FUNCTION
This hob function automatically activates the hood. When the hob is turned on, the hood starts automatically with the communication signal. The desired operating parameters and the highest temperature of the hob are automatically detected. The hood can also be controlled manually. This function can be turned off by pressing the hob button.

Check the hood's operating parameters and the highest temperature of the hob before using the function.
USING THE HIGHEST TEMPERATURE OF THE HOB
When the hob is turned on, the highest temperature of the hob starts within 8 minutes. After this time, the hood automatically adjusts the operating parameters.

When the function is turned on, the hood button may be pressed to turn it off.
The water alarm signal must not be confused with the water level indicator and the water level indicator. If the water level indicators (red) need to be checked, press and hold for 30 seconds. If the water level indicators (red) do not need to be checked, press and hold for 30 seconds.

Check the device for the water alarm signal from the control and adjustment panel.
- Press the control panel.
- Press the reset button.
- Press and hold for 3 seconds to add or remove water.

If the water alarm is activated, the water indicator (red) will flash five times.

Water alarm signal
If the water level is low, the water
indicator (red) will flash three times.
CONTROL AND ADJUSTMENT
WATER LEVEL ADJUSTMENT
The water level can be adjusted several times. To arrange the water levels, short presses and long presses are used in sequence.
To adjust the water level:
- Press the button to open the water inlet.
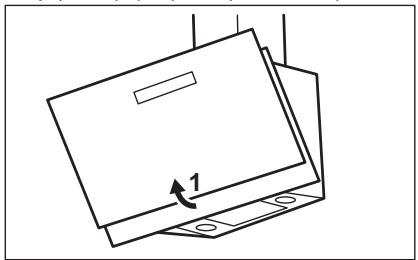
- Install the filter element into the housing until it stops (1).
- First remove the old filter element (2), then install the new one.
For all filters, replace the O-rings.
- Do not use metal tools to remove the filters; use plastic or nylon tools instead.

The maximum operating temperature and pressure are indicated on the filter housing. Do not exceed these values, as this may damage the filter.
- To replace the filter, remove the two screws on the cover.
If necessary, replace the O-rings for all filters.
REPLACING THE FILTER

WARNING! Do not operate the filter without a filter element.
The filter must be replaced when the pressure drop between the inlet and outlet reaches the maximum allowable value.
To replace the filter:
- Remove the filter element from the housing.
Refer to the section "Removing the filter element" for this step.
- Install the new filter element in the reverse order of removal.
Occasionally, the filter element may need to be replaced more frequently.
KOMIP CY3ΓICH AYbICTbIPY
Cy3riHH eckepTy cHnIbI Kocybl 6oNca, Kemip cy3ricH aBip6actay KepeK.

OcbI TapaydaIbI cy3riH iE cKeptTy CnHaJIbI TypaJIbI aKnapaATbI KapaHbI3.
Kemip cy3ricih TOIy yahtbTaFAM nicipyIH Typi MeH MaCy3ricih KaHaJbIKbTb Kni Ta3anaHaFaHbHa 6aJaNbICTb 6oNabl.

ECKEPTY! Kemip cy3ricin Jyyffa BOJMAIdbI! Cy3rihi KaNNbHa KeTipty MymkIn emec!
Kemip cy3ricih aybictbipy yuih:
- Mai cy3rinepiH KpybIfBidaH aIbIHbI3.
OcbI tapaydaIbI "MaI cy3rIepiH ta3anay" 6enimH kapaHbI3.
- Cy3rihi cafAT tinihe KapcbI 6aftTb 6ypaHbI3 (1), codan Kein TapTBHbI3 (2).
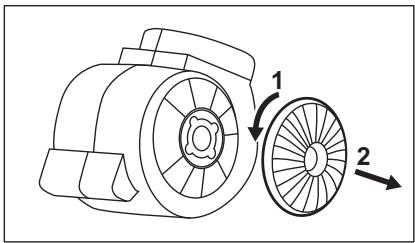
Cy3rHi KaTa opHbHa KOIO yuIH KaaMdapbI KepicIHWe opbIHdaHb3.
CY3ΓIHH ECKEPTY CNHAJIbI

Cy3riHIn eckepTy CnHaJIbH KOCy KHe CEHNipy TypaJIbAknapaTbI KYNdeNIkTI NaJdaNaHy TapMaFbIHAn KaPaHbI3.
OcbI tapaydafbMaJ cy3rinePi Ta3anay 6eImiH KapaHbI3. Kemip cy3ricin Ta3anay Hemece Kemip cy3ricin aybictby TapaybH KapaHb3 (cy3ri Typihe 6aIINaHbCTbl).
EckepTy cnHbIn KaNbHa KeNtipy yuih:
6enriueecin 3cekyHd 6acbHbI3.
You must use the hood with the hob (the hood) when using the hob. You can use the hood without the hob. For instructions on how to use the hood, see the "Operation" section in the "User Manual".
SAFETY INSTRUCTIONS
Before cleaning the appliance, turn it off. Before cleaning, unplug the appliance. To clean the electrical and electronic parts, use a dry cloth. Do not use water or steam.
Do not allow children to play with the appliance. Do not touch the hot parts with wet hands. If the appliance is damaged, contact the service center or the manufacturer.
VISIT OUR WEBSITE TO:

www.zanussi.com/support
SAFETY INFORMATION AND INSTALLATION

WARNING!
FUNCTION "HOB TO HOOD"
www.zanussi.com/support
SAFETY INFORMATION AND INSTALLATION

WARNING!
Before using or cleaning the appliance, carefully read the safety instructions.
FUNCTION "HOB TO HOOD"
This is an automatic function that connects the hob surface and the cooker hood. The hob surface and the cooker hood have an infrared signal communication device. The fan speed is set automatically, taking into account the mode setting and the temperature of the hot cooking vessel placed on the hob. The fan can also be operated manually using the hob surface. The function can also be activated from the hob surface panel.

For more information on using the function, see the hob user manual.
ACTIVATING MAXIMUM MOTOR SPEED
SAFETY INFORMATION AND INSTALLATION

WARNING!
PRODUCT DESCRIPTION
CONTROL PANEL OVERVIEW

SAFETY INFORMATION AND INSTALLATION

WARNING!
SAFETY INFORMATION AND INSTALLATION

CAUTION!
Safety information and installation instructions are given in a separate booklet on safety and installation. Before
performing any actions on use or practical maintenance of the appliance, carefully read the chapters concerning safety.

1 BkN/Bbkn 2 First speed of the motor 3 Second speed of the motor 4 Third speed of the motor 5 Maximum speed of the motor
6 Function "Breeze" 7 Reminder about the filter 8 Function "Hood to Hood" 9 Lighting lamp
DAILY USE
USE OF THE EXTRACTOR
The recommended speed values are given in the table below.
It is recommended to let the extractor run for about 15 minutes after cooking.

The control panel is a touch zone. The functions are activated by touching the symbols for 1 second.
Switching on the extractor:
- 1. Switch on the appliance by touching the symbol ①. Now you can switch on the functions. 2. To activate the functions, touch the symbols.
- If necessary, touch the symbol for the light to illuminate the cooking area.
www.zanussi.com/support
SAFETY INSTRUCTIONS AND INSTALLATION

WARNING!
www.zanussi.com/support
SAFETY INFORMATION AND INSTALLATION

WARNING!
PRODUCT DESCRIPTION
CONTROL PANEL OVERVIEW

"HOB TO HOOD" FUNCTION
It is an automatic function that connects the hob with an extractor hood. Both the hob and the hood have an infrared communicator. The fan speed is automatically determined based on the mode setting and the temperature of the hottest pan on the hob. You can also use the fan by manually operating the hob. The function can be activated from the hob panel.

For more information on how to use the function, refer to the user manual for the hob.
ACTIVATING THE MAXIMUM MOTOR SPEED
CONTROL PANEL DESCRIPTION

1 On/Off 2 Motor speed 1 3 Motor speed 2 4 Motor speed 3 5 Maximum motor speed 6 Hood function
7 Filter saturation indicator 8 Function for connecting the hob and hood 9 Lamp
DAILY USE
USING THE HOOD
We recommend the following speed according to the table.
It is recommended to use the device for about 15 minutes before cooking.

Early control is urgent. Touch the button on 1 second to activate the function.
For heavy use:
- Turn on the device by pressing the symbol ①. The indicator will activate the function. 2. To activate the function, press the symbol.
- If necessary, touch the symbol Q to illuminate the surface.
To turn off the device, press the symbol ① again.
i
i
1.

- EXTRACTOR HOOD
- SAFETY INFORMATION AND INSTALLATION
- WARNING
- PRODUCT DESCRIPTION
- DAILY USE
- USING THE HOOD
- TO OPERATE THE HOOD
- HOB TO HOOD FUNCTION
- ACTIVATING MAXIMUM MOTOR SPEED
- CARE AND CLEANING
- CLEANING THE GREASE FILTER
- TO CLEAN THE FILTER
- ACTIVATING AND DEACTIVATING THE FILTER NOTIFICATION
- REPLACING THE CHARCOAL FILTER
- TO REPLACE THE CHARCOAL FILTER
- FILTER ALARM
- TO RESET THE ALARM
- REPLACING THE LAMP
- HOB TO HOOD - FUNCTION
- REPLACEMENT OF THE CHARCOAL FILTER
- SAFETY INSTRUCTIONS AND INSTALLATION
- TURN ON THE HOB FUNCTION
- USING THE HIGHEST TEMPERATURE OF THE HOB
- CONTROL AND ADJUSTMENT
- WATER LEVEL ADJUSTMENT
- TO ADJUST THE WATER LEVEL
- REPLACING THE FILTER
- KOMIP CY3ΓICH AYBICTBIPY
- KEMIP CY3RICIH AYBICTBIPY YUIH
- CY3ΓIHH ECKEPTY CNHAJIBI
- SAFETY INSTRUCTIONS
- VISIT OUR WEBSITE TO
- FUNCTION "HOB TO HOOD
- CONTROL PANEL OVERVIEW
- CAUTION
- USE OF THE EXTRACTOR
- SWITCHING ON THE EXTRACTOR
- HOB TO HOOD" FUNCTION
- ACTIVATING THE MAXIMUM MOTOR SPEED
- CONTROL PANEL DESCRIPTION
- FOR HEAVY USE
Brand : ZANUSSI
Model : ZFV919Y
Category : Range hood