
DPE5660M - DPE5660G - Basket AEG - Free user manual and instructions
Find the device manual for free DPE5660M - DPE5660G AEG in PDF.
| Brand | AEG |
| Model | DPE5660M / DPE5660G |
| Product type | Decorative extractable hood |
| Dimensions (W x D x H) | 60 x 50 x 15 cm (estimate) |
| Weight | Approximately 12 kg (estimate) |
| Power supply | 220-240 V, 50 Hz |
| Motor power | 200 W (estimate) |
| Lighting | Integrated LED, separate control |
| Fan speeds | 4 speeds (+ intensive) |
| Delayed shut-off function | Yes, with adjustable timer depending on speed |
| Grease filter | Aluminum, dishwasher safe |
| Charcoal filter | Optional, replaceable every 4 months |
| Filter alarm | Flashing LED reminder for cleaning/replacement |
| Noise level | 55-65 dB(A) (estimate) |
| Max airflow | 650 m³/h (estimate) |
| Material | Stainless steel / glass (depending on version) |
| Repairability | Spare parts available: filters, LED bulb (replacement by professional) |
| Annual energy consumption | Approximately 35 kWh (estimate) |
| Warranty | 2 years (standard, check conditions) |
Frequently Asked Questions - DPE5660M - DPE5660G AEG
User questions about DPE5660M - DPE5660G AEG
0 question about this device. Answer the ones you know or ask your own.
Ask a new question about this device
Download the instructions for your Basket in PDF format for free! Find your manual DPE5660M - DPE5660G - AEG and take your electronic device back in hand. On this page are published all the documents necessary for the use of your device. DPE5660M - DPE5660G by AEG.
USER MANUAL DPE5660M - DPE5660G AEG
natural_image
Simple line drawing of a kitchen chimney with three dots on the base (no text or symbols)СЪДЪРЖАНИЕ
natural_image
Technical line drawing of a mechanical component with an arrow indicating direction (no text or symbols)natural_image
Diagram of a solar panel with two arrows indicating direction, no text or symbols presentnatural_image
Line drawing of a mechanical component with an arrow indicating direction (no text or symbols)natural_image
Diagram of a grid with arrows indicating direction, no text or symbols presentnatural_image
Line drawing of a ceiling-mounted device with an arrow indicating direction (no text or symbols)natural_image
Diagram of a solar panel with two arrows indicating direction, no text or symbols presentnatural_image
Technical line drawing of a mechanical component with an arrow indicating direction (no text or symbols)natural_image
Technical line drawing of a mechanical component with an arrow indicating direction (no text or symbols)Thank you for choosing this AEG product. We have created it to give you impeccable performance for many years, with innovative technologies that help make life simpler – features you might not find on ordinary appliances. Please spend a few minutes reading to get the very best from it.
Visit our website to:

Get usage advice, brochures, trouble shooter, service and repair information: www.aeg.com/support

Register your product for better service: www.registeraeg.com

Buy Accessories, Consumables and Original spare parts for your appliance: www.aeg.com/shop
CUSTOMER CARE AND SERVICE
Always use original spare parts.
When contacting our Authorised Service Centre, ensure that you have the following data available: Model, PNC, Serial Number.
The information can be found on the rating plate.

Warning / Caution-Safety information

General information and tips

Environmental information
Subject to change without notice.
1. SAFETY INFORMATION AND INSTALLATION

WARNING!
Refer to the separate Installation Instructions booklet for Safety Information and Installation. Read carefully the Safety chapters before any use or maintenance of the appliance.
2. PRODUCT DESCRIPTION
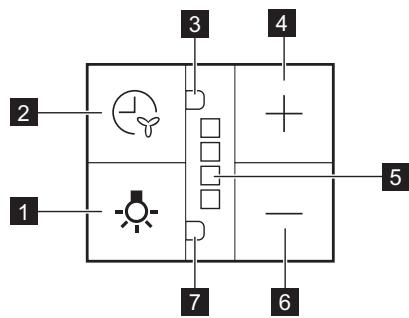
2.1 Control panel overview
| Function | Description | |
| 1 | Lamp | Turns the lights on and off. |
| 2 | Delayed switch off function button | The function sets automatic switch off delay. |
| 3 | Indicator for delayed switch off function | Indicates if function is activated. |
| 4 | Plus button | Increases the fan speed level. |
| 5 | LED indicators | indicates fan speed levels. |
| 6 | Minus button | Decreases the fan speed level. |
| 7 | Indicator for filter alarm function | Indicates if filter alarm is on. |
3. DAILY USE
3.1 Using the hood
Check the recommended speed according to the table below.
| 1 | While heating up food, cooking with covered pots. |
| 2 | While cooking with covered pots on multiple cooking zones or burners, gentle frying. |
| 3 | While boiling and frying big quantities of food without a lid, cooking on multiple cooking zones or burners. |
4
While boiling and frying big quantities of food without a lid, big humidity. After 8 minutes the appliance returns to previous setting.
It is recommended to leave the hood operating for approximately 15 minutes after cooking.
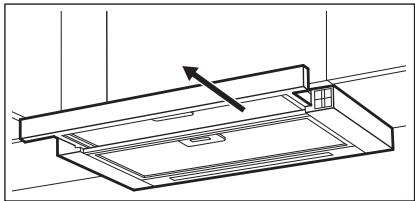
To operate the hood:
- Pull out the drawer of the hood more than 5 cm.
natural_image
Technical line drawing of a mechanical component with an arrow indicating direction (no text or symbols)The control panel is exposed.
- Press the + button to switch on the hood.
To increase the fan speed level press the button again. Press — to decrease the fan speed level.
The LED indicators on the panel switches on accordingly to selected fan speed level.
The hoods light works independently to other hood functions. To illuminate the cooking surface touch the light symbol ⚙️. Closing the drawer has no effect on the hood light.
To turn off the fan continue to press — until the hood fan stops or close the hood drawer.
The hood remembers last setting of fan speed on closing the drawer. The hood will operate on this fan speed level when drawer is pulled out again.
3.2 Delayed switch off function
This function allows to automatically turn off the fan after specific time of operating.
-
Set the desired fan speed.
-
Press the ⏻ button.
The indicator on the panel turns on. To turn off the function press the button again.
The change of the hood fan speed level or closing the hood drawer when the function is activated will result in deactivation of this function.
The time after the function switch off the fan:
| Motor Speed level | Time (min) |
| 1 | 20 |
| 2 | 15 |
| 3 | 10 |
| 4 | 8 |
3.3 Filter notification
Filter alarm reminds to change or clean the charcoal filter and clean the grease filter. The LED indicator blinks red regularly for 30 seconds if the grease filter must be cleaned. The LED indicator blinks red twice per every second for 30 seconds if the charcoal filter must be replaced or cleaned.
This function activates independently after 40 hours of operation for grease filter and 160 hours of operation for charcoal filter.

The fan does not operate during the alarm. Fan starts to operate on last remembered setting after 30 seconds.

Refer to cleaning the grease filter in care and cleaning chapter.

Refer to cleaning the charcoal filter or replacing the charcoal filter in care and cleaning chapter.

The function counter for charcoal filter is disabled by default.
To activate or deactivate the counter for charcoal filter:
- Pull out the hood drawer.
-
Make sure that the fan is turned off.
-
Press ⏻ for 3 seconds. The function is activated if two white LED indicators flashes for 3 seconds. The function is deactivated if only one LED indicator flashes for 3 seconds.
To reset the function counter in the notification period:
- Pull out the hood drawer.
- Press ⚙ for 3 seconds.
To reset the function counter out of the notification period:
- Pull out the hood drawer.
- Make sure that the fan is turned off.
- For grease filter press 🙏 for 3 seconds.
- For charcoal filter press — for 3 seconds.
The indicator blinks once for correct reset.
4. CARE AND CLEANING
4.1 Notes on cleaning
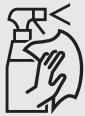 | Do not use abrasive detergents and brushes.Clean the surface of the appliance with a soft cloth with warm water and a mild detergent. |
| Cleaning Agents | After cooking some parts of appliance can get hot. To avoid stains appliance must be cooled down and dried with clean cloth or paper towels. |
| Clean stains with a mild detergent. | |
 | Clean the appliance and grease filters each month. Clean the interior and grease filters carefully from fat. Fat accumulation or other residue may cause fire. |
| Keep the hood clean | Grease filters can be washed in a dishwasher.The dishwasher must be set to a low temperature and a short cycle.The grease filter may discolour, it has no influence on the performance of the appliance. |
 | The time of saturation of the charcoal filter varies depending on the type of cooking and the regularity of cleaning the grease filter. |
| Charcoal filter | |
4.2 Cleaning the grease filter
Filters are mounted with the use of clips and pins on the opposite side.
To clean the filter:
- Press the handle of the mounting clip on the filter panel underneath the hood.

- Slightly tilt the front of the filter downwards, then pull.
Repeat the first two steps for all filters.
- Clean the filters using a sponge with non abrasive detergents or in a dishwasher.

The dishwasher must be set to a low temperature and a short cycle. The grease filter may discolour, it has no influence on the performance of the appliance.
- To mount the filters back follow the first two steps in reverse order.
Repeat the steps for all filters if applicable.
4.3 Replacing the charcoal
filter - optional


WARNING!
Depending on type, filter can be or cannot be regenerated. Refer to the leaflet provided with the filter.
5. ENVIRONMENTAL CONCERNS
Recycle materials with the symbol

Put the packaging in relevant containers
To replace the filter:
- Remove the grease filters from the appliance.
Refer to "Cleaning the grease filter" in this chapter.
- Pull the tabs towards the bottom part of the filter.
-
Slightly tilt the front of the filter downwards, then pull.
-
To install a new filter, perform the same steps in reverse order.
In any case, it is necessary to replace the filters at least every four months.
4.4 Replacing the lamp
This appliance is supplied with a LED lamp and separate control gear (LED driver). These parts can be replaced by a technician only. In case of any malfunction refer to "Service" in the "Safety Instructions" chapter.
to recycle it. Help protect the environment and human health by
recycling waste of electrical and electronic appliances. Do not dispose of appliances marked with the symbol 📄
with the household waste. Return the product to your local recycling facility or contact your municipal office.
CONTENIDO
natural_image
Technical line drawing of a mechanical component with an arrow indicating direction (no text or symbols)natural_image
Diagram of a grid with arrows pointing downward, no text or symbols presentnatural_image
Technical line drawing of a mechanical component with an arrow indicating direction (no text or symbols)natural_image
Diagram of a solar panel with two arrows indicating direction, no text or symbols present- Kallutage filtri esiosa kergelt allapoole, seejärel tömmake.
- Uue filtri paigaldamiseks tehke samad toimingud vastupidises järjekorras.
natural_image
Line drawing of a mechanical component with an arrow indicating direction (no text or symbols)natural_image
Technical line drawing of a mechanical component with an arrow indicating direction (no text or symbols)natural_image
Diagram of a solar panel with two arrows indicating direction, no text or symbols present3. SVAKODNEVNA UPORABA
3.1 Uporaba nape
natural_image
Line drawing of a mechanical component with an arrow indicating direction (no text or symbols)natural_image
Diagram of a solar panel with two arrows indicating direction, no text or symbols present- Lagano nagnite prednji dio filtra prema dolje, a zatim ga povucite.
- Da biste instalirali novi filtar, izvršite iste korake obrnutim redoslijedom. U svakom slučaju, potrebno je zamijeniti filtre najmanje svaka četiri mjeseca.
4.4 Zamjena žarulje
natural_image
Line drawing of a ceiling-mounted cabinet or enclosure with an arrow indicating direction (no text or symbols)natural_image
Diagram of a grid with two arrows pointing downward, no text or symbols presentnatural_image
Technical line drawing of a mechanical component with an arrow indicating direction (no text or symbols)natural_image
Diagram of a grid with two arrows pointing downward, no text or symbols presentnatural_image
Line drawing of a mechanical component with an arrow indicating direction (no text or symbols)natural_image
Diagram of a grid with two arrows pointing downward, no text or symbols presentnatural_image
Technical line drawing of a mechanical component with an arrow indicating direction (no text or symbols)Už stalčiuko pamatysite valdymo pultelj.
- Norèdami jungti gartraukj
paspauskite mygtuka +.
natural_image
Diagram of a solar panel with two arrows indicating direction, no text or symbols presentnatural_image
Technical line drawing of a mechanical component with an arrow indicating direction (no text or symbols)natural_image
Diagram of a solar panel with two arrows indicating direction, no text or symbols presentnatural_image
Line drawing of a ceiling-mounted cabinet or enclosure with an arrow indicating direction (no text or symbols)natural_image
Technical line drawing of a mechanical component with an arrow indicating direction (no text or symbols)natural_image
Diagram of a solar panel with two downward arrows indicating direction, no text or symbols presentnatural_image
Technical line drawing of a mechanical component with an arrow indicating direction (no text or symbols)Kontrollpanelet er eksponert.
natural_image
Diagram of a solar panel with two arrows indicating direction, no text or symbols presentnatural_image
Technical line drawing of a mechanical component with an arrow indicating direction (no text or symbols)natural_image
Diagram of a solar panel with two downward arrows indicating direction, placed on a grid surface (no text or symbols)natural_image
Technical line drawing of a mechanical component with an arrow indicating direction (no text or symbols)natural_image
Diagram of a grid with arrows indicating direction, no text or symbols presentnatural_image
Technical line drawing of a mechanical component with an arrow indicating direction (no text or symbols)natural_image
Diagram of a solar panel with two arrows indicating direction, no text or symbols presentnatural_image
Technical line drawing of a mechanical component with an arrow indicating direction (no text or symbols)natural_image
Diagram of a solar panel with two downward arrows indicating direction, placed on a grid surface (no text or symbols)natural_image
Technical line drawing of a mechanical component with an arrow indicating direction (no text or symbols)natural_image
Diagram of a solar panel with two arrows indicating direction, no text or symbols presentnatural_image
Technical line drawing of a mechanical component with an arrow indicating direction (no text or symbols)- Rahlo nagnite sprednji del filtra navzdol, nato povlecite.
- Za namestitev novega filtra ponovite iste korake v obratnem zaporedju.
V vsakem primeru je treba filtre zamenjati vsaj na štiri mesece.
4.4 Zamenjava žarnice
2. PËRSHKRIM I PRODUKTIT
natural_image
Technical line drawing of a mechanical component with an arrow indicating direction (no text or symbols)natural_image
Diagram of a solar panel with two arrows indicating direction, no text or symbols presentnatural_image
Technical line drawing of a mechanical component with an arrow indicating direction (no text or symbols)natural_image
Diagram of a grid with two arrows pointing downward, no text or symbols present5. ЕКОЛОШКА ПИТАЊА
reparationsinformation:
www.aeg.com/support
natural_image
Technical line drawing of a mechanical component with an arrow indicating direction (no text or symbols)natural_image
Diagram showing two arrows pointing downward on a grid-patterned surface, with no text or symbols present.natural_image
Technical line drawing of a mechanical component with an arrow indicating direction (no text or symbols)natural_image
Technical line drawing of a mechanical component with an arrow indicating direction (no text or symbols)natural_image
Diagram of a grid with arrows indicating direction, no text or symbols present5. المخاوف البيئة
natural_image
Technical line drawing of a mechanical component with an arrow indicating direction (no text or symbols)لوحة التحكم مكشوفة.