
DCK5281HG - Range hood AEG - Free user manual and instructions
Find the device manual for free DCK5281HG AEG in PDF.
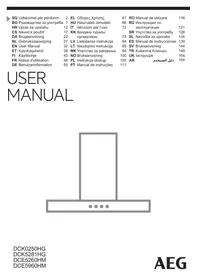
 FR
FR
 AR
AR
 BG
BG
 CS
CS
 DA
DA
 DE
DE
 EL
EL
 EN
EN
 ES
ES
 ET
ET
 FI
FI
 HU
HU
 IT
IT
 KK
KK
 LT
LT
 LV
LV
 MK
MK
 NL
NL
 NO
NO
 PL
PL
 PT
PT
 RO
RO
 RU
RU
 SL
SL
 SQ
SQ
 SR
SR
 SV
SV
 TR
TR
 UK
UK
| Product Type | Range hood |
| Brand | AEG |
| Model | DCK5281HG |
| Width | 600 mm (estimate) |
| Depth | 500 mm (estimate) |
| Height | 300 mm (estimate) |
| Net weight | 15 kg (estimate) |
| Power supply | 220-240 V, 50/60 Hz |
| Number of speeds | 4 speeds + maximum speed |
| Hob²Hood function | Automatic control from the hob |
| Lighting | LED bulb with variable intensity (max, med, low, off) |
| Grease filter type | Dishwasher safe |
| Charcoal filter type | Washable and regenerable (replace every 2 years) |
| Filter notification | Cleaning or replacement reminder |
| Remote control included | Yes |
| Noise level | Not specified, but quiet (estimate 50 dB) |
| Warranty | 2 years |
| Maintenance | Monthly cleaning of grease filters, charcoal filter every 2 months |
| Installation | See separate installation manual |
Frequently Asked Questions - DCK5281HG AEG
User questions about DCK5281HG AEG
0 question about this device. Answer the ones you know or ask your own.
Ask a new question about this device
Download the instructions for your Range hood in PDF format for free! Find your manual DCK5281HG - AEG and take your electronic device back in hand. On this page are published all the documents necessary for the use of your device. DCK5281HG by AEG.
USER MANUAL DCK5281HG AEG
Please use original spare parts.
When contacting our after-sales service, you must have the following information: model, serial number.
The information table should also be opened with basic data.
Defects / Attention - Safety information
Both information and information environment
Reserve the right to make changes.
1. SAFETY AND INSTALLATION INFORMATION

WARNING!
Read the entire brochure
Instructions for
Installation and
Safety information
Safety and installation.
Read carefully
Table 3a Safety
Before each use
Check the device.
2. DESCRIPTION OF THE DEVICE
2.1 Before first use
3. DAILY USE
3.1 Using the absorber
Check the pre-filter speed according to the table below.
The device must be set to low temperature and short cycles. The oil filter may lose color, but this does not affect the operation of the device.
- To mount the filters, pull the two rods in the opposite direction.
Repeat the rods for each filter, if necessary.
4.3 Replacing the activated carbon filter
To replace the filter:
1. Remove the oil filter from the device. See "Removing the oil filter" in this chapter. 2. Remove the screws that hold the filter base (1), then the base itself (2).
3. DAILY USE
3.1 Using the hood
Check the recommended speed according to the table below.
| 0-1 | Prilikom zagrijavanja hrane, kuhanje sPokrivenim pos-sudama. |
| 2 | Prilikom kuhanja sPokrivenim posudama na više zo-na kuhanja ili plamenika, blago prženje. |
| 3 | Prilikom ključanje i prženja velikh količina hrane bezPoklopca, kuhanja na više zona kuhanja ili plameni-ka. |
| Prilikom ključanje i prženja velikh količine hrane bezPoklopca, visoka VLCznost. |

It is recommended to leave the hood running for about 15 minutes after cooking.
To operate the hood:
Thank you for choosing this AEG product. We have created it to give you impeccable performance for many years, with innovative technologies that help make life simpler – features you might not find on ordinary appliances. Please spend a few minutes reading to get the very best from it. Visit our website to:

Get usage advice, brochures, trouble shooter, service and repair information: www.aeg.com/support

Register your product for better service: www.registeraeg.com

Buy Accessories, Consumables and Original spare parts for your appliance: www.aeg.com/shop
CUSTOMER CARE AND SERVICE
Always use original spare parts.
When contacting our Authorised Service Centre, ensure that you have the following data available: Model, PNC, Serial Number.
The information can be found on the rating plate.
Warning / Caution-Safety information
(1) General information and tips Environmental information
Subject to change without notice.
1. SAFETY INFORMATION AND INSTALLATION

WARNING!
Refer to the separate Installation Instructions booklet for Safety Information and Installation. Read carefully the Safety chapters before any use or maintenance of the appliance.
2. PRODUCT DESCRIPTION
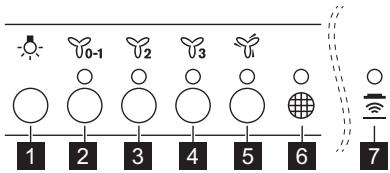
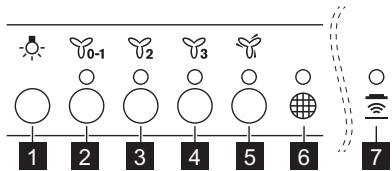
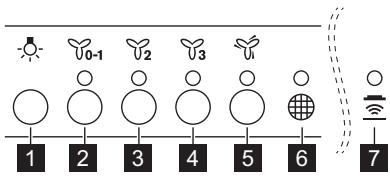
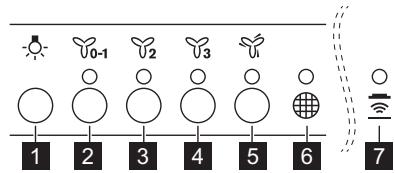
2.1 Control panel overview
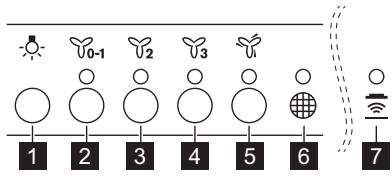
| Function | Description | |
| 1 | Lamp | Turns the lights on and off. |
| 2 | First speed / Off | The motor switches to first speed level. Second press turns off the appliance. |
| 3 | Second speed | The motor switches to second speed level. |
| 4 | Third speed | The motor switches to third speed level. |
| 5 | Maximum speed | The motor switches to maximum speed level. After 5 minutes appliance switches to third speed. |
| 6 | Filter notification | Reminds to change or clean the charcoal filter and clean the grease filter. |
| 7 | Hob²Hood | Indicator of the function to control hood from hob. For some models the symbol present on the control panel. |
3. DAILY USE
3.1 Using the hood
Check the recommended speed according to the table below.
| 0-1 | While heating up food, cooking with covered pots. |
| 2 | While cooking with covered pots on multiple cooking zones or burners, gentle frying. |
| 3 | While boiling and frying big quantities of food without a lid, cooking on multiple cooking zones or burners. |
| 4 | While boiling and frying big quantities of food without a lid, big humidity. |

It is recommended to leave the hood operating for approximately 15 minutes after cooking.
To operate the hood:
- Press the first speed button to switch on the appliance.
- If needed, press the light button to illuminate the cooking surface. The light is dimmable. Press again the button to change the intensity from: a. Maximum, b. Medium, c. Low, d. Off.
- If needed, change the speed by pressing the desired button.
To turn off the appliance, press the first speed button again.
3.2 Hob²Hood function
It is an automatic function which connects the hob with a hood. Both the hob and the hood have an infrared signal communicator. The speed of the fan is defined automatically based on the mode setting and the temperature of the hottest cookware on the hob. You can also operate the fan manually using the hob. The function can be activated from the panel of the hob.

For more information on how to use the function, refer to the hob user manual.
3.3 Filter notification
The filter alarm reminds you to change or clean the charcoal filter and clean the grease filter.
The filter indicator flashes for 30 seconds if the grease filter must be cleaned. The filter indicator flashes for 30 seconds if the charcoal filter must be replaced or cleaned.

Refer to cleaning the grease filter in the care and cleaning chapter.

Refer to cleaning the charcoal filter or replacing the charcoal filter in the care and cleaning chapter.
To activate or deactivate the function:
- To activate the function, press button 2 for 3 seconds.
If the function is activated, the filter indicator flashes twice.
- To deactivate the function, press button 2 for 3 seconds.
If the function is deactivated, the filter indicator flashes once.
To reset the function, press button 3 for 3 seconds.
3.4 Remote-control
The appliance is supplied with a remote-control.
The connection is originally enabled.
To connect or disconnect remote-control:
- Switch off the appliance.
- Press the button for 3 seconds.
The indicator on the control panel flashes twice if the function is enabled and once if disabled.
4. CARE AND CLEANING
4.1 Notes on cleaning
| Cleaning Agents | Do not use abrasive detergents and brushes. Clean the surface of the appliance with a soft cloth with warm water and a mild detergent. |
| After cooking some parts of appliance can get hot. To avoid stains appliance must be cooled down and dried with clean cloth or paper towels. | |
| Clean stains with a mild detergent. | |
| Keep the hood clean | Clean the appliance and grease filters each month. Clean the interior and grease filters carefully from fat. Fat accumulation or other residue may cause fire. Follow the instructions for cleaning the accessories when filter notification is on. Refer to Filter notification in daily use chapter. |
| Grease filters can be washed in a dishwasher. The dishwasher must be set to a low temperature and a short cycle. The grease filter may discolour, it has no influence on the performance of the appliance. | |
| Charcoal filter | The time of saturation of the charcoal filter varies depending on the type of cooking and the regularity of cleaning the grease filter. Charcoal filter is washable, clean or regenerate the filter after approximately every two months. Refer to leaflet included in the accessory. |
4.2 Cleaning the grease filter
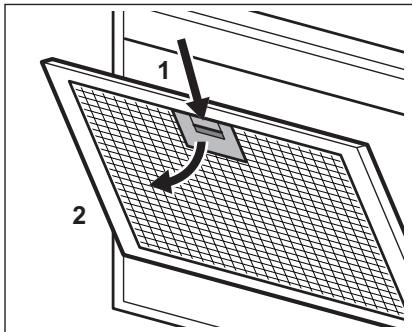
Filters are mounted with the use of clips and pins on the opposite side.
To clean the filter:
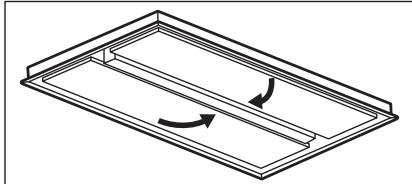
- Pull the cover to open it.
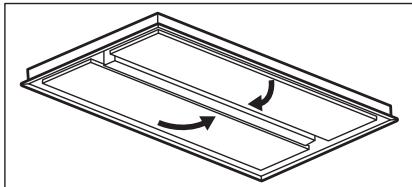
- Press the handle of the mounting clip on the filter panel underneath the hood (1).
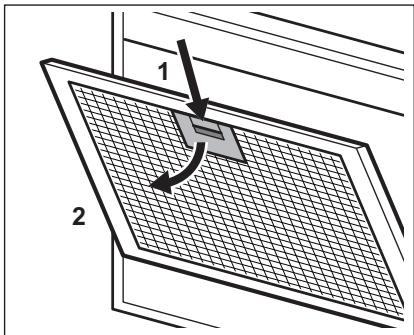
- Slightly tilt the front of the filter downwards (2), then pull.
Repeat the first two steps for all filters. 4. Clean the filters using a sponge with non-abrasive detergents or in a dishwasher.
The dishwasher must be set to a low temperature and a short cycle. The grease filter may discolour, but this has no influence on the performance of the appliance. 5. To mount the filters back, follow the first two steps in reverse order. Repeat the steps for all filters if applicable.
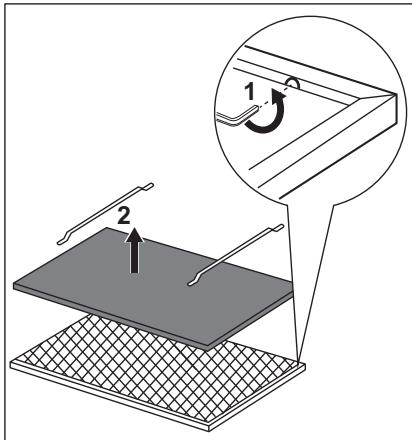
4.3 Cleaning the charcoal filter
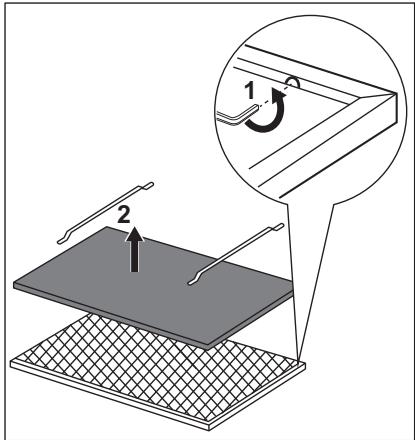
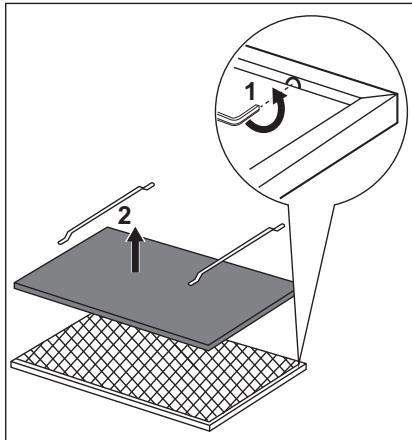
To remove the filter:
- Remove the grease filters from the appliance. Refer to "Cleaning the grease filter" in this chapter.
- Remove the clips holding the filter bed (1), then the filter bed (2).
5. GUARANTEE
Customer Service Centres
| Point of Service | ||
| Industriestrasse 10 | Le Trési 6 | Via Violino 11 |
| 5506 Mägenwil | 1028 Préverenges | 6928 Manno |
- Wash the filter bed in hot water without using detergent or use a dishwasher.
Set the dishwasher without using rinse aids or any other detergents. The dishwasher cannot be filled with dishes.
- Leave the filter bed to dry or use an oven.
Set the oven for 7 minutes at the maximum temperature of 60°C.
- To install the filter, perform the steps in reverse order. The filter has to be fully dried before installing it back into the appliance.
Replace the filter bed every 2 years or when the cloth is damaged.
4.4 Replacing the lamp
This appliance is supplied with a LED lamp. This part can be replaced by a technician only. In case of any malfunction refer to "Service" in the "Safety Instructions" chapter.
| Point of Service | |
| Morgenstrasse 1313018 Bern | Service-Helpline0848 848 111service@electrolux.ch |
| Langgasse 109008 St. Gallen | |
| Am Mattenhof 4a/b6010 Kriens | |
| Schlossstrasse 14133 Pratteln | |
| Comercialstrasse 197000 Chur | |
Spare parts service Industriestrasse 10, 5506 Mägenwil, Tel. 0848 848 111
Specialist advice/Sale Badenerstrasse 587,8048 Zurich,Tel.0444058111
Warranty For each product we provide a two-year guarantee from the date of purchase or delivery to the consumer (with a guarantee certificate, invoice or sales receipt serving as proof). The
guarantee covers the costs of materials, labour and travel. The guarantee will lapse if the operating instructions and conditions of use are not adhered to, if the product is incorrectly installed, or in the event of damage caused by external influences, force majeure, intervention by third parties or the use of non-genuine components.
6. ENVIRONMENTAL CONCERNS
Recycle materials with the symbol. Put the packaging in relevant containers to recycle it. Help protect the environment and human health by recycling waste of electrical and electronic appliances. Do not dispose of appliances marked with the symbol with the household waste. Return the product to your local recycling facility or contact your municipal office.

For Switzerland:
Where should you take your old equipment?
Anywhere that sells new equipment or hand it in to official SENS collection points or official SENS recycling firms.
The list of official SENS collection points can be found at www.erecycling.ch
- PRODUCT DESCRIPTION 39
- DAILY USE 39
- CLEANING AND MAINTENANCE 41 5. WASTE MANAGEMENT 42
FOR BEST RESULTS
TURN ON THE TAP.
SET THE TEMPERATURE
PRESS THE ON BUTTON
DURING OPERATION
SAFETY INFORMATION
TROUBLESHOOTING
WATER FILTER.
2. INSTALLATION
2.1 Water connection procedure
The indicators are lit.
To adjust the functions, press and hold the button.
3.4 Removing the control panel
The control panel is fixed with screws.
Disconnect the pipes.
To remove or replace the control panel:
- Remove the screws.
- If the control panel indicators do not light up, check the connections. If they still do not light up, replace the panel.
4. CLEANING AND MAINTENANCE
4.1 Safety precautions for cleaning
| Жуrbш 3aTTAP | Жemіріш жуrbш 3aTTAPDBI жэне щeТкелерпді naДаланьань.КурьлфынгИаДынгБИжуrbИн жумсak жуфыш 3aT KOCылfaHжылбI cyfa 6batbpylnfahжумсak уsybepeknen ta3anaHbI3. |
| Таfram Nicip'reненг Кэн IN курьлфынгИн кэн Бilekterip bICbIn KeTyIMyMKIN. Дады 6oIbIbpMaC yuH IN KурьлфынгИс cybITbIn, ta3aшуbepeknen Hemece KaFa3 cyIprimen H kypfaTу kepek. | |
| ДаKTapdbJxKуMcaKжуфыш 3aTneH ta3anaHbI3. | |
| Aya TaptkbiшКуралды ta3aУстаньз | Курьлфынш жэне май сугinerpiH ai сaybH ta3anaHbI3. Курьлфынш iшин жэне май сугinerpiH майдан ta3apTBиB3. Май xinHaflaHdaHemece backka kaIdBiK xinHaIcA, орт kayiniH TydbybMyMmIK.Сугинх xaырама синhalы Кocylы KeЗde kepek-JkapakTapdbI ta3anay HsckaynapbH opbIH daHbI3.Сугri typanbI xaырамaHbIkyнdeniKTI naDalaHny tapaybIHAN hapaHbI3. |
| Майы сугinerpiH bIDlc Jyfbsh Maшинада Jyyyfa 6oIaDbIbldic JyfuSh Maшинafara Temen TempepaTypeжэн Кыckeц zuKlOpHaTukepek.Май сугicinHynci e3repuyi MymKinH,Бул курьлфынHжмьicicteyiHe acep etneiDi. |
Water pressure
Before cleaning, make sure that the water pressure and the water supply are turned off. Do not use water pressure to clean the device. Use a damp cloth for cleaning. For stubborn dirt, use a mild detergent.
4.2 Cleaning the device
To replace the filters, remove the screws and the cover.
To clean the device:
- Pull out the dust filter.
- Clean the filter with a vacuum cleaner or wash it with water and let it dry completely before reinstalling.
- Rinse the filter elements with clean water (2), then dry them.
All filters are installed in two stages.
- Filters are not washed with water, but cleaned with compressed air or a vacuum cleaner.

The vacuum cleaner requires a temperature and low humidity. When cleaning the filter, this does not affect the operation of the dryer.
- Install the filter in the reverse order of the two stages of installation.
If necessary, replace the filters for all filters.
4.3 Cleaning the filter
To remove the filter:
- Remove the filters from the dryer.
See the section "Cleaning the filters".
- Remove the filter holder (1), then remove the filter (2).
- Clean the filter with a soft brush or with a vacuum cleaner.
Check the vacuum cleaner parameters and do not use other cleaning agents. Do not use the vacuum cleaner for vacuuming.
- Replace the filter if it is damaged or worn.

Operate at a maximum temperature of 60°C for 7 minutes.
- The lamp is designed for general lighting. The lamp
must be installed by qualified personnel.
The lamp must be installed in a location where it is not exposed to excessive heat or moisture.
4.4 Maintenance
The LED lamp is maintenance-free. This is a high-tech product. For any malfunctions, refer to the "Service" section in the "Safety Instructions".
5. DISPOSAL OF THE APPLIANCE
Used materials should be disposed of in accordance with local regulations. Dispose of used materials in the appropriate containers. Electrical and electronic equipment must be disposed of separately from household waste to protect the environment and human health.
Do not dispose of the appliance with household waste. Take it to a designated collection point or contact your local waste disposal service.
This product has been manufactured with the highest quality and precision. The serial number is located on the rating plate. The first two digits indicate the year of manufacture, the next two digits indicate the month. For example, serial number 14512345 means the product was manufactured in 2021, in the 45th week.
Manufacturer: Electrolux Appliances AB, St. Goransgatan 143, 105 45 Stockholm, Sweden.
CONTENTS
- SAFETY INFORMATION AND INSTALLATION 84 2. PRODUCT DESCRIPTION 85
- DAILY USE 85
- CLEANING AND CARE 87
Visit our website for:

Information regarding
technical safety.
2. DESCRIPTION OF THE DEVICE
2.1 General view of the control panel
3.1 Using the extractor
Recommended speed values are given in the table below.
Switching on the extractor;
- To turn on the device, press the first speed selection button 0-1. 2. If necessary, press the lighting button to illuminate the panel. The lighting level is adjustable. Successive presses of the button change the lighting level as follows:
a. Maximum, b. medium level, c. low level, d. off.
- If necessary, change the speed by pressing the desired button.
Made in Italy.
CONTENTS
- SAFETY INFORMATION AND INSTALLATION 129 2. PRODUCT DESCRIPTION 129 3. DAILY USE 129
- HELP AND SUPPORT 131
- ENVIRONMENTAL CONCERNS 133
FOR PERFECT RESULTS
Thank you for choosing this AEG product. We have created it to give you impeccable performance for many years, with innovative technologies that make life simpler – features you might not find on ordinary appliances. Please spend a few minutes reading this to get the very best from it.
Visit our website:

Get usage advice, brochures, trouble shooter, service and repair information:
www.aeg.com/support

Register your product for better service:
www.registeraeg.com

Buy accessories, consumables and original spare parts for your appliance:
www.aeg.com/shop
CUSTOMER CARE AND SERVICE
Always use original spare parts.
When contacting our authorized service center, ensure that you have the following data available: Model, Product Number, Serial Number.
Read the manual before installation, in accordance with the technical characteristics.
Reference/Index - safety information, instructions and advice for environmental protection
Copyright.
1. SAFETY INFORMATION FOR INSTALLATION

WARNING!
Read the
brochure with instructions for
installation for
normal
safety
installation. Also
read the seller's notes on
safety before
www.aeg.com/support
Register your product for better service:
www.registeraeg.com


OKPemomy6yKnTei iNCTpyKu3i BCTaHOBLeHH. IpeEd
BVKOPINCTaHHaMcN
O6cIyROByBaHHm IpiHJaD
yBaXHo npOuHTaIte po3diINn 1oDo 6e3neKn.
2. DESCRIPTION OF THE PRODUCT
2.1 Control panel
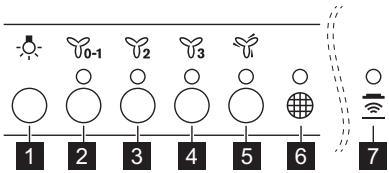
| ФункцioHAJIbHicTh | Опис | |
| 1 | Ламма | УвIMКнeHHЯ i ВIMKнeHHЯ пIDСВiЧУВань. |
| 2 | Першa šWBιДКiCtь /ВИМК. | ДВИгУН BVIKKa€TbCSЯ ha pIBeHь пERшоI šWBιДКоCTi.Dpyrte наТИСЕння BVIKKa€ пИПад. |
| 3 | Дрuya šWBιДКiCtь | ДВИгУН BVIKKa€TbCSЯ ha pIBeHь дPyroÖI šWBιДКоCTi. |
| 4 | Трета šWBιДКiCtь | ДВИгУн BVIKKa€TbCSЯ ha pIBeHь ТретБоI šWBιДКоCTi. |
| 5 | Мakсимальна šWBιДКiCtь | ДВИгУн BVIKKa€TbCSЯ ha pIBeHь makсимальноI šWBιДКоCTi.Черес 5 xВИПINн пИПад пЕremika€TbCSЯ ha pIBeHьТретБоI šWBιДКоCTi. |
| 6 | ПовiodOMLEHЯ пpoфльчр | Haradуе пpo Heo6xIДнICTь зamIHи abO очиelenHЯ By-rilbHOrO φiNbIbTPa ta OChuSEHЯ кИРOBOrO φiNbIbTPa. |
| 7 | Hob²Hood | Идikatop Функцii ДЯг КерУВань ВИТЯЖКою 3 Ba-pinьhoI пaheni. Y DeякIx MОdelen CImBOJ писуTNiHa пaheni KерУВань. |
Hob²Hood 3.2 a,b,gll
gall jogaoaia wai aag g 0jwJlogoagelcbgagall.aa20 gall acw yddy puy cyaewll ylgolggoglldGgall Wlal JwLdlckay .gall Lc agswy abgl bawwnk .gall no a>gall .gall a >
aS S c logall no jall
JgJ aabgl pdo
.ogall 12
i
jala 3.3
jil jizui jzui jilll jai jia jil jia jia u gdl jilg aubag aabgu jil 1i 30 oal jll
aIg aIeI.4
aJbJI Jg> Jb>Jo 4.1
| . . . . . . . . . . . . . . . . . . . . . . . . . . . . . . . . . . . . . . . . . . . . . . . . . . . . . . . . . . . . . . . . . . . . . . . . . . . . . . . . . . . . . . . . . . . . . . . . . . . . .. العربية بَلُّرِه وَالعَدْبْنِ وَالعَدْبْنِ وَالعَدْبْنِ وَالعَدْبْنِ وَالعَدْبْنِ وَالعَدْبْنِ وَالعَدْبْnِ وَالعَدْبْnِ وَالعَدْبْnِ وَالعَدْبْnِ وَالعَدْبْnِ وَالعَدْبْnِ وَالعَدْbْnِ وَالعَدْbْnِ وَالعَدْbْnِ وَالعَdْbْnِ وَالعَdْbْnِ |
| . . . . . . . . . . . . . . . . . . . . . . . . . . . . . . . . . . . . . . . . . . . . . . . . . . . . . . . . . . . . . . . . . . . . . . . . . . . . . . . . . . . . . . . . . . . . . . . . . . . . . . . . . . . . . . . . . . . . . . . . . . . . . . . . . . . . . . . . . . . . . . . . . . . . . . . . . . . . . . . . . . . . . . . . . . . . . . . . . . . . . . . . . . . . . . . . . . . . . . . - . . . . . . . . . . . . . . . . . . . . . . . . . . . . . . . . . . . . . . . . . . . . . . . . . . . . . . . . . . . . . . . . . . . . . . . . . . . . . . . . . . . . . . . . . . . . . . . . . . . ? . . . . . . . . . . . . . . . . . . . . . . . . . . . . . . . . . . . . . . . . . . . . . . . . . . . . . . . . . . . . . . . . . . . . . . . . . . . . . . . . . . . . . . . . . . . . . . . . . . . - - - - - - - - - - - - - - - - - - - - - - - - - - - - - - - - - - - - - - - - - - - - - - - - - - - - - - - - - - - - - - - - - - - - - - - - - - - - - - - - - - - - - - - - - - - - - - - - - - - - - - . . . . . . . . . . . . . . . . . . . . . . . . . . . . . . . . . . . . . . . . . . . . . . . . . . . . . . . . . . . . . . . . . . . . . . . . . . . . . . . . . . . . . . . . . . . . . . . . . . . • - - - - - - - - - - - - - - - - - - - - - - - - - - - - - - - - - - - - - - - - - - - - - - - - - - - - - - - - - - - - - - - - - - - - - - - - - - - - - - - - - - - - - - - - - - - - - - - - - - - . . . . . . . . . . . . . . . . . . . . . . . . . . . . . . . . . . . . . . . . . . . . . . . . . . . . . . . . . . . . . . . . . . . . . . . . . . . . . . . . . . . . . . . . . . . . . . . . . . . \- . . . . . . . . . . . . . . . . . . . . . . . . . . . . . . . . . . . . . . . . . . . . . . . . . . . . . . . . . . . . . . . . . . . . . . . . . . . . . . . . . . . . . . . . . . . . . . . . . . - - - - - - - - - - - - - - - - - - - - - - - - - - - - - - - - - - - - - - - - - - - - - - - - - - - - - - - - - - - - - - - - - - - - - - - - - - - - - - - - - - - - - - - - - - - - - - - - - - - - - - - - - - - - - - - - - - - - - - - - - - - - - - - - - - - - - - - - - - - - - - - - - - - - - - - - - - - - - - - - - - - - - - - - - - - - - - - - - - - - - - - - - - - - - - - - - - - - - - - - - - - - - - - - - - - - - - - - - - - - - - - - - - - - - - - - - - - - - - - - - - - - - - - - - - - - - - - - - - - - - - - - - - - - - - - - - - - - - - - - - - - - - - - - - - - - - - - - - - - - - - - - - - - - - - - - - - - - - - - - - - - - - - - - - - - - - - - - - - - - - - - - - - - - - - - - - - - - - - - - - - - - - - - - - - - - - - - - - - - - - - - - - - - - - - - - - - - - - - - - - - - - - - - - - - - - - - - - - - - - - - - - - - - - - - - - - - - - - - - - - - - - - - - - - - - - - - - - - - - - - - - - - - - - - - - - - - - - - - - - - - - - - - - - - - - - - - - - - - - - - - - - - - - - - - - - - - - - - - - - - - - - - - - - - - - - - - - - - - - - - - - - - - - - - - - - - - - - - - - - - - - - - - - - - - - - - - - - - - - - - - - - - - - - - - - - - - - - - - - - - - - - - - - - - - - - - - - - - - - - - - - - - - - - - - - - - - - - - - - - - - - - - - - - - - - - - - - - - - - - - - - - - - - - - - - - - - - - - - - - - - - - - - - - - - - - - - - - - - - - - - - - - - - - - - - - - - - - - - - - - - - - - - - - - - - - - - - - - - - - - - - - - - - - - - - - - - - - - - - - - - - - - - - - - - - - - - - - - - - - - - - - - - - - - - - - - - - - - - - - - - - - - - - - - - - - - - - - - - - - - - - - - - - - - - - - - - - - - - - - - - - - - - - - - - - - - - - - - - - - - - - - - - - - - - - - - - - - - - - - - - - - - - - - - - - - - - - - - - - - - - - - - - - - - - - - - - - - - - - - - - - - - - - - - - - - - - - - - - - - - - - - - - - - - - - - - - - - - - - - - - - - - - - - - - - - - - - - - - - - - - - - - - - - - - - - - - - - - - - - - - - - - - - - - - - - - - - - - - - - - - - - - - - - - - - - - - - - - - - - - - - - - - - - - - - - - - - - - - - - - - - - - - - - - - - - - - - - - - - - - - - - - - - - - - - - - - - - - - \- - - - - - - - - - - - - - - - - - - - - - - - - - - - - - - - - - - - - - - - - - - - - - - - - - - - - - - - - - - - - - - - - - - - - - - - - - - - - - - - - - - - - - - - - - - - - - - - - - - () () () () () () () () () () () () () () () () () () () () () () () () () () () () () () () () () () () () () () () () () () () () () () () () () () () () () () () () () () () () () () () () () () () () () () () () () () () () () () () () () () () () () () () () () () () () () () () () () () () () ( ) () () () () () () () () () () () () () () () () () () () () () () () () () () () () () () () () () () () () () () () () () () () () () () () () () (). () () () () () () () () () () () () () () () () () () () () () () () () () () () () () () () () () () () () () () () () () () () () () () () () () (> ) () () () () () () () () () () () () () () () () () () () () () () () () () () () () () () () () () () () () () () () () () () () () () () () () () () / / / / / / / / / / / / / / / / / / / / / / / / / / / / / / / / / / / / / / / / / / / / / / / / / / / / / / / / / / / / / / / / / / / / / / / / / / / / / / / / / / / / / / / / / / / / / / / / / / / / // / / / / / / / / / / / / / / / / / / / / / / / / / / / / / / / / / / / / / / / / / / / / / / / / / / / / / / / / / / / / / / / / / / / / / / / / / / / / / / / / / / / / / / / / / / / / / / / / / / / / / / / / / / / / / / / / / / / / / / / / / / / / / / / / / / / / / / / / / / / / / / / / / / / / / / / / / / / / / / / / / / / / / / / / / / / / / / / / / / / / / / / / / / / / / / / / / / / / / / / / / / / / / / / / / / / / / / / / / / / / / / / / / / / / / / / / / / / / / / / / / / / / / / / / / / / / / / / / / / / / / / / / / / / / / / / / / / / / / / / / / / / / / / / / / / / / / / / / / / / / / / / / / / / / / / / / / / / / / / / / / / / / / / / / / / / / / / / / / / / / / / / / / / / / / / / / / / / / / / / / / / / / / / / / / / / / / / / / / / / / / / / / / / / / / / / / / / / / / / () () () () () () () () () () () () () () () () () () () () () () () () () () () () () () () () () () () () () () () () () () () () () () () () () (} () () () () () () () () () () () () () () () () () () () () () () () () () () () () () () () () () () () () () () () () () () () () () () () () () (100) (100) (100) (100) (100) (100) (100) (100) (100) (100) (100) (100) (100) (100) (100) (100) (100) (100) (100) (100) (10 0 0 0 0 0 0 0 0 0 0 0 0 0 0 0 0 0 0 0 0 0 0 0 0 0 0 0 0 0 0 0 0 0 0 0 0 0 0 0 0 0 0 0 0 0 0 0 0 0 0 |
aal .2
ρS > 2.1
o 1d l d j 1i a o .AEG 1d J
www.aeg.com/support
www.registeraeg.com
www.aeg.com/shop



- SAFETY AND INSTALLATION INFORMATION
- WARNING
- DESCRIPTION OF THE DEVICE
- BEFORE FIRST USE
- DAILY USE
- USING THE ABSORBER
- REPLACING THE ACTIVATED CARBON FILTER
- USING THE HOOD
- TO OPERATE THE HOOD
- CUSTOMER CARE AND SERVICE
- SAFETY INFORMATION AND INSTALLATION
- PRODUCT DESCRIPTION
- CONTROL PANEL OVERVIEW
- HOB²HOOD FUNCTION
- FILTER NOTIFICATION
- TO ACTIVATE OR DEACTIVATE THE FUNCTION
- REMOTE-CONTROL
- TO CONNECT OR DISCONNECT REMOTE-CONTROL
- CARE AND CLEANING
- NOTES ON CLEANING
- CLEANING THE GREASE FILTER
- TO CLEAN THE FILTER
- CLEANING THE CHARCOAL FILTER
- GUARANTEE
- REPLACING THE LAMP
- ENVIRONMENTAL CONCERNS
- FOR SWITZERLAND
- FOR BEST RESULTS
- INSTALLATION
- WATER CONNECTION PROCEDURE
- REMOVING THE CONTROL PANEL
- TO REMOVE OR REPLACE THE CONTROL PANEL
- CLEANING AND MAINTENANCE
- SAFETY PRECAUTIONS FOR CLEANING
- CLEANING THE DEVICE
- TO CLEAN THE DEVICE
- CLEANING THE FILTER
- MAINTENANCE
- DISPOSAL OF THE APPLIANCE
- CONTENTS
- GENERAL VIEW OF THE CONTROL PANEL
- USING THE EXTRACTOR
- SWITCHING ON THE EXTRACTOR
- FOR PERFECT RESULTS
- SAFETY INFORMATION FOR INSTALLATION
- DESCRIPTION OF THE PRODUCT
- CONTROL PANEL
- HOB²HOOD 3.2 A,B,GLL
Brand : AEG
Model : DCK5281HG
Category : Range hood