
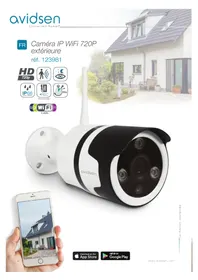
123282 - Surveillance Camera AVIDSEN - Free user manual and instructions
Find the device manual for free 123282 AVIDSEN in PDF.
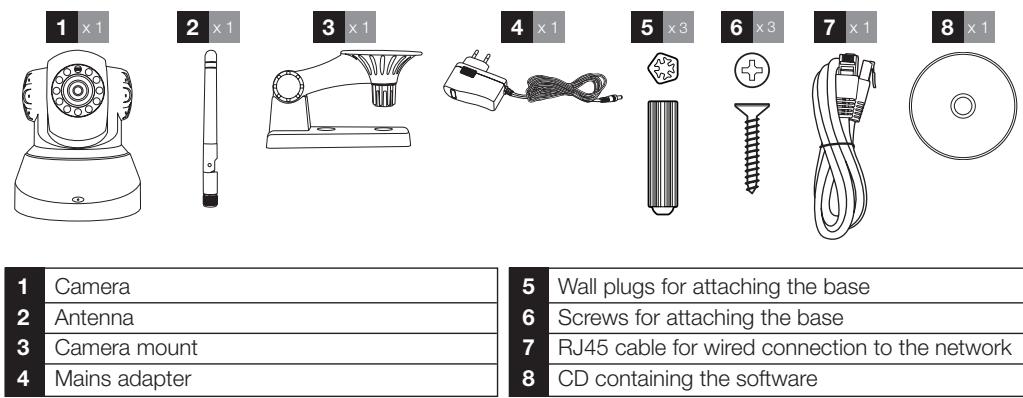
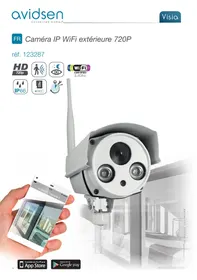
| Product type | Motorized WiFi IP camera 720p |
| Power supply | 5Vdc / 2000mA (230Vac 50Hz / 5Vdc 2A mains adapter supplied) |
| Night vision | Infrared, range 10 m, automatic or manual (dusk sensor) |
| Video resolution | Main stream: up to 1280x720 pixels; secondary stream: up to 640x352 pixels |
| Viewing angle | 56° (optics f:3.6mm) |
| Motorized movement | Rotation 345°, tilt 90° |
| Audio | Built-in microphone and speaker for two-way audio communication |
| Connectivity | Ethernet RJ45 10/100, WiFi IEEE 802.11b/g/n |
| Motion detection | Yes, with customisable zones and adjustable sensitivity |
| Storage | Recording on smartphone/tablet or PC software (SD card not supported) |
| Alert functions | Sends image by email on motion detection |
| Maintenance and cleaning | Unplug before cleaning; use a soft, slightly damp cloth; do not use abrasive or corrosive products |
| Safety | Indoor use only; do not expose to moisture, scratches, chemicals; comply with local legislation |
| Warranty | 2 years parts and labour (excluding damage caused by negligence) |
| Spare parts and repairability | Spare parts stock available during the warranty period; do not open or repair yourself |
| General information | 1/4" CMOS sensor, h.264 compression, operating temperature 0°C to 40°C, humidity 20% to 85%RH |
| Kit contents | Camera, mains adapter, RJ45 cable, CD, screws and wall plugs, quick start guide |
Frequently Asked Questions - 123282 AVIDSEN
User questions about 123282 AVIDSEN
0 question about this device. Answer the ones you know or ask your own.
Ask a new question about this device
Download the instructions for your Surveillance Camera in PDF format for free! Find your manual 123282 - AVIDSEN and take your electronic device back in hand. On this page are published all the documents necessary for the use of your device. 123282 by AVIDSEN.
USER MANUAL 123282 AVIDSEN

m = 311 ;
Alexandre Chaverot, president
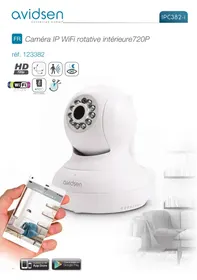
EN Motorised 720P WiFi IP camera
ref. 123282


HD
PICTURE
720p
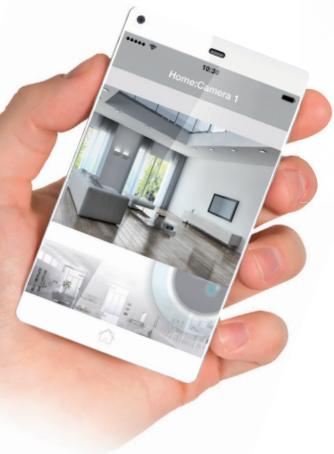
TABLE OF CONTENTS
A - SAFETY INSTRUCTIONS 05
1-OPERATING PRECAUTIONS 05
2 - MAINTENANCE AND CLEANING 05
3 - RECYCLING 05
B - PRODUCT DESCRIPTION 06
1-CONTENTSOF THE KIT 06
2-CAMERA 06
3 - MAINS ADAPTER 06
C - INSTALLATION 07
1- INSTALLING THE CAMERA 07
2-CONNECTING THE CAMERA 07
D - CONFIGURATION 08
1- ACCESS TO CAMERA CONFIGURATION 08
2-ACCESS TO ALL THE SETTINGS 08
2.1-LIVEVIDEO 08
2.2- SETTINGS 09
2.3-SETTINGUPAWIRELESSCONNECTION 09
2.4 - EXAMPLE: PROGRAMMING AN EMAIL ALERT TO BE SENT WHEN MOTION IS DETECTED 10
E - USING THE PRODUCT ON A SMARTPHONE 11
F - USING THE PRODUCT ON A COMPUTER VIA THE AVIDVIEW SOFTWARE 13
G-RESET 14
H - FAQ 14
I - TECHNICAL AND LEGAL INFORMATION 15
1 - GENERAL CHARACTERISTICS 15
2 - WARRANTY 16
3 - HELP AND ADVICE 16
4-PRODUCTRETURNS/AFTER-SALES SERVICE 16
5-DECLARATION OF CONFORMITY 16
A - SAFETY INSTRUCTIONS
1 - OPERATING PRECAUTIONS
- The cameras must not be installed where the lens filter may be vulnerable to scratching and dirt.
- The camera is not designed for outside installation and should not be installed in locations that are subject to extremes of humidity or temperature.
- Do not expose the lens to direct sunlight or any reflected light source.
- Do not daisy-chain extension cords and/or multi-socket adapters.
- Do not install near acidic chemicals, ammonia or sources of toxic gasses.
- Do not unscrew the lens completely.
- The installation and use of the camera must comply with local laws.
2 - MAINTENANCE AND CLEANING
Always unplug the product from the mains before carrying out any maintenance.
- Never use abrasive or corrosive substances to clean the products.
- Use a soft, slightly damp cloth.
- Never use an aerosol to spray the product as this may damage the internal workings.
3 - RECYCLING

This logo denotes that devices which are no longer in use must not be disposed of as household waste as they are likely to contain hazardous substances which are dangerous to both health and the
environment. Return the equipment to your local distributor or use the recycling collection service provided by your local council.
B - PRODUCT DESCRIPTION
1 - CONTENTS OF THE KIT
2-CAMERA
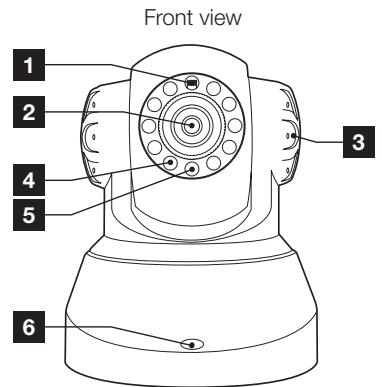
| 1 | Brightness sensor |
| 2 | Lens |
| 3 | Loudspeaker |
| 4 | Infrared light for night vision |
| 5 | Power indicator |
| 6 | Microphone |
| 7 | WiFi antenna |
| 8 | Audio output for external device (optional, not supplied) |
| 9 | Ethernet socket for connecting to the wired network |
| 10 | 5VDC 2A mains adaptor power supply included in the kit |
| 11 | Reset button (on the bottom side) |
3 - MAINS ADAPTER
A 230VAC 50Hz / 5VDC 2A mains adapter for powering the camera is included in the kit. Do not use other power supplies as they could damage the camera and invalidate the warranty.
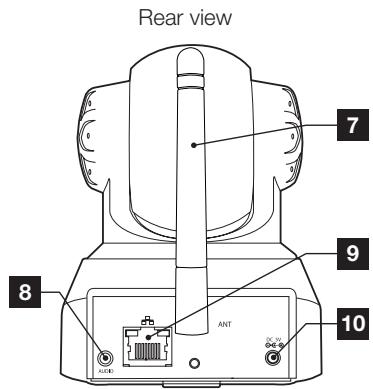
1 - INSTALLING THE CAMERA
- Mount the camera using suitable screws and wall plugs for the type of surface (the screws and plugs supplied are suitable for solid walls).
- Make sure the camera is properly secured to prevent it from falling.

2 - CONNECTING THE CAMERA
- A wired connection is compulsory when starting up, even if you plan on using a WiFi connection later.
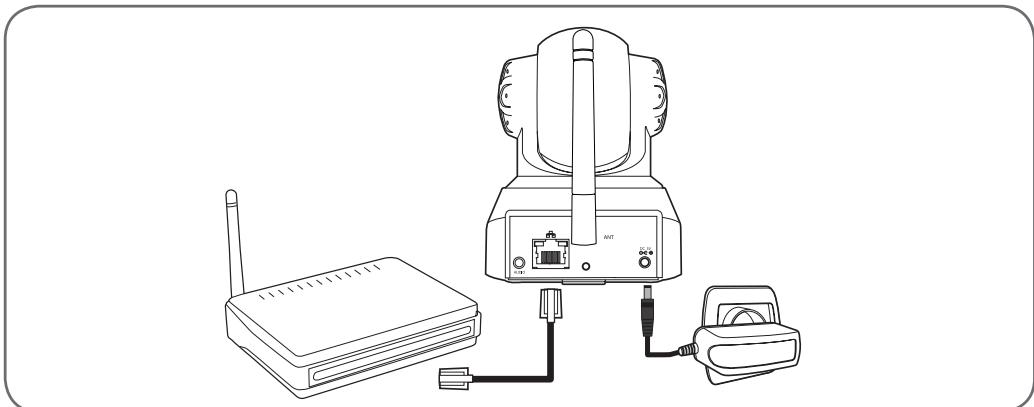
IMPORTANT: Do not connect your camera to your computer. This will not provide it with access to the Internet.
Connect your camera to the ADSL/fibre box using the RJ45 cable and connect its power supply.
In most cases, the camera is immediately detected by the modem/rodger, which grants it access to the Internet.
D - CONFIGURATION
1 - ACCESS TO CAMERA CONFIGURATION
The IPCam Search software on the CD provided (which can also be downloaded from our website, www.avidsen.com) allows you to detect the IP cameras on the network. Install and launch IPCam Search:
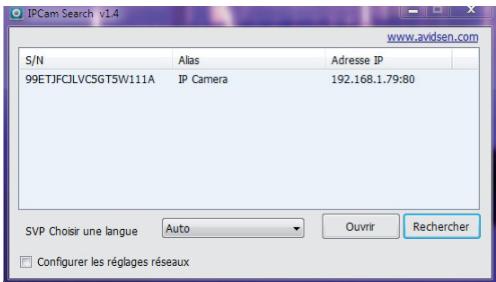
This will detect your camera on the network and show its IP address.
Double-click on its name to open the camera configuration in your web browser.

Enter the username and password for connecting to your camera. By default, the username is admin and the password is admin as well. At the first connection, the camera will immediately ask you to replace the default username and password to improve security.
When you have finished changing the username and password, you will be asked to log back in.
Your browser will need an additional module to display the image from your camera correctly and will ask you if you want to install it. Accept the request to allow your browser to display the image:

Notes:
- If you do not wish to install the module, the configuration of your camera will still be accessible, only the direct view on your computer will be affected.
- Depending on which browser you are using, the procedure may differ but the principle remains the same: you must permanently allow the module to run if you want your camera to work properly in your browser.
2 - ACCESS TO ALL THE SETTINGS
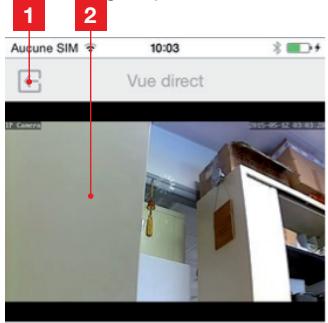
2.1-LIVEVIDEO
Once you have logged in with your new username and password, the camera feed will be displayed:
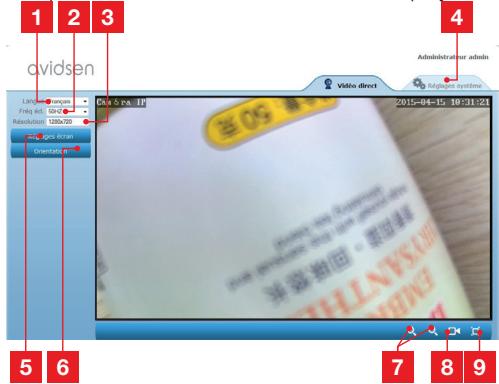
| 1 | Language selection |
| 2 | Anti-flicker: If the image lighting is artificial, select 50Hz. |
| 3 | Image resolution |
| 4 | Access to camera configuration tab |
| 5 | Brightness, contrast, and colour settings |
| 6 | Orientation settings: allow you to, for example, flip the image if your camera is installed upside-down |
| 7 | Digital zoom controls |
8 Manual start for recording on a computer's hard disk
9 Display the image full screen (double-click on image to revert)
2.2 - SETTINGS
You can access your camera settings by clicking on "Réglages système [System settings]" at the top of the window:

1 "Système [System]" Section: gives you access to your camera's basic settings, such as its name and the time settings
2 "Autres [Others]" Section: options for backup and factory reset, options for restarting and resetting the camera
3 "Audio & Video" Section: settings for each video stream, resolution, frame rate
4 "Alerte [Alert]" Section: definition of the zones and motion detection sensitivity, email settings for sending alerts via email
5 "Réseau [Network]" Section: all the settings for wired and wireless network connections. Here you may define the WiFi network to which you wish to connect the camera.
2.3 - SETTING UP A WIRELESS CONNECTION
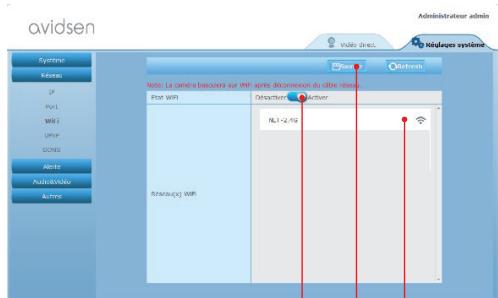
To connect your camera to a WiFi network, go to the "Réseau [Network]" menu, "WiFi" in your camera's system settings:
1 2 3
1 Click on "Activer [Activate]" to activate the camera's wireless connection and display he WiFi networks detected near the camera
2 IMPORTANT: When you have finished configuring the device, do not forget to click on "Sauver [Save]" at the top of the screen to confirm the entries you have made.
3 The detected networks appear here. Click on one of them to enter the corresponding password and get connected.
IMPORTANT: Once your camera is set up to connect to a wireless network, unplug the network cable to put these configurations into effect.
Note: The camera's wireless network settings are also accessible through the app "Avidview" on Android and iOS:

(See Section F)
D - CONFIGURATION
2.4 - EXAMPLE: PROGRAMMING AN EMAIL ALERT TO BE SENT WHEN MOTION IS DETECTED
To program an alert to be sent when motion is detected, you need 2 email addresses: the address of the sender which will be used by the camera, and the address which will receive the alerts. The camera uses the username and password of the sender address to connect and send the email. Configuration depends on the chosen email provider's settings.
Note: the 2 email addresses can be the same (you will simply be sending an email to yourself).
In our example, we use www).(gmail.com: sender-address@gmail.com sends the alerts, addressee@gmail.com receives the alerts. Both addresses need to have been created beforehand.
First of all, go into "Email" under the "Alert" heading:
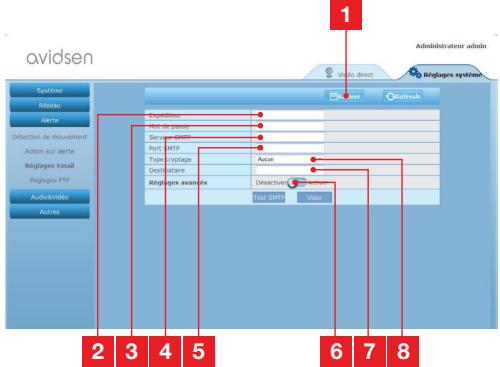
1 IMPORTANT: When you have finished configuring the device, do not forget to click on "Sauver [Save]" at the top of the screen to confirm the entries you have made.
2 Sender: Name that you must enter to connect to the mailbox that will send out the alerts. In our example using Gmail, this is the sender address: sender-address@gmail.com
3 Password: The password used to log into sender-address@gmail.com in our example
| 4 | SMTP server: varies with the email provider sending the alert. In our example using Gmail, smtp gmail.com |
| 5 | SMTP Port: varies with email provider of address sending the alert. In our example using Gmail, 587 |
| 6 | SMTP Test: allows you to simulate sending an email and ensure that your camera is properly configured. |
| 7 | Addressee: Here, enter the email address that will receive the alerts. In our example: addressee@gmail.com |
| 8 | Type of encryption: connection security setting, varies with email provider. In our example using Gmail, SMARTTLS |
Note: it does not matter who the email provider of the addressee or addressees is as it is the email provider of the sender which dictates what needs to be entered. However, you must ensure you check that the alerts are not treated as spam by any of the addressees.
When you have finished configuring your camera, it will be able to send emails. You must now tell it when to send them by clicking on "Alerte [Alert]", "Action sur alerte [Alert action]":
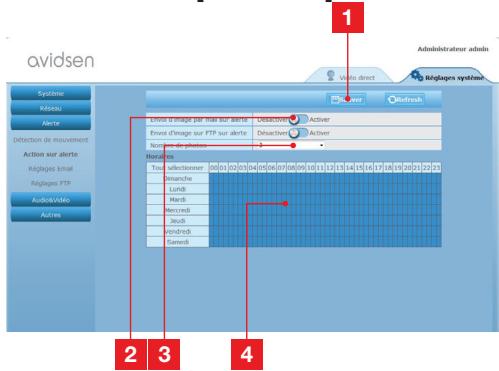
| 1 | IMPORTANT: When you have finished configuring the device, do not forget to click on "Sauver [Save]" at the top of the screen to confirm the entries you have made. |
| 2 | Enable "Envoi d'image par mail sur alerte [Sending an image via email alert]" to activate email alerts. |
| 3 | Number of photos: Here, indicate how many photos you wish to receive as an attachment when an email alert is triggered. |
D - CONFIGURATION
4
The calendar allows you to programme the times the camera is allowed to send an email when motion is detected. Click to activate (blue box) or deactivate (white box) the desired times.
Click on "Alerte [Alert]", "Détection de mouvement [Motion detection]:
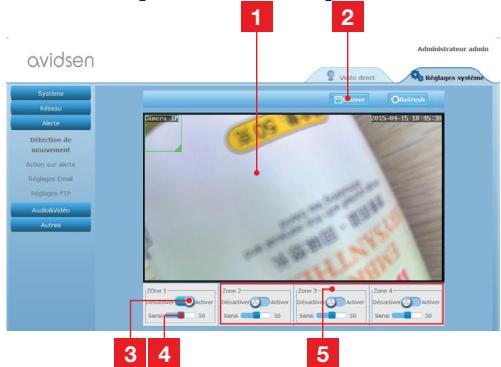
1 Motion detection zone: all movements in this area will trigger an alert.
2 Activation of detection zone 1. Click to activate motion detection. By default, zone 1 covers the whole screen.
3 Detection sensitivity for zone 1: When it is set to the minimum value, only a major change in the image will trigger an alert. When it is set to the maximum value, the slightest movement within the zone will trigger an alert.
4 Zones 2, 3, 4: you can draw other zones on the screen and give them different sensitivities.
5 IMPORTANT: When you have finished configuring the device, do not forget to click on "Sauver [Save]" at the top of the screen to confirm the entries you have made.
This completes the configuration. From now on, any motion detected by the camera in the zones and at the times you have specified will trigger an email alert.
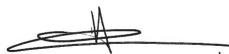
E - USING THE PRODUCT ON A SMARTPHONE
The free application used to control, configure and view the cameras remotely on your smartphone is available from the Appstore and Google Play. Download, install and run the "AvidView" app. Although we have described how the Android app works here, the same applies to the iPhone.
Launch the application on your smartphone or tablet, then click on the icon. Then click on "Ajout manuel camera [Add manual camera]"
at the bottom of the screen, then on the icon. This will activate the phone's camera so that you can scan in the QRCode.
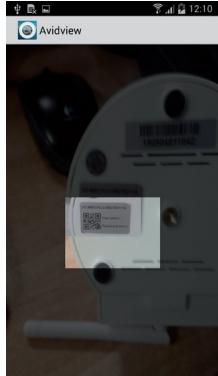
Important note: the code scan works more effectively when the code is positioned above the red line on the screen.
Next, enter the name you want to give your camera and its password. Tick the "Mot de passer par défaut [Default password]" box if you use the default password (you will be asked to change it to improve security). The ID for your camera is not requested here.
E - USING THE PRODUCT ON A SMARTPHONE
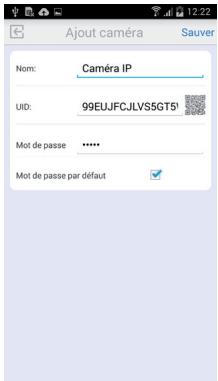
Click on "Sauver [Save]" to confirm then on the thumbnail for your camera to display the image from your camera.
Note: the images are taken from the Android version of the application. The iPhone version works in exactly the same way.
The configuration options and commands can be accessed by clicking on your camera video feed:
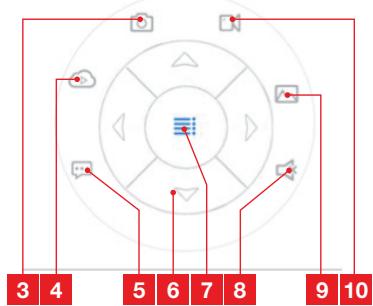
| 1 | Return to the main menu and the list of saved cameras |
| 2 | Viewing window |
| 3 | Taking a photo with the camera and saving it to a smartphone or tablet |
| 4 | Not used on this model |
| 5 | Activating or deactivating the camera's loudspeaker. Allows you to talk to a person via the camera's loudspeaker |
| 6 | Motor controls (motorised models only) |
| 7 | Displaying/hiding controls |
| 8 | Enabling or disabling the camera's microphone. Used for listening to sounds picked up by the camera |
| 9 | Access to the photos and videos stored in the smartphone or tablet's memory |
| 10 | Start/stop of a recording with the camera, saving to a smartphone or a tablet (compatible models only). |
F - USING THE PRODUCT ON A COMPUTER VIA THE AVIDVIEW SOFTWARE
The Avidview software provided on the CD provides simple remote access to the camera and can manage 16 separate cameras. Install the program on the computer you want to use to connect to your camera.
Launch the software on your computer. Click on the "Ajout camera [Add camera]" icon + . In the window which opens, enter the name you want to give your camera and its UID. The UID is a unique code assigned to your camera. Enter your camera's password as well (default: "admin"). The ID for your camera is not requested here.
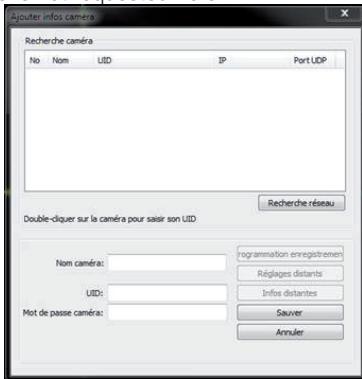
Confirm by clicking on Save then click on the "Ouvrin toutes les caméras [Open all cameras]" icon

The AvidView software lets you manage several cameras at once and gives you complete control over each one and their respective settings:
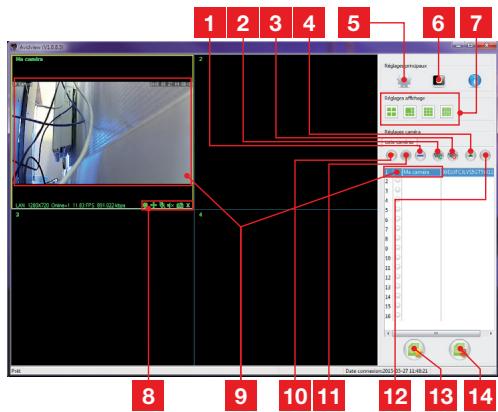
| 1 | Adding a new camera to the software |
| 2 | Running a video of all the recorded cameras |
| 3 | Stopping the video of all the recorded cameras |
| 4 | Up button for the camera currently selected in the list: if you have several cameras, this allows you to reorder them |
| 5 | Access to the software's options: storage folder for the videos and photos taken with the software, notification sounds, etc. |
| 6 | Access to the photos and videos recorded with the software |
| 7 | View of the image of the cameras on the screen |
| 8 | Controls of the currently selected camera: starting a video or photo recording, control over the motors (motorised cameras only), running the camera's microphone or loudspeaker, etc. |
| 9 | Camera currently selected |
| 10 | Edition of the camera currently selected |
| 11 | Adding a new camera to the software |
| 12 | Down button for the camera currently selected in the list: if you have several cameras, this allows you to reorder them |
| 13 | Saving the list of current cameras in a file |
| 14 | Recalling a list of cameras from a file |
G - RESETTING
If there is a problem or the login details have been lost, the camera can be reset to its default settings by pressing the Reset button on the side of the camera for 10 seconds.
| Settings | Default value |
| Username | admin |
| Password | admin |
| Time Zone | GMT+1 |
| Ports | http: 80 rspp: 554 ntp: 6600 ONVIF: 8080 ftp: 21 |
| Plug and play access | Enabled |
| Motion detection | Disabled |
| Main video stream | 720p @ 25 frames per second |
| Secondary video stream | 640 x 352, 25 images per second |
| Night vision | auto |
H - FAQ
If your problem is not covered below, please contact our helpline.
| Symptoms | Possible causes | Solutions |
| Cannot connect to camera over local area network (e.g. IPCam Search) | Network problem | Check your connections. Temporarily connect using the network cable if the camera is connected over WiFi |
| Network configuration problem | Check your camera's network connection settings. Reset your camera if it is no longer accessible. | |
| The camera feed cannot be accessed over the internet | Network configuration problem | Check your device settings (box, router) |
| Incorrect video settings | Check the video settings and reduce the quality if necessary Test the "flux secondaire [secondary stream]" to confirm | |
| Poor quality or shaky image | Incorrect video settings | Test the "flux secondaire [secondary stream]" to confirm, check the video settings and reduce the quality if necessary |
| Motion detection is triggered unnecessarily | Unsuitable motion detection settings | Reduce the trigger sensitivity or limit the area being covered |
I - TECHNICAL AND LEGAL INFORMATION
1 - GENERAL CHARACTERISTICS
| Power supply | 5VDC / 2000mA |
| Network interface | Ethernet 10/100, audio-MDIX, RJ45 |
| Wireless network interface | IEE 802.11b/g/n |
| Optical sensor | ¼” CMOS |
| Minimum luminous intensity | 0 lux |
| Night vision | Manual or automatic (dusk-to-dawn sensor) - Range: 10m |
| Lens | F: 3.6mm |
| Buttons | Reset button: restores factory settings |
| Video compression | h.264, Angle of view: 56° |
| Resolution | Primary stream: up to 1280x720 pixels Secondary stream: up to 640x352 pixels |
| Audio | Built-in microphone and loudspeaker for two-way audio communication |
| Motors | Motors for controlling tilt (90°) and rotation (345°) of the lens |
| Operating temperature and humidity | 0°C to 40°C, 20% to 85% RH, non-condensing For indoor use only |
| Storage temperature and humidity | -10°C to 60°C, 0% to 90% RH, non-condensing |
I - TECHNICAL AND LEGAL INFORMATION
2 - WARRANTY
- This product is under warranty for parts and labour for 2 years from the date of purchase. Proof of purchase must be retained for the duration of the warranty period.
- The warranty does not cover damage caused by negligence, knocks, or accidents.
- The parts of this product must not be opened or repaired by any persons not employed by Avidsen.
- The warranty will be void if the device is tampered with.
3 - HELP AND ADVICE
- If, in spite of the care we have taken in designing our products and drafting these instructions, you do encounter difficulties when installing your product or you have any questions, we urge you to contact one of our specialists who will be glad to help.
- If you encounter operating problems during the installation or a few days afterwards, it is essential that you are in front of your installation when contacting us, so that one of our technicians can diagnose the source of the problem, as it will probably be the result of a setting that is incorrect or an installation that is not to specification. If the problem is caused by the product itself, the technician will give you an RMA number so that you can return the unit to the shop. Without this RMA number, the shop may refuse to exchange the product.
Contact our after-sales service technicians on:
0 892 701 369
Monday to Friday, 9 AM to 12 PM and 2 PM to 6 PM.
4 - PRODUCT RETURNS / AFTER SALES SERVICE
If, despite the care we have taken in designing and manufacturing your product, it needs to be returned to our customer service centre, you can check the progress of the work on our website at the following address: http://sav.avidsen.com
5 - DECLARATION OF CONFORMITY
With the LVD and EMC directives
Avidsen declares that the following equipment:
Motorised 720P WiFi IP camera 123282
Complies with the 1999/5/EC directive and its conformity has been assessed pursuant to the applicable standards in force:
EN60950-1:2006+A11:2009+A1:2010+A12 :2011+A2:2013
EN 62311:2008
EN301489-1V1.9.2
EN301489-17V2.2.1
EN 300 328 V1.8.1
Date: 01/06/2015
Alexandre Chaverot, President
NL Gemotoriseerde camera IP WiFi 720P
ref. 123282


HD
PICTURE
720p


INHOUDSOPGAVE
A - VEILIGHEIDSVOORSCHRIFTEN 05
1 - GEBRUIKSVOORSCHRIFTEN 05
2-ONDERHOUD EN REINIGING 05
3-RECyclAGE 05
B-BESCHRIJVING VAN HET PRODUCT 06
1-INHOUD VAN DE KIT 06
2-CAMERA 06
3-LICHTNETADAPTER 06
C - INSTALLATIE 07
1- INSTALLATIE VAN DE CAMERA 07
2 - AANSLUITING VAN DE CAMERA 07
D-CONFIGURATIE 08
1-TOEGANGTOTDECONFIGURATIEVANDECAMERA 08
2-TOEGANGTOTHETGEHEELAANINSTELLINGEN 08
2.1-LIVEVIDEO 08
2.2 - INSTELLINGEN 09
2.3 - EEN DRAADLOZE VERBINDING MAKEN 09
2.4 - VOORBEELD: INSTELLING VAN EEN E-MAILWAARSCHUWING BIJ BEWEGINGSDETECTIE 10
E GEBRUIK OP SMARTPHONE 11
F - GEBRUK VAN DE COMPUTER MET DE AVIDVIEW SOFTWARE 13
G-RESETTEN 14
H - FAQ 14
1- INSTALLAÇAO DA CÁMARA
2 - LIGACAO DA CÁMARA
De segunda a sexta-feira entre as 9h e as 12h e entre as 14h e as 18h.
H - ΣYXNEΣ EPQTHΣEΙΣ 14
Θ - TEXNIKEΣ KAI NOMIKEΣ ΠΛHPOΦΟPIΕΣ 15
1 - FENIKA XAPAKTHPISTIKA 15
2-EΓYH∑H 16
3-BOHoeIA KAI SYMBOYAE16
4 - EπIΣTPOΦH ΠPOIONTOΣ - EMΠ 16
5-△HΛΩΣH ΣYMMOPΦΩΣH
1-ПОФУАЕΙS XPHESH
H kaepa 8ev npenei va ekykaioataai oe onmuo nou to pfItpo Tou paKo ou 8ekTIeTai oTeuXov ypaTOauviEc kai aKaapoiEc.
H kaepa 8ev npoopiEeai yia ekyataotaon oEewtepiko wpo n oE akpaiec ouvthetakeuypaiaic n 8epuokpaaic.
O paKoc dev npEevi va ektiBetai o aneVthetaic c tou nIoU n o e OTOIAbHnote nyn TOC avtavaklaacei.
Mynxpnnoiopoioite nolunpica kai kaawdi Eπεκtaoç.
Na mny tov ykaotate kovta o npoiovta me xnmu oEa, aumwia n oeyec eknoptnc toekw v aepiwv.
MnV EεβiδωνεTE EVTEλωC to φακό.
H kaepa 0a npénei va eyaKoiTatai kai va xpoioioeital ouuwpwa u Tnv toikn vmoθεσia.
2-SYNTHPHsHKAIKAOAPIMOs
- Piv ano tyn kteleon onoiowhntote epyaiov suvtnpnnc, anouuvdeote to tropofoDTIKO.
Mny katheta to pioov uoknpec n dia ρwtké ouiec.
XpnoiouoieTe eva anlo maalakotavi, elambda pαuρó.
MnyeKAcTeTo npoiov MEeKaeoTnpa,KaOwC Ev6ExTaI v npokAnThei BλaBn OTO EOWTepiKt TOU npoiovToC.
3-ANAKYKAΩEH
Auto to loyotuno onmaive oti oi axpnoTeC oukeuec npenei va anoppintovta mazi ta oikiaka anoppmuata. OI eikivuvc ouieic nou evdoexouvewva nepiexouv mopoie va baoov tvn avthetainuv yea n
to nepiabalov. Eniotpetye autc tic ouokeuc otyn avtinpoosnia h xnpaunoiote ta mea enilektiknc avakouidn c anoppmuatw nou diatihevtai ano to 0 oac.
B-NEPIIgPAΦH IPOIONTO
1-NEPIEXOMENA ΣYΣKEYAΣIAΔ

H - ΣYXNEΣ EPΩTHΣEΙΣ
Av to npoBla nua oac dev aaveapepetai napakatw, eikoiuvnote me tyn tnaeovnik mac botheia.
F - UPORABA NA RACUNALNIKU S PROGRAMSKO OPREMO AVIDVIEW 13
G-PONASTAVITEV 14
H - POGOSTA VPRASANJA 14
I - TEHNICNE IN ZAKONSKE INFORMACije 15
1 - SPLOŠNE ZNACILNOSTI 15
2-GARANCIJA 16
3 - POMOC IN PODPORA 16
4-ZAMENJAVA NAPRAVE-UPORABNIISKI SERVIS 16
5-IZJAVA O SKLADNOSTI 16
A - VARNOSTNA NAVODILA
1 - PREVIDNOSTNI UKREPI
F - UPORABA NA RACUNALNIKU S PROGRAMSKO OPREMO AVIDVIEW
E - POUŽITIE NA SMARTFÔNE 11
F - POUŽITIE NA PC SO SOFTWARE-OM AVIDVIEW 13
G - NOVÁ INICIALIZÁCIA 14
H - FAQ 14
I - TECHNICKÉ A PRAVNE INFORMÁCIE 15
1-VSEOBECNE POZNAMKY 15
2-ZARUKA 16
3-POMOCAPODPORA 16
4 - VYMENA ZARIADENIA - SLUZBA ZAKAZNIKOM 16
5-PREHLASENIE O ZHODE 16
A - BEZPEČNOSTNÉ POKNY
E - POUŽITIE NA SMARTFÔNE

Kliknite pre potvrdenie na Uložit' a potom na miniatürne zobrazenie Vasej kamery, aby ste zobrazili obraz z Vasej kamery.
- EN Motorised 720P WiFi IP camera
- HD
- TABLE OF CONTENTS
- A - SAFETY INSTRUCTIONS 05
- B - PRODUCT DESCRIPTION 06
- C - INSTALLATION 07
- D - CONFIGURATION 08
- E - USING THE PRODUCT ON A SMARTPHONE 11
- F - USING THE PRODUCT ON A COMPUTER VIA THE AVIDVIEW SOFTWARE 13
- G-RESET 14
- H - FAQ 14
- I - TECHNICAL AND LEGAL INFORMATION 15
- A - SAFETY INSTRUCTIONS
- - OPERATING PRECAUTIONS
- - MAINTENANCE AND CLEANING
- - RECYCLING
- B - PRODUCT DESCRIPTION
- - CONTENTS OF THE KIT
- 2-CAMERA
- - MAINS ADAPTER
- - INSTALLING THE CAMERA
- - CONNECTING THE CAMERA
- D - CONFIGURATION
- - ACCESS TO CAMERA CONFIGURATION
- Notes:
- - ACCESS TO ALL THE SETTINGS
- 2.1-LIVEVIDEO
- - SETTINGS
- - SETTING UP A WIRELESS CONNECTION
- - EXAMPLE: PROGRAMMING AN EMAIL ALERT TO BE SENT WHEN MOTION IS DETECTED
- 4
- E - USING THE PRODUCT ON A SMARTPHONE
- F - USING THE PRODUCT ON A COMPUTER VIA THE AVIDVIEW SOFTWARE
- G - RESETTING
- H - FAQ
- I - TECHNICAL AND LEGAL INFORMATION
- - WARRANTY
- - HELP AND ADVICE
- - PRODUCT RETURNS / AFTER SALES SERVICE
- - DECLARATION OF CONFORMITY
- NL Gemotoriseerde camera IP WiFi 720P
- INHOUDSOPGAVE
- A - VEILIGHEIDSVOORSCHRIFTEN 05
- B-BESCHRIJVING VAN HET PRODUCT 06
- C - INSTALLATIE 07
- D-CONFIGURATIE 08
- E GEBRUIK OP SMARTPHONE 11
- F - GEBRUK VAN DE COMPUTER MET DE AVIDVIEW SOFTWARE 13
- G-RESETTEN 14
- 1- INSTALLAÇAO DA CÁMARA
- - LIGACAO DA CÁMARA
- H - ΣYXNEΣ EPQTHΣEΙΣ 14
- Θ - TEXNIKEΣ KAI NOMIKEΣ ΠΛHPOΦΟPIΕΣ 15
- 1-ПОФУАЕΙS XPHESH
- 2-SYNTHPHsHKAIKAOAPIMOs
- 3-ANAKYKAΩEH
- B-NEPIIgPAΦH IPOIONTO
- 1-NEPIEXOMENA ΣYΣKEYAΣIAΔ
- H - ΣYXNEΣ EPΩTHΣEΙΣ
- F - UPORABA NA RACUNALNIKU S PROGRAMSKO OPREMO AVIDVIEW 13
- G-PONASTAVITEV 14
- H - POGOSTA VPRASANJA 14
- I - TEHNICNE IN ZAKONSKE INFORMACije 15
- A - VARNOSTNA NAVODILA
- - PREVIDNOSTNI UKREPI
- F - UPORABA NA RACUNALNIKU S PROGRAMSKO OPREMO AVIDVIEW
- E - POUŽITIE NA SMARTFÔNE 11
- F - POUŽITIE NA PC SO SOFTWARE-OM AVIDVIEW 13
- G - NOVÁ INICIALIZÁCIA 14
- I - TECHNICKÉ A PRAVNE INFORMÁCIE 15
- A - BEZPEČNOSTNÉ POKNY
- E - POUŽITIE NA SMARTFÔNE
Brand : AVIDSEN
Model : 123282
Category : Surveillance Camera