USER MANUAL STRIPE ELICA
EN Instruction on mounting and use
EN - Instruction on mounting and use
Closely follow the instructions set out in this manual. All responsibility, for any eventual inconveniences, damages or fires caused by not complying with the instructions in this manual, is declined. The hood is conceived for the suction of cooking fumes and steam and is destined only for domestic use.
The hood can look different to that illustrated in the drawings in this booklet. The instructions for use, maintenance and installation, however, remain the same.
It is important to conserve this booklet for consultation at any moment. In the case of sale, cession or move, make sure it is together with the product.
! Read the instructions carefully: there is important information about installation, use and safety.
! Do not carry out electrical or mechanical variations on the product or on the discharge conduits.
! Before proceeding with the installation of the appliance verify that there are no damaged all components. Otherwise contact your dealer and do not proceed with the installation.
Note: the elements marked with the symbol (*) are optional accessories supplied only with some models or elements to purchase, not supplied.

Caution
WARNING! Do not connect the appliance to the mains until the installation is fully complete.
Before any cleaning or maintenance operation, disconnect hood from the mains by removing the plug or disconnecting the mains electrical supply.
Always wear work gloves for all installation and maintenance operations.
The appliance is not intended for use by children or persons with impaired physical, sensorial or mental faculties, or if lacking in experience or knowledge, unless they are under supervision or have been trained in the use of the appliance by a person responsible for their safety.
This appliance is designed to be operated by adults, children should be monitored to ensure that they do not play with the appliance.
This appliance is designed to be operated by adults. Children should not be allowed to tamper with the controls or play with the appliance.
Never use the hood without effectively mounted grating!
The hood must NEVER be used as a support surface unless specifically indicated.
The premises where the appliance is installed must be sufficiently ventilated, when the kitchen hood is used together with other gas combustion devices or other fuels.
The ducting system for this appliance must not be connected to any existing ventilation system which is being used for any other purpose such as discharging exhaust fumes from appliances burning gas or other fuels.
The flaming of foods beneath the hood itself is severely prohibited.
The use of exposed flames is detrimental to the filters and
may cause a fire risk, and must therefore be avoided in all circumstances.
Any frying must be done with care in order to make sure that the oil does not overheat and ignite.
Accessible parts of the hood may become hot when used with cooking appliance.
With regards to the technical and safety measures to be adopted for fume discharging it is important to closely follow the regulations provided by the local authorities.
The hood must be regularly cleaned on both the inside and outside (AT LEAST ONCE A MONTH).
This must be completed in accordance with the maintenance instructions provided in this manual). Failure to follow the instructions provided in this user guide regarding the cleaning of the hood and filters will lead to the risk of fires.
Do not use or leave the hood without the lamp correctly mounted due to the possible risk of electric shocks.
We will not accept any responsibility for any faults, damage or fires caused to the appliance as a result of the non-observation of the instructions included in this manual.
This appliance is marked according to the European directive 2002/96/EC on Waste Electrical and Electronic Equipment (WEEE). By ensuring this product is disposed of correctly, you will help prevent potential negative consequences for the environment and human health, which could otherwise be caused by inappropriate waste handling of this product.

The symbol on the product, or on the documents accompanying the product, indicates that this appliance may not be treated as household waste. Instead it should be taken to the appropriate collection point for the recycling of electrical and electronic equipment. Disposal must be carried out in accordance with local environmental regulations for waste disposal.
For further detailed information regarding the process, collection and recycling of this product, please contact the appropriate department of your local authorities or the local department for household waste or the shop where you purchased this product.
Additional Installation Specifications:
Use only the fixing screws supplied with the product for installation or, if not supplied, purchase the correct screws type.
Use the correct length for the screws which are identified in the Installation Guide.
In case of doubt, consult an authorised service assistance centre or similar qualified person.
WARNING! Failure to install the screws or fixing device in accordance with these instructions may result in electrical hazards.
Use
The hood is conceived for the suction of cooking fumes and steam and is destined only for domestic use.
The hood is designed to be used either for exhausting or filter version.

Ducting version
In this case the fumes are conveyed outside of the building by means of a special pipe connected with the connection ring located on top of the hood.
Attention! The exhausting pipe is not supplied and must be purchased apart.
Diameter of the exhausting pipe must be equal to that of the connection ring.
In the horizontal runs the exhausting pipe must be slightly slanted (about 10^ ) and directed upwards to vent the air easily from the room to the outside.
Attention! If the hood is supplied with active charcoal filter, then it must be removed.
Connect the hood and discharge holes on the walls with a diameter equivalent to the air outlet (connection flange).
Using the tubes and discharge holes on walls with smaller dimensions will cause a diminution of the suction performance and a drastic increase in noise.
Any responsibility in the matter is therefore declined.
Use a duct of the minimum indispensable length.
! Use a duct with as few elbows as possible (maximum elbow angle: 90^ ).
Avoid drastic changes in the duct cross-section.
Use a duct as smooth as possible inside.
The duct must be made of certified material.

Filter version
One active charcoal filter is needed for this and can be obtained from your usual retailer.
The filter removes the grease and smells from the extracted air before sending it back into the room through the upper outlet grid.
Installation
The minimum distance between the supporting surface for the cooking equipment on the hob and the lowest part of the range hood must be not less than 45cm from electric cookers and 50cm from gas or mixed cookers.
If the instructions for installation for the gas hob specify a greater distance, this must be adhered to.

Electrical connection
The mains power supply must correspond to the rating indicated on the plate situated inside the hood. If provided with a plug connect the hood to a socket in compliance with current regulations and positioned in an accessible area, after installation. If it not fitted with a plug (direct mains connection)
or if the plug is not located in an accessible area, after installation, apply a double pole switch in accordance with standards which assures the complete disconnection of the mains under conditions relating to over-current category III, in accordance with installation instructions.
Warning! Before re-connecting the hood circuit to the mains supply and checking the efficient function, always check that the mains cable is correctly assembled.
The hood is provided with a special power cable; if the cable is damaged, request a new one from Technical Service.
Mounting
Before beginning installation:
- Check that the product purchased is of a suitable size for the chosen installation area.
- Remove the charcoal (*) filter/s if supplied (see also relative paragraph). This/these is/are to be mounted only if you want to use the hood in the filtering version.
- Check (for transport reasons) that there is no other supplied material inside the hood (e.g. packets with screws (), guarantees (), etc.), eventually removing them and keeping them.
- If possible, disconnect and move freestanding or slide-in range from cabinet opening to provide easier access to rear wall/ceiling. Otherwise put a thick, protective covering over countertop, cooktop or range to protect from damage and debris. Select a flat surface for assembling the unit. Cover that surface with a protective covering and place all canopy hood parts and hardware in it.
- In addition check whether near the installation area of the hood (in the area accessible also with the hood mounted) an electric socket is available and it is possible to connect a fumes discharge device to the outside (only suction version).
- Carry out all the masonry work necessary (e.g. installation of an electric socket and/or a hole for the passage of the discharge tube).
Expansion wall plugs are provided to secure the hood to most types of walls/ceilings. However, a qualified technician must verify suitability of the materials in accordance with the type of wall/ceiling. The wall/ceiling must be strong enough to take the weight of the hood. Do not tile, grout or silicone this appliance to the wall. Surface mounting only.
Operation
Use the high suction speed in cases of concentrated kitchen vapours. It is recommended that the cooker hood suction is switched on for 5 minutes prior to cooking and to leave in operation during cooking and for another 15 minutes approximately after terminating cooking.
Model with touch panel
To select the functions of the hood just touch the commands.

Light key ON/OFF

Intensive speed selection key (suction power) - duration 5 minutes - press again to return to previous setting.

High-speed selection key (suction power).

Medium-speed selection key (suction power) - when flashing it indicates the need to wash or replace the carbon filter. This signal is normally deactivated. To activate the alarm, disable the electronic by pressing the 0 button for 3 seconds.
Next, simultaneously press buttons 1 and 2 for 3 seconds; at first, only button 1 will flash, then both buttons 1 and 2 will flash to indicate activation. Repeat the procedure to deactivate the alarm; at first buttons 1 and 2 will flash and subsequently only button 1 to indicate deactivation.

Low-speed selection key (suction power) - when flashing it indicates the need to wash the fats filter.

Motor key OFF (stand by) - excludes the electronics - reset wash/replace filters signals. MOTOR OFF
Press briefly to switch the motor off.
RESET FILTERS SIGNALS
In functioning mode, after carrying out filter maintenance, press the key until hearing the sound signal. The flashing LED 1 (grease filter) or 2 (carbon filter) stops flashing.
EXCLUDING THE ELECTRONICS
Press the key for 3 seconds. The hood command electronics will be excluded.
This function can be useful during the product cleaning operations.
Just repeat the operation to reinsert the electronics.
If the hood fails to operate correctly, briefly disconnect it from the mains power supply for almost 5 sec. by pulling out the plug. Then plug it in again and try once more before contacting the Technical Assistance Service.
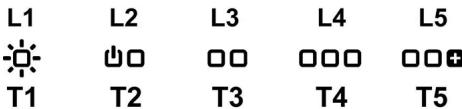
T1. Button ON/OFF lights (Led L1 lit)
T2. Button OFF - Selection button suction speed (power) 1 (Led L2 lit)
T3. Selection button suction speed (power) 2 (Led L2+L3 lit)
T4. Selection button suction speed (power) 3 (Led L2+L3+L4 liti)
T5. Selection button intensive suction speed (power) (Led L2+L3+L4 lit + Led L5 flashing) - duration 5 minutes - after which the hood automatically sets suction speed (power) 2.
Delayed switch-off of the hood (flashing LEDs):
It is possible to set the delayed hood switch-off by pressing again for more than 2 seconds the button of the suction speed (power) active at that time.
The available delayed switch-off options are:
Suction speed (power) 1:20 minutes
Suction speed (power) 2:15 minutes
Suction speed (power) 3:10 minutes
Intensive suction speed (power): 5 minutes
Filter saturation indicator
The hood is equipped with a function that warns the user, at regular time intervals, when the filters are saturated and it is necessary to perform their maintenance.
Grease filter saturation indicator: With the hood off (OFF) all suction speed (power) LEDs light up with steady light for 40 seconds.
Activated charcoal filter saturation indicator: With the hood off (OFF) all suction speed (power) LEDs flash for 40 seconds.
Activation of the active charcoal filter saturation signal: normally, this function is disabled; to activate it, switch off the hood (OFF) and simultaneously press buttons T3 and T5 for more than 3 seconds. LEDs L3 and L5 will start flashing.
To disable repeat the operation: LEDs L3 and L5 light up with steady light.
Resetting the filters' saturation indicator:
With the hood on (ON) press button T2 for more than 2 seconds; all LEDs will light up briefly.
Note: if necessary, repeat the operation in case both indicators (grease filter and activated charcoal filter) are active.
Maintenance
ATTENTION! Before performing any maintenance operation, isolate the hood from the electrical supply by switching off at the connector and removing the connector fuse.
Or if the appliance has been connected through a plug and socket, then the plug must be removed from the socket.
Cleaning
The cooker hood should be cleaned regularly (at least with the same frequency with which you carry out maintenance of the fat filters) internally and externally. Clean using the cloth dampened with neutral liquid detergent. Do not use abrasive products. DO NOT USE ALCOHOL!
WARNING: Failure to carry out the basic cleaning recommendations of the cooker hood and replacement of the filters may cause fire risks.
Therefore, we recommend observing these instructions.
The manufacturer declines all responsibility for any damage to the motor or any fire damage linked to inappropriate maintenance or failure to observe the above safety recommendations.
Grease filter
Fig. 9-16
Traps cooking grease particles.
This must be cleaned once a month (or when the filter saturation indication system - if envisaged on the model in possession - indicates this necessity) using non aggressive detergents, either by hand or in the dishwasher, which must be set to a low temperature and a short cycle.
When washed in a dishwasher, the grease filter may discolour slightly, but this does not affect its filtering capacity.
To remove the grease filter, pull the spring release handle.
Charcoal filter (filter version only)
Fig. 15
It absorbs unpleasant odours caused by cooking.
The saturation of the charcoal filter occurs after more or less prolonged use, depending on the type of cooking and the regularity of cleaning of the grease filter.
In any case it is necessary to replace the cartridge at least every four mounths (or when the filter saturation indication system - if envisaged on the model in possession - indicates this necessity). The charcoal filter may NOT be washed or regenerated.
Circular carbon filter
Apply one on each side as cover to both the shield grids of the motor impeller, then turn clockwise.
For the disassembly, turn counter-clockwise.
Replacing lamps
Fig. 20
Disconnect the appliance from the electricity.
Warning! Prior to touching the light bulbs ensure they are cooled down.
Replace the old light bulb with the one of the same type as specified in the feature label or near the light lamp on the hood.
- Using a flat head screwdriver or equivalent tool, carefully pry loose the light cover.
- Remove the damaged light and replace with a new 12 Volt, 20 Watt (Maximum) halogen light made for a G-4 base SuITABLE FOR USE IN OPEN LUMINAires. Follow package directions and do not touch new light with bare hands.
- Reinstall the light cover. (it will snap shut).
If the lights do not work, make sure that the lamps are fitted properly into their housings before you call for technical assistance.
ANVAND INTE ALKOHOL!
MOOTTORIN OFF painike
Odsavani's recikulaci
Pred zahajenim instalace:
- Ebponeckata DnpekTnBa 2002/96/EC
- Waste Electrical and Electronic Equipment (WEEE).
YeBepaikn Ce, Ye To3n ypei 6bJe peuKlnpah no nOoobabauiT 3a TOBa NaHn, Bne DOnpnHacrte 3a Oan3BaHcToHa OKOIHaTa Cpea N BaWTe 3dpaBe.

CmBbIbT BbPx ypea IINB PnpDpykBaUaata ro DOKyMeHTaunia NocOuBa,Ye To3n npDyKT He Tpr6Ba da 6bde CUnTAn 3a DomAuaHc OTNaBbK, a Tpr6Ba da 6bde npeaaden B CneuaHNO PnpDaHaehNITE 3a TOBA NyHKTOBE 3a peuKKnipaHe Ha eNeKTPnueCa H eneKTPoHna TexHnka. PnpDpKaJte Ce KbM MeCTHIne HopMaTnBu 3a nppea60Ta Ka HTa. 3a No-nOpRoHa INΦopMaua H Bb Bp3ka C npEpaBaHTo, CbSiPaeHc H peuKKnipaHcTo Ha To3n npOyKT Bn CbBETBaMe Da ce ObpHete KbM KomTeHTHIne MEChn CnyKb, CnyKbTe 3a CbSiPae Ha DomAuaHn OTNaDbLsI IN Mma3nHbT, B KOIT Oe 3aKynPiN To3n en. eyed.
BHIMAHHE! Hen3BpUbaHToHa MoHTaHa H BuHtOBeI HaФнКсИраUTe MEXaHn3Mn B CbOTBeTcTBne C HAcTOrIuTe INHCTpyKlUm,MOKeДЯДОБeDE Do PnCKOBE OT eNeKTpNuecko ECTEBO.
YnoTpe6a
AcnipatobTe npoeKtupan 3a acnnpupahe Ha dma n napata, KOINTO CE OTDeJIPT pRn roTBeHe, Ie npedHa3HaueH cAmo 3a 6ntota ynoTpe6a.
AcnpaTOpbT mma cneHOTOn ppeHa3NaueHHe: BCMyKBa n OTBeJda HABhNINΦnITpnpa Bb3dYxa, KaTO eHOBPeMeHHO CToBa r peuNKJInpa.

AcnnpupaBercn
Napata ce OTBeJda HABbN NocpeDCTBOM Bb3dYxOBoHa Tpb6a CbBy3aHa CbC CbeDNHTENHnF PhaHeu.
B Te3n Cnyan fmpMaTa He Noema HnKaKBa OTROBOPHOCT.
I Ⅲan3BaIte Tpb6a C Heo6xOdImata DblnHa.
!N3IOJ3BaIe Tp6a C Bb3MOxHO HaM-MaJIKO Tp6Hn KOJIeHa (CMAKCImaJIe HbIa HA N3BvBAka:90°).
He npomehaTe p3ko ceehnTo Ha Tpbnte!
I N3noN3BaIe Tpb6n C Bb3MOxH0 Hai-ΓlaKo BbTpeuHO nOKPITHe.
I MaTePnAJIbT,OT KOItO Ca n3pa6oTeHn TpB6nTe Tp8Ba Da OTROBAPHa HOpMnTe B Cnla.

Фильтураць Версан
Acnipnnapnrt B3dxy Ce npeuicntba n ocBexkaba npedna Bne3e OTHOBO B obpuehne B NOMEueneto. 3a da n3no13bate acnpatopat B To3n Bapnant Ha pa6ota Tp6ba Da IHCTanipate DoIbHInTeHa fHPTnpaua CnCTema Ha 6a3ata Ha fHnTPn CakTINBEH BbrJIen.
MOnTnpaNe
MHHMMAHOTO pa3cTOrHHe MEXdy NOBbpxHOCTTa, Ha KORTO ce NOCTaBRT CBdoBete 3a TOBHeBE HnAH-NHCkATA qACT Ha kXhENckn acnnpatop, Tp6Ba Da 6Be He No-MAnKO OT 45cm B CnyaH Na EneKtpnWeckn NeeKn HneNo-MAnKO OT 50cm, B CnyaH Na Ra3OBn INI KOM6bHnPaHn NeeKn.
Ako B INCHTpykUHHe Ha ra3OBuYpeI 3a rotBHe e nocOeHo NO-TOJIIMO pa3CToHHe, TO Tp8Ba Da ce HMa npEdn.

En.Bpb3ka
HanpexeHneto B en.MpeXaTa Tpa6Ba Da OTRObAp Ha HapexeHneto, KOEt e NocOeHOb Bbpyx EtNKeTa C daHNHTe 3a acnnpaTopa, NoCTabEn OT BbTpeWHaTMy cTpaHa. AKe e ChAbDen C uenceCBpbKete AcnnpaTopa KbM KONTAK, CbOTBcTBAuH Na DeIcTBaUHte HopMN HAMnpauC Ce Ha JECHO DOCTbHNO MRCTO DOpN i CNeL PrkHIOVAHe HA MOThaxa. AKe He cChAbDen C uenceL (DpuKTHo CBbP3BaHe KbM MPexaTAt), INN UeNCeNTbHe H a DoCTbHNO MRCTo CneL PrkKnIOVABe HA MOThaxa, INN0N3BaTe DByN0NtOcEH PpeKbCbae CNopeD HOpMtE, Taka Ye Da ce OcnIypn PblHo IN3KNIOVAHe HA MPexaTApn CBpbXHAnpexeHne III, B CbOTBcTCTBne C npABINlata 3a MOHTipane.
BnmaHne! Ppei Da Cbbpke Te OTHOBO acInpata KbM Mpekata n da npOBepTe daHfHKUOnHpa npaBnHIO, npOBepTe daHn KaebT e MOHTpanh KaKTo TpA6Ba.
Acnipatobt e cahbden cbc cneuanaen kaebn 3a 3axpaHbahe; B cnuyai, ye kabebt b6nde yBpehen o6bpheTe ce KbI rapaunOHnna cepBn3 3a da nOlyuHTe HOB.
MOHTAX
Ppei Da npntbntte KbM MONTXka:
- Ybepete ce, Ye 3akyenHnT oBac npOyKT otroBaPra no pa3mepn Ha n36paHOTo MRCTO 3a HnCTaInpaHe.
- Oćtrpahete φnntbpa/φnntpnte c AKTNBEN Bbltnen (pa3bnape ce, akno n3bpanhmt ot Bac moen pa3nONara c TaKbB). 3a da n3bbpnte TOBA npocnepe Te onepaunite B cbOTBeTHnaparpa. MoTnpaTe FnPTPte OTHOBO CAMO Bcnyauh, ye Xe Jenaeta de a mOpJ3BaTE acnPnapatoB bBb Bapnant Ha φnntpnpaua Bepcnia.
- YBepete ce, ye no Bpeme Ha TpaHcnpTa BBb BtpeuHaT aCt Ha acnnpaTopa He ca nonaHnJn Dpe6Hn PnpdmTe, KaTo HapnPmeP nIiKHTe C BNHTObe, rapaHcIOHHN KapTn nD.; aKO hAmepTE TaKINBa OTCpAHeTe m n n 3ana3ete.
Ako e Bb3MOxHO pa3rNo6eTe n IpemecTe Me6eJIte, KOINTO ce HAMnpat B HenOpceDCTBeHa 6n3oCT Do MxCTOTO, KbDETo Bb3HAMEPRAte Da MOHTnPate acnnpatopa. IIO To3N haunH ue IMATE No-do6bp DocTbn Do TabaHa INI CTeHata, KbDETo 6bDe IHCTanpah. B npOTHBcIyau, BHIMABAte Da He YBpeNTe NO BpeMe Ha MOHTaXe Me6eJIte N BCNU OctaHAn InpeDMETu. IV6epete paBaNA NobbpxHOCt N OOKPNIte C PNOxDQAIO pNaTHO, BbPxY KoEto Da noCTaBITE acnnpatopa N CbOTBEhTIte AkCEcoApn.
- YBepete Ce, Ye B 6JIn3OCT Do MЯCTOTO, KbDeTo Bb3HaMepaBeTa Da MOHTnPaTe acNnPaTopa NMa JIeCHO DoCTbIeN KOtAKeT N CbIo Taka, Ye E Bb3MOxHO Da CE CBbPKe C OTduShNIK (cAmO 3a acNnPnpaUte BepCm).
- ɪnɪbɪnɪtete BCɪnɪ Kɪ Heo6xOdɪmɪ Onepaɪzɪn, Hapɪpɪmep: MOHTɪpɑaɪte en. KOHTAKT W/ɪnɪ Nəhpɑaβe TOBOP 3a npokapɑbaene HaɪxOJHATA Tpɪb6a. Acɪnpɑtopbɪt e cháðeŋ Ṣdɪðeŋ 3a φɔκcɪpɑaHæ NoɪxOjərɪs 3a no-tərɪmaT a qæct OT CTeHNTe n TaBauHnte.
Pn BCE TOBA, Bn npenopbYbame Da ce nocbBetBaTe c KbaJInΦmuaipan texHnK, 3a Da CTE cnypHn, Ye doCTaBeHnTe
akcecoapn ca noDxOJaun 3a ueJt. CteHata, cBoTBeTHo TabAHbT, Tpa6Ba da 6bDat DoCTaTbUHO CTabmHn 3a da N3dbPjKAT Ha HATOBAPBaaneto.
Hauin ha ynoptpe6a
Ako npn roTbe ce otdeJI MHO napa, npemHHe Ta MaKcMAnen pexmHa pa6Ota. PpenOpbTuTeIHO e Da BKNIOHTe acnnpaTopa 5 MNHTu npedn da 3anoHHe Ta RotBte n da ro octabTe da pa6OTn OOE 15 MNHTu cneI KATO npNKIOHTe.
MoTeI cTbU 6yToHn
3a da n36epete keenahnrt ot Bac pexkim Ha pa6oTa e doctaTbUHO da hatcHete neko cbOTBeTHN 6yToH.

Bytoh ON/OFF 3a oCBeTneHne

Bytoh 3a n3bnpahe Ha pexkma Ha pa6ota (cteneH Ha acnnpaunia - HHTeH3NBHA) - Bpemetpaene: 5 MNHyT. HatncHete Oue eDHH nbT 3a da ce BbpHete B IIpbBOHaJHata No3uN.

Bytoh 3a n3bnpahe Ha pexkma Ha pa60ta (cteneh Ha acnnpaunia - Bucoka)

Bytoh 3a n3bnpaHe Ha cpeHa ckopocT (MOUHOCT Ha aCnnpaHae) - KORATO NpemrBaO 03Hauaba, ye FNTbpT C AKTNBEH BByIeN Tp86Ba Da ce N3Mne IIN NOmEHN. No pInHcNt Ta3n CnHAnl3aun e De3AKTNBpuHa. 3a da a AKTNBPate, N3KIOUcTe ENEKTPOHnKaTa KaTO HAtNHcHTe ByToH O 3aIbPkNte B npOblJxHeHne Ha 3 ckyHd.
CneTobHaHtChTe eHNOBpEmHe 6yToHn1 n2 3aDpXkTe B npOdbIkeHMe Ha 3 cekyHn, TpbOu 3aONue Hda npEMiBa cAmo 6yToHn 1 a CneTobA eHOBpEmHo 6yToHn 1 n 2, KoETO O3NaHaba, Ye fHKUraE aKtNbUpaHa. 3a Da de3aKtNbUpaTe CnHAnl3aunrta, NOBTOpeTe OepaunrTa. TpbPOe 3aONuHAT da npEMirBat 6yToHn 1 n 2, a CneTobA cAmo 6yToHn 1, Koeto O3NaHaba, Ye fHKUraTe aDe3aKtNbUpaHa.

Bytoh 3a n3bnpahe Ha pexkma Ha pa6ota (cteneH ha acnnpaun - HnCKa). Korato mna O3NaHauaba, ye e Heo6xOIMo da NoHcntte fIITbpa 3a Ma3HHNHTe.

Bytoh OFF motore (stand by) - N3knHouBaHe na eIeKtponHKATA - HynipaHe Ha cnHaJIaN3aCnRA Ta 3a MneHe / noMnaHa Ha pfIITpIte. OFF MOTORE
HaTnCHeTe IeKo 3a Da I3KnIouHte MOTopa. HYNIPAHE HA CNIHAN3ALJYTA 3A
ΦNITPNTE
PnBKnHoyen acnnpaTop n Cne KaTc TNe 3bBpwnnn NODpbXkata HaΦnTPnte, HATNCHE6byToHa n 3aDpXte DOKATO yyeTe 3yKBOB CnHAn. IpemrBaunT CBToND1 (HaΦnTbpa 3a Ma3HNn) nn2 (HaΦnTbpa c AKTNBEH BByIeN) Pnctaba Da npemrBa.
N3KJIIOUBAHE HA EJEKETPOHKATA
HaTnCHeI 3aDpBxTe HaTnCnat 6yToHa B npOblJxKeHne Ha 3 cekyn, n0 To3n HauHn Ce n3KJIIOuBa KOMaHdHaTa eNeKTPOHnKa Ha acnnpaTopa.
Ta3nФункцmaMoKe Da Bn 6bde noJe3Ha npin oNoHCTBaHe Ha ypeDa.
3a da aKTbIpaTe OTHOBo eNekTpOHnKaTa TpIbBa Da noBtOpTe onepaunra.
Ako 3a6eKITE HeN3npabHocTn NO BpeMe Ha pa60THNIA KIbJI, N3KJIIOUcTe Ka6eJa OT KOHTaKtA, N3UkaJIte MHNIMYM 5ceKHyMN I ro BKIOUcTe OTHOB. Ako TOBa He pa3peShn np6bIema, Bn CbBETBAME Da ce o6bPHe T KbM CbOTBeTHNRApaHUNOEN cepBn3.
MoJenHaHmNpyIeH MoyIaTOp c56yToHa
1-BACKOPOCT(MOUHOC)Haacnnpupahe:20MmHyTu
2-pa ckopoct (MOUHOC) Ha acnnpupahe: 15 MmHytn
3-TaCKOPOCT (MOUHOC) Ha acnnpupahe: 10 MNHyTN
HHTe3nBHa CKoOCT (MoUHOCT) Ha acnnpupaHe: 5 MNHyTn
CnHaH3aun 3a 3ambpcBaHe na qnntpnte
AcnpaTobpTa3noIaracfynKun,piKoToHa onpeJeHnTEpBnOT Bpeme CeNoDaba CnHnA,Ye fHnITPnte ca 3ambpceHn e Heo6xOdmo Da ce N3BbPnN noDpBjka.
CnHaHn3aun 3a 3ambpcBaHe Ha chnTbpa 3a Ma3HNHn: npn n3Klnouen acnpatop (OFF) BCNUK CBeTOIOOn 3a ckOPOCTTa (MOUHOCTTa) Ha acnPupane ce 3aJeIcTBat n OCTabAT BKNIOUeH N b npDblXKeHne Ha 40 cekyHd.
CnHaHn3aun 3a 3aMbpcBaHe Ha fHnTbpa cAknBHe BByIe: npu n3KJIIOUeH acnIpaTop (OFF) BCNUK CBeTOJNOJ 3a ckOPOCTTA (MOUHOCTTA) Ha acnIpnpaHe npemIrBaT B pOJbJIXeHne Ha 40 cekyHdn.
Akmubapane Ha cu2hanu3aumma 3a 3ambpc8ahe Na pfumtpac Akmuehen b2len: no npnHnCnHnHn3aunra T e da a kTnBupate n3KJIIOUe T acnpuTopa (OFF) n HATNCHeTe eHOBpeMeHHo 6ytoHn T3 n T5 n 3aDpXte B npOdbIxKeHne Ha noBce To 3 cekyHn. CBeToNDoNt L3 n L5 ue 3anoHnat da npemrBat.
3a da DeakTNBnpaTe OTHOBO CnHnHaN3aunrTa NOBTOpeTe onepaunra. CBeToNDn L3 n L5 ce BKIOuOBat C NoCToHNHa CBETNIHa.
Hynipahe Ha cnHaJIIN3aunra 3a 3aMbpcBaHe Ha cnntpnte:
PnB KIIIOHEn acINpApToP (ON), HATNCHeTe 6yTOH T2 n3aIpbXTe B IpoDJIbIXeHne Ha NOBeYe OT 2 CeKHyDN. BCNUKN CBeTODIOHN Ue CE KIIIOUaT 3a KpaTko.
BeneKka: aKO u DBeTe CnHAnIm3aunn (KaKTo Ta3n HaФЛТьpa 3a Ma3HHN, Taka n Ta3n HaФЛТьpa c AKTINBEH BbJIte) ca AKNBupanu, NOBTOpe TE OepauJra.
PoiDpBxka
BHHMaHHe!Ppei KaKbATO n da e onepaCnCBp3Ana c nooNCTBaHe nIIN NOdPbXkA N3KnHoyete acnHpata OeI.MpeXaT, KATO N3BaDInTe UenCeJa IIN N3KnHOnHTe rIaNbHn PneKbCBAu Ha XJINlUeTo.
NouchTaBHe
AcnpatopbT Tp6Ba Da ce nouchCTBa YecTo (nHn nohe ToIKoBA Ha YecTo KOJKOto NouchBATE fHNTPnte), KaKTO OTbTp e Taka n OTbH. N3no3BaTe HablaKHeHa Kbpna HeYtpaJIH N TeHH NouchBaU npenapATN.
I36raBae npenapatn, KOINTcIbPjKat a6pa3nBn uactn.
BHHMaHHe! He nouchBaIte HnKora cbc cnInr!
BhMaHHe! HecnBa3BaHTo Ha HopMInTe 3a NoOpCTBaHe Ha acnupatopa 3a noJamHa ha qinnptne BDo pncKBe ot nokap. Cna3BaIte cTporo nocOeHIne IHcTpyKUni!
He ce noema HnKaKbA OTROBOPHcT 3a eBeHTyalnIu CeTn HaHECEHn PO MOTopa N IOXAPn, Bb3NHKnHn CNeCTBne Ha HEnpaBnHa POnDpBxKa INn HeCnA3BaHe Na HactoIuNTe HNCTpykUIN.
ΦnTbP 3a Ma3HHN
Φn.r.9-16
ФиNTbpyT 3aIbpxMa3HnTe YactnU,OTdJIaHn npri IOTBeHe.
Ja ce nouchta BeHbX MeeUHO NIN KOraTO INnKATOpbT 3a npEacmuahe Ha cnntpTe rO noka3Ba (pa3bnpa Ce B CnyaH, Ye MoDJIbT, KOITcE 3aKynIe E cHa6dE H TaKbB INnKATOp).
I3noI3BaIe He MHOrO CnIIH MmIIN npenapatn I noIcTbAte pTuHO INB CbDOMyIHa MaIINHa, HO HA Hncka Tempepatya I KpaTbK peXIM Ha I3MnBaHe.
Pn MneHe Ha MeaJIHnIeФmITbP 3a Ma3HNHnTE B CbDOMNJIHATA MaUNHa e Bb3MOXHO ToJ da Ce 06e3UBeTn, HO TOBa IIO HNKaKbB Cnyuay He HAMJIraBa Bb3MOXHOCTnTe My 3aФmITpnpaHe.
3a da pa3rIIO6nTe fIITbpa 3a Ma3HNHInTe, IpbNHHeTe
ДрьжКаТСпрухинЕн МexанзВМ.
ФиNTbP cakTNBeH BbIeH (cAmO 3a ФиNTpnpauaBepcn)
Фur.15
3aIbPka HnepnAHTHnTe Mnpn3Mn, KOITc ce OTdEJrT npn IpbxKeHe.
ФИNTbPbT CakTNBEH BByIeN CE 3aNYUba Pn6JIIN3ITeINHO CNEД bIbIg nepIOd Ha n3NOJBaHe B 3aBNCMOC T O HauHa HA rotBeHe N OT TOBA KOLKO YecTo NOcHCTBaTeФИNTbPa .
BbB BCEk ncluya e Heo6xOIMO da nOpMeHrte fnnIbpa c AKTINBEH BflnH Ha BCEK yETnpi Meceua NIN KOrato INdikatopbt 3a 3acuane Ha fnnTPnte (pa3bpu ce aKO BaAIMT MOeJ pa3noIara c TaKB) NOKa3Ba, ye e Heo6xOIMO.
He ce mne HnTo MoKe Da ce n3non3Ba nobTOpHO.
KpbblnΦnntbpcakTNBEH BbIeH
Iocabete no eDIN hФnTbO BCa Ka cTpaHa, taKa Ye da ce nOKprrdBeTe npedna3Hn peWetKn Ha pa6oTHOTo KOJIeNo Ha MOTopa, CneJ KoETo 3aBbptete No Nocoka Ha YacOBHKOBata cTpeNka.
Pn demontaxa 3abptete B nocoka obaatha Ha yacobHnikobata cTpeIka.
IopmHa ha en. KpyuKn
Фиг.20
I3knHouTe ypea ot en. Mpekata.
BnmaHne! Ppei Da B3eMeTe B pka en. KpyuKntepnoBepete daJin ca n3ctHaJI.
IOnMeHete NOBpeDeHATA NAMnA C HOBa O T CbUIM TaKAKKTO e nocOeHO Bbpy EtnKeTc XapakTePncTnKeTe IIN6bn3o Do camata NAMnA Bbpy acnPnPota.
- C nomoza ha manika otBepTKa nn noo6eH INCTpyMeHT OTcpanete kana Ka HnlafoHneepata.
2.Пл demehete n3roprajlata kpyka.
I3noJ3BaIte cAmo XaIooHn IaMn ot 12V, MaKcIMyM 20W-G4, KaTo BHMabate Da He nDOKOCBATE Cpka.
- 3aTbOpTe nlafoHnepeTa (npn 3aTbApHe npuPakBa).
Ako en. KpyuKInTe He CBeTt, npOBepTe DaIa Ca MOHTpauHn npabINHO npEn Da Notbpcnte NOMOHTa Ha CneuaJIInCT.
He octabnIte detei 6e3 npncMOtra, YTObI OHI He nrgpAln C np6obopom.
He nCnoJIb3yIte BbITaKky, ecn peWetka HnpaBnIbHO yctahOBnlaHa!
Kateropnueckn 3anpeuetaTcNIOJIb3OBAbBbITJkU B KaheCTBe ONOPH NIOCKoCTN, eCNI 3TO CNEuaJIbHO He OROBOpeHO.
O6ecneyte HaIeKaun Bo3DyXoo6MeH NomeJeHnA, KOrDa BbI cNoJIb3yeTe BbITaKky B KxHHe OJHOBpeMeHNO C dpyrMn npIbOpam Ha ra3y HIn Ha dpyrom rOpUcHm.
BbIyraBEmbBo3dyHdJKeH BbIpaBaBbCn HApKy uepe3 Bo3dyXOBOD,NCIOJIb3yEmbIgN BbIbPoCa DmOB OT np60OB Cra3OBbIM CxNraHnEM mIc C nITaHnEM dpYrMnTopOuMM.
Kateropnueckn 3anpeaetcra roTOBnTb 6IIOda naI pIamHeHem, nOckoJIbky CBO6OJHoe IINAMr MOxET NOBpeiNTbФIbTpbl nCTaTb PnUHNHO NOKapa; N03TOMy, BO3depKJBauTecb O T3TOro B LIO6OM clyuae.
KapeHbe B 60JIbIOM KOJIuYeCTBe Macla DOnJIKHO npOu3BOuNTbcra IOI NOCTOaHHbIM KOHTpOJeM, IMe B BVNu, yTO nepepeToe MaCIO MoKET BoCNJaMaHrTaC.
Пи ИСЮЛБЗОВАнь ВмEcTe CпочIMN annapatamДЯ варК, OTKpbIbIteЧТИnpбОа MOrT CmblHOr HarpeBaTbcS.уTO KAcAeTcR TeXnUeCKnx МрИ yCIOBn NO TExNHKe 6Be3ONaChOCTn рп OTbOde DbIMOB,TO npInePJKBaNTecb CTPOr pAnBIn,пeДyCMOTpeHHbIX PerIaMeHTOM MeCTHbIX KOMNETHTHbIX BnActE.
Ipon3BODInTE nepnoDnueckyo ONUCTKY BbITJAKK KAK BHyTpn, TAK n ChapyKu (IPO KPAHHEI MEPE, PA3 B MECLI C cO6JIIODeHNEM ycNOBNI, KOtOpBLE cneMaJIbHO npEduCmOTpeHb IMHcTpyKUINx NO o6CnYkMaHIO daHHoro np6Oba).
Heco6IHOeHne HNCTpyKuIN NO YNCTKe BbITaXKn IN No 3aMeHe u NCTke QJIbTPOB MOxET CTaB pNCHNOI NOxapa.
He nCnoJb3yIe H He octabJIe Te BItIaKg 6e3 npAbuIbHO yCTAHOBIIeHHbIX JAMIOueK B CBy3N C BO3MOXHbIM pNCKOM yDapa 3NeKTpUneCKM TOKOM.
Mblchimaem C c6eBcKky OTOBTBeTBEHOCt 3a HeNoIaIKn, yuepe nnCropaHne pnpbopa BCNECTBne HecobJIOJeHna HNCHpyKlpi, pnpBeDeHHbIX B daHHom pyKOBOcTBe.
Данhoe ИделпnpoMapКИрOBaH B COOTBETCTBn C
Еврелсков ДиpeKТВоB 2002/96/EC NO yTININ3aUN
ЗлктчecкOrи иЗлктpoHOrO obopyobAnHa (WEEE).
OeceueHb npaBnBHy yTnIaZIO daHHoro n3dEJIa, BbI NOMOXETe pTeoTbPaTb NOteHuaIbHbe I HeTaNBbIe NocneCTBn DnOKpyKaIoUeI cpebl 3DopOBBa YelOBeka.

CnB01 Ha cAMOM n3dennn nIN cOpBoNDteHbHOJ DOKyMeHTaun yka3bIAeT, YTO pRn yTNIn3aUN daHHORO n3dennr C HMM HeN53 O6paauTcB KAK C obHybIMn 6bIToBbIMn OTOxOAMu Bmcto 3TO,ero cIeDyET cDaBaTb COOTBcTcByUoU nnKt npneMkn 3NeKTPnuEckoro n 3NeKTPoHOrO o6opyDoBaHnn IJn NocIeDyIOSeY eyni3aun.
CdaHa HcNOM DoJXHa Ipon3BOJntbCBy COOTBETCTBn C MeCTbIMn PpaBNJIaMn N OytIN3aUm OTxOIOB.
3a 60lee npdo6ho HnHopmauee O npabinax obaapeHncaTAKMIM N3dEINMAH, IN yTNInaLcMn NEpepaBtKnObpaauTceB B MeCThIbe OprAhbl BnactM, B Cnyk6y noytInaunm OTXoDob INN B Mara3HN, B KOTOPOM Bplno6bpEn daHnoe n3deJne.
BHIMAHHE! OTCyTCTBNE yCTAHOBKN BINTOB N yCTPOINCTB KpeJIeHnB B COOTBETCTBn C 3TNMn INCHPTyKLJnMn MOKET NOBJeB 3a coBoN pncKn 3JeKTpnHeCKOrO xapakTepa.
Ponb3ObaHne
BbITJkKa CnyKt IaIg BCacbBaHnIyMbIa Inpa npI npriROTOBHeHm NIIuN IpeHa3HaueHa TOlbKO dJI 6bITOBOrIO NCNoJIb3OBAHnI.
BbIyKa cKoHCTpyuPoBaHa dJa pa6OtBJ B pexMe OTbDa BO3DyHa hapyu nn peuKpUyIaun BO3Dya.

IcnoJIHeHneC OTBODOM BO3duxa
B 3TOM pexnme nnapenHb BbIbOaTcH npHyK uepe3 ngknn Tpy6oPiPoBD, NOcoeINHeHHb K COeHNHTeHbHOMy KOJIbU. DnAmETp BblOHO Tpy6bl DOJXeH COOTBcTcBOBaT b DnAmETpy CoeHNHTeHbHO KOJIba.
BHMaHHe! BbIbOHaN TaYb6 He BxOaNT B KOMPJIeKT mDOnKHa 6bIt npNo6peTeHa OTdJIbHo.
B roPn30HTaIbHOn qactn Tpy6a DOnKHa 6bITb HEmHOro npInOJaTa K Bepxy (npImepHo Ha 10^ ) Tak, YTo6bl Bo3dyx 6bICTpee MOr BbIXoDHT hApNyXy. Ecnn BbITraKk ChabKeHa yroIbHbIM fNtTprom, To y6epiTe erO
IOnCOeMHINb BYITJCKY K BbIBOHOH TpyBe C dAmetpOM COOTBcTCTByUOzMM OTBepCTNHO BVIXoA BO3DyXa (coeHNHTelhBHyΦlaHeu).
UctahOBka Tpy6 C MehBzIM DnAmEtpom DaCT yMeHbSeHne MOUHOCTN BCaCbIBaHnB BO3Dyxa N pe3Koe YBeINuEHne yPoBHa Wyma.
IpoIN3BOIDteJIb CHIMaET CCE6B C8KyIO OTBETCTBEHHOCTb IO OTHOHeHIO BbIe CKa3aHHO.
I NcnoIb3OBAtB Tpy6y C MmHImaIbHo Heo6xoDmOMy DnHoi.
I NcnoJb3OBAbT Tpy6y C HnMHeHbUIM KOJIuYeCTBOM n3rN6OB (MAKcImaJIbHbI yrOJI n3rN6a: 90^
I N36eRaTb pe3KOro n3MeHeHn CeeHn Tpybl.
BHTpeHHra NOBepxHocTb NCNoJIb3yEmo Tpy6bl DOnKHa 6bIb KaK MoXHO 6Ooe rJaKnOi.
I MaTePmaJI Tpy6bl DOJKeH COOTBETCTBOBaTb HOpMaTINBaM.

IcnoHHeHBeBpeXnmepeunpkyJauu
KhONka nepeKIOUeHnHa BbICOKyO CKOpocTb (MOUHOCTB BCaCbIBaHn)

KhONka nepeKnIOueHnHa cpeHIOU CKoOpOCTb (MOUHOCT BCAcBtAHN) - KOrda MnaeAet, yKa3sIbAeT Ha Heo6XODMOCb ONUCTK, ININ 3aMeHbI yTOBHO rOfNbTPa. DAnHaa CnHnAIn3aUaOBuHO oEhNO OTKIOueHa, DIA AKTbuaCm CnHnAIn3aUaHnEO6XODM0 NCKIOUHTb 3NeKTPoHnki. INI 3TOrO HaxKMITE HA KONy 0 I depKHe e HAXaToHn HnpOTxKeHN 3 cekHyd. 3aTEM ONDOBPeMeHHo HaxMaJIte Ha KONk1 2 Na npOTxKeHN 3 cekHyd. Chauana HauHET PnIbCupObaTb KHONka 1, NOTOM HauHY TnyIbCupObaTb OBe KHONk 1 n 2, YTO CBnDETeJIbCTByET O TOM, YTO AKTbAUzra 3aBeRseHa. NIObTOPIn TaHHyO oneaHIO DnIg OTKIIOueHn CnHnAIn3aUm, Chauana HauHY TnyIbCupObaTb KHONk 1 n 2, NOTOM HauHET NpIbCupObaTb KHONka 1, YTO YKa3sIBaET Ha OTKIIOueHne CnHnAIn3aUin.

KhONka nepeKNoUeHnHa Hn3KyIOCKoPocTb (MOuHOCTb BCaCbIbAHnH) - KOrJaMnraet, Yka3bIbAEt Ha Heo6XoDMOCtB ONUCTKn FmJIbTpTa 3aepKKn Knpa.

KhoNka OFF MOTopa (stand by) - UckIIOUeHne 3JeKTPoHnKn - C6poc CnHaJIIN3aUNO ONUCTKa/3aMeHa φnIbTPOB. OFF MOTOP
KpaTkoBpeMeHNO HauKaTb Ha KhoNkU, YTO6bl BbIKJIOuHTb MOTOP. CBPOC CnIHAN3ALUN FNJIbTPOB Ipn BcIIOueHHo BbITaXKe, Nocne TOrO, KaK 6bIIO BbIOJIHeNo TexHnueckoe OcbIyKmBaHne
ФильТpoB,HажатьHa KhoNkуИ Deржать
HakatoI pOKa He npO3ByuHT ayKCTnuCeckn
CINrHAn. MiraToUoIи CBTeOJIoD 1
(MeTaJInuNeCKyIФильТp) mIIn 2 (yroIbHbI
ФильТp)npEkpAITMIRaTb.
NCKIIOUeyHE 3JIeKTPoHnKIn
B cnyae BO3MOXhblx anHomai np60tbl, nepe TeM KAK o6paTb8cB a CEHTp TEXHueckO nOMoU 0KJIIOHTb OT 3NEkTpONIaTHn MInHMMym Ha 5 cek. pnp6op, INBNeKaB BNIKy n NOTOM BHOb NOpCOeDNHb ee. B cnyae, ecn anHomaiye Hcne3aET, o6paTb8cB cHTp TEXHueckO nOMoU.
MoenbcnaHeNbHOHa5KhoN
T1. Khonka BKJI/BbIKJcbeta (Led L1 BkJIoueH)
T2. Khonka BblKJI - Khonka Bbl6opa ckopoctn (Mouchoctn) BCacbIBaHna Bo3dyxa 1 (Led L2 BKJIOUeyH)
T3. KhoIIka BbIbopa ckOcStN (MoUHocTn) BCaCbIbAHnBaO3dyxa 2 (Led L2+L3 BKIOueHebl)
T4. KhoIIka BbIbopa ckOcStn (MoUHocTn) BCacbHaHna BO3duxa 3 (Led L2+L3+L4 BKJIIOHeHbI)
T5. Khonka Bb6opa CKOpOCTn (MOUHOCTH) INTEHCNBHO BCaCbIBAHNA (Led L2+L3+L4 BKIOUeHb + Led L5 MmraIoum) -IpnoJIoJIKHTeNbHocTB 5 MNHyT - Nocne Yero BBITJXKA yCTaHaBJIbBaET abOTomatueckn CKOpOCTb (MOUHOCTB) BCaCbIBAHNA 2.
3aMeIeHHe BbIKNoUcHHe BbITaXKn (Led Muraioune):
Bo3MOXHO yCTaHOBnTb 3aMeIeHHe BbIKIOUcHHe BbITJAKK (BbIKN), DePKa HaxaToI 3aHOBO 60JIbIe Yem 2 CekyHdbI KHOIIKY ckOcTn (MoUHcTn) BCacbIBaHnA, JeIcTBYIOuN B 3TOM MOMHT.
BpMa 3aMeIeHHOro BbIKIOUeHnI NMeIoTcB HaNuHn TOJIbKO:
Ckopoctb (MOUHOCtB) BCacbIBaHn1:20 MNHT
CKoPoCTb (MoUHcOtB) BCaCbIbHaNra 2:15 MmHyT
CKoPoCTb (MoUHOCtB) BCaCbIbHaNra 3:10 MmHyT
Ckopoctb (MOUHOCTb) BCacbIBaHHe INHTeHCNBHOe: 5 MmHyT
CnHn HacbIeHne FJIbTPOB
BbIyKka Cha6xHa fynkUme, yTO B peryIpaHbIX npomexyTkax BpeMeHN ppeynpexkdaet NOnb3ObaTeJIa, KOrda pfNtbpHacblueHbN HkyHNO pOBecTn npocnakTneckn yXoJ.
CnHn HacbIeHnna FnbTpOB 3aedpKKn Xnpa:BblKIOUeHHa BbITRAKKa (BblKI), BCE Led cKOpocTm(MOuHOCTN) BCaCbIBaHnB BKIOUcTcA C fIKCnPoBaHHbIMCBetOM Ha 40 cekyHd.
CnHn HacbIeHne FInbTpoB aKTHBnPoBaHHoro yrna: BbIKIOUeHHa BByTgKa (BbIK), BCE Led cKopocTn (MOuHcOCTN) BCaCbBaHHa MmraHOT Na pnoTjKeHHn 40 cekyHd.
Akmueaua cuehana hacbuehenu pfunbmpa
akmueupoabnoho yar: CnHAn De3akTMBPOBaH,
yTObbl AKTNBPOBaT bE OBykHOHTb BByTJCKy (BblKl)
n HaxaTb ODHOBpeMeHHO KHONIK T3 N50JIe Yem 3
ceHybI, Led L3 nL5 NaHTMnAr.
TObI De3aKTHBnPoBaT NOBTOPTb ONEpaHIO Led L3 N L5 BKJIIOUaTcA CΦNKCUPOBaHHbIM CBETOM.
Bo3Bpat B nCxOdHoe noLoXeHne CnHaIa HacblSeHna ΦnlbTPOB:
B COCTOHN BKNIOUeHHoB BVITJAKKIN (ON) HauKaTb KHOIky T2 60JIbe 2 cekyH, BCE Led BKNIOuHa cHa KOpOTKe Bpemr.
PpimmeaHHe:ecn Heo6xoJIMo NOBtOpNTb obe onepaun B Cnyan akTnBhIX DByX CNrHaNoB (ΦnJIbTp 3aepxKn Knpa n ΦnIbTp aKTNBnPoBaHHO rYn).
yxo
BHHMaHHe!IpeXeJeM BbInOnHnTb JIO6yIO OnepaunHO no YnCTKe Nn texHNueckOMy 06cnyKbBaHIO,OTcoEINHtE BbITJxKy OT 3JNEKTPOCeTH,OTcoEINHry BnKy nnn IraHBn BbIKNIOuATEJIb NOMeUeHHa.
OuInCTka
BbIyKka DoJNkHa NIOBepRaTbCra YactOu ONUCTKe KaK BHyTpN, TaK n Chapxyn (No KpaHne HMepe C ToT JKe NepMOINHOCTbO, YTO n yXoD 3a FnbltpAmn Dnla 3aJePcknn XIPA).ДЯ NUCSTKN IcNOIb3yTe CNEUaNbHYO TpRNY, CMOeHNHyO He npMehaTe cpeDbTa, coepxaaue MabpaHbHbIe MaTepaHbIb.
HE PIPMEHJTE CNTIPT!
BnmaHne: He co6IIOHe Hne npabIN nCCTKN npi6Opa n3aMeHbI pInbTPOB MOKET npuBeCTN K pNCky BO3HKnHOBeHnnoJokapa. I03ToMpy ekOMeHNyEM co6JIIOdaT b npuBeHnble INHcTpKUIN.
CHHMaTeCJIIO6aOTBETCTBeHHOCTb B CBA3N C BO3MOXHbIMN NOBpeXdENHMIM DnIraTeJIg N C NOKApAMN, BO3NHKUIMM BCNEcDCTBHe HnPabINbHOrO peMOHTa INI HeCO6JIIODeHNH BIIeOONICAHbIXnpEDynpeXdEHNI.
BnTjKHe NOBnHa BnKOpNCtOByBaTncb RaONOPH a nobepxHn,Piue y BNnKaX KOIN YcHO pO cKe Cka3aHO.
B BnnaKky BnKOpNCTaHnBnTJxKn pa3om 3 iHUnmPiNPCTPOAMn Ha razi a60 iHUnx RopUCh, npMlueHnMaMCaMn DOCTaTHo BENTINJIuIIOBiterp, 1O BCMOKTyctcBHeMaC 6ytN HnPaBNeHO B BnTJXhN KAnJ, kNBNOPKCTOBcyTBnDn BnKNDy DmIMB Bid po6OTn pnpCTPoiBaHa razi a60 iHUnx RopUCh.
Cybopo 3abopohertcra roTyBaTu ydaanT bixi nd Borhem.
BnKOpNCTaHH BilbHOrO BOrHIO E uKIDINBM DnIg PJIbTpIB i MoKe BnJInKaTn NoKExy,OTKe HEO6xIdHO yHnKaTn NOro BnKOpNCTaHH y 6yDy-KOMy BnPaNdY.
CmaXeHHMaBicbYBaTncnpiKoHTpOJeM,uOb yHnKHytn 3aImaHH po3irpItoi onii
Bjdkpnti TaCTHmN MoKyTb CnIbHo Harpibatncs KOLIN BHKOPINCTOByOTbCpa30 3 npnnaamn nIra Bapihn.
LIOJXCTOCYETCBANKOPNCtAHN TEXHINnpABIN Ta npABIN 6e3neKn DnA BKNIDy DmMIB,TO Heo6xidHO YITKO dOTPmMyBaTncB HopMaTnBIB, nepeD6aueHnx MicceBmN iHCTAHJIaMI.
YHueHHBnTgKmMaepeyIpyHO npOBoHTNCa,AK BCEpeHNi,Tak iHa3OBHI (HE MEHUIE OJHOPO PA3Y HA MICLb,B6yIb-kyOMBy BnAky BnKOHyBaTN Bci IHCTpyKuii, 0O ONCAHI BcOMy KepiBnTuB).
HeDToPMMaHH HOpM OOnuEHHBNTJXKN Ta 3aMIH i OOnuEHHpIbTpIb MOKe BnKJNkATn PN3NK NOKeKi.
He BnKOpNCTOByIe i He 3aJIIMJaIte 6e3 BiPHO BMOHTOBaHIN JAMn y 3B'J3Ky 3 MoXJIINBM pU3NKOM ydApy eNEKTPuHNM CTpyMOM.
He HeceTbCJ KOHOI BiINOBiJaNbHObCTa HeNcnpabHocTi, yUkoJXeHnra Ta Nojexi HAnECheni PnICTPOU, 00 E HacniKOM HeNoTpImaHnroPapd, noDaHHx B daHii iHCTpyKuII.
Danhi Bviip6 npomapkobAHn BiinobiHNO do CbponecboKi DineKtmb 2002/96/EC, ytnia3aui eektpnHoro i eektponHoro 6bnadHaHH (WEEE). 3a6e3neuyuoh bipy Hytin3aio cbo RBO BPO6y, Bu donoMokete nonepedtn NotehciHi HeRaTbHI HacniKn I py OTOUYOHO cerpoBua i 3doPob8' JIOHNH, KOTPI MOrN 6MaTmCue B nPoTnEcxHOMy BnAnky.

Cnmbon ha camomy Bnpo1 a60 ha cynpobodkyohomy Ioro dokymenti bka3ye, 10 npn ytni3aui 2b0r O npboy 3 Hm He moxna nobOHTNCRA k3 i3BnuaiHMMN NOBYTOBIMN BiXODAMn. BIn Mae 3daabTncs y BiNDIOHN PnyKT npniOmy EneKTPuHORI eNEKTPoHORO o5NaDHaHH NIA NOAJIbWoI ytni3aui. 3DaBaHH Ha 3nAm NobINHO BVKOHByATNC 3riIDHO 3MICUEBMn pnbAMn PO tni3aui BIDXODIB. DnB JaIbe DetalbHoIH Hopmaui np npabNnno NobOJKeHHN 3 TakmMn Bnpo6mixnqnnnB Miuebi OrpAHn BnAan, B Cnyx6y no ytni3aui BIXOXOB, a60 B Mara3HN, B KOMy Bin prnd6ann daHH Bnpi6.
YB4A! BiCyTHICTb yCTaHOBnEHn rBNHTiBaTeTaneN KpInnEHn y BiNObiDnOci Do cix IHCTpyKuIM MoKe np3BcTeN do pnsKy eNeKtpnHOro xapakTepy.
BnKOpNCTaHH
BntjKHN KOBnak CnpoeKTOBaHm DnB BCMOKTyBaHHaDMy Ta npay, 0o yTbOpocTbcN iD qac npiroToBaHH aKi Ta npn3HaueHm IInse dnn no6yToBOrO BnKOpncTaHHa..
Bntjka po3po6JIeHa nIg pO6OTn BpeKIMi BCMOkTyBaHHa, BnBOJHn NOBITpr Ha3OBHI a60 B φJIbTpyKoyOMy peKIMi 3 peuPKyIauJIcIO nobITpr.

Pekim BiDvOy
Papn BvBODaTbCn Ha3OBHni cepe3 BvBiDn Ty6y 3akpinHeNy DoФlaHn4 3'EdHaHHN.
IiAmetrp BmBjIoH Ipy6n NobHH BiNobiDatn iiametpy 3'cHyBaJIbHOrO KJIbU.
Ybara! BmBiHa Tpy6 He NoctaAeTbC a I TOMy Heo6xIHO II npIa6Tu Okpmo.
B ropn3oHTaIbHI qactHNI BvBIDHa Tpy6a MaE 6yTu TpOx n iNHaTa (iND KytOM 6n3bKO 10^ ) Tak uo6 MoKHa 6yIo WbNDse BvBODInu NOBITpr Ha3OBHi.
KIO BNTXKN KOBNAK Mae ByrIbHi fiJIbTpN, To iX Tpe6a 3HATN.
Пд' endat no hactinho BvBidno Tpyb Ta BvBIDHOro OTbOpy 3 OndaKOBIM diaMetpom BxOxy nobitpr (3'edhyouchФlaheu).
BukopinCTaHn HactiHnX BvBiHnx Tpy6 Ta OTbOpB 3 MeHIM DiAMetpom npBBeDo 3MeHWeHH eEeKTHBOcTI BCMOKTyBaHH Ta 3NaHHe 3bIbWeHH pIBHa My.
Tomy Mm 3Himaemo 3 c6e Bc8ky BiDnOBiDaIbHiCtB no Bmuecka3aHOMy! BnKOpNCTaTn YKOMoRa KopoTKn BnTJxHNI KaHAn.
! BnKOpNCTaTn BnTJXHm KHaJI 3 KaOMora HnMeHsOo KInbKiCtIO NOBOPOTIB (MaKcImaJIbHm Kyt NOBOPOTy: 90^
YnkaTpi3kX3mHnlooJInepepi3yBtJxHorOKaHaNy.
I BnKOpNCtOByBatn KaHan 3 YKOMoRa rJaDeHbKOHO noBepxHeJ.
! Matepian BITJXHORO kaHaJy Mae BiINOiAtn HOPMaTINBaM.

Pexm peunpkyiaii
BTRHyTe NOIbITp3HExHnIOeTcBa Ta OUYuETcBa Ta 3HOBy NOBepTaecTcB B pImiueHn. IJr TORO, U6B BVKOpNtOByBATNI KOBnak y cboMy pexnmi, Heo6XiDHO BCTaHOBNi DdaTkoBY CNTeMf MyIbTpIB 3 aKTbOBaHm ByrillnM.
Inctanuaia
BiDCTaHb HNKBo BiDuctHNB BITJXKN Do nocyDu Ha kXOHHI pNTi Ma 6ytn He MeHwe 45cm, y Bnpanky eIeKtpuHnx pNT, ta 50cm, y Bnpanky ra3OBHX Ta KOM6IIHOBAHIN PNT.
Heo6xioHn npinmatn do ybarn BiIctahi, kio Bka3yIObCB I nCTpykui 3 ihtanlaii rata0BOi PInNT.

Пд'энндаюелкрөхи
Hanpyra B eJektpomepexi Maé BiJNOBIdaTn Bk3aHIMXapakTepeNtKam Ha etKeTci, RaKa 3hAXoNDtcbc BcepeNHiBVTRJKK. RaIIOB KOMPiEKT BXoNDtB BVIIKA NiD'EnHNNB EeJIkpomepexy, To cIiPi dEHaTHn BITRAKyy Do pO3eTKI, 0oBiNJOBIDAE ICHYUHM HOPMAM Ta 3hAXoNDtCB B DOCTynHOMyMICi, 0o MoKHa BVKOHaTn Ni Cnla IHCTanLJI. KaIIO XBVIIKA He BXoNDtB KOMPiEKT (npIame NDiEHNHBA EeJIkpomepexy), afo PO3eTKa He 3hAXoNDtB B DOCTynHOMyMICi, TAKO J iNcIa IHCTanLJI, To cIi DBMHTyBaTN HALEXHHDBOX-POINCHNI BVMNKau, AkiN 3a6e3IeHTb NOBHeBIKnIOeHNNA BID MEPEKx BiYMOBax nepeHAnpyr III kateropii, B NOBH II DINOIBHOCTI 3 npabUNAmn IHCTanLJI.
Ybara! nepeT TmM YK 3HOBy nIDKnIOUHTN BNTJXKy Do eNeKTpOMePexi I nepeBipInn npabINbHicb pOBoTn, 3aBXKn KOHTPOJIOnTe 5o6 uHpy MepeKs 6yB 3MOHTOBAHn BipHO.
Bntaeknn KOBnak Mae cneuaJIbHn npoBID kJNBeHHa; y BnnaIky noKoDkeHHn npOBOy, 3AmOte Ioro y cnyk6i texhiHoro o6cnyroByBaHH.
Inctanuaia
Ipeep noaTkoM MoTaKy:
- IpeBipTe 06 po3mIP npnd6aHOro Bamn Bnp6y niXoDInI Do BV6paHOrO Micra Ioro MOHTaxy.
3HimtB ByilbHn Fibtp/n RaKIO BIn/BOH npCytHi (DINBNTcB TaKoX BiNOBiHN po3dIn). FIBTp/n 3HOBy BCTaHOBIIIObTcR JaKIO Bu XOHTe BIKOpNCTOBaTn KOBNak B peKIMPeuPKyIJI.
- PapeBipinu Ⅲ6 BCEpeNHi KOBnaka He 3aIiuaNooc npedMetB, NOMUeHNX Tyn Ha Yac Ioro TpaHcnpotyBaHHa (HaPnKnAd, NaKeTnKiB 3 uypyamn, JIcTIB rapaHTii i T.n.),Jkso BOH e,BmMtB ix i 3beepkItb.
Kkto MoKJINBO,BID'edHnTe i BIDcyHbTe KxOHHi Me6JI,IIO 3NaXoDЯTbCn PII KObNakOM I HABKpyrN 3OnH NOrO IHCTaHnii,IIN4 3a63neueHH 6Bb W BInbHO Doctyny DO CTNI/CTIN DE KObNak 6ye npKpInnEH. KaTO ce HEMoKJINBO YAKOMA peteLbHIe 3axNCtTB Me6JI i HuiI npEmTe HA vac MONTVABHn. Bi6epiB pIBHy NOpePxHNO,HakPnTE II 3axCHHM NOKpTTmI pO3MICITb Ha Hi KObNak i Detani dN KpInnEHn.
TakoNnepeBipTe 06bnpaI 33OHO MOHTaKy KObNaKa (B 3OHi, DONTyNH TAOK NcPMAOTaKy KObNaKa) 3HAXOINACA MEpeXeBA pe3eTKa i OTBp IaI dMIOxOy, kIM BMOInTb DM HA ByNIuO (JIiue B Pexnmi BiDBOy).
Bukohatn Bci Heo6xidiPi p60Tu (HapnKla; BCTaHOBHeHHa MepeXeBoI pe3eTK n i/a60 BukOHaHHa OTbOpy IJRA DmMOBoI Tpy6N).
B KOMNIIeKT BITXKBNXOJTB UpyuIN DnI KpINHeHn, po3paxoBaHn HsBILuCiTb TUNiB CTIN/CTEN. Ipote Heo6XiHo 3BepHyTnCn DO KBaIipfikOBaHOro Texhika DnI nepeBipKn npDAtHOCTi MATEpianIB B 3aJIeXHOCTi BiD TINy CTIN Nc CTeni. CTHa/CTeN NOBHNHi 6yTN DoCTaTHb MOUHMN, UO6 BHTPIMATN BARY BITXKKN.
FyHkuioHyBaHHa
BnKOpNCTOByte INTeCHNBHy 7bNdktcb y BNpaKy OOCbNBO BWCCKOI KOnHeHTpauJI KxOHNNx npaiB. PekOMeHcyEMO BKNIOHTN BNTAKKy 3a 5XbNIIN Do nooATky roTyBaHHI iKi i ZAIHNITM IYO BKnIOUeHM Ha npotra 15 XbNIIN NICr 3aIKHcEHNR roTyBaHHI iKi.
Modenb 3 KhoNkamn JERKORO DOTOPKaHHa
Дя Вибору Функшй KOBпа КОCTаTHьо ЛERКHaTиСHTи HaKOMaHДи KHONK.

Khonka ON/OFF cBirna

Khonka nepeknoueHHa iHTehCNBHy WbNdkictb (NOTyXHcTb BCMOKTyBaHH) - TpBnAictb 5 XBNINH - 3HOBy HATNCHTN, IO6 NOBepHyTncsHa nonepedHIO yCTAHOBky.

Khonka nepekIIOUeHHa HbNcOKy WbNDkictb (NOTyXHICTb BCMOKTyBaHHA)

KhONka nepeKJIIOUeHnHa cepEDHOb WbNkICTb (NOTyXHICTB BCMOKTyBaHH) - KONMnrae Bk3aye Ha HeO6xDiHCTb YcTKn a60 3aMIByrIbHOo pIbtpy. Lc CnHAnl3aJz 3aBvau BIdKInOHeHa Dnla TOrO uO6 NiKJIOuTN CnHAnl3aJIO HeO6xIDHO BnKJIOHTn eJIeKtPOniKy, HATNCKaOnu Ha npTo3i 3 cekYd KhONk O. DaI, oNDohAcHo HATncHyTu KhONk1 i 2 npToTrom 3 cekYd, cNoaTky Noqhe 6bnmatn KhoNk1 a, Not im O6Bdi KhoNk 1 i 2, Bk3aoyu Ha NiKJIOUeHn CnHAnl3aJi. POBTOPTN onepaJIO dJa BiKJIOUeHn CnHAnl3aJi, cNoaTky 6dyTb MmROTItn KhoNk1 i 2, Notim 3AmroTntb TiNbKn KhoNk 1, Bk3aoyu Ha BiKJIOUeHn CnHAnl3aJi.

Khonka nepekIIOUeHHa Hn3bky WbNDkICTb (NOTyHKHcTB BCMOKTyBaHHa - KOIN MInAe BKA3ye HA Heo6xIDHcTb YnCTKN φiNbTpY 3atpUMKn XnIPIB.

Khonka OFF MOTOP (stand by) - BvnHouenHH EneKtpoHikn - CknHytn cnHanizauio uNCTka/3amiHa phiIbTpib OFF MOTOP
HaTnCHyTN KOpOTKOuACHO, IO6 BmMKHyTN MOTOP.
CKNHYCNIHHAJI3ALIQUΦIbTPIB
Ha BBIMKHyTI BINTXJI, NICN npOBeHnHO bOcIyROBvBaHHa FInbTIPi, HATNUHT Ha KONKY Ta YTPMByTaII Do OTPMAHNHA 38yKOBOrO CnHany. CbitIO diao1, 10 MroTntb (KIpOBnI pInbTp) n2 2(ByrInhni FInbTp) nepeCTaHe MNTOITI.
BVKJIIOUOHEHHEJIEKTKPOHIK
HaTnCHyTuHa 3 cekyHdN Ha KhoNkU, BnKlIOuHTbCg KOMaHdHa eJeKTpoHika KoBnaka.
LJ Onpaio MoKe 6yT KOpnsHoi NiI qac YnCTKn Bnpo6y.
IITTO,IO63HOBy NiIKHouHTN eNEKtpoHIky, IOCTb NOBtOpHTn DIO.
YBnadky anHomaniIyHyKIOHyBaHHa nepu HIX 3BepHyTnca Do CEHTpy TexHIOHOO6cNryBOvBAHHa BIDKIOHTn Ha 5 cek. Bnip6 BiEneKtPOMepeXi, BNTraHOU NBIky i NOTIM 3HOBy BmKNHTn ii. JkIo anHomaiIy FyHKIOHyBAHHa He 3NHKe 3BepHyTnc DO CEHTpy TexO6cNryBOvBAHHa.
MoeJIb 3 naHeJIHO Ha 5 KhONK

T1. Khonka BKJI/BNKJI cBirtna (Led L1 BKNIOHEN)
T2. Khonka BKNJI - Khonka Bn6opy uBnKocti (notyXhOcti) BCaCbIBaHna BO3dyxa 1 (Led L2 BKJIOeHnI)
T3. Khonka Bn6bopy uBnKocti (notyXhOcti) BtaryBaHnnoBITPra 2 (Led L2+L3 BKIOUeHNI)
T4. Khonka Bn6bopy uBnKocti (notyXhOcTi) BtaryBaHnnoBITP3 (Led L2+L3+L4 BkIIOHeHn)
T5. Khonka Bn60py uBnKocti (notyXhOcti) iTeHcNBHO BtaryBaHH NOBITp (Led L2+L3+L4 BKIOHEn + Led L5 MraOCh) - TpmbaIcTb 5 XBNINH - nCIA YORo BtYkKa BCTaHOBJIoe ABTomAtuHO CKOpictb (notyXhICtB) BtaryBaHH 2.
YnOBiInbHeHe BnKIIuOeHHBnTJxKKn (Led MmraUoHn):
Moxnbo BctaHOBNYonBJIbHeNE BmKIOUeHHN BtJAKK (BNKJI), TpIMaOCH3HOBy 6IbJe YMM2 XbNIHn HaxKaTOH KONKY WbIKoCTi (NOTyKHOCTi) BTryBaHHa, RaKa DcBcMOMeHT.
YacynobInbHeHOro BnKIOueHHMaTb HnABHOCTiTjBKn:
WBnKicTb (notyXhCtB) BTRyBaHHa 1:20 xBnHn
WBnKicTb (notyXhCtB) BTRyBaHHa 2:15 XBnH
WBnDkiCTb (notyKhiCtB) BTRyBaHHa 3:10 xBnH
Ubukicb (noTyxHCTb) BtaryBaHHI INTEHCINBHe: 5XBNiINH
CnHnHaN hAcuYehn pInbTpiB
Bntjka ochaeta fynkciio, 0o B peryarnx npomixkax yacy nonepedjae Kopnctybaa, koni pfIbtpn hacuhe i notipno pOBectn npocipaktnue obcnyrobybanha.
CnHnH nacuHnH pInbTpiB 3atpumKn Xnpy: BnKlOueHa BnTgKa (BnKJI), Bci Led uBnKocTi (notyXhoCTi) BTaryBaHHB KInOuTaCb cPikcoBaHm CbITIOM Ha 40 cekyHd.
CnHn HnChenHnФiNbTpB aKTHOBaHO ByrInna:BnKJUeHa BNTAJKA (BKNJ), Bci Led WbNdkOCTI (notyXhOCTi) BTRyBaHHa MmraTb npToTROM 40 cekyHd.
Akmuaa CuZany HacuHnphiIbmpy akmboaHOO 8zInn: CINHaJ De3aKTHBOBaHIM, I06N I0rO aKTHByBaTN, BKNIOCHNTBtXkY (BNJI) i
Hajatn OndOuacho KhoNk T3iT5 6Inbue YmHa 3 cekyHdn, Led L3iL5 noHytb Mrratn.
Ioo de3aKTHByBAtn nobTopitb onepauH Led L3 i L5 BKJIOUATbcra fIKCOBAHM CBITLOM.
He BnKOpNtOByIte 3ac06n 10 MaIOTb a6pa3nBHi MaTepiAnI.
HE BHKOPNCTOBYNTCINPT!
Ybara: He BnKoHaHn npabIn qUeHH n 3amHn pfInbTpib MoKe npBecTn Do pN3NKy BnHKHeHH NooKexi. Tomy peKomeHdycMo dOtpmByBaTncb npBeDeHNx IHCTpykui.
3HimaTbCBA KcA BiIIOBdAaJIbHiCTb B 383Ky 3 MOKJIINBMIMU ykoJKeHHMa MDbryHa i NOKeKaMn, 10 BuHKnBhAcNiDOK HeBipHoro pemOHTy a6o He BnKOHaHH BnSeOpNCaHnx nonepedKeHb.
ΦIbTp 3aTpIMKn XkpB
Man. 9-16
3atpmyc xnpoBi cnoJyehn, 0o BnHnKaHb nid yac npirotoybaHH iKi.
MOOTORI VÄLJALÜLITAMISE NUPP
Dokunmatik tuslu model
bc Jaiia jie a jiljia jia jie jia jia jia
a 1
jssd sddall
16-9.
a
iic j
121 131 132 133
biaydi jySg(-iial)gill
aiaiaia 1
. 5
1 1
1
gai 3 1
a 1
Jusu Jusu, jusuill yjcbjia a Juaa Juaa
5
aalll aaii jil lail llaill g wbal
5 5

( led L1) ON/OFF .T1 (b) 1 - OFF .T2 ( led L2)
a a a a a a a a a a a a a a a a a a a a a a a
(OFF) 1 b bll :n a y
40
()baill 10000000000000000000000000000000000000000000000000000000000
40 2d 2
15
j 1 j 1 j 1 j 1 j 1 j 1 j 1 j 1 j 1 j 1 j 1 j 1 j 1 j 1 j 1 j 1 j 1 j 1 j 1 j 1 j 1 j 1 j 1 j 1 j 1 j 1 j 1 j 1 j 1 j 1 j 1 j 1 j 1 j 1 j
ON/OFF

-()()

-5 5
aaiiie aiee iie eae

-aa(ba)s)a aal 100
laa jai Jauo 100
laag 100
laag 100
.21 100
21 100
-2a 100 (b) 100 8,3)4y y 100 j


aal all 1y
OFF
alil
glll jie gii (jssll s
y
1 1
a 1
1 1
a a 1
a 100
Aiiill sL Llll
1
a a
a 1
1
0jg 11s j g all jg jll
all o 111 1 (all a all o j k)
aiaaiiaie jiluiiiaai
1 1
(jll)(jla)
i: li:li, ji: j: jll lill
a a 3 2 2 2 2 2 2 2 2 2 2 2 2 2 2 2
i 1
aJus JcJcJlJzJ 1
aJ 1
aillgol blll lle jiuie Lle L gjy Jao
a#
()
a=2j(clbill j)
j 1 j 1 j 1 j 1 j 1 j 1 j 1 j
(aui)
()a
(.)
a 100 c 100 (c) 100
JU 100000000000000000000000000000000000000
j 1 j j j j j j j j j j j j j j j j j j j j j j j j j j j j j j j j j j j j j j j j j
biuill
Jaeun
y 1
la jiall JuauiuJus
aie jai g aill baiy aay jauw palaa hll chat
jdlal 45
bi

a a a a a a a a a a a a a a a a a a a a a
山
a / 1000
b.
(10)
a a a a a a a a a a a a a a a
dii jc aiaiaaiaaii iiaiaiaiaiaiaiaiaiaiaiaiaiaiaiaiaiaiaiaiaiaiaiaiaiaiaiaiaiaiaiaiaiaiaiaiaiaiaiaiaiaiaiaiaiaiaiaiaiaiaiaiaiaiaiaiaiaiaiaiaiaiaiaiaiaiaiaiaiaiaia
Jay la Jai jai Jai!
yglll yjg) 101 jn Jsay la JyJl
(90°
J 1
JLa Jdolal JyLj
Lglae Lgeaegaaagao gao aon no n nn
a#

a a a a a a a a a a a a a a a a a a a a a a a a a a a a
aill 100sll sla oio gaiia aaii iui
blll lal jallle aie ylll alil
45 jLai 11 12 ball bce lbc j glall wlll
jI Jau 2al g U 50 u a 1
abiliall
aaii jlll lal
Jie 11

1
1s11.1s11 4a jkall bai 1bc cia
bill 100000000000000000000000000000000000000
1 1
j 1
Jg) jg j g j 15 Jg, g j
i 1
i 1
J 10000000000000000000000000000000000000000000000000000000000000000000000000000000000000000000000000000

1 1 1 1 1 1 1 1 1 1 1 1 1 1 1 1 1 1 1 1 1 1 1 1 1 1 1 1 1 1 1 1 1 1 1 1 1 1 1 1 1 1 1 1 1 1 1 1 1 1 1
J 11111111111111111111111111111111111111111111111111111111111111 0000000000000000000000000000000000000000000000000000000000000000000000000000000000000000000000
#
!
Jik 10000000000000000000000000000000000000000000000000000000000000000000000000000000000000000000000000