Y82IS443 - Y82IS443 - Hob ELECTROLUX - Free user manual and instructions
Find the device manual for free Y82IS443 - Y82IS443 ELECTROLUX in PDF.
| Brand | Electrolux |
| Model | Y82IS443 |
| Product type | Built-in induction hob |
| Number of cooking zones | 4 |
| Heating technology | Induction |
| Power supply | 220-240 V / 400 V 2N, 50/60 Hz |
| Maximum total power | 7.2 kW (7200 W) |
| PowerBoost function | Yes (up to 3600 W depending on zone) |
| SenseBoil® function | Yes (automatic boiling control) |
| Bridge function | Yes (coupling of two left zones) |
| Hob²Hood function | Yes (communication with compatible hood) |
| Automatic safety shut-off | Yes |
| Child safety device | Yes |
| Control lock | Yes |
| Timer | Yes (hourglass timer and kitchen timer) |
| Residual heat indicator | Yes (3 levels: / / ) |
| Power management | Yes (power distribution between phases) |
| Zone dimensions (diameter) | Front left: 21.0 cm Rear left: 21.0 cm Front center: 14.5 cm Rear right: 24.0 cm |
| Energy consumption per zone | Front left: 179.6 Wh/kg Rear left: 177.0 Wh/kg Front center: 180.2 Wh/kg Rear right: 174.6 Wh/kg |
| Energy consumption of the hob | 177.9 Wh/kg |
| Recommended cleaning | Soft damp cloth and non-abrasive detergent; special scraper for burnt residues |
| Spare parts | Use only genuine Electrolux parts |
| Repairability | Contact an authorized after-sales service |
Frequently Asked Questions - Y82IS443 - Y82IS443 ELECTROLUX
User questions about Y82IS443 - Y82IS443 ELECTROLUX
0 question about this device. Answer the ones you know or ask your own.
Ask a new question about this device
Download the instructions for your Hob in PDF format for free! Find your manual Y82IS443 - Y82IS443 - ELECTROLUX and take your electronic device back in hand. On this page are published all the documents necessary for the use of your device. Y82IS443 - Y82IS443 by ELECTROLUX.
USER MANUAL Y82IS443 - Y82IS443 ELECTROLUX
electrolux.com/register
MINGLIM3A BAC
Блардам Ви, Que 3akynxte ypeД Ha Electrolux.ИзбрахтпрodyкТ, коTo Hocn B ce6e cn DeceTInTeTЯ npOceCnoHaleH ONIT N INHOVAciN. OpuHaNaeH n CTJIeH, ToI e c3dadeH C mscbl 3a Bac. 3aTOBa, KOrato ro n3POn3BaTe, MoxKeTe da cTe cnrypHn, Ye BCEKn PtT Ue NOCTIrate CTpaxOTn pe3yIYtATn.
Добpe дошлв Electrolux.
Nocetete haunya ye6caT 3a:

BnxTe nOJe3Hn CbBETn 3a yNtpe6a, 6poUpyn, OTCTpaHraBaHe Ha HEn3npaBHOCTn,
HOpMaunr 3a cepBn3 n peMOHT:
www.electrolux.com/support

PerncpauTe Baunn npOyKT 3a no-Do6po o6cnykBaHe: www.registerelectrolux.com

Kynete akcecoapri, koncymatnbn i opunhahn pe3epbni qactn 3a Bauny ype: www.electrolux.com/shop
OBCJNYKBAHE HA KJINEHTN
BnHa n3no3BaIe opunHnpe3epBn qactn.
Korato ce cBbP3BaTe c HauHn OToPn3IpaH OTdEn ,O6cnykBaHe", Tp8Ba Da nMaTe pOda PbKa cneHaTa INΦOpMaZy: MoDen, PNC, cepNeH Homep.
HnΦopMaunTa MoKe Da 6bJe OTKpuTa Ha TaBeKkata C OCHOBn DaHHN
Iп dedурждени /Внимани-Инфорmaцяза 6e3onachoCT
①Obua nHΦopMaζηι ΚbBεTη
IINΦopMaζηa 3a OKJHaTa cpeJa
3ana3bame cn npabTo Ha n3MeHeHn.
CbIbPJKAHNE
- INHΦOPMALIJI 3A BE3OPIACHOCT. 3
- INHCTPYKUIN 3A BE3OJACHOCT.. 5
3.MOHTAX. 7
4.ОПИСАНЕHA UРЕДA 10 - INPEIINIIbPBA YNOTPE6A 11
- BCEKnIHEBHA YIOTPEBA 12
7.IPENOPbKNI CbBETN 18
8.ΓPINAIIOUCHCTBAHE 21 - OTCTPAHRAHE HA HEN3INPABHOCTN 21
- TEXHINUeCKN DAHHN 24
- EHEPNIHA EΦEKTINBHOCT 24
12.ОПАЗВЕHAOKOLHATA CPEДA 25
1. UNHΦOPMAÇΥA 3A BE3OПАСHOCT
IpeiMoHTnpaHToN yIpOte6aTaHa ypeDa BHNMaTeJIHO npOyTeTe IpeIOCTaBeHnte IHCTpyKcIn. Ipon3BOJnteJIrT He e OTROBOpEn 3a HapaHЯBaHnI yIIN IOBpeDi B pe3yIITaT Ha He npABynHa nHCTaJaCnI yIpOTpe6a. BnHaRn dpbXKe INCTpyKcInTe Ha 6e3OpaCHO n JecHo DoCTbIIHO MAcTO 3a CnpaBka B 6bDeSe.
1.1Бe3OnaHocT 3a Deca N Iuca B HepaBHOCTOHO NOLOXKeHne
To3n ypei moje da 6bIe n3noJ3BaH OT deca na 8- roDnSHA Bb3pact, KaKTO IOT LIIua C HamaJIeHN fni3nueckn, cetNBn I yMCTBeHn Bb3MOxHOCTN IJIIN OT IIna 6e3 OINT I N03HaHnA, cAmO aKO Te ca IOnd HabIoJeHne IIN 6bDaT INCTpykTnpaHn OTHOCHO 6e3Opacnata yNoTpe6a Ha ypeDa I pa3bIpaT Bb3MOxHnTe pIcKOBe. Deza IOD 8-roDnSHA Bb3pact I Xopa C TeJKN IINI KOMPJIeKCHN YBpeJdaHnra Tp86Ba Da ce IbpxaT daley OT ypeDa, OCBEN aKO He ca IOnd NoCToRHHo HabIoJeHne.
- DeçaTa TpЯБВa Да БДаТ пон HabлЮдене, 3a Дa ce rapaHTnpa, Ye He CSИграЯT C ypeDA.
- ДрьжтЕ BCичКи ONaKOBКи дале ue OT Deça и n3XbPJIeTe ONaKOBKITE NO MeCTHITe ПраВILA.
- ПЕДУПЕЖДЕНЕ: Урети和他的овпесьни частсе наюразьат по врeme на унотреба. Пазetime.Deцату и домашни лобимци далей от урета, korato ce n3ползви когато ce oxлajda.
- Ako урedingима устюгоство за.DeТСКа 6e3ОпаСHOCT,TO TpЯбВа Дa ce aKТИВира.
- Деца He Трава Да ИЗвршВат поисвае Или Рдравka на урета, КогаTO ca 6e3 Надзор.
1.2 O67a 6e3oNaacNoCT
To3n ypeE npedHa3NaueH cAmO 3a rOTBeHe.
To3n ypeE npedHa3NaueH 3a domaunHa ynoTpe6a B 3aTBOpEn NOMEeHnA.
To3n ypeJ moKe Ja ce n3noJ3Ba B OocN, CTaB XOTeJ, CTaN B MOTeJ, KbIu 3a rOCTn I npyTu NpOobHm MeCTa 3a HactaHaBaHe, KbTeTO TOBa n3NoJ3BaHe He HaDbuShaBa (cpeJHo) HNBOTO Ha DomaSha yNtpe6a.
- I P E D U N P E X J D E H N E: Ype d T N H e r O B N T E D O C T b N H N u c t N C e H a r o p e s q B a T N O B p E M e H a y n o T p e 6 a. T p 6 b a d a c e B h m a b a i d a c e n 3 6 8 r B a D O K O C B a H e H a r p 8 B a u n t e c e e J e l e M e H T N.
- ПЕДУПЕЖДЕHINE: ГOTBEHETO C XINBOTINHCKa Ипп пастиелна Ma3нHa 6e3 NaДЗОр можеда e onaCHO nда пөдИЗВИКа пожар.
Hnkora He n3noJ3BaIte B0da 3a notuShaBaHe Ha orbHn npi rotBeHe. N3KlNoJeTe ypeDa i NOKpNiTe PnAmbCInTe C ODeJIIO nII KanaK.
- ПЕДУПЕЖДЕНЕ: Уребт He Тябва Да e 3axpaHBaH
Чез Вьншно певКлюващо устpoистBO КATO Таймер Или
Да e CBьр3ан КьМ eЛжКтпчесka ВерURA, KОТTO NOCTОЯнHO
Се ВКлючBA и ИЗКЛючBA OT устpoистBO.
BHIMAHNE:Процьт ha rotbehe Tpr6Ba Da 6bde Na6JIIOdAbaH. KpaTknrT npOec Ha rotBeHe Tpr6Ba Da 6bde Na6JIIOdaBaN NOCToHNo.
- ПЕДУПЕЖДЕHINE: Onacnoct ot noxap: He cbyxpaaHbAaTe ppeDMeTn Bbpxy NOBbpxHOCTnte 3a TOTBeHe.
MeTaJIHn IpeDMeTn KaTo HOXOBe, BUNIuN, JbJxUcN IN KanaCn He Tp8Ba Da ce NocTaBAt BbPxy Rot. NIOr, TbN KaTO MOraT Da Ce 3arpeT.
He n3noJ3BaIte ypeJa, npeNi Da ro IHCTaIIpaTe BbB BrpaJeHata KOHCTpyKcIy.
- He nouchte ypea c napouncha.
Clej ynoTpe6a, n3KJIOUeTe PLOTa NocpeDCTBOM KJIIOua 3a ynpabIeHne I He pa3uHTaIte Ha uHKcIyra 3a JOKaJIIN3IpaHe Ha rotB. CbIOBe.
Ako cTBKJIOKEpaMnUHaTa / cTBKJIeHaTa NOBbpxHOCT e HanykaHa, n3KJIuOte YepeDa n rO n3KJIuOte OT eJeKTPnueckaTa mpeKa. B cIyauaYe ypeDbT e CBbP3aH
Дирек THО Кьм eЛeКТрчecKaТа Мржа CпOMоцтА Na CBeДинHTeJIна КУТЯ, пeMaxHete ПpeДиa3ИTeЛЯ, 3a Дa N3KЛюЧte урEDA OT eЛeКТрчecKaТа Мржа. ВьВ BCEKN eДин сЛучай ce CBbPЖeTe C OTOpИЗИраня СерВиЗЕн ZEHTbp.
- Ako 3axpaHbauT Ka6e n e NobpeDeH, ToT Tp8Ba da ce 3aMeHn OT npOn3BODnteJI, OT yPbJHOMOuEHH cepBn3EH ueHTbp nIiN OT IInca CbC CXoHa KBaJIuΦnKaUa, 3a Da ce n36erHe onaCHOCT.
- ПЕДУПЕЖДЕHINE: Използваite само педпа3ителура КOTлони разрабо-teни OT пОиЗВODителя Или уноменати OT Hero В Инстукцит e 3a уNotрe6a, Или педпа3ителу 3a KOTлони ВграDEни B урEDA. ИзпOLТБанeto на HeNoДхОдяши педпа3ители може дадоведи do 3лОпOLуКИ.
2.ИHCTPYKUN 3A BE3OПАСНОCT
2.1 ИстANAЯ

BHIMAHNE!
Cama KbaIINΦnIpaHo IInCe MoXe Da I3BbPbM OMTaKa Ha ypeDa.

BHIMAHNE!
OnachocT OT hapaHbAne nIIN nobpeHa Ha ypeHa.
MaxHeTe BCnUKN ONaKOBKn.
He mONTpaTne Hn H3noJ3BaIte noBpeDeH ypeI.
CneDbaiTe HNCTpyKunTe 3a INHCTaJInpaHe, pInIOKeHN KbM ypeDa.
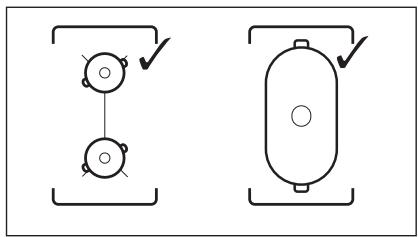
- Tp86Ba Da c7a3BaTe MInHIMaJIHOTOPa3CTOHaHne Do dpyrN ypeDN uYcTpoiCTBa.
BnHaRn BnHmAbaYte, KOraTo MeCTnTe ypeDa, TbI KaTO e TeKbK. BnHaRn n3NoJ3BaYTe pPeJna3HN pKaBnCn N 3aTBopeHn OByBKn.
- YπΠbTHeTe cρε3aHηTe NOBbpxHOCTn Ha OTbopa C yπΠbTHιTEI, 3a Da πpeθOβrpatIe ΘdYBaHé NOPaDn Bλara.
- Празаьiate Долнata уст на урда от napa и влara.
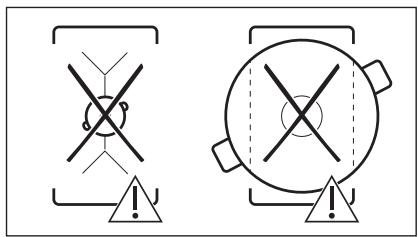
He mOnTnpaIte ypeDa 6nI3o Do BpaTa nnPi nOd npO3opeu. Taka upeI npEIoTbPaTIte naDaheto Ha ropeuI rOtBapcKn cBdoBe ot ypeDa, KOraTo ce OTBOpN BpTaTa nnPi npO3opeuT.
- Bcekn ypei nma oxnajdaun BeHTnlaTOpn Ha IbHOTO.
Ako ypeIbTe moHTnpaH naJyekMeJxKeTo:
He cklaandaipaTe MaJkn napYeHua nn XapTnKIn, KOHTo MORaT da 6bDat BCMyKaHN i Da HapaHrOxJaXdaUte BeHTnLaTopu NII da IOBpeJr OXJaXdaUta CNTeMa.
- Пазerte дистанцяо OT mHHmym 2 cm Mekdny tboHOTo Ha ypeda N CKlaDnpaHNTe Yactn B YeKMeJKeTo.
- OtctpaHete BCaKaBn pa3JeIaI nnHeJI, MOHTnpaHI B WkaFpa IoI ypeJa.
2.2 EneKtpnuecko Cbbp3BaHe

BHIMAHNE!
Pnck OT npoxap nn TOKOB ynap.
BcnuKn eNeKtpuYeCKn Bp3Kn Tp86Ba Da ce n3BbPbWBat OT KBaINΦuIpaH eneKtpoTeXnK
- YpeBt Tp8Ba Da ce 3a3emn.
- Прази за ИЗвьршптЕ ДэйстВе, се уBERpeTe, чу уразьтЕ ИЗКЛючен OT eLEKТр03axpaHbaHeto.
- YBepTe ce, Ye napameTpnte Ha TaBeIkata C TexHnueCKn DaHHn Ca CbBmecTUMN C eNEKtpuYeCKnTe DaHHN Ha 3axpaHbauaTa MPeka.
- Ybepete ce, Ye ypeDbT e MOHTnpaH npabnno. Xna6abn n HnnpabnHn eJektpnueckn 3axpaHbau n Ka6eN nIu nIeNceN (aKo ca NaInuHn) MOrat da DoBeedat do npenharpaBaHe.
- I3noJI3BaIte IOJXOJaI 3axpaHbIaKa6eI.
He no3BoJbAaTe 3axpaHbAaTg Ka6eI da ce npenPnTa. - YBepete ce, ye e nHctaInpaHa 3aunTa OT TOKOB ynap.
3akpenete ka6ena c npitraa cko6a npotNB onbbahe. - YBepete ce, Ye Ka6eIbT 3a eJekTpO3axpaHbAHETo IINI sEcnCeIbT (aKo e HAIyueH) He DOKOCBaT HArOpeseHnYpeD INI rOpEsiCbDoBe 3a RotBeHe, KOraTO BkIIOChTe yPeDa B KOHTaKT.
He n3no3BaIte pa3KnOHTeIN nn aanTepn C MHOro BXoOBe.
He nobpekdaaTe 3axpaHbauu ycenceI (ako e hannueH) nll 3axpaHbauu Ka6eI. CbpxKeTe ce c haunia OTOpn3npaH cepBn3eH ueHTbp nll eJeKtpoTeXnK 3a cmHaTa Ha nobpeDeH 3axpaHbau Ka6eI.
3aunntata ot tokob ynap ha ropeunte n 30inpanu hactn Tpr6ba da 6bde 3aTeHaTa IIO TaKbB HauH, Ye da He MOKe da ce OTCTpAHn 6e3 INHCTpyMeHTN.
CbpxkeTe Ka6eJa 3a 3axpaHbaHeTo KbM KOHTaKaTc EINHCTBeHO B KpaHa INHCTaIaIraTa.YBepTe Ce,Ye IeIeNcJIbT 3a 3axpaHbaHe e IOCTbIeH CJIeI INHCTaIIpaHeTo.
Ako KOhtakTbTe pa3xla6eH, He CBbP3BaIte 3axpaHbAunu sienceJ.
He n3dbpnbai Te 3axpaHbaua KabeI, 3a da n3kIouHte ypeJa. BnHarn n3dbpNbai Te uencena Ha 3axpaHbAHeto. - I3noI3BaIte caMo npabInHn yctPoIcTba 3a n3OJaIyra: npdeIpa3HN ppeKbcBauH naMpexKaTa, npdeIpa3nteIi (npdeIpa3HTeIITeOT BnHTOB TIN TpIbBa da ce n3BaIaT OT facyHrata),
N3KIIQUyBaTeIIN KOHTaKTOpN 3a yTeUka Ha 3a3EmraBaHTo.
- EneKtpnueckaTa nHcTaJaunr Tpr6Ba da Ima n30JnpaO yCTpoiCtBO, KoTo Bn No3BOLraBa da n3KJIIOUHTe ypeDa ot en. MpeJkata npn BCNUCKn PONIOCU. N30JnpaOTo yCTpoiCtBO Tpr6Ba da e c ShnPnHa Ha OTbapRHe Ha KOHTaKaTaNHHmym 3 MM.
2.3 IV3non3BaHe

BHIMAHHE!
PnCK OT hapaHЯBaHe, n3rapaHnIy n TOKOB yap.
He npomehyTe npedHa3NaueHneTo Ha ypeda.
- OTeTpaHete BCnUckn OnaKOBKn, eTNKeTn 3aUnTHoФOJINo (ako e Heo6xoJIMo) npeDi nIbPBOHaJHaTa yNoTp6a.
- YBepete ce, Ye BeHTnlaZuHOHHIte OTbOpN He ca 6JIOKpAHI.
He octabrayte ypeda 6e3 hao3op no Bpeme Ha pa60ta.
- N3KJIIOUBAIte 3OHaTa 3a rotBeHe cIeD BcRAka yNtpe6a.
He noctabray Te npibopn 3a xpahe nIte Hdxepn Bbpxy 30hnte 3a roTbe He Morat da ce haropeuT.
He pa6oTeTe C ypeDa C MOKpn pBue Nn KOrato NMa KOHTaKT C BODa.
He n3noJI3BaIte ypeDa KaTo pa6OTha NOBbpxHOCT ININ NOBbpxHOCT 3a CbXpaHeHne.
Ako nobbpxhocTt ha ypea e hanykaHa, He3a6abHNO n3KnHouTe ypea OT 3axpaHbAHeto. Toba ce npabn c uei npedeOTbpaTaBaHe Ha TKOB ynap.
Iotpe6nteHn CneHcMeKbTpTpa6Ba Da cna3BaT nCTaHcNHaH-MaNKo 30 cm OT INHykCIOHOHHTe 3OHN 3a rOTBeHe, KOraTo ypeDbT pa6Ot.
Korato noctabraye xpana B ropeo MaCNo, TЯ moKe da npbcka Ma3HnHa.

BHIMAHHE!
Опасноct OT покар пип ekрлозь
HaropeeHNTMa3HHnIIMmaclo Morat Da IOBeDat DO OTdJIaHe Ha Bb3JIaMeHmN napi. He do6JIkBaIte nnambk IIN HAropeeHNI pEmTeN do
Ma3HnHaTaNJIMMacNOTO,KORaTO rOTBNTC TaKnBa.
- Papnte, KonTO OTdEJIa MHOrO HAropeuHcHTo MaCJIO, MORaT Da DOBeJaT Do BHe3aHNO Bb3PJIaMeHraBaHe.
- I3noJ3BaHOTo MaCNo, KOeTO MoKe Da CbDbPka OCTaTbCu OT XpaHa, MOKe Da npuHnI NoXkap PnI NO-HNcKa Tempepatya B cpaBHeHne C MacNoTo, I3noJ3BaHO 3a IIpbBn IbT.
He noctabaIte 3anaJIMn npOdyKTn nn npEpmEtN, KOITo Ca hAMOKpeHn CbC 3anaJIMn npOdyKTn, B 6bn30ct Do ypea nn Bbpxy Hero.

BHIMAHNE!
Onacnoct OT nobpea B ypea.
He npbXnE ropeu nroTbapcN cIIOBe Bbpx TaJIoTO 3a ynpabJIeHne.
He nocTaBnTe ropeu Kaak Ha TnraH Bbpxy CTbKLeHaTa NOBbPxHOCT Ha Nlota.
He octabraye TeuHocTb B roTbapcknte CbdoBe na 3Bpu HanbJIHO.
BHMmaBaiTe Da He N3TbPaTe npEaMeTu INIg roTbapCk CbIOBe BbPx ypeJa. NobbpxHocCTTa MoKe Da ce NOBpeNi.
He BkIIOUbaIte 3OHNTE 3a rotBeHe, KOrato Ha TEx Ima Ipa3Hn RotBapcKu CbIOBe, INI KOrato HMa TaKuBa.
He nocTabraTe aIyMnHneBO oIIO Bbpxy ypeJa.
TOrbapcknTe CbdoBe OT UyHyN HIn TaKnBa C nobpeDeHO DbHO MOraT Da NaDpaKaT CTbKnIoTo/CtBKnIOkepAmkata. BnHar n NobdIraTe Te3n PpeMete, Korato Tp6Ba Da rN IpemecTe Bbpxy NobbpxHOCTTa 3a RotBeHe.
2.4 Frpka n nouchTbahe
Почистваite peIDOBHO ypeda,3a da npdeIOTbpaTHe YBpeKdAne Ha NOBbpxHOCTHnMaTePnAJI.
3. MOHTAX

BHIMAHNE!
Bx. rnaBa "Be3onacnoct".
- N3kJIIOUeTe ypeDa n rO octaBeTe da ce OXJaDi, ppeDi Da rO noHcTnTe.
He n3no3BaIte BOIOCTpyuKa IIN npa, 3a Da noUcTnTe ypeDa. - POnucTeTe ypeDa C MOKpa N MeKa KbPna. H3PON3BaIte cAmo HeYtpaIIHn npenapatN. He n3PON3BaIte a6pa3NBn npOdyKTI, rpanabN, nouchTbaUc N KbpN, pa3TBOpNTeIN INM MetaJIHN ppeDMeTn.
2.5 O6cnyxBaHe
3a nonpaBka Ha ypeDa ce CbpxKeTe c OTOpU3npaHna cepBn3eH ueHTbp. 13non3BaIte camo opuHaJIHH pe3epBn Yactn.
- OTHOCHO JAMnata(HTe) BbTpE B TO3n npOdyKT n pe3epBHNte JAMnnpOdaBaHn OTdEJIHo: Te3n JAMn ca npEHa3NaueHn Da n3DbpKAT Ha ekCTpeMnHn fN3uYeCKn ycNoBnB DOMaKnHcckn ypeDn, KaTO TemNepaTpya, Bv6paqnn, BLnaxKHOCT nIaC npEHa3NaueHn Da cNrHaJIN3upat INΦopMauaN 3a pa60THOTo CbCToRnHe Ha ypeDa. Te He naPdea3NaueHn 3a m3NOJ3BaHe B Dpyr n pnpIoXeHn N He ca NOxOJaU 3a OCBeTBaHe Ha NOMeSeHn B DomaKnHCTBOTO.
2.6 N3xBbPJIaHe

BHIMAHNE!
PnCK OT HapaHyaBe nIIN 3aDyShaBaHe.
CbpxTe ce c MeCTHnTe Bnactn 3a nHopMaunKa kDa nXbPnIte ypeda.
- IЗключeteуpeда от eNeEkTpO3axpaHbaHaeTO.
Изва对接харазьшюял.КбелВ 6иЗОТdoурдаигиэХБьрле.
3.1 Ппеди мотрака
Ipei Da nHCTaJIuPaTe pIoUyata, no-dOny 3aIIwete uHΦoPMaúŋraT a TabeKkata C daHH. TaBeKkata c OCHOBnTe daHH e pa3noJoxeHa B DoJIHATA yAcT Ha pIoUyata.
CepneH Homep
3.2 Bvpradeeni nloyn
BrpadeHnTe PIOOuMOraTaCa eN3PON3BaT cAmo CneI KaTo Ca MOHTnpaHn B NOxOJaUcBpAdeHn EINHnIu pa60THn PLOTOBe, KOINTOTROBaprHa CTAndapTHe.
3.3 Cbbp3Baau Ka6eI
-Плоча т ce Доставсс CBp3Baц ka6eJ.
3a da noDMehnTe NOBpeDeH 3axpaHbau Ka6eI, n3no3BaIte Ka6eI TIN: H05V2V2-F KoIto n3dbpKa Ha TemnepaTpyo AT 90^ mIIO-BvcoKa. EHNHnHnT npOBdNk Tpr6Ba Da Ima DnAmetbp MNHmym 1,5 MM². CbþxKeTe ce CaBnA MeCTe H cepBn3eH cHTbp. Cbþr3Baunr Ka6e MoJc Da ce noDMehra camo OT KBaIIΦnUpaH eNeKTPoTeXnK.

BHIMAHNE!
Bcun kn eJ. Bp3kn Tpr6Ba da ce HnpaBrt OT KBaJIInΦuNpuH eJeKtpoTeXnK.

IPEyIPEKDEHNE!
Bp3knte ype3 KOHTaKTHnTe ⅢeNcEIN ca 3a6paHeHn.

IPEyIPEKDEHNE!
He npobuBaIte nIIN 3aONBaIte kpaIzata ha Jxuata. Toba e 3a6paHeno.

PENDyPEXDEHNE!
He Cbbp3BaIte Ka6ena 6e3 HakpaHnK pBkAB.
EhOpa3oBa Bpb3ka
- Премaxнente OT Накраинka рькавернataи Кадява киц.
- Премхнеше ИЗолацята OT черся Кадявая Нкрайнк.
- CnBaHe Ha uepHInTe N KaΦyBnTe KpaIa Ha Ka6eJa.
- Пocтавete HOBШауxBpxy CTaHdapTHNЯ HaKpaHnK Ha Ka6eNa (Heo6xoJIM e CneuIaEN INCTpyMeHT). HanpeyHo ceeyHne Ha Ka6eNa 2x1,5 MM²
| Енфразова врька: 220 - 240 V~ | Дыфразовсвьрзван: 400 V 2 ~ N | ||
| 3elen - XbЛТ | 3elen - XbЛТ | 1 | |
| N | Синbos и синbos | Синbos и синbos | N |
| L | Черно и Кадяво | Черно | L1 |
| Кадяво | L2 | ||
3.4 Crlio6BaHe
Ako INHCTaIInPaTe NIOt NIOI naHeHa Ha a6cop6aTopa, MoJIa, BnKTe MInHMmaJIHOTo pa3CTOraHne MExy ypeINTe B INHCTpyKcInTe 3a MOHTaX Ha a6cop6aTopa.
Ako ypeDbTe e INcTaJInpaH nA dYeKMeJKe, BENTINaIpyaTHa nIIOTa MOKe da 3arpee eIeMeHTnte, CbXpaHЯBaHn B YeKMeJKeTo NO Bpeme Ha IpoUceCa Ha rotBeHe.

Iotbpcete Bndeo ypoka ,KaJa moHTnpate Baunna HnykUHOH Nnot Electrolux -MOHTaK Ha pa6OteH Nnot" ,KATO HAnuTe TbJHOTO IMe, NOKa3aHo Ha rpaФnkata NO-dony.

YouTube
www.youtube.com/electrolux
www.youtube.com/aeg
How to install your Electrolux Induction Hob - Worktop installation

4.ОПИSCAHNEHA YPEДА
4.1 Pa3noJoxHeH He NOBbpxHOCTTa 3a rotBeHe

1 INdukunohna 30ha 3a rotbehe
2 KoHTpOJIeH nAneI

3a noipo6ha nHΦopMaζη 3a pa3mepnte Ha 30HnTe 3a rotBeHe, BnKTe ,Texnueckn DaHHN".
4.2 OΦopMJIeHne Ha KOHTpOJIHnI naHeI
I3noJI3BaIte ceH3OpHnTe noJeTa, 3a da pa6oTnte c ypeJa. Ioka3aHnra Ta Ha dinCnpe, INHdkaTOPnte n 3ByKOBtne CnHaII NOKa3BaT KOHcHKUpa6oTrt.
Ako n36peTe eDHO OT HnCKnte HnBa Ha MOuHOCT, yHKuYrTa SenseBoilMoKe Da He paBToN. BnKTe Ta5nUcaTa No-doJy.
√-Функцятapa6otn,X-Функцятahepa6otn.
| Нива на мошиноct | Зона за ratовене | |||
| Прedeна лява | Задна лява | Прedeна среда | Задна дясан | |
| 210 MM | 210 MM | 145 MM | 240 MM | |
| P 72 | ✓ | ✓ | ✓ | ✓ |
| P 15 | X | X | X | X |
| P 20 | X | X | X | X |
| P 25 | X | X | ✓ | X |
| P 30 | ✓ | ✓ | ✓ | ✓ |
| P 35 | ✓ | ✓ | ✓ | ✓ |
| P 40 | ✓ | ✓ | ✓ | ✓ |
| P 45 | ✓ | ✓ | ✓ | ✓ |
| P 50 | ✓ | ✓ | ✓ | ✓ |
| P 60 | ✓ | ✓ | ✓ | ✓ |
6. BCEKNДHEBHA YNOTPEBA

BHIMAHNE!
Bx. rnaBa "Be3onacnoct".
6.1 AkTbBnpaHe n DeakTbBnpaHe
ДоКОСHTe ①3a 1 cekyHda,3a da aKTHBnPaTe nIIN DeaKTHBnPaTe pNoChaTa.
6.2 ABTomatNHO n3KJIIOUBAHe
Функцята DeakTNbnpa NNToa ABTomatNHO, aKO:
BCNUKIN3OHN3aROTBEHeCaN3KJIOUeHn,
He 3aandaTe CTeHnHa HapraBaHe CneBkJIIOUbaHe Ha nIOTA,
pa3JIeTe HeIIO nIIIOCTaBnTe HeIIO (CbD, Kbpna I T.H.) Ha KOHTPOJHOTO
Ta6No 3a noBce oe 10 cekyHn.
Ipo3Byuaba 3bYKOB ciRHaJ, KOrato
KOTIOHbT ce deakTbUpa.CBaJeTe
IpeDMeTa HIn NouchTe TE KOHTPOJHOTo
Ta6No.
- Плота CTаBA MHorO ropeu (Hanp., KOrato TeuHocTTa B TeHdKepaTa e N3BprJa HanbJHo). OCTaBeTe 3oHaT a 3a rOToBHe Da n3CTnHe,пeDi n Da n3NoJ3BaTe ПлOTa OTHOBO.
I3NIOJI3BaTe HEnOJXOJaI rOTBapcKn CbI. CmBOJIbT FCBETBa I 3OHaTa 3a rotBeHe Ce DeaKTINbPa aBTOMaTHNoCneI 2 MInHyTu.
He CTe DeaekTbupaJIIN 3OHaTa 3a rOTBeH He CTe IpOMeHNJIN CTeneHTA Ha
HarpraBaHe. CneI n3BcTeHb BpeMe
CBETBa I NJIOTa Ce DeaKTbBnpa.
Bp3kaTaeMekdy cTeNeHTaHaHarpBaHe n BpeMeTo, CJeI KOeTO PnOta ce DeakTbBnpa:
6.4 OptiHeat Control (3-cTbNKOB INHdNKaTOP 3a OCTaTbUHa TOJIINHa)

BHIMAHNE!
//二/二-IOkaTo INdNkaTOpbT CBETn, CbIeCTbYBa pNCK OT n3rapnHrO OCTaTbUHa TOONHnA.
ИндукционнITE 30н 3а roтvehe npoIN3BexJaT TOnnHa, HeO6xOДIMA 3a npOceca Ha roTBeHe, HAnpaBO HaNbHOTo Ha roTbapcknCsbI. CtBKnOkepamKkata ce 3aRpaBa OT TOnnHaTa Ha CbdoBeTe 3a roTbeHe.
Индикаторite ce noявьВаТ, korato 3Oha 3a roTbeHe e ropeшa. Te noka3BaT HnBOTO Ha OCTaTbUHaTa TOnJIHa 3a 3OHNTe 3a roTBeHe, KONTO n3NoJ3BaTe B MOMeHTa:
-
npoDbJxkabaHa roTBeHeTo,
-
noДьржане на ТОПЛИнэ
-
- OCTaTbUHa TOnJIiHa.
INHnKaToptbT MoKe CbIo Da Ce NOBN:
3a CbceHnTe 30Hn 3a rOtBeHe, DOpn aKO He rN n3PON3BaTe,
Korato ropeu CbdoBe 3a rotBeHe ca NoctabeHn Ha CTydeHa 30Ha 3a rotBeHe,
KOrato PIIOyatae IN3KJIIOUeHa,HO 30HaTa 3a rotBeHe e BCE OSe Ropeu.
Инданахт NTи3уe3Ba, KOrato 30HaTa 3a roTBeHe ce OxlaД.
Ako mma octaTbUHa TOnJIInHa
(/ /)B3OHaTa 3a rotBeHe, KOrTo NcKaTe Da n3No3BaTe, Ce n3JaBa 3ByKOb CnHapNΦyHKuYraTa He Ce CTapTnpa.
- HatncheTe ①, 3a da aktnbnpate nIOTA.
2.ДOKOCHETe 3aДаakTNBnpaTeФункцяТа.
IopBraCe MURaio B 3OHTe 3a rotBeHe, B KOnTO MOKeTe Da N3N0JI3BaTe yHKUraTa B MOMeHa.
3.ДOKOCHTeJIeHTaTa 3a yInpaBJIeHne,Ha KOrTo I Da e CBo6oJa 30Ha 3a rotBeHe, 3a KOrTo NCKaTe Da cTapTupaTe ΦyHKuYra (HacTpoiKa 3a HarpBaHe MEXdY 1-14)
Функцятастура.
Ako He n36epete 30Ha 3a roTBeHe B pamKnTe Ha 5 cekyni, yHKunra He ce aKtBnpa.

CneI KaToФyHKUryTa ce CTaPTnpa,HNDNKaTOPHe Ha CMBOJa tCBEbTaEINCHeI DpyrdoDcTirAHeHaTOckaTa HaNKInHeHaBOdaTa.
KoratoФункцяta yctahOBn TOnkata Ha KInneHe,ПLOTa n3daBa 3ByKOb CInHaJ N
HNBOTO Ha HapraBaHe aBTOMaTnUHO Ce npomeha Ha 8.

Ako BCNUK 3OHN 3a rotBeHe
Buee Ce N3PON3BaT, INN aKO IMa
OCTaTBuHa TOnPiHa Ha BCJa O'TaX, KOTIOHbT N3DaBa bINKaU
3Byk, INDnKaTOpIte HAd tS'
MIRAT IN ΦyHKuYraTa He ce
CTapTnpa.
3aДа DeakTNBnpuTeФyHKnpyTa,DOKOCHeTe 18f (ФункиЯТа ce DeakTNBnpa n HAcTpoiKaTa 3a HapRyaBe ce HamaJЯBa Do 0)Ил DOKOCHeTe KOHTpoJHaT a JeHt a PeryInpaIte HAcTpoiKaTa 3a HapRyaBe pBuHO.
6.10 Taɪmep
Taimep 3a ot6pOraBaHe
Mozete Da n3nO3BaTe Ta3nФyHKuN, 3a da 3aJaTe DbJxHnHaTa Ha eHNHuCecnHa rotBeHe.
6.13 OffSound Control (ДeakТиВираHe n aKТиВираHe Ha 3ByцHTe)
I3KJIIOUeTe IIOOaTa. JOKOChTe 3a 3 CEkyHdN. EKpaHbT Ce BKnIOUBa n N3racBa.
HaTnCHeTe 3a 3cekyHn. nIu nIe CBETHe. DOKocheTe +OT TaMepa, 3a da u36epeTe eDHO OT cneHNTE:
- 3BvIuTE ca n3KJIIOUeHn
- 3BYUHTe Ca BKJIIOUeHn
3a da notbpydeTe n36op yakaite dokaTOKTIOHbT Ce deakTNBnpa aBTOMaTHueCKN.
KoratoФункцятaelуctahOBHeBa 3a BVE MOKETeДaЧВATE3BvUITE,camoKORATO:
- HATINCHETe ①
Taimepce noHxN - Taïmep 3a oTbpoBaHe ce noHxu
CnaraTe HeIoo Bbpxy KomaHdHTo Ta6No.
6.14 UnpaBJIeHne Ha MoUcHOCTTa
Ako ca aKTHBHN HRAKO KHOH N KOHCympaHaTa MOUHOCT HaDBNaBa JINMMTA HA eJeKTPnueCKOTO 3axpaHbAHe, Ta3N OYHKnPa 3a3dEeNaHJNuHaTa MOUHOCT MeKdy BCNUKN 30Hn 3a rTOBHe (CbP3AHN KbM eHa n Cbua P3a).PiOtBT KOHTPOJIpa HAcTPOIKnTe Ha TOnNIHaTa, 3a Da npEJa3n npEJa3nTeJIte Ha IHCTaIaNJaTa Ha DOMA.
3OHTe 3a rotBeHe ca rpynpaHn CnopeI MeCTOnIOJoxEHHeTo n 6pOHa a3HTe B KOJIHOHa. BcKa a3a IMA MaKcImaJeH eJEKTprUeCKn TOBap OT (3700BT).Ako PIIOTA DOCTHrHE rpaHcTaHa MAKCImaJIHATA HaJIINuHa MoUHocT B eJHa a3a ,MOUHOCTTa Ha 3OHTe 3a rotBeH e CE cHaMaJI ABTomATNoHO.
HacpoKaTaHaToPiHataHa nocleHaTaN36paHa 30Ha 3a roTBeHe BnHaIe C npOpTe. OcTaHaIaTa MoUHOCT ige ce pa3deJIIM MeKdy IpeDbapNTeHNO AKTINBupaHnte 30Hn 3a roTBeHe B o6pAteH peHa N36op.
EkpaHbT 3a peryunipaHe Ha TemnepaTypaHa HamaJeHte 3OHn CE npomEn MExdy IIpbBOHaJALHO n36paHaTa HAcTroKa Ha HarpBaHe n HamaJeHaTa HAcTroKa Ha HarpBaHe.
-Изчakайт,ДOKATOДиСПЛЯТспpeДа MнгИннHamalteHACTPOIkaTаHa HargBaHe Ha 30HaTa 3a rotBeHe, KOrTo e n36paHa nocNeHa.3OHNTe 3a rotBeHe iche npDbJxKat da pa60Tc HamaJIeHaTahactpoiKaHa HargBaHe. PpomeHeTe pTuHO HAcTPOIknTe 3a HargBaHe Ha 3OHNTe 3a rotBeHe,aKOe Heo6xOdmo.
BnKTe NIOCTpaunTa 3a Bb3MOxHN KOM6HnauzIM, PnN KOINTOMOuHOCTTa MOKe Da Ce pa3PipeJin Mekdy 3OHNTe 3a rotBeHe.

6.15 Hob²Hood
ToBa e yCbBbPseHcTBaHa aBTOMaTHHa yHKu, CBp3Ba7a nIota CbC cneuaJIe H acnnpatop. INoTa n acnnpatopbT pa3noJarat c KOMyHnKaTOp c INHpaepBeH cnHan. CkopoCTTa Ha BeHTnlaTopa ce ONpeJeA bTOMaTHUHO Ha OCHOBATA Ha NaCTPOIkaTa Ha pexIMa n TempeaTypaHa Ha N-ROPeIte RotBapCKn CbIOBE BbpxY nIOTA. CbIo TaKa MoKTe Da ynpabIbATE BeHTnlaTopa n PbUHO, OT IILOTA.

Pn noBceTo acnpaTopn
DntaHOnHata CnCTema e
n3KnUoyeha nO noOpa3bnpahe.
BkIouteЯ npedn da
n3no3BaTe yHKuYra. 3a
noBee INΦopMaun BnKTe
pBkoBOdCTBOTO 3a ynTpe6a Ha
acnpaTopa.
ABTomatnHa pa6oTa cФyHKnra
3a da ynpablaBaTe fynkunra Ta
aBTOMaTHUHO, 3aJaIe aBTOMaTHUHnA
peXIM Ha H1 - H6. IbPBOHaJHo IIOta e
3aJaDeHa Ha H5. AcnpaTopbT pearupa
BCEKINbT, KORAto pa6oTnTe c nIOTA. IJIOTA aBTOMaTHUHO pa3No3HaBA TeMnepaTypaTa Ha rOtBapCKnTe CbDoBe NpeyInpa CKOpocCTTa Ha BEHTNuTaOpa.
ABTomatuHnpeKmM
| АBSTOMA- ТУСHО OCBETЛЕ- НIE | Варене1) | Пьржени2) | |
| Рек imm H0 | ИЗКЛ. | ИЗКЛ. | ИЗКЛ. |
| Рек imm H1 | ВКЛ. | ИЗКЛ. | ИЗКЛ. |
| Рек imm H2 3) | ВКЛ. | Скорост на ВECHTINATO- pa 1 | Скорост на ВECHTINATO- pa 1 |
| Рек imm H3 | ВКЛ. | ИЗКЛ. | Скорost на ВECHTINATO- pa 1 |
| Рек imm H4 | ВКЛ. | Скорost на ВECHTINATO- pa 1 | Скорost на ВECHTINATO- pa 1 |
| Рек imm H5 | ВКЛ. | Скорost на ВECHTINATO- pa 1 | Скорost на ВECHTINATO- pa 2 |
| Рек imm H6 | ВКЛ. | Скорost на ВECHTINATO- pa 2 | Скорost на ВECHTINATO- pa 3 |
1)TOrBapcknIITNOTpa3No3Haba npocecaHaBapeHe IN BkInOuBa CKOpocTTa Ha BeHTmJNaTopaB CbOTBETCTBNE C ABOTMaTHnIpeKIM.
2) TOrBapcKnT PnOT pa3nO3Haba npoeca Ha nIpbXeHe N BkJIIOvBa CkOPOCTTa Ha BeHTnIaTOpa B CbOTBETCTBne C ABOTMaTHnpeKIM.
3) To3n pexkIM BKNIOUba BEHTNlAToPA n OCBETJIeHNIETO, KATO He 3aBNCN OT TEMNEpApTaPATA.
PpomHa Ha aBTOMaTHnHnpeXmM
1.ДeakTNBuaPte nIota.
2. HaTnCHHeTe ① B npOdbJIkeHne Ha 3 cekyHdi. IucnPJIeT CBeTbA u n3racBa.
3. Hatachete B npodbJxkeHne Ha 3 CEkyHn.
4. HaTnucheTe HRAKOJIko NbTN, DOKaTO CBETHe.
5. HataHCTe +Ha TaIeMepa, 3a da n36peTe aBtOMaTUnHeN peKIm.
3a da pa6oTnTe c acnnpatopa, DnpeKTHo Ha nHaHeNa Ha acnnpatopa N3KJIouYe aBTOMaTuHnPeXmHa 0yHKzraTa.
Korato npnknlouhnte c rotbeheTo n N3kIouhnte pIoTa, BeHTnlaTopbT Ha acnnpaTopa MoKe Da npOdbJnx Da pa6oTn 3a OnpedeJeH nepNoD OT BpeMe. Cnei To3n nepNoD OT BpeMe CNCTeMaTa ABTomatuHOn N3KJIIOvBa BEHTnlaTopa I npedOTBpTaRa CBnuHHO My BKJIIOUBaHe B cIeDbauHte 30 CEkyHdN.
PbUHO ynpaBJIeHne Ha ckOpocTHa BeHTnlaTopa
Moxete cBIO da ynpabIbAte fynKcIyraT a bYHO. 3a Ta3n ceH hATncHeTe, kORato nIOTA pa6OTn. TObA deakTNBupa abTomatuHaTa pa6Ota Ha fynKcIyraT u Bn
no3BOJBA pByHO da npomeHrTe ckOpocCTTa Ha BENTnlaTopa. Pnp HAntckaHe Ha yBeJIuYabATECKOpocTHa BA BENTnlaTopa C eHa edHHua. Korato DocturHete INHTeH3NBHO HNOI OTHOBo HAtncHete 3aJaBaTe CKOpocTHa BA BENTnlaTopa Ha 0, KOETO N3KIOUBy BA BENTnlaTopa Ha acnnapota. 3a Da cTaptnPate OTHO Bo BENTnlaTopa Ha CKOpOCT 1, HAtncHete
3a da aKTHBnpaTe aBTOMaTnHOr ynpabJIeHneTo Ha cyHKuIyTa, nKJIIOUcTe IOTHO BkJIIOUcTe nnota.
BknIOUbaHe Ha OCBetJIeHHeTo
MoxTe Da hactpOnTe PnToA Da BKnHouBa OCBETJIeHNHeTO ABTomaTnUHO, KOrato BKnHouHTe PnToA.3a Ta3n ZeI nactpOte ABTomaTnUHHa pexIM Ha H1-H6.
CBeTnHaTa Ha acnnpaTopa ce N3KJIIOUBa 2 MmHyTu CJeI N3KJIIOUBaHe Ha nIoTA.
7. ПЕПОРьКИ NG CBBETN

BHIMAHHE!
Bx. rnaBa "Be3onacnoct".
7.1 TovBapcKs cIbOBe

Pn INNkyKUOHHTe 3OHN 3a TOTBEHe CINHO
eJIeKTPomarHHTHO JIe Cb3JaBaT OIIINHaTa B rOtBapCKnCbMHO6bp30.
I3noJI3BaIte INdyKUHOHHTe 3OHN 3a rotBeHe C NOxOJaUN IOTBapCKn CbDOBe.
- HnHOHa rOToBapKmCbD Tp86Ba Da e KOJIKOTO MOKe NO-De6eJo N IIOcKO.
- YBepete ce, Ye nbHaTa ha cbIobete ca chCTn I cyxN, IpEiN da I n IOCTaBNTe Ha NOBbpxHOCTTa H a IIOTA.
3a da n36berheTe OndpackBaHnra, He nIb3raIte nn TpniTe Cbda No KepaMnHOTo CTbKIO.
MaTePnAHa roTbapcknte cBdoBe
- npaBnHNo: Ugamma, CTomHa, emaiJnpaHaCTomHa, HepbXdaema CTomHa, MHOroCNOIHO bHo (c npaBnHaMapKnPOBaOa OT pOn3BOIDTeJIa.
He npabnHO aJyMHH, Mei, MecnHCTbKIO, KepaMka, nopueHaN.
CbBt 3a roTBeHe e noDxoJa 3a HnyKuONHa nloa, ako:
BODaTa 3aBnpa MNoRo 6bP3o Ha 30Ha, HAcTpoEHa Ha Han-BnCOKaTa HAcTpoiKa 3a HApraBaHe.
MaHHT PnBJIuHa DbHOTo Ha rotBapCKn CbD.
Pa3MepnHa roTbapckn cIdoBe
ИндукюнHTe 30и 3a rotBeHe aBTOMaTnHc Ce npICNoC6BaT KbMa pa3Mepa Ha IbHOTo Ha rotBapCKnCbD.
- Eф ekTNBHOCTTa Ha 3OHaTa 3a rotBeHe 3aBnCn OT dIaMeTbpa Ha rotBapCKnA CBd. CbDoBe 3a rotBeHe c NO-MaTbK dIaMeTbp OT MInHmAlHnI NOlyuBaBAT Camo Yact OT MOUHOCTTa, rEhePnpaHa OT 3OHaTa 3a rotBeHe.
- Ot cbo6paxeHn 3a cnIpyhOCT n 3a ONTmAlHn pe3yIITaN npri rotBeHe, He I3NOJ3BaIte rOTbAPCKn CbD, KOJIto e noRJAM OT NOCUHeHTo B „CneuΦnKaun Ha 3OHn 3a rotBeHe". IV36raBaiTe I3NOJ3BaHETo HA rOTbAPCKn CbD 6n3o DO KOHTPOJHOTo TabNo NO BPeme Ha rotBeHe. Toba MOKe Da NOBnIe Bbpxy FyHKUOnHpaHTo Ha KOHTPOJHOTo TabNo INN MoKe CNyauHDo a AKTNBupa FyHKUInTe Ha KOTJIOHa.

BnKTe „TexHnueeCKn XapakTepncTnKn".
7.2 WymoBete no BpeMe Ha pa6ota
Ako 4yBaTe:
- Nykaцшуm: rotbapcknT cБд e HanpaBeH OT pa3JIuYeMaTePnaI (KOHCTpyKcIycaHDbV).
cBnpeHe:Bue n3noJ3BaTe 3oHa 3a rotBeHe C BnCOKo HnBO Ha MOUHOCT, a rotBapCKnT CbI e HAnpaBeH OT pa3JIuYeMaTePnaJI (KOHCTpyKcIra CaHDbV). - 6yuHe: BnE n3noJI3BaTe BnCOKO HnBO Ha MOUHOCT.
- UpaKaHe: eNeKtpuYeCKO npeBkJIIOvBaHe.
CbnteHe,6pMbYeHe:BHTnataOpT pa60Tu.
UymoBeTe ca HopMaJIHn He noka3BaT HEn3npaBHOCT.
7.3 Пpenopbknи cbbTeN 3a SenseBoil®
AcnnpaTopbT, noka3an no-dony, e camo cnJIIOCTpaTnBHa ueI.

10. TEXHnueCKn DAHHN
10.1 Ta6eIka c daHnn
Mодел Y82IS443
Tun 62 D4A 01 AA
NHydkun7.2kW
CepneH No
ELECTROLUX
Пюдков КОД (PNC) 949 599 258 00
220 - 240 V / 400 V 2N, 50 / 60 Hz
How to install your Electrolux Induction Hob - Worktop installation

4. POPIS SPOTbreBICE
| P 72 | ✓ | ✓ | ✓ | ✓ |
| P 15 | X | X | X | X |
| P 20 | X | X | X | X |
| P 25 | X | X | ✓ | X |
| P 30 | ✓ | ✓ | ✓ | ✓ |
| P 35 | ✓ | ✓ | ✓ | ✓ |
| P 40 | ✓ | ✓ | ✓ | ✓ |
| P 45 | ✓ | ✓ | ✓ | ✓ |
| P 50 | ✓ | ✓ | ✓ | ✓ |
| P 60 | ✓ | ✓ | ✓ | ✓ |
6. DENNÍ POUZÍVÁNÍ

VAROVÁNÍ!
How to install your Electrolux Induction Hob - Worktop installation

4. PRODUKTBESKRIVELSE
| P 72 | ✓ | ✓ | ✓ | ✓ |
| P 15 | X | X | X | X |
| P 20 | X | X | X | X |
| P 25 | X | X | ✓ | X |
| P 30 | ✓ | ✓ | ✓ | ✓ |
| P 35 | ✓ | ✓ | ✓ | ✓ |
| P 40 | ✓ | ✓ | ✓ | ✓ |
| P 45 | ✓ | ✓ | ✓ | ✓ |
| P 50 | ✓ | ✓ | ✓ | ✓ |
| P 60 | ✓ | ✓ | ✓ | ✓ |
6. DAGLIG BRUG

ADVARSEL!
7.2 Lyden under drift
Hvis du kan hore:
7.4 Öko Timer (Eco-timer)
WE'RE THINKING OF YOU
Thank you for purchasing an Electrolux appliance. You've chosen a product that brings with it decades of professional experience and innovation. Ingenious and stylish, it has been designed with you in mind. So whenever you use it, you can be safe in the knowledge that you'll get great results every time.
Welcome to Electrolux.
Visit our website to:

Get usage advice, brochures, trouble shooter, service and repair information: www.electrolux.com/support

Register your product for better service: www.registerelectrolux.com

Buy Accessories, Consumables and Original spare parts for your appliance: www.electrolux.com/shop
CUSTOMER CARE AND SERVICE
Always use original spare parts.
When contacting our Authorised Service Centre, ensure that you have the following data available: Model, PNC, Serial Number.
The information can be found on the rating plate.
Warning / Caution-Safety information
① General information and tips
Environmental information
Subject to change without notice.
CONTENTS
1.SAFETY INFORMATION. 70
2.SAFETYINSTRUCTIONS 72
3. INSTALLATION 74
4.PRODUCT DESCRIPTION. 76
5. BEFORE FIRST USE 77
6.DAILYUSE 78
7. HINTS AND TIPS 83
8.CARE AND CLEANING 86
9.TROUBLESHOOTING 86
10. TECHNICAL DATA 88
11. ENERGY EFFICIENCY 89
12. ENVIRONMENTAL CONCERNS 89
1. SAFETY INFORMATION
Before the installation and use of the appliance, carefully read the supplied instructions. The manufacturer is not responsible for any injuries or damage that are the result of incorrect installation or usage. Always keep the instructions in a safe and accessible location for future reference.
1.1 Children and vulnerable people safety
- This appliance can be used by children aged from 8 years and above and persons with reduced physical, sensory or mental capabilities or lack of experience and knowledge if they have been given supervision or instruction concerning the use of the appliance in a safe way and understand the hazards involved. Children of less than 8 years of age and persons with very extensive and complex disabilities shall be kept away from the appliance unless continuously supervised.
- Children should be supervised to ensure that they do not play with the appliance.
- Keep all packaging away from children and dispose of it appropriately.
- WARNING: The appliance and its accessible parts become hot during use. Keep children and pets away from the appliance when in use and when cooling down.
- If the appliance has a child safety device, it should be activated.
- Children shall not carry out cleaning and user maintenance of the appliance without supervision.
1.2 General Safety
- This appliance is for cooking purposes only.
- This appliance is designed for single household domestic use in an indoor environment.
- This appliance may be used in, offices, hotel guest rooms, bed & breakfast guest rooms, farm guest houses and other
similar accommodation where such use does not exceed (average) domestic usage levels.
- WARNING: The appliance and its accessible parts become hot during use. Care should be taken to avoid touching heating elements.
- WARNING: Unattended cooking on a hob with fat or oil can be dangerous and may result in fire.
- Never use water to extinguish the cooking fire. Switch off the appliance and cover flames with e.g. a fire blanket or lid.
- WARNING: The appliance must not be supplied through an external switching device, such as a timer, or connected to a circuit that is regularly switched on and off by a utility.
- CAUTION: The cooking process has to be supervised. A short term cooking process has to be supervised continuously.
- WARNING: Danger of fire: Do not store items on the cooking surfaces.
- Metallic objects such as knives, forks, spoons and lids should not be placed on the hob surface since they can get hot.
- Do not use the appliance before installing it in the built-in structure.
- Do not use a steam cleaner to clean the appliance.
- After use, switch off the hob element by its control and do not rely on the pan detector.
- If the glass ceramic surface / glass surface is cracked, switch off the appliance and unplug it from the mains. In case the appliance is connected to the mains directly using junction box, remove the fuse to disconnect the appliance from power supply. In either case contact the Authorised Service Centre.
- If the supply cord is damaged, it must be replaced by the manufacturer, an authorized Service or similarly qualified persons in order to avoid a hazard.
- WARNING: Use only hob guards designed by the manufacturer of the cooking appliance or indicated by the
manufacturer of the appliance in the instructions for use as suitable or hob guards incorporated in the appliance. The use of inappropriate guards can cause accidents.
2. SAFETY INSTRUCTIONS
2.1 Installation

WARNING!
Only a qualified person must install this appliance.

WARNING!
Risk of injury or damage to the appliance.
- Remove all the packaging.
- Do not install or use a damaged appliance.
- Follow the installation instructions supplied with the appliance.
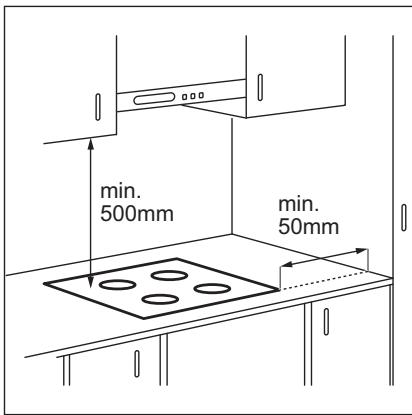
- Keep the minimum distance from other appliances and units.
Always take care when moving the appliance as it is heavy. Always use safety gloves and enclosed footwear. - Seal the cut surfaces of the cabinet with a sealant to prevent moisture from causing swelling.
- Protect the bottom of the appliance from steam and moisture.
-
Do not install the appliance next to a door or under a window. This prevents hot cookware from falling from the appliance when the door or the window is opened.
Each appliance has cooling fans on the bottom.
If the appliance is installed above a drawer: -
Do not store any small pieces or sheets of paper that could be pulled in, as they can damage the cooling fans or impair the cooling system.
-
Keep a distance of minimum 2 cm between the bottom of the appliance and parts stored in the drawer.
-
Remove any separator panels installed in the cabinet below the appliance.
2.2 Electrical Connection

WARNING!
Risk of fire and electric shock.
- All electrical connections should be made by a qualified electrician.
The appliance must be earthed. - Before carrying out any operation make sure that the appliance is disconnected from the power supply.
- Make sure that the parameters on the rating plate are compatible with the electrical ratings of the mains power supply.
- Make sure the appliance is installed correctly. Loose and incorrect electricity mains cable or plug (if applicable) can make the terminal become too hot.
- Use the correct electricity mains cable.
- Do not let the electricity mains cable tangle.
Make sure that a shock protection is installed. - Use the strain relief clamp on the cable.
- Make sure the mains cable or plug (if applicable) does not touch the hot appliance or hot cookware, when you connect the appliance to a socket.
- Do not use multi-plug adapters and extension cables.
- Make sure not to cause damage to the mains plug (if applicable) or to the mains cable. Contact our Authorised Service Centre or an electrician to change a damaged mains cable.
- The shock protection of live and insulated parts must be fastened in such a way that it cannot be removed without tools.
-
Connect the mains plug to the mains socket only at the end of the installation. Make sure that there is access to the mains plug after the installation.
If the mains socket is loose, do not connect the mains plug. -
Do not pull the mains cable to disconnect the appliance. Always pull the mains plug.
- Use only correct isolation devices: line protecting cut-outs, fuses (screw type fuses removed from the holder), earth leakage trips and contactors.
- The electrical installation must have an isolation device which lets you disconnect the appliance from the mains at all poles. The isolation device must have a contact opening width of minimum 3 mm.
2.3 Use

WARNING!
Risk of injury, burns and electric shock.
- Do not change the specification of this appliance.
- Remove all the packaging, labelling and protective film (if applicable) before first use.
Make sure that the ventilation openings are not blocked. - Do not let the appliance stay unattended during operation.
- Set the cooking zone to "off" after each use.
- Do not put cutlery or saucepan lids on the cooking zones. They can become hot.
- Do not operate the appliance with wet hands or when it has contact with water.
- Do not use the appliance as a work surface or as a storage surface.
- If the surface of the appliance is cracked, disconnect immediately the appliance from the power supply. This to prevent an electrical shock.
- Users with a pacemaker must keep a distance of minimum 30~cm from the induction cooking zones when the appliance is in operation.
- When you place food into hot oil, it may splash.

WARNING!
Risk of fire and explosion
-
Fats and oil when heated can release flammable vapours. Keep flames or heated objects away from fats and oils when you cook with them.
-
The vapours that very hot oil releases can cause spontaneous combustion.
- Used oil, that can contain food remnants, can cause fire at a lower temperature than oil used for the first time.
- Do not put flammable products or items that are wet with flammable products in, near or on the appliance.

WARNING!
Risk of damage to the appliance.
- Do not keep hot cookware on the control panel.
- Do not put a hot pan cover on the glass surface of the hob.
- Do not let cookware boil dry.
- Be careful not to let objects or cookware fall on the appliance. The surface can be damaged.
- Do not activate the cooking zones with empty cookware or without cookware.
- Do not put aluminium foil on the appliance.
- Cookware made of cast iron or with a damaged bottom can cause scratches on the glass / glass ceramic. Always lift these objects up when you have to move them on the cooking surface.
2.4 Care and cleaning
Clean the appliance regularly to prevent the deterioration of the surface material.
- Switch off the appliance and let it cool down before cleaning.
- Do not use water spray and steam to clean the appliance.
- Clean the appliance with a moist soft cloth. Use only neutral detergents. Do not use abrasive products, abrasive cleaning pads, solvents or metal objects.
2.5 Service
To repair the appliance contact the Authorised Service Centre. Use original spare parts only.
- Concerning the lamp(s) inside this product and spare part lamps sold separately: These lamps are intended to withstand extreme physical conditions in household appliances, such as temperature, vibration, humidity, or are intended to signal information about the operational
status of the appliance. They are not intended to be used in other applications and are not suitable for household room illumination.
2.6 Disposal

WARNING!
Risk of injury or suffocation.
3. INSTALLATION

WARNING!
Refer to Safety chapters.
3.1 Before the installation
Before you install the hob, write down the information below from the rating plate. The rating plate is on the bottom of the hob.
Serial number
3.2 Built-in hobs
Only use the built-in hobs after you assemble the hob into correct built-in units and work surfaces that align to the standards.
3.3 Connection cable
-
The hob is supplied with a connection cable.
To replace the damaged mains cable, use the cable type: H05V2V2-F which withstands a temperature of 90^ or higher. The single wire must have a diameter of minimum 1,5mm^2 . Speak to your local Service Centre. The connection cable may only be replaced by a qualified electrician. -
Contact your local authority for information on how to dispose of the appliance.
- Disconnect the appliance from the mains supply.
- Cut off the mains electrical cable close to the appliance and dispose of it.

WARNING!
All electrical connections must be made by a qualified electrician.

CAUTION!
Connections via contact plugs are forbidden.

CAUTION!
Do not drill or solder the wire ends. It is forbidden.

CAUTION!
Do not connect the cable without cable end sleeve.
One-phase connection
- Remove the cable end sleeve from black and brown wires.
- Remove an insulation of the brown and black cable ends.
- Merge the black and brown cable ends.
- Apply a new wire end sleeve on the common cable end (special tool required).
Cable cross section 2 × 1,5 ~mm^2
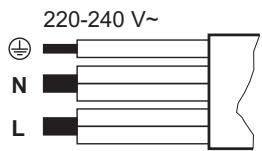
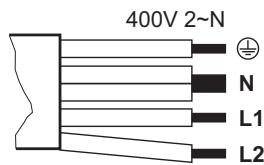
| One-phase connection: 220 - 240 V~ | Two-phase connection: 400 V 2 ~ N | ||
| Green - yellow | Green - yellow | L | |
| N | Blue and blue | Blue and blue | N |
| L | Black and brown | Black | L1 |
| Brown | L2 | ||
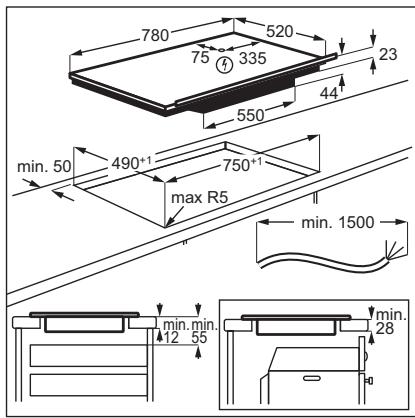
3.4 Assembly
If you install the hob under a hood, please see the installation instructions of the hood for the minimum distance between the appliances.
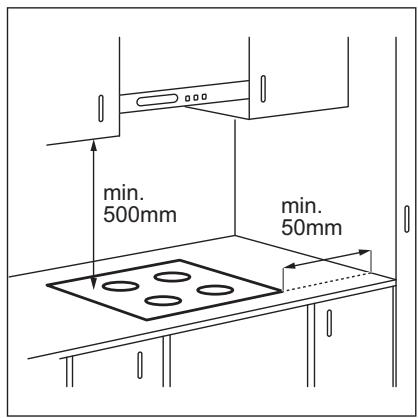
If the appliance is installed above a drawer, the hob ventilation can warm up the items stored in the drawer during the cooking process.
Find the video tutorial "How to install your Electrolux Induction Hob - Worktop installation" by typing out the full name indicated in the graphic below.

YouTube
www.youtube.com/electrolux
www.youtube.com/aeg
How to install your Electrolux Induction Hob - Worktop installation

4. PRODUCT DESCRIPTION
4.1 Cooking surface layout

1 Induction cooking zone
2 Control panel

For detailed information on the sizes of the cooking zones refer to "Technical data".
4.2 Control panel layout

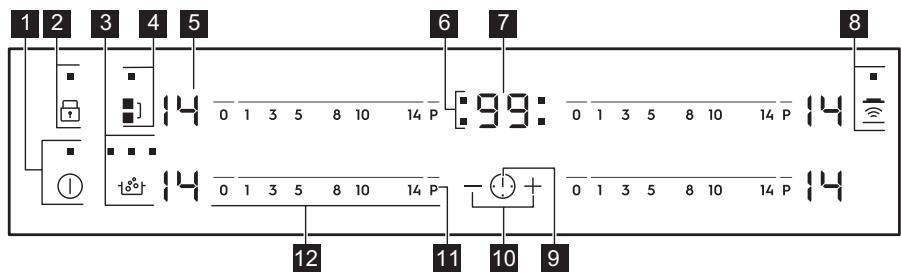
Use the sensor fields to operate the appliance. The displays, indicators and sounds tell which functions operate.
| Sensor field | Function | Comment | |
| 1 | ① | On / Off | To activate and deactivate the hob. |
| 2 | Lock / Child Safety Device | To lock / unlock the control panel. | |
| 3 | SenseBoil® | To activate and deactivate the function. The indicators above the symbol show the progress of the function. | |
| 4 | Bridge | To activate and deactivate the function. | |
| 5 | - | Heat setting display | To show the heat setting. |
| 6 | - | Timer indicators of cooking zones | To show for which zone you set the time. |
| 7 | - | Timer display | To show the time in minutes. |
| 8 | = | Hob²Hood | To activate and deactivate the manual mode of the function. |
| 9 | 1 | - | To select the cooking zone. |
| 10 | +/- | - | To increase or decrease the time. |
| 11 | P | PowerBoost | To activate the function. |
| 12 | - | Control bar | To set a heat setting. |
4.3 Heat setting displays
| Display | Description |
| ü | The cooking zone is deactivated. |
| I - I4 | The cooking zone operates. |
| ü | SenseBoil® operates. |
| R | Automatic Heat Up operates. |
| P | PowerBoost operates. |
| E + digit | There is a malfunction. |
| 三 / 二 / 二 | OptiHeat Control (3 step Residual heat indicator): continue cooking / keep warm / resid-ual heat. |
| L | Lock / Child Safety Device operates. |
| F | Incorrect or too small cookware or no cookware on the cooking zone. |
| - | Automatic Switch Off operates. |
5. BEFORE FIRST USE

WARNING!
Refer to Safety chapters.
5.1 Power limitation
Originally the hob is at its highest possible power level.
To decrease or increase the power level:
- Deactivate the hob.
- Touch ① for 3 seconds. The display comes on and goes off.
- Touch for 3 seconds. or comes on.
- Touch ① . P 72 comes on.
- Touch 1+ of the Timer to set the power level.
Power levels
Refer to "Technical data" chapter.
P72—7200W
P15—1500W
P20—2000W
P25—2500W
P30—3000W
P35—3500W
P40—4000W
P45—4500W
P50—5000W
P60—6000W

CAUTION!
Make sure that the selected power fits the house installation fuses.

WARNING!
If you select one of the lowest power levels the SenseBoil® function may not work. Refer to the table below.
- the function works, X - the function does not work.
Power lev- Cooking zone
| Left front | Left rear | Middle front | Right rear |
| 210 mm | 210 mm | 145 mm | 240 mm |
| P 72 | ✓ | ✓ | ✓ | ✓ |
| P 15 | X | X | X | X |
| P 20 | X | X | X | X |
| P 25 | X | X | ✓ | X |
| P 30 | ✓ | ✓ | ✓ | ✓ |
| P 35 | ✓ | ✓ | ✓ | ✓ |
| P 40 | ✓ | ✓ | ✓ | ✓ |
| P 45 | ✓ | ✓ | ✓ | ✓ |
| P 50 | ✓ | ✓ | ✓ | ✓ |
| P 60 | ✓ | ✓ | ✓ | ✓ |
6. DAILY USE

WARNING!
Refer to Safety chapters.
6.1 Activating and deactivating
Touch ① for 1 second to activate or deactivate the hob.
6.2 Automatic Switch Off
The function deactivates the hob automatically if:
- all cooking zones are deactivated,
-
you do not set the heat setting after you activate the hob,
-
you spill something or put something on the control panel for more than 10 seconds (a pan, a cloth, etc.). An acoustic signal sounds and the hob deactivates. Remove the object or clean the control panel.
- the hob gets too hot (e.g. when a saucepan boils dry). Let the cooking zone cool down before you use the hob again.
- you use incorrect cookware. The symbol comes on and the cooking zone deactivates automatically after 2 minutes
- you do not deactivate a cooking zone or change the heat setting. After some time comes on and the hob deactivates.
The relation between the heat setting and the time after which the hob deactivates:
| Heat setting | The hob deactivates after |
| 1 - 3 | 6 h |
| 4 - 7 | 5 h |
| 8 - 9 | 4 h |
| 10 - 14 | 1.5 h |
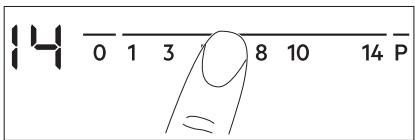
6.3 The heat setting
To set or change the heat setting:
Touch the control bar at the correct heat setting or move your finger along the control bar until you reach the correct heat setting.
6.4 OptiHeat Control (3 step Residual heat indicator)

WARNING!
/ As long as the indicator is on, there is a risk of burns from residual heat.
The induction cooking zones produce the heat necessary for the cooking process directly in the bottom of the cookware. The glass ceramic is heated by the heat of the cookware.
The indicators appear when a cooking zone is hot. They show the level of the residual heat for the cooking zones you are currently using:
- continue cooking,
-keepwarm, - residual heat.
The indicator may also appear:
for the neighbouring cooking zones even if you are not using them,
- when hot cookware is placed on cold cooking zone,
- when the hob is deactivated but the cooking zone is still hot.
The indicator disappears when the cooking zone has cooled down.
6.5 Using the cooking zones
Place the cookware in the centre of the selected zone. Induction cooking zones adapt to the dimension of the bottom of the cookware automatically.
You can cook with large cookware placed on two cooking zones at the same time. The cookware must cover the centres of both zones but not go beyond the area marking. If the cookware is located between the two centres, Bridge function will not be activated.
6.6 Bridge
The function operates when the pot covers the centres of the two zones. For more information on the correct placement of cookware refer to "Using the cooking zones". The function does not work while SenseBoil® operates.
This function connects two left side cooking zones and they operate as one.
First set the heat setting for one of the left side cooking zones.
To activate the function: touch. To set or change the heat setting touch one of the control sensors.
To deactivate the function: touch. The cooking zones operate independently.
6.7 Automatic Heat Up
Use the function to get a desired heat setting in a shorter time. When the function is on, the cooking zone operates at the highest heat setting in the beginning and then continues to operate at the desired heat setting.

To activate the function the cooking zone must be cold.
To activate the function for a cooking
zone: touch P (P comes on). Immediately touch a desired heat setting. After 3 seconds R comes on.
To deactivate the function: change the heat setting.
6.8 PowerBoost
This function makes more power available to the induction cooking zones. The function can be activated for the induction cooking zone only for a limited period of time. After this time the induction cooking zone automatically sets back to the highest heat setting.

Refer to "Technical data" chapter.
To activate the function for a cooking zone: touch P. comes on.
To deactivate the function: change the heat setting.
6.9 SenseBoil®
The function automatically adjusts the temperature of water so that it does not boil over once it reaches the boiling point.
If there is any residual heat ( - / - / - ) on the cooking zone you want to use, an acoustic signal is emitted and the function does not start.
- Touch ① to activate the hob.
- Touch to activate the function. A blinking appears for cooking zones on which you can presently use the function.
- Touch the control bar of any available cooking zone for which you want to start the function (between the heat setting 1-14).
The function starts. If you do not choose any cooking zone within 5 seconds the function does not activate.
Once the function starts the indicators above the symbol come on one after another until the water reaches the boiling point.
When the function detects the boiling point the hob emits an acoustic signal and the heat level automatically changes to 8.
If all cooking zones are already in use or there is some residual heat on all of them, the hob emits a beep sound, the indicators above blink and the function does not start.
To deactivate the function touch (the function deactivates and the heat setting goes down to 0) or touch the control bar and adjust the heat setting manually.
6.10 Timer
- Count Down Timer
You can use this function to set the length of a single cooking session.
First set the heat setting for the cooking zone, then set the function.
To set the cooking zone: touch ① repeatedly until the indicator of a cooking zone appears.
To activate the function: touch + of the timer to set the time (00 - 99 minutes). When the indicator of the cooking zone starts to flash, the time counts down.
To see the remaining time: touch ① to set the cooking zone. The indicator of the cooking zone starts to flash. The display shows the remaining time.
To change the time: touch ① to set the cooking zone. Touch + or -
To deactivate the function: touch ① to set the cooking zone and then touch —. The remaining time counts down to 00. The indicator of the cooking zone disappears.

When the countdown ends, an acoustic signal sounds and 00 flashes. The cooking zone deactivates.
To stop the sound: touch ①.
- CountUp Timer
You can use this function to monitor how long the cooking zone operates.
To set the cooking zone: touch ① repeatedly until the indicator of a cooking zone appears.
To activate the function: touch — of the timer. UP appears. When the indicator of the cooking zone starts to flash, the time counts up. The display switches between UP and the counted time (in minutes).
To see how long the cooking zone
operates: touch ① to set the cooking zone. The indicator of the cooking zone starts to flash. The display shows how long the zone operates.
To deactivate the function: touch ① and then touch + or -. The indicator of the cooking zone disappears.
- Minute Minder
You can use this function when the hob is activated and the cooking zones do not operate. The heat setting display shows 0 .
To activate the function: touch ① and then touch + or - of the timer to set the time. When the time finishes, an acoustic signal sounds and 00 flashes.
To stop the sound: touch ①.

The function has no effect on the operation of the cooking zones.
6.11 Lock
You can lock the control panel while cooking zones operate. It prevents an accidental change of the heat setting.
Set the heat setting first.
To activate the function: touch L comes on for 4 seconds. The Timer stays on.
To deactivate the function: touch. The previous heat setting comes on.

When you deactivate the hob, you also deactivate this function.
6.12 Child Safety Device
This function prevents an accidental operation of the hob.
To activate the function: activate the hob with ①. Do not set any heat setting. Touch for 4 seconds. L comes on. Deactivate the hob with ①.
To deactivate the function: activate the hob with ①. Do not set any heat setting. Touch for 4 seconds. ② comes on. Deactivate the hob with ①.
To override the function for only one cooking time: activate the hob with ①. ⑤ comes on. Touch ④ for 4 seconds. Set the heat setting in 10 seconds. You can operate the hob. When you deactivate the hob with ① the function operates again.
6.13 OffSound Control (Deactivating and activating the sounds)
Deactivate the hob. Touch ① for 3 seconds. The display comes on and goes out. Touch ④ for 3 seconds. or ⑥ comes on. Touch ^+ of the timer to choose one of the following:
- the sounds are off
- the sounds are on
To confirm your selection wait until the hob deactivates automatically.
When the function is set to you can hear the sounds only when:
- you touch ①
- Minute Minder comes down
- Count Down Timer comes down
- you put something on the control panel.
6.14 Power management
If multiple zones are active and the consumed power exceeds the limitation of the power supply, this function divides the available power between all cooking zones (connected to the same phase). The hob controls heat settings to protect the fuses of the house installation.
- Cooking zones are grouped according to the location and number of the phases in the hob. Each phase has a maximum electricity loading (3700 W). If the hob reaches the limit of maximum available power within one phase, the power of the cooking zones will be automatically reduced.
- The heat setting of the cooking zone selected last is always prioritised. The remaining power will be divided between the previously activated cooking zones in reverse order of selection.
- The heat setting display of the reduced zones changes between the initially selected heat setting and the reduced heat setting.
- Wait until the display stops flashing or reduce the heat setting of the cooking zone selected last. The cooking zones will continue operating with the reduced heat
setting. Change the heat settings of the cooking zones manually, if necessary. Refer to the illustration for possible combinations in which power can be distributed among the cooking zones.
6.15 Hob²Hood
It is an advanced automatic function which connects the hob to a special hood. Both the hob and the hood have an infrared signal communicator. Speed of the fan is defined automatically on basis of mode setting and temperature of the hottest cookware on the hob. You can also operate the fan from the hob manually.

For most of the hoods the remote system is originally deactivated. Activate it before you use the function. For more information refer to hood user manual.
Operating the function automatically
To operate the function automatically set the automatic mode to H1 - H6. The hob is originally set to H5. The hood reacts whenever you operate the hob. The hob recognizes temperature of the cookware automatically and adjusts the speed of the fan.
Automatic modes
| Automat- ic light | Boiling1) | Frying2) | |
| Mode H0 | Off | Off | Off |
| Mode H1 | On | Off | Off |
| Mode H2 3) | On | Fan speed 1 | Fan speed 1 |
| Mode H3 | On | Off | Fan speed 1 |
| Mode H4 | On | Fan speed 1 | Fan speed 1 |
| Mode H5 | On | Fan speed 1 | Fan speed 2 |
| Mode H6 | On | Fan speed 2 | Fan speed 3 |
1) The hob detects the boiling process and activates fan speed in accordance with automatic mode.
2) The hob detects the frying process and activates fan speed in accordance with automatic mode.
3) This mode activates the fan and the light and does not rely on the temperature.
Changing the automatic mode
- Deactivate the hob.
- Press ① for 3 seconds. The display comes on and goes off.
- Press for 3 seconds.
- Press ① a few times until comes on.
- Press + of the timer to select an automatic mode.

To operate the hood directly on the hood panel deactivate the automatic mode of the function.
7. HINTS AND TIPS

WARNING!
Refer to Safety chapters.
7.1 Cookware

For induction cooking zones a strong electro-magnetic field creates the heat in the cookware very quickly.
When you finish cooking and deactivate the hob, the hood fan may still operate for a certain period of time. After that time the system deactivates the fan automatically and prevents you from accidental activation of the fan for the next 30 seconds.
Operating the fan speed manually
You can also operate the function manually. To do that press when the hob is active. This deactivates automatic operation of the function and allows you to change the fan speed manually. When you press you raise the fan speed by one. When you reach an intensive level and press again you will set fan speed to 0 which deactivates the hood fan. To start the fan again with fan speed 1 press

To activate automatic operation of the function, deactivate the hob and activate it again.
Activating the light
You can set the hob to activate the light automatically whenever you activate the hob. To do so set the automatic mode to H1 - H6.

The light on the hood deactivates 2 minutes after deactivating the hob.
Use the induction cooking zones with suitable cookware.
- The bottom of the cookware must be as thick and flat as possible.
- Ensure pan bases are clean and dry before placing on the hob surface.
In order to avoid scratches, do not slide or rub the pot across the ceramic glass.
Cookware material
- correct: cast iron, steel, enamelled steel, stainless steel, multi-layer bottom (with a correct marking from a manufacturer).
not correct: aluminium, copper, brass, glass, ceramic, porcelain.
Cookware is suitable for an induction hob if:
water boils very quickly on a zone set to the highest heat setting.
- a magnet pulls on to the bottom of the cookware.
Cookware dimensions
- Induction cooking zones adapt to the dimension of the bottom of the cookware automatically.
- The cooking zone efficiency is related to the diameter of the cookware. The cookware with a diameter smaller than the minimum receives only a part of the power generated by the cooking zone.
- For both safety reasons and optimal cooking results, do not use cookware larger than indicated in "Cooking zones specification". Avoid keeping cookware close to the control panel during the cooking session. This might impact the functioning of the control panel or accidentally activate hob functions.
i
Refer to "Technical data".
7.2 The noises during operation
If you can hear:
- crack noise: cookware is made of different materials (a sandwich construction).
whistle sound: you use a cooking zone with a high power level and the cookware is made of different materials (a sandwich construction).
humming: you use a high power level. - clicking: electric switching occurs.
- hissing, buzzing: the fan operates.
The noises are normal and do not indicate any malfunction.
7.3 Hints & Tips for SenseBoil®
The function works best for boiling water and preparing potatoes.
It does not work with cast iron and non-stick cookware, e.g. with a ceramic coating. Enamelled steel pots are recommended for achieving the best results while boiling potatoes.
Check if the pot you chose is suitable for SenseBoil® by monitoring the first cooking session.
To use SenseBoil® efficiently follow the advice below:
- Fill between half to three quarters of the pot with cold tap water leaving 4cm from the rim of the pot empty. Do not use less than 1 or more than 5 litres of water. Make sure the total weight of the water (or the water and potatoes) ranges between 1 - 5kg .
If you want to cook potatoes, make sure they are completely covered with water, but remember to leave at least one quarter of the pot empty.
To achieve the best results cook only whole, unpeeled, medium-sized potatoes. - Make sure you do not pack potatoes too tightly.
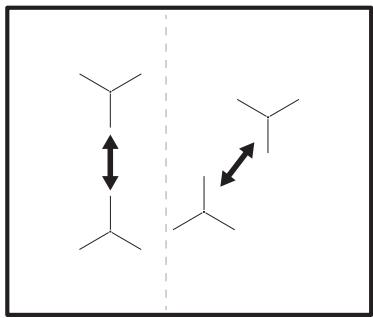
- Avoid producing external vibrations (e.g. from using a blender or placing a mobile phone next to the appliance) when the function is running.
If you want to use salt, add it after the water reaches the boiling point. - The function may not work properly for water kettles and espresso pots.
7.4 Öko Timer (Eco Timer)
To save energy, the heater of the cooking zone deactivates before the count down timer sounds. The difference in the operation time depends on the heat setting level and the length of the cooking operation.
7.5 Examples of cooking applications
The correlation between the heat setting of a zone and its consumption of power is not linear. When you increase the heat setting, it is not proportional to the increase of the consumption of power. It means that a
| Heat setting | Use to: | Time (min) | Hints |
| 1 | Keep cooked food warm. | as neces-sary | Put a lid on the cookware. |
| 1 - 3 | Hollandaise sauce, melt: butter, choco-late, gelatine. | 5 - 25 | Mix from time to time. |
| 1 - 3 | Solidify: fluffy omelettes, baked eggs. | 10 - 40 | Cook with a lid on. |
| 3 - 5 | Simmer rice and milkbased dishes, heat up ready-cooked meals. | 25 - 50 | Add at least twice as much liquid as rice, mix milk dishes halfway through the procedure. |
| 5 - 7 | Steam vegetables, fish, meat. | 20 - 45 | Add a couple of tablespoons of liquid. |
| 7 - 9 | Steam potatoes. | 20 - 60 | Use max. ¼ l of water for 750 g of po-tatoes. |
| 7 - 9 | Cook larger quantities of food, stews and soups. | 60 - 150 | Up to 3 l of liquid plus ingredients. |
| 9 - 12 | Gentle fry: escalope, veal cordon bleu, cutlets, rissoles, sausages, liver, roux, eggs, pancakes, doughnuts. | as neces-sary | Turn halfway through. |
| 12 - 13 | Heavy fry, hash browns, loin steaks, steaks. | 5 - 15 | Turn halfway through. |
| 14 | Boil water, cook pasta, sear meat (goulash, pot roast), deep-fry chips. | ||
| P | Boil large quantities of water. PowerBoost is activated. |
7.6 Hints and Tips for Hob²Hood
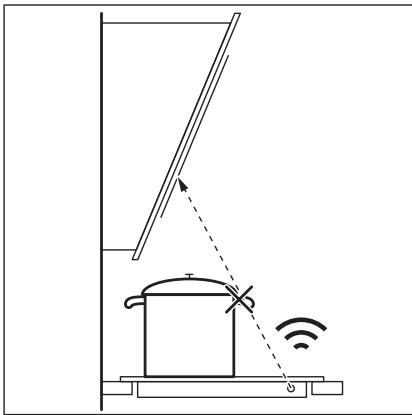
When you operate the hob with the function:
- Protect the hood panel from direct sunlight.
- Do not spot halogen light on the hood panel.
- Do not cover the hob control panel.
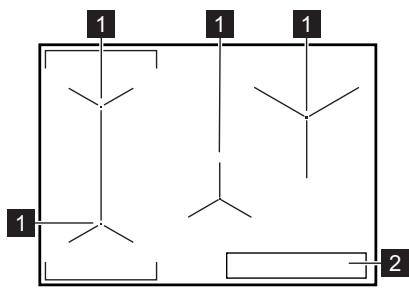
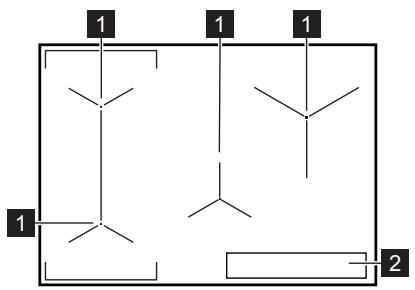
- Do not interrupt the signal between the hob and the hood (e.g. with the hand, a cookware handle or a tall pot). See the picture.
The hood pictured below is for illustration purpose only.
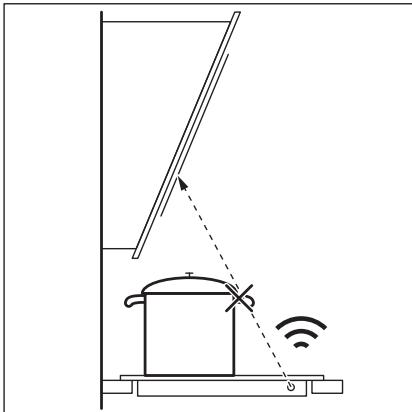

Other remotely controlled appliances may block the signal. Do not use any such appliances near to the hob while Hob²Hood is on.
Cooker hoods with the Hob²Hood function To find the full range of cooker hoods which work with this function refer to our consumer
website. The Electrolux cooker hoods that work with this function must have the symbol
8. CARE AND CLEANING

WARNING!
Refer to Safety chapters.
8.1 General information
- Clean the hob after each use.
Always use cookware with a clean base. - Scratches or dark stains on the surface have no effect on how the hob operates.
- Use a special cleaner suitable for the surface of the hob.
Use a special scraper for the glass.
8.2 Cleaning the hob
- Remove immediately: melted plastic, plastic foil, salt, sugar and food with
sugar, otherwise, the dirt can cause damage to the hob. Take care to avoid burns. Use a special hob scraper on the glass surface at an acute angle and move the blade on the surface.
- Remove when the hob is sufficiently cool: limescale rings, water rings, fat stains, shiny metallic discoloration. Clean the hob with a moist cloth and a non-abrasive detergent. After cleaning, wipe the hob dry with a soft cloth.
- Remove shiny metallic discoloration: use a solution of water with vinegar and clean the glass surface with a cloth.
9. TROUBLESHOOTING

WARNING!
Refer to Safety chapters.
9.1 What to do if...
| Problem | Possible cause | Remedy |
| You cannot activate or operate the hob. | The hob is not connected to an elec-trical supply or it is connected incor-rectly. | Check if the hob is correctly connected to the electrical supply. |
| The fuse is blown. | Make sure that the fuse is the cause of the malfunction. If the fuse is blown again and again, contact a qualified electrician. | |
| You did not set the heat setting for 10 seconds. | Activate the hob again and set the heat setting in less than 10 seconds. | |
| You touched 2 or more sensor fields at the same time. | Touch only one sensor field. | |
| There is water or fat stains on the control panel. | Clean the control panel. | |
| You can hear a constant beep noise. | The electrical connection is incor-rect. | Disconnect the hob from the electrical supply. Ask a qualified electrician to check the installation. |
| An acoustic signal sounds and the hob deactivates. | You put something on one or more sensor fields. | Remove the object from the sensor fields. |
| An acoustic signal sounds when the hob is deactivated. | ||
| The hob deactivates. | You put something on the sensor field①. | Remove the object from the sensor field. |
| Residual heat indicator does not come on. | The zone is not hot because it oper-ated only for a short time or the sen-sor is damaged. | If the zone operated sufficiently long to be hot, speak to an Authorised Service Centre. |
| You use a very tall pot which blocks the signal. | Use a smaller pot, change the cooking zone or operate the hood manually. | |
| Automatic Heat Up does not op-erate. | The highest heat setting is set. | The highest heat setting has the same power as the function. |
| The zone is hot. | Let the zone become sufficiently cool. | |
| The heat setting changes between two levels. | Power management operates. | Refer to "Daily use". |
| The control panel becomes hot to the touch. | The cookware is too large or you put it too close to the control panel. | Put large cookware on the rear zones, if possible. |
| There is no sound when you touch the panel sensor fields. | The sounds are deactivated. | Activate the sounds. Refer to "Daily use". |
| Lcomes on. | Child Safety Device or Lock oper-ates. | Refer to "Daily use". |
| Fcomes on. | There is no cookware on the zone. | Put cookware on the zone. |
| The cookware is unsuitable. | Use cookware suitable for induction hobs. Refer to "Hints and tips". | |
| The diameter of the bottom of the cookware is too small for the zone. | Use cookware with correct dimen-sions. Refer to "Technical data". | |
| FandIappear alternately. | The power is too low due to unsuita-ble cookware or an empty pot. | Use the appropriate type of cookware. Refer to "Hints and Tips" and "Techni-cal Data". Do not activate any zone with an emp-ty pot on it. |
| FandIappear alternately. | The pot is empty or contains some liquid other than water, e.g. oil. | Avoid using the function with liquids other than water. |
| F and 3 appear alternately. | There is too much or too little water in the pot. You boiled some food other than water and potatoes. The boiling point was moved in time and SenseBoil® could not work properly. | Only boil water and potatoes with the use of SenseBoil®. Refer to "Hints and Tips". |
| You hear a beep sound, the indicators above t6'f blink and SenseBoil® does not start. | None of the cooking zones is ready to be used with SenseBoil®. There is some residual heat on the cooking zones you want to choose or they are still in use. | Finish your previous cooking activities and choose a free cooking zone without any residual heat. |
| E and a number come on. | There is an error in the hob. | Deactivate the hob and activate it again after 30 seconds. If E comes on again, disconnect the hob from the electrical supply. After 30 seconds, connect the hob again. If the problem continues, speak to an Authorised Service Centre. |
9.2 If you cannot find a solution...
If you cannot find a solution to the problem yourself, contact your dealer or an Authorised Service Centre. Give the data from the rating plate. Give also three digit letter code for the glass ceramic (it is in the corner of the glass surface) and an error
message that comes on. Make sure, you operated the hob correctly. If not the servicing by a service technician or dealer will not be free of charge, also during the warranty period. The information about guarantee period and Authorised Service Centres are in the guarantee booklet.
10. TECHNICAL DATA
10.1 Rating plate
Model Y82IS443
Typ 62 D4A 01 AA
Induction 7.2 kW
Ser.Nr.
ELECTROLUX
PNC 949 599 258 00
220 - 240 V / 400 V 2N, 50 / 60 Hz
Made in: Germany
7.2 kW

10.2 Cooking zones specification
| Cooking zone | Nominal power (maximum heat setting) [W] | PowerBoost [W] | PowerBoost maximum dura- tion [min] | Cookware diameter [mm] |
| Left front | 2300 | 3200 | 10 | 125 - 210 |
| Left rear | 2300 | 3200 | 10 | 125 - 210 |
| Cooking zone | Nominal power (maximum heat setting) [W] | PowerBoost [W] | PowerBoost maximum dura- tion [min] | Cookware diamie- ter [mm] |
| Middle front | 1400 | 2500 | 4 | 125 - 145 |
| Right rear | 2300 | 3600 | 10 | 205 - 240 |
The power of the cooking zones can be different in some small range from the data in the table. It changes with the material and dimensions of the cookware.
For optimal cooking results use cookware no larger than the diameter in the table.
11. ENERGY EFFICIENCY
11.1 Product Information
| Model identification | Y82IS443 | |
| Type of hob | Built-In Hob | |
| Number of cooking zones | 4 | |
| Heating technology | Induction | |
| Diameter of circular cooking zones (Ø) | Left front | 21.0 cm |
| Left rear | 21.0 cm | |
| Middle front | 14.5 cm | |
| Right rear | 24.0 cm | |
| Energy consumption per cooking zone (EC electric cooking) | Left front | 179.6 Wh/kg |
| Left rear | 177.0 Wh/kg | |
| Middle front | 180.2 Wh/kg | |
| Right rear | 174.6 Wh/kg | |
| Energy consumption of the hob (EC electric hob) | 177.9 Wh/kg | |
IEC / EN 60350-2 - Household electric cooking appliances - Part 2: Hobs - Methods for measuring performance.
The energy measurements referring to the cooking area are identified by the markings of the respective cooking zones.
11.2 Energy saving
You can save energy during everyday cooking if you follow the hints below.
- When you heat up water, use only the amount you need.
- If it is possible, always put the lids on the cookware.
- Put the cookware directly in the centre of the cooking zone.
- Use the residual heat to keep the food warm or to melt it.
12. ENVIRONMENTAL CONCERNS
Recycle materials with the symbol . Put the packaging in relevant containers to
recycle it. Help protect the environment and human health by recycling waste of electrical
and electronic appliances. Do not dispose of appliances marked with the symbol with the household waste. Return the product to
your local recycling facility or contact your municipal office.
SINUN PARHAAKSESI
How to install your Electrolux Induction Hob - Worktop installation

4. TUOTEKUVAUS
4.1 Keittoaluejärnestely
| P 72 | ✓ | ✓ | ✓ | ✓ |
| P 15 | X | X | X | X |
| P 20 | X | X | X | X |
| P 25 | X | X | ✓ | X |
| P 30 | ✓ | ✓ | ✓ | ✓ |
| P 35 | ✓ | ✓ | ✓ | ✓ |
| P 40 | ✓ | ✓ | ✓ | ✓ |
| P 45 | ✓ | ✓ | ✓ | ✓ |
| P 50 | ✓ | ✓ | ✓ | ✓ |
| P 60 | ✓ | ✓ | ✓ | ✓ |
How to install your Electrolux Induction Hob - Worktop installation

4. DESCRIPTION DE L'APPAREIL
How to install your Electrolux Induction Hob - Worktop installation

4. TERMÉKLEÍRÁS
| P 72 | ✓ | ✓ | ✓ | ✓ |
| P 15 | X | X | X | X |
| P 20 | X | X | X | X |
| P 25 | X | X | ✓ | X |
| P 30 | ✓ | ✓ | ✓ | ✓ |
| P 35 | ✓ | ✓ | ✓ | ✓ |
| P 40 | ✓ | ✓ | ✓ | ✓ |
| P 45 | ✓ | ✓ | ✓ | ✓ |
| P 50 | ✓ | ✓ | ✓ | ✓ |
| P 60 | ✓ | ✓ | ✓ | ✓ |
6. NAPI HASZNÁLAT

FIGYELMEZTETÉS!
Serial number (raonumber)
How to install your Electrolux Induction Hob - Worktop installation

4. VÖRULYSING
4.1 Uppsetting eldunarhellu

1 Spanhella
2 Stjornboró

Nanari upplysingar um staeroir eldunarhellna er ao finna i Taeknilegar upplysingar.
| P 72 | ✓ | ✓ | ✓ | ✓ |
| P 15 | X | X | X | X |
| P 20 | X | X | X | X |
| P 25 | X | X | ✓ | X |
| P 30 | ✓ | ✓ | ✓ | ✓ |
| P 35 | ✓ | ✓ | ✓ | ✓ |
| P 40 | ✓ | ✓ | ✓ | ✓ |
| P 45 | ✓ | ✓ | ✓ | ✓ |
| P 50 | ✓ | ✓ | ✓ | ✓ |
| P 60 | ✓ | ✓ | ✓ | ✓ |
How to install your Electrolux Induction Hob - Worktop installation

4. PRODUKTBESKRIVELSE
| er | Venstre fremme | Venstre bak | Midtre fremre | Høyre bak |
| 210 mm | 210 mm | 145 m | 240 mm | |
| P 72 | ✓ | ✓ | ✓ | ✓ |
| P 15 | X | X | X | X |
| P 20 | X | X | X | X |
| P 25 | X | X | ✓ | X |
| P 30 | ✓ | ✓ | ✓ | ✓ |
| P 35 | ✓ | ✓ | ✓ | ✓ |
| P 40 | ✓ | ✓ | ✓ | ✓ |
| P 45 | ✓ | ✓ | ✓ | ✓ |
| P 50 | ✓ | ✓ | ✓ | ✓ |
| P 60 | ✓ | ✓ | ✓ | ✓ |
6. DAGLIG BRUK

ADVARSEL!
6.7 Automatism oppvarming
How to install your Electrolux Induction Hob - Worktop installation

4. OPIS URZADZENIA
| P 40 | ✓ | ✓ | ✓ | ✓ |
| P 45 | ✓ | ✓ | ✓ | ✓ |
| P 50 | ✓ | ✓ | ✓ | ✓ |
| P 60 | ✓ | ✓ | ✓ | ✓ |
6. CODZIENNE UZYTKOWANIE

OSTRZEŽENIE!
2. BEZPEČNOSTNÉ POKNY
2.1 Montáz

VAROVANIE!
Tento spotrebičmöze nainstalovat'len kvalifikovaná osoba.

VAROVANIE!
How to install your Electrolux Induction Hob - Worktop installation

4. POPIS VYROBKA
4.1 Rozlozenie varnej plochy

1 Indukcná varná zona
2 Ovladacic panel

| P 72 | ✓ | ✓ | ✓ | ✓ |
| P 15 | X | X | X | X |
| P 20 | X | X | X | X |
| P 25 | X | X | ✓ | X |
| P 30 | ✓ | ✓ | ✓ | ✓ |
| P 35 | ✓ | ✓ | ✓ | ✓ |
| P 40 | ✓ | ✓ | ✓ | ✓ |
| P 45 | ✓ | ✓ | ✓ | ✓ |
| P 50 | ✓ | ✓ | ✓ | ✓ |
| P 60 | ✓ | ✓ | ✓ | ✓ |
6. KAŽDODENNE POUŽÍVANIE

VAROVANIE!
How to install your Electrolux Induction Hob - Worktop installation

4. PRODUKTBESKRIVNING
4.1 Hallens layout
1 Induktion tillagningszon
2 Kontrollpanel

| P 72 | ✓ | ✓ | ✓ | ✓ |
| P 15 | X | X | X | X |
| P 20 | X | X | X | X |
| P 25 | X | X | ✓ | X |
| P 30 | ✓ | ✓ | ✓ | ✓ |
| P 35 | ✓ | ✓ | ✓ | ✓ |
| P 40 | ✓ | ✓ | ✓ | ✓ |
| P 45 | ✓ | ✓ | ✓ | ✓ |
| P 50 | ✓ | ✓ | ✓ | ✓ |
| P 60 | ✓ | ✓ | ✓ | ✓ |
6. DAGLIG ANVÄNDNING