
VISIO CARE 3 - Baby monitor BABYMOOV - Free user manual and instructions
Find the device manual for free VISIO CARE 3 BABYMOOV in PDF.
| Product Type | Baby monitor with touch screen |
| Brand | BABYMOOV |
| Model | VISIO CARE 3 |
| Technology | 2.4 GHz FHSS (Frequency Hopping Spread Spectrum) |
| Range | 250 m in open space |
| Screen | 3.5 inches color TFT touchscreen |
| Night vision | Automatic |
| Walkie-talkie function | Yes, 'Answer baby' |
| VOX function | Yes, voice activation |
| Maximum number of cameras | 4 |
| Recording | On micro SD card (not included) |
| Lullabies | 3 built-in |
| Nightlight | Yes, remotely controllable |
| Temperature alarm | Yes, adjustable |
| Out of range alarm | Yes |
| Zoom | x10 |
| Transmitter power | 5 V AC power adapter |
| Receiver power | Rechargeable lithium-polymer battery 1200 mAh (5 V AC adapter) |
| Operating temperature range | -9 °C to +50 °C |
| TV output | Yes (PAL/NTSC) |
| Maintenance and cleaning | Clean with a soft, dry cloth. Do not immerse. |
| Safety | Use only provided accessories. Do not disassemble. Supervise the child. |
| Spare parts and repairability | Battery and adapters available from the manufacturer. |
Frequently Asked Questions - VISIO CARE 3 BABYMOOV
User questions about VISIO CARE 3 BABYMOOV
0 question about this device. Answer the ones you know or ask your own.
Ask a new question about this device
Download the instructions for your Baby monitor in PDF format for free! Find your manual VISIO CARE 3 - BABYMOOV and take your electronic device back in hand. On this page are published all the documents necessary for the use of your device. VISIO CARE 3 by BABYMOOV.
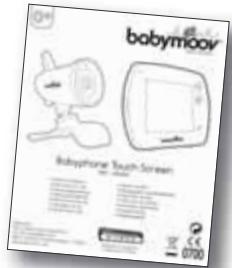
USER MANUAL VISIO CARE 3 BABYMOOV
Babyphone Touch Screen
Réf.: A014411
- Notice d'utilisation
- Instructions for use
- Benutzungsanleitung
- Gebruikshandleiding
- Instruetiones de uso
- Instruções de uso
-
Istruzioni per l'uso
-
Návod k pouziti
- INHCTpyKzna IO NcNolb3ObaHnIO
Hasznalatiutasitas - Instruetioni de'utilizaré
- Instrukcja uzytkowania
- Brugsanvising
- O8nlyicxprnons
NOTICE D'UTILISATION
ACCESSIONS STANDARDS
Thank you for having chosen our Babyphone Touch Screen. Please read this instruction manual carefully to make the most of your device and ensure excellent long service life. However, should you encounter a problem of any kind or detect a defect, please contact our customer service.
FUNCTIONS
2.4 GHz FHSS digital technology without interference.
- Capacity: 250 m in open field.
Colour Display 3.5"TFT with touch screen and resolution.
High definition digital image.
Automatic night vision.
- Receiver equipped with rechargeable lithium battery.
- Answering the baby function on the receiver to reassure the child at a distance.
- Adjustable screen brightness and ability to zoom in on the image.
Voice activation (VOX Function).
- Temperature indicator.
- Out of reach alarm.
- USB port on the receiver.
- Battery indicator.
- Ability to connect up to 4 video cameras and 4 split screens.
- Recording on micro SD card (not included).
- Adjustable video camera.
- Night light and lullaby function (3 tunes). Remote control capacity from the receiver.
CAUTION
- The Babyphone Touch Screen should not be considered a medical device. We recommend the combined use of the Babyphone Touch Screen with the direct adult supervision of the child. Premature babies or babies considered at risk should be monitored by s paediatrician or other health care professional.
- Do not ever leave your child alone or home, even for a moment.
- Always use the manufacturer supplied handset battery: If the battery is damaged, it is to be replaced by the manufacturer, its customer service assistance or people with similar qualifications, to avoid any danger.
- For the best use of your Babyphone and in order to limit any interference, we recommend that you do not plug other electrical devices into the same outlet that is connected to your Babyphone (do not use a multiple socket outlet).
PRECAUTIONS
- Only use the adapters included. Use of any other adapter may damage the Babyphone Touch Screen.
- When not using the Babyphone Touch Screen for a period of time, remove the battery from the receiver to prevent damage caused by battery leakage.
- Unplug the AC adapter from the wall socket when the Babyphone is not in use.
- Best performance of the Babyphone Touch Screen is obtained within a temperature range of -9^ and +50^ .
-
Do not expose the Babyphone Touch Screen to direct sunlight for a long period of time and do not place it near a heat source, in a humid or excessively dusty place.
-
Do not disassemble the device: it does not contain any parts that can be used separately.
-
Electric and electronic devices form part of separate waste collection. Do not dispose of electrical and electronic devices with assorted municipal waste, but perform separate waste collection.
-
Within the European Union, this symbol indicates that this product can not be thrown in the garbage or together with household waste, but should be disposed of using the appropriate separate waste collection.
STANDARD ACCESSORIES
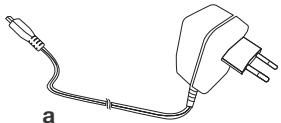
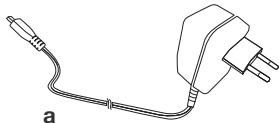
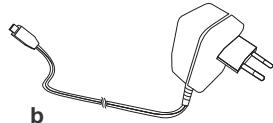
a. AC adapter 5V (transmitter)
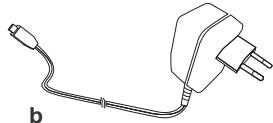
b. AC adapter 5V (receiver)
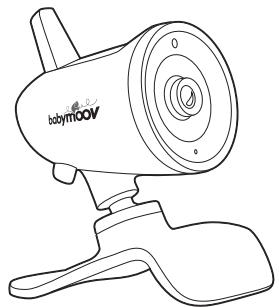
c. Transmitter
d. Receiver
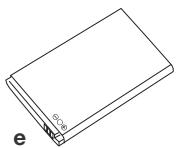
e. Rechargeable 1200mAh lithium polymer battery
f. Instructions for use
C
d
f
CONTROLS
TRANSMITTER
- ON/OFF LED
- Nightlight
- Brightness sensor
- Sensitivity microphone
- ON/OFF button
- Mic-USB port
- Temperature probe
- Synchronisation button
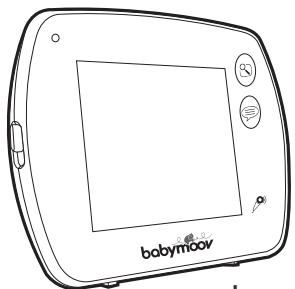
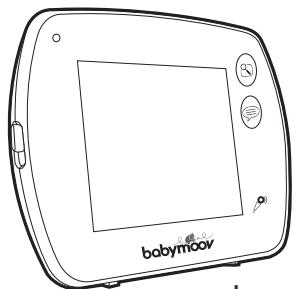
RECEIVER
- Selector block for the touch screen
- LED: green, the receiver is on, red, the receiver is in charge
- LCD touch screen
- Power Button
- «Menu» Button
- «Answering the baby» Button
- Microphone
- Micro USB output and power connection
SCREEN
a. Video camera selection icon
b. Microphone sensitivity settings icon
c. Lullaby selection icon
d. «Auto Switch» icon
e. Temperature icon
f. Battery icon
g. Signal strength icon
h. Date and time display
i. Touch screen lock icon
J. TV output (PAL or NTSC) selection
- Micro SD Card Reader
- TV output (cable not included, available at http://www.babymoov.fr/sav-shop.html SAV)
- Speaker
- Antenna
- Synchronisation button
- Lithium Battery Compartment
icon
k. Photo/video folder icon
I. Icon information micro SD card
m. Motion detector activation icon
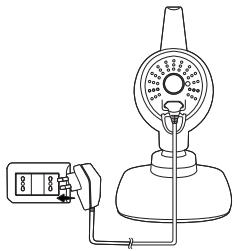
POWER SUPPLY
A/ TRANSMITTER
The transmitter operates on power. Connect the power adapter to the wall outlet.
B/ RECEIVER
1. Operation with battery supplied
The lithium polymer battery is already installed in the receiver. To replace the battery, unscrew the battery compartment cover (22), and remove the battery.
2. Charge the battery with the AC adapter
When your receiver's battery runs down, use the mains power adaptor (included) to recharge it.
Wait 10 minutes before using your babyphone.
When the battery is fully charged, the red light will turn green.
NB. Prior to first use, charge the lithium polymer battery for at least three hours. It is recommended that the device be turned off during the first charge.
NB. To ensure longer battery life, wait for the battery to fully discharge power before recharging.
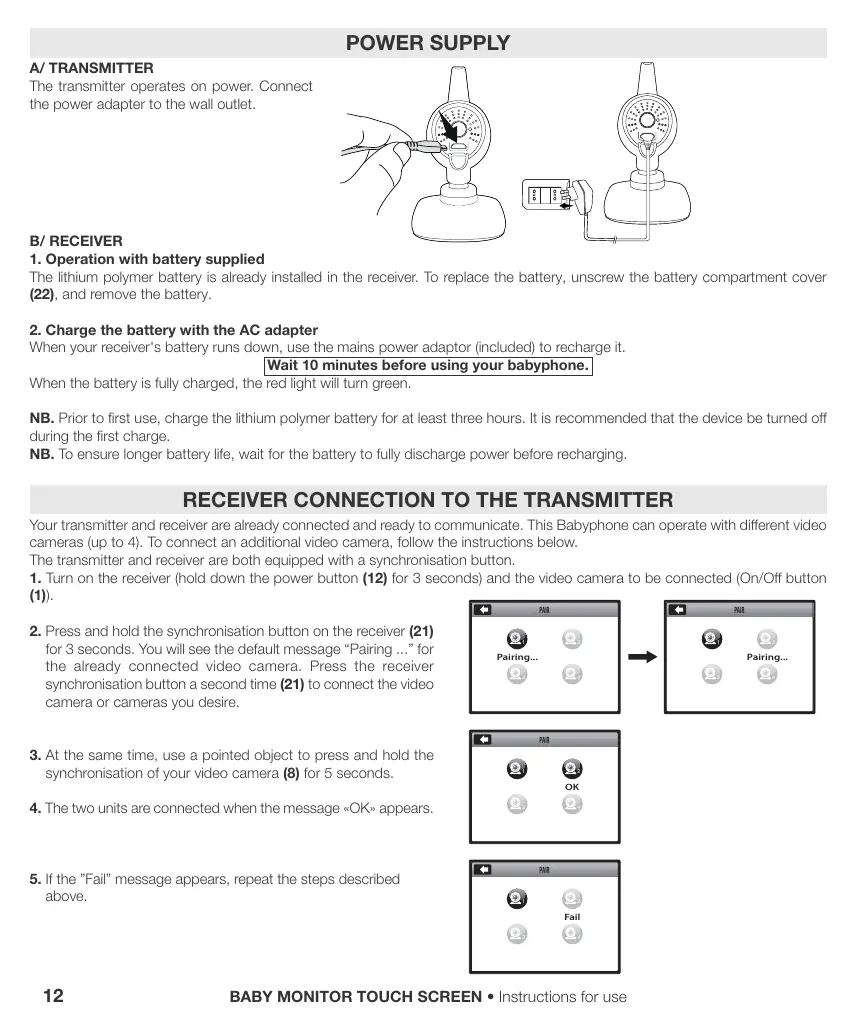
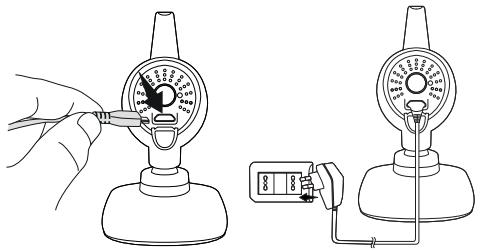
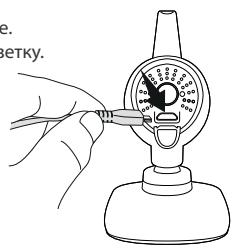
RECEIVER CONNECTION TO THE TRANSMITTER
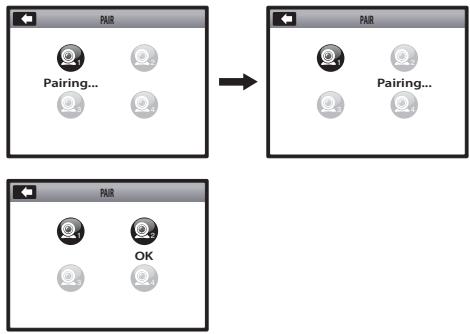
Your transmitter and receiver are already connected and ready to communicate. This Babyphone can operate with different video cameras (up to 4). To connect an additional video camera, follow the instructions below.
The transmitter and receiver are both equipped with a synchronisation button.
- Turn on the receiver (hold down the power button (12) for 3 seconds) and the video camera to be connected (On/Off button (1)).
- Press and hold the synchronisation button on the receiver (21) for 3 seconds. You will see the default message "Pairing ..." for the already connected video camera. Press the receiver synchronisation button a second time (21) to connect the video camera or cameras you desire.
- At the same time, use a pointed object to press and hold the synchronisation of your video camera (8) for 5 seconds.
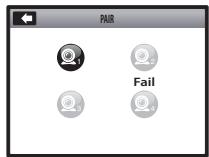
- The two units are connected when the message «OK» appears.
- If the "Fail" message appears, repeat the steps described above.
MICRO SD CARD
The micro SD card is not included. Photos and video functions, in addition to reading the menu, are not accessible.
Insert the micro SD card into the reader (17) until you hear a click.
Press on the micro SD card to eject it from the locking mechanism. You should hear a click.
TOUCH SCREEN
Hold down the power button (12) for 3 seconds and then press the «Menu» key (13) to access the main menu. If you wish, you can lock the touch screen by moving the switch block (9).
WALKIE-TALKIE
This Babyphone is equipped with a function "Answering the baby", which enables parents to talk to their children. This function can only be activated when the screen displays the image of the child. Press and hold the "Answering the baby" (14) and speak into the microphone (15). Your voice will be broadcast through the loudspeaker (7). To listen to your baby, release the button "Answering the baby" (14).
LANGUAGES
The default language is English. Available in 5 languages: FR, EN, DE, NL, ES. To select your language, follow the instructions below:
- Press the "Menu" button (13).
- Press icon
- Afterwards press icon Use the arrow «up/down» keys and select «Language».
- Finally, select your language from the 5 options.
MAIN MENU OPERATION (please refer to page 2 external flap)


A1. Setting the volume and screen features
Volume

/ Brightness

/ Contrast

Programming lullabies
B1. Connected video cameras are green. Unconnected video cameras are grey.
B2. Select one of 3 lullabies and sound level you desire.
Please note: the lullaby can also be activated through the touch screen, clicking on the lullaby icon (c).
Programming the night light
C1. Connected video cameras are blue. Unconnected video cameras are grey.
C2. ON

/ OFF

Video and photos Function / updating the micro SD card ATTENTION: A MICRO SD CARD IS REQUIRED!
D1. To capture an image, press icon

then the icon 101
| D2. To shoot a video, press the icon , and then icon . Press the icon again to end recording. Please note: the time and date can be displayed on your photos and videos by activating or deactivating the box. D3. : accessing the information on the micro SD card. D4 & D5. : access for formatting the micro SD card. | |
| E | Viewing photos and videos recorded ATTENTION: A MICROSD CARD IS REQUIRED! Files are sorted by date and time. Photo example: E1-E5 - Video example: E6-E10. E11. Two ways to delete your files: - holding down for a period of time in correspondence with the file to be deleted until a message appears on the screen. - viewing the photo or video and clicking icon |
| F | Display video camera mode 3 possibilities: F1. : in continuous mode, selecting the video camera desired. F2. : with the screen divided in 4. F3. : in scan mode «AUTO SWITCH», with video camera scrolling. Please note: the video camera display time can be selected for the menu's parameters |
| G | Programming the VOX function (voice activation) The VOX function can be enabled or disabled on the video camera desired. The microphone's sensitivity can also be adjusted: |
| H | Setting the parameters of the receiver and video camera(s) H1. : screen parameters H2 & H3. Date/Time Date and time settings. H4 & H5. Time Alarm Programming an alarm at a given time. H6 & H7. Auto Switch Time Selecting the video camera's display duration (5 s, 10 s, 30 s or 1 min). Ability to select the video camera(s) desired. H8 & H9. TV Out Format Selecting the TV out format: PAL (EU) o NTSC (US). H10 & H11. Recording Schedule Programming a video recording at a specific time: ON / OFF |
H12 & H13 & H14. Zoom
Zoom 10 × function by clicking on + or - on the screen.
H15 & H16. Video Off Timeout
Screen stand-by (from 5 s to 180 s).
Please note: this mode is not available when the VOX function is activated.
H17 & H18. Touch Panel Calibration
To calibrate your touch screen, touch the centre of the cross exactly at the point where it appears on the screen in all 4 positions, otherwise the tests will continue.
H19 & H20. Language
Available in 5 languages.
H21 & H22. Motion Detection
Programming the detection of movement.
- Activating the motion detection function: ON

/ OFF

- Motion detector sensitivity settings:


- Activates a default video recording

Selection of recording time (5 s to 1 min).
ATTENTION: A MICROSD CARD IS REQUIRED!
- Alarm activation: ON

/ OFF

Please note: this alarm can be used without a micro SD card.
H23 & H24. USB Output
2 possibilities:
- D : charging the receiver battery.
- : data transfer of pictures/videos to computer (cable not included).
ATTENTION: A MICROSD CARD IS REQUIRED!
H25 & H26. Micro SD Card Update
Updating the micro SD card.
H27 & H28. Reset To Factory Default
Resetting the settings.
H29 & H30. About & Version
H31. : video camera parameters
Unconnected video cameras are grey.
H32 & H33. Temperature/Alarm
to display arrows up/down. Adjust the desired temperature range. Outside this field
an audible alarm will be activated.
- Temperature alarm: ON / OFF
- Select alarm time repetition (5 s, 10 s, 30 s, 1 min)
H34 & H35. Volume
- Volume from 1

to 6

TROUBLE SHOOTING TABLE
| Problem | Possible Causes | Solutions |
| • No audio or video signal is transmitted. | • The microphone's sensitivity is too low. • The mains adapter is not connected correctly to the transmitter. | • Increase the microphone's sensitivity by means of the adjustment system. • Verify the connection. |
| • Permanent transmission. | • The microphone's sensitivity is too high. | • Diminish the microphone's sensitivity by means of the adjustment system so that the transmitter is activated by the voice. |
| • Alarm out of range permanently activated. | • The distance between the transmitter and the receiver exceeds the range of action. | • Bring the receiver and the transmitter closer together. |
| • The image on the screen is not homogeneous or is fixed or appears in black and white. | • The limits of the range of action have been reached. • The light intensity is too weak in the baby's room; the unit functions in night vision mode and so uses the infrared LEDs as lighting source. | • Move the receiver closer to the camera. • Increase the light in the baby's room. |
| • Lots of static noise and interference. | • The transmitter is placed beside other electric appliances. | • Remove the electric appliances or the transmitter to remove the source of interference. |
| • Range of action too small. | • There must be a lot of partitions between the receiver and the transmitter. | • Move the transmitter and the receiver. |
BENUTZUNGSANLEITUNG
VOORZORGSGMAATREGELEN
H17 & H18. Calibrazione schermo tattile (Touch Panel Calibration)
MEPbI PPEIOCTOPOXHOCTN
IcNOnb3yTe TOnBko CeKtOpHbIe aJaTOpBi, KOTOpBie BXOJrT B coCTaB. IcNOb3oBaHne dpyuNx aJaTpeOB MOKeT IcNtOPTMb radioHOHAno Touch Screen.
Korda Bbl He nonb3yeteb padnoHRee Toush Sceen B TeueHHn Dolrro TepnoDa, Bblte6aTapeu 13 pnpemHnKa, UTO6bl 136ekat npoteKaHHn 6aTapeN.
-OTKIIIOUHTe ceKTOpHbI aIaITeP u3 pa3ETKn, KOrDa Bbl He noJIb3yeTecb paIIOHJHeI.
-Радионян Touch Screen pa60aet lyuwe npi TemnepaType Mekdy -9°C n + 50°C.
- He bǐctánbārǔn ā, pìoǎonjīntēbǐhǔm ǒbpa3OM, pádniOHOu Touch Screen Ha npiàMbte coJHneHbIe lyu n H ne NòmeaJIaTe ee prAOM C nCTOUYHKOM Teŋla n nn BO BλaJxHyU, n nn OueH bǐjlbHyO KOMHaTу.
- He pa3bnpaIte annapat: OH He cOepeKnT HN OJHOH NHyKHOI DeTaN, KOTpyIO MOXHO 6bIJO 6bl INCNOB3OBaTB INbIM 06pa3OM.
- 3NeKtpnueckne n 3NeKtpoHHbIe 06OpdyOBaHnRA BJIaOTcR npdMetom n3bIpateNbHorO c6pa. He n3abJAAntecb OT xTOxOdB 3NeKtpnuecknx n 3NeKtpoHHbIX 06OpdyOBaHn C He copTepyEmblIMu MHyHUnPnaBbHIMn OTXODAMn, a pInCTyINTE K n3bIpateNbHOMC6OpY.

- TOT CMBON yka3bAe chepe3 Ebponeckn Co03, YTO TOT TOBAP He NOJIXeB 6bITb BbIbPOUeHHbIM B yPHy IINb 6bITb CMEUSAHbIM C XO3JICTBEHbIM MycOpAM, a DOJIXeBbITb JIJIaTbCpnpMeTOM KOLNEKTHBORO C6OpA.
CTAHДAPTHbIE KOMПЛЕКТУЮШЕ ПИНHAДLEЖHOCTN
a. CeKTopHbI aanTep 5 V AC (nepeDaTUnK)
b. CeKTophbl aadantep 5 V AC (npneMHnK)
c.Передатчн
d. Пиемнik
e.Литnevвая-Полимернaya 6atapeя,песаражамая 1200 mAh)
f. INHCTpykuzno NO ICSNoJIb3OBAHnIO

C
d
f
MEXAHIN3MbI YIPABJIENIA
NEPEDATYIK
- BbIKJIIOUaTeIb ON/OFF
2.HouHnK
3.ИндікатopOCBseцhenHOCTN - Minkpooh ToHocTN
- Khonka ON/OFF
6.Bxo-USB - KotpoB temnepaIypbI
8.KhONka cHxpoHHaUIN
ПРИЕМнИК
- KhoNka 6IokupOBKn TaKTnIbHOrO 3KpaHa
- LED (CBETOДо): 3elenHy-npniemHNK BKNJIoEN, KpaCHbI-pnHmMNH HAXODITcN Ha 3apJaKe
11.CehcOpHbIyKpaH LCD - Khonka BkIoueHnA
- KhoKa « MeHIO »
-
KhoIIka « OTBeTntb pe6eHky »
15.Minkpooh
16.BXoM MKNpo USB nIPOKJIIOUeHne 3JIeKTPocetn -
UCTPOINCTBO CHTBIBAHNNEpOkaPTbMIKpOfoHa SD
- Bxod TV (ka6eBHe npedocablen, doctyneHa caite SAV http://www.babymoov.fr/sav-shop.html)
19.Грмогоровптуль
20.AHTeHHa
21.Khonka cunxpoHn3aun
22.Отдение Литnevов 6атAPEN
OKPAH
a.N3o6paXeHHe BbI6opa KaMepbl
b.ИЗбрахеоне ретулроваяня
ТочноTN MKNpoФОha
c.ИЗбрахе"Hne ВьБбора Колыбельноi
d.ИЗбрахенье « Auto Switch »
e.N3o6paXeHne TempeaTpybI
f. N3o6paXeHne 6aTapei
g.N3o6paKeHne MoUHocTn CnHaHa
h. Poka3aTeJIb daTbI bPemeHn
i. N3o6paXeHne 6nOKnpOBKn TaKtINbHOrO 3kpaHa
j.Изобрахени Вьбopa Вьхoga ДЯ TV (PAL UNI NTSC)
K.ИЗбрахени паши
фотогрфи/Nвдево
I.N3o6paJeeHne INHΦopMaUIN MKNpO KapTb1 SD
m.ИЗбрахениakтINBn3aци DeTEKTopaДВИЖЕнЯ
ПИТАНЕ
A/IIPEPDAUHK
IpepaTUnK fHyHKUHOHpyeT Ha ceKtope.
IopKJIouHt e aanTep Ha cekTopHyu pa3eTKy.
B/TPNEMHVK
1.Функунонуетсбатаер,КOTOPАВXOДNTВCOCTAB.
JIITnEBAI-ONIMepHAA6aTapey yXe HaxoDntcB INpneMHNke. YTo6bI NOMEHrB 6aTapeO, OTKpoTe OTBePte (22), BbIHbTe 6aTapeO.
MnKpo KapTa SD He BxOaTb CoCTab. OyHKmI FOToRpaHm I BnDeo He DocTyNbl.
BCTaBbTe MmKpo KapTy BD CcHTbIbAIOoee yCtpoiCTBO (17)doTOrKaK yCblIwnte IeIeuok.
Haxmte Ha mKpO KapTy SD, yTo6bI BbTaunTb n3 MexaHn3Ma 6nOKnpOBKn. BbldoJXbI yCbIwaTb eJenQok.
TAKTNbHbI 3KPAH
Hakmnte 3 cekyndbHa KhoNky BkIIOueHnra (12).3aTeM hakmnte Ha KhoNky MeHIO (13) UTO6bBoITB rnaBHOe MeHIO.
YBaC eCTB 03MOXHOCTb 3a6bLOKINPOBA Tb NHTaTKnHbNkKpaH, npeMeuza KhoNky 6loKINPOBKN (9).
PALUN
37a paIIOHnRA CHa6KeHa 0yHcMEn « OTBetNTb pe6EHKy» : OHa nO3BOJnET pOJITENm PA3ROBAPuBaTb C INx pe6EHKOM. 3Ta 0yHcNIA MOKET 6bITB BKNUeHa, TOnBJKO KOrJa I3o6paxHe Baaero pe6EHKa NORBAETc H A3KpaHe. 3aDePjXITE HAXATOI KHONKY « OTBetNTb pe6EHKy » (14) TOBOPrte B MkPcofoh (15). BaB roNoC 6yEdt yCbluH e B rPOMKOrOBOpTeIN (7). OTnyCTne KHNKy «OTBetNTb pe6EHKy » (14), UTO6bI cnuuA bAaero pe6EHKa.
3bIKN
3bIK aHfNcKNI. 5 BO3MOxNbIX 3bIKOB: P , AHII, HEM, ICN, HINDEPI. YTO6bl B16paTb 3bIK, NOCTyNTe CNeDyUOUM O6pa3OM:
- Haxmte Ha KhoNkY « MeHIO» (13).
2.HaXMMTeHa n3o6paXeHne - Haxmte 3aTeMa n3o6paKeHne
4.3aTe Bb6epnte Baaw 3bIK cpei5 npdeIOxEHHbIX.
MoUHOCTb /OcBeueHHOCTb

/KoHTpaCT


PporpaMmpoBaHne KOnbl6eJbHbIX necen
B1. PodkIIOUeHHbIe KAMepbI ropT 3eJIeHbIM. He podKIIIOUeHHbIe KAMepbI ropT cepbIM.
B2. BbIbIpuTe OndHy n3 KoJIbIeJIbHbIX neCen H ypoBeHb JKeJaemoro 3Byka.
PnmueyHne:BbTakKeMoKTeaKTINBnIPOBaTbKoJIbIeBHyIO neCHIO TAKTNbHOrO 3KpaHa,HaXIMaHa n06paJcHHe KOnIbIeBNaJ (c).

PporpammpoBaHne HouHnka
C1. PodkIyueHbIe KaMepbl roprt roIy6bIM cBeTOM. He podKJIyueHbIe KaMepbl roprt cepblcBETOM.

C2.ON /OFF

D
H17 & H18. Calibrarea ecranului tactil (Touch Panel Calibration)
H32 & H33. Alarm temperature (Temperature/Alarm)
-Wybrac ^ C lub ^F

- Klikné na ikone

- Alarm temperature: ON

- Temperature alarm: ON

/ OFF

- Valg af gentagelssesinterval for alarmen (5 s, 10 s, 30 s, 1 min)
H34 & H35. Volumen (Volume)
- Volumen fra 1

til 6

GUIDE TIL FEJLRETTELSER
SAFETY: EN 62311:2008
EN 62471
EC DECLARATION OF CONFORMITY
Babymoov
Declare that the following product(s):
Model: Babyphone Touch Screen
Reference: A014411
Model: JY357T
is in conformity with the following relevant harmonised:
EMC: EN 301 489-1 V1.9.2
EN 301 489-17 V2.2.1
RF: EN 300 328 V1.8.1
Following the provisions of Council Directive 99/05/CE on radio equipment and telecommunications terminal equipment and the mutual recognition of their conformity.
Name: Mr Laurent Windenberger
Title: Marketing Manager
Signature:
Date: 21/10/14