AKR809MR - Basket WHIRLPOOL - Free user manual and instructions
Find the device manual for free AKR809MR WHIRLPOOL in PDF.
| Product type | Wall-mounted kitchen hood |
| Brand | Whirlpool |
| Model | AKR809MR |
| Installation | Exhausting or recirculation (with optional charcoal filter) |
| Filters | Washable metal grease filter (monthly); activated charcoal filter (optional, replace every 3 years) |
| Controls | 4 buttons: lighting on/off, motor on/off, speed selection minimum, intermediate, maximum |
| Lighting | Fluorescent lamp (replacement by after-sales service) |
| Motor | Integrated motor, 3 suction speeds |
| Power supply | 220-240 V, 50 Hz (check rating plate) |
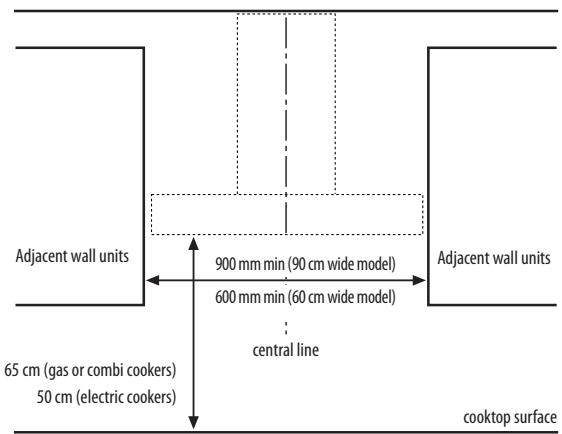
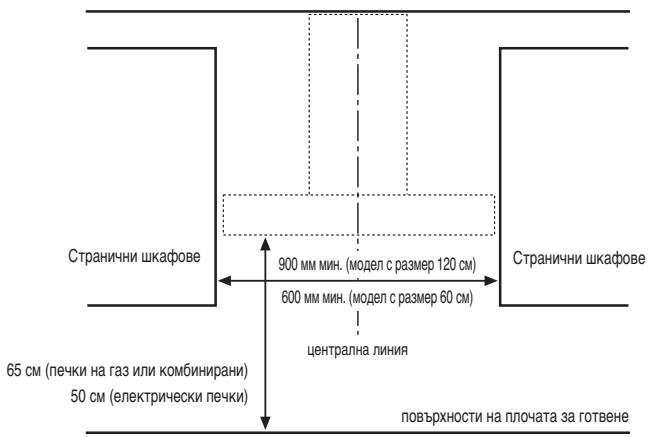
| Minimum distance from cooking surface | 50 cm for electric hobs, 65 cm for gas or mixed hobs |
| Maintenance | Clean surfaces with damp cloth and mild detergent; wash grease filters monthly; replace lamp by after-sales service |
| Safety | Unplug before maintenance; do not use without filters; do not touch hot lamps |
| Repairability | Original spare parts; repairs by authorized after-sales service |
| Disposal | Do not dispose with household waste; follow local regulations for WEEE |
Frequently Asked Questions - AKR809MR WHIRLPOOL
User questions about AKR809MR WHIRLPOOL
0 question about this device. Answer the ones you know or ask your own.
Ask a new question about this device
Download the instructions for your Basket in PDF format for free! Find your manual AKR809MR - WHIRLPOOL and take your electronic device back in hand. On this page are published all the documents necessary for the use of your device. AKR809MR by WHIRLPOOL.
USER MANUAL AKR809MR WHIRLPOOL
IMPORTANT INSTRUCTIONS FOR SAFETY
YOUR SAFETY AND THAT OF OTHERS IS HIGHLY IMPORTANT.
This manual and the appliance itself provide important safety warnings, to be read and observed at all times.

This is the attention symbol, pertaining to safety, which alerts users to potential risks to themselves and others.
All safety warnings are preceded by the attention symbol and the following terms:

DANGER:
indicates a hazardous situation which, if not avoided, will cause serious injury.

WARNING:
indicates a hazardous situation which, if not avoided, could cause serious injury.
All safety warnings specify the potential danger/warning to which they refer and indicate how to reduce the risk of injury, damage and electrical shock resulting from incorrect use of the appliance. Comply with the following instructions:
Installation or maintenance must be carried out by a specialized technician, in compliance with the manufacturer's instructions and local safety regulations. Do not repair or replace any part of the appliance unless specifically requested in the user manual.
The appliance must be disconnected from the power supply before carrying out any installation work.
- Earthing of the appliance is compulsory. (Not necessary for class II hoods identified by the symbol on the specifications label).
- The power supply cable must be long enough to permit connecting the appliance to the mains socket outlet.
- Do not pull the power supply cable in order to unplug the appliance.
The electrical components must no longer be accessible to the user after installation.
- Do not touch the appliance with any wet part of the body and do not operate it when barefoot.
This appliance may be used by children older than 8 years of age and by persons with reduced physical, sensory or mental capacities or with inadequate experience and knowledge only if they are supervised or if they have been taught how to use the appliance in conditions of safety and if they are aware of the dangers involved. Children must not play with the appliance. Cleaning and maintenance must not be carried out by children, unless they are supervised by adults.
- Do not repair or replace any part of the appliance unless specifically indicated in the manual. Defective parts must be replaced using genuine parts. All other maintenance services must be carried out by a specialized technician.
Children must be supervised to ensure they do not play with the appliance.
- When drilling through a wall or the ceiling, pay attention not to damage electric connections and/or pipes.
The ventilation ducts must always discharge to the outside.
- Exhaust air must not be vented through a flue used for removal of fumes produced by appliances burning gas or other fuels, but must have a separate outlet. All national regulations governing extraction of fumes must be observed.
If the hood is used together with other appliances operating on gas or other fuels, the negative pressure in the room must not exceed 4 Pa (4 x 10⁻⁵ bar). For this reason, make sure the room is adequately ventilated.
- The Manufacturer declines any liability for improper use or incorrect setting of the controls.
- Regular cleaning and maintenance is essential to correct functioning and good performance of the appliance. Frequently clean all encrustations from dirty surfaces to prevent the accumulation of grease. Regularly clean or replace the filters.
- Failure to observe the instructions for cleaning the hood and replacing the filters may result in a fire.
The fume extractor hood must never be opened without the grease filters installed and it should be kept under constant supervision.
Gas appliances must be used under the extractor hood only with pans resting.
- When using more than three gas cooking points, the hood should be operating at power level 2 or greater. This will eliminate heat congestion in the appliance.
Before touching the bulbs, first ensure that they are cold.
- Do not use or leave the hood without its lamps correctly installed - risk of electric shock.
- Wear work gloves for all installation and maintenance operations.
The product is not suitable for outdoor use.
- When the hob is in use, accessible parts of the hood may become hot.
Scrapbing of household appliances
This appliance is manufactured with recyclable or reusable materials. Dispse of it in accordance with local waste disposal regulations. Before disposing of it, make it unusable by cutting off its power supply cable.
- For further information on the treatment, recovery and recycling of household appliances, contact your competent local authority, the collection service for household waste or the shop where you purchased the appliance.
KEEP THESE INSTRUCTIONS
INSTALLATION
After unpacking the appliance, check for any damage caused during transport. In case of problems, contact the dealer or the After-Sales Service. To avoid any damage, it is advisable to only remove the appliance from the polystyrene base just before installation.
PREPARATION FOR INSTALLATION

WARNING:
this appliance is heavy; the hood should only be lifted and installed by two or more people.
The minimum distance between the cooking pan support on top of the cooker and the bottom of the hood must not be less than 50~cm for electric cookers and 65~cm for gas or mixed cookers.
Before installation also check the minimum distances stated in the manual of the cooker.
If the installation instructions for the cooker specify a greater distance between cooker and hood, this distance must be observed.
ELECTRICAL CONNECTIONS
Make sure the power voltage specified on the appliance rating plate is the same as the mains voltage.
This information may be found on the inside of the hood, under the grease filter.
Power cable replacement (type H05 VV-F 3 x 0.75 mm²) must be carried out by a qualified electrician. Contact an authorized service centre.
If the hood is fitted with an electric plug, connect the plug to a socket complying with current regulations, located in an accessible place. If no plug is fitted (direct wiring to the mains), or if the socket is not located in an accessible place, install a standardized double pole power switch that will enable complete isolation from the mains in case of category III overvoltage conditions, in accordance with wiring rules.
GENERAL RECOMMENDATIONS
Before use
Remove cardboard protection pieces, transparent film and adhesive labels from accessories.
Make sure the appliance has not been damaged during transport.
During use
Do not place weights on the appliance, as they could damage it.
Do not expose the appliance to atmospheric agents.
SAFEGUARDING THE ENVIRONMENT
Disposal of packing
The packing material is 100% recyclable and is marked with the recycle symbol . The various parts of the packing must be disposed of responsibly and in full compliance with local authority regulations governing waste disposal.
Disposal of the appliance
This appliance is marked in compliance with European Directive 2002/96/EC on Waste Electrical and Electronic Equipment (WEEE).
- By ensuring that this appliance is disposed of correctly, you can help prevent potentially damaging consequences for the environment and health.
The symbol on the product or on the accompanying documentation indicates that it should not be treated as domestic waste but must be taken to an appropriate collection centre for the recycling of electrical and electronic equipment.
TROUBLESHOOTING GUIDE
The appliance does not work:
- Check the domestic power supply and ensure the appliance is connected to the mains properly.
- Switch the hood off and then on again to see if the problem has been resolved.
The hood is not extracting satisfactorily:
- Check the extraction speed is set to the desired level;
Check the filters are clean;
Check the air vents are not blocked;
The light does not work:
- Check to see if the lamp needs replacing;
- Check to see if the lamp has been fitted properly;
AFTER-SALES SERVICE
Before calling the After-sales Service:
- See if you can solve the problem yourself with the help of the "Troubleshooting guide".
- Switch the hood off and then on again to see if the problem has been resolved.
If, after the above checks, the problem persists, contact your nearest After-sales Service.
Always provide:
a brief description of the problem;
the type and specific model of the appliance;
the Service number (this is the number which follows the word SERVICE on the dataplate), inside the appliance. The Service number is also printed on the warranty booklet;
- your full address;
- your telephone number;
SERVICE 0000 000 0000

If any repairs are needed, contact an authorized Service Centre (to ensure that only original spare parts are used and that repairs are made correctly).
CLEANING

WARNING:
- Do not use steam cleaners.
- Disconnect the appliance from the power supply.
IMPORTANT: Do not use corrosive or abrasive detergents. If any of these products accidentally comes into contact with the appliance, clean it immediately with a damp cloth.
Clean the surfaces with a damp cloth. If very dirty, add a few drops of washing up detergent to the water. Dry with a dry cloth.
IMPORTANT: Do not use abrasive sponges or metallic scrapers or scouring pads. Their use could eventually ruin the enamelled surfaces.
Use specific detergents to clean the appliance and follow the manufacturer's instructions
IMPORTANT: Clean the filters at least once a month to remove built-up oil and grease.

CAUTION:
- use protective gloves.
- disconnect the appliance from the mains power supply.
GREASE FILTERS
Metal grease filters have an unlimited life and should be washed once a month either by hand or in a dishwasher at a low temperature and with a short cycle. Washing in a dishwasher can cause grease filters to turn white, but this in no way affects efficiency.
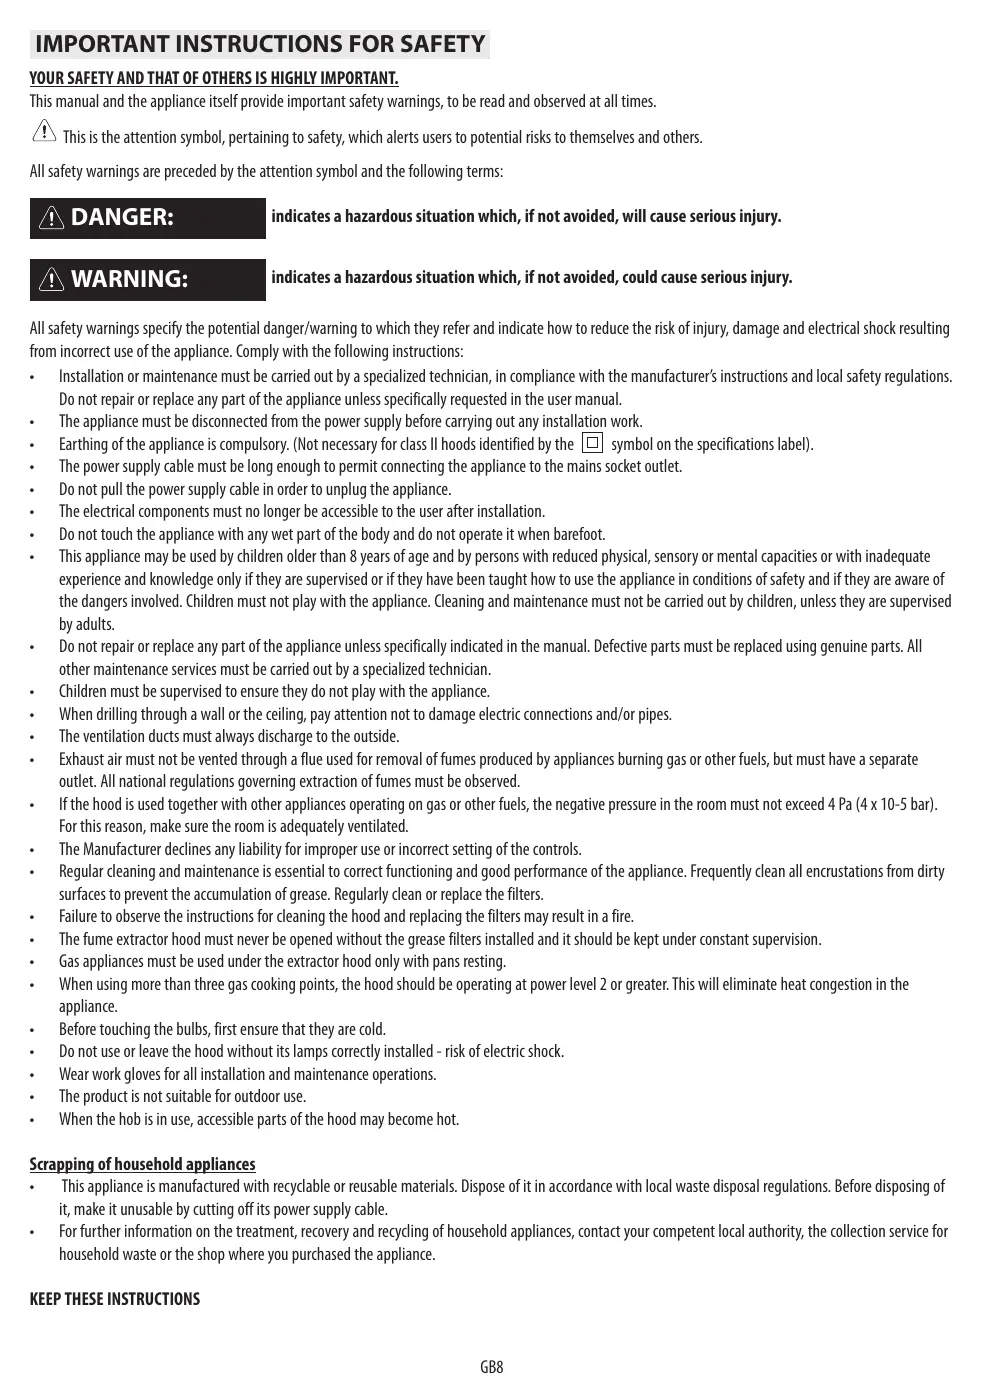
Pull out the handle to remove the filter.
Wash the filter and leave it to dry, proceeding in reverse order to refit it.
REPLACING THE FLUORESCENT LAMP
Contact the technical support service for replacements.
Note:
Should the fluorescent lamp suddenly switch off:
Press the Lights ON/OFF button, wait a few seconds and then press again.
ACTIVE CARBON FILTER
.filter hoods only):
The carbon filter must be cleaned once a month in a dishwasher at the highest temperature, using a normal dishwasher detergent. Wash the filters on their own.
After washing, reactivate the carbon filter by drying it in the oven at 100^ for 10 minutes.
Change the carbon filter every 3 years.
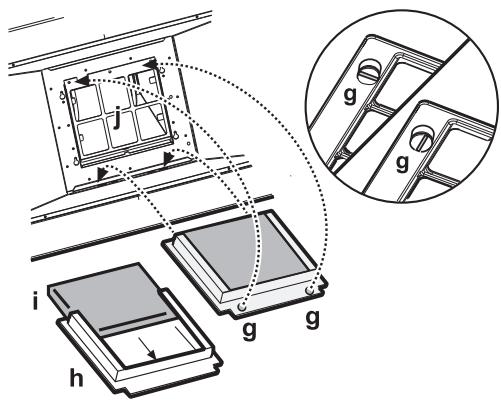
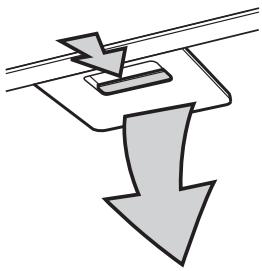
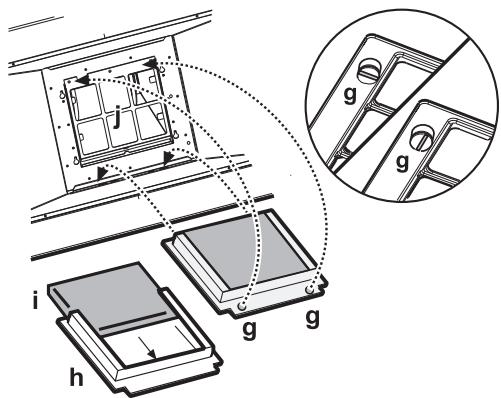
Fitting the carbon filter:
- Remove the grease filter.
- Turn the side knobs 90^ and then remove the filter holder "g".
- Fit the carbon filter "i" in the filter holder "h".
Reverse the above procedure to refit the filter holder and grease filter.
MATERIAL SUPPLIED
Remove all the components from the packets. Check that all the components are included.
- Hood assembled with motor, lamps and grease filters installed.
- Instructions for assembly and use
1 collar
1 electrical cable
1 Assembly template
6 wall plugs 0 8 mm - 6 screws 0.5 × 45
1 cable clamp
1 screw 0 3.5 x 9.5
1 Flue support bracket
1 deflector
2 screws 2.9× 6.5
2 screws 03x9
INSTALLATION - PRELIMINARY ASSEMBLY INSTRUCTIONS
The hood is designed for installation and use in "Extractor version" or in "Filter version".
Note: The model with electric shutter can only be used in "Extractor version" and the exhaust pipe must be connected to a peripheral extraction unit.
Extractor Version
Fumes are extracted and expelled to the outside through an exhaust pipe (not supplied) fixed to the hood exhaust pipe connector. Depending on the exhaust pipe purchased, provide for suitable fixing to the exhaust pipe connector.
IMPORTANT: If already installed, remove the carbon filter/s.
Filter Version
Air is filtered through the carbon filter/s and recycled into the surrounding environment.
IMPORTANT: check that air recirculation is facilitated.
If the hood does not have a carbon filter/s, order one/them and fit it/them before use.
Install the hood away from very dirty locations, windows, doors and sources of heat.
The hood comes supplied with all the materials required for installation on most walls/ceilings. However, a qualified technician is needed to make sure that the plugs are suitable for your ceiling.
INSTALLATION DIMENSIONS
INSTALLATION - ASSEMBLY INSTRUCTIONS
The instructions below, to be carried out in the order in which they are numbered, refer to the figures (with the same step numbers) given on the last pages of this manual.
Note: Some instructions differ depending on the hood body width and height, in which case installation differences are described both in the text and in the figures.
- Mark a line on the wall right up to the ceiling, corresponding to the centre-line of the hood.
- Cut the template along the line H6 or H10 (depending on whether the body of the hood you have purchased is 6 cm or 10 cm high) and attach the hole diagram to the wall (using adhesive tape): the vertical centre line printed on the hole diagram must match the centre line drawn on the wall, and the lower horizontal edge of the hole diagram must match the lower edge of the hood.
Drill a hole.
- Remove the hole diagram, and insert plugs and screws as shown.
- Partially tighten the screws
- Place the flue support bracket on the wall, against the ceiling. Drill and insert the wall plugs as indicated. Fix the bracket.
- For Extractor Version only - rear exhaust outlet: Make an opening on the wall for the exhaust pipe.
- For Extractor Version only - ceiling exhaust outlet: Make an opening in the ceiling for the exhaust pipe.
- Prepare the electrical connection to the mains power supply.
- For Filter Version only: Fix the deflector to the flue support bracket.
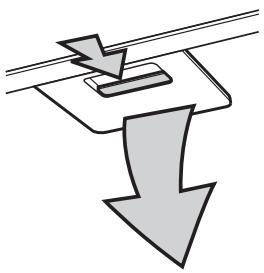
- Remove the grease filter/s.
- Remove the adhesive tape holding the control electronics box to the motor body.
Note: the figure is indicative only, the box may be temporarily fixed to other sides of the motor body.
- Hook the hood to the wall.
- Adjust the hood horizontally.
- Adjust the distance between the hood and the wall.
- Mark the hole/s for the final fixing of the hood as shown.
- Remove the hood from the wall.
- Drill and insert the wall plugs as shown.
- Rehook the hood to the wall.
- Fix the hood to the wall with screws as shown.
- Fix the collar to the exhaust outlet.
- Fully tighten the screws fixing the box to the motor body.
Note: the box is of two types, either front fixing or rear fixing. Follow the instructions in the figures (21a and 21b) depending on the model you have purchased).
22. Slide the power supply cable into its housing.
23. Secure the cable with a cable clamp.
IMPORTANT: It is essential to carry out this operation in order to avoid accidental disconnection of the cable.
Carry out the electrical connection to the mains power supply.
- Connect an exhaust pipe to the collar; the fumes must be ducted to the outside (extractor version) or towards the deflector (filter version).
- Fit the flues over the extractor unit, engaging them in their seat above the hood.
- Slide the top section upwards and fix the flues with the screws as shown.
- Fit the carbon filter (Filter Version only) andrefit the grease filter/s.
Check for correct hood operation, referring to the hood description and use section.
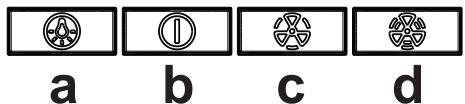
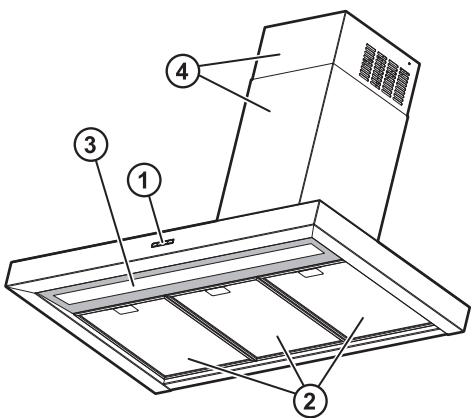
- Control panel.
- Grease filters.
- Fluorescent lamp.
- Telescopic flue.
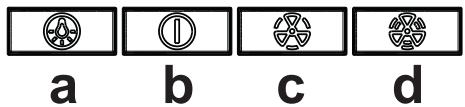
Control panel
a. Lights ON/OFF button
b. Motor ON/OFF and minimum speed (extraction power) selection button
c. Medium speed (extraction power) selection button
d. Maximum speed (extraction power) selection button
CONSIGNES IMPORTANTES POUR LA SÉCURITÉ DES PERSONNES
VOTRE SECURITE ET CELLE DES AUTRES EST UNPEPRIORITÉ
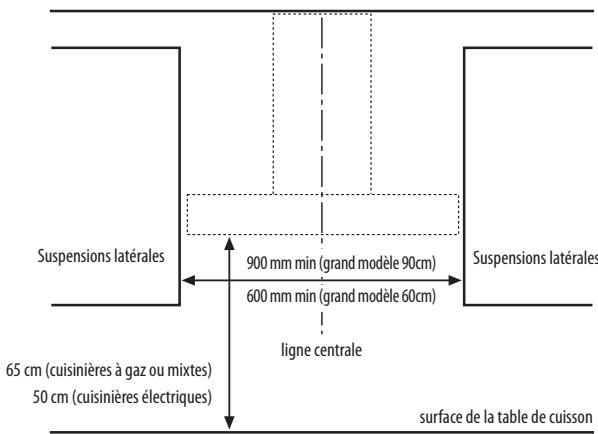
DIMENSIONS D'INSTALLATION
INSTALLATION - INSTRUCTIONS DE MONTAGE
GUIDA RICERCA GUASTI
UDSKIFTNING AF LYSSTOFRÖRET
MATERIAL WCHODZACY W SKŁAD ZESTAWU
3NEKTPWUECKOE NOIDKJIIOUCHENE
Y6eHntecb, cyo HaprrjEHe He TtAHn, yka3aHHoe Ha nacnpTHo TabmUe np60pa, cootBcTByeH naPrrJHIO cTeB B aWseM Dome.
3Tu INHOpMaunIO MOJHO HAHTN BO BHTpeHHe YaCTN BbITXKN NOD KINPOUYABIAUOM FInIbTpOM.
3aMeHa Ka6eI nHTAHn (TIna H05 VV-F) dOJxHa OcUeCTBnTbCra TOnbKO KBaIIuNpUOBaHHbIM 3JeKTPnKOM. 06paauTeCb B aBTOpn3OBaHHbI cepBnCHbI ueHtp.
EcnHa Ka6bI nHTAHnBaTJxKn UCTAHOBHeBA BnKa, noCDoeHNHee K po3eTKe 3eKTPoCtEn, COOTBeCTBTOUeJe DeiCTBTOUm HOpMaH uCTAHOBHeHnB DoCTynHom MeTe. EcnBnBnKa He yCTaHOBHeA (B Cnyae npAmOIO NKJIIOUeHnK CTu) INI pO3eTKa HaxOJTcB HNeOCTyHOM MeTe, Heo6xoIMo UCTAHOBt, cIeYI npABINAM 3eKTPoMOHTaKa, CTaNapTINpOBaHHb DByXNIOCHb BIKIOUaTeIb, o6ceNeuBAOUsI IOnHoe OToOEINHEne OT CTeN B YCNoBnx NpeHAprrKeHn KaTEROpnn III.
OBUIE PEKOMEHDAUIN
Ipeedncnolb30BaHneM
YdaJIte 3aunHbIe KapToHHbIe npokLnKn, npO3paHyIO pHeKHy I TKeTKn, HAcKHeHHbIe Ha npHaJdLnExKHOCTN.
Y6eIteCb B TOM, YTO BO BVpMa TpaHcnpTIpOBKn Pnp6Op He 6bl NOBpeXJdH.
BoBpemaNcNoIb3OBaHnna
He knaite Ha np6op TjxkeIbe npedMeTb, T.K. OHN MOyT nobpeiNb erO.
He donyckaite, tO6bI np60p noBepraCBA 03dEeCTBnO aTMoCΦpehbx ΦaKtOpOB.
PEKOMEHDAUINIPO3AUITEOKPYXAOUeI CPEdbI
Yttnn3aun ynaKOBkn
YnaKOBuHbI MaTePnHa 100% NoJNeXHT BToPnHoi nepepa6Ote, Ha yTo yKa3bIbAe COTBETCTBYUoiin CmBOn .Ha yNaKOBe. Pa3InuHbe YacTn yNaKOBKn HeJIb3a BbIbPaBt C bItobbIM MycOpom; OHI NoJNeXaT yTIN3aUIN B COBTBETCBN C HopMaTbAMn, yCTaHOBHeHHbIM MecThbIM BnactTM.
Ytunnaa npn6opa
-ДанhoeизделпимeETМаркИрOBКВ coOTBETCTBm c БрoneckоДиpeKТИВОY 2002/96/EC no ytIN3aUNI 3JIeKTPuYeCKORO I 3JIeKTPoHOrO obopydobAHn (WEEE).
06eCneuHnAaJyU yTuIN3aUIO daHnOro n3JeNIA, noIb3oBaTeNb cIocO6CTByET npEioTBpaueHIO nToeHuaJIbHbIX oTpuTaIbHbIX nocJeCTBn IAn OkpykaOuI epebl 3doOpOBbY qeNoBeKa.
- Cnmbon Ha n3dennn mnn B cnpboNDteHbON DOKyMEnHTaun, yka3bBaET Ha TO, YTO C 3TNm 3dennm HEB3 O6paAaTcK KAC C 06bUHBMn 6bTOBbIMN OTXoAMn. BmecTo 3TOrO, eero CLEyET CdaT B AABTOPIN3OBaHHb IyHK T pIeMKN 3NeKTpueCKORO N 3NeKTPOHNO 06OpyDobAHn JnnoCneDuYuSe yTuIN3aun.
ПОИСК И YYSTРАЕНЕ HENСПAPВHOCTЕN
Pp6op He pa60aet:
- Поверьтpe npabunbHocTьэкTpuecknx CoeINHeHи nHaJIuYne HapJxKeHnB CeTN.
BbKIOUHTe n CHOBA BkIOUHTe np60p, UTO6bl pOBepntb, He Ncye3HeTn HcnpaBHOCTb.
Ako acnnpaTopbT He acnnpupa DoctaTbHNo:
Ybepete ce, ye ckopocTHa acnnpupahe noidxogya;
Ybepete ce, ye chntpnte ca nctm;
YbepeTe ce, Ye n3xOdHnT OTBp He e 3anyuH;
Jaamnata he pa60Tu:
- PpOBepeTe dAJIH He e Heo6xOДIMo Da ce CmEH KpyuKkata;
- PpOBepeTe dAnI KpyUkAte a NocTabeHa npaBnHNo.
CEPBn3 3A IOdIPrbXKA
IpeDn da ce 6oAnte B CepBn3a 3 na npDpBkka:
- Поверете дали He в Бьз金融机构 Да пазштоп пооблесам Вьз онова Нунковотовete, опсань Глары "Отсторявache на Немправочи".
2.ИЗклочеураи ngвьклочеOTHOBO,3а ДИнITEДАЛ ИНЗпарВHOCТа ce NOТарЯ.
Ako cnei trohpnte npOBepKHe Hn3npaBHOCTTa ce noBtapra, ce o6aTe B hai-6bn3knpebp3a noDpBxka.
Iocouete:
KpaTKO OINICAHNE HA HEN3PpABHOCTTa;
TOUHINI MIOEHa ypeda;
cepBnHnH oHmep (t. e. Homepa cIeI yMATA SERVICE Ha tabenkata c daHH, KOaTO ce HAMIPA BbB BbTpueHocCTT ha ypeHa).CepBnHnT HOpemep nocOeH N B rapaHnOHHa t KaHHKka;
- PbJHnIcN aDpeC;
TelefoHHmCnHomep;
SERVICE 0000 000 0000

Ako e Heo6xOdIm pemOnT, ce 6bPheTe KbM yIbHOMoUe H cepBn3 3a noDpBkKa (3a da rapaHTnpaTe, ye 6bDaT n3no3BaHn opuHaHn pe3epBn qactn i peMOTht 6bDe n3Bbpue H npabInHO.
ПОЧИСТBAHE

PNEyPPEXDEHNE:
- He n3no3BaIte ypeDn 3a nouCTBaHecnapa.
-Изклювайура от eнектучесka мржka.
BAxHO: He n3non3BaIte KOpOzBHN mIa 6pa3uBHN npenapTu 3a nouchTbaHe. Ako TaKbB npoayKT clyaHOBnEe B KOHTAKT CypeDa, He3a6abHo nouchTe C bJaXHa KbPna.
IOnCTBaIte NOBpXHOCTe C BAnxHa Kbpna. AKe Te ca CnHIO 3aMbpeHN, IN3no3BaIte pa3TBop OT BOJa HJKO KaKN MmJeH npenapat. PnKluOHTe NoCTBaHETo CbC cyxa Kbpna.
BAXHO: He n3non3baine a6pa3nBn r6n, metanHn cTbprankn nn Tei 3a n3TbPKBaHe. C teueHne Ha BpeMeTo ynotpe6ata Ha taKnaBa cpeCTBa moKe da pa3pyu n cTbKnIoTO.
-Използайт eретаи 3a почствае, сецmaлно pa3pa6oTeHи 3a почствае на тakINBa урden, и сецьайе ИСТPyкципerte на пронзовпгеля
BAxHO: IooHCTBaIte fHHTpe IIOHe BeHNbX MeceHNO, 3a da OCTpaHraBe OCTaTbUte OT ONHO Ma3HHN.

ПЕДУПЕХДЕНЕ:
-излгдайтпрдамн рькавиц.
-иЗклоче урEDA от eнeКтчecKaтma Мржа.
ФИТРМ 3A MA3HINH
MetaHnT ΦnTbp 3a Ma3HHn HmA HeoRpaHueh JxHBOT n Tp6Ba Da ce N3MBA BeDhbK MeceHNO ha pKa INB CbDOMnHa MaunHa npn HcKa TeMnepaTpyn KpaTbK uKcbI. Pnpn N3MBAhe B
CbDOMJIHa MaIINHa fNITbPbT 3a Ma3HNIH MOKe Da cTaHe HEnpO3paeH, Ho HerOBaTcNoCo6HOCT 3a fNITpIPAHe NO HnKaKbB HaINH He Ce IpOMeH.
HaTnCHETe DpBxKkATA,3a Da nI3BaIITe fHnTbpa.
Cnei KaTo CTe IpomnInI OCTaBnIa Da I3CbXHe ΦNITbpa 3a Ma3HnH, DeIcTBaIte B o6pateH peI, 3a da ro MOHTnPATE OTHOBO.
3AMRAHA HA ΦΙΥΟPECUEHTHATA JIAMITA
3a 3amha ce cBbpxKe Te cbc cnjx6ata 3aTexnuecka noDpIbXka.
3a6eJexka:
BcnyaHa Bhe3aHnO n3KJIouBaHa hΦlyopeceHTHaT a lamna:
HaTnCHete 6yToHa 3a OcBteIeHneTe ON/OFF (BKJ./N3KJI.),I3uKaai Te HAKoKo cekyni n cnE ToBa r HaTnCHete OTHOBO.
ФЛТБСAKTUBEHВbJIIEH
(cam03aMoJeN CnHCTaJauZna 3aΦnTpuNaHe):
BbIeHOBnAT ΦJIITbPTr6Ba Da CE I3MnBA BeINbX MeceHNo B CbDOMnJIHa MaShnHa IIpi NO-BiCOKa TemnepaTpa, CuI3IOn3BaHe Ha HOpMaJIeH MmJIeH IIpeNaP 3a MaSHnHa.
PepnopbUba ce nIITbpt Da ce I3MnBa cAmOCToTEnHO.
CnE n3MmBaHTo Ha BbIeNoBMy HnTbp, ToI Tp86Ba Da ce n3cuyu Bbb FypHa npn 100°C 3a 10 MInyTu, 3a Da ce akTubnpoBtopHO.
CmeHnIeBbIeHOBnIaHbBaCEKn3roDnHn.
Montax Ha BbIneHOBn# hntbp:
- Cbane tbpa 3a Ma3HnHn.
- CbaJIeTe paMKaTa Ha 9nJIbTbpa, KaTo 3aBbPITHe Na 90^ IpbXkNte"g".
- NocTabete BbIeHOBnI nITbp "i" BbTpE B pAMKaTa 3a peryInpaHe Ha nITbpa "h". IV3IbIHeTe B o6pAteH peD, 3a da NocTabITE Ha MAcTo pAMKaTa 3a peryInpaHe Ha nITbpa H nITbpa 3a Ma3HHH.
ПРИJOXKEHIMATEPNAJI
V3BaTe TE BCNUKIN KOMNHOENTI OT ONAKOBKNTE. IPOBepe TdAJI N BCUKNKIN KOMNHOENTI cHaJIInCe.
- Acnnapotc mOnhtnpaH enEkeTpomToI uHCTaInpaHn KpyuKu nΦUntpn 3a Ma3HNH.
Ihctpykun 3a nHCTanlupaHe n ynoTpe6a
1CBbp3Baui npbcteh
1eIekTpueckn Ka6en
1 甲6JIOH3aMOHTax
6ДIO6eNa3aCTeHa08MM
6BnHTaC05x45
1 ka6eJHa cKo6a
1 BnHTc03,5x9,5
1 onopha nlaHka 3a KOMIN
1dEeKTop
2BnHTaC0,2,9x6,5
2BnHTac03x9
ИнhoeТАЛИРАЕ - ПЕДВAPITEЛПИ ИНСТPyКЦИ 3A MOHTAZ
Acnipatopbt e npoeKtnpaa 3a nHCTaIIpaae Hn30n3Bahe BbB "BapnaHT 3a acnpura" nn "BapnaHT 3a oJITpupeA."
3a6eJka: MoelbT c eIeKtpueckn BeHTn MOKe Ja pa60Tu CaMo BbB "BapnaHT 3a acnnpnpaHe", a Tpb6aTa 3a OTBeXdaHe Tp6Ba Da ce CbPke c nepuepno yctpoCTBO 3a acnnpnpaHe.
Bapnant3aacnpupahe
Iapnte ce BcMykbat n ce OTBeKdaT HaBbN PocpeiCTBOM OTBeKdaa TpB6a (He e npiloxea), KOaTO ce 3akpeiBa KbM CbeDInHtEHa H3XoDa Ha Bb3dYx Ha acnnapota.
B 3aBcImocT OT 3aKyIeHaT OTBxJaTa TpB6a, TpRbDa Na Ce npEbnDn IOxOJaCnTeMa 3a 3akpeBaHe KbM CbeHNHtEn Ha N3xoJa 3a Bb3dYx.
BAXHO:Ako mHa nHctaIIpaH eIN Hn NIOBEe BbIeNoBn fHNTpu, cBaTe rH.
Bapnnt 3a qnntpnpane
Bb3dyxbt ce qnItpnpa npn pIpeMnHaBaHe np3 BvIgHeNob qnItpb n cpeuKnpa B OkolnaTa Cpeda.
BAXHO:Поверете далп рсиркунацята на Вьздуха ce ИЗВьшва лесно.
Ako acnnpatopbT he e cah6dien c einn nnn noBce BbyIeNoBOnBn 0nItpn, Te Tp8Ba da ce npbTuAT mOHTnpaT npdeu H3nON3BaHe.
HCTaIpaHeTo Ha acnnpaTopa Tp6Ba Da ce n3BbPm Dalaue O tCINHO 3aMbpceHm MeCTa, pO3Opz, BpTn H3TOHmHa ToPInHa.
KbM acnnpatopbt ca npiloojehn BCUKN Heo6xodmIM MaTePnAa 3a HcTalnPanhe BbPxy no-tolmaTacCTeHN/TabAHn. Bce nak e heo6xodmo da ce o6bphete KbM KBaIINphiuapah TeHHNK, 3a da CE yBepNTe 3a roDIOHCTTA Ha MaTePnAInTE B3aBUCIMOCT OT TINa CTHe/TabAHn.
MHCTAJIAZNOHHI PA3MEPN
ИнhoeТАЛINРАЕ - ИНСТPyКЦИЗ 3A MOHTAZK
HnCTpykunite B uipobny pei, daen no-dony, ce OTHacr 3a fynypnte, KOITc HAMnPaT Ha NocneHaTa CtpaHua HA TOBa pBkoBoCTBO n Ca Cbc CbOTBeHTa Homepauna.
3a6eJka: HAnOHCTpyKUcIe pa3JIuHbAOT pa3MePnTe Ha ypeDa IIO OTHoSeHHe Ha shpHnHaT a II INCOUHHa T AINTO Ha acnPaTopa, KaTO B TaKbB cnyai pa3IKnTE B INCTaJImPahETO ca daDEHN B TEkCTa IIN HA fHyprnTe.
- HauerpTaIe IINHnO nTo cTeHATA Do TaBaHa, CbBnaJauaC cHeTpalHaTaNIIHnA.
2.ИзржeteшблonaВполиньтA H6 ИИнH10 (соред Ви cohнataHa TЯлOTоHa CBtBteHnmaModeHa acnpaTOp,КоToПrtexKaBaTe 6cmИIN10 cm)и noctabete cхemATAHa OTbOpHTe Bbpxy CTeHATA (ФИСИРаTEЯ CЛЕпЕнka):ВерТИКалHATAцENTpaIIHa LInHЯ,ОЗHAчЕHa Bbpyx CxemATA Ha OTbOpITE,ТрбБаДа CBBnADAcLInHЯ,OTбELЯЗHa CTeHATA,KATO pRnTOBAДOLHnR KpAHa CxemATAHa OTbOpTe Tp8Ba Da CBBnADAcDOLHnRaPb6HaacnnpaTopa.HanpabeteOTbop. - CbaneTe cXemata Ha OTBOpHTe, BKapaIte IIO6eINи BInTObe, KaKTo e IIOka3aHo.
- 3aBnHTe TaCTuH0
- Ioctabete onopHata PlaHka Ha KOMHa Ha CTehata, KOaTo Onpa B TabaHa. Ipo6nTe N BkapaTe JIO6eN B CTehata, KaKTo e NOKa3Ho. 3akpenete PnaHKata.
- Camo npu bapuahma c acnupupahe - 3aHno OTbexJaHa: Hanpabete OTbop Ha 3aHnata CTeHa 3a IpeMnHaBaHe Ha Tpb6aTa 3a OTBeJaHa.
- Camo npu bapuahma cacnupupahe - OTBexKaHe KbM TabaHa: HanpaBeTe OTBp Ha TaBaHa 3a IIpeMInHabA He Tpb6Ta 3a OTBexKaHe.
- IodrotBete Cbbp3BaHeTo cJeIeKtpnueckaTa MpeXa Ha doma.
- Camo npu bapuahma c pfumpupane: 3aKpeTne DeΦeNTOPa KbM OnpHata TnHaKa Ha KOMHa.
- CbaTe ΦnITbpa/ΦnITpnte 3a Ma3HnHn.
- Cbanelte IeneHKata, KOITa 3aKpENBa KytTAta 3a YnpabIeHne Ha eJekTKoHnKaTa H TaITo Ho eJekTKpOMotopa.
3a6eJkKa: fIpyaTe e uCTo OpiHtIpOBbUHa, KaTo KytTnTa MoE Ze 6bJe fIKCuPahBa PemEHNo Ha DpyTne CTeHn Ha KytTnTa Ha eEnKtpomOTopa. - 3akaeta acnnpatopa Bbpxy cehata.
- HubeiapaTe xOpI3OHTaIIHO acnIPAtoPA.
- Perynnpaite pa3ctoHneTo Ha acnPapota do ctehata.
- O3haute OTbopa/OTbopnta 3a OKohateneHIO qKncpaHe Ha acnnpaTopa, KaKTo e noka3aHo.
- CbaIeTa acnnpaTopo ot cTeHaT.
- Поби Te и В capaite Добели в сенота, Ккто e nokazho.
- 3aKaayete OTHOBO acnnpaTopo Bbpxy CteHaTa.
- 3aKpeneTe OKOHyATEJIHO acnnpaTopa KbM cTeHaTa C BuHTOBe, KaKTo e NOKa3aHo.
- 3aKpepeTe CbPb3Baunn PpbTcH KbM OTBopa 3a OTBeKaDaHe.
- 3aKpeTe KytTnA T C BnHToBete KOnTO Ca YaCTuHo OTBnHTeH, KbM TaIIO To Ha eJEnKTpOMToTopa.
3a6beneKka: KyTnTa MoKeJa 6bJe OTe EINH OT DBA TIna - C npeIHO IJN 3aIHO 3akpeIbAHe; CneIeBaIte INCTpyKcIITe Ha fIgypaTa (21a N 21b) BCbOTBcTCTBVe C MOeNa, KOJI To pIntexKaBaTe). - BkapaTte eIeKtpnuecknaKa6eB CbOtBeTHna KaHaN.
- OcnypeTe Ka6ena cpeu 3aTnckaHe.
BAxHO: Ta3n onepaunra Tp6Ba da ce n3IbIhN 3aIbIgnteHNo. Ta cnyxn 3a npedotbpaTbaHe Ha cnuyaHn npekbcBaHe Ha enektpueckna Ka6en.
V3nblHene Cbbp3BaHEno C eNeKtpuYeckKaTa MpeKa Ha Doma. - Cbpxte Tpb6ata 3a OTBexdane Ha m3napenra Ta KbM Cbbp3Baunia npcTeH; Tpb6ata N3n3a DnpeKTHo HABh (BapnaHT c acnpupaHe) nn KbM dephiektopa (BapnATc fnnTpupaHe).
- BkapaIte Tpb6nte B cboTBetHO rHe3No Haad acnnpaTopa, nIbTHo pInpIeHAni KbMa cnpnpaAsTa rpyna.
- ɪЗbaɪte rohpata qætɪ n ɜːkpeŋe Tpɒbɪne C bɪntəbete, kɑkTo e nɔkəzəHo.
-
NocTaBete BbIeHOBnA ΦIITbP (cAmO npN BaPn AHaTc a CΦIITpnpaHe) nMOHTnpaYte Ha MCTo ΦIITbPa/ΦIITpNTe 3a Ma3HNHn.
IpoBepete oynkunohnpaHTo ha aCnnapota, kaKTo e onncHO Ba p3dJa 3a onncAnHe n 3nOJ3BaHe Ha aCnnpaTopa. -
KomahДноТаБно.
- Φιπη 3a Ma3HΠΗ.
- ΜλογοεςζηθήλαΜηα.
- Teneckonuueh KOMH.
Komahno Tabno
a. BytoTH 3a OCBetIeHHeNTo ON/OFF (BKJI./M3KJI.)
b. BytoH 3a BKJI./W3KJI. Ha eIeKtpomotopa n I36upaHe Ha MInHMmaHa CKOpocT (MoUHOCT Ha acnnpupaHe)
c. Bytoh 3a n36mpahe Ha cpeHa ckopoCT (MoUHocT Ha acnnpupahe)
d. Bytoh 3a n36upaHe Ha mAKCImaJIHa ckOcT (MOUHcT Ha acnnpupaHe)