USER MANUAL PACW9HP WHIRLPOOL
6. TASTE 6TH SENSE (6. SINN)
Please ready all instructions carefully before using this product. When using this appliances, should always follow this instruction to reduce the risk of fire, electric shock, and injury to person.
Please keep this manual. If you deliver the appliance to other users, do handover this manual together.
These instructions shall also be available on website: www.whirlpool.eu.
SAFETY PRECAUTIONS
- The Installation and service/repair must be performed by a qualified technician, in compliance with the producer's instructions and following local safety norms. Do not repair or replace any parts of the appliance unless it is specifically written in the user instructions.
- Do not pull the power supply cord to remove it from the socket. Do not twist or press the power supply cord, and make sure it is not broken.
- Do not touch the power plug, circuit breaker and emergency button when your hands are wet.
- Do not insert your fingers or foreign substances into the air inlet/outlet of indoor&outdoor unit.
- Never block the air inlet or outlet of indoor and outdoor unit.
- Physically or mentally disabled people, children and people without any experience with the product are only allowed to use
the appliance if they have had specific training on how to operate the appliance by a person responsible for their security and well-being. The appliance is not intended for use by disabled people and very young children without supervision.
- Children should be supervised to ensure that they do not play with the appliance (including remote control).
- This appliance can be used by children aged from 8 years and above and persons with reduced physical, sensory or mental capabilities or lack of experience and knowledge if they have been given supervision or instruction concerning use of the appliance in a safe way and understand the hazards involved. Children shall not play with the appliance. Cleaning and user maintenance shall not be made by children without supervision.
AIR CONDITIONER PRECAUTIONS
Please strictly follow the below instructions:
- Long and direct exposure to cool air might be harmful to health. It is advisable to set the louvers in order to avoid direct cool air and deflect it within the room.
- Upon malfunctioning first turn the appliance off by pressing the ON/OFF button on the remote control, then disconnect it from power supply.
-
Always turn off the air conditioner by remote control first. Do not use the power supply circuit breaker or pull off the plug to turn it off.
-
Do not switch the appliance on and off too often as this can damage the appliance.
- Do not place any objects on the outdoor unit.
- Disconnect the air conditioner from the power supply if it is to be left unused for a long period of time or during a thunder/lightning storm.
- This product contains Fluorinated Greenhouse Gases covered by the Kyoto Protocol, the refrigerant gas being in a hermetically sealed system. Refrigerant gas: R410a has a Global Warming Potential (GWP) 2087.5.
SAFEGUARDING THE ENVIRONMENT
- This appliance has been made of recyclable or re-usable material. Scrapping must be carried out in compliance with local waste disposal regulations. Before scrapping it, make sure to cut off the mains cord so that the appliance cannot be re-used.
- For more detailed information on handling and recycling of this product, contact your local authorities who deal with the separate collection of rubbish or the shop where you bought the appliance.
SCRAPPING OF PACKAGING
- The packaging can be 100% recycled as confirmed by the recycling symbol . The various parts of the packaging must not be dispersed in the environment, but must be scrapped in line with local authority regulations.
SCRAPPING OF APPLIANCE
- This appliance is marked according to the European Directive 2002/96/EC, Waste Electrical and Electronic Equipment (WEEE).
- By ensuring that this product is disposed of correctly, you will help to prevent potentially negative consequences for the environment and for human health.
The symbol on the product or on the documents accompanying the product indicates that this appliance should not be treated as household waste, but must be given to the appropriate local gathering place where electric and electronic appliances are stored and recycled.
STARTING YOUR LOCAL AIR CONDITIONER

This section explains proper local air conditioner operation.
IMPORTANT:
- The air conditioner display shows the setting temperature.
- Only in standby mode the display shows the ambient temperature
- When changing modes while the air conditioner is operating, the compressor will stop for 3 to 5 minutes before restarting.
If a button is pressed during this time, the compressor will not restart for another 3 to 5 minutes.
- In Cooling or Dry mode, the compressor and condenser fan will stop when the room temperature reaches the set temperature.
NOTE: In the event of a power failure, your air conditioner will operate at the previous settings when the power is restored.
I. Select the mode. See "Mode."
2. Select the fan speed. See "Fan Speed."
3. Set the temperature. See "Temperature."
4. Press ON/OFF button to start the air conditioner.

POWER
NOTE: When the air conditioner is turned on for the first time after it is plugged in, it will run in the 6th Sense Mode control.
When the air conditioner is turned on at all other times, it will run according to the previous settings. 6th Sense Mode can be selected with the remote control only.
Only if the unit is operated in UNLIKELY VERY HUMID air, water will be collected in the container inside the unit. If the water container is full, the air conditioner will stop. The water container is full, the air conditioner will stop. The screen will display "E5" to inform you to empty the internal container.
STORAGE AND TIPS FOR USING THE RC
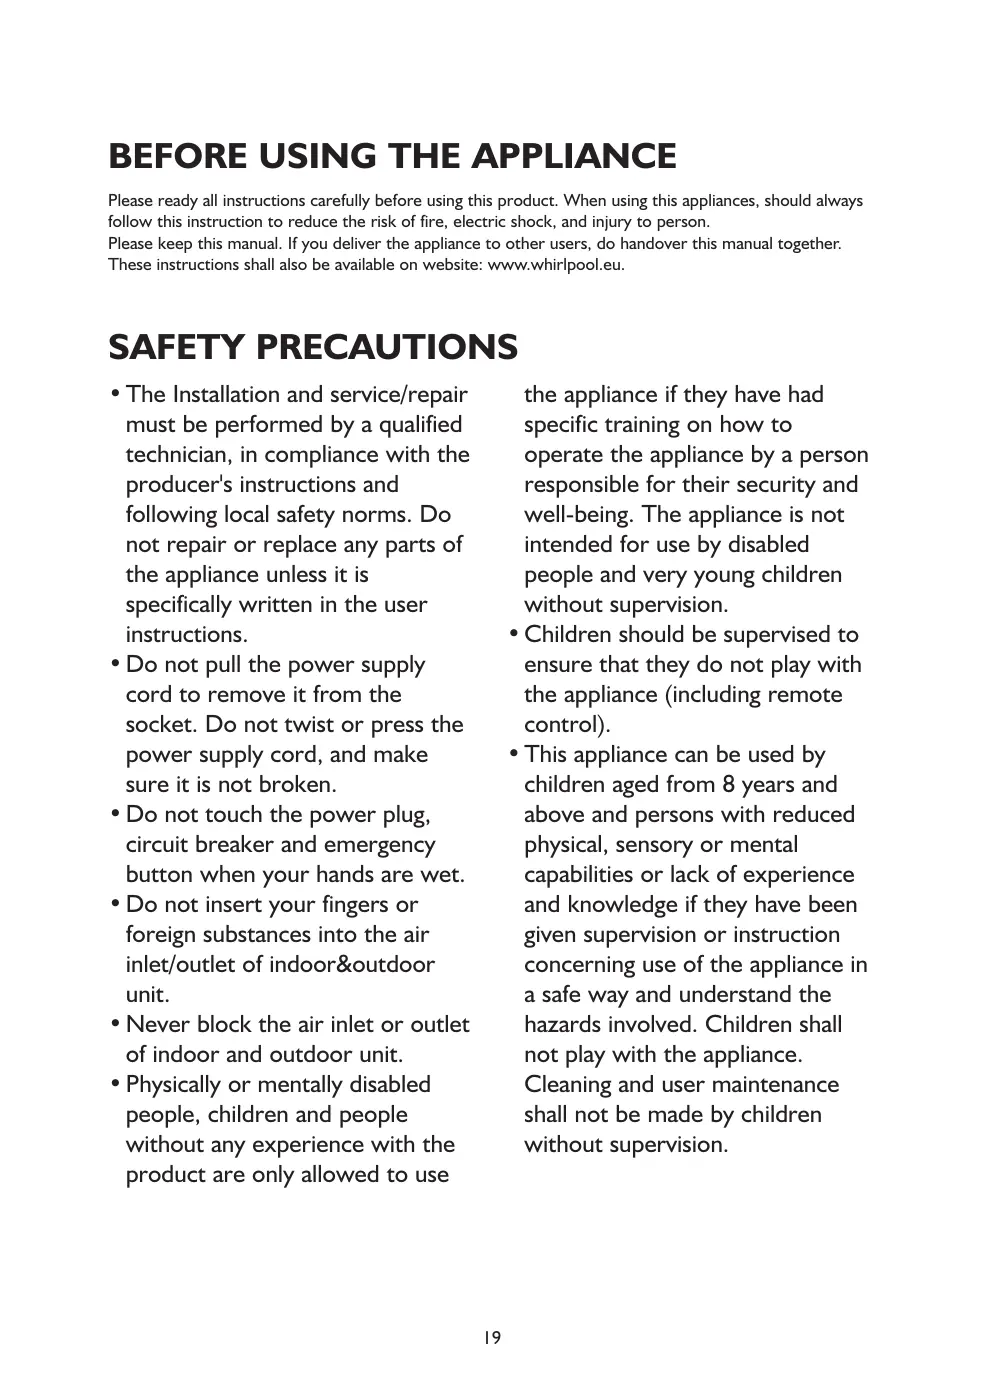
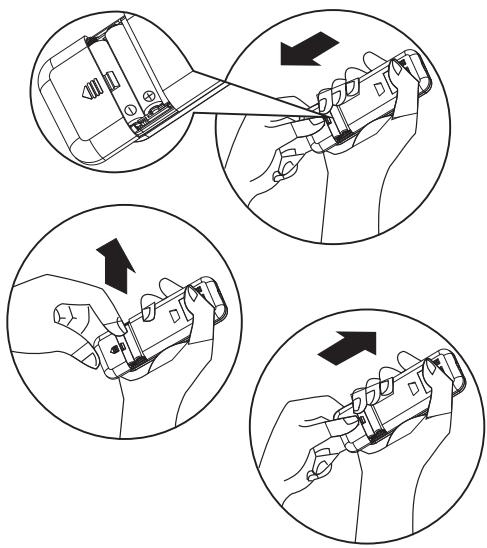
How to insert the batteries
Insert a pin and gently press down on the battery cover and push in the direction of the arrow to remove, as shown.
2 Insert 2 AAA batteries (1.5V) into the compartment. Ensure that "+" and "-" polarity is correctly positioned.
3 Close the battery cover on the remote control.
How to remove the batteries
Remove the battery cover in the direction of the arrow.
Press the positive pole of the battery softly with your fingers, then draw the batteries out of the compartment. All this should be done by adults, children are forbidden to remove the batteries from the remote control in order to avoid danger of swallow.
Disposal of the batteries
To protect natural resources and to promote material reuse, please separate batteries from other types of waste and recycle them through your local, free battery return system.
Precautions
- When replacing the batteries, do not use new batteries with old batteries, or different types of batteries as this may cause the remote control to malfunction.
- If you do not expect to use the remote control for some time, take the batteries out to prevent leakage of battery acid in the remote control.
- Operate the remote control within effective range. Keep the remote control at least 1 meter from any TV set or HI-FI equipment.
- If the remote control does not work normally, take the batteries out and reinstall after 30 seconds. If it still does not work install new batteries.
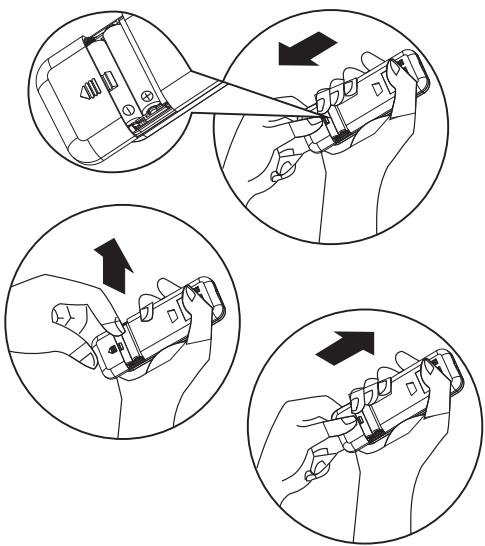
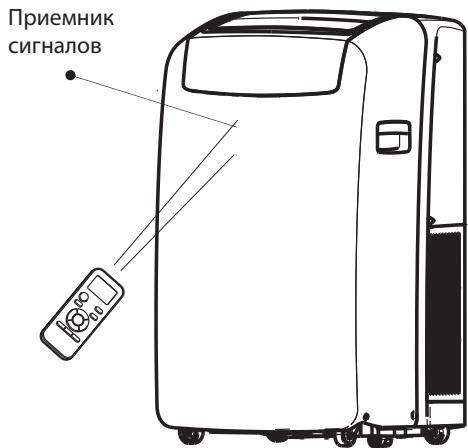
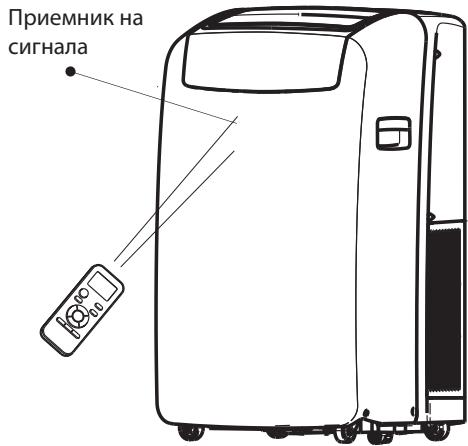
- To operate the appliance by remote control, point the remote control at the receiving device on the indoor unit, to ensure receiving sensibility.
- To send a message from remote control, the symbol will flash for 1 second. On receipt of the message, the appliance will emit a beep.
- The remote control will operate the air conditioner at a distance of up to 7m .
Each time the batteries are replaced in the remote control, the remote control is pre-set at Heat mode.
OPERATING MODE DESCRIPTION
Operating modes:
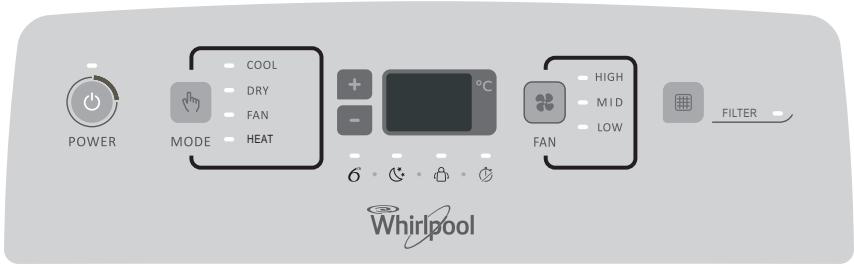
I. Press and release MODE until you see the symbol glow for the desired setting

MODE
- Choose Cooling, Dry, Fan Only or Heating.
Cooling-Cools the room. Press FAN to select High, Mid or Low. Press the Plus or Minus button to adjust the temperature.

COOL
- Dry-Dries the room. The air conditioner automatically selects the temperature. The fan runs on Low speed only.
NOTE: Dry mode should not be used to cool the room.

DRY
- Fan Only-Only the fan runs. Press FAN to select High, Mid or Low.

FAN
- Heating-Heats the room. Press FAN to select High, Mid or Low. Press the PLUS or MINUS button to adjust the temperature.
NOTE: Heating is NOT available for cooling only air conditioner.

HEAT
Fan Speed
I. Press and release FAN to choose the desired fan speed.

FAN
- Choose High, Mid or Low.
High-for maximum fan speed

HIGH
Mid-for normal fan speed

MID
- Low-for minimum fan speed

LOW
Filter Reset
-
When the Filter Reset indicator light is lit, remove, clean and replace the air filter. See "Cleaning the Air Filter."
-
Press and release FILTER button after replacing the air filter.

NOTE: After 360 hours of fan operating time, the Filter indicator light will turn on. It will remain on for 180 hours or until you press FILTER button. After 180 hours, it will turn off automatically.
Temperature
- Press the PLUS button to raise the temperature. Press the PLUS button once to increase the set temperature by 1^ .

- Press the down Adjust button to lower the temperature. Press the down Adjust button once to decrease the set temperature by 1^ , or press twice to decrease the set temperature by 2^ .

NOTES:
- In the Cooling and Heating mode, the temperature can be set between 18^ and 32^ .
- In Fan Only mode, the temperature cannot be set.
- In Dry mode, press the PLUS/MINUS botton the set temperature change by 2^ .
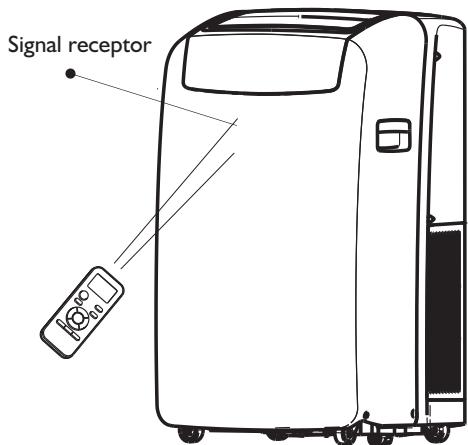
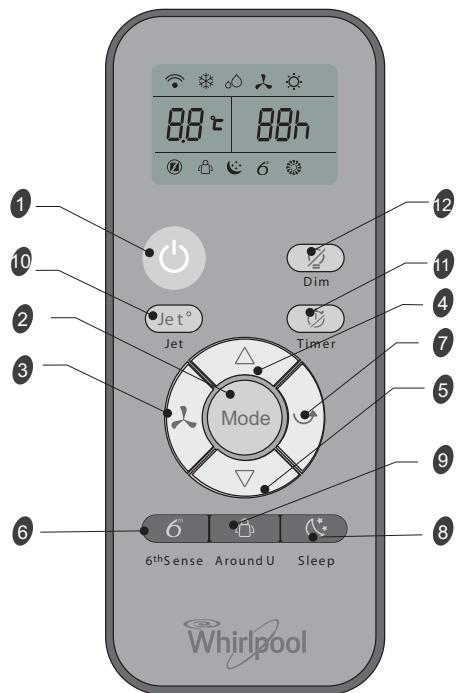
REMOTE CONTROL FUNCTIONS AND INDICATORS
Starts and/or Stops the appliance by pressing this button.
Used to select the operation mode.
Used to select fan speed in sequence auto, high, medium or low.
Used to select the room temperature. Used to set time in timer mode and real time clock.
Sets or cancels 6th sense operation.
Stops or starts horizontal adjustment louver swinging and sets the desired up/down airflow direction.
Sets or cancels Sleep Mode operation.
Used to set or cancel Around U function.
Used to start or stop the fast cooling or heating.
Used to set or cancel the timer on operation. Used to set or cancel the timer off operation.
Used to turn on or turn off display light on indoor unit.
INDICATOR SYMBOLS ON RC DISPLAY

Cooling indicator

6th Sense indicator

Dry indicator

Sleep indicator

Fan only indicator

Around U indicator

Heating indicator

Jet indicator

Auto fan speed

Signal transmission

High fan speed

Display set timer

Medium fan speed

Display set temperature

Low fan speed
FUNCTION DESCRIPTIONS
Power On or Off
Press ON/OFF button to turn on or off the unit.

NOTE:
- Changing the mode during operation. Sometimes the unit does not response at once, wait 3 minutes
- Wait 3 minutes before restarting the appliance.
Selecting mode
I. Press and release MODE until you see the symbol glow for the desired setting.
Mode
- Choose Cooling, Dry, Fan Only or Heating.
Cooling-Cools the room. Press Fan to select Auto, High, Mid or Low. Press the up or down Adjust button to adjust the temperature.

- Dry-Dries the room. The air conditioner automatically selects the temperature. Fan runs on Low speed only.
NOTE: Dry mode should not be used to cool the room.
At "Dry" mode, the unit can decrease or rise 2^(3^ or 4^) if you still feel uncomfortable.

- Fan Only-Only the fan runs. Press FAN to select High, Mid or Low.

NOTE: Auto fan speed cannot be selected in Fan Only mode.
- Heating- Heaters the room. Press FAN to select the fan speed. Press the up or down button to select the temperature.

6th Sense mode
The air conditioner automatically selects Cooling or Dry mode, depending on room temperature and sets the target temperature.

Operation mode and temperature are determined by indoor temperature.
Electric Heat models
| Indoor temperature | Operation mode | Target temperature |
| 21°C or below | HEATING | 22°C |
| 21°C-23°C | FAN ONLY | |
| 23°C-26°C | DRY | Room temperature decrease 2°C after operating for 3 minutes |
| Over 26°C | COOLING | 26°C |
| Indoor temperature | Operation mode | Target temperature |
| 21°C or below | FAN ONLY | |
| 23°C-26°C | DRY | Room temperature decrease 2°C after operating for 3 minutes |
| Over 26°C | COOLING | 26°C |
Cooling only models
NOTE: Temperature, airflow and direction are controlled automatically in 6th Sense mode.
However, a decrease or rise of up to 2^ can be set with the remote control if you still feel uncomfortable.
- Press 6th Sense button.

6^th Sense
- In Fan Only mode, press Fan to select High, Mid or Low.
Jet mode
Jet button is used for fast cooling or heating.
NOTE: 6th Sense mode button does not operate when Jet function is selected.
I. Press Jet in cooling mode. The air conditioner automatically sets the fan speed and the temperature to 18^ . Fast heating operates at auto fan speed, changing the set temperature to 32^ .

- To exit Jet mode press any button except Timer Around U and Swing button.
Fan Speed
I. Choose desired fan speed.

- Each time the "FAN" button is pressed, the fan speed is changed in sequence:

- Auto-automatically controls fan speed depending on current room temperature and temperature control setting.
NOTE: Auto fan speed cannot be selected in Fan Only mode.

High - for maximum cooling

Mid - for normal cooling

- Low - for minimum cooling

Temperature
- Press the UP adjust button to raise the temperature. Press the UP Adjust button once to increase the set temperature by 1^ , or press twice to increase the set temperature by 2^ .

- Press the DOWN adjust button to lower the temperature. Press the DOWN adjust bottom to decrease the set temperature by 1^ , or press twice to decrease the set temperature by 2^ .

NOTES:
- In the Cooling or Heating mode, the temperature can be set between 18^ and 32^ .
- In Fan Only mode, the temperature cannot be set.
- In Dry mode, press the UP/DOWN bottom the set temperature change by 2^ .
Around U function

When you press this button, the remote control transmits signal of the actual room temperature around it to the unit, and the appliance will operate according to this temperature to let you feel more comfortable.
Please keep the remote control in a location where it can transmit the signal to the unit properly. Press once to set and press again to cancel.
Sleep mode
Press Sleep button on remote control and the indicator in LCD lights up, the appliance operates in sleep mode and the fan speed is automatically set to low speed.

NOTES:
- The appliance will stop operation automatically after operating for 8 hours.
Fan speed is automatically set at low speed..
- In Cooling mode if the current room temperature is below 26^ , the temperature will automatically increase 1^ during the first hour after Sleep control is activated, then remain the same.
- In Heating mode, the setting temperature will decrease by 3^ at most for 3 hours constantly, then keeps steady.
I. Press MODE to select Cooling, Dry or Heating. NOTE: Sleep mode cannot be selected when Fan Only is selected.
2. Press the or button to set the temperature.
3. Press SLEEP. After 10 seconds, the lights on the control panel display will dim.
NOTE: The temperature and airflow direction may be adjusted during Sleep control. The fan speed is automatically set to Low speed. After 10 seconds, the lights on the control panel display will dim again.
4. To turn off Sleep control, press SLEEP, MODE, FAN, ON/OFF or wait 8 hours for Sleep control to turn off automatically.
DIM function
Press the DIM button to turn off the light and the display in the unit.

NOTES: When the light is off, receive signal will turn on the light again.
TIMER function
It's convenient to set the timer on with TIMER button before you leave so that you will come back to the comfortable room temperature you set. Press the TIMER button to set a switch-on button when the appliance is off. Press the TIMER button to set a switch-off timer during operation.

How to set TIMER
I. Set desired operating mode, temperature setting and fan speed firstly, then press the TIMER button and "01h" flashed on LCD.
2. Set desired operating mode, temperature setting and fan speed firstly, then press the TIMER button and "01h" flashed on LCD.
3. Point the remote control at the signal receptor of the unit, press the + or - button when "01h" flashes.
Choose the timer you want, then press the TIMER button.
A "beep" can be heard.
- Timer indicator on the control panel lights up.
-h" stops flashing.
4. To cancel the set timer: press the TIMER button again, a "beep" can be heard.
NOTES:
- The range can be set is 1 hour to 10 hours.
After setting a switch-on timer when the appliance is off, the Timer light on the control panel lights and
- Setting a switch-off timer when the unit working, the Timer light of the control panel lights up.
Changing Air Direction
Press SWING once to change vertical airflow direction. Press again to stop airflow louver at desired airflow direction.

Normal Sounds
When your air conditioner is operating normally, you may hear sounds such as:
Air movement from the fan.
- Clicks from the thermostat cycle.
- Vibrations or noise due to poor wall or window construction.
- A high-pitched hum or pulsating noise caused by the modern high-efficiency compressor cycling on and off.
MAINTENANCE
Draining the Air Conditioner
(in accordance with the indication of Water Full under "Starting your local air conditioner".)
I. Press ON/OFF to turn off the air conditioner.
2. Unplug air conditioner or disconnect power.
3. Move the appliance gently and stably to a draining location or outside to drain water. Do not move the unit before water is drained out completely.
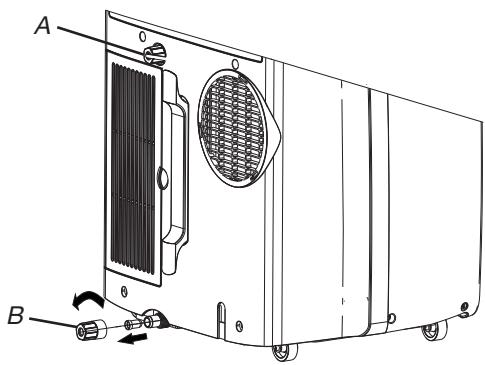
4. Remove the secondary drain plug and drain water completely.
5. Remove the primary drain hose from the drain hose clip. Remove the drain hose plug from the end of the primary drain hose and drain water completely.
NOTE: If air conditioner will be stored after use, see "Storing After Use."
- Reinstall the drain hose plug and the secondary drain plug.
- Reattach the primary drain hose to the drain hose clip.
- Reposition the air conditioner.
- Plug in air conditioner or reconnect power.
- Press ON/OFF to start the air conditioner.
Cleaning the Air Filter
I. Press ON/OFF to turn off the air conditioner.
2. Open the filter panel door on the back of the air conditioner and remove it.
3. Remove the air filter from the filter panel door.
4. Use a vacuum cleaner to clean the filter. If filter is very dirty, wash filter in warm water with a mild detergent.
NOTE: Do not wash filter in the dishwasher or use any chemical cleaners.
- Air dry filter completely before replacing to ensure maximum efficiency.
- Reattach the air filter to the filter panel door.
- Reinstall filter panel door.
- Press ON/OFF to start the air conditioner.
Cleaning the Outside
I. Unplug air conditioner or disconnect from power.
2. Remove the air filter and clean separately. See "Cleaning the Air Filter."
3. Wipe outside of the air conditioner with a soft, damp cloth.
4. Plug in air conditioner or reconnect power.
5. Press ON/OFF to start the air conditioner.
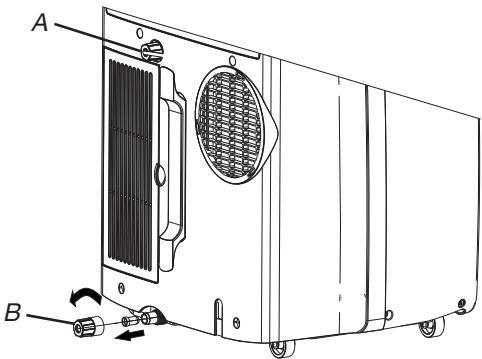
A. Secondary drain plug
B. Drain hose plug

A. Filter panel door
B. Air filter
Storing After Use
I. Drain the water (see the "Draining the Air Conditioner")
2. Run the air conditioner set to Fan Only for approximately 12 hours to dry the air conditioner.
3. Unplug air conditioner.
4. Remove flexible exhaust hose and store with air conditioner in a clean, dry area. See "Installation Instructions."
5. Remove window kit and store with air conditioner in a clean, dry area. See "Installation Instructions."
6. Remove the filter and clean. See "Cleaning the Air Filter."
7. Clean the outside of air conditioner. See "Cleaning the Outside."
8. Reinstall filter.
9. Remove the batteries and store the remote control with air conditioner in a clean, dry area.
TROUBLESHOOTING
Before calling for service, try the suggestions below to see whether you can solve your problem without outside help.
| Trouble | Analysis |
| Air conditioner does not operate | ·The power supply cord is unplugged. Plug into a grounded outlet. See "Electrical Requirements."·A household fuse has blown, or a circuit breaker has tripped. Replace the fuse, or reset the circuit breaker. See "Electrical Requirements."·The On/Off button has not been pressed. Press ON/OFF·The local power has failed. Wait for power to be restored.·Time-delay fuse or circuit breaker of the wrong capacity is being used. Replace with a time-delay fuse or circuit breaker of the correct capacity. See "Electrical Requirements." |
| Air conditioner blows fuses or trips circuit breakers | ·Too many appliances are being used on the same circuit. Unplug or relocate appliances that share the same circuit.·You are trying to restart the air conditioner too soon after turning off air conditioner. Wait at least 3 minutes after turning off air conditioner before trying to restart it.·You have changed modes. Wait at least 3 minutes after turning off air conditioner before trying to restart the appliance. |
| Air conditioner seems to run too much | ·Is there a door or window open? Keep doors and windows closed.·In cooling mode: the air conditioner is in a heavily occupied room, or heat producing appliances are in use in the room. Use exhaust vent fans while cooking or bathing and try not to use heat producing appliances during the hottest part of the day. Local air conditioners are designed as supplemental cooling to local areas within a room. A higher capacity air conditioner may be required, depending on the size of the room being cooled.·In heating mode: the air conditioner is in a very cool room. Local air conditioners are designed as supplemental heating to local areas within a room. A higher capacity air conditioner may be required, depending on the size of the room being heated up. |
| Air conditioner runs for a short time only, but room is not cool or hot | ·Set temperature is close to room temperature. Lower or Higher set temperature. See "Operating mode description". |
| Display error code | ·If the unit display error code E5, it is water full in the unit, you should drain the water, see "Draining the air conditioner". After draining, you can operate the unit.·If the unit display error code E1/E2/E3/E6/E7/EA, please contact customer service. |
| Air conditioner runs, but does not cool/hot | ·The filter is dirty or obstructed by debris. Clean the filter.·Air outlet is blocked. Clear air outlet.·The setting temperature is not compatible. In cooling mode: set temperature is too high. Lower set temperature. In heating mode: set temperature is too low. Higher set temperature. |
| Air conditioner cycles on and off too much | ·The air conditioner is not properly sized for your room. Check the cooling/heating capabilities of your local air conditioner. Local air conditioners are designed as supplemental cooling/heating to local areas within a room.·The filter is dirty or obstructed by debris. Clean the filter.·In cooling mode there is excessive heat or moisture (open container cooking, showers, etc.) in the room. Use a fan to exhaust heat or moisture from the room. Try not to use heat-producing appliances during the hottest part of the day. In heating mode the temperature of the environment is too high. Do not use your air conditioner when the temperature of the environment is too high.·The louvers are blocked. Install the air conditioner in a location where the louvers are free from curtains, blinds, furniture, etc.·The outside temperature is below 18°C. Do not try to operate your air conditioner in the cooling mode when the outside temperature is below 18°C. |
INSTALLATION REQUIREMENTS
Gather the required tools and parts before starting installation. Read and follow the instructions provided with any tools listed here.
I. Tools needed
- Phillips screwdriver
- Saw
- Cordless drill and 1/8'' bit
- Scissors
- Pencil
2. Parts Supplied
The company provides only one plan to install local air conditioner. See "Install local Air Conditioner".
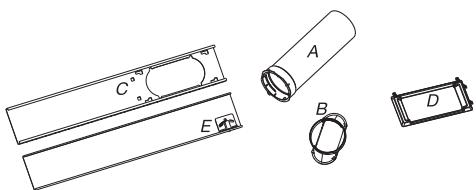
A. Flexible exhaust hose
B. Window exhaust adapter
C. Outer slider section
D. Rain Cover
E. Inner slider section
Location Requirements
NOTES:
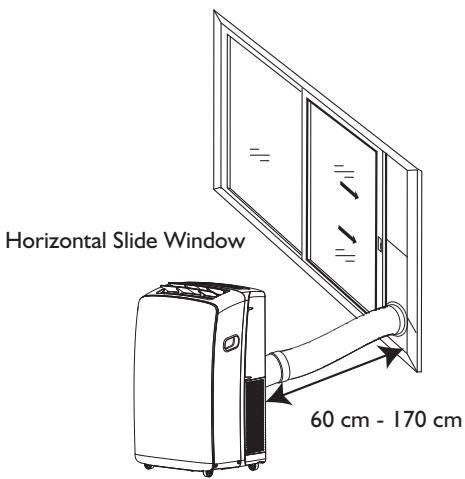
- The flexible exhaust hose allows placement of the air conditioner between 23 12'' and 67'' (60 cm and 170 cm) from window or door.
- Local air conditioners are designed as supplemental cooling to local areas within a room.
To ensure proper ventilation, keep the required distance from the return air outlet to the wall or other obstacles at least 2312 (60 cm).
- Do not block air outlet.
- Provide easy access to grounded outlet.
Electrical Requirements
- The local air conditioner should be connected to a 220-240V / 50Hz, 20-amp fused grounded outlet.
- The use of a time-delay fuse or time-delay circuit breaker is recommended.
- All wiring must comply with local and national electrical regulations and be installed by a qualified electrician. If you have any questions, contact a qualified electrician.
Use your power supply cord:
Plug power supply cord into a grounded outlet.
NOTES:
- A damaged power supply cord must be replaced with a new power supply cord obtained from the product manufacturer and must not be repaired.
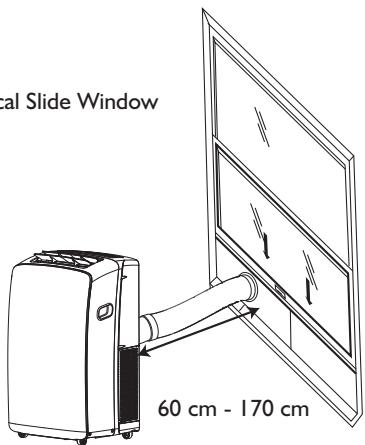
Vertical Slide Window
INSTALLATION INSTRUCTIONS
Unpack the Air Conditioner
Remove packaging materials
- Remove and dispose of/recycle packaging materials. Remove tape and glue residue from surfaces before turning on the air conditioner. Rub a small amount of liquid dish soap over the adhesive with your fingers. Wipe with warm water and dry.
- Do not use sharp instruments, rubbing alcohol, flammable fluids, or abrasive cleaners to remove tape or glue. These products can damage the surface of your air conditioner.
Install Local Air Conditioner
Install Exhaust Hose and Adapter
I. Open the window.
2. Measure the window opening.
- If the window opening is too narrow for the window slider kit, remove the inner slider from the window slider kit.
A. Inner slider section
B. Outer slider section
- Using a saw, cut the inner slider section to fit the window opening.
- Slide the inner slider section into the outer slider section of the window slider kit.
- Place the window slider kit into the window, extending it to fit the width of the window. Be sure the rain cover is on the outside of the window.
NOTE: For casement window installation, the window slider kit may be installed vertically with the window slider kit opening at the bottom.
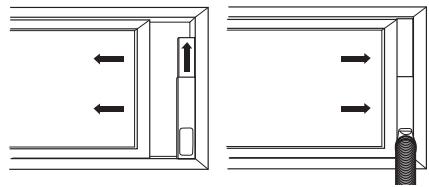
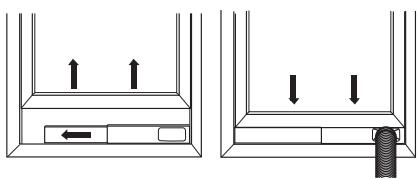
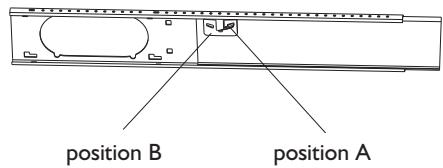
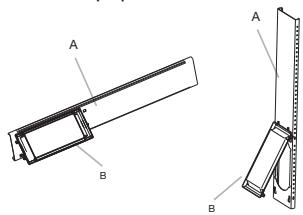
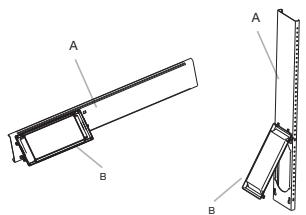
- Use a special plastic device with spring to fix the window brackets: Place the device to the position A, the pin may stretch out then lock the brackets, when place the device to position B, the pin will draw back and the brackets will be released the window slider kit.
- Close the window onto the window slider kit to secure.
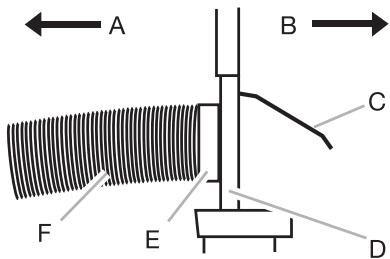
A To local air conditioner
B Outdoors
C Rain cover
D Window slider kit
E Window exhaust adapter
F Flexible exhaust hose
Install Exhaust Hose and Adapter
I. Roll the air conditioner to selected location. See "location Requirements".
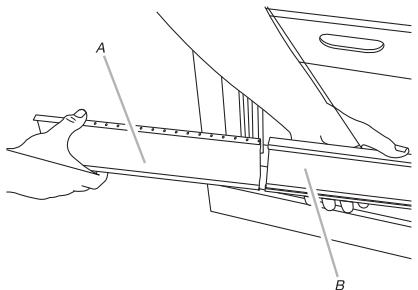
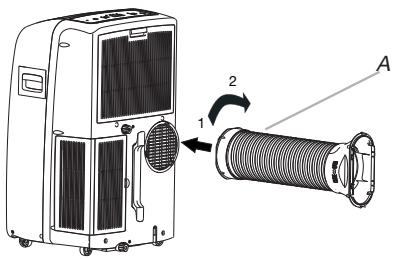
2. Attach the window exhaust adapter to the flexible exhaust hose. Turn anticlockwise until securely locked into place.
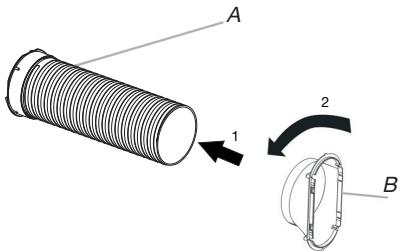
A Flexible exhaust hose
B Window exhaust adapter
- Insert the dummy coupling into the slot on the back of the air conditioner.
- Put and rotate to lock the hose into place.
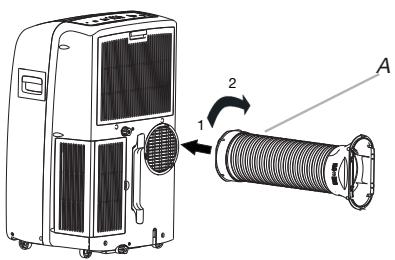
A. Flexible exhaust hose
Window Installation
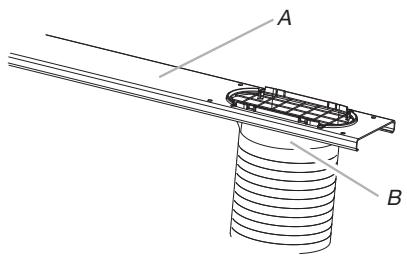
I. Your window slider kit has been designed to fit most standard vertival and horizontal window applications. Roll the air conditioner to selected location. See "Location Requirements".
2. Insert the window exhaust adapter into the slot on the window slider kit.

A. Window slider kit
B. Window exhaust adapter
Rain Cover Installation
Attach the rain cover to the holes of the outer slider section. Then slide the rain cover until securely locked place.
Vertical Installation
Horizontal Installation
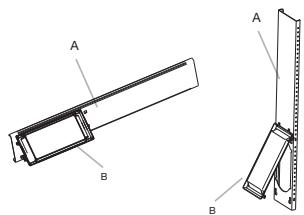
A. Out slider section
B. Rain cover
Complete Installation
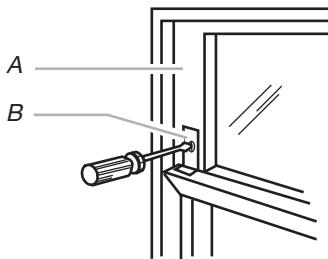
I. Place the window-lock bracket on top of the lower window and against the upper window sash.
2. Use 1 / 8^ drill bit to drill a starter hole through the hole in the bracket.
3. Attach the window-lock bracket to the window sash with wood screw(provdie 4) to secure the window in place.
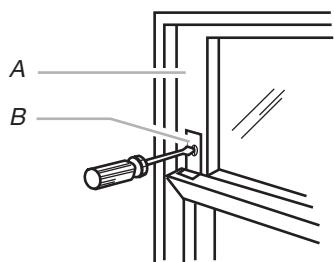
A. Upper window sash
B. Window-lock bracket
- Insert the foam seal behind the top of the lower window sash and against the glass of the upper window.
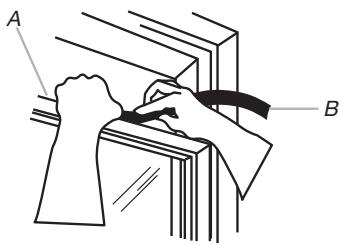
A. Top of lower window sash
B. Foam seal
AFTER SALES SERVICE
I. Try to solve the problem yourself based on the descriptions given in the "Troubleshooting".
2. Turn the appliance off and restart it to see if the fault persists.
Please give:
- a short description of the fault;
the exact model of the air conditioner;
- the service number (this is the number found after the word Service on the rating plate), located on the back of the appliance. The service number can also be found in the warranty booklet;
- your full address;
- your telephone number.
If repair work has to be carried out, contact the Customer Care Centre (Use of original spare parts and a proper repair is guaranteed).
You will need to present the original invoice.
Failure to comply with these instructions could compromise the safety and quality of your product.

AVANT D'UTILISER L'APPAREIL
Mode 6th Sense (6eme Sens)
Exigences relatives aux raccordements electriques
AFVOER VAN DE VERPAKKING
AFVOER VAN HET APPARAAT
7. KOYMNI SWING (Taλavτωη)
iakontei n EKKIVE tNv aiwpon tnc ypiiaoc opicovtia cpuoiqcn kauouice tNv eniountn avodikn/kaOobikn kateuohvon tnc poic aepa.
8. KOYMNI SLEEP ('Yntvooc)
- PatnoTe to koumi 6th Sense (6n aoθηση).

6^th Sense
A Eukamtooc owlnvac Eaywynic
B Ppooapouyeac Eaywync npaohpuo
- Eioayete To omoiwa Ouzekntpa Tny unodoxn OTNV NIOW NLEUPa Tou KLImuATIKOU.
- TonoθeTnToE kai περIoTρεγTe TOV εukαμπTO ωλνa yia va TOV ασφλioεTe Θη θεοι TOU.
A. EuKaμπTcσ Oληνac εξαγωγις
TooTeTnOe npaOpO
- To kit oIioθntnpa napaθρou exi oxδiaotε i e Tétoio tpóno, wote va eivai katáλλno yia ta πepiooTepa tuniKa takaKópu Ka opióvtia oupóeva npáθupa. Metakivnote to KλiμatiOTIKO OTNV Eπileyμevn ΕeON. Deite tvn napaypao «Anaitnoic tonoθétanç.
- Eiayetye tov npoapmuoyea Eaaywync npaohpuo stynuOdoxni oTo kIT oAnthnpa npaohpuo.
A.Kit olaogntnpa npapuou
B. PpOpaIpyoEaC EaWynic npaOpou
TOnoTeTnO kALuMaToc yia tn BpOxH
Uvdeote to kalumu yia tn bpoxn otic onc tou Ewteipou tmuatoc tou oiothnpa. Meta, oupeTe to kalumu yia tn bpoxn mexpi va aopalioti ka la otn eoTou.
Kaθετη τοῦθετηση
Opiovia tootheTton
Mid (Mellan)- for normal kylning

INSTALLATIONSINSTRUCTIONS
Ta ut luftkonditioneringsapparaten ur forpackningen
Vertical installation
Horisontell installation
FORHOLDSREGLER FOR KLIMAANLEGGET
Vis timer-innstilling
BB
Vis innstilt temperatur
FUNKSJONSBESKRIVELSER
Strøm av eller pa
Horizontal installations

A. Ytre gliderdel
B. Regndeksel
Komplett installationsjon
I. Sett vindusåsbraketten oppå den nedre vindusrammen og opp mot det øverste vindusrammen.
2. Bruk 1/8" bor til a drille et feste hull gjennom hullet i braketten.
3. Fest vinduslåsbraketten til vindusrammen med treskrue (4) for a feste vinduet pä plass.
A. Øvre vindusramme
B. Vinduslasbrakett
FØR APPARATET TAGES I ANVENDELS
6 Indikator for 6th Sense
Indikator for Slumre
Indicator for Around U
Indikator for Jet
Signaltransmission
BBh Vis indstillet timer
BB Vis indstillet temperatur
FUNKTIONSBESKRIVELSER
On ell er Off
Tryk pa knappen ON/OFF for at tende aller slukke for eheden.

BEMAERK:
Opbevaring after drug
KAUKOSÄATIMEN TOIMINNOT JA KUVAKKEET
I. VIRTAPAINIKE
6. 6TH SENSE -PAINIKE
SPUŠTěNI VOLNÉ STOJÍCÍ KLIKATIZACE
POPIS PROVOZNÍCH REŽIMÜ
Provozní režímy:
4-5. TLACITKO TEPLOTA
MEPbI INPEIOCTOPOXHOCTN
- UCTaHOBka N TexHnueCKoe 6cIyJXnBaHne/peMOHTdoJIxHbI BblIOJIHaTbcr TexHnueCKIM CNeUaJIncTOM B COOTBeTCTBmN C INHCTpyKzJMaMn IPOUN3BOJNTeJIa N DeIcTBYIOZMM MeCTHbIMN HOpMaMn IO 6e3OJaCHOCTN 3aIpeUaETcra peMOHTnpoRObaTb nIIN 3aMeHЯTb DeTaJIIn npu6Opa, 3a NCKJIoueHnEM ClyuaeB, KOHKpeTHO OROBopeHHbIX B INHCTpyKzUIN NO 3KcPnyataUIN.
3aŋpezaetc TaHnyt 3a ceTeBOI shHyp dIy TOrO, yTO6bI BbIHyt bNkky n3 po3eTkn. He nepern6aIte n He nepexmaite ceTeBOI shHyp, cIeINTe 3a ero NaJIeXaIIM COCTOHNEM.
3aπpezaetcKacaTbCSBnKN, aBTOMaTa 3aUNTbl N KHOPIKn aBapnHOrO OCTaHOBa BlaJXHbIMN pykamn.
3anpeuaeTcBCTaBnTb naIbcuI pyK nIIN NOCTOpOHnE npedMeTb B OTBepCTnI dJI 3a6Opa/BbInycka BO3dyXa BHyTpEnHero I HapxKnOro 6IoKOB.
- Hn B Koem cnyuae He nepereopaxnBaIte OTBepCTna Dnla 3a6opa/BbInycka Bo3nyxa BHyTpeHHeRo n HapyKHOro 6JOKOB.
JIIOJAMC OOrpaHnUeHHbIMN 03MOXHOCTaM,JeTAM NlIaM, He IMeOuIM ONbIta
IcNoJIb3OBAHnJaHHOro Iprn6opa,
pa3pe7aetcraIOJIb3OBAtbcra IM
TolbKO NocJe TOrO, KaK OHI
IpoUIn CneuAJIbHOe OObyuHne
IIO IcNoJIb3OBAHnIO prn6opa IOd
pyKOBOdCTBOM InuCa,
OTBETCTBeHHORo 3a INX
6e3OpaChOCTb IN 3DOpOBBe.
Iprn6op He IpeHa3NaueH dJa
EKCpIyatauIN JIOdbMn C
OrpaHnueHHbIMN BO3MOxHOCTaMn
IIIN DeTbMn 6e IprncMOTpa.
Heo6xOIMO CneIHTb 3a DeTbMn, TTO6bl OHN He nIgpaNc Pnp6Opom (B TOM YNCJIe C NylbTOM dNCTaHcNOHHOrO ynpaBJeHna).
-Даньи пибор может
И спользоватбая DeТьМС CTарше 8
ЛET И ЛЮдьМС CO CHИЖЕНБIMN
ФИЗЧЕСКИМ, СЕССОРНБIMN ИЛИ
УМCTВЕньIMN CПОСОБHOCТЯМN, He
ОБlaДАЮШМN DOCTATOчБIM
ОПБITOM ИЛI ИЗHAKOMБIMN C
ИЗДЕЛЕМ, TOLьКО ПОД
ПИСМOTРМ ДИЦA,
OTВETCTBEHNOТ 3a ИX
6e3ОпаСнOCTь, ИЛI пRу YСLOВИN,
ЧTO OНI ПЮшIL NИСТPyKTаЖ ПО
ПраВилam 6e3ОпаСнОH
эКсПлуаТацIN ᵇЛeКТрОприбopa И
ПОнИмайт CBЯЗAHьIE C ᴄТИМ
ОпаСнOCTи. He pa3peшaite DeTЯМ
ИграТь с пиборom. He
ДопунSCaйTe DeTeY K ChIcTke I
УхODу 3a пиборom 6e3
ПиСМOTрa.
MEPBI INPEIOCTOPOXHOCTN INPNIOBPAUHIN C KOHdIcNoHEPOM
Ctporo co6IouaIte nHcTpyKcun, npBVeDeHHbIe HnJke:
- Пюдолжитьhoe И
неносретбевhoe BO3deiCTBVE
холODного BO3dUxa может 6bITb
Вразно ДЯЗдоровь. В
и36жане BO3dEiCTBnIpyMOrO
хOLODного BO3dUxa
peKOMeHnyETcY UCTaHOBtB
ЖалЮЗИ,ЧTOБы I3MeHNTb
Наразвileнe BO3dUxa BпpeДeJax
NOMEseHnI.
- Пи Исправноctи сачалы ВьИкlioчITE пибор nyTem Нжатя Кногки ON/OFF (ВКЛ./ВьИКЛ.), a 3aTeM OTCоeДиНite erO ot ЭлЕКтричесКо сети.
Bcerda cHaana BbIKIouaTe KOHNIOHOep C NOMOsbIO pYnbTa DnCTaHcNIOHHOro ynpaBJeHn. 3aPpeaaetcnaCNoIb3OBaTb aBTOMat 3aunTbI CETn IJI
BbIeprnBaTb BnIky dny BbIKIoueHn np60pa.
- He BKJIIOUaIte n He BbIKIIOUaIte npI6Op cIIuKOM qACTo, TaK KaK 3TO MOKeT pINBecTn K eRO NOBpeKdEHIIO.
- He klaДиTe npeДмТын hapyЖьн 6лOK.
- OTKIIOUHTe KOHdIcNoHep OT NCTOUYNka NITaHn,ecn OH He 6yJeT IcNOJIb3OBaTbcr B TeueHne npOdoJXHTeJIbHOrO nepNoJa BpeMeHn,a TaKKe BO BpeMra rpo3bl.
-Данhoeизделиноideржnt
ф�торсодаржашие napніковые
газы, на КOTОпье
pacnpocstpaняетсдемстве
Кnotckoro потokола, ra3-
хладаг ent NaXODNTСВИТРи
repeMtNCHORO KOHTypa. Ra3-
хладаг ent: R410a Имeel
notehцал Глобального
noteПеленя (GWP) 2087.5.
PEKOMHDAUINIPO3AUINTEOKPYKAIOUCEI CPEbl
Даньл пибор n3roTOBHeN n3 mATEpHana,ДоуSCaHOJero erо nepepa6Oky nIIN NOBTOPHoe nCNoJIb3OBaHne.УТЛИЗАцЯДОЛЖHa BblONJIrTbCBy COOTBetCTBm C HOPMaMn HaIZIOHAJIbHOrO 3aKOHODaTeJIbCTBa.IpeDe yTNIJIzAuznei KOHNIZHOhePa Heo6xOJIMO o6pe3aTb CeTeBOI shHyp, YTO6bl NCKJIQUHTb BO3MOXHOCTb erO NOBTOPHOrO NcNoJIb3OBaHnY.
3a6olee npdo6hoi nHfOpmauee o npabunax o6paueHncaKIMn 13dEJIyMa, ux yTNI3aUHn n nepepa6OTKn o6paauTecb B MeCTbIe uYpeXJDeHn, KOTOpBle 3aHNMaHTcra pa3JeIbHbIM c6OpOM OTXoOB NII IN B MaRa3IN, B KOTOpOM Bbl npno6pEn DaHHoe n3dEJIne.
YTNIN3AUH N YIAKOBOHyBIX MATEPNAJIOB
Kak BCTabJIaTb 6aTapei
1 BCTaBbTe ⅢTnΦT n CJIeKa HaIadabInTe Ha KpbIshKy OTcKa n CdBnHbTe ee B HApPaBHeHn, O6O3HaueHHom CTpeNkO Ha Kopnyce, KaK NOKa3aHO Ha pncyHke.
2 UctaHOBITE B OTCsE K 2 6aTapeu Tnna AAA (1,5 B).Ipn yctaHOBKe co6JIoJaTe o6O3HaueHHyIO NOJrPHOCtB (^ + ^ n"-").
3 3aKpoIe KpbIuKy OTCeKa 3JIeMeHToB NITaHnnybTa Iy.
Kak BbiHImatb 6atapen
Cdbnhte Kpbikky OTeJeHn6bTapeB HnpaBHeHn CTpeKN.
Clerka npnKmTe naIbZamn nIOJXmTeIbHbI
noIoc 6aTapei,3aTeM n3BLeKeTIe 6aTapeu I3
OTdelenHn. 3aMeHy 3JeMeHTOB nITaHnI DOJXhbl
BbIIOHnTB B3POcJIbe,
pnp 3OM DeTAM 3aPpeUaeTcR n3BLeKaTb
6aTapeu n3 npIbTa DY BO n36exHaHne
npoIaTbIBaHnI.
Ytuln3aun6atapei
Дязштblпрюньх pecypcoBи
Обссчени IOBTOHOrO IcNoIb3OBaHnA
MaTePnaIOB Heo6xODmO OTdJIeTb 6aTapeN O T
DpyrNX TINOB OTXODOB u YtINl3uPOBaTb INC
NOMOuBIO MeCTHOJ 6ecPnATHOH CNTEmbl
BO3Bpata 6aTapeN.
MepbipnpedoctoPOXHOCTN
- Пи заме He 6aTape He nCnOlb3yIte HOBbIe 6aTape BMeTe CO StapbIMn, a TaKxHe HcNOb3yIte 6aTape paZLIuHbIX TINOB, TaK KaK 3TO MOxET pRiBecTNI K NOBpeJdeHInIO pyJIbTaДИCTaHcUOHHOуnpaBJIeHnI.
- Ecn npednonaeraTc dntelbHn nepepbB B nCnoJb3ObaHHn nyIbTa DY, peKoMeHnyeTc n3BLeyb n3 Hero 6aTapeu, yTo6bl npedOTbpaTnTB BO3MOxHyIO yTeky 3NeKtpoJINaTn IOBpeXdHeHne NyIbTa.
- Ynpablenhe yctpoiCTBOM npn nomoouny npbTa DY doJnxHO oCyueCTBnTbcn B npedeIax erO paunyca deIcTBn. He pacnoIaraiTe npbT DY na paCCToHnn MeHee 1 M OT TeNeBUNOHbIX npneMHNKOB nIi HI-FI annnapatypbl.
- PnC6OaX B pa6oTe nyIbTa DY n3BLeKeNTe 6aTapeH ha 30 cekyHd, a 3aTeM BHOBB yCTaHOBInTe Ix. Ecnn pa6oTOcNOc6HOCTb nyIbTa H EBOcTaNOBuNacb, 3aMeHNte 6aTapeH.
- Пи Испόньзовани пьы ДУ habравліе erо на приемhoe Okошко на BHTpeHHem
6IIOKe KOHdUcHIOHepa, YTO6bl NOBbICuTb KaueCTBO pniema KOMaHd.
- PnnperepaeyKOMaHdbcnybTaNyHaero
DnCnPeeB TeueHne 1 cekyHdb6yDet MngaTb
CmMBOI .PnponLyeHn CnHnA-la-KOMaHdbi
OT nybTa Ny KOHNzIOHep 6yDet n3daBaTb
3ByKOBoi CNrHaI.
- Пльт Ду обесенььает управлике Кондцноером на пасстаян до 7 M.
Kaxdbpa3 npu yctaHOBe B nybT DY HOBORO KOMPNekeTa 6atapei nylbT nepexoNTB pezIM o6orpeBa.
ОПИСАНЕ PЕЖUMOB PABOTbl ППБОРА
Pexumbl pa60Tbl:
- HaxmTe KhoNky MODE (PEXIM) n He OTnycKaIte ee, NOKa He NOBtCn CnMBoN, COOTBeTCTByOuNn HxHOn NaCTpOJKe.

MODE
- Виберпе Cooling (Охлajдени), Dry (Осушени), Fan Only (Толъко вентлитог) пи Heating (Обогрев).
- Pexim Cooling (OxlaJdeHne) - oxlaJdaet nomeJeHne. HaxmTe KhoNky FAN (BEHTUJIaTOP)ДЯ BbIbopa hyXhON knOpocTu: High (BbICoka), Mid (CpeDnA) nn Low (Hn3ka). HaxmTe KhoNky C pIIIOcOM nIIN mInHycom dJa peRyIINpOBKn TempepaTypbl.

COOL
- PexMM Dry (Ocyuene) - BblonHaeT ocyuene BO3dyxa B NOMeHn. Bb6op TempeatpybblbONHaeTcB KOHNIOHepe aBTomatueckn. Ppi 3tOM BeHTnIaTOp pa6otaet Tolbko Ha Hn3Ko cKopoCTn (Low).
Fan Only (ToIbKO BeHTnJIaTOp) - pa6oTaet ToIbKO BeHTnJIaTOp. HaxMITE KhoNky FAN (BEHTnJIaTOp) dIy BbI6opa hyxHoi CKOpocTu: High (BbICoka), Mid (CpeDnay) nII Low (Hn3ka).

FAN
- Pexim Heating (O6orpeB) - o6orpeBaet nomeuene. HaxmTe KhoNky FAN (BEHTUJYTOP) dans b6opa hxhnockopctn: High (Bbicokaj), Mid (CpeHny) nn Low (Hn3kaj). HaxmTe KhoNky c PJIIOCOM nn MHHYCOM dans perynipOBKn TempepaTpybl.
ПРМЕЧАНЕ:Функцяообогрева OTCYTCTBYETВ moDEлгх KOнДино hedge, pa6oTaIOxToIbKO ha OxlaJб徳пe.

HEAT
Ckopoctb BeHTnIaTopa
- Haxmte n otnyctnte KhoNky FAN (BEHTINJATOP) dIy BbIbopa hUxHoi cKOpocTn BpaueHnBeHTINJATopa.

FAN
- BbIepeTe Ondy n3 onuM: High (BbICOKa), Mid (CpeHra) nn Low (Hn3Ka).
- High (BbCoka) - MaKcImaIbHaN cKOpocTb BeHTnJIrTopa.

HIGH
Mid (CpeHnra) - 06bUHnA cKOpocTb BeHTnJIrToPa.

MID
- Low (Hn3Ka) - MmHmAlbHaC KoOpocTb BeHTnlaTopa.

LOW
BocctaHOBJeHne HJIbTpA
- Korda 3aropaetcnaHdkkaTop Filter Reset (BocstaHOBJIeHne fNbTp), Heo6xoJIMOBbHyTb BO3dUshnI bIbTp, IpOuHCTntb erO uYctaHOBtB o6paTHo Ha MeTo. Cm. pa3dJe "UcnTka Bo3dyuSHoro fNbTpA".
2.Поссе установский Oишениного Фильстра на место нажмпги OTпунчтente Кногу FILTER (ФИльТР).

IcnoB3yeTcIyraYCTaHOBKINOTMeHbI BKNUeHnIPO TaMepy.
IcnoIb3yeTcIЯ yCTaHOBKn OTMeHb I BbIKJIIOUeHnI NO TaIMepy.
12. KHOPIKA DIM (IOIDCBETKA)
IcnoIb3yeTcA DnB KblOueHn N OTKlOueHn NOCBETKn DcCnpeHa BHyTpHeHem 6Noke.
CIMBOЛы ИнданКATOPOB HA ДИСПЛЕпуньТА ду
染 INHdkaTop pejima oxJaXeHnra
HdNkaToppejMaOcyuEHHa
HnDnKaTOp pexmAbeHTnIaTopa
UHДИКaTOP pexKMa o6orpeBa
A BATOMaTnuecka CKoPoCTb BeHTnIaTopa
BbICOKaCKOPOCTBeHTINJITOPa
CpeHnA KOpocTb BeHTnIaTopa
Hn3kackoocbBeHTnIaTopa
6' INHnkaTop peKIma 6th Sense (6-e yBCTBO)
IHHdNkaTop pexIma Sleep (CoH)
HINHnKaTOp pexmAm Around U (TempepaTypa OkpykaUoSei cpebl)
UHdukatoppekImaJet (bblctpb)
Pepedaya cunhana
BBh Iucnneu yctaHOBKn TaIMepa
BB T DnCnneynyctaHOBKn TEMpepaTypbI
ОпИСАне PЕЖИМOB PABOTbl
BkIIOUeHne nn BbIKIOUeHne
HaKmTe KhONkY ON/OFF (BKJ./BbIKJ.), qTo6bl BKNHouNTb INI NBIKlnOuNTb np6Op.

ПРИМЕЧАНЕ:
Cmeha pexkma BO Bpema pa60tbl np6bopa. Hnorga np6bop He pearnpyet cpa3y, noDoxjnte 3 MNHyTbI.
- Побождente 3 мнутbl, пешке чемпесацкатл рибор.
Bb6op pexma
- HaxmTe KhoNky MODE (PEXIM) n He OtnyckaIte ee, Noka He NoBtCn CnMBOJ, COOTBeTCTByUOuH NyKHOH NaCTpoiKe.

-
Виберпente Cooling (Охлajдени), Dry (Осушени), Fan Only (Толъко вентлитог) пи Heating (Обогрев).
-
Pexim Cooling (Oxnaedne) - oxlaqdaet nomeeene. Haxmte KhoNky Fan (BeHTnIaTOp) dans BbIbopa ckopoctn BpaeeHnB eHTnIaTopa: Auto (ABtOMaTueckn BbIbOp), High (BbICOKa), Mid (CpeDnA) nn Low (Hn3kA). Haxmte KhoNky peryunipOBKn co cTeJIko BBePxA nn BHN3 dLn 3aDaHn HyKHO TeMnepaTypbl.

- PexMM Dry (OcyuheHne) - BbIOnHaeT ocyuHne BO3dyxa B IomeUeHn. Bb6Op TempeatypbI bIbONHReTcB KOHNIOHepe aBTOMaTUnecKn. PpN 3tOM BeHTnIaTOp pa60aet TolbKO Ha Hn3Ko KcOpocTn (Low).
PexkM 6th Sense (6-e yBCTBO)
Pexm pa60tI n TempepaTpya 3aBncrT OTeMpepaTpyb B NOMEueHn.
Moden C 3neKtpo06orpbeBaTelem
PexMM Jet (5b1cTpbl)
Khonnka Jet (bictpbpekm) nCnOJb3yETcIa 6bictporo oxJaXeHnI nn o6OrpeBa.
ПИМЕЧАНЕ: Кнока рекима "6-e УвстBO" He pa6oTaET, KOrda BbI6paH 6bIcTpbl рекIM.
- Haxmte Jet b pexime oxnaekdeHn. KoHnIIOHeP aBTOMaTNUeCKN 3aJaET ckOpocTB BpaueHnBEHTINJIaTOPa n TEMpePaTy p 18°C. 5bICTpbO6OrpeB OcUeCTBJIeTcA aBTOMaTNUeCKo CKOpOCtBu BEHTINJIaTOPa, npn 3Tom 3aDaHHaT EMMepaTypa aBTOMaTNUeCKn yctHaBnIBNaEt cHa 32°C.

2.ДЯ Bы IXODa n3 6bICTPOpeXIMHa HaxMnte IIO6yIO KHOINK, KpOme KHOIN KaIMePA,ФункuAn Around U (TempepaTpa OkpykaUoSei cpeB) n Swing (KauaHne).
Ckopoctb BeHTnlaTopa
- BbIbepeTe HnyKHyIO cKOpocTb BpaueHnBcHTINaTopa.

HhctpymeHTbI n dTaII
Cobepnte Heo6xOaMbIe IHCTpyMeHTbI n DeTaII, npexJe Yem HaunHaTb MOHTaJ. IpouHtaiTe INcHIOdaIte IHCTpyKcUN KO BcEM nepeUncJIeHHbIM 3deCb IHCTpyMeHTaM.
- Heo6xOaMbIe INCTpyMeHTbl
Kpecto06pa3HaJ OTBepTka
·Пида
AkkymyIaTOPHaI dpeIb co CBePLOM 1/8 IIOMa
HOxHnUbI
KapaHdaa
U3BaXdaHe Ha 6aTePmnte
CbaTe KanaeTo Ha OTdJIeHneTo 3a 6aTePnI NO Nocoka Ha CTpeNkata.
HaTnCHeTe BnHmATEJIHO C npbCTN NIOJOCa ^ + " Ha 6aTePnra TcIe TOBa n3BaJeTe 6aTePnnte OT OTeJeHnETo m. TOBa ce n3BbPbBA cAmO OT Bb3pactNI.
3a6paHEno e dca da n3BaJat 6aTePnnte Ha nDCtAnuOHnTO ynpaBHeHne, 3a da ce n36erHe onaCHOCT OT nOrIbuaHe.
U3XBpIaHeHa6aTePunTe
3a da donpinyceTe 3a ona3BaHe Ha OKoHnHaTa CpeDa n 3a NOBTOPO IN3NOJ3BaHe Ha MaTePnaJIte,OTdEJaIe 6aTePnIte OT npyTe BnIOBe OTnAdbuN rN peUKNIpaiTe qpe3 MeCTHaTa 6e3PnIaTHa CNCTeMa 3a Cb6InpaHe Ha 6aTePnI.
PpeDn3Hm MepKu
Korato cmeHrTe 6aTePnITe, He cMeCbaiTe HOBu n CTapu 6aTePmN, HnTO 6aTePmN OT pa3IyuHen TIN, TbN KaTO TOBa MOKe Da DOBeJe Do HEn3IpaBHOCT Ha DInCTaHcIOHHTO ynpabJIeHne.
- Ako HЯMaДа ИЗПОЛЗВATE ДИСТАЦНОНOTOуправлике 3a ИЗВЕСТHOВРЕМ, ИЗВадеTe 6aTeрпине, 3a Да ИЗБERHETe ИЗТУЧАне наКИСЕЛHA OТ TЯВ BДИСТАЦНОНOTO.
-ИЗполз Bavтелдостанционноуnpавлени В
Herobniaобхват на.Deяст绛.Дрьжт
Дистанционноуnpавленина пое 1
MeTpВ рОТ TeleБиЗори Или Hi-Fi оборудва.
-ИЗполз Bavтелдостанционноуnpавлени
С.
- Ako Дистанционноту упаразелене He pa6otn HopMaJIHo, ИЗВаде 6aTepeuNTe n Г NOCTaBeTe OTHOBO cIeD 30 ceKHyД. Ako To Bce OSe He pa6OTn HopMaJIHo, cIoxKeTe HOBn 6aTeepuN.
Korato n3no3BaTe dntaHOnHHOTO ynpabHeHne, HacoYBaTe FO KbM pInemaTO yctpoiCTBO Ha BtpeHOTO TIA, 3a da

rapaHTnpaTe YUbCTBNTeJIHOCT Ha npIeMaHe.
- Pn n3npaana He Ha CnHnO T INCTaHnOHHOT O npaBHeHne CmMBoJIbT ⑤e npimrBa B npoJbIxKeHne Ha 1 cekyHda. Korato npneMe CnHana, ypeJbT ige n3dae 3BYK.
-Дистанционноу упаразелене зашиства Климат尼克 OT pa3ctоянne до 7 m.
- Пи BCЯкamянHa ha6aTePnIneВДИCTaHcNoHHOTO ynpaBLeHne TO ce HacTpoiBaabTomatNtuHo Ha pexim "OtOnJIeHne".
ОпИСАнгЕ HA PEXКUMITE HA PABOTA
PekmmHa pa6ota:
- HatackaiTe n otnyckaTe MODE (PEKIM), DOKaTO CBETHe CmBOLbT Ha XeJaHaTa HaCTpoiKa.

MODE
2.ИЗберетe"Оxnackданe",ИЗсушаванe",СамоBEHTиларop"ил"OTOnпене".
- OxlaJaIaHe - OxlaJda nOmeJeHneTo. HATnCKaIe FAN (BEHTNUlATOP), 3a da n36peTe BnCoka, cpeHa nInn HnCKa CkOpocT Ha BEHTNJatopa. HATnCKaIte 6yToHa "+" nInn " -, 3a Da peRynipate TemnepaTypata.

COOL
I3cuwaBaHe - 3CuwaBA B3dYxA B nOMEeHneTo. KImMaTnKbT N36npa aBTOMaTuHo TempepaTypa. BeHTnlaTopbT pa6OTn cAmO Ha HnCKa CKOpocT.
3A6EJIEXKKA: PexnM "I3cyuBaHaNe He Tp86Ba da ce I3NoI3Ba 3a OXlaJxJaHe Ha NOMeUeHHeTo.

DRY
- Camo BeHTnlaTop - pa60Tu camo BeHTnlaTopbT. HatncKaIte FAN (BEHTnlaTOP), 3a da n36epete BncoKa, cpeHa nn HnCKa ckopocT Ha BeHTnlaTopa.

FAN
- OToPJIeHHe - OToPJIaBa nOmeUeHneTo. HAtnCKaIte FAN (BEHTNlATOP), 3a da n36epeTe BnCoka, cpeHa nIIu HnCKa CKOpocT Ha BeHTnlaTopa. HAtnCKaIte 6bToHa "+" nIIu"-3a da peRyIuPaTe TemnepaTypaTa.
3A6EJIEXKKA: KIIMaTnUte, npeHa3NaueHcncamO 3a oxlaJdaHe, HAMAT pexkM "OtponJeHne".

HEAT
Ckopoct Ha BeHTnlaTopa
- HatnckaTe n otnyckaTe FAN (BEHTUNATOP), 3a da n36epeTe JeknaHaTa ckopocT ha BEHTUNaTopa.

FAN
2.ИЗберетe Всока,средна Или Ниска ckopoct.
Bucoka-3a MaKcImMaHa cKoPoCT Ha BeHTnlaTopa

HIGH
- CpeHa - 3a HopMaJIHa ckOpocT Ha
- BeHTnlaTopa

MID
Hncka-3a MNHmajHa CKOpocT HaBeHTnlaTopa

LOW
PecaptipaneHaΦnltbpa
- Korato CBETn INHdkaTOpbT 3a pectapTnpaHe Ha N Tbpa, CBAIeTe, NOUCTeTe N oCtabete OTHOB Bb3dyuHnA N Tbp.Bx. "POncTbaHe Ha Bb3dyuHnA N Tbp".
- HatncheTe n OTnycHeTe 6yToHa FILTER (HJTbP), cIeK KaTO CTe CMeHInn Bb3dUshnna HINTp.

3A6EJIEXKKA: Cne 360 yaca pa6oTa ha BeHTnIaTopa INdNkaTOpbT Ha fNITbpa Ze CBETHe. ToI ue OCTaHE BKNIOueH BnpOdbJIxKeHne Ha 180 yaca IIN dOKaTO He HATNCHE Te 6yToHa FILTER (fNITbP). Cne 180 yaca INdNkaTOpbT Ye Ce n3KJIIOUH aBTOMaTHUHO.
Temnepatypa
- HatnckaTe 6yToHa ^ + ^ 3a da NOBUnTe TempepaTypa. Hatnche Te BeHbX 6yToHa ^ + ^ 3a da NOBUnTe HactpoeHaTa TEMpepaTypa C 1^

- HatackaTe 6yToHa cbc StpeKna HaOny, 3a da noHNxNte TemnepaTypata. HataChTe 6yToHa cbc CTePka HAnOly BeHbX, 3a da noHNxNte 3adaHeHata TemnepaTypata c 1^ , nIn dBa TbTN, 3a da na noHNxNte c 2^

BENEKKN:
BpeKIM"OxlaJxHaHe"uIN"OTOpJIeHne" TempepaTypaTAMoKeJa6bJe HactPoeHa Mejdy 18^ n 32^
BpeKIM"CaMoBeHTnlaTOp"He MoKeJa ce HactpoBa TempepaTypaTa.
Bpejnm "I3cyaabaHe"HaTnckaHeto Ha 6byToHa ^ 一 / - ^ 一 npomehra3daedeHaTa temepaotypac 20^
- BYTOH "SWING" (3ABbPTAHE)
Cnnpa nn nyska 3aBbPtaHTo Ha kany3nte 3a xopn3OHTaIIHO peryInpaHe n 3aJaBa KjelaHaTa Nocoka Harope/HaOny Ha Bb3DyUHHN IOTOK.
- BSYTOH“SLEEP”(CINIILPEXIM)
BkIIOUba nn n3KIIIOUba cnae npexnM.
- ByTOH "AROUND U" (OKOJO BAC)
I3no3Ba ce 3a BkIIOUbaHe IINI IN3KIOUbaHe Ha fynKcunra "Around U"(Okono Bac).
- BYTOH "JET" (TYPBO)
I3nol3Ba Ce 3a BkIIOUBaHe IIN IIN3KlIOUBaHe Na fYHKZIraTa 3a 6bP3O oxJaXdaHe IIN OTOpJIeHne.
- BSYTOH "TIMER" (TAIMEP)
I3no3Ba ce 3a BkIIOUBaHe IINI IN3KIOUBaHe HaФyHKuYraT“TaMep 3a BkIIOUBaHe"
I3nO3Ba Ce 3a BkIIOUBaHe IINI IN3KIIIOUBaHe Ha YHKuTAta "TaIMep 3a IN3KIIIOUBaHe".
12. ByTOH "DIM" (ДИМИРАЕ)
ABTOMATUHa CKOPOCT Ha BEHTUNaTopa
BnCoka ckopoCT Ha BeHTInaTopa
CpeHa ckopocHa BeHTnlaTopa
Hncka ckopocT Ha BeHTnlaTopa
6 INdkaTop"UeTo yBCTBO"
IHHdkaTop 3a cpiu peximM
IHHdNkaTOp "Around U"
3A6EJIEXKKA: ByToHbT 3a peXnIM "IeCTo yBcTB0" (6th Sense) He yHKcuOnHnpa, KOrato e n36paHa yHKcnyTa "Typ6o."
- Hatnche Jet (Typ6o) B pexmHa oxlaqdahe. KImatKbT aBtOMaTuHo hAcIpoBa cKOpocTa Ha BeHTnlaTopa n TempepaTypa tHa 18^. Ppi 6bp3O OTIpHe N KImatKbT pa60n C aBTomatuHa cKOpoc Ha BeHTnlaTopa, KaTo IpomHe 3aJaDeHaTa TempepaTypa Ha 32^
Jet°
- 3a da n3ne3eTe ot Typ6o pejMma,HaTnCHete KOIto n Da e 6yToH, C n3KJIuOeHne Ha 6yToHnte Timer (TaIMep),
Around U (Okono Bac) u Swing (3aBbptaHe).
Ckopoct Ha BeHTnlaTopa
I3toBaHe Na KInMaTuKa
(pn INIINKaizna 3a nbIeN KOHTeHep 3a BODa, Bx. "IyckaHe Na IOKaJIHHa KJIIMaTNIK")
- HATINCHETe ON/OFF (BKJL./N3KJI.), 3a da n3KJIIOUHTe KIMMATnka.
2.ИЗваде TEцпсени Na Климатиka OT KOТа Кл Ипpeкьс悔ETaхраНВаHETO.
3.Ппемсгете урда винмателно Истблно на мосто заиточын силовьз,за ду поютente ВODATA. He mсгетe урда,пду вODATA д ce и STOTUNA дokраi.
4.CBaIeTe DOnbIInHTeNHaTApIO6Ka 3a N3TOUBAHe N3TOUeTe BODaTdoKpai.
5.Cbane OCHOBnHa Mapky 3a n3TOBaHe O CKo6aTa My.
CbaIe np6kata B KpaHa OCHOBnHa Mapky 3a n3TOBaHe
n n3TOye BOdaTdoKpa.
3A6EJEXKA: Ako KInMaTnKbT ige 6bJe pIn6paH 3a cbXpaHene cNei yNtpe6a, Bx. "CbxpaHene cNei yNtpe6a".
6. Пoctabete OTHOBIO np6kata Ha Mapkya 3a ИЗTOUBAHe IДОТblHITeJIHATA np6ka 3a ИЗTOUBAHe.
7. Okaete ochOBHnma Mapkyu 3a n3ToUbahe Ha ckO6aTa My.
8. Bbphete KImatika Ha MCTOT My.
9. Bклучete Клматиka B KOHTa TИ NII Bb3ctaHOBeTe eNeKTpo3aXpaHbAHeTO.
10. Hatachete ON/OFF (BKJI./M3KJI.), 3a da BKJIIOUHTe KIMMATika.
TouncTBaHe Ha Bb3dUnHnA Qmntbp
- HataHcHete ON/OFF (BKJI./M3KJI.), 3a da n3KJIIOUHTe KJIMATNka.
- Otbopete BpaTnUkata Ha naHena Ha nItbpa, KoTo e Ha Tpb6a Ha KJImatnka, I a CbaIe.
3.ИЗвадеТБьздушни Флтbp OT bpaTичкataHa NaHeNaHaФлтbpa.
4.ПоунстефиNTbpaспрахocmykaчka.AкоФиNTbрт eMHORO cyx,ИЗМиITE ro CToTnla BODa C Mekпeриел npenapat.
3A6ELEKKA:He MmIteФinTbpa BcBdOMnraHaMaMnHa N He 3NpON3BaYTe HNKaKBN NOUChTBaUN XMMNkAJN.
5.ИЗсушete HanbIино Вьзduшпя Филтbp,прди на го Вьрнete Ha мястOTO му, за де сега rapанда мakсималhaТа му eфektimbHOCT.
6.3akpenete Bb3dyuHnna fnnTbp KbM bpaTuKaTa Ha naHeNa ha fnnTba.
7. BbpheteBpaTmukkataHa naHena HaΦnITbpaHa MRCTOI.
8. HataChete ON/OFF (BKJ./I3KJI.), 3a da BKJIouHtTe KJIIMATnKA.
TouncTBaHcOTBbH
1.ИЗваде Teцпсени Na Климатika OT KOHTaKa TИnpeкьс悔Te 3axpaHbAHETo My.
2.ИЗвадете Вьздушни ФиNTьр и Го почеспг Рдени.Вж. "Почиствано вьздушни ФиNTьр".
3.ИЗБРБЕТЕКINIMATINAOTВБСМЕKAВДАХHAКьрпа.
4. Bклioчete КлmaТиКВ KOHTaNTI NII Bb3TaHOBeTe eNeKtpo3axpahBaHTo.
A.Доьнштелна побka 3a n3toubahe
B.Пpo6kaHaMapkya3aI3ToUbaHe

A. Bpatauka Ha naheHa φnItbpa
B.B3dyeuhenΦnTbp
- HatncheT ON/OFF (BKl./I3Kl.), 3a da BKliouynte KImatnka.
Cbxpanenme cne ynoptpe6a
1.ИЗTOUYE BODATA(BK.“ИЗTOUBA He KaJIIMaTnKa")
2. Octabete KInmatnka da pa6oTb B pexim "Camo BeHTINATOp" 3a OKOIO 12 Yaca, 3a Da ce n3Cywn.
3.ИЗваде тценина на Климатinksо Контакт.
4.CBaIeTe TbBkAIBMa MapKyu 3a OTBeXJaHe n rO cbXpaHbAitte 3aeDnC KInMAtnKa Ha NcTcTo n CyX MoCTo. Bx."VHcTpkyuIm 3a MoHTnpaHe"
5.CbaneTe KOMPnEKeT3a 3npo3opeu n ro CbXpaHBAIte 3aeJHO C KJIIMaTIka Ha YnCTO n CyXo MxCTo. Bx. "INcTpyKUIn 3a MOHTnpaHe."
6.ИЗвадеTeФиNTьрази ro почесTe.BЖ.“ПочисванеHa Bb3duyHnIЯ ФиNTbp".
7.ПочиртeteКлIMaTnkaOTbB.N.BxKTe"ПочИсТВанe OTbBn".
8. Bbphete qntbpa Ha mactoto My.
9.ИЗвадеTe 6aTePIMTe n CbXpaHЯВaTeДиCTaHcUHNoHHOTOупавленье 3aEdnoСКИМATиKaHa YIcTо N CyX MoTTo.
OTCTPAHЯBAHE HA HEN3ПРABHOCTN
Ipeu da ce 6auneBcepu3a, u3npo6baTe npednoxehnraTno-dony - Te moxe da Bn nomorhat da peuinte npo6nema 6e3 yxka nomou.
| Heɪзправноct | Анелиэ |
| КлIMаткьт не рабoting | 3axpaHbauηrT ka6e e n3KluyenOT OKTakTa. BkIoueTe UpeBa 3a3eMeH NOKTAK. Bx.
"ЗИSCBANHЯ KмЕLEKTPO3AXPANBAHETO".
Изгоря e npednaitelВ tabIoToHa doma BnIInpEkbCbaByt Ha eNektrpueckata BeprA rce e n3KlouyIL. Cmehete npednaitelЯ nIbKloueTe OTOHO BpeKbCbaAha Bepurata. Bx.
"ЗИSCBANHЯ KmELEKTPO3AXPANBAHETO".
He e Hatichat 6byoTbON/FF (BKJI./IV3KJI). Hatichete ON/OFF (BKJI./IV3KJI).
П配电chato e elektroazpangbaneto. Ичakайда BA b3ctahOBY TЕLEKTPO3AXPAHBAHeto.
Изретынг.TpeDnAHTe IINI npEkbCBAcBcSb3Zakbchenie NO BpeMe e c HeNoDxOJaIg
КалчET.Смehete c npednaitelЯ nIbPeleKbCBAUBAcBcSb3Zakbchenie NO BpeMe c IOxOJaIg
КалчET. Bx."ИЗСВВANHЯ КмELEKTPO3AXPANBAHeto". |
| КлIMаткьт пушинывиЗагаре на п配电дител.II npEkbCBAuHe Na pEkbCBAuHa Na eNeKTPueckata ВерURA | ИзретытгТБВрDE MNOrO UpeДу в Edna HElEeTrpuecka ВрURA.ИЗКluyeTe OT KONTAKТЯ II INI npEmeCTe HЯКоуe Dpyra E leKETPueckea ВрURA.
Опиггате сда сретартiptate.KlIMATKa TBbRpeсКоуe cIbKdAne 3a OBeKdAne, Korato rotBNTe IINI ce Kblte, И спостаразепуз.ИЗнOLТУСТСНКIMATKa, рepondа DA go pectaprtipate.
Сmeni tce pexim.ИЗчakай Te NOE 3MHyTu cIed n3KlouvBaHTo HO KImATMka, рepondа DA go pectaprtipate. |
| Изглесда, чe кlIMаткьт рабoting ТВьрд eMHOrO | Има li OTBOPeHa Brata II INI npOzopeuz. Дрьжte BbatITE и розорцite 3aTBopeEN.
В ржим Ha oxlaJdahe: KlIMATKbT b Bnomeшени, B Koeto IMA mHoro Xopa IINI CE n3KlOHTB AT OTOPIITe HUpeДу. ИЗнOLТYСТСНКIMATKa TBbRpeсКоуe cIbKdAne 3a OBeKdAne, Korato rotBNTe IINI ce Kblte, И спостаразепуз.ИЗнOLТYСТСНКIMATKa, рepondа DA go pectaprtipate.
Сmeni tce pexim.ИЗчakай Te NOE 3MHyTu cIed n3KlouvBaHTo HO KImATMka, рepondа DA go pectaprtipate. |
| КlIMATKьт рабoting сamo 3a Kpatko BpeMe, HO B NOMeSHeMoTe He e xlaJdo IINI TOII | Насгенату TempeРуtpa e bIzksa Do StaiHata. YBelenche IINI hamalete NahtproeHata TempePyrpa. Bx. "Описанe Ha peximite Ha pabota". |
| Покадан e Kod ha Гrelшka | АкDiICPleT Ha UpeDA pOKa3Ba Ka 3a rpeika E5, 3auchuYe e nbLHEN KOHTeHepbT 3a BOda.
ИЗТоMuTe BoDATA, Bx. "ИЗТоMuVeHa Na KIMATMka".Сched n3TOUVAHTo MОseHTo MaDE a PUCHE T KIMATMka.
Ак DiICPleT Ha UpeDA pOKa3Ba Ka 3a rpeika E1/E2/E3/E6/E7/EA, obadete ce B cepBn3a. |
| КlIMATKьт рабoting, HO He oxlaJda-/3aTOII | ФИNTbpye TmpScen II INI eZanuShen OT OtnaDbu. Почstete ФИNTbpa.
ИЗхODNHYT OTBOP 3a Bb3dux e bokoparh. Почstete ИЗХODNHYT OTBOP 3a Bb3dux.
Насгенату TempePyrpa He e nomOxOJaIa. B pexim"OxlanJDAe": NaCTPOHATA TempePyrpa e pexalte BocOka.
Hamalote NahtproeHata TempePyrpa. B pexim"OTOnIeHne": NaCTPOHATA TempePyrpa e pexalte BocOka.
tempePyrpa e pexalte HoxNc. YBlinuTe NahtproeHata TempePyrpa. |
| КlIMATKьт ce BKVIOUBy Iи3KlIOUBy TBbRpe chetO | КlIMATKьт He c PoXOJrySmaP3Mer 3a NOMeSHenTo. Пожерete KanacunTeta 3a OXIAJDAe/OTOnIeHne Ha BaSHAЯ NOKaIeH. IOKaIInTe KIMATMka Ca npedn3aNaChuEn 3a DoTbNITeHNO OXIAJDAe/OTOnIeHne Ha onpeHEnHa TOMINHATA IINI Bnlarata OTOmeSHenTo. Пожерete KanacunTeta 3a OXIAJDAe/OTOnIeHne ToNOMeSHenTo. IOKaIInTe KIMATMka Na MyCToTo. IOKaIInTe KIMATMka Na MyCToTo. IOKaIInTe KIMATMka Na MyCToTo. IOKaIInTe KIMATMka Na MyCToTo. IOKaIInTe KIMATMka Na MyCToTo. IOKaIInTe KIMATMka Na MyCToTo. IOKaIInTe KIMATMka Na myCToTo. IOKaIInTe KIMATMka Na myCToTo. IOKaIInTe KIMATMka Na myCToTo. IOKaIInTe KIMATMka Na myCToTo. IOKaIInTe KIMATMka Na myCToTo. IOKaIInTe KIMATMka Na myCToTo. IOKaIInTe KIMATMca Na MyCToTo. IOKaIInTe KIMATMca Na myCToTo. IOKaIInTe KIMATMca Na myCToTo. IOKaIInTe KIMATMca Na myCToTo. IOKaIInTe KIMATMca Na myCToTo. IOKaIInTe KIMATMca Na myCToTo. IOKaIInTe KIMATMca Na myCToTo. IOKaIInTe KIMATMCA Na myCToTo. IOKaIInTe KIMATMca Na myCToTo. IOKaIInTe KIMATMca Na myCToTo. IOKaIInTe KIMATMca Na myCToTo. IOKaIInTe KIMATMca Na myCToTo. IOKaIInTe KIMATMca Na myCToTo. IOKaIInTe KIMatMca Na myCToTo. IOKaIInTe KIMATMca Na myCToTo. IOKaIInTe KIMATMca Na myCToTo. IOKaIInTe KIMATMca Na myCToTo. IOKaIInTe KIMATMca Na myCToTo. IOKaIInTe KIMATMca Na myCToTo. IOKaIInTeKIMATMca Na myCToTo. IOKaIInTe KIMATMca Na myCToTo. IOKaIInTe KIMATMca Na myCToTo. IOKaIInTe KIMATMca Na myCToTo. IOKaIInTe KIMATMca Na myCToTo. IOKaIInTe KIMATMca Na myCToTo. IOKaIINTe KIMATMca Na myCToTo. IOKaIINTe KIMATMca Na myCToTo. IOKaIINTe KIMATMca Na myCToTo. IOKaIINTe KIMATMca Na myCToTo. IOKaIINTe KIMATMca Na myCToTo. IOKaIINTe KIMATMca Na myCToTo. IOKaNITe KIMATMca Na myCToTo. IOKaIINTe KIMATMca Na myCToTo. IOKaIINTe KIMATMca Na myCToTo. IOKaIINTe KIMATMca Na myCToTo. IOKaIINTe KIMATMca Na myCToTo. IOKaIINTe KIMATMca Na myCToTo. IOKaIXeTae, ILOpi, Me6eni I.T.H.
Вьншота TempePyrpa e pod 18°C. He n3PON3BaiTe KIMATMka B pexim Ha oxlaJdahe, korato BbNshnta TempePyrpa e pod 18°C. |
6. BUTONUL AL 6-LEA SIMT
Seteazā sau anuleazā functionarea in modul Al 6-lea simt.
7. BUTONUL OSCILARE