
TDA5029210 SENSIXX'X DA50 SENSORSEC - Iron BOSCH - Free user manual and instructions
Find the device manual for free TDA5029210 SENSIXX'X DA50 SENSORSEC BOSCH in PDF.



| Product Type | Steam Iron |
| Brand | BOSCH |
| Model | TDA5029210 SENSIXX'X DA50 SENSORSEC |
| Power Supply | 220-240 V ~ 50/60 Hz |
| Power | 2400 W |
| Water Tank Capacity | 350 ml |
| Dimensions (L x l x h) | 30 x 15 x 20 cm |
| Weight | 1.5 kg |
| Soleplate | Ceramic or similar soleplate |
| Main Functions | Steam ironing, steam burst, spray, vertical ironing, dry ironing |
| Safety | SensorSecure (automatic shut-off when releasing the handle), anti-drip protection, automatic shut-off after 10 seconds of non-use |
| Maintenance and Cleaning | Calc'nClean descaling system, descaling liquid recommended every 3 months |
| Included Accessories | TextileProtect cover, StoreProtect accessory for hot storage, descaling liquid (TDZ1101) |
| Spare Parts and Repairability | Contact Bosch authorized customer service for any repair or replacement of parts |
| General Information | Household use only. Do not immerse. Unplug before filling or cleaning. |
Frequently Asked Questions - TDA5029210 SENSIXX'X DA50 SENSORSEC BOSCH
User questions about TDA5029210 SENSIXX'X DA50 SENSORSEC BOSCH
0 question about this device. Answer the ones you know or ask your own.
Ask a new question about this device
Download the instructions for your Iron in PDF format for free! Find your manual TDA5029210 SENSIXX'X DA50 SENSORSEC - BOSCH and take your electronic device back in hand. On this page are published all the documents necessary for the use of your device. TDA5029210 SENSIXX'X DA50 SENSORSEC by BOSCH.
USER MANUAL TDA5029210 SENSIXX'X DA50 SENSORSEC BOSCH
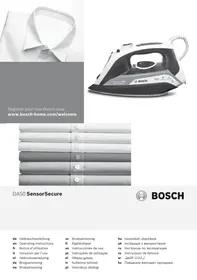
Register your new Bosch now: www.bosch-home.com/welcome

DA50 SensorSecure

BOSCH
de Gebrauchsanleitung en Operating instructions fr Notice d'utilisation it Istruzioni per l'uso nl Gebruiksaanwijzing da Brugsanvising no Bruksanvisning
sv Bruksanvisning fi Käytöhjeet es Instrucciones de uso pt Instruções de utilização el Odyiecxpnonc tr Kullanma talimati pl Instrukcja obslugi
hu Hasznalatiutasitask uk Inctpykui 3 BnKOpncTaHHa ru Hnctpykun IIO 3KcIaTaun ro Instruetiuni de folosire ar kz PAndaanhy XeHInDeri Hcyckaybik
Index
| DEUTSCH | 6 |
| ENGLISH | 12 |
| FRANÇAISE | 18 |
| ITALIANO | 24 |
| NEDERLANDS | 30 |
| DANSK | 36 |
| NORSK | 42 |
| SVENSKA | 48 |
| SUOMI | 54 |
| ESPAÑOL | 60 |
| PORTUGUES | 66 |
| ΕΥΑΗΝΙΚΑ | 72 |
| TÜRKUAGE | 78 |
| POLSKI | 84 |
| MAGYAR | 90 |
| ΥΚΑΙΗCbKA | 96 |
| ΡΥСΚΙΝΙ | 102 |
| ROMÁN | 108 |
| الجيرة | 119 |
| ΚΑ3ΑΚ | 120 |
DEUTSCH
ESPANOL
ENGLISH
PORTUGUES
FRANÇAISE
EMLHNIKA
ITALIANO
TÜRKÇE
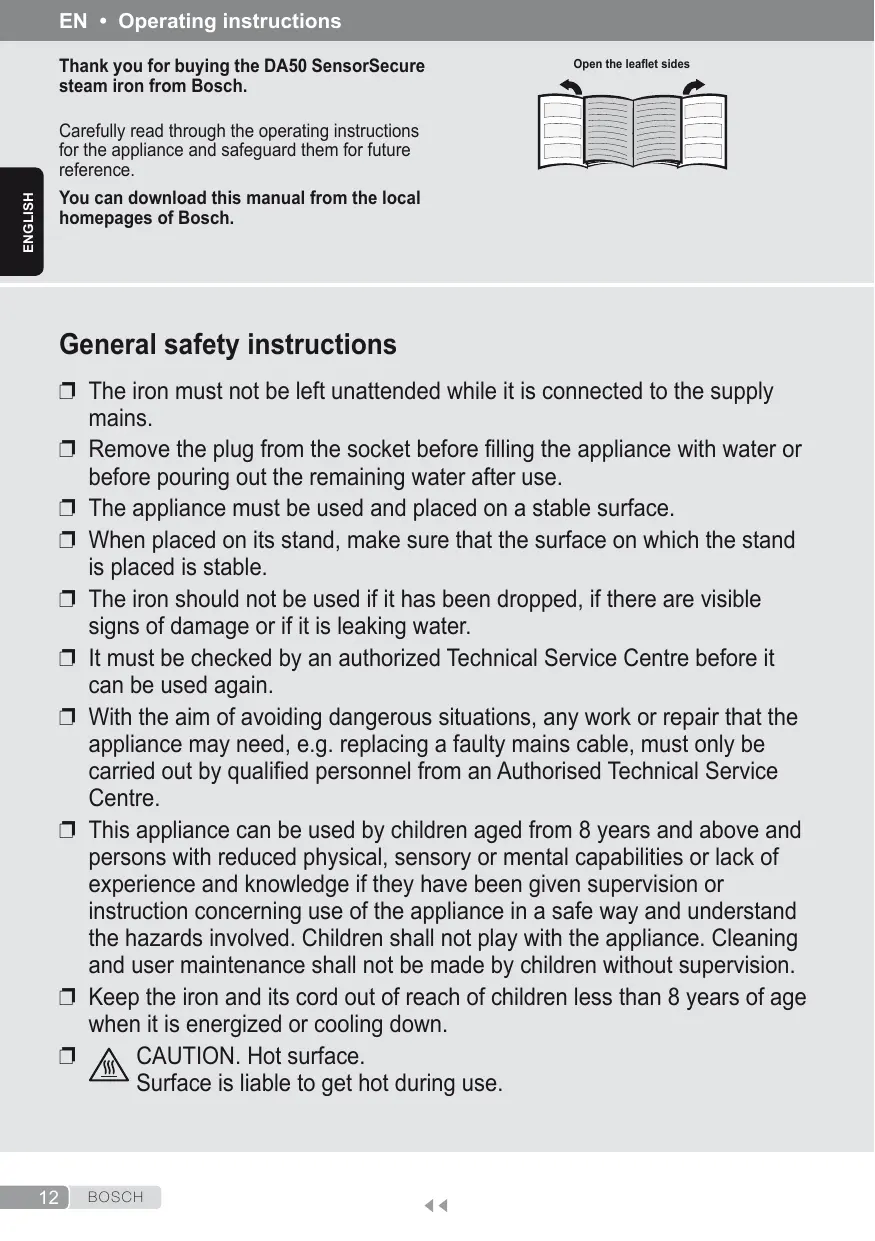
Thank you for buying the DA50 SensorSecure steam iron from Bosch.
Carefully read through the operating instructions for the appliance and safeguard them for future reference.
You can download this manual from the local homepages of Bosch.
Open the leaflet sides
General safety instructions
The iron must not be left unattended while it is connected to the supply mains.
- Remove the plug from the socket before filling the appliance with water or before pouring out the remaining water after use.
The appliance must be used and placed on a stable surface.
- When placed on its stand, make sure that the surface on which the stand is placed is stable.
The iron should not be used if it has been dropped, if there are visible signs of damage or if it is leaking water.
It must be checked by an authorized Technical Service Centre before it can be used again.
- With the aim of avoiding dangerous situations, any work or repair that the appliance may need, e.g. replacing a faulty mains cable, must only be carried out by qualified personnel from an Authorised Technical Service Centre.
This appliance can be used by children aged from 8 years and above and persons with reduced physical, sensory or mental capabilities or lack of experience and knowledge if they have been given supervision or instruction concerning use of the appliance in a safe way and understand the hazards involved. Children shall not play with the appliance. Cleaning and user maintenance shall not be made by children without supervision.
- Keep the iron and its cord out of reach of children less than 8 years of age when it is energized or cooling down.

CAUTION. Hot surface.
Surface is liable to get hot during use.
Important notices
- This appliance has been designed exclusively for domestic use and must not be used for industrial purposes.
- This appliance must be used only for the purposes for which it was designed, i.e. as an iron. Any other use will be considered improper and consequently dangerous.
- The manufacturer will not be held responsible for any damage arising from misuse or improper use.
- This appliance reaches high temperatures and produces steam during use, this could cause scalds or burns in case of improper use.
- Do not touch the soleplate! Hold the iron by its handle.
- Do not leave the supply cord hanging over the table or ironing board, to prevent the appliance from falling.
- Do not iron clothing while it is being worn!
- Never spray or aim the steam at persons or animals!
- Do not allow the power cable to come into contact with sharp edges or with the soleplate when it is hot.
- Never rest the iron in a horizontal position when the soleplate is hot. Rest it on its heel.
- Do not touch the appliance with wet hands when in operation.
- This appliance is to be connected and used in accordance with the information stated on its characteristics plate.
- This appliance must be connected to an earthed socket. If it is absolutely necessary to use an extension cable, make sure that it is suitable for 16A and has a socket with an earth connection.
- In order to avoid that, under unfavourable mains conditions, phenomena like transient voltage drops or lighting fluctuations can happen, it is recommended that the iron is connected to a power supply system with a maximum impedance of 0.28Ω . If necessary, the user can ask the public power supply company for the system impedance at the interface point.
- The appliance must never be placed under the tap to fill the water.
- Unplug the appliance from the mains supply after each use, or if a fault is suspected.
- The electrical plug must not be removed from the socket by pulling the cable.
- Never immerse the iron in water or any other fluid.
- Do not leave the appliance exposed to weather conditions (rain, sun, frost, etc.).
Advice on disposal
Our goods come in optimized packaging. This basically consists in using non-contaminating materials which should be handed over to the local waste disposal service as secondary raw materials. Your local town council can give you information about how to dispose of obsolete appliances.

This appliance is labelled in accordance with European Directive 2012/19/EU concerning used electrical and electronic appliances (waste electrical and electronic equipment - WEEE). The guideline determines the
framework for the return and recycling of used appliances as applicable throughout the EU.
Description
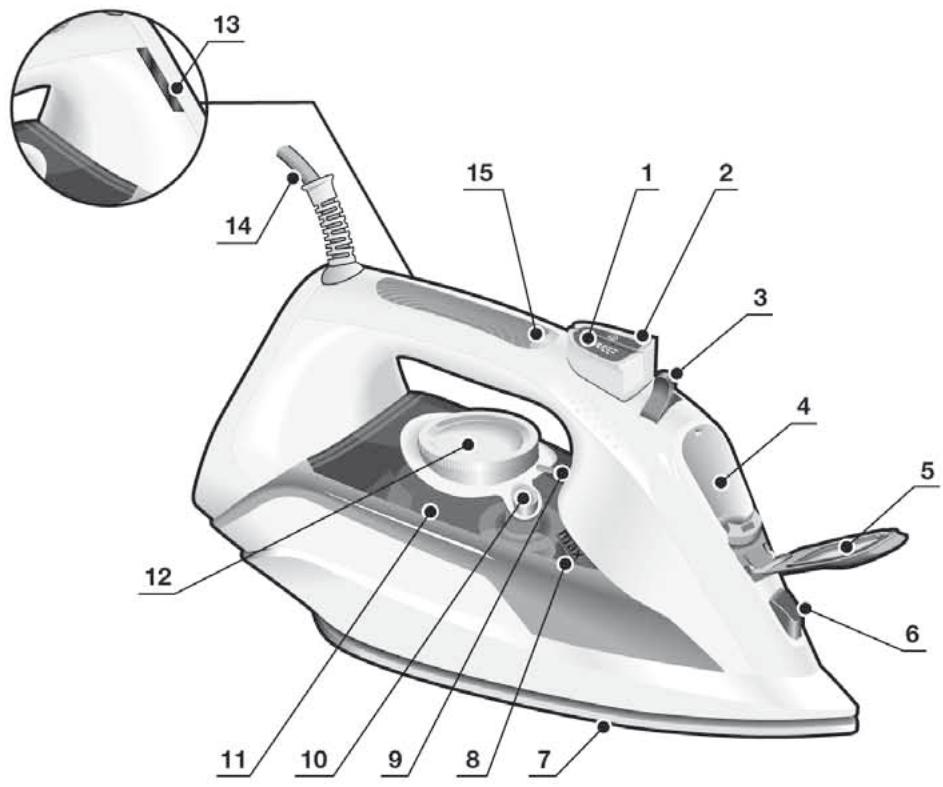
- Spray button
- Shot of steam button
- Steam regulator
- Water inlet
- Water inlet lid
- Spray nozzle
- Soleplate
- Level mark for maximum filling
- Temperature index
- "clean" button
- Water tank
- Temperature control
- Pilot light
- Power cord
- "SensorSecure" light
- "TextileProtect" fabric protector *
- Descaling fluid *
- "StoreProtect" accessory *
Before using your appliance for the first time
Remove any label or protective cover from the soleplate (7).
During its first use, the iron may produce certain vapors and odors that will disappear after a few minutes.
Using your appliance

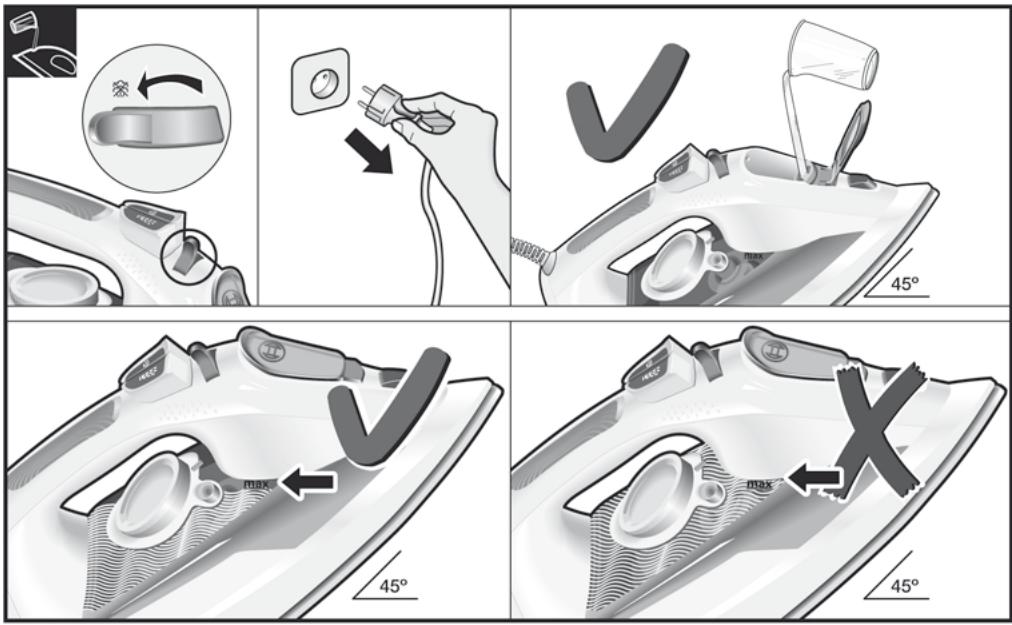
1. Filling the water tank
See the leaflet sides
This appliance has been designed to use normal tap water.
- The addition of other liquids (unless recommended by Bosch), such as perfume, will damage the appliance.
- Do not use condensation water from tumble dryers, air conditioning systems, or similar.
Any damage caused by the use of the aforementioned products will void the guarantee.
Set the steam regulator (3) to the × × position and unplug the iron from the mains!
- Open the water inlet lid (5).
- Fill the water tank (11). Never fill beyond the level mark for maximum filling (8).
- Close the water inlet lid.
Tip: To prolong the optimum steam function, you may mix tap water with distilled water 1:1. If the tap water in your district is very hard, mix tap water with distilled water 1:2.
You can inquire about the water hardness with your local water supplier.

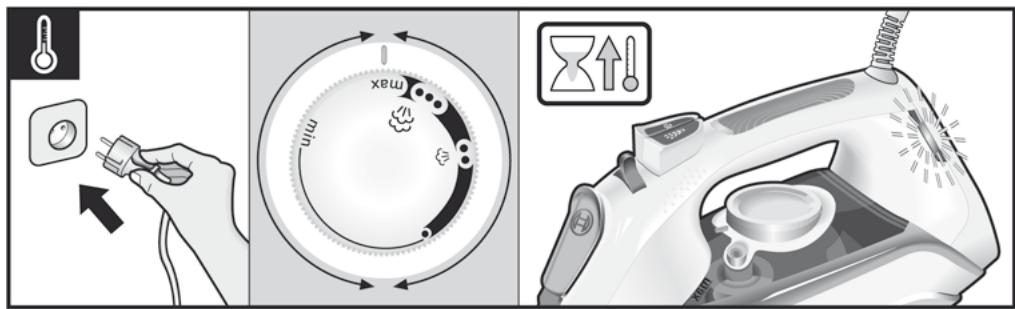
2. Setting the temperature
See the leaflet sides
The temperature control (12) adjusts the temperature of the soleplate (7).
Set the temperature control to the corresponding position by lining it up with the temperature index (9) on the iron.
| Temperature | Suitable for: |
| ● | Synthetics |
| ●● | Silk – Wool |
| ●●● | Cotton |
| max | Linen |
The pilot light (13) switches on while the appliance is heating up and switches off as soon as the set temperature is reached. If the temperature of the hot iron drops, you can continue ironing while the iron heats up again to the set temperature.

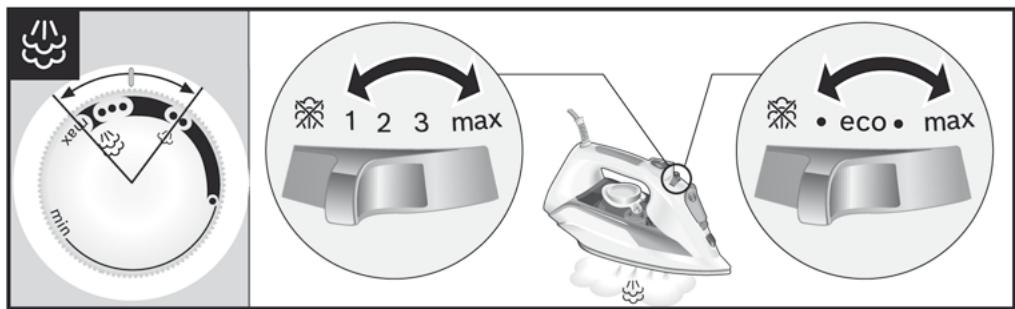
3. Ironing with steam
See the leaflet sides
The steam regulator (3) is used to adjust the amount of steam produced when ironing.
Temperature control (12)
Recommended position of the steam regulator (3) *

123 max
Tip: For better ironing results, iron the last strokes without steam to dry the garment.

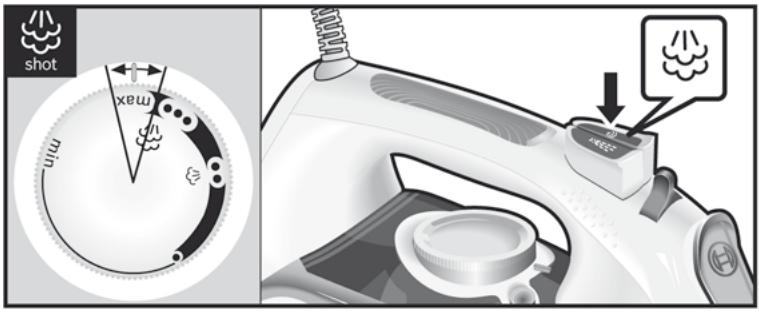
4. Shot of steam
See the leaflet sides
This can be used to remove stubborn wrinkles or to press in a sharp crease or pleat.
- Set the temperature control (12) to "max".
- Press the shot of steam button (2) repeatedly with intervals of at least 5 seconds.

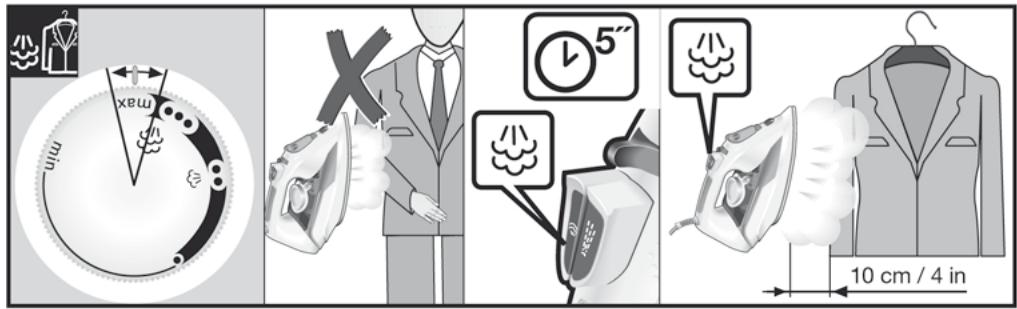
5. Vertical steam
See the leaflet sides
This can be used to remove creases from hanging clothes, curtains etc.
- Set the temperature control (12) to "max".
- Hang article of clothing on a clothes hanger.
- Operate the iron in a vertical position at a distance of 10 cm / 4 in, and press the shot of steam button (2) repeatedly with pauses of at least 5 seconds.

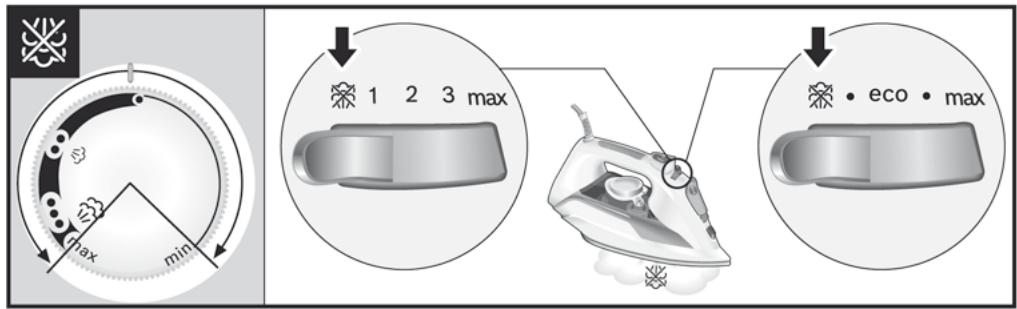
6. Ironing without steam
See the leaflet sides
This enables the iron to be used for dry ironing.
Set steam regulator (3) to the position.

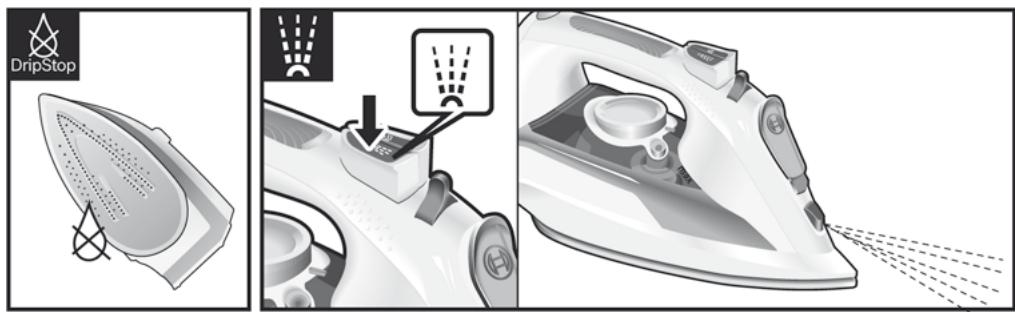
7. Drip protection *
See the leaflet sides
If the temperature is set too low, the steam is automatically switched off to avoid dripping. There may be an audible click when this occurs.

8. Spray
See the leaflet sides
This can be used to remove stubborn wrinkles.
Do not use the spray function with silk.

9. "SensorSecure" function
See the leaflet sides
The "SensorSecure" function makes the iron heat up only when the handle is gripped, and stop heating when the handle is no longer gripped. Thus, safety and saving energy get increased.
- Plug in the iron.
- "SensorSecure" light (15) flashes when the handle is not gripped, and will show a continuous light when the handle is gripped.
- If the iron handle is released for more than 10 seconds, the iron will stop heating automatically.
- When the handle is gripped again, the iron will start heating up again.
Initial heating up process: it is not necessary to grip the handle until the iron heats up to the set temperature. Once such temperature is reached, the pilot light (13) goes off.

10. After ironing
See the leaflet sides
- Switch the steam regulator (3) from "x" to "max" and back again several times (self-cleaning).
- Empty the tank. Hold the iron with the point down and shake lightly.
- Store standing on the rear, not on the base.
- Do not wrap the power cord (14) too tight!

Tips to help you save energy
Steam production consumes the most energy. To help minimise the energy used, follow the advice below:
- Start by ironing the fabrics that require the lowest ironing temperature. Check the recommended ironing temperature on the label on the garment.
- Regulate the steam according to the selected ironing temperature, following the instructions in this manual. Only use steam if necessary. If possible, use the spray function instead.
Try to iron the fabrics while they are still damp and reduce the steam setting. Steam will be generated from the fabrics rather than the iron.
If you tumble dry your fabrics before ironing them, set the tumble drier on the 'iron dry' program.
- If the fabrics are damp enough, turn off the steam regulator (3) completely.
- Stand the iron upright during pauses. Resting it horizontally with the steam regulator on generates wasted steam.

Cleaning & Maintenance
See the leaflet sides

Attention! Risk of burns! Always unplug the appliance from the mains supply before carrying out any cleaning or maintenance operation on it.
- If the iron is only slightly soiled, pull out the plug and allow the soleplate (7) to cool down. Wipe the housing and the soleplate with a damp cotton cloth only.
- If the cloth is synthetic, it may melt due to the high temperature on the soleplate, switch off the steam and rub off any residue immediately with a thickly folded, dry cotton cloth.
- To keep the soleplate smooth, you should avoid hard contact with metal objects. Never use a scouring pad, or chemicals to clean the soleplate.

AntiCalc
Multiple descending system
See the leaflet sides
A self-clean
Each time you use the steam regulator (3), the "self-clean" system cleans the mechanism of scale deposits.
B Calc'nClean
The "Calc'nClean" function helps to remove scale particles out of the steam chamber. Use this function approximately every 2 weeks if the water in your area is very hard.
Unplug the iron from the mains socket, set the steam regulator (3) to the xx position and fill the water tank (11) with water. Set the temperature control (12) to the "max" position and plug in the iron. After the necessary warm-up period, the lamp goes out. Then, unplug the iron (very important!). Set steam regulator to the "max" position. Hold the iron over a sink. Press the "clean" button (10) and shake the iron until approximately one third of the water capacity of the tank is evaporated. Boiling water and steam will come out, carrying scale or deposits that might be there. Release the "clean" button, and gently shake the iron for some seconds. Repeat the steps 5 and 6 three times until the tank is empty. Then plug the iron in and heat it up again until the remaining water has evaporated. Unplug the iron and let the soleplate (7) cool down. Wipe the soleplate with a damp cotton cloth only.
C "Calc'nClean" with descending liquid *
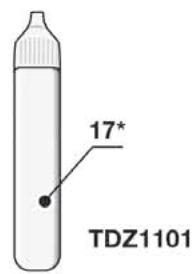
For deep descending, it is recommended to use the descending liquid especially developed by Bosch. This procedure should be carried out every 3 months.
- Fill the water tank (11) with tap water mixed with a measure (25ml) of the descending fluid (17*)
- Then follow the procedure described above in section "Calc'nClean" (steps 2 to 9).
The descending liquid may be purchased from our after-sales service or specialist shops.
Name of accessory: TDZ1101
D anti-calc
The "anti-calc" cartridge has been designed to reduce the build-up of scale produced during steam ironing, helping to extend the useful life of your iron. Nevertheless the "anti-calc" cartridge cannot remove all of the scale that is produced naturally over time.
TexttileProtect
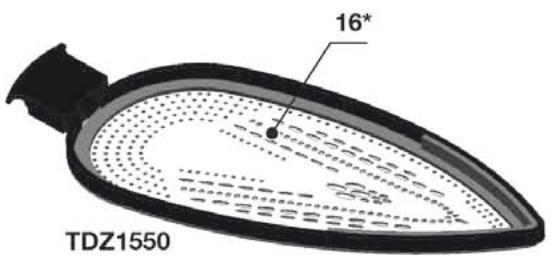
"TextileProtect" fabric protector *
See the leaflet sides
The fabric protector (16*) is used for steam-ironing delicate garments at maximum temperature without damaging them.
The fabric protector may be purchased from our after-sales service or specialist shops.
Name of accessory: TDZ1550
StoreProtect
"StoreProtect"
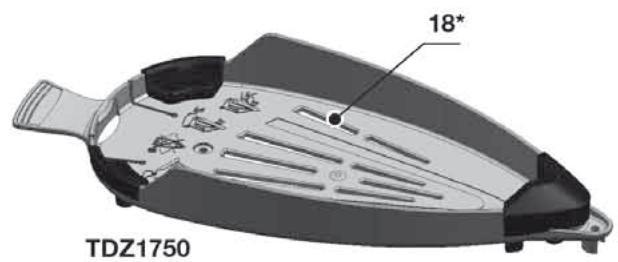
The "StoreProtect" accessory (18*) enables an immediate and safe storage of the iron, even with a hot soleplate (7).
This accessory may be purchased from our after-sales service or specialist shops.
Name of accessory: TDZ1750
| Problem | Probable cause | Solution |
| The iron does not heat up. | 1. Temperature control (12) set to minimum. 2. The “SensorSecure” system has been activated. The iron is set to stand-by. | 1. Turn to a higher position. 2. Grip the handle of the iron to re-start it. |
| “SensorSecure” indicator lamp (15) flashes. | 1. The “SensorSecure” system has been activated. The iron is set to stand-by. | 1. Grip the handle of the iron to re-start it. |
| The clothes tend to stick. | 1. The temperature is too high. | 1. Turn the temperature control (12) down and wait until the iron has cooled down. |
| Water drips out of the soleplate (7) together with steam. | 1. Temperature control (12) setting is too low. 2. Steam regulator (3) is set too high in conjunction with a low temperature. 3. You have pressed the shot of steam button (2) repeatedly without waiting for 5 seconds between each press. | 1. Turn the temperature control to a higher setting (between “•” and “max”) and wait until the pilot light (13) goes out. 2. Set the steam regulator (3) to a lower setting. 3. Wait 5 seconds between each press of the shot of steam button. |
| Steam does not come out. | 1. Steam regulator (3) is set to ×× position. 2. The temperature is too low. Anti-drip system is activated. | 1. Set the steam regulator to a higher position. 2. Set to a higher temperature if compatible with the fabric. |
| Smoke comes out when connecting the iron for the first time. | 1. This may be caused by the lubrication of some of the internal parts. | 1. This is normal and will stop after a few minutes. |
| Deposits come out through the holes in the soleplate (7). | 1. Traces of lime scale are coming out of the steam chamber. | 1. Carry out a cleaning cycle (see “Calc'nClean” section). |
If none of the above solves the problem, get in touch with an authorised technical service.
2. Setting the temperature
Ironing board sides
The temperature regulator (12) adjusts the temperature of the soleplate (7).
Set the temperature regulator by comparing with the temperature marking (9) on the iron.
| Temperaturinnstilling | Passer til: |
| • | Syntetisk |
| •• | Silke - ull |
| ••• | Bomull |
| max | Lin |
The indicator light (13) turns on when the iron heats up and turns off when the set temperature is reached. If the temperature of the hot iron drops, you can continue ironing while it heats up to the set temperature again.

3. Ironing with steam
Ironing board sides
6. Ironing without steam
T Seutbrettsidene
2. Set the temperature
10. Meta to oIdepwma
BLaTe TIG PIAUpeC TQU 5eOImluovou
1. Fill the water tank (3) up to the "max" mark and press a few times (self-cleaning) (automatic cleaning). 2. Set the thermostat. Hold the iron with the soleplate facing down and shake it gently. 3. Unplug while holding the appliance, not the base. 4. Do not touch the soleplate (14)!

- Do not immerse the appliance! Keep the cord away from the iron. Plug in so that the cord does not hang from the table and work properly to avoid damaging the appliance.
- Do not work with the appliance!
- Never immerse the appliance in water and do not use it near water!
Make sure the cord does not touch sharp objects and work with the iron properly. Never place the iron with the soleplate horizontally. Place it vertically. - Do not touch the appliance with wet or damp hands. - The appliance should be switched off and used according to the information on the rating plate. This appliance should be connected to an earthed socket. If absolutely necessary, before using, check that it is suitable for a 16 A supply and has an earthed socket. - To avoid overloading or damaging electrical circuits in case of unfavorable conditions in the electrical network, connect the iron to a network with maximum resistance
0.28 Ω. If necessary, the user can contact the energy company for information about the resistance of the network between the phases.
- Do not hold the appliance upside down to fill it with water. Always unplug the appliance from the mains after use or if you suspect a fault. Do not pull the plug out of the socket by pulling the cord.
- Do not immerse the iron in water or any other liquid.
- Do not leave the appliance outside the room (in the rain, in the sun, in the frost, etc.).
Recommendations for disposal
The appliance must be disposed of at an authorized collection point. This appliance contains materials that do not pollute the environment and can be handed over to the local waste disposal service for recycling. At local authorities, you can obtain information on how to dispose of old electrical appliances.
This appliance is marked in accordance with the European Directive 2012/19/EC on waste electrical and electronic equipment (WEEE), which has been withdrawn from use.
appliances - WEEE).
This directive establishes standards for the return and recycling of used electrical appliances and applies throughout the EU.
Description of the appliance
- Water tank release button
- Steam burst button
- Steam regulator 4. Soleplate 5. Water tank cap
- Spray nozzle 7. Handle
- Maximum water level mark 9. Temperature indicator
- “Clean” button (self-cleaning)
- Water tank
- Temperature regulator 13. Indicator light 14. Water fill opening 15. “SensorSecure” indicator
- Protective coating for fabrics «TextileProtect» (fabric protection) *
- Section for use of the device
- Protective coating «StoreProtect» (protection for storage) *
Before first use of the device
Remove all labels (7) and protective coatings.
During first use, the device may emit steam and odor, which will disappear after a few minutes.
Using the device

1. Filling the water tank
Fig. A. Side view
Fig. B. Assembly view
The steam regulator (3) is used to adjust the amount of steam; it is activated during operation.
| Р发电机 Темпегатур(12) | Екώнotherapyе положения napoperúлаятора (3)* |
| 1 2 3 max | |
| • eco • max | |
| 1 2 3 max | |
| • eco • max |

Tip: To achieve optimal results, we recommend turning on the steam and running the iron over the fabric several times without water, so that it absorbs well.

4. Steam burst
Fig. B. Assembly view
This function can be used to strengthen stubborn creases or to refresh clothes.
- Set the temperature regulator (12) to the maximum mark (max).
- Press the steam button (2) several times with an interval of about 5 seconds.
This function can be used for dry ironing on a low setting, for example.
- Set the temperature regulator (12) to the maximum mark (max). 2. Hang the clothes on a hanger. 3. Treat the garment with steam, holding the iron vertically at a distance of 10 cm. Press the steam button (2) with intervals of about 5 seconds.

Table of contents
The steam boost function can be used for dry ironing.
Set the steam regulator (3) to the position

7. Protection against drips*
Table of contents
If the temperature is set too low, the steam may turn off automatically to prevent drips. In this case, condensation may appear.

Do not use the spray function while ironing.

9. «SensorSecure»
Table of contents
Thanks to the «SensorSecure» function, the ironing process starts automatically when you take the iron in your hand and stops when you put it down. This ensures the safety of the device and saves energy.
1. Plug the iron into a power outlet. 2. When you are not touching the iron handle, the «SensorSecure» indicator (15)
Mirae. KoJiX Bn bepetecra 3a pyuKy, BIn NOUHaC CBITNTNcRA NOCTIHNM CBITTIOM.
- JI KIIO BIDNCTITn pyKy 6JIbSe HIX Ha 10 cKeYH, HarpiBaHHr npackn aBtOMaTHHO npINHHTbcR.
- Kolni Bn 3HOBy Bi3bMeTeC8 3a pyuKy, npacka 3HOBy NoUHe HarpiBaTnc8.
NouaTKOBE HarpiBaHHa: HeMae Heo6XiIHoCTi 6paTnc3a pyuKy, POKn IpaCaKe He HarpieTbcr Do 3aDaHOI Tempepatypn. PicraIOocrHHeHH nOTpiHOI Tempepatypn CbitIOBm iINkAtop (13) rache.

10.Писяпасуванья
TINB.CknaedeHCToPiHKN
1.Перекнітьnapорулітόр(3)зх ha MaKcIMaMbHypo3HaUky(max)iHa3aД degiNbKa pa3iB(CamOoUHSeHH). 2. CnpoJxHitb pe3epeByap. NObepHtB npacky HocIKOM doniInu 3Inerka notpcitb. 3. Y paazi 36ipahan npacky Heo6xidno CTaBHTn Ha 3aHIO qactiny, a He Ha NiDOWbY. 4. He ckpyuYte uHyp XnBneHHa (14) duXe cnIbHO!

IopaAn 0oDo 3aoUaJxHnEheprii
Binbwe BcboE eHepriBntpaAcTbCna H yTBOpENH npn. 1063aoaadtneJeKtpoeHepriIO, DToTPMMyTeCb TaKx npaI:
1.Почнайтпрасувань 3блн3и,ш потребуснйнкчогуtemпepатугогоржIMy. Реком endobanytempepaTyprapsувань моЖна рдИВNTUCЯярпкax peey. 2. BiDperyIHOte noIaU npn BiIDnoBIDNo do oBpaHOro TempepatyHoro pexMMy npacByaHna, DoTPMMYIOuHcB Bka3IBOK iiei IHCTpyKlii 3 ekcnnyataJIi. 3. KopncTyIeTce nproIO IInSe y pa3i notpe6n. Hatomictb, kUO MOxHa, BIKOPNCTOByTe cyHKUIO p03NIJIIOBAHH BOIN.
HamaraTeca npacyBatn 6iH3ny, nKn BOHa 1e BOJORA, BCTaHOBIOUOy peXIM noaHi napn Ha MeHwe 3NaueHnn. TaKm YINOM npayTbOPOBATImetbcr BCEpeDInHi TkaHNn, a He B npacci. JaKIo Bu KOpNCyTecB cyNlIbHOIO MaunHOIO, obnapnte nporpamy «nID npacky".
4.Якiosoблнзн достаTNBOBONORA, napoperуTNTop(3)MOXHA B3araJI BUMKHyTN. 5.Пид уас пayзу пpoцeci npacybaHHЯ CTaBTe npacky BeptnkaJIbHo.JKso npacka 3
YbIMKHeHm napoperyIaTOpOM CToITb Trop3OHTaJIbHO,MapHO Bntpaaetbca npapa.

OuHcHnTaDOrJa
TINB.CKNaedeHCTOPIHKN

Speed should be reduced to 3 or less before unplugging the appliance from the outlet.
- If the iron is dirty, unplug it from the outlet and let it cool down (7). Wipe the soleplate and the body with a damp cloth only. 2. If the fabric is synthetic, it may melt at high temperatures. In this case, unplug the iron and immediately remove any residue with a dry cloth. Repeat a few times.
- To protect the soleplate surface, avoid contact with metal objects. Never use abrasive sponges, cleaning agents, or chemicals to clean the soleplate.

AntiCalc
Cleaning system
Page 3
A self-clean
Each time you use the steam regulator (3), the self-cleaning system activates automatically.
In Calc'nClean
The Calc'nClean function helps remove scale from the steam chamber. If the water in your area is very hard, use this function approximately every 2 weeks.
Plug the iron into an electrical outlet, set the steam regulator (3) to the indicated position, and fill the water reservoir (11). 2. Set the temperature regulator (12) to the maximum position (max) and plug the iron into the electrical outlet.
3 After the iron heats up, the indicator turns off. Then unplug the iron from the electrical outlet (this is very important!). 4 Set the steam regulator to the maximum position (max). 5 Hold the iron over a sink. Press the "clean" button (10) and shake the iron until about a third of the water has evaporated from the reservoir. Steam and any residue will come out. 6 Release the "clean" button and carefully shake the iron for a few seconds. 7 Repeat steps 5 and 6 until the water reservoir is empty. Then plug the iron back into the electrical outlet and heat it again until all remaining water has evaporated. Unplug the iron from the electrical outlet and let it cool down (7). Clean the soleplate with a damp cloth (do not use any other materials).

Troubleshooting
| Поблесma | Можлова р�чина | Рішени. |
| Прасka не наразовастся. | 1. Perúларт op Tempepatурni (12) BCTAHOBVIENH ha MIIIMaIbHy po3HaCy. 2. AKTIBOBAHA систем «SensorSecure». Прасka перашило do reşиму очikвань. | 1. Uctanobitbperúlarpottempepatурni ha 6ilbsh Bvscoky po3HaCy. 2. Bi3bmitcya 3a ryku npackn dlya II yBIMKHeHnY. |
| Mirae i Indikatop «SensorSecure» (АВТОВIMКHeHнЯ) (15). | 1. AKTIBOBAHA систем «SensorSecure». Прасka перашило b reşимо ochivBaHnY. | 1. Bi3bmitcya 3a ryku npackn dlya II yBIMKHeHnY. |
| Одя піліпац. | 1. Tempepatура занадTo BvScoka. | 1. Uctanobitbperúlarpottempepatурni (12) Ha мeншу po3HaCy i 3aekayite, nokn прасka oxolohne. |
| Разом 3 napою 3 πidòши (7) посочустся вoda. | 1. Perúларт op Tempepatурni (12) BCTAHOBVIENH ha 3ahandTo Hn3bky po3HaCy. 2. ПaporegУларт (3) BCTAHOBVIENH ha 3ahandTo BvScoke 3auchenry pri n Hn3bKOMU tempepatуHomy reşimi. 3. Ви кльba pažíb Hatinchyni ha KhoNkUpapoboro ydary (2), He 3auchekabSh 5 cekynd mIx hantickaHnMy. | 1. Поверніtberperúlarpottempepatурni ha 6ilbse 3auchenry (mIx «**» i «max») i nočekayite, nokn 3rache i Indikatop (13). 2. UctanobitbnaporegУларt (3) Ha мeншу no3HaCy. 3auchakite 5 cekynd mIx hantickaHnMy n KaHONkUpapoboro ydary. |
| Прара не вихODиь. | 1. ПaporegУларt (3) уstановелу y noLoXeHnY. 2. 3ahandTo Hn3bka tempepatура. AKTIBOBAha anTKKpANELbHa систем. | 1. UctanobitbnaporegУларt ha 6ilbsh BvScoke 3auchenry. 2. Uctanobitb6ilbS BvScoke 3auchenry, якшоZe πidxodntb Дlya ТканHiN,ЯкBu NpacysTe. |
| Пд часпшого вкluченны до мереки ist раcsski вихODиь DIM. | 1. Ze moze bytnc snpruchinohe OMaSeHnYam Deякxh BvHTpiIzhix DeTaIeŋ. | 1. ZeHopmaIbNeя виши, чered з кльka xВилии BOH noPruINHnTcY. |
| I3 OTbOriB y πidòшиВихODиь nakin (7). | 1. I3 napoBoi' kamepi вихODиь nakin. | 1. Виковaite zuKIn kn OChuSEHnR (ДИВ роздln «Функця видаленин有很大псИpy Calc'nClean'). |
If the problem is not resolved by the steps above, contact an authorized service center.
Blah blah Vasya running around DA50 SensorSecure from Bosch.
Read the operating instructions carefully and keep them for future use.
This manual can be downloaded from the Bosch website for your country.
Unfold the folded pages.
The basic rules for the collection and recycling of waste electrical and electronic equipment are defined throughout the EU.
Description
- Water separation button
- Steam burst button 3. Steam regulator 4. Water filling opening 5. Water filling opening cover
- Spray nozzle 7. Soleplate 8. Maximum water level mark 9. Temperature indicator
- “Clean” button (descaling)
- Water tank capacity
- Temperature regulator
- Light indicator
- Power supply indicator lamp "SensorSecure"
- Protective cover for delicate fabrics "TextileProtect" (fabric protection) * 17. Liquid for stain removal*
- Additional accessory "StoreProtect" (protection during storage) *
Before first use of the appliance
Remove the label or protective coating from the soleplate (7).
During first use, the iron may emit steam and odors that will disappear after a few minutes.
Using the appliance

1. Filling the water tank
See folded pages
This appliance is designed for use with normal tap water.
Adding other liquids (if they are not recommended by Bosch), for example perfumes, can lead to damage to the appliance. Do not use condensed water from tumble dryers, air conditioning systems, or other similar devices.
Any damage caused by the use of the above-mentioned substances will lead to the termination of the warranty.

Set the steam regulator (3) to the position and unplug the iron from the socket!
- Open the water inlet cover (5).
- Fill the water tank (11). Never fill water above the maximum fill level mark (8).
- Turn the knob to open the hole.

Tip: To ensure the system operates efficiently and safely, you can mix distilled water with tap water in a 1:1 ratio. If the tap water in your area is very hard, mix it with distilled water in a 1:2 ratio. You can find out the hardness of your water from your local water supply company.

2. Temperature adjustment
Hot plates
Adjust the temperature using the thermostat (27) via the control knob (12).
Set the thermostat to the desired temperature according to the temperature indicator (9) on the unit.
TDZ1750:

"self-clean"
Calc'nClean
B
g 3) jai bia .1 (jdi tse sall "max"
jaiabaiil juyiyolssal .jj jyj yj .2 0
1e 1j j 3
(14) 5jLjSll jSll cal a.4
aalbllgdi dlaclu cldlu

1
g 2
aill aiai g. 3.3 .sol i dll j


- DA50 SENSORSECURE
- BOSCH
- INDEX
- GENERAL SAFETY INSTRUCTIONS
- IMPORTANT NOTICES
- ADVICE ON DISPOSAL
- DESCRIPTION
- BEFORE USING YOUR APPLIANCE FOR THE FIRST TIME
- REMOVE ANY LABEL OR PROTECTIVE COVER FROM THE SOLEPLATE (7)
- USING YOUR APPLIANCE
- FILLING THE WATER TANK
- ANY DAMAGE CAUSED BY THE USE OF THE AFOREMENTIONED PRODUCTS WILL VOID THE GUARANTEE
- SET THE STEAM REGULATOR (3) TO THE × × POSITION AND UNPLUG THE IRON FROM THE MAINS
- SETTING THE TEMPERATURE
- THE TEMPERATURE CONTROL (12) ADJUSTS THE TEMPERATURE OF THE SOLEPLATE (7)
- IRONING WITH STEAM
- THE STEAM REGULATOR (3) IS USED TO ADJUST THE AMOUNT OF STEAM PRODUCED WHEN IRONING
- SHOT OF STEAM
- THIS CAN BE USED TO REMOVE STUBBORN WRINKLES OR TO PRESS IN A SHARP CREASE OR PLEAT
- VERTICAL STEAM
- THIS CAN BE USED TO REMOVE CREASES FROM HANGING CLOTHES, CURTAINS ETC
- IRONING WITHOUT STEAM
- THIS ENABLES THE IRON TO BE USED FOR DRY IRONING
- DRIP PROTECTION
- SPRAY
- THIS CAN BE USED TO REMOVE STUBBORN WRINKLES
- SENSORSECURE" FUNCTION
- THE "SENSORSECURE" FUNCTION MAKES THE IRON HEAT UP ONLY WHEN THE HANDLE IS GRIPPED, AND STOP HEATING WHEN THE HANDLE IS NO LONGER GRIPPED. THUS, SAFETY AND SAVING ENERGY GET INCREASED
- AFTER IRONING
- TIPS TO HELP YOU SAVE ENERGY
- CLEANING & MAINTENANCE
- ATTENTION! RISK OF BURNS! ALWAYS UNPLUG THE APPLIANCE FROM THE MAINS SUPPLY BEFORE CARRYING OUT ANY CLEANING OR MAINTENANCE OPERATION ON IT
- MULTIPLE DESCENDING SYSTEM
- A SELF-CLEAN
- B CALC'NCLEAN
- C "CALC'NCLEAN" WITH DESCENDING LIQUID
- NAME OF ACCESSORY: TDZ
- D ANTI-CALC
- TEXTILEPROTECT" FABRIC PROTECTOR
- STOREPROTECT
- THE TEMPERATURE REGULATOR (12) ADJUSTS THE TEMPERATURE OF THE SOLEPLATE (7)
- SET THE TEMPERATURE
- META TO OIDEPWMA
- RECOMMENDATIONS FOR DISPOSAL
- DESCRIPTION OF THE APPLIANCE
- BEFORE FIRST USE OF THE DEVICE
- REMOVE ALL LABELS (7) AND PROTECTIVE COATINGS
- USING THE DEVICE
- STEAM BURST
- PROTECTION AGAINST DRIPS
- SENSORSECURE
- ПИСЯПАСУВАНЬЯ
- IOPAAN 0ODO 3AOUAJXHNEHEPRII
- OUHCHNTADORJA
- SPEED SHOULD BE REDUCED TO 3 OR LESS BEFORE UNPLUGGING THE APPLIANCE FROM THE OUTLET
- CLEANING SYSTEM
- IN CALC'NCLEAN
- TROUBLESHOOTING
- BLAH BLAH VASYA RUNNING AROUND DA50 SENSORSECURE FROM BOSCH
- BEFORE FIRST USE OF THE APPLIANCE
- USING THE APPLIANCE
- TEMPERATURE ADJUSTMENT
- AALBLLGDI DLACLU CLDLU
Brand : BOSCH
Model : TDA5029210 SENSIXX'X DA50 SENSORSEC
Category : Iron