SENSIXX DA 30 - Iron BOSCH - Free user manual and instructions
Find the device manual for free SENSIXX DA 30 BOSCH in PDF.

User questions about SENSIXX DA 30 BOSCH
0 question about this device. Answer the ones you know or ask your own.
Ask a new question about this device
Download the instructions for your Iron in PDF format for free! Find your manual SENSIXX DA 30 - BOSCH and take your electronic device back in hand. On this page are published all the documents necessary for the use of your device. SENSIXX DA 30 by BOSCH.
USER MANUAL SENSIXX DA 30 BOSCH
Register your new Bosch now: www.bosch-home.com/welcome
Sensixx'xDA30

BOSCH
de Gebrauchsanleitung
en Operating instructions
fr Notice d'utilisation
it Istruzioni per l'uso
nl Gebruiksaanwijzing
da Brugsanvisning
no Bruksanvisning
sv Bruksanvisning
fi Käytöohjeet
es Instrucciones de uso
pt Instruções de utilização
el Odyiec xpnoc
tr Kullanma talimati
pl Instrukcja obslugi
hu Hasznalatiutasitask
uk IHCTpykci3 BVKOpncTaHH
ru INHCTpykU TIO 3KcTnAytauuN
ro Instruetiuni de folosire
ar
kz Taaaandahy xehiHderi Hcyckaybik


Index
| DEUTSCH | 6 |
| ENGLISH | 12 |
| FRANÇAISE | 18 |
| ITALIANO | 24 |
| NEDERLANDS | 30 |
| DANSK | 36 |
| NORSK | 42 |
| SVENSKA | 48 |
| SUOMI | 54 |
| ESPAÑOL | 60 |
| PORTUGUES | 66 |
| ΕΥΑΗΝΙΚΑ | 72 |
| TÜRKUAGE | 78 |
| POLSKI | 84 |
| MAGYAR | 90 |
| ΥΚΑΙΝΥΚΑ | 96 |
| ΡΥСΚΗ | 102 |
| ROMÁN | 108 |
| الجيرة | 119 |
| ΚΑ3ΑΚ | 120 |
DEUTSCH
ESPANOL
ENGLISH
PORTUGUES
FRANÇAISE
EMLHNIKA
ITALIANO
TÜRKÇE
NEDERLANDS
POLSKI
DANSK
MAGYAR
NORSK
YKPAIHCBKA
SVENSKA
PYCCKHE
SUOMI
ROMÁN
KA3AK
Thank you for buying the Sensixx'x DA30 steam iron from Bosch.
Carefully read through the operating instructions for the appliance and safeguard them for future reference.
You can download this manual from the local homepages of Bosch.

Open the leaflet sides
General safety instructions
The iron must not be left unattended while it is connected to the supply mains.
- Remove the plug from the socket before filling the appliance with water or before pouring out the remaining water after use.
The appliance must be used and placed on a stable surface.
- When placed on its stand, make sure that the surface on which the stand is placed is stable.
The iron should not be used if it has been dropped, if there are visible signs of damage or if it is leaking water.
It must be checked by an authorized Technical Service Centre before it can be used again.
- With the aim of avoiding dangerous situations, any work or repair that the appliance may need, e.g. replacing a faulty mains cable, must only be carried out by qualified personnel from an Authorised Technical Service Centre.
This appliance can be used by children aged from 8 years and above and persons with reduced physical, sensory or mental capabilities or lack of experience and knowledge if they have been given supervision or instruction concerning use of the appliance in a safe way and understand the hazards involved. Children shall not play with the appliance. Cleaning and user maintenance shall not be made by children without supervision.
- Keep the iron and its cord out of reach of children less than 8 years of age when it is energized or cooling down.

CAUTION. Hot surface.
Surface is liable to get hot during use.
Important notices
- This appliance has been designed exclusively for domestic use and must not be used for industrial purposes.
- This appliance must be used only for the purposes for which it was designed, i.e. as an iron. Any other use will be considered improper and consequently dangerous.
- The manufacturer will not be held responsible for any damage arising from misuse or improper use.
-
This appliance reaches high temperatures and produces steam during use, this could cause scalds or burns in case of improper use.
-
Do not touch the soleplate! Hold the iron by its handle.
- Do not leave the supply cord hanging over the table or ironing board, to prevent the appliance from falling.
- Do not iron clothing while it is being worn!
-
Never spray or aim the steam at persons or animals!
-
Do not allow the power cable to come into contact with sharp edges or with the soleplate when it is hot.
- Never rest the iron in a horizontal position when the soleplate is hot. Rest it on its heel.
- Do not touch the appliance with wet hands when in operation.
- This appliance is to be connected and used in accordance with the information stated on its characteristics plate.
-
This appliance must be connected to an earthed socket. If it is absolutely necessary to use an extension cable, make sure that it is suitable for 16A and has a socket with an earth connection.
-
In order to avoid that, under unfavourable mains conditions, phenomena like transient voltage drops or lighting fluctuations can happen, it is recommended that the iron is connected to a power supply system with a maximum impedance of 0.28 . If necessary, the user can ask the public power supply company for the system impedance at the interface point.
- The appliance must never be placed directly under the tap to fill the water tank.
- Unplug the appliance from the mains supply after each use, or if a fault is suspected.
- The electrical plug must not be removed from the socket by pulling the cable.
- Never immerse the iron in water or any other fluid.
- Do not leave the appliance exposed to weather conditions (rain, sun, frost, etc.).
Advice on disposal
Our goods come in optimized packaging. This basically consists in using non-contaminating materials which should be handed over to the local waste disposal service as secondary raw materials. Your local town council can give you information about how to dispose of obsolete appliances.

This appliance is labelled in accordance with European Directive 2012/19/EU concerning used electrical and electronic appliances (waste electrical and electronic equipment - WEEE). The guideline determines the
framework for the return and recycling of used appliances as applicable throughout the EU.
Description
- Spray button
- Shot of steam button
- Steam regulator
- Water inlet
- Water inlet lid
- Spray nozzle
- Soleplate
- Level mark for maximum filling
-
Temperature index
-
"clean" button
- Water tank
- Temperature control
- Pilot light *
- Power cord
- "auto off" indicator lamp *
- "SensorSecure" light *
- Beaker *
Before using your appliance for the first time
Remove any label or protective cover from the soleplate (7).
During it first use the iron may produce certain vapours and odours that will die away after a few minutes.
Using your appliance

1. Filling the water tank
See the leaflet sides
This appliance has been designed to use normal tap water.
- The addition of other liquids, (unless recommended by Bosch) such as perfume, will damage the appliance.
- Do not use condensation water from tumble dryers, air conditioning systems or similar.
Any damage caused by the use of the aforementioned products will make the guarantee void.
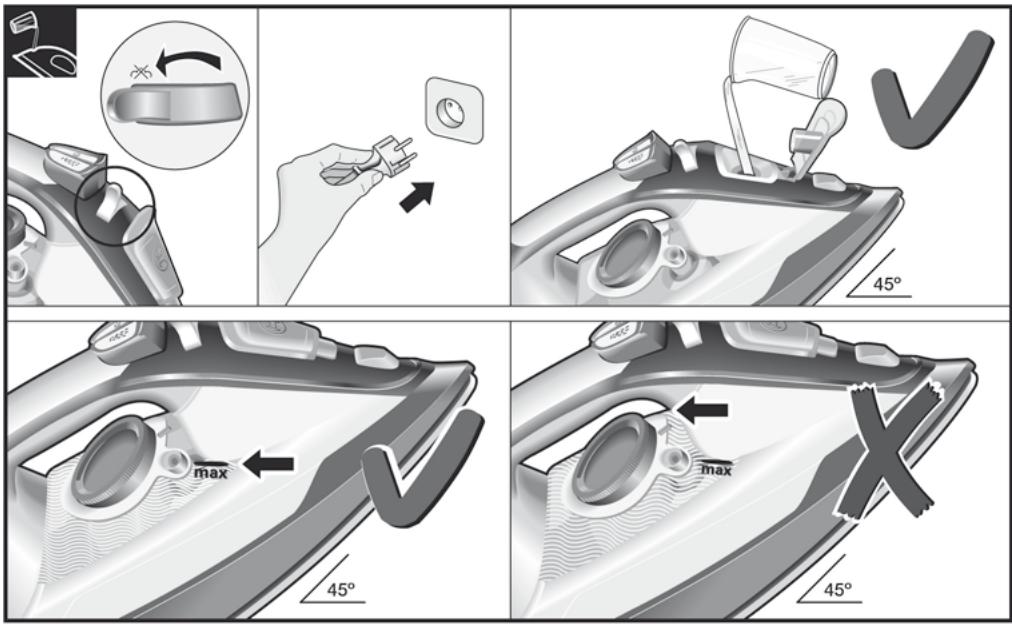
Set the steam regulator (3) to the [X] position and unplug the iron from the mains!
- Open the water inlet lid (5).
- Fill the water tank (11). Never fill beyond the level mark for maximum filling (8).
- Close the water inlet lid.
Tip: To prolong the optimum steam function, you may mix tap water with distilled water 1:1. If the tap water in your district is very hard, mix tap water with distilled water 1:2.
You can inquire about the water hardness with your local water supplier.
![BOSCH SENSIXX DA 30 - Set the steam regulator (3) to the [X] position and unplug the iron from the mains! - 1](/content/2025/01/194371/images/28aff939c1607bec2e08a6a6fead633c5bb6a4aff7d13f9bb811ef16659d1dcc.jpg)
2. Setting the temperature
See the leaflet sides
The temperature control (12) adjusts the temperature of the soleplate (7).
Set the temperature control to the corresponding position by lining it up with the temperature index (9) on the iron.
| Temperature | Suitable for: |
| • | Synthetics |
| •• | Silk – Wool |
| ••• | Cotton |
| max | Linen |
The pilot light (13^*) switches on while the appliance is heating up and switches off as soon as the set temperature is reached. If the temperature of the hot iron drops, you can continue ironing while the iron heats up again to the set temperature.

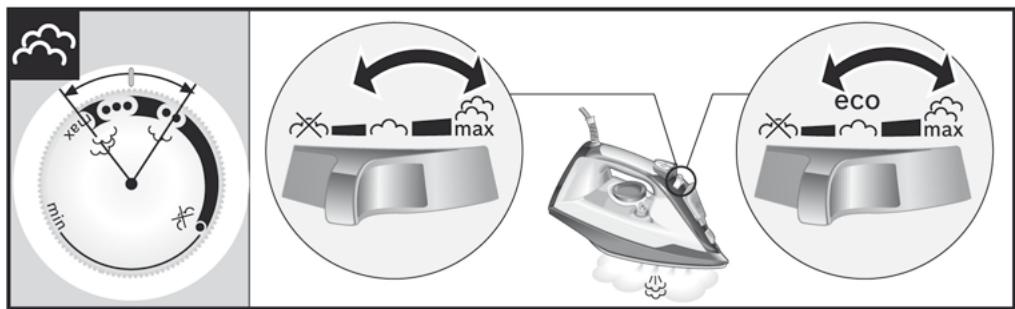
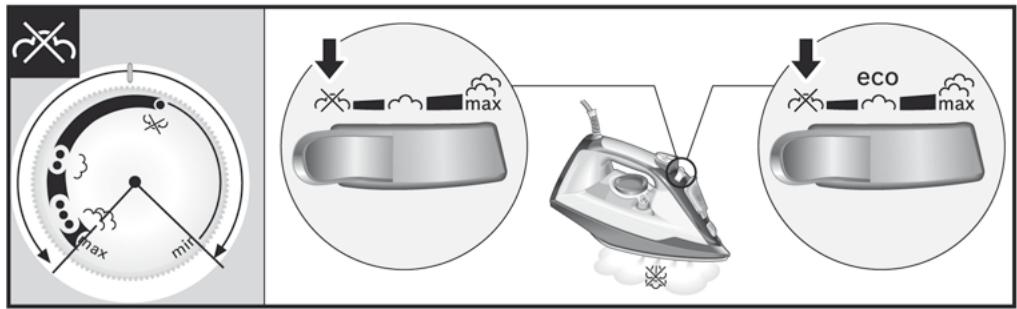
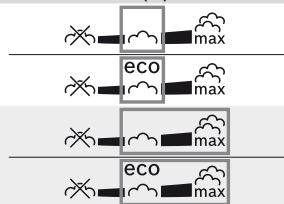
3. Ironing with steam
See the leaflet sides
The steam regulator (3) is used to adjust the amount of steam produced when ironing.
Temperature control (12)
Recommended position of the steam regulator (3) *


Tip: For better ironing results, iron the last strokes without steam to dry the garment.

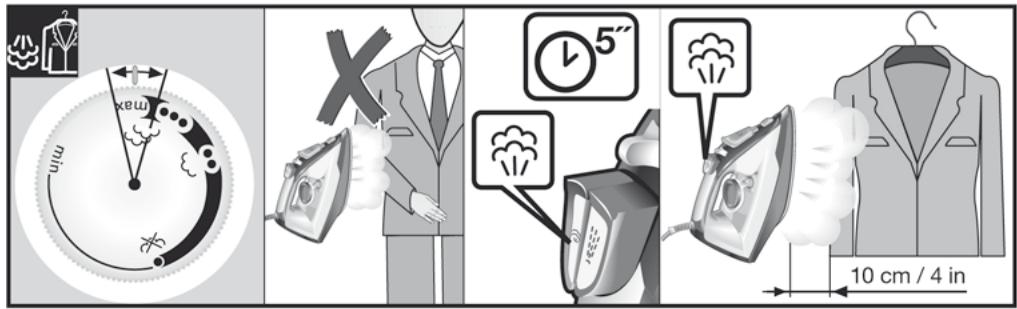
4. Shot of steam
See the leaflet sides
This can be used to remove stubborn wrinkles or to press in a sharp crease or pleat.
- Set the temperature control (12) to "max".
- Press the shot of steam button [ ] (2) repeatedly with intervals of at least 5 seconds.
See the leaflet sides
This can be used to remove creases from hanging clothes, curtains etc.
- Set the temperature control (12) to "max".
- Hang article of clothing on a clothes hanger.
- Operate the iron in a vertical position at a distance of 10cm /4 in, and press the shot of steam button [2] (2) repeatedly with pauses of at least 5 seconds.

6. Ironing without steam
See the leaflet sides
This enables the iron to be used for dry ironing.
Set steam regulator (3) to the [※] position.

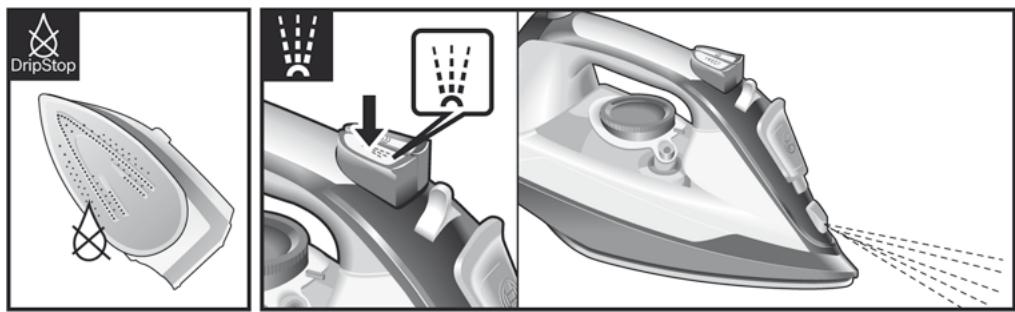
7. Drip protection *
See the leaflet sides
If the temperature is set too low, the steam is automatically switched off to avoid dripping. There may be an audible click when this occurs.

8. Spray
See the leaflet sides
This can be used to remove stubborn wrinkles.
Do not use the spray function with silk.

9. "secure" auto shut-off function *
See the leaflet sides
The "secure" auto shut-off function switches off the iron when it is left unattended, thus increasing security and saving energy.
If your iron is equipped with "secure" function, you can find the text "auto off" on handle.
- Plug in the iron.
-
Initial heating up process: this function will be inactive for the first two minutes in order to give the appliance time to reach the set temperature.
-
The safety circuit will switch the appliance off automatically and the pilot light (15^*) will start flashing in the following cases:
a If the iron is not moved for 30 seconds while resting on its soleplate or on its side.
If the iron is not moved for 8 minutes while in the upright position.
- To reconnect the iron, just move it about gently.

10. "SensorSecure" function *
See the leaflet sides
The "SensorSecure" function makes the iron heat up only when the handle is gripped, and stop heating when the handle is no longer gripped. Thus, safety and saving energy get increased.
If your iron is equipped with "SensorSecure" function, you can find the text "SensorSecure" on handle.
- Plug in the iron.
- "SensorSecure" light (16^*) flashes when the handle is not gripped, and will show a continuous light when the handle is gripped.
- If the iron handle is released for more than 10 seconds, the iron will stop heating automatically.
- When the handle is gripped again, the iron will start heating up again.
Initial heating up process: it is not necessary to grip the handle until the iron heats up to the set temperature. Once reached such temperature, the pilot light (13^*) goes off.

11. After ironing
See the leaflet sides
- Switch the steam regulator (3) from [× ] to "max" and back again several times (selfcleaning).
- Empty the tank. Hold the iron with the point down and shake lightly.
- Store standing on the rear, not on the base.
- Do not wrap the power cord (14) too tight!
Steam production consumes the most energy. To help minimise the energy used, follow the advice below:
- Start by ironing the fabrics that require the lowest ironing temperature. Check the recommended ironing temperature in the label on the garment.
- Regulate the steam according to the selected ironing temperature, following the instructions in this manual.
3 Only use steam if necessary. If possible, use the spray function instead.
Try to iron the fabrics while they are still damp and reduce the steam setting. Steam will be generated from the fabrics rather than the iron.
If you tumble dry your fabrics before ironing them, set the tumble drier on the 'iron dry' program.
- If the fabrics are damp enough, turn off the steam regulator (3) completely.
- Stand the iron upright during pauses. Resting it horizontally with the steam regulator on generates wasted steam.

Cleaning & Maintenance
See the leaflet sides

Attention! Risk of burns!
Always unplug the appliance from the mains supply before carrying out any cleaning or maintenance operation on it.
- If the iron is only slightly soiled, pull out the plug and allow the soleplate (7) to cool down. Wipe the housing and the soleplate with a damp cotton cloth only.
- If the cloth is synthetic, it may melt due to the high temperature on the soleplate, switch off the steam and rub off any residue immediately with a thickly folded, dry cotton cloth.
- To keep the soleplate smooth, you should avoid hard contact with metal objects. Never use a scouring pad, or chemicals to clean the soleplate.

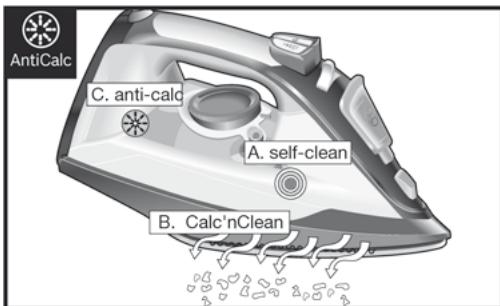
AntiCalc
Multiple descending system
See the leaflet sides
A self-clean
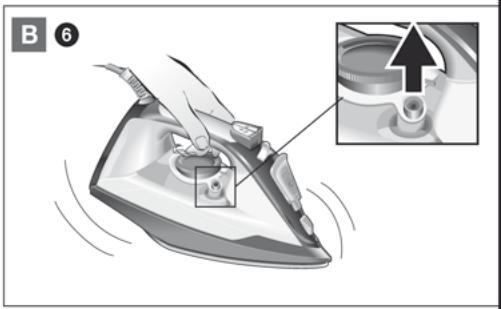
Each time you use the steam regulator (3), the "self-clean" system cleans the mechanism of scale deposits.
B Calc'nClean
The "Calc'nClean" function helps to remove scale particles out of the steam chamber. Use this function approximately every 2 weeks if the water in your area is very hard.
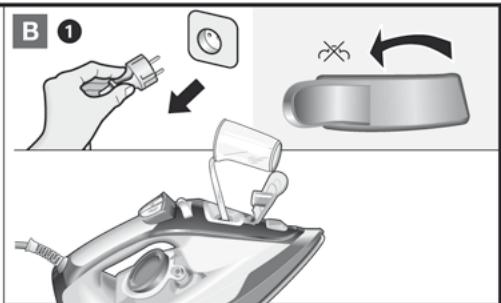
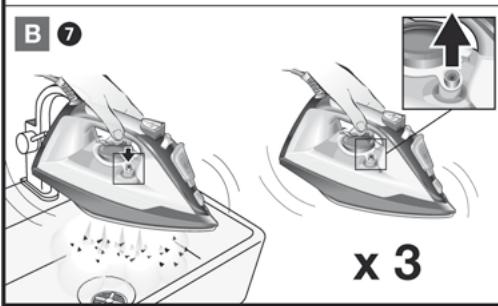
Unplug the iron from the mains socket, set the steam regulator (3) to the [× ] position and fill the water tank (11) with water.
Set the temperature control (12) to the "max" position and plug in the iron.
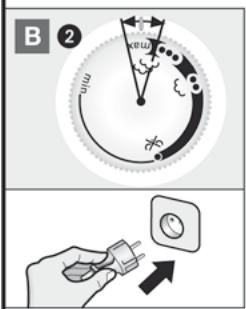
After the necessary warm-up period, the lamp goes out. Then, unplug the iron (very important!).
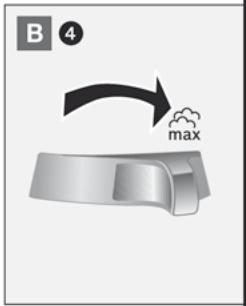
Set steam regulator to the "max" position.
Hold the iron over a sink. Press the "clean" button (10) and shake the iron until approximately one third of the water capacity of the tank is evaporated. Boiling water and steam will come out, carrying scale or deposits that might be there.
Release the "clean" button, and gently shake the iron for some seconds.
Repeat the steps 5 and 6 three times until the tank is empty.
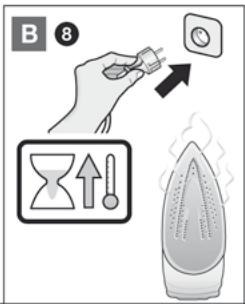
Then plug the iron in and heat it up again until the remaining water has evaporated.
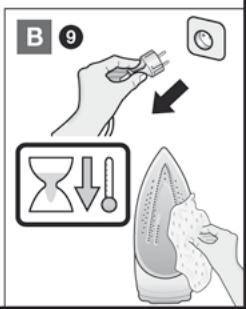
Unplug the iron and let the soleplate (7) cool down. Wipe the soleplate with a damp cotton cloth only.
anti-calc
The "anti-calc" cartridge has been designed to reduce the build-up of scale produced during steam ironing, helping to extend the useful life of your iron. Nevertheless the "anti-calc" cartridge cannot remove all of the scale that is produced naturally over time.
| Problem | Probable cause | Solution |
| The iron does not heat up. | 1. Temperature control (12) set to minimum. 2. The “secure” system has been activated. The iron is set to stand-by. 3. The “SensorSecure” system has been activated. The iron is set to stand-by. | 1. Turn to a higher position. 2. To reconnect the iron, just move it about gently. 3. Grip the handle of the iron to re-start it. |
| “auto off” indicator lamp (15*) flashes. | 1. The “secure” system has been activated. The iron is set to stand-by. | 1. To reconnect the iron, just move it about gently. |
| “SensorSecure” indicator lamp (16*) flashes. | 1. The “SensorSecure” system has been activated. The iron is set to stand-by. | 1. Grip the handle of the iron to re-start it. |
| The clothes tend to stick. | 1. The temperature is too high. | 1. Turn the temperature control (12) down and wait until the iron has cooled down. |
| Water drips out of the soleplate (7) together with steam. | 1. Temperature control (12) setting is too low. 2. Steam regulator (3) is set too high in conjunction with a low temperature. 3. You have pressed the shot of steam button (2) repeatedly without waiting for 5 seconds between each press. | 1. Turn the temperature control to a higher setting (between “•” and “max”) and wait until the pilot light (13*) goes out. 2. Set the steam regulator (3) to a lower setting. 3. Wait 5 seconds between each press of the shot of steam button. |
| Steam does not come out. | 1. Steam regulator (3) is set to [×] position. 2. The temperature is too low. Anti-drip system is activated. | 1. Set the steam regulator to a higher position. 2. Set to a higher temperature if compatible with the fabric. |
| Smoke comes out when connecting the iron for the first time. | 1. This may be caused by the lubrication of some of the internal parts. | 1. This is normal and will stop after a few minutes. |
| Deposits come out through the holes in the soleplate (7). | 1. Traces of lime scale are coming out of the steam chamber. | 1. Carry out a cleaning cycle (see “Calc'nClean” section). |
If none of the above solves the problem, get in touch with an authorised technical service.
2. Stille inn temperature
Teutbrettssidene
Temperaturvelgeren (12) justerer temperaturen pa salen (7).
Still inn temperaturverlagen ved a sammenigne med temperaturmerkingen (9) på strykejernet.
| Temperaturinnstilling | Passer til: |
| • | Syntetisk |
| •• | Silke - ull |
| ••• | Bomull |
| max | Lin |
Statuslampen (13^*) slas pa nár strykejernet varmes opp og slas av nár innstilt temperatur er nadd. Hvis temperaturen pa det varme strykejernet synker, kan du fortsette a strykemens det varmes opp til innstilt temperatur igjen.

3. Stryke med damp
Teutbrettssidene
6. Stryking uten damp
Teutbrettssidene
2. Stalla in temperature
Peped nepshm BnKOpncTaHnAmpnctpo
3HIMITb 3 niOoBn (7) yci etHKeTKn Ta 3axnche nokpTTT.
TbM.BcNadEHI CTOpIHMI
TbM.BcNadEHI CTOpIHMI
Tempepamypa nidouwu (7) peaynloemcbcra 3a donomozoo peaynnapoma memepamypu (12).
YctaHObITb peryIaTOp TEMpePaTyprn HapOTn BiIDNoBIiHOI N03HaUKN IOKaKuNkA TEMpePaTyprn (9) Ha npacui.
| Tempepatуrchий реким | Тащни, як можнан прасуваци: |
| • | Си nteteшика |
| •• | Шов – Вовна |
| ••• | Бавовна |
| max | Льон |
Плд ac HarpiBaHHЯ ристpoI roptb iHnkaTOp (13^*) ,якг rache, кОн dioCraTaBc 3aDaHaTeMpepatya.Якso Tempepatya rapaоi npackn naaE, можна npodOBxByaTn npacyBaHHa - npackaуцй ac 卡ЗHOу bуde HarpiBaTscndo 3aDaHOI Tempepatypn.

3.Ппacyваньзапою
TbM.BcNadEHI CTOpIHMI
Papopeeynnap (3) eukopucmoeybca dna peaynboaHH KInkbocmi napu, uo zhepeycmcbn qac npacyeaHH.
| Р散发но Туmpларури (12) | Р散发но Туmpларури (3)* |
| max | |
| eco max | |
| max | max |
| eco max |

Iopada: Ipy OTpMaHnO NTmAlbHnx pe3yIbTatIB HApNkIHcI npacyBaHHB BMKnHtB npaTy KaIbKa pa3iB npoBeiTb npackoIO nTkahNi 6e3 3BOJoxHn, 0o6 dope npocuyuHTn II.

4. Napobni ydap
TbM.BcNadEhi CTOpIHIN
Lya yhnkui moke eukopucmooyamucra ycyhenhcmiuux cknadook a6o fikcai cmpinok ma nice.
- UctahOBiB peryIaTOp TempeaTypr (12)Ha MaKcImaIbHy I03HaKy (max).
- Kibka pa3ib HaTNCiTh Ha KHONky napoBoro ydapy [@] (2) 3 iHTepBaIOM uOHaMMeHue y 5 cekyH.
Lio yHKIO MOKHa EukOpucMoeyamu dno eudaneHnckladoK Ha nideiuehomy oya3i, umopax moio.
- UctahOBiTb peryIaTOp TempeaTyprn (12)Ha MaKcImaJIbHy nO3HaUKy (max).
2.Повсьте одеку на виалк.
3.Obp6JIyIe OJgI npackoHO,po3TaUObaHOBepTKaJIbHO Ha BiIcTaHI 10 cm.HaTnCKaIteKHONky napOBoro yIapy [2] (2) 3 IHTepBaIOMUohAmHe y 5 cekyHd.

TnBcKnaedhi CtoPiHKN
Leu pexum do3e0nnc eukopucmooyamu npacky dny cyx0zo npacybaHH.
Yctanobitb napoperynarTop (3) y noJoxeHn [X].

7. 3axnCT BiD kpanelb\*
TINB.CknlaedeHCTOPIHKN
KuToemnepaTpyaBCTaHOBNeHaHa3aHaTTO HN3bKe 3NaueHH, Npaa Napn ABTomTuH0 BIDKNUoAeTbcra, UOb YNHKnHyTN YTBOpEHKaPaeNb. Y TAKOMy pa3i MoKe 3'BAHTnc KlaCaHH.

TINB.CknaedeHCTOpiHKN
3aedka yfHKii «SensorSecure» npoec Haapibahnnpacku nouhaembcmiBku y momy pa3i, kkuo Bu 6epemeca 3a pyky, i 3ynhmecbc, konu Bu ii iidnyckaeme. Lie ndbuuye 6e3neky ufozo npucmpoio i cnpuerekOHOOMII eekmpoehep2ii.
Ykso Ba7a npacka ochaeta h yHKuiEo «SensorSecure», ha puu i e Hannc «SensorSecure».
1.ПлдкночьштencьнБинкупpackиdo p03etkn.
2. Koln Bn He TopkaTeec pyKn npackn, cBITIOBNI iINiKaTOp «SensorSecure» (16*) MIRae. Koln Jn Bn bepeTeec 3a pyKy, BIn NOUHHe CBITITNCRA NOCTIHNM CBITJOM.
3. JI KIIO BiJnCyTInr pyKy 6JIbSe HIX Ha 10 CekYH, HarpIBaHH npackn aBtOMaTHo npINHHTbcR.
4. Kolni Bn 3HOBy Bi3bMeTeC8 3a pyuKy, npacka 3HOBy noUHe HarpiBaTnc8.
NoataKobe HarpibaHnHa: HeMae Heo6XiJHoCTi 6paTnc3a pyuKy, POKn npacka He HarpieTbcra Do 3aDaHOI Tempepatypn. Picna DoocrHeHHN notpiHOI Tempepatypn CbitIOBn iINkatoP (13*) rache.

11.псяnpacyвань
TINB.CKNaedeHCTOPIHKN
1.Перекнітьnapорулітόр(3)з[ ]намakсмальнуpo3нчky(max)iHAЗдДeкільka pa3ib(CAMOOUHSEHЯ).
2. CnpoJxHitb pe3epeByap. NObepHitb npacky HocIKOM doniInu 3Ierka nOtprcItb.
3.Y pa3i 36epirahan npacky Heo6xidno CTabTn Ha 3aHIO YactINy,a He NaPiDOWBY.
4.He CkpyuYTe 5Hyp XmBHeHn8 (14) dyKe cInbHo!

IopaAn 0oOo 3aoUaJxHnHa eHeprii
Binbwe BcboE hepriB BuTPaueTbCn Ha yTBOpENH napi. 1063aoaadtneJeKtpoeheprio, DOTPMyTeCb TaKx npaI:
1.Почнайтпрасувань 3блзн,шо
notpebye наннчсуг Temnéратугог рекиму.
Реком endobany Temnéратугпрасувань можна рдиВИТССЕ на ярпікх рechey.
2. BiDperyHIOHe ToIaU npn BiIDnoBIDNo Do oBpaHOro TEMpePahrOro peKIMy npacByaHHa, DToPmMyUHcB Bka3IBOK liEi IHCTpyKuii 3 EKcnnyataui.
3.KopncTyntecnnapoIinypeypaiznoTre6n. Hatomictb,kaKIO moKHa, BnKOpNCTOBuyte FynKcIOPO3NIIOBANHBOJN. HamaraiTeCpnpCyBaTNbINs3Hy,POKINBOHa Ⅲe BOJORA,BCTAOBNIOHOnypeXIMnOdai npaNHa MeHne 3NaueHH.Nakim YHOM npaYTBOPOBATmETbCeBCEPeDInH TKAHNH,aHe Bnpacci.JKaIIOBnKOpNCTyTeCB cyuNNbHO MaunHoO,ObnpaTne nporpamy «nID npacky
4.Якiosoблнздосстьв Волora, napoperуларop (3) moxha B3araJI BUMKHyTN.
5.Плдчаспay3уnpoceci npacvbaHHЯстelve npackyВeRTnKaIbHo.JKIO npacka 3 yBIMKHeHIM napoperyIaTOpOM CToITb ropnsOHTaIbHo,MapHO BnTPaayAcTapa.

OuHcHnTaDOrJyAd
TbM.BcNadEHIctopIKHm

Yeasa! IcHyc He6e3neKa onikie!
Ipeed 6yDb-yaKIMM 3axoJamn 3 ouNueHHa Ta DOrJaY 3a npncTpoCm 3aBxKn BUMkaTe Noro 3 pO3eTK.
- Jkso npacka 3JIeKka 3a6pydHnIacB, BITrHiTb WTeNcB 3 po3ETKn i daIte NiOwBi (7) OXoNoHyTu. IpoTpiTB KOpNc i NiOuBy TiNbKn BOJOrOToTKaHNHO.
2.Якwo TkaHnHa e CnHTeTNUHO,BOHA MOKe po3PJIaBNTINcR PID BnINBOM BnCOKoi Temnepatypn iIOoBn.Y TaKOMy pa3i BiDknOuHt b NdaCy npi i BiDpa3y J 3NCTiTb HaNInPiM MaTepiA 3a DOnOMOrO cyXo6 BabOBHnoI TKAHNH,CKNaDeHOY JeKInbKa pa3IB.
3.卍o6 nɪdtpmymbATn NOBepxHIO nIDOWBNrlaeHbkoHO, cnɪd yHnKaTn KOHTaKtɪB 3
MeTaeBIMn ppeMtaM.N yKoHOMy pa3i He BnKOpNCTOBuYTe IJNA ONUeHNr PINOWBn KOpCTKi r6Kn dJa MNTT Ta NocUdy i XimHi peOvBNH.

CnCTema BndaJIeHnHaKIny
TINB.CKNaedeHCTOPIHKN
A self-clean
KoXhoro pa3y npn BmKOpnctAHHi napopeyIaTopa (3) CnCTema camOOnuHnO OUnuE mExaH3M BiD 3aIIuKiB.
B Calc'nClean
Функць Видаелнна Нау «Cale'nClean» ДОпOMaRae ВДадИТиЧаСКИНУ i3 napOBoi Kamepи.Якso ВODA B BaшOMy PerioHi duJke JOKcTka, ВИКOPИСТОВИЕЦЮ Функцю Рпблзно КОЖHI 2 TИЖHI.
B ViKJIIOUHTb npACKy BiD eNEKTpOmepeXi, yCTaHOBIb napOperyIaTOp (3) HaNo3HaCy [X] Ta HAnOBHITb pe3epByap IdЯ BODn (11).
2 YctahOBiB pepyIaTOp Tempeatypn (12) Ha MaKcImaJIbHy nO3HaUky (max) Ta NiIckIIOuHITb npacky do eNeKTpOMepexi.
3 Picna 3aikyuHn Hpoecu HarpibaHn iDnkaTOp BIMKHeTBc. Picna Iboro BiKlnuHtB npacky BiD eNeKtpomepexi (ue dyke BaXlnBo!).
YCTaHOBITnapoperyIaTOpHaMaKcImaJIbHy n03HaKy(max).
PiiHimItb npacky Haad paKOBnHO. HatnciItb Ha KhoNkY «clean» (10) Ta notpycItb npacky, Dokn He Bnnapntcb 6ilra TpeTnHn BODn 3 pe3epByapa. Hakn Ta Ioro 3aIinuKn BnDyTb 3 rapauo BOIO TO napom.
6 BiDnyctiB KhoNky «clean» Ta obepexHo notpcaTiB npacky npotrorm KjIbKoX cekHyd.
7 Nobtopitb d5 Ta 6 Tpui, Dokn pe3epByap dIy BOIN He CNOPOXHITbcr.
Iotim niknouitb npacky do enektpomepexi Ta 3HOBY harpiite ii,doKniuBODn He BnnapaTcR.
B BiiknioHb npacky BiE eNektpomepexi Ta daIte niOoBi (7) oxIoOnHyTN. OunchTb NiOuBy 3a donOMorIO BONOrI bABOBHHO raHicPK (He BnKOpNCTOBy Te iHsi MaTepiAn).
KaptpnJx «anti-calc» np3NaueHn dIy 3MeHwEHHaYTBOpEHHaKaNpy nId cIac npacyBaHHa 3 napO, IIO Do3BOJIe IpoDObXHTn TepMIn EeknIyatauii npICTpO. AJe KaptpnJx «anti-calc» He MoKe BnDaJIHTn BeCb HAcNII, IIO yTBOpIeTbCnPiI dac BVKOpNCtAHH pIcSTpO.

YcyHenHHeNcPpaBHOtei
B He onpeJeHbI OCHOBHbI npaBnla c6opa n yTnN3aunOtpa6oTaBux 3NeKTPuYeCKNX n 3NeKTPoHHbIX np6OpOB Ha BcE TeppnTopn EC.
OncaHne
- Khonika paçnbjIeHnBa BObl
- Khonka napoboro ydapa
- NapoperynayTop
4.OTBepCTneIJIa BObl
5.KpbIkaOTBepCTnIy BoIbI - Pacnbintenbna fopcyhka
7.Побшваутora
8.OTmTeKa MaKcMaJIbHOro yOpBnHaNoIHeHnIa -
Ykaatelb TemnepaTpybl
-
Khonka «clean» (Oučněká)
11.EmKoCTbIJIa BObl - Tepmoperyjatop
- CBeTOBoi INHdNKaTOP
- Kaßeběnbíttátnýra
15.Инданахогаяnamna «auto off» (abTOBbIKJIQUHcHne)*
16.Инданахогаялампа «SensorSecure» * - Мерньштабан*
Ppei nepBbIM npImeHneM np6opa
CHIMITE C NOOOWBbl yTOra (7) 3TNKETky nIN 3aunTHoe NOKpbITne.
Pn nepBOM nCNOJb3OBAHm yTIOM MoKET BbIpa6aTbIBaTb nap n 3anaxn, KOTOpbIe Ncye3HyT Chepe3 HeCKoJIbKO MmHYt.
Ppimenenne npnbopa

1. HanonHeHne emKocTn dny BOdbl
Tcm. cnoxohhbe ctpaHnbl
DanHbI np6Op npedHa3NaeH dIy IcNoJIb3OBAHnI ObIuHOB BOOnpOBoHOBIObl.
Добавлией Дуг nx kdkocte (ecn OHI He pekomehdoBaHbI kOMpaHne Bosch), Hanpimep otduweK, npBedeT K nobpekdeHIO npibopa.
He IcIOnJIb3yIte BOJIAHOI KOHJeHCAT N3 cyUINJIbHbIX 6apabAHOB, CNTTEM KOHdUNIOHOHPOBaHnR BO3duXaN IdpYmIX IOIObHbIX YCTpOHTB.
JIIO6oe NOBpeXdHHe, BbI3BaHHoe
NCNlOB3OBaHNEm YKa3aHHbIX BbIe CpeCDTB, npINBOJNT K NpeKpaUeHNo DeIcTBnIraPANTM.
UcTaHOBnTe napoperyJrTOp (3) BVIOLOXeHne [x] nI3BNeKHTe WTeNCeBHyIO BnIKy yTjOra n3 po3ETKn!
- OtkpoTe KpbIshky OTBepCTnIЯ BOIbI (5).
- HanoJIHInTe EMKOCtB DnI BObI (11). HNKoRda He HAnBaIte BOy DBy BbIe OTMeTkn MAKcImaJIbHOro yOBHr HANOJIHeHn (8).
- 3aKpoTe KpbIuKy OTBepCTnIy BoIyI.
CObET:YTo6bI ObcEeHtB dInTeIbHyIO n 3ΦΦeKTHBHyO paB0Ty CnCTEmbI NOaHn npa, Bbl MoXeTe CMeUINBaTb BOOpOBoHO BVdy C DnCTnIIINPOBaHHO BOOJ B COOTHOJEHIM 1:1. EcnB OBOIpOBoHOra B OBO B BaWe mpeHone OHeB JxctKaA, CMeUINBaIte ee c DnCTnIIINPOBaHHO BOOJ B COOTHOJEHIM 1:2. Y3HaTb JxectKOCTB DObl MOXHO B MecTHOH BOOCHa6kaHOSeKOMNaHIM.

2. PerylnopoBaHne TempepaTypbI
TcmCNOXeHHbIeCTpaHnbl
Ipeynupoanm mepeampynbodouy mjoa7) uonb3yemc mepmoeaynnap (12).
YctaHOBInTe TepMOpEryIaTOp Ha COOTBeTCTByUOyU OMTeKyu yka3aTeIa TempePaTypbI (9) Ha yTHore.
| Tempepatryhny pexim | TkaHn, KOTOpbIe MoxHNo rJaIITb: |
| • | CinHTeTnKa |
| •• | Шeн-Шерсь |
| ••• | XlonopoK |
| max | Лен |
a a a a a a a a a a a
ylllllllllllllllllllllllllllllllllllllllllllllllllllllllllllllllllllllllllllllllll
1golglslalil 1j
. ol ol ol ol ol ol ol ol ol ol ol ol ol ol ol ol ol ol ol ol ol ol ol ol ol ol ol ol ol ol ol ol ol ol ol ol ol ol ol ol ol ol ol ol ol ol ol ol ol ol ol ol ol ol ol ol ol ol ol ol ol ol ol ol ol ol ol ol ol ol ol ol ol ol ol ol ol ol ol ol ol ol ol ol ol ol ol ol ol ol ol ol ol ol ol ol ol ol ol ol
aill i j 150j g jll cldy jld s
:dllll llll l l ( *15) aaii
gla jzj 30 3d 1
-
-
- 1.
-
g jn jnsi lae jn jn oal gall
1
4
\* "SensorSecure".10

1
olal juswie "SensorSecure" aLg Jnai ic nuiill jol alal lgl .aalal 12yag. aalal ojgg jolal no yja aiei lau .aalal
“SensorSecure”
"SensorSecure"
1.
品 "SensorSecure" (*16)
Jaiell aie jiau Jauaui jai
10 12 jj dai jie .3
lllglgjjllllllll
Jusill 1sall 11 s j 1j 1i 4
L
ai jssuusususususususususususususususususususususususususususususususususususususususususususususususus
a jy Jy y aay. abaaal oJall ay
Aaijuiyaiyaiiyaiyaiyaiyaiyaiyaiyaiyaiyaiyaiyaiyaiyaiyaiyaiyaiyaiyaiyaiyaiyaiyaiyaiyaiyaiyaiyaiyaiyaiyaiyaiyaiyaiyaiyaiyaiyaiyaiyaiyaiyaiyaiyaiyaiyaiyaiyaiyai
y.11

J
G 1 [x] G 3)
"max
Aaagaa jaiy jaii aai iia laie
8.8

J 1
iouuui uclai iue aegbll oio pluiui jse
y
sulogglaalaaaagg.9
- "secure"

secure
1 1
olal "secure"
gill glln a jal g y laa piaiui ngs lgs jie
aIgunll 1
auto" 品 _ 品 secure"
. 与 d 相等
1.
Jg aagaaagaaagaaagaaagaaagaaagaaagaaagaaagaaagaaagaaagaaagaaagaaagaaagaaagaaagaaagaaagaaagaaagaaagaaagaaagaaagaaagaaagaaagaaagaaagaaagaaagaaagaaagaaagaaagaaagaaagaaagaaagaa
i j 1
S OBC = S COD + S_ BOC
| الإستعمال | الإستعمال الحرفية |
| الإستعمال | • |
| ∙∙∙∙∙∙∙∙∙∙∙∙∙∙∙∙∙∙∙∙∙∙∙∙∙∙∙∙∙∙∙∙∙∙∙∙∙∙∙∙∙∙∙∙∙∙∙∙∙∙∙∙∙∙∙∙∙∙∙∙∙∙∙∙∙∙∙∙∙∙∙∙∙∙∙∙∙∙∙∙∙∙∙∙∙∙∙∙∙∙∙∙∙∙∙∙∙∙∙∙··∙∙∙∙∙∙∙∙∙∙∙∙∙∙∙∙∙∙∙∙∙∙∙∙∙∙∙∙∙∙∙∙∙∙∙∙∙∙∙∙∙∙∙∙∙∙∙∙∙∙∙∙∙∙∙∙∙∙∙∙∙∙∙∙∙∙∙∙∙∙∙∙∙∙∙∙∙∙∙∙∙∙∙∙∙∙∙∙∙∙∙∙∙∙∙∙∙∙∙‒∙‒‒‒‒‒‒‒‒‒‒‒‒‒‒‒‒‒‒‒‒‒‒‒‒‒‒‒‒‒‒‒‒‒‒‒‒‒‒‒‒‒‒‒‒‒‒‒‒‒‒‒‒‒‒‒‒‒‒‒‒‒‒‒‒‒‒‒‒‒‒‒‒‒‒‒‒‒‒‒‒‒‒‒‒‒‒‒‒‒‒‒‒‒‒‒‒‒‒‒‒––‒‒‒‒‒‒‒‒‒‒‒‒‒‒‒‒‒‒‒‒‒‒‒‒‒‒‒‒‒‒‒‒‒‒‒‒‒‒‒‒‒‒‒‒‒‒‒‒‒‒‒‒‒‒‒‒‒‒‒‒‒‒‒‒‒‒‒‒‒‒‒‒‒‒‒‒‒‒‒‒‒‒‒‒‒‒‒‒‒‒‒‒‒‒‒‒‒‒‒⁄‒‒‒‒‒‒‒‒‒‒‒‒‒‒‒‒‒‒‒‒‒‒‒‒‒‒‒‒‒‒‒‒‒‒‒‒‒‒‒‒‒‒‒‒‒‒‒‒‒‒‒‒‒‒‒‒‒‒‒‒‒‒‒‒‒‒‒‒‒‒‒‒‒‒‒‒‒‒‒‒‒‒‒‒‒‒‒‒‒‒‒‒‒‒‒‒‒‒‒”—max |
j 13) aaiuuiyaii yaiy i
aaiyaiyaiyaiyaiyaiyaiyaiyaiyaiyaiyaiyaiyaiyaiyaiyaiyaiyaiyaiyaiyaiyaiyaiyaiyaiyaiyaiyaiyaiyaiyaiyaiyaiyaiyaiyaiyaiyaiyaiyaiyaiyaiyaiyaiyaiyaiyaiyaiyaiyai
J3.3

aaiiaaiiaaiiaaiiaaiiaaiiaaiiaaiiaaiiaaiiaaiiaaiiaaiiaaiiaaiiaaiiaaiiaaiiaaiiaaiiaaiiaaiiaaiiaaiiaaiiaaiiaaiiaaiiaaiiaaiiaaiiaaiiaaiiaaiiaaiiaaiiaaiiaaiiaaiiaaiiaaiiaaiiaaiiaaiiaaiiaaiiaaiiaaiiaaiiaaiiaai
sll sll aee eae ae aea baa (3) jll pia
jlll pblal 4 00000000000000000000000000000000000000000000000
(12)


y 1 y
J 4

J
gl aalll ally aagbll ao plasnil 5c glaalgl gaiyall gao la biaiall
gcl (12) jralg y g cail llaa.
"max, 4j
cl jis 2 [n] jll qblr jge biaill Js
JyI g n j5 Iio J5 jiaia
gj21 o jall jglal piaiul
a 15 a 25 a 35 a 45 a 55 a 65 a 75
aai 1
y_1y_2 = p · z^ z^ w^
alj 1.1

aaiiie
alall allaa aaiyaaol Sall oag 4s jia jia yu yu la) yj jiyuyy
alldally jrrnall
ai ci aobij g uoydall ciao jao laicio clo piauuiy 1
pduuuln 2y y u 1 1 1 1 1 1 1 1 1 1 1 1 1 1 1
Ejgl [X] 3 (3) jai bia hui 1 jilr jn ool

(5) all we can bc 1
121 111 111 111 11
(8) 2^x = 1 x S .
.3
bls ciay jlll aiaa ayialll Jaiy s jia all by: abgata g yjuaall elo jls 1:1 auiu ybae elay juaill elo ayiu ybae elay juaill elo bals iayd lue tiaibio glall gajll glall jucn jc n deiuyiy slkiay.2:1
- a4 = a1 + 2d( a - 1)
aJalal aJbua.2

J
a 12) a j 7 (7)
jgljll jll jilbJ jgsy J. jglal alisiwly abjjall jblal all lgc g wg aio
J 1
8 8 8 8 8 8 8 8 8 8 8 8 8 8 8 8 8 8 8 8
e 1
.
1

Bosch KOMnHaHcBihBIn DA30 6y YtiriH caTbIn anFaHbIhbl3 ywiH anFbIcBIMbl3dbi 6inDipem3.
AcnantbI naDanaHy hcyKayIbIKTapbiH MyKnIaT OKbIN 1bIFbIHb3 XHe aNdaFby yaKbITTa KOJdAnhy yuHcAKTan KOnbHb3.
Eyn HycKayIbIKtB Bosch KOMnHaHcBihBjH Jekprinikti 6aTbI 6ertepiHeh xyKTe anyra 6oJabl.

KaibinaTbH JAKTapbHa
XaJIbI Kayinci3dk HycKayIbIKTapbl
Jektp KyatbHbH XeniciHe KocblbIn TypfaH YtIKTi KapaycbI3 KaIdbipMaHbI3.
Acapka cy toIbpydbH aIbHda Hemece Ohbl naJaHaHydAn KeiH KaIraH cydbTeYdeH 6ypbH aWalbI aBipbH YaWbIKTah WbIFapbIHb3.
AcnantbI TypaKtbI 6eTte naJaHaHbIn, opHaJaCTbIpy KaXeT.
AcapntbI TypaftbHa opHajactbipy Ke3iHne TypaK opHajackan 6eTTiH 6epik eKeHdiirHe Ke3 JeTki3iHi3.
Ytik KyjanaH JafdaJa, 3aKbIMdaHydbiH aHbIK i3epi 6oJca Hemece OdaH cy aKKaH JafdaJa DA OHbl NaJaIaNbHaBbI3.
AcnantbI KaTaNanahyadn 6ypbH OHbEKeJIeTTi TexHnKaIbIK KbI3MeT Kepcety optaBIfbI TeKcepy Tnic.
Kayinti JaaTaNapbIb6oNbIpMaYyWIn, KypblfBIfaKaXeT 6OlybIMMKIH Ke3 KeIReH XeHDey XyMbICTapbIH, MbICaJIb, aKaybl MaINCtpaJIb CbIMbIH aybICTbpydIb TEK OKeJIeTTI TexHNkaJIbIK KbI3MeT KepCETy OpTaJIbIFbIHbIH 6bnikTi MAmAHbI rHa Jxypri3yi KepeK.
Kayinci3 naIdaIaHy TypaIbI aIbIbI aJa HycKaMa aNy JxHe KypblfblHbI naIdaIaHymen 6aIbIbICTbI Kayinti yfbIHfAH XaFdaIa Hemece JxayantbITyJFaIapdbIH KapaybIMe 8 XacTah ackan balaIapfa JxHe DeHe, ce3Hy Hemece akbl-oi KaibIeTepi WeKteynl TylfApra Hemece caikeciHwe TExipn6eci MeH 6iJIiMIXoK TyIaIapfa ataIfAH KypblfblHbI naJaIaHaYfA 60anaB. BaIaNAPdbIH KypblfblMeH OIN HaybiHa XOJ BepMeHi3. EpeceKTePdiN KapaybIHcbI3 baIaIapFA KypblfblHbI Ta3aIay MeH Kytim Jxacayra Kon 6epMeHi3.
Acnan KocylbI TyprHaHna Hemece naJaIaNbIINFaHHaN KeiH CyyfakoiblIHaN Ke3IHDe, YtIK NeH OHbIH CBIMbIH 8 XacTaH KiWi 6aIaNapDbIHKoJIbXeTneTIH XepDe CaKaTHbI3.
A5A# BOJIbIHbl3. bIcIbIK 6eT. KOndaHy 6apbcblHa 6eT KbI3ybl MymKiH.
MaHbI3dbI eckeptTnelep
Булкрынгд TeK TyMbICTbIK KOnlaHbIC YuH apHaJIfAH XeHe eHepKcInTik MaKcaTTapda NaДаJaHbЛmaybl KaKet.
Byn Kpyblfby TeK Taaiybnanyb6oynHsa,
YrHn YrIK petIHde fHa KOndaHbIybl Tnic.
Ke3 KeJREh 6aKa XoJImeH naIaIaNHy Dypbc
Emec, demek, Kayinti BoIbIn caHanaIbI.
OHeDipywi KpyblfblHbIy Dpybc HemeC TnicTi
TypDe naIaIaNbHaydAn naJa bOJHan Ke3
KeJRE h 3anaJ yWIn KxayapKeepwnik apTnaIbI.
- PnIaHb6apbcihda 6yN Kpyblfbl Jxorapbl Tempepatypara DeiH KbI3aBlj XeHe 6y IbIparabbl, 6yI dypbc naiDanaH6aFah KaFdaIda KYIOJIepdi TydbipyMymKiH.
- Ytiktih TaabaHbH yCTamaHbI3! YtikTi TyTKacbIHah YCTaHbI3.
KypbIfblHbH KyaybH 60bnbpMay yuH Kyat CbIMbH YCTenDeH Hemece YtIKTeY TaKaTbIHcA1bIpaFaH KyIHHe KaIbIpMaHbI3. - YctiH3re KNIJIN TpyFaH KIMDi YtIKTeMeH3I!
Aadamapra Hemece XaHpyapnapra Kapaewkaawan cyblb6yprkimehi3XeHe 6ydb6afblTTamahb13!
KyaTcMbHbIH eTKip 3aTTapMeH HeMece Kbl3bn TypFaH YtIKTiH Ta6aHbIMe JkAhaCyblH 6oJNbIPMaHbI3.
YtikTH Ta6aHbI bICtBik 6oNfAH Ke3Ne, YtIKTe uKaUah KJIdeHeH KJyIe KaIbIpMaHbI3. YtIKTI TiriHeH, Ta6aHbImE OPhaIaCTbipy KaXet.
Kymbcic ICTey Ke3iHne KypblfblHbI cy KOJMeH yCTaMaHbI3.
- ByI KpyBjNfBiHbI TexNHKaJIbIK CnnaTtAmaIapbl Jka3bJIFaH TaKtaIshaJaBfI aKnapaTkCaJKeC Kocy JxHe KOnDaHy KaKTe.
- Byn KypblfblHbI Jxepre TyblkTaNfAH yAubikKa Kocy Kaket. Y3apKbIbTbMIHdeTTI TypDe naDlAnhy Kaket 6oNfAH XaFdaJa, on 16A
cAeKec XaHe Xepre Tybiktany KocblbMbi 6ap YwBkneH Ka6bktanFaHbHa Ke3 Xetki3iH3.
- ByhIn anbIn any yuIn eTnei KepHeyin TEmHeJeYi Hemece XapBtHaDpyBuH aytKByk KyBnIbCTapbl ceklnd Herizr XaRbIMCb3 XaFdaInapda Ytki Keeprici 028Ω bapbHwa Jxorapbl 3NeKtp Jeniche Kocya Kecnc 6epinei. KaKet XaFdaJa naDaanahyUb 3NeKtpmEn KaMTy KOMPNAHcBHaH KocBlyHyKTECIHderi Keepri TypaNbIaknapbTI aJna aNabi.
Kypblfblhl ep6ip KojdaHbICTaH KeiH Hemece akayblk 60Jybl MymkiH KaFdaJa Kaat JeicineH anXbIpaTbHbI3.
Kypblfbl aHbIpbHbIH CbIMbIH yAubkTaH xylkbIn sbIfapyfa 60JMaBbl. - Ytiki cyfa Hemece 6aca cybIKtbIKKa 6aTbIPMaHb3.
Ytikti aushk KaJFaH kepeKe KaIbIpMaHb3 (KaHaBp, KyH, aA3DbI KyH,...).
Kadere xapaTy TpyanbKeHec
Bi3diTayapnapbIMbI3dbH KanTaMaCbI dypbcOiNaCTbIPbINFaH. Byn Heri3iHeN ekiHiu Wnk3at petInHe KaIbIKTapdbI KeJere Japaty BoBlnHaJXeprilKiTi Kbl3MeT KepcTeTy opTaJIbIFbIHaXibepinyTnicLactamBtBn MaTePnAnDapdbI KOnDaHydAn TpyabI. Eckipren KypbIbnApdbKJedere Japaty TypabI aKnapaTTbI XeprinKiTiKaNA ekimUiniriHeh AnybH3ra 60nda.

Бул Крьлфыда Колданытbing Зл ektpnik кэне Зл ektpондык Крьлфыларfa Катысты 2012/19/ EO EyponaындиpeKТиВаси саикесбелгileнген (Зл ektpnik Жэне Зл ektpондыкЖабдык
KaIbIKTapbl-33K(K).
ByhNHyckayIbIK EO 6apnbik ayMaftby ywiH KOndaHbINaTbIH naDaIaNbIrfAH Kpyblfblnapbl KaTatyxeHe KaTa eHdey BoHHwa JaaNbl waTtapbl aHbIKaIdbI.
Cunatrama
- Bypky Tymmeci
- By cokkbcihbH tyMEci
- By petteriwi
4.Cy Kyo caHbInaybl
5.CyKuO CaHbIaNaybIbH KKaNpaBf
6.Бурку санылайы - YtiktiH Ta6aHbI
- Tonydbin JxofapbI DeHreinHn 6enrici
-
Tempepatypa kcpctkiu
-
"clean" (ta3aJay) TyImeci
- Cy baTbI
- TemnepaTypaHbI petrey
13.Бакынayшамы* - KyaT CbIMbl
- "auto off" (aBTo eHIpy) kapbIK nHnDnKaTOpbl*
- "SensorSecure" KapbIK INДИКaTOpbI*
- CtaKaH *
Ytikti anfawkbl pet naDanahydbH aJbIHda
Ytiktih Ta6aHbIHah (7) Ke3 KeIreH XaNCbIPMaHbI Hemece KopraHbc Xa6bIHbIH aJIbIN TactaHbI3.
Ytki aIfawkbi pet konlaHy bapbcihDa temip 6eri 6y kHe niCTep shbFapbyi MymKIn, bipaK onap biPheWe MNHyTTaH KeiH XOblnKeTei.
KypbIINfbIHBn naIdaIaHy

1.Cy6aBbIH TOITbIPbIHbI3

KaanbtaHnKaTapbHKepy
Atanfah Kpyblfbl yMeK acTbHdafb Kdimri cydbn naaandahyfa apHaIaNfah.
- Niccy CnKtbl 6aca CynbIKTbIKTapbl Kocy (Bosch KompanHcbl ycbIHbaca) KypblfblHbl 3aKbIMdaIbI.
KentipriuTep,aya caKbIHdaTkblIxJyHepeI Hemece OcbIapFa YKcAc KpyBbIFJIaPdAfbI KOHDeHCAT cyblI naJaIaNHa6aHbI3.
Korapbda atanfah Kypaandapbl KOlahydah TybHaFaH Ke3 KeJreH 3aKbIMdaHy KenindeMe KywiHIn XoBlybHa eKeJeDi.
By petteriwiH (3) KyiHe opHaTbIHb3 XeHe YtIKTi 念 XeJIinepeH axbIpaTbIHb3!
1.CyKyo caHbInaybHbH KaKnarblbHaBbHb3(5).
2.Cy6aIbIH(11)TOITbIPbIH3.CydbI eKsaH anEHXoFapfBI TOITbpy DeHreinIH 6enricHeh acbipa KyImaHbI3 (8).
3.CyKUOcaHbIaNaybIbIHKaKnarfbIHKa0bIbI3.

Kehec: OHTaIbI 6y dyHKUraCbIHbH KbI3MeT MEP3IMiH y3apTu yuHi, Ky6bIp CybIH Ta3apTbIJFaH cyMeH 1:1. apakaTbIHcBtHa DapaIaCTbIPyfa 60laDb. Ci3di H aMafbIbIb3daFb Ky6bIp cyI KePMeK cy 60nCa, OHbTa3apTbIJFaH cyMeH 1:2. apakaTbIHacBtHaD apaIaCTbIPbIBH3. CydbH KepMeKTiniri TypaIb JkeprilikTi cy JeKti3yuicHeH binyiH3re 60naDb.

2. TempeatypaHbI opHaTy
T KaaBnTaBIn XaKTapbIn Kepy
Temnepamypemmeziwi (12) ymik maabaHbIHbIN (7) memnpamypacbIH pemmeudi.
Temnepatypa petteriin ytikteri temnepatypa kpcetkiimEn (9) caikectehipin Tniicti Kyire opHaTbIh3.
| Temperatura | Adecuado para: |
| ● | CINhteатINA |
| ●● | Жібек - жун мanta |
| ●●● | Mačтɑ |
| max | Зыrfыр |
BakbIay wambl (13^*) Kypblfbl Kbl3y Ke3iHde 60nfa JkaHaabJxHe OpaTbIuFaH TeMnepatypara DeiH Kb3raHHaN KeiH oWeJI. bIcTBk YtIKTH TeMnepatypacbl TemeHden Ketce, YtIK KaTadaH opTaIbFaH TeMnepatypara DeiH Kb3y yCTIHde 60nfaKKe3e YtIKTeYdi KaIFaTbIpya 60nAbJ.

3. BymeH yTikTey
T KaaBbJatbH XaKtaptbH Kepy
By pemmeziwi (3) ymikmey 6apbcihda 6eJIiHcEH 6ydbH MeIuepin pemmey ywiH KOJIaHaJIaObl.
| Темпера typаны peTTey (12) | Бу peTTERiWIiHIN (3) УСынБИЛГФАН КУМI* |
| max | eco |

Kehe: XakcbI yTikTey HETINKEnepiHe KON KeTki3y MaKcTaBHa DNIMdepi KeNTipy YuiH, yTikTeYdiN CObHda 0ycb3 yTikTeHi3.

4. By cokkbicbHbH TYmecci
T KaaBbIaNtBbIXaKTapbIbKepy
Byn Kbi3Mem ymikmenyi Kuibn Kamnapnapobkemipy yuhi, mik cbi3bikmapboj kamkb13bn,6ypmepeo jka3y yuhi kondahbnadbl.
- TemnepaTypa petteriuiH (12) "max" Kyire oHaTbIHbI3.
- By cokkbcihbH Tymecin (2) KEM deReHde 5 ceKHyI apaIbIKneH KaTaNan 6acbHb3.
T KaaBnTaBIn XaKTapbIn Kepy
ByfHKuua iniHmypraH Kuimdepezai, nepdenepezai Xane m.6. 6ykmeylepdi Jazy yuih kondahbila.
- TemnepaotypapeTteriuiH (12) "max" Kyire OPHAbIbI3.
2.KmIMdepkiKmIM iInriuke iIniHa.
3.YtikTi TIK KyuIe 10 CM KaUbIbTKbIbTa 6ackapbHbI3 XHe 6y CoKbIcBi TYmeciH (2) KEM DereHne 5 CeKyHd Y3nIiCTepMeH KaiTaanBacbHbI3.

6. Eycbl3 yTiktey
T KaaBbJatbH XaKTabbH Kepy
ByfynKuua ymikmi Kyprayimkmeye naoanahya MymkiHdik 6epeoi.
By peTteriiH (3) Kynie opHaTBiHbI3.

7. CydbH TaMybHaH Kopray *
T KaaBnTaBbXkAaTpabH Kepy
TemnepaTpa TbIM TeMeH opHaTbInFaH 60JICA, cydbH TaMybH 60JbIpMaY yuH 6y ABTomaTTbI Type eWezi. Cy TaMbIJaFah Ke3e Weptinre Dblbic bHybmyMkiH.

8. Bypky
T KaaBnataBxKxAkTapbH Kepy
ByfynKuua ymikmeNy iKubn Kamnapapobkemipy yuin KOndaHbIaobI.
BpykPyuHnucycbH Xi6ek MaTanapFa naidanHaBb3.

9. "secure" aBTO eшіру Функцясbl *
T KaaBbJatbH XaKTabbH Kepy
"secure" aəmo ewipy fynkucncbi
Kayincizidik peh kyammbi yhemdeydi
apmmbipa omblpinn ymikmi kapaycbi3
kannran ke3de ewiipeidi.
Erep yiriH3 "secure" cyHKnrcbIme HkaBbIKtaIaHaB 6oJca, TyTKaJa "auto off" mTeHiH Ta6a aIacbl3.
-
Ytiktih aWaiJIb aiIbIbIH pO3eTKaFA KocblHbI3.
-
BactanKbI KbI3Dbipy: 6ynФyHKUa acnantbHOpHaTbJFaH Tempepatypara JkTeYiHe yaKbIT6epy ysiH, aIrauKbI eKI mHyTTa 6enCeHdi6oMaNdbI.
- Kayinci3dk ti36eri acnantbI abTOMaTTbI Typde eWipeDi XHe INDnKaTOp 7ambl (15*KeNeci KaDaJIaJapda XbIbJIbIKTaB6tA6tAaDbI:
a Ytik TabaHbIHda Hemece 6yuiipiHe XaTkaH Ke3e 30 cekHyK bJNkbIMaca.
Ytik TIK KyiJe 6oJFaHda 8 MmHyT KblKnbImca. - Ytikti KaTka Kocy yuHIn OHbI XaJXbJIbITbIbI3.

10. "SensorSecure" *
T KaaBnTaBn XaKTapbN Kepy
"SensorSecure"Функцясbl TTKaHbI YCTaraH Ke3de FaHa γTikTi Kb13bipaDbI XeHe TTKa Xi6epinreH Ke3de Kb13bipyDbI TOKTataDbI. Ocblnaiwa Kayinci3dk nen Kyat Yhemdey deHreNi apTtbpInaDbI.
Erep yiriH3 "SensorSecure" cyHKUraCbImeH KaBbIKTaIaH 6oIca, TyTKaJa "SensorSecure" mTeiHiT a6a anacb3.
- Ytiktih aIaJIbI aIbIPbIH pO3eTKaFA KcBbHbI3.
- "SensorSecure" wamby (16*) Tytka yctaJIMaHaN Ke3De KbIbIbIKTaIbIb JxHe TytKa YcTaNFaH Ke3De Y3dIKc3 XapbIKtBk KepceTei.
3.YtIKTH TYTKacbl 10 cekyHdTaH apTbIK Xi6epilreH Ke3Je, YtIK ABTOMaTTbI TypDe Kbl3dbpyDbI TOKTaTaDbI. - Tytska Kaitya yctaanfah Ke3de, ytk KaiaTaanH Kbl3dbpydbl 6actaIdbl.
BactanKbI Kbl3blpy:Ytik opHaTbIraH TemnepaTypaFa DeiH KbI3blpblMaHaHsa TyTKaHbI YCTaydbH KaKeTi JOK, MyHdaI TemnepaTypaFJ XeTKeHne, INdNkatop 13* eWeJI.

11. YtikTeN 6oNfAHHaH KeiH
T KaaBbJatbH JxKtaptbH Kepy
- By petteriuiH (3) kyiHeH "max" kyiIe ^※ aybICTbIpyIn, bipHeWe pet KaTaNbI3 (e3diirHeH Ta3anay).
- Cydi baktaH teriH3. YtikTi TEmeH kapaTbIN cAn ciNkiH3.
- OHJI Heri3iHNe eMec, apTKJI XaFbIMeH TypFaH KyiHHe caKaTaHbI3.
- Kyat cbIMbiH (14) TbIM bekem opamaHbI!
KyaT Ke3i Ke6iHece 6y TV3yRe KeTei. KyaT Ke3iH naIaHaHybl a3aIy UwIH TEmHeIe I KeHeCTepi KaPaHbI3:
- Eh a3 yTikTey TemnepaTypacbH KaKet etetih KIMdepdi yTikTeyDen bactahI3. YtikTeydi KaKetTi TemnepaTypacbH 6yibIMbIH XancbIpMaCbHaH Kepyre 6oJabl.
- OcbHyckayIbIaFbHcKaynapIe cKepe OTbIPbIN, 6y Xibepydi TaHaJaIFaH yTikTey TemnepatypacbHa cai peTehi3.
- KaKet 6oJcA, 6yIb I Fana naiJaIaHaHbIbI3. MyMkiH 6oJca, OhBiH opHbHa 6byKy cyHKiYcBbH naIaIaHaHbIbI3. KmIeep dIbIMkbl KyeDe 6oJIaH Ke3De yTtKeH3 XeHe 6yBiH DeHReHIN TeMeHdTeYre TbIPbcHbI3. ByN Ke3de 6yTtKe EmeC, MaTaBHn 03iHne Ty3iNetIH 6oJabi. KmIeepdi yTtKeYeHd 6byBIn KeNTipy MaunHacbHaDa KeNTIpceHi3, KeNTipriIi MaunHAcbHI "KpyraK KyJe 6yTtKeY" 6aFapIamacbHaOpHaTbHbI3.
- KIMdep JeKTIJKTI TypDe DbIMKBJ6ONca, 6y peTteriuiH (3) ToJIbIFImeH eWipin KOJIbIbI3.
- Y3iNICTep 6apbIcbHda YtIKTI TIK KynIHKe KOyIbHbI3. YtIKTI by peTteriJi Kocynbl BONFaHda KeIeHeH KyIe KaIbIpy naIdaCbI3 by Ty3iJyIe anIbIn KeJIeIi.

Ta3aay XeHe TexHnKaIbIK Kbl3MeT KePcety
TkaHbJntaBtXkaptabH Kepy

Ha3ap aydapbIbI3! Kyuiin Kany Kayni 6ap! Ke3 KeiReH Ta3anay XeHe TexHNKaIbIK KbI3MeT KepCteTy KymblCTapBH Kypri3yDen 6ypbIH KpyblfBbIH aWala bIa bIpbIH YraWbIKTaH WbIFapbIH3.
- Ytik a3dian kipnen kaIfah 60nca, awanbl aIbIPbIH yAdbkTah WbIFapbHb3 KHe TaBaHbHbIH (7) cyybHa MymKInDik 6epiH3. YtIKTH KopnycbI MeH TaBaHbIN DbIMKbI NybepeknEh cyptiH3.
- Mata cHTeKakBik 60nca, on yTik TaBaHbHbIK KOFapbl TEMpepatypacbHbIH 0cepiHeH epin ketyi MyMkiH. MyHdai KaFdaJa 6yDbl Ewipin, Ke3 KeIreH KaIbIKbI Depey KaBHbIKyTeJIreH, KpyraK MaKTa MaTaMeH CypTHi3.
- Ytik TabaBHIN Teric, Kblntbip Kynde caKtay YuH, KatTb MeTann 3aTAPMeH XaHAcyBH 6oJbIPMaHbI. YtIKTH TaBaHbN Ta3anay YUH eWkaaH da bIbC JyyFa apHaIFaH KaTb bICbIHTap MeH XmMnJIbK 3aTATpDa NaiJaHaH6aHbI3.
T KaaBbJatbH XaKtaptbH Kepy
A self-clean
By petteiriuih (3) naIdaIaNrHan Ke3de, "e3diriIHeN Ta3aJay"KyuIeCi KaKTapDbIH 6eniHy MexAHn3MIn Ta3aJaIbI.
B Calc'nClean
"Calc'nClean"Функцясbl6byTy3iJy KaMepacbHdaFbIycakKaKbeNtKeipH KJOFOf KaMeKTECEdi.Ci3iH aIMaKTafblCyTe KePmek BonFaH KaFdaIb,6yN KbI3MeTTI2 anTada6bpet KOnDaHaHxH.
1 Ytikti jeninep yuibfbiHaH axbipaTbHb3,6y peTteriuiH (3) KyiHe opHaTbHb3 xHe cy 6barh (11) cyMeH TOIbPbHb3.
2 Temnepayps peTteriuiin (12) "max"kyire opHaTBHb3 xHe yTikTiH aWaalbl aiBipbIH pO3eTKaFA KocBhlB3.
KaKeTti KbI3dbpy yaKbITbIHan KeiH wam oWeedi. CoadaH KeiH, YTIkTIH aWaNbI aNbIPbIH pO3eTKaDah aXbIpaTbHbI3 (eTe MaHbI3DbI!).
By petteriin "max"kyre ophaHbIb3.
5 YtikTb6aKaIbIKbIH yCTiHne yCTan TypbIHb3. "clean" (Ta3aIay) TYmeciH (10) 6acbIHb3 KxHE KOIMAHbIH CY CBIBIMDbJIbIFbIHbIH WAMAMEH YUHTeB iOp 6eniri 6yfa aiHaMaHaHa YA tIKti CiciKHi3. Ka nen TY3iJIcTePdiN KaIdbfBiH KeTIpiN, YtIKTH Ta6aHbIHn KaIhak cy aBIn, 6y bIfa 6bactaBl.
"clean" (taaJay) Tymecin bocatbH3 xHe yTikTi bipHee sekynd akbpHc iJkiH3.
7 BaK bocamafahwa 4 XeHe 5 KaIaMdapdbi KaItaHaB13.
CocbH yrikTe jenire KocbH, KaJFaH cy TOnbIfbImeH 6yra aHaJIMaHaHwa KaI-Ta KbI3DbIpbIHbI3.
9 YtikTi po3eTkadaan axbipatbIn, Ta6aHbH (7) cyb1bHbI3. YtIKTI h Ta6aHbIH TEK DbIMKbIN MaKTA MaTAmEH CypTih3.
anti-calc
"anti-calc" Kaptrudki yTiriH3iH naIaIbI Kbl3MeT Kepcety MEP3imH apTTbIpa OtIbIbI, 6bMyen Ytiktey bacIcBiHa n aIa IbaONaTbIH KaKtBuXnHaJIyBnA3aI TyUWnApHaNFaH. AJaIda "anti-calc" Kaptrudki yaKbIT eTe Ty3inTeH bacIbIK KaKtBu TOnbIK Ketipe anMaJdbI.
| Macele | Мукин себбí | Шебим |
| Ytik Кызайдь. | 1. Temnepatya petteriш (12) са зшама opнатылган. 2. "secure" жунеша бенидірілган. Ytik Кут рекиміе opнатылган. 3. "SensorSecure" жунешабенидірілган. Ytik Кут рекиміе opнатылган. | 1. Temnepatya petteriш жогарырak ки're opнатылгиз. 2. Ytik Кайta кosity ушін оны жайжыкытылгиз. 3. Ytik Кайta кosity ушін оны туткасынан устаньиз. |
| "auto off" karbін ндікаторы (15°) Жыltыктайдь. | 1. "secure" жунешабенидірілган. Ytik Кут рекиміе opнатылган. | 1. Ytik Кайta кosity ушін оны жайжыкытылгиз. |
| "SensorSecure" karbін ндікаторы (16°) Жыltыктайдь. | 1. "SensorSecure" жунешабенидірілган. Ytik Кут рекиміе opнатылган. | 1. Ytik Кайta кosity ушін оны/tуткасынан устаньиз. |
| КиIM徴 утікін tabanba naх жабісын кал берedi | 1. Temnepatya оte төmen. | 1. Temnepatya petteriш (12) төmenБүрьндз max'apalibiniz(“*”)ж've пamутpres opнатылб (“*”)ж've "max" apalibiniz(а) ж've bakuynay шамы (13*) bukehenne ktyтigiz. |
| Су buyмен Бірre утікін tabanba nah (7) Тамшылайдь. | 1. Temnepatyaныр pettey (12) napametri тьм төmen. | 1. Temnepatya petteriш жогарырak пarametrpre opнатылб (“*”)ж've "max" apalibiniz(а) ж've bakuynay шамы (13*) bukehenne ktyтigiz. |
| 2. By petteriш (3) төmen temnepatypara cәйес тьмхогары opнатылган. 3. By cokkibcibnн Түмecin (2) орбасу.apalibiniz 5 секунд кутпeй kaɪtanan baco bεpehciiz. | 2. By petteriш (3) төmenri пarametrpre opнатылб.3. 3. By cokkibcibnн Түмecin орбасу apalibiniz 5 секунд кутпiz. | |
| Бу shыкай жатыр. | 1. By petteriш (3) күйн opнатылган. 2. Temnepatya оte төmen. Тамшыra kapсы жүйьбенидірілган. | 1. By petteriш жогарырak ки're opнатылб.3. 2. Матаflа сәйес күлгетхаftади, оданда жогарытіtemратypаfla opнатылб. |
| Бурку phunckиясы жмьс icтeme'di. | 1. Бакта (11) су жok. 2. Күрьндьб iiteеліng калган. | 1. Cbyabln Tontlbpbliz.3. 2. Тхн��алык Кьзмет Крссу optaillbfa hya-bapnaacbliz. |
| Бастankы рет коссан kezie du tukten TUTIN шыfasдь. | 1. Byl Kei6ip iushi beilekterperdiin maɪlaybɪnəн bɔlby MUMKIH. | 1. Byl kalibntы joагдai joэne bɪspheisme MHyttah keiɪn TOKtaɪdɪ. |
| Сydдн TUTбалары утікін tabanbɪndаflы (7) Тechітір apkibnyшылбдь. | 1. Ka'tbɪn iЗdepi by kamerpacbl apkibnyшылбнлллллллллллллллллллллллллллллллллллллллллллллллллллллллллллллллллллллллллллллллллллллллллллллллллллл. | 1. Tazanay proceciin opblindahl (‘"Cal'nClean" boIimin kapanbɪz). |
KoFapbIda bepijireh ueiimdepin euKaicbIcbl KEmektecnereh XaFdaJa, ekineTTi TexHnKaJIbIK KbI3MeT KepceTy optaIbIfbHa xa6abpnaCbIbI3.