
APH 240 - Electric drill KRESS - Free user manual and instructions
Find the device manual for free APH 240 KRESS in PDF.

| Brand | KRESS |
| Model | APH 240 |
| Product type | Cordless pneumatic hammer drill |
| Power input | 360 W |
| Power output | 275 W |
| No-load speed | 0–1000 min-1 |
| Speed under load | 0–800 min-1 |
| Impact frequency under load | max. 4400/min |
| Impact energy per blow | max. 2.0 J |
| Right/left rotation | Yes |
| Tool holder | SDS-Plus |
| Max. drilling diameter in steel | 10 mm |
| Max. drilling diameter in wood | 20 mm |
| Max. drilling diameter in concrete | 20 mm |
| Battery type | NiCd |
| Rated battery voltage | 24 V |
| Battery capacity | 1.2 Ah |
| Charging time | max. 120 min |
| Tool weight | 3.6 kg |
| Battery weight | 1.2 kg |
| Noise level | 93 dB(A) |
| Acceleration value | < 12 m/s² |
| Maintenance | Clean cooling vents; wipe with a damp cloth; periodic inspection by an authorized KRESS service center |
| Safety | Additional handle mandatory; wear safety glasses, hearing protection, gloves and safety shoes; slip clutch |
| Warranty | 24 months |
Frequently Asked Questions - APH 240 KRESS
User questions about APH 240 KRESS
0 question about this device. Answer the ones you know or ask your own.
Ask a new question about this device
Download the instructions for your Electric drill in PDF format for free! Find your manual APH 240 - KRESS and take your electronic device back in hand. On this page are published all the documents necessary for the use of your device. APH 240 by KRESS.
USER MANUAL APH 240 KRESS
Operating Instructions GB 9
Mode d'emploi F 14
The battery-powered pneumatic drill hammer can be used universally for hammer drilling and drilling as well as for screwdriving in wood, metal and plastic.

This pneumatic drill hammer is not suited for chiselling work (also not with pointed chisels).
2

Safety Instructions and Accident Prevention
WARNING! When using battery-driven tools basic safety precautions are to be taken, including the following, in order to reduce the risk of fire, batteries leaking and persons becoming injured.
Before operating the machine, please read through the operating instructions completely, follow the Safety Instructions in this manual as well as the general Safety Instructions for Power Tools in the accompanying booklet.
Important instructions, which should be read before starting operation, and which we strongly recommend observing:
- For charging the batteries, only use a charger which is recommended by the manufacturer and never use the recommended charger to charge other electrical equipment.
- Never carry the tool with your finger on the switch.
- Before any work on the machine itself, remove the battery.
- Do not use any defective or deformed batteries.
- Any machines and batteries that are not being used should be kept separately in a dry place that is high up or locked, out of the reach of children. For safety's sake, a battery charger connected to the mains should also be permanently supervised.
- Do not expose the machine, battery and battery charger to rain. Do not use the machines in a wet or damp environment.
- Always keep the battery and battery charger clean and dry.
- Do not open the battery and protect from impact.
-
Protect the battery from heat and fire: Danger of explosion! Do not place the battery on radiators or expose to strong sun rays for a longer time; temperatures over 50^ cause damage.
-
In extreme conditions battery fluid can leak out. This does not mean it is defective. If in such a case the casing is no longer sealed and battery fluid comes into contact with the skin, proceed as follows:
- Wash affected skin immediately with soap and water.
- Neutralise the battery fluid with vinegar or lemon juice.
- If the eyes are affected, rinse with clear water with at least 10 minutes. Consult a doctor immediately!
- Before connecting the charger to the mains, please check that the voltage of your mains connection corresponds to the voltage stated on the nameplate of the charger.
- Always inspect the plug and cable before use. If damaged, they must be replaced by a qualified professional.
- Caution - High voltage: Do not open the battery charger!
- Ensure that the connection between the battery charger and battery is correctly positioned and is not obstructed by foreign bodies.
- Keep battery charger slot free of foreign objects and protect against dirt and humidity. Store in a dry and frost-free place.
- When the battery is outside the battery charger, cover battery terminals to avoid short circuits from metal objects. Danger of fire or explosion results when shorted by a metal object!
- Do not charge batteries of other manufacturers. Only use genuine Kress accessories.
- Observe notes on environmental protection.
- When drilling or screwing in walls, they must be checked for hidden electric cables or water and gas pipes with a detector.
- Do not work with materials containing asbestos!
- Do not drill holes into the housing to label the machine. The protective insulation will be bridged. Please use self-adhesive labels.
- Protect the cables of the battery charger from sharp edges. Damaged cables must be replaced immediately by one of our service depots.
- For safety reasons, work only with the auxiliary handle 10 mounted.
- Wear protective glasses, hearing protection, protective gloves and sturdy shoes.
- When the drill unexpectedly jams, the machine kicks back. Therefore, always take a secure stance and hold the machine firmly with both hands.

10 English
APH 240
3 Illustration
1 Tool holder
2 Dust protection cap
3 Unlocking collar
4 Drilling/Impact drilling selector
5 Ventilation slots
6 ON/OFF switch
7 Rotational direction switch
8 Unlocking button
9 Battery
10 Auxiliary handle
11 Depth stop
12 Battery charging unit
13 LED charging condition indicator
14 Battery charging cavity
Accessories illustrated or described are not always included as standard delivery items.
Battery
Type
Rated voltage
Capacity (NiCd/NiMH)
Number of cells
Operating temperature range
Weight
Battery charging unit
Input voltage
Output voltage
Charging current/time
Weight
AP 240
NiCd
24V =
1.2 Ah
20
+5°C ... +45°C
1.2 kg
CLG 120
230 ~V
24V =
max. 0.75 A/
max. 120 min.
approx. 1.65kg
5 Noise/vibration information
Measured values determined according to EN 50 260.
Sound pressure level: 80 dB (A)
Sound power level: 93 dB (A)
Work place emission value: 83 dB (A).
For operation, noise protection measures are required.
The acceleration measured is usually less than 12m / s^2
6 Auxiliary Handle
Mounting the Auxiliary Handle
Only use the machine together with the auxiliary handle 10. Place the auxiliary handle onto the clamping collar and tighten firmly with the handle piece.
7 Charging the batteries
The rated voltage of the battery must agree with the value on the machine.
- The batteries are not charged. They therefore have to be charged before use.
- A new battery develops full power only after it has been subjected to approx. 5 charging and discharging cycles.
- The maximum service life of the batteries is attained if you charge these at an ambient temperature of between +5^ and max. +45^ .
- If the battery is not within the permitted loading temperature range (approx. +5^ and +45^ ) charging time is extended by the cooling or warm-up time.

4 Technical Data
Battery-Powered
Pneumatic Drill Hammer
Article number
Input power
Output power
No-load speed
Speed under load
Load hammer blows
Impact energie
Right/Left rotation
Clamping collar dia.
Tool holder
Drill dia.:
- Steel
- Light metal
- Wood
Hammer drilling in concrete
Recommended hammer drilling
range
Screw dia.:
- Wood
- Sheet metal
Corner measure
Weight
APH 240
360 W
275 W
0-1000 min
0-800 min
max. 4400/min
max. 2.0J
.
43 mm
Euro standard
SDS-Plus
max. 10mm
max. 13mm
max. 20mm
max. 20mm
4-14 mm
max. 6 mm
max. 6.3 mm
33 mm
3.6 kg


APH 240
- Important! Batteries will discharge even if the tool is not used. They should therefore be re-charged regularly.
Or better still - connect the battery to the mains charger which will automatically switch to maintenance charging after the battery has been fully charged. This is particularly useful for maintenance and for the optimal operational readiness of the batteries. - Do not leave the battery in the charger if the latter is not in operating condition.
To ensure long service life, the batteries should always be charged in good time. This is particularly important if you notice a reduction in power output.
- Remove battery 9 from the handle by simultaneously pressing the locking device 8.
- Make sure that the mains voltage complies with the voltage on the name-plate on the charger. Connect charger plug to mains.
- Push battery into battery until it snaps into place.
Battery charging unit type: CLG 120
Use as Intended
The device is only designed for charging Kress batteries with a voltage of 24V
Both NiCd batteries and NiMH batteries can be charged.
Charging Procedure
The quick, computerised battery charger has an extensive function for monitoring the battery and charging parameters and charges the battery with the optimum quick-charging current in each case, depending upon the temperature. This enables the shortest charging times and a long battery service life.
Fully insert the battery into the charging slot until it is heard and/or felt to notch. For removing the battery, press both lock-release buttons until the battery can be taken out of the battery charger without any resistance. Do not exert any force!
After completion of the quick charging process, the charging unit switches automatically to trickle charging. This compensates for the natural self-discharging of the battery.
Display and Key
Constant green indicator light: The charging unit is correctly connected to the power mains and is ready for operation. No battery is inserted in the charging cavity or it is not making contact.
Blinking green indicator light: The battery is making contact and quick charging is in progress.
Constant green indicator light: The quick charging process has ended and the charging unit has switched to trickle charging. The battery is completely charged and can be removed.
Rapid flashing green indicator light: The battery temperature is outside the allowable range. The charging process begins as soon as the battery temperature is again within the prescribed temperature range.
The battery is defective or there is a short between the charging contacts.
- Remove the battery from the battery charger.
- Pull out the mains plug!
- Check the charging slot for foreign bodies.
No light: Mains voltage missing.
If the batteries cannot be charged correctly:
- Make sure the socket is providing voltage.
- Make sure the charging points provide good contact.
- Should charging still not be possible, please send the battery and battery charger to our nearest service centre.
Notes for the correct use of the battery:
- To obtain the maximum service life, do not recharge the battery immediately after a short period of use but, if possible, discharge to the lower capacity limit and then recharge.
- Avoid to the extent possible the blocking of the machine. The resulting excessive current flow leads to quick discharging and increased wear of the battery.
- An increasingly shorter operating time per recharging of the battery is an indication that the battery is worn out and must be replaced.
Do not carry out any repair on the charger yourself!
As a basic rule, return the faulty machine to our next customer service centre (also in the case of defective mains cables)!

12 English
APH 240
8 Putting into Operation
Convince yourself before using that the battery is securely seated in the machine.
SWITCHING ON/OFF
Press or release the On/Off switch 6.
DRILLING - IMPACT DRILLING
For drilling, place the selector 4 in the position.
For impact drilling, set to
The switch-over can best be performed at a standstill. Only after the On/Off switch 6 is actuated and the machine starts does the gear box shift to the selected mode.
Note: Left rotation when impact drilling damages the drill. Switch off the impact mechanism for diamond crown drilling or for mixing work.
When hammer drilling, use exclusively drills with hard metal inserts and SDS-Plus shafts. The use of commercially available masonry drills with cylindrical shafts by means of the adapter 18 and the normal drill chuck in conjunction with the pneumatic impact mechanism is not possible.
SPEED CONTROL

With the On/Off switch 6, the speed can be continuously varied. With light pressure on the On/Off switch 6, the machine begins to rotate slowly; with increased pressure, the speed increases.
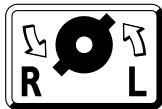
ROTATIONAL DIRECTION SWITCHING
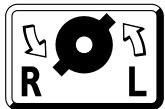
Operate the rotational direction switch 7 only when the machine is at a standstill!
Take hold of the rotational direction switch 7 on both sides.
Right rotation: Set the rotational direction switch 7 to “R”.
Left rotation: Set the rotational direction switch 7 to "L".
Important! Press the rotational direction switch 7 in each case to the stop on the housing, i. e. until it can be felt to engage.
If the rotational direction switch 7 is set between the positions "R" and "L", the machine cannot be switched on.
9 Inserting/Removing Tools
The tool holder 1 clamps the drilling tools without using a tool key.
INSERTING TOOLS
Before all work on the machine itself, always set the rotational direction switch 7 to the middle position.
Clean and lightly grease the tool shaft.
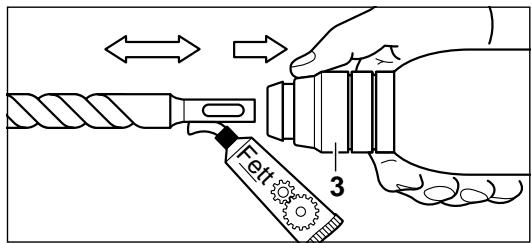
Pull back the unlocking collar 3. Insert the tool while turning into the tool holder until it latches. Release the unlocking collar. Check whether the tool is firmly seated.
Take care that the dust protection cap 2 is not damaged.
Replace damaged dust protection caps!
REMOVING TOOLS
Slide the unlocking collar 3 to the rear and pull out the tool.
10 Drill Chuck (Accessory)
For drilling work in metal, wood and plastic with drills that have normal shafts, a drill chuck (13 mm max. chuck opening) is available. The drill chuck is mounted on the adapter (accessory) for screwdriver bits. All common drill chucks with 1/2'' × 20 UNF internal threads (13 mm max. chuck opening) can be used.
MOUNTING THE CHUCK
Before all work on the machine itself, always set the rotational direction switch 7 to the middle position.
Clean the threads of the drill chuck (accessory) and the adapter 18 (see accessory). Screw the drill chuck onto the adapter and tighten firmly (approx. 30Nm ). Clamp in a vise for tightening the adapter, for example. Clamp an Allen key in the drill chuck and use it to tighten the chuck. Then lock the adapter in the tool holder the same as a drill.


APH 240
English
13
11 Practical Tips
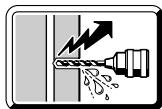
Do not drill into hidden electrical lines or gas and water pipes. Check the area to be worked with a metal detector, for example, before starting.
For metal, use only flawless, sharpened drills; for stone and concrete, only masonry drills with hard metal inserts.
Always adapt the speed to the material to be worked and the diameter of the drill. For precision working with metal and wood, place the machine in a drill stand (accessory).
HAMMER- DRILLING

Wear protective glasses and hearing protection.
Do not apply to much pressure. The performance is not increased in this manner.
For hammer drilling, work only with protective glasses, hearing protection and the auxiliary handle 10. Check before putting into operation if the shift knob 4 is latched in the position.
DRILLING IN TILES
Start drilling slowly on the tile. After the tile is drilled through, switch to impact drilling.
SCREWDRIVING
Screwdriver bits can be inserted into the adapter 18 (see accessory). Commercially available bits with a hexagonal dimension of 6.3mm or 1/4 (DIN 3126, Form C) can be used.
The screwdriver bits are held in the adapter with a spring ring. Therefore, use only bits with a notch.
12 Slip Clutch
If the drilling tool become jammed or get caught, the slip clutch releases.
Remove the load from the machine immediately by pulling back the drilling tool.
Always hold the machine tightly with both hands and assume a secure stance.
13 Maintenance Measures
Before all work on the machine itself, always set the rotational direction switch 7 to the middle position.
Always keep the ventilation slots clean.
Wipe off the accessible plastic parts regularly with a cloth without cleaning agent.
After heavy use over a long period, the machine should be taken to a Kress service location for an inspection and thorough cleaning.
14 Environmental Protection

Kress takes back worn-out machines for the purpose of resource-saving recycling. As a result of their modular construction, Kress machines can be very easily dismantled into their reusable materials.

Defective rechargeable batteries must be recycled according to the Guidelines 91/157/EEC.
Do not throw used batteries in household waste, in fire or in water.
Do not open battery and dispose of it through the available collection points.
Do not place the battery on any heated surface or expose it to strong sunlight for a longer period of time. Do not expose the battery to temperatures over 50^ .
Give your worn-out Kress machine to your dealer or send it directly to Kress.
Subject to change without notice

14 François
APH 240
1 Utilisation
MISE EN MARCHE/ARRET
PERCAGE - PERCAGE AVEC PERCUSSION
PERCAGE AVEC PERCUSSION

TALADRAR - TALADRAR CON PERCUTOR
OMKOPPLING AV ROTATIONSRIKTNING
Reservation for andringar

1 Anvendelse
Ladeaggregat for akku
Indgangsspaending
Udgangsspaending
Ladestrom/ladetidt
Vægt
AP 240
NiCd
24V =
1,2 Ah
20
+5°C...+45°C
1,2 kg
CLG 120
230V
24V =
maks. 0,75 A/
maks. 120 min.
ca. 1,65 kg
4 Tekniske data
Akku-pneumatik-borehammer
Varenummer
Optagen effekt
Afgiven effekt
Omdrejningstal, ubelastet
Omdrejningstal, belastet
Ladeaggregat for akkumulator type: CLG 120
Anbefalt boreomrade for
hammerboring
Skrue-0:
-
Tre
-
Metall
Vinkeldimensionjon
Vekt
APH 240
360 W
275W
0-1000 min-1
0-800 min
maks. 4400/min
maks. 2,0 J
43 mm
Euro-norm
SDS-Plus
maks. 10 mm
maks. 13 mm
maks. 20mm
maks. 20mm
4-14 mm
maks. 6 mm
maks. 6,3 mm
33 mm
3,6 kg
Til hammerboring innstiles.
PORAAMINEN LAATTOIHIN
TONOETHsH TOY EPRAAEIY
Aniv dEiyTe OOniahnotepyaoia oTo iio To mXavnaTOnotheite naVtoTdoiaKoTTn aalaync opac nepiotpOphc 7 otv kevtpiKt
Iatnpou to 0ikaiomega aalaywv


GB C Declaration of conformity
We declare under our sole responsibility that this product is in conformity with the following standards or standardization documents: EN 50 260, EN 55 014-1, EN 55 014-2, EN 61 000-2-3, EN 61 000-3-3 according to the provisions of the regulations 73/23/EEC, 89/336/EEC, 98/37/EC.
(Charging device: EN 60 335, EN 55 014-1, EN 55 014-2, EN 61 000-3-2, EN 61 000-3-3, 73/23/EEC, 89/336/EEC).
- This electro-tool was manufactured with high precision and subjected to rigorous factory quality controls.
- Therefore, we guarantee the cost-free correction of fabrication or material defects that occur within 24 months of the date of purchase by the end user. We reserve the right to repair defective parts or replace them with new parts. Replaced parts become our property.
- Improper use or handling as well as opening of the machine by unauthorised repair agencies voids the guarantee. Parts subject to wear are excluded from the guarantee.
- The guarantee may only be enforced when defects are reported without undue delay (including shipping damage). Guarantee implementation does not extend the guarantee period.
- If the tool is defective, please complete the guarantee card and return the unit, guarantee card and a brief description of the problem to the responsible service location. Please enclose your sales receipt.
- The guarantee obligations assumed by us shall exclude any further claims on the part of the buyer, in particular the right to recission of a sale, reduction and the assertion of damage claims.
- However, the buyer shall have the right to either a reduction (in the purchase price) or the recession of the sale (cancellation of the sales agreement) should we fail to eliminate any defects within a reasonable period of time.
- Damage claims in accordance with §§ 463, 480 Paragraph 2,635 BGB due to absence of guaranteed quality shall not be not excluded.
- The provisions defined in Items 7 and 8 only apply to the Federal Republic of Germany.
NL
Garantie
27 Boulton Rd., Reading, Berkshire RG2 ONH
Telefon: +44-(0)118-975 17 27
Telefax: +44-(0)118-975 22 12
e-mail: dougm@bmjpower.com
Portugal:
Sarraipa S.A.
Please fill in immediately and keep in safe place.