Heiniger Saphir Cord - Electric mower Coburn - Free user manual and instructions
Find the device manual for free Heiniger Saphir Cord Coburn in PDF.
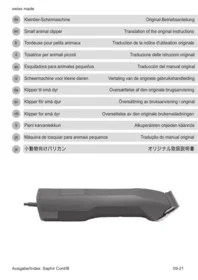


| Product type | Electric animal clipper for commercial use |
| Brand | Coburn |
| Model | Heiniger SAPHIR Corded Clipper |
| Animals concerned | Dogs, cats, livestock, and horses |
| Power supply | Mains via provided power adapter |
| Current type | Alternating current (corded) |
| Weight | Approximately 1.2 kg |
| Dimensions | Approximately 25 x 5 x 7 cm |
| Cutting head | Interchangeable |
| Blades | Professional blades to be lubricated regularly |
| Intended use | Commercial use only |
| Usage prohibitions | Do not use on humans or dangerous animals |
| Electrical safety | Unplug immediately if immersed; do not reach for an appliance that has fallen into water |
| Child safety | Supervise children; do not leave the appliance plugged in unattended |
| Maintenance | Cleaning after each use, lubricating the blades |
| Cleaning | Remove the cutting head for cleaning; do not immerse |
| Spare parts | Cutting heads and blades available |
| After-sales service | Authorized service center indicated in the manual |
| Warranty | Warranty conditions detailed in the manual |
| Storage conditions | Dry place, out of reach of children |
| Included accessories | Power adapter and cutting head |
Frequently Asked Questions - Heiniger Saphir Cord Coburn
User questions about Heiniger Saphir Cord Coburn
0 question about this device. Answer the ones you know or ask your own.
Ask a new question about this device
Download the instructions for your Electric mower in PDF format for free! Find your manual Heiniger Saphir Cord - Coburn and take your electronic device back in hand. On this page are published all the documents necessary for the use of your device. Heiniger Saphir Cord by Coburn.
USER MANUAL Heiniger Saphir Cord Coburn
Inhaltsverzeichnis
1 Sicherheit .... 3

Abb. 7
Abb. 8
Abb. 9
Abb. 10
Abb. 11
Abb. 12
1.1 Personal 3
1.2 Symbols and warning notes 3
1.3 Stipulated usage....4
1.4 Personal protective equipment.... 4
1.5 Power supply 4
1.6 Animals....6
1.7 Clipping blades....6
1.8 Children 6
2 Generalities....7
2.1 Guarantee conditions 7
2.2 Customer service 7
2.3 Limitation of liability 7
3 Technical data....8
3.1 General information....8
3.2 Mains voltage 8
3.3 Operating conditions 8
4 Assembly and function....8
4.1 Scope of delivery....8
4.2 Overview....8
4.3 Abstract 9
4.4 Operating elements 9
5 Transport, packaging and storage 9
6 Operation 10
6.1 Initial start-up.... 10
6.1.1 Fitting the clipper head 10
6.2 Activities during operation....11
6.2.1 Clipping....11
6.2.2 Changing the clipper head 11
6.2.3 Lubrication....12
6.2.4 Cleaning.... 12
7 Troubleshooting....13
8 Spare parts....14
9 Disposal 15


IMPORTANT SAFETY INSTRUCTIONS
NOTE!
When using an electrical appliance, basic precautions are required to always be followed, including the following:
Read all instructions before using (this appliance).
1 Safety
The non-observance of the instructions and safety regulations mentioned in this manual can cause operating malfunctions or serious injury to persons.
1.1 Personal
- The operator must be experienced in handling the animals to be clipped.
- Children are not permitted to operate the equipment.
Operation of the clipper is only permitted by personal expected to do their work reliably. Persons, whose reactivity is affected by drugs, alcohol or pharmaceuticals, are not permitted to operate the equipment.
1.2 Symbols and warning notes
Various symbols are used in the operating instructions. These symbols indicate possible hazards or bring to the user's attention such technical information that, if not complied with, may lead to personal injury and material damage or to uneconomic operation.
Hazard symbols

WARNING/DANGER!
Denotes a possibly hazardous situation. Serious injury and even death can result if such situations are not avoided.

CAUTION!
Denotes a possibly hazardous situation. Light or slight injury can result if such situations are not avoided.
Information symbols

NOTE!
A note which, if not complied with, can lead to operational stoppages or damage.
1.3 Stipulated usage
The equipment is exclusively designed and conceived for the here described use and intention.
The equipment is exclusively intended for use on dogs, cats, cattle and horses. The device is intended for commercial use.
The compliance of all indications in this manual is part of the intended use.
Other uses are expressly prohibited.
The device may only be operated with the power supply unit provided.

WARNING!
Expressly prohibited are:
• Using the machine on persons.
- Clipping other animals, in particular dangerous animals such as beasts of prey.
1.4 Personal protective equipment
Antislip shoes. For protection against slipping on slippery underground.
1.5 Power supply

DANGER!
To reduce the risk of electric shock:
- Do not touch the device if it falls into water. Immediately pull the plug out of the socket.
▶ Do not use while bathing or in a shower. - Do not place or store appliance where it is able to fall or be pulled into a tub or sink. Do not place in or drop into water or other liquid.
▶ Except when charging, always unplug this appliance from the electrical outlet immediately after using.
▶ Unplug this appliance before cleaning.

WARNING!
To reduce the risk of burns, fire, electric shock, or injury to persons:
▶ An appliance shall never be left unattended when plugged in.
This appliance is not intended for use by persons (including children) with reduced physical, sensory or mental capabilities, or lack of experience and knowledge, unless they have been given supervision or instruction concerning use of the appliance by a person responsible for their safety. Children should be supervised to ensure that they do not play with the equipment.
▶ Use this appliance only for its intended use as describe in this manual. Do not use attachments not specified by the manufacturer.
▶ Never use the device if the cable or outlet are damaged or if it does not work properly after falling, sustaining damage or landing in water. Take the device to a service centre for inspection and repair.
- Keep the cord away from heated surfaces.
- Keep the air openings free of lint, hair, and similar objects.
▶ Never drop or insert any object into any opening.
- Do not use outdoors or operate while aerosol (spray) products are being used.
- Do not use this appliance with a damaged or broken comb, as it has the potential to result in facial injury.
- First insert the plug into the device before plugging it into the outlet. To disconnect, turn all controls to off position (e.g. "0") then remove plug from outlet.

WARNING!
Keep the device dry.
1.6 Animals
The appliance is intended for trimming purposes only.

WARNING!
The noise of the clipper can trouble animals. A kick, an attack or the weight of the animal can cause serious injuries. Therefore:
- Just persons being experienced in handling with animals are allowed to clip the animals.
- Fix and calm the animal sufficiently before clipping.
▶ Work carefully.
▶ Unauthorised persons are not permitted to approach the clipping place. -
Do not charge, install or leave the device in places where it is expected to:
-
Be exposed to damage from an animal,
• or to weather effects
1.7 Clipping blades

WARNING!
Moving blades and sharp edges of the blades can cause injuries on the skin. Therefore:
▶ Work carefully.
- Avoid any contact with the moving blades.
1.8 Children

WARNING!
Never let the equipment unsupervised and use it very carefully when children or persons who cannot judge the dangers are nearby.
Children are not permitted to operate the equipment.
Children should be supervised to ensure that they do not play with the equipment.

SAVE THESE INSTRUCTIONS!
2 Generalities
This manual facilitates a safe and efficient machine handling. Read these instructions carefully before starting operation.
Basic requirements for a safe operation are the adherence of all the information regarding safety and operation in this manual.
Keep this manual permanently. If you hand on the equipment to other persons, provide them with this manual.
2.1 Guarantee conditions
The guarantee conditions are included in the general terms and conditions of the manufacturer.
2.2 Customer service
For technical information, our customer service and our authorised service centres are at your disposal.
Furthermore, our staff is interested in new information and experience resulting from the operation which could be useful for the improvement of our products.
2.3 Limitation of liability
All data and information in this instruction manual were arranged in consideration of the current standards and regulations and state of the art as well as our realizations and experiences of many years.
The manufacturer assumes no liability for disadvantages due to:
• Non-observance of the instruction manual.
- Operation of the clipper for not intended use.
- Assignment of not instructed personal.
• Technical modifications.
- Use of not approved spare parts.
The actual scope of delivery can differ from specially designed models, from additional ordering options or due to the latest state of the art from the here described annotations and illustrations.
This product has been developed and assembled using the best individual components available. It is designed to give longevity and high performance. If spare parts are used during the life of this product, please ensure that they are genuine Heiniger parts.
Failure to use genuine Heiniger spares may reduce the performance of this precision engineered product and will void any warranty claim.
3 Technical data
3.1 General information
| Clipper | Length | 204 mm |
| Width | 50 mm | |
| Height | 41 mm | |
| Weight with battery | 440 g |
3.2 Mains voltage
| Electrical(charging station) | Voltage | 100–240 V |
| Charging rate, maximum | according rating plate |
3.3 Operating conditions
| Environment | Temperature range | 0–40°C |
| Relative humidity, maximum | 75% | |
| Vibration ahv | < 2,5 m/s 2 | |
| Noise emission ( LpAm ) | < 70 dB |
4 Assembly and function
4.1 Scope of delivery
| Clipper | 1 pce |
| Clipper head (equipment oriented) | 1 pce |
| Oil dispenser | 1 pce |
| Cleaning brush | 1 pce |
| Operating instructions | 1 pce |
| Packaging for transport and storage | 1 pce |
4.2 Overview

Mains connection cable
Direct operation adapter
Slide switch
Clipper
Clipper head

Direct operation adapter release button
Interlock clipperhead
Fig. 2
4.3 Abstract

The clipper serves to clip dogs, cats, cattle and horses. Two comb-shaped blades are the cutting tool. The bottom blade facing the skin (3) is standing firm and is fixed on the blade hinge (4). The top blade (2) is agitated crossways that one. The top blade is moving by the help of a turning lever (1).
Fig. 3
4.4 Operating elements

Fig. 4 Switch in OFF-position ("0")

Fig. 5 Switch in ON-position ("I")

Fig. 6 Interlock clipperhead (7)
5 Transport, packaging and storage
Check the delivery on receipt immediately on completeness and damage in transit.
NOTE!
Complain any damage as soon as you discover it. Claims for damages only may be made within the valid time.
For the packaging, just non-polluting material is being used.
The packaging is to protect the individual components from transport damage, corrosion and other forms of damage prior to use.
Store clipper and accessories on the following conditions:
▶ Do not store outdoor.
▶ Store dry and dust-free.
▶ Protect against solar irradiation.
▶ Avoid mechanical shocks.
▶ Storage temperature: 0 until 40°C.
▶ Always store in the packaging supplied with it.
▶ Relative humidity: max. 75 %. When storing longer than 3 months, check periodically the general condition of all parts. If necessary, refresh or renew the conservation.
6 Operation

WARNING!
Incorrect operation may cause damage on persons or objects. Therefore:
- Do all the steps of operation according to the indications in this instruction manual.
6.1 Initial start-up
6.1.1 Fitting the clipper head

Fig. 7
- If the blade hinge (2) is accidentally closed, lift the latter up using a screwdriver (1) while simultaneously pressing the blade interlock.

Fig. 8
- Fit the clipper head (1) on the open blade hinge (2).

Fig. 9
- Fold the clipper head (2) by applying light pressure on to the clipper (1) when the device is switched on.

Fig. 10
- Make sure, that the clipper head (1) is engaged firmly.

NOTE!
For proper operation make sure that the clipper head (1) is engaged correctly.
6.2 Activities during operation
6.2.1 Clipping
- Fix and calm the animal sufficiently before clipping.
- Switch on the clipper already in the field of vision of the animal.
- Approach to the animal from ahead.
- During clipping, look at the behaviour of the animal.
6.2.2 Changing the clipper head

Fig. 11
- Move the switch to position "0" (Fig. 4).
- Push the interlock clipperhead.

Fig. 12
- Fold the clipper head forwards when the interlock clipper head is pressed.
- Take off the clipper head.
-
Clean the opened hinge by the help of the provided brush.
-
Fit the favoured clipperhead to the blade hinge and fold it on to the switched-on clipper by light pressure. (fig. 8, 9, 10).
NOTE!
Only work with sharp clipping blades, replace blunt or defective blades without teeth. The correct resharpening of clipping blades is only to be done by special machines or by a specialist. In that case, contact your service centre.

6.2.3 Lubrication
To receive good clipping results and to increase the durability of the clipper and the clipperhead, it is necessary to apply a thin oil coat between top and bottom blade (Fig. 13).

CAUTION!
Inadequate lubrication of the clipper head causes heating and a reduced durability of clipper and blades, as well as a reduction of the battery runtime. Therefore:
▶ Lubricate the blades sufficiently during the clipping (at least every 15 minutes), so that they do not drain (Fig. 13).
▶ Only use the lubricants prescribed by the manufacturer.

NOTE!
Only use our special oil or a paraffin oil meeting the ISO VG 15 specification.
The provided oil is non-toxic and produces no irritation on contact with the skin or the mucous membranes. This paraffin oil degrades to some 20% after 21 days (CEL-L-33-T-82).
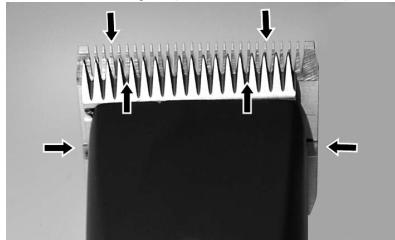
Fig. 13
The blades must be oiled before, during and after every use. When the blades of the clipper are leaving stripes or are running with reduced speed, this is a signal that oil is required. Place a few drops of oil ahead and laterally on the clipper blades (see arrows in Fig. 13). Wipe off the excessive oil with a smooth, dry cloth. Lubrication sprays do not have sufficient oil for a good lubrication, but serve for cooling the clipping blades. Immediately change damaged or crenated blades to avoid injuries.

CAUTION!
Remove all the leaking, used up or excessive grease from all the lubrication points, and it is to be disposed in accordance with the local regulations.
6.2.4 Cleaning
To receive good clipping results and to increase the durability of the clipper and the clipperhead, it is necessary to apply a thin oil coat between top and bottom blade (6.2.3 Lubrication).
Clipper head and hinge
Clean clipperheads und hinge between the different clippings.
7 Troubleshooting
- The here described tasks for troubleshooting can be done mostly by the operator.
- Some tasks only may be done by especially trained personal or by an authorised service centre. These tasks are marked with (S).
| Malfunction | Cause | Rectification |
| Top blade does not move | Clipper head is not well engaged | Engage the clipper head correctly when the motor is running |
| Turning lever is defective | Replace turning lever (S) | |
| Clipper cuts badly or not at all | Clipper blades are blunt | Have top and bottom blades resharp-enend by service centre (S) |
| Clipper blades have not been correctly ground as per specification | ||
| Clipper blades are not oiled | Oil clipper blades every 15 minutes | |
| The animal's hair is wet | Only clip dry hair | |
| Hairs jammed between top and bottom blades | Take off clipper head, push the top blade half away from the clipper head, take away hairs between top and bottom blade | |
| Clipper head has too little clipping pressure | Have clipper head inspected (S) | |
| Motor is not running | Contacts dirty | Switch clipper off and clean the contacts of the clipper and the battery |
| Smell of burning from the motor housing. Motor burned out. | Have motor and / or electronics replaced (S) | |
| Motor does not work | Faulty motor and / or electronics | Have motor and / or electronics replaced (S) |
| Clipper head blocked | Clean and oil clipper head | |
| Motor runs very slowly | Clipper blades were not oiled sufficiently | Oil clipper blades |
8
Spare parts
See illustration spare parts at the end of this instruction manual.

WARNING!
Faulty spare parts may cause damages, malfunctions or total loss and may reduce security. Therefore:
▶ Only use original spare parts from the manufacturer. Purchase the spare parts at the official distributor or directly at the manufacturer.
If using no original spare parts all warranty and service claims are expiring.
| Pos. No. | Description | Quantity |
| 1 | Complete housing set | 1x |
| 4 | Motor complete | 1x |
| 5 | PCB shearer | 1x |
| 6 | Rubber tap | 1x |
| 7 | Turning lever | 1x |
| 8 | Seal | 1x |
| 9 | Circlip | 1x |
| 10 | Washer | 1x |
| 11 | Eccentric cogwheel, pre-assembled | 1x |
| 14 | Kombitorx KA30x16 PT screw | 12x |
| 15 | Blade support | 1x |
| 16 | Blade interlock | 1x |
| 17 | Kombitorx KA30x8 PT-screw | 1x |
| 18 | Clipping pressure spring | 1x |
| 19 | Blade guide | 1x |
| 20 | Clamp holder | 1x |
| 21 | Top blade | 1x |
| 22 | Bottom blade | 1x |
| 23 | Screw M3,5x4 | 2x |
| 36 | Direct operation adapter cord | 1x |
| 37 | Plug EU | 1x |
| 38 | AU/ARG plug | 1x |
| 39 | Plug GB | 1x |
| 40 | Plug US | 1x |
9 Disposal

CAUTION!
Environmental damages when disposing incorrectly!
Electronic scrap, batteries, lubricants and other indirect materials are subject to hazardous waste treatment and may only be disposed of by approved specialist companies!

NOTE!
For disposal hand the clipper and charging station over to a nearby service centre or specialist shop for electronics.
Table des matières
1 Sécurité .... 3
Fig. 7
Fig. 8
Fig. 9
Fig. 10
Fig. 11
Fig. 12
Fig. 7
Fig. 8
Fig. 9
Fig. 10
Fig. 11
Fig. 12
Fig. 4 Interrupteur posición DESCO. («0»)

Fig. 5 Interrupteur posición CO. («I»)

Fig. 7
Fig. 8
Fig. 9
Fig. 10
Fig. 11
Fig. 12
Afb. 6 Snapsluiting scheerkop (7)
5 Transport, verpakking en opslag
Afb. 7
Afb. 8
Afb. 9
Afb. 10
Afb. 11
Afb. 12
Fig. 4 Kontakt i OFF-position ("0")

Fig. 5 Kontakt i ON-position ("I")

Fig. 7
Fig. 8
Fig. 9
Fig. 10
- Kontroller, at skærehovedet (1) sidder sikkert fast.

BEMAERK!
Fig. 11
Fig. 12
Fig. 7
Fig. 8
Fig. 9
Fig. 10
Fig. 11
Fig. 12
Fig. 5 Bryter i PÅ-posisjon («I»)

Fig. 7
Fig. 8
Fig. 9
Fig. 10
Fig. 11
- Sett bryteren på «0» (Fig. 4).
- Trykk inn sperren for klippeho- det.

Fig. 12
Fig. 4 Kytkin OFF-asennossa ("0")

Fig. 5 Kytkin ON-asennossa ("I")

Fig. 7
Fig. 8
Fig. 9
Fig. 10
Fig. 11
Fig. 12
Fig. 7
Fig. 8
Fig. 9
Fig. 10
Fig. 11
Fig. 12
図.4 スイッチOFF位置

図.5 スイッチON位置

图.7
图.8
图.9
図.10
图.11
図.12
In case of claim, please return your machine with the instruction manual and the warranty card directly to your local distributor. Please do not cut off the warranty card from the instruction manual.
© 2021 Heiniger AG. All rights reserved.
This instruction manual may not be duplicated or distributed, neither completely nor in extracts, or by electronic or mechanical means (including photocopying), transmitted or used for the purpose of competition without authorisation from Heiniger AG.
Subject to change without notice.
Translation of the original instructions
- INHALTSVERZEICHNIS
- SICHERHEIT
- GENERALITIES
- TECHNICAL DATA
- ASSEMBLY AND FUNCTION
- TRANSPORT, PACKAGING AND STORAGE
- OPERATION
- TROUBLESHOOTING
- SPARE PARTS
- DISPOSAL
- IMPORTANT SAFETY INSTRUCTIONS
- NOTE
- SAFETY
- PERSONAL
- SYMBOLS AND WARNING NOTES
- HAZARD SYMBOLS
- WARNING/DANGER
- CAUTION
- INFORMATION SYMBOLS
- STIPULATED USAGE
- WARNING
- PERSONAL PROTECTIVE EQUIPMENT
- POWER SUPPLY
- DANGER
- ANIMALS
- CLIPPING BLADES
- CHILDREN
- SAVE THESE INSTRUCTIONS
- GUARANTEE CONDITIONS
- CUSTOMER SERVICE
- LIMITATION OF LIABILITY
- GENERAL INFORMATION
- MAINS VOLTAGE
- OPERATING CONDITIONS
- SCOPE OF DELIVERY
- OVERVIEW
- ABSTRACT
- OPERATING ELEMENTS
- STORE CLIPPER AND ACCESSORIES ON THE FOLLOWING CONDITIONS
- INITIAL START-UP
- FITTING THE CLIPPER HEAD
- ACTIVITIES DURING OPERATION
- CLIPPING
- CHANGING THE CLIPPER HEAD
- LUBRICATION
- CLEANING
- CLIPPER HEAD AND HINGE
- TABLE DES MATIÈRES
- SÉCURITÉ
- TRANSPORT, VERPAKKING EN OPSLAG
- BEMAERK
Brand : Coburn
Model : Heiniger Saphir Cord
Category : Electric mower