Heiniger Xplorer - Electric mower Coburn - Free user manual and instructions
Find the device manual for free Heiniger Xplorer Coburn in PDF.
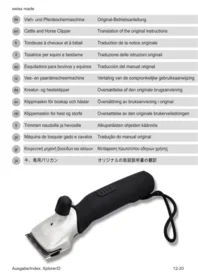


| Product type | Electric animal clipper |
| Brand | Coburn |
| Model | Heiniger XPLORER |
| Use | Shearing animals (sheep, goats, etc.) |
| Power supply | Rechargeable battery with charging station |
| Battery type | Lithium-ion battery |
| Charging station | Included with power supply unit |
| Supply voltage | 100-240 V power supply unit, mains compatible |
| Battery life | Approximately 60 to 90 minutes depending on use |
| Charging time | Approximately 60 minutes |
| Motor | Maintenance-free electric motor |
| Weight | Approximately 800 g with battery |
| Dimensions | Approximately 25 x 6 x 5 cm |
| Blades | Replaceable stainless steel cutting blades |
| Pressure adjustment | Integrated adjustment wheel for optimal cutting |
| Lubrication | Required every 15 minutes of use |
| Cleaning | Brush and dust brush included for maintenance |
| Safety | Protected against moisture, do not use on wet animals |
| Minimum age | Use by children under 8 years of age prohibited |
| Spare parts | Available (blades, battery, charging station) |
| After-sales service | Supported by the manufacturer |
| Warranty | In accordance with the manufacturer's warranty conditions |
Frequently Asked Questions - Heiniger Xplorer Coburn
User questions about Heiniger Xplorer Coburn
0 question about this device. Answer the ones you know or ask your own.
Ask a new question about this device
Download the instructions for your Electric mower in PDF format for free! Find your manual Heiniger Xplorer - Coburn and take your electronic device back in hand. On this page are published all the documents necessary for the use of your device. Heiniger Xplorer by Coburn.
USER MANUAL Heiniger Xplorer Coburn
Inhaltsverzeichnis
1 Sicherheit....3
Abb. 3
Abb. 4
Abb. 5

Abb. 6

Abb. 8
Abb. 10

Abb. 11

Abb. 12
Abb. 13

Abb. 14
Abb. 15
1.1 Generalities .... 3
1.2 Personnel requirements .... 3
1.3 Dangers that can be caused by the device 4
1.4 Personal Protective Equipment (PPE) 6
2 Generalities....7
2.1 Guarantee conditions 7
2.2 Customer service 7
2.3 Limitation of liability 7
2.4 Copyright 8
2.5 Symbols used 8
2.6 Stipulated usage....9
3 Technical data....10
3.1 Clipper 10
3.2 Charger and power supply unit 10
3.3 Battery 10
3.4 Operating conditions 10
4 Assembly and function....10
4.1 Construction 10
4.2 Functional description ...... 11
5 Transport, packaging and storage 11
5.1 Scope of delivery....11
5.2 Packaging....11
5.3 Storage 11
6 Operation 12
6.1 Requirements at the place of use.... 12
6.2 Setting up the charging station.... 12
6.3 Charging the batteries.... 12
6.4 Charging status display 13
6.5 Adjusting the clipping pressure 14
6.6 Switching the clipper on and off 15
6.7 Using the clipper.... 15
6.8 Replacing the clipping blades.... 15
6.9 Lubrication....16
6.10 Cleaning.... 17
7 Troubleshooting....17
7.1 Safety instructions.... 17
7.2 Causes of malfunctions and their rectification 18
8 Spare parts....20
9 Disposal 21
1 Safety
1.1. Generalities

DANGER!
DANGER FROM DISREGARDING THE SAFETY INSTRUCTIONS!
Disregarding the operating instructions and safety precautions presented in these operating instructions will lead to serious injury to people as well as damage to the device.
- The warnings and instructions in these operating instructions must be observed.
Observe the following safety instructions:
▶ Do not leave the clipper unattended when switched on.
- Store the clipper out of reach of children.
1.2 Personnel requirements
- This clipper may be operated only by persons who can be expected to carry out their work responsibly. Persons whose ability to react is undermined by, for example, drugs, alcohol or medication should not be allowed to use the device.
- The operator must be experienced in handling the animals to be clipped.
- Children younger than 8 years are strictly prohibited from operating the device.
Unauthorised persons

CAUTION!
DANGER FOR AND FROM UNAUTHORISED PERSONS!
Unauthorised persons who do not meet the requirements described here will be unable to recognise dangers in the work area.
▶ Prohibit access by unauthorised persons to the location where the clipping is being performed.
If in doubt, approach the persons and instruct them to leave the work area.
- Suspend work until the unauthorised persons have left the work area.
1.3 Dangers that can be caused by the device
1.3.1 Danger from electrical current

DANGER!
DANGER OF FATAL ELECTRIC SHOCK!
Fatal electric shocks can result from contact with electrically live conductors or components!
- Permit repairs to the clipper to be made only by authorised dealers or the factory customer service department; this applies especially to the replacement of a damaged power cord on the charger.
- Keep moisture away from the clippers. This can cause a short circuit. If you suspect that moisture has penetrated the device, do not switch it on again; instead take it to a repair shop.
▶ Never clip wet animals.
▶ Never submerge the clipper in water or other liquids.
▶ Always disconnect the charger power cord from the mains by grasping the plug, not the cord.
Before every use, check the clipper for externally visible damage. If the clipper is damaged, do not use it. - Only ever insert the charger's electrical plug into an undamaged socket.
▶ Never wrap the power cable around the clipper, and keep the clipper away from hot surfaces and objects.
Before plugging in the charger, compare the electrical connection data (voltage and frequency) on the nameplate with that of your electric mains. These data must be identical so that no damage occurs to the device. If in doubt, ask your specialised electrical dealer. - Do not under any circumstances open the housing of the clipper.
If voltage-bearing connectors are disturbed or the electrical and mechanical construction is modified, there is risk of electric shock. - Clean the clipper only when it is dry, using a brush or the enclosed cleaning brush.
▶ Always switch the clipper off before working on it and remove the battery from the device.
▶ Only use original batteries.
▶ Use only original power supply units. Use of the wrong power supply units will invalidate the warranty. - Do not expose the charger and the batteries to direct sunlight or humidity.
1.3.2 Blades

CAUTION!
DANGER FROM MOVING COMPONENTS!
The moving clipping blade and its sharp edges can cause injuries.
▶ Proceed with caution when working.
- Avoid any contact with the moving clipping blades.
- Do not touch the area around the clipping blades whilst the machine is still plugged in to a power source, even if it is switched off. Before working on the clipping blade/clipping head, always disconnect the electrical power first.

CAUTION!
DANGER OF BURNS!
Insufficient oiling of the clipping head will cause it to become hot. This may agitate the animals.
- When clipping, oil the clipping blades and clipping head through the lubrication opening provided for this purpose at least every 15 minutes, so that the blades do not run dry.
1.3.3 Batteries

CAUTION!
RISK OF INJURY WHEN HANDLING INCORRECTLY WITH BATTERIES!
Rechargeable batteries must be handled with especial care.
▶ Only use original batteries.
- Do not throw the batteries into a fire or expose them to high temperatures. There is a risk of explosion.
▶ Only use undamaged batteries.
- Do not expose the batteries and charger to direct sunlight or humidity.
▶ Never short circuit the batteries. Because of overheating the battery can blow out.
▶ Never open the batteries. In case of incorrect use, escaping liquid can cause skin irritation. Avoid contact with the liquid. Rinse off any liquid immediately. If the liquid gets into your eyes, rinse your eyes out immediately for 10 minutes with water and consult a doctor without delay.
1.3.4 Animals

CAUTION!
DANGER OF INJURY BY ANIMALS!
The noise of the clipper can trouble animals. A kick, an attack or the body weight of the animal can lead to injuries.
- Just persons being experienced in handling with animals are allowed to clip the animals.
- Secure the animal sufficiently and calm it before starting work.
▶ Proceed with caution when working.
▶ Call in a second person if necessary.

NOTE!
REDUCED DURABILITY OF BATTERIES WHEN HANDLING INCORRECTLY!
When handling incorrectly, the capacity of the batteries will be reduced.
▶ Use only the original charger. Other charging stations could damage the battery beyond repair.
▶ If for an extended period the charger will not be used, disconnect it from the power supply.
- Remove the battery from the charger when the charger is not connected to the power supply.
▶ Never insert other objects into the opening of the charger or into the battery holder on the device.
- Replace any batteries that can no longer be recharged. since they will damage the charger.
1.4 Personal Protective Equipment (PPE)

CAUTION!
DANGER OF INJURY THROUGH INCORRECT OR MISSING PROTECTIVE EQUIPMENT!
Personal protective equipment is required when working, in order to minimise the possibility of endangering health.
▶ Always wear the protective equipment required for the current task when performing work.

Antislip shoes. For protection against slipping on slippery underground.

Protective goggles to protect eyes from flying parts.

Close-fitting protective clothing with low resistance to tearing, with tight sleeves and no protruding parts. This is primarily to prevent injury if they become caught between moving parts of the machine.
Do not wear rings, chains or other jewellery.

Wear work gloves to protect against injury.

The acoustic emission while operating the device is typically 65 dB(A). We recommend that you always wear ear protection when working with the device.
2 Generalities
This manual facilitates a safe and efficient machine handling. Read these instructions carefully before starting operation.
Basic requirements for a safe operation are the adherence of all the information regarding safety and operation in this manual.
Keep this manual permanently. If you hand on the equipment to other persons, provide them with this manual.
2.1 Guarantee conditions
The guarantee conditions are included in the general terms and conditions of the manufacturer.
2.2 Customer service
For technical information, our customer service and our authorised service centres are at your disposal.
Furthermore, our staff is interested in new information and experience resulting from the operation which could be useful for the improvement of our products.
2.3 Limitation of liability
All data and information in this instruction manual were arranged in consideration of the current standards and regulations and state of the art as well as our realizations and experiences of many years.
The manufacturer assumes no liability for disadvantages due to:
- Disregarding the operating instructions.
• Non-intended uses of the device. - Assignment of not instructed personal.
• Technical modifications. - Use of non-original spare parts.
The actual scope of delivery can differ from specially designed models, from additional ordering options or due to the latest state of the art from the here described annotations and illustrations.
2.4 Copyright
This document is protected by copyright. Any kind of reproduction or copying, in whole or in part, or the reproduction of images, even when changed, may be performed only with the written agreement of the manufacturer.
2.5 Symbols used

DANGER!
A WARNING AT THIS DANGER LEVEL DESIGNATES AN IMMINENTLY DANGEROUS SITUATION.
If the dangerous situation is not avoided, it will lead to death or serious injury.
▶ To avoid the danger, follow the instructions shown.

CAUTION!
A WARNING AT THIS DANGER LEVEL DESIGNATES A POSSIBLY DANGEROUS SITUATION.
If the dangerous situation is not avoided, it can lead to injury.
▶ To avoid the danger, follow the instructions shown.

CAUTION!
A WARNING AT THIS DANGER LEVEL DESIGNATES POSSIBLE PROPERTY DAMAGE.
If the dangerous situation is not avoided, it can lead to property damage.
▶ To avoid the danger, follow the instructions shown.

NOTE!
- This advice designates additional information that simplifies operation of the device.
2.6 Stipulated usage
This equipment is to be used exclusively to clip cattle and horses. Any other use or use extending beyond the above is considered unauthorised.

CAUTION!
Danger from unauthorised use!
Danger can result from improper use or use for a purpose other than that intended.
▶ Use the device only as intended.
- Limit yourself to the procedures described in these operating instructions.
Claims of any nature for damage resulting from unauthorised use will not be accepted.
Such use is entirely at the operator's own risk.

CAUTION!
In particular, the following applications of the device are prohibited:
▶ Using the machine on persons.
- Clipping other animals, in particular dangerous animals such as beasts of prey.
3 Technical data
We reserve the right to make technical changes and improvements without notice.
3.1 Clipper
| Handle | 54 mm |
| Length | 280 mm |
| Weight with battery | 1.02 kg |
| Motor output | see specifications plate on the device |
| Rotary speed | see specifications plate on the device |
| Noise emission | 65 dB (A) (EN 60745-1:2009) |
| Uncertainty K | 3 dB (A) |
3.2 Charger and power supply unit
| Voltage | see specifications plate on power supply unit and charger. |
| Max.current consumption | see specifications plate on power supply unit and charger. |
| Frequency | see specifications plate on power supply unit and charger. |
3.3 Battery
| Type | Li-Ion |
| Voltage | 10.8 V |
| Capacity | see specifications plate on the battery |
3.4 Operating conditions
| Ambient temperature range | 0 - 40 °C |
| Maximum relative humidity | 75 % |
4 Assembly and function
4.1 Construction
1 Blades
2 Clipperhead
3 Lubrication opening
4 Clipping pressure adjustr
5 Motor unit
6 ON/OFF switch
7 Interlock battery
8 Cord

Fig. 1
4.2 Functional description

The clipper is used for clipping cattle and horses. Two comb-shaped blades are the cutting tool. The lower blade (2), which is closest to the animal's skin, is fixed and attached to the housing. The top blade (3) is agitated crossways that one. The upper blade is set in motion with the help of a pivot lever. The clipping pressure between the blades is adjusted via the adjustable head (1).
Fig. 2
5 Transport, packaging and storage
5.1 Scope of delivery
1 Clipper
1 pair of clipping blades
1 charger
1 backup battery (depending on device)
1 power supply unit with plug
1 special screwdriver
1 bottle of special lubricating oil
1 cleaning brush
1 case for transport and storage
1 operating instructions

NOTE!
▶ Check to ensure the completeness of the contents and that there is no damage. Please report incomplete package contents or any apparent damage immediately to your supplier/dealer.
5.2 Packaging
For the packaging, just non-polluting material is being used.

The return of the packaging saves raw materials and reduces the volume of waste. Dispose of packaging materials that are no longer needed in accordance with locally applicable regulations.
5.3 Storage
Store clipper and accessories on the following conditions:
▶ Do not store outdoor.
▶ Store dry and dust-free.
▶ Protect against solar irradiation.
▶ Avoid mechanical shocks.
▶ Storage temperature: 0 until 40 °C
- When storing longer than 3 months, check periodically the general condition of all parts.
- When not using the clipper, store it in the case making sure it is well cleaned, lubricated and that the clipping elements are not spring loaded (risk of corrosion).
6 Operation
6.1 Requirements at the place of use
▶ Observe the manual (see chapter Specifications).
▶ Power outlets in the outer area must be equipped with a residual current circuit breaker (FI).
The work place must have adequate lighting.
The electrical socket must be easily accessible so that the device can be quickly disconnected from the mains.
The location of installation must be out of reach of children.
The charger power cord must not be taut or kinked.
▶ Make sure there is adequate ventilation.
6.2 Setting up the charging station

Fig. 3
▶ Position the charger (1) on a fixed, level, dry and clean surface.
- Connect the power supply unit (2) to the charger.
▶ Plug the power supply unit into the power socket.
The continuous green light on the lower LED (3) signals that the power supply unit is correctly plugged into the power socket and the charger is supplied with power. The charger is ready to operate (see also chapter 6.4).
6.3 Charging the batteries

Fig. 4
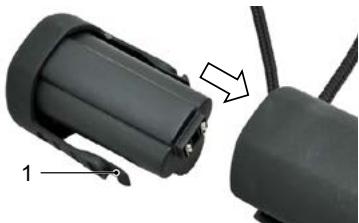
▶ Press both sides of the battery latch (1) and remove the battery.
▶ Check the battery terminals for foreign objects and dirt.

Fig. 5

Fig. 6

▶ Without applying force, insert the battery from above into the charging bay provided on the charger.
The battery will now start charging. The status of the charging process is displayed using LEDs (see also chapter 6.4). As soon as the battery has finished charging, all the LEDs change from red to green and the charger switches to “trickle charging”.
▶ Push the charged battery into the clipper until the battery latch (1) engages on both sides.
Fig. 7
6.4 Charging status display

The LEDs are shown as follows in these operating instructions:
1 LED switched off
2 LED lights up red
3 LED lights up green

Four charging statuses are displayed with the LEDs: Power supply unit connected
The continuous green light on the lower LED signals that the power supply unit is correctly plugged into the power socket. The charger is supplied with power and is ready to operate.
Normal charging
The green light indicates that the battery is charged. The charging process is displayed differently depending on the status:

Discharged battery, 0 % battery charge

approx. 30 % battery charge

approx. 75 % battery charge

approx. 90 % battery charge

Deep discharging
If the battery is deeply discharged the bottom LEDs lights up green. The charger will attempt to charge the battery. If after a short while the voltage has not increased, the display shows "Battery defective". If the voltage has increased, normal charging starts.

Defective battery
If the battery cannot be charged or is defective, the top LED flashes red.
6.5 Adjusting the clipping pressure

Fig. 8
Set the clipping pressure as follows before you start clipping:
▶ Turn the adjusting knob in the direction of the arrow until you feel resistance.
▶ Turn the knob another 1/4 turn in the direction of the arrow.
▶ After each new setting, check the cutting power on the animal and only then continue turning.
If the clipping quality deteriorates, increase the clipping pressure by turning the adjusting knob another 1/4 turn in the direction of the arrow. If this does not produce the desired result, the blades must be replaced or sharpened.

NOTE!
If the clipping pressure is too low, hair can gather between the clipping blades. This results in a poor clipping quality. In this case, clean the clipping blades as described in chapter 6.10.
6.6 Switching the clipper on and off

Fig. 9
▶ To switch the clipper on, slide the ON/OFF switch to the position I.
▶ To switch the clipper off, slide the ON/OFF switch to the position 0 (see Fig. 9).
6.7 Using the clipper
▶ Approach the animal from the front.
- Secure the animal to be clipped and calm it down.
▶ Switch the clipper on while you are in the visual range of the animal.
Observe the animal's behaviour while clipping.
▶ Switch the clipper off after you have finished clipping.
6.8 Replacing the clipping blades

Fig. 10
Switch the clipper off by sliding the switch to the position "0".
▶ Turn the adjusting knob in the direction of the arrow until the resistance decreases.
Place the clipper with the comb plate screws facing upwards on a flat surface.
▶ Loosen the comb plate screws and remove the clipping blades.

Fig. 11

Fig. 12

NOTE!
▶ Make sure the clipping blades are positioned correctly when installing the new or sharpened blades.

Fig. 13
- Place the new upper blade on the guiding tips of the pivot lever.
▶ Apply a few drops of oil on the polished surfaces of the upper blade.

Fig. 14
▶ Install the new lower blade. Align it so that the ground surface of the lower blade protrudes approx. 1.5 - 2 mm above the point of the upper blade.
▶ Tighten the comb plate screws.

NOTE!
▶ Only work with sharp blades, replace blunt or defective blades without teeth. The correct resharpening of blades is only to do by special machines or by a specialist. In that case, contact your service centre.
6.9 Lubrication

Fig. 15
To achieve a well-clipped animal and to increase the life of the device including the clipping head, it is necessary to apply a thin coat of oil between the upper and lower blades. All other moving parts of the clipping head must also be lubricated.
▶ Apply some drops of oil on to the clipping blades and into the lubrication opening.

CAUTION!
POSSIBLE DAMAGE TO THE CLIPPER!
Insufficient oiling of the clipping head will lead to warming and will shorten the life of the clippers and its blades.
▶ Oil the clipping blades adequately during the clipping session, at least once every 15 minutes, so that they do not run dry.
▶ Only use the special oil supplied or a paraffin oil conforming to the ISO VG 15 specification.

NOTE!
The provided oil is non-toxic and produces no irritation on contact with the skin or the mucous membranes. This paraffin oil degrades to some 20 % after 21 days (CEL-L-33-T-82).
▶ Oil the blades prior to, during and after every use.
▶ Oil the blades no later than when the blades leave streaks or slow down.
▶ Apply several drops of oil on the front and on the sides of the clipping blades (see Fig. 15)
- Immediately replace damaged or notched blades in order to avoid injuries.
6.10 Cleaning

CAUTION!
IMPROPER CLEANING.
RISK OF DAMAGING THE CLIPPER!
▶ Use only a dry cloth and the brush provided to clean the clipper.
▶ Never use compressed air for cleaning the clipper.
Housing of the clipper
▶ Clean the housing of the clipper with a dry cloth.
Clipping blades, clipping head and charger
▶ Disconnect the charger from the power supply.
▶ Use the brush supplied to clean the clipping blades, clipping head and charger.
▶ Lubricate the clipping blades as described in chapter 6.9.
▶ Remove any hair from the charging bay.
▶ Clean the terminals with a dry cloth if necessary.
7 Troubleshooting
7.1 Safety instructions

DANGER!
DANGER OF FATAL ELECTRIC SHOCK!
Fatal electric shocks can result from contact with electrically live conductors or components!
▶ Switch the equipment off before troubleshooting the problem.
▶ Repairs to electrical devices must only be carried out by the factory service department or specialists who have been trained by the manufacturer.
During the warranty period the device must be opened only by personnel authorised by the manufacturer, otherwise the warranty will be void.
7.2 Causes of malfunctions and their rectification
| Malfunction | Cause | Rectification |
| Upper blades moving too little. | Leaf springs broken. | Notify customer service. |
| Eccentric square or eccentric shaft worn (insufficient lubrication). | ||
| Top blade does not move | Defective gear wheel. | Notify customer service. |
| Adjusting knob jammed. | Thread dirty or rusty. | Notify customer service. |
| Pressure spring jammed. | ||
| Leaf springs in the head mount are too loose. | Comb plate screws loose. | Tighten the comb plate screws. |
| Play between pivot lever and leaf spring. | Leaf springs and/or cylinder head screws worn. | Notify customer service. |
| Pivot lever difficult to move up and down. | Centring sleeve lost. | Notify customer service. |
| Clipper cuts badly or not at all | Clipper blades blunt | Notify customer service. |
| Clipper blades have not been correctly ground | ||
| Clipper blades are not oiled | Lubricate the clipping blades every 15 minutes. | |
| Clipping pressure too low. | Increase the clipping pressure, as described in chapter 6.5. | |
| Leaf springs broken. | Notify customer service. | |
| The animal's hair is wet. | Only clip dry hair. | |
| Hairs jammed between top and bottom blades. | Remove the clipping blades; clean, lubricate and install them again; set the clipping pressure. | |
| Too much play at the clipping head. | Notify customer service. | |
| Clipping blades not properly aligned. | Align the clipping blades correctly, see Fig. 14. | |
| Motor does not run or stops immediately. | Clipping pressure too strong. | Reduce the clipping pressure, as described in chapter 6.5. Have the blades sharpened. |
| Battery is dead. | Charge battery. | |
| Contacts dirty. | Switch clipper off and clean the contacts. | |
| Faulty battery. | Replace battery. | |
| Smell of burning from the motor housing. Motor burned out. | Notify customer service. | |
| Clipperhead blocked. | Remove jamming. | |
| Motor and/or electronics defective. | Notify customer service. | |
| Motor runs very slowly. | Clipper blades were not oiled sufficiently. | Lubricate the clipping blades. |
| Clipping pressure too strong. | Reduce the clipping pressure, as described in chapter 6.5. | |
| Battery almost discharged. | Charge battery. | |
| Motor and/or electronics defective. | Notify customer service. | |
| Motor unit becomes hot. | Clipping pressure too strong. | Reduce the clipping pressure, as described in chapter 6.5. |
| Motor faulty. | Notify customer service. | |
| Running time of a fully charged battery is too short and / or blades are getting hot. | Clipper blades were not oiled sufficiently | Oil clipper blades. |
| Flat, not fully charged or faulty battery is being used. | Only use intact, fully charged original batteries. | |
| Lowest LED on charger is not lit. | Charging station is not connected to the power supply. | Connect the charging station to the power supply. |
| Electronics or power supply unit defective. | Notify customer service. | |
| Normal charging does not start when the discharged battery is inserted. | Battery terminals and/or charger are dirty. | Clean contacts. |
| Faulty battery. | Replace battery. | |
| Electronics are defective. | Notify customer service. | |
| Bottom LED lights up green. | Battery is deeply discharged, the charger is trying to boost the battery voltage. | If it is successful, normal charging starts. (Never store batteries in the discharged state). |
| If it is not successful, the lowest LED lights up red (see the following table). | ||
| Top LED lights up red. | Faulty battery. | Replace battery. |
8
Spare parts
See spare parts list at the end of these operating instructions.

CAUTION!
FAULTY SPARE PARTS MAY CAUSE DAMAGES, MALFUNCTIONS OR TOTAL LOSS AND MAY REDUCE SECURITY.
▶ Use only original spare parts from the manufacturer. Obtain spare parts from an authorised dealer or directly from the manufacturer.

NOTE!
If non-approved parts are used, all warranty, service, compensation and liability claims against the manufacturer or its employees, dealers and representatives will be forfeited.
During the warranty period the device must be opened only by personnel authorised by the manufacturer, otherwise the warranty will be void.
| Pos. No. | Description | Quantity |
| Clipper | ||
| 1 | Clipper head cattle complete | 1 |
| 2 | Tension nut cattle | 1 |
| 3 | Distance screw | 1 |
| 4 | Tension sleeve | 1 |
| 5 | PH screw M5x14 | 2 |
| 6 | Clipper head case | 1 |
| 7 | Pressure spring | 1 |
| 8 | Pressure plate | 1 |
| 9 | Eccentric square | 1 |
| 10 | Socket head cap screw with shank M3x6 | 2 |
| 11 | Leaf spring | 2 |
| 12 | Turning lever | 1 |
| 13 | Comb plate screw Cattle/horse | 2 |
| 14 | Centring bush complete | 2 |
| 15 | Circlip for shaft size 9. 3.73 | 1 |
| 16 | Circlip for shaft size 9. 6 | 1 |
| 17 | Crankshaft cattle | 1 |
| 18 | Crank spindle sleeve complete | 1 |
| 19 | Double straight gear wheel Z27 | 1 |
| 27 | Rubber foot | 1 |
| 30 | Upper housing cover | 1 |
| 31 | Switch lever | 1 |
| 32 | Catch spring for switch | 1 |
| 33 | Lower housing cover | 1 |
| 34 | Motor holder, front | 1 |
| 35 | Motor holder, rear | 1 |
| 36 | Battery Li-Ion | 1 |
| 37 | PCB for machine | 1 |
| 38 | Switch contact | 1 |
| 39 | Cheese-head screw M2.6x6 | 2 |
| 40 | Motor housing upper, incl. switch lever | 1 |
| 41 | Cord | 1 |
| 45 | Motor complete | 1 |
| 50 | Complete charger | 1 |
| 51 | Upper housing to charging station | 1 |
| 52 | PT screw KA30x16 | 15 |
| 53 | Baseplate to charging station | 4 |
| 54 | Fibre optic conductor | 1 |
| 55 | PCB charging station | 1 |
| 60 | Power supply unit | 1 |
| 61 | Plug EU | opt. |
| 62 | Connector OFF | opt. |
| 63 | Plug GB | opt. |
| 64 | Plug US | opt. |
9 Disposal

CAUTION!
Environmental damages when disposing incorrectly!
Electrical waste, lubricants and other consumable materials are subject to special regulations regarding disposal. They can only be disposed of only through qualified specialists!

NOTE!
- Dispose of the clipper at a service centre or nearby electrical workshop.
Table des matières
1 Sécurité .... 3
Fig. 3
Fig. 4
Fig. 5

Fig. 6

Fig. 8
Fig. 10

Fig. 12

INDICATION!
Fig. 13
Fig. 15
Fig. 3
Fig. 4
Fig. 5

Fig. 6

Fig. 7
Fig. 8
Fig. 9
Fig. 10
Fig. 11

Fig. 12

NOTA!
Fig. 13
Fig. 15
Fig. 3
Fig. 4
Fig. 5
Fig. 7
Fig. 8
Fig. 9
Fig. 10
Fig. 11

Fig. 12

NOTA:
Fig. 13
Fig. 15
Afb. 3
Afb. 4
Afb. 5

Afb. 6

Ontladen accu, 0 % acculading

ca. 30 % acculading

ca. 75 % acculading

ca. 90 % acculading

Diepontladen
Afb. 8
Afb. 10
Afb. 11

Afb. 12

AANWIJZING!
Afb. 13
Afb. 15
▶ Tryk på begge sider af batterilåsen (1) og tag batteriet ud.
- Kontrollér batteriets kontakter for fremmedlegemer og snavs.
Illustration 4

Illustration 5

Illustration 6

Illustration 7
Afladet batteri, 0 % batteriladning

ca. 30 % batteriladning
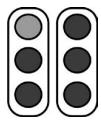
ca. 75 % batteriladning

ca. 90 % batteriladning

Dybdeafladning
Illustration 8
Illustration 9
Illustration 10
Illustration 11
Illustration 12

BEMÆRK!
Illustration 13

5.1 Leverans....11
5.2 Emballage....11
5.3 Lagring....11
6 Handhavande....12
Fig. 3
Fig. 4
Fig. 5

Fig. 6
Fig. 7
Urladdat batteri, 0 % batteriladdning

ca 30 % batteriladdning

ca 75 % batteriladdning

ca 90 % batteriladdning

Djupurladdat batteri
Fig. 8
Fig. 9
Fig. 10
Fig. 11
Fig. 12

NOTERA!
Fig. 13
Fig. 15
Fig. 5

Fig. 6

Utladet batteri, 0 % batteriladning

ca. 30 % batteriladning

ca. 75 % batteriladning

ca. 90 % batteriladning

Sterk utladning
Fig. 8
Fig. 9
Fig. 10
Fig. 11
Fig. 12

HENVISNING!
Fig. 13
Fig. 15
Kuva 3
Kuva 4
Kuva 5

Kuva 6
Kuva 8
Kuva 9
Kuva 10
Kuva 11
Kuva 12

HUOMAUTUS!
Kuva 13

Kuva 14
Kuva 15
Fig. 3
Fig. 4
Fig. 5

Fig. 6
Fig. 7
Bateria descarregada, 0 % de carga da bateria

aprox. 30 % de carga da bateria

aprox. 75 % de carga da bateria

aprox. 90 % de carga da bateria

Descarga profunda
Fig. 8
Fig. 10
Fig. 11

Fig. 12

NOTA!
Fig. 13
Fig. 15
Eik. 3
Eik. 4
Eik. 5
Eik. 7
Eik. 8
Eik. 10
Eik. 11

Eik. 12

ΥΠΟΔΕΙΞΗ!
Eik. 13
Eik. 15
图 5
图6
空バッテリー 0 %充電

約 30 %充電

約 75 % 充電

約 90 % 充電

放電
图8
图9
図 10
図 11
刃止めネジを緩めて刃を取り外します。

図 12

! 記
図 13
图 15
| Item | Artico | Tuote |
| Artículo | Artikel | Προϊόν |
| Article | Artikel | アイテム |
| Artikel | Artikel | |
| Articolo | Artikkel |
| Serial no. | No. di serie | Serie nummer |
| No. de serie | No. de série | Sarjanro |
| No. de série | Serie nr. | Ap. σειράς |
| Serien-nummer | Serie Nr. | シリアル |
| Serienr. |
| Date of purchase | Data di vendita | Köpdatum |
| Data de compra | Kjøpsdato | |
| Fecha de compra | Ostopäivä Datum van aankoop | Ostopäivä |
| Date d'achat | aankoop | Hμερομηνία |
| Kaufdatum | Købsdato | ayopáς購入日 |
| Stamp and signature | Stämpel och |
| Sello y firma | namnteckning |
| Cachet et signature | Stempel og |
| Stempel und Unterschrift | underskrift fra forretningen |
| Timbro e firma | Myyjän leima ja allekirjoitus |
| Carimbo e assinatura | Σφραγίδα καιυπογραφή |
| Stempel en handtekening | スタンプと署名 |
| Stempel og underskrift |
In case of claim, please return your machine with the instruction manual and the warranty card directly to your local distributor. Please do not cut off the warranty card from the instruction manual.
© 2020 Heiniger AG. All rights reserved.
This instruction manual may not be duplicated or distributed, neither completely nor in extracts, or by electronic or mechanical means (including photocopying), transmitted or used for the purpose of competition without authorisation from Heiniger AG.
Subject to change without notice.
Contact:
Heiniger AG
Industrieweg 8
Translation of the original instructions
- INHALTSVERZEICHNIS
- SICHERHEIT
- SAFETY
- GENERALITIES
- DANGER
- DANGER FROM DISREGARDING THE SAFETY INSTRUCTIONS
- PERSONNEL REQUIREMENTS
- UNAUTHORISED PERSONS
- CAUTION
- DANGER FOR AND FROM UNAUTHORISED PERSONS
- DANGERS THAT CAN BE CAUSED BY THE DEVICE
- DANGER FROM ELECTRICAL CURRENT
- DANGER OF FATAL ELECTRIC SHOCK
- BLADES
- DANGER FROM MOVING COMPONENTS
- DANGER OF BURNS
- BATTERIES
- RISK OF INJURY WHEN HANDLING INCORRECTLY WITH BATTERIES
- ANIMALS
- DANGER OF INJURY BY ANIMALS
- NOTE
- REDUCED DURABILITY OF BATTERIES WHEN HANDLING INCORRECTLY
- PERSONAL PROTECTIVE EQUIPMENT (PPE)
- DANGER OF INJURY THROUGH INCORRECT OR MISSING PROTECTIVE EQUIPMENT
- GUARANTEE CONDITIONS
- CUSTOMER SERVICE
- LIMITATION OF LIABILITY
- COPYRIGHT
- SYMBOLS USED
- STIPULATED USAGE
- DANGER FROM UNAUTHORISED USE
- TECHNICAL DATA
- CLIPPER
- CHARGER AND POWER SUPPLY UNIT
- BATTERY
- OPERATING CONDITIONS
- ASSEMBLY AND FUNCTION
- CONSTRUCTION
- FUNCTIONAL DESCRIPTION
- TRANSPORT, PACKAGING AND STORAGE
- SCOPE OF DELIVERY
- PACKAGING
- STORAGE
- OPERATION
- REQUIREMENTS AT THE PLACE OF USE
- SETTING UP THE CHARGING STATION
- CHARGING THE BATTERIES
- CHARGING STATUS DISPLAY
- NORMAL CHARGING
- DEEP DISCHARGING
- DEFECTIVE BATTERY
- ADJUSTING THE CLIPPING PRESSURE
- SWITCHING THE CLIPPER ON AND OFF
- USING THE CLIPPER
- REPLACING THE CLIPPING BLADES
- LUBRICATION
- POSSIBLE DAMAGE TO THE CLIPPER
- CLEANING
- HOUSING OF THE CLIPPER
- CLIPPING BLADES, CLIPPING HEAD AND CHARGER
- TROUBLESHOOTING
- SAFETY INSTRUCTIONS
- CAUSES OF MALFUNCTIONS AND THEIR RECTIFICATION
- SPARE PARTS
- FAULTY SPARE PARTS MAY CAUSE DAMAGES, MALFUNCTIONS OR TOTAL LOSS AND MAY REDUCE SECURITY
- DISPOSAL
- TABLE DES MATIÈRES
- SÉCURITÉ
- INDICATION
- NOTA
- DIEPONTLADEN
- AANWIJZING
- DYBDEAFLADNING
- BEMÆRK
- HANDHAVANDE
- DJUPURLADDAT BATTERI
- NOTERA
- STERK UTLADNING
- HENVISNING
- HUOMAUTUS
- DESCARGA PROFUNDA
- ΥΠΟΔΕΙΞΗ
- 放電
- 記
- CONTACT
Brand : Coburn
Model : Heiniger Xplorer
Category : Electric mower