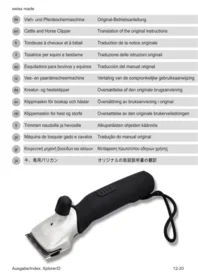
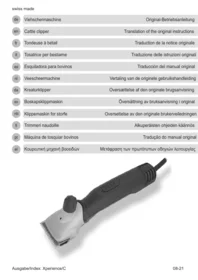
Heiniger Xpert - Electric mower Coburn - Free user manual and instructions
Find the device manual for free Heiniger Xpert Coburn in PDF.


User questions about Heiniger Xpert Coburn
0 question about this device. Answer the ones you know or ask your own.
Ask a new question about this device
Download the instructions for your Electric mower in PDF format for free! Find your manual Heiniger Xpert - Coburn and take your electronic device back in hand. On this page are published all the documents necessary for the use of your device. Heiniger Xpert by Coburn.
USER MANUAL Heiniger Xpert Coburn
Inhaltsverzeichnis
1 Sicherheit .... 3
Abb. 2
Abb. 3
Abb. 4
Abb. 5

Abb. 6

Abb. 7

Abb. 9
Abb. 8
Abb. 11
1.1 Generalities 3
1.2 Symbols and warning notes 3
1.3 Stipulated usage....4
1.4 Personnel requirements 4
1.5 Power supply 4
1.6 Animals....6
1.7 Shearing blades....6
1.8 Personal Protective Equipment (PPE) 7
1.9 Children 7
2 Generalities....7
2.1 Guarantee conditions 8
2.2 Customer service 8
2.3 Limitation of liability 8
2.4 Copyright 8
2.5 Purpose of use 8
3 Technical data....9
4 Assembly and function....10
4.1 Construction 10
4.2 Functional description 10
5 Transport, packaging and storage 10
5.1 Scope of delivery.... 10
5.2 Packaging....11
5.3 Storage....11
6 Operation 11
6.1 Requirements at the place of use....11
6.2 Adjusting the clipping pressure 11
6.3 Switching the shearing machine on and off 12
6.4 Using the shearing machine.... 12
6.5 Replacing the shearing blades.... 13
6.6 Lubrication....14
6.7 Cleaning.... 15
7 Troubleshooting....16
7.1 Safety instructions.... 16
7.2 Causes of malfunctions and their rectification 16
8 Spare parts....18
9 Disposal 19

IMPORTANT SAFETY INSTRUCTIONS
NOTE!
When using an electrical device, you must always observe basic precautionary measures as described below:
Read all instructions before using the device.
1 Safety
1.1 Generalities

DANGER!
DANGER FROM DISREGARDING THE SAFETY INSTRUCTIONS!
Disregarding the operating instructions and safety precautions presented in these operating instructions will lead to serious injury to people as well as damage to the device.
- The warnings and instructions in these operating instructions must be observed.
Observe the following safety instructions:
- Do not leave the shearing machine unattended as long as the plug is plugged in.
- Store the shearing machine out of reach of children.
1.2 Symbols and warning notes
Various symbols are used in the operating instructions. These symbols indicate possible hazards or bring to the user's attention such technical information that, if not complied with, may lead to personal injury and material damage or to uneconomic operation.

Hazard symbols
WARNING/DANGER!
Denotes a possibly hazardous situation. Serious injury and even death can result if such situations are not avoided.

CAUTION!
Denotes a possibly hazardous situation. Light or slight injury can result if such situations are not avoided.

Information symbols
NOTE!
A note which, if not complied with, can lead to operational stoppages or damage.
1.3 Stipulated usage
The shearing machine's intended purpose of use is described in Chapter 2.5 Purpose of use. Use for any other purposes, particularly on people and dangerous types of animals, especially predators, is expressly forbidden.
The device is intended for commercial use.
The shearing machines must only be used in dry areas.
The details contained in Chapter 3 Technical data, are to be considered as legally binding limit values and characteristic data.
1.4 Personnel requirements
- This shearing machine may be operated only by persons who can be expected to carry out their work responsibly. Persons whose ability to react is undermined by, for example, drugs, alcohol or medication should not be allowed to use the device.
- The operator must be experienced in handling the animals to be sheared.
- Children are strictly prohibited from operating the device.
- Children should be supervised to ensure that they do not play with the equipment.
Unauthorised persons

CAUTION!
DANGER FOR AND FROM UNAUTHORISED PERSONS!
Unauthorised persons who do not meet the requirements described here will be unable to recognise dangers in the work area.
▶ Prohibit access by unauthorised persons to the location where the clipping is being performed.
If in doubt, approach the persons and instruct them to leave the work area.
- Suspend work until the unauthorised persons have left the work area.
1.5 Power supply

DANGER!
In order to reduce the risk of electric shock:
- Do not touch the device if it falls into water. Immediately pull the plug out of the socket.
▶ Do not use when bathing or in the shower. - Do not place or store the device in such a way that it can fall or be pulled into a tub or sink. Do not place the device in water or other liquids and do not allow it to fall in.
▶ Always unplug the device from the wall socket immediately after use, except when charging.
▶ Unplug the device from the mains before cleaning it.

WARNING!
In order to reduce the risk of burns, fire, electric shocks or injuries to people:
▶ A device must never be left unattended when it is plugged in.
This device is not intended to be used by persons (including children) with reduced physical, sensory or mental capabilities, or lack of experience and knowledge, unless they are supervised by a person responsible for their safety or have been given instructions by that person on how to use the device. Children should be supervised to ensure that they do not play with the equipment.
▶ Only use the device for the purpose described in these instructions. Do not use any mounting components that are not specified by the manufacturer.
▶ Never use the device if the cable or outlet are damaged or if it does not work properly after falling, sustaining damage or landing in water. Take the device to a service centre for inspection and repair.
- Keep the cable away from heated surfaces.
- Keep the air openings free of lint, hair, and similar objects.
▶ Never drop or insert objects into an opening.
- Do not use the device outdoors and do not operate it while aerosol products (sprays) are being used.
- Do not use this device with a damaged or broken comb as this may cause injury to the face.
- First insert the plug into the device before plugging it into the outlet. In order to disconnect the device, switch all operating elements to the OFF position (e.g. "0") and then remove the plug from the socket.
- Do not charge, install or leave the device in places where it is expected to:
- be exposed to damage by an animal, or
- be exposed to weather conditions

WARNING!
Keep the device dry.
1.6 Animals

CAUTION!
DANGER OF INJURY BY ANIMALS!
The noise of the clipper can trouble animals. A kick, an attack or the body weight of the animal can lead to injuries.
- Just persons being experienced in handling with animals are allowed to shear the animals.
Before beginning shearing, remove foreign objects from the coat (wire, wood etc.). - Secure the animal sufficiently and calm it before starting work.
▶ Proceed with caution when working.
▶ Call in a second person if necessary.
1.7 Shearing blades

CAUTION!
DANGER FROM MOVING COMPONENTS!
The moving shearing blade and its sharp edges can cause injuries.
▶ Proceed with caution when working.
- Avoid any contact with the moving shearing blades.
- Do not touch the area around the shearing blades whilst the machine is still plugged in to a power source, even if it is switched off. Before working on the shearing blade/shearing head, always disconnect the electrical power first.
- Do not use damaged shearing blades with blunt or missing teeth. Only work with sharp shearing blades sharpened by a specialist workshop.
The upper blade of the shearing head is only held by the tapered pins of the chicken feet. If the shear-pressure adjustment head is released too much, the upper blade can fly off and result in injuries.

CAUTION!
DANGER OF BURNS!
Insufficient oiling of the shearing head will cause it to become hot. This may agitate the animals.
- When clipping, oil the shearing blades and shearing head through the lubrication opening provided for this purpose at least every 15 minutes, so that the blades do not run dry.
The shearing blades may become hot after prolonged use.
1.8 Personal Protective Equipment (PPE)

CAUTION!
DANGER OF INJURY THROUGH INCORRECT OR MISSING PROTECTIVE EQUIPMENT!
Personal protective equipment is required when working, in order to minimise the possibility of endangering health.
▶ Always wear the protective equipment required for the current task when performing work.

Antislip shoes. For protection against slipping on slippery underground.

Protective goggles to protect eyes from flying parts.

Close-fitting protective clothing with low resistance to tearing, with tight sleeves and no protruding parts. This is primarily to prevent injury if they become caught between moving parts of the machine.
Do not wear rings, chains or other jewellery.

Wear work gloves to protect against injury.

The acoustic emission while operating the device is typically 79 dB(A). We recommend that you always wear ear protection when working with the device.
1.9 Children

WARNING!
Never let the equipment unsupervised and use it very carefully when children or persons who cannot judge the dangers are nearby.
Children are not permitted to operate the equipment. Children must not be allowed to play with the device.

KEEP THESE INSTRUCTIONS IN A SAFE PLACE!
2 Generalities
This manual facilitates a safe and efficient machine handling. Read these instructions carefully before starting operation.
Basic requirements for a safe operation are the adherence of all the information regarding safety and operation in this manual.
Keep this manual permanently. If you hand on the equipment to other persons, provide them with this manual.
2.1 Guarantee conditions
The guarantee conditions are included in the general terms and conditions of the manufacturer.
2.2 Customer service
For technical information, our customer service and our authorised service centres are at your disposal.
Furthermore, our staff is interested in new information and experience resulting from the operation which could be useful for the improvement of our products.
2.3 Limitation of liability
All data and information in this instruction manual were arranged in consideration of the current standards and regulations and state of the art as well as our realizations and experiences of many years.
The manufacturer assumes no liability for disadvantages due to:
- Disregarding the operating instructions.
• Non-intended uses of the device. - Assignment of not instructed personal.
• Technical modifications. - Use of non-original spare parts.
The actual scope of delivery can differ from specially designed models, from additional ordering options or due to the latest state of the art from the here described annotations and illustrations.
2.4 Copyright
This document is protected by copyright. Any kind of reproduction or copying, in whole or in part, or the reproduction of images, even when changed, may be performed only with the written agreement of the manufacturer.
2.5 Purpose of use
The device is designed exclusively for shearing sheep, goats and llamas, alpacas and other camelidae. The device is intended for commercial use.
Any other use or use extending beyond the above is considered unauthorised.

CAUTION!
Danger from unauthorised use!
Danger can result from improper use or use for a purpose other than that intended.
▶ Use the device only as intended.
- Limit yourself to the procedures described in these operating instructions.
Claims of any nature for damage resulting from unauthorised use will not be accepted.
Such use is entirely at the operator's own risk.

CAUTION!
In particular, the following applications of the device are prohibited:
▶ Using the machine on persons.
Shearing other animals, in particular dangerous animals such as beasts of prey.
3 Technical data
| Handle | 54 mm |
| Length | 301 mm |
| Weight (without charger power cord) | 1.24 kg |
| Voltage | |
| Maximum current consumption | |
| Frequency | See rating plate on the device |
| Power drawn | |
| Rotary speed | |
| Noise emission ( LPA ) | 79 dB(A) (EN 60745-1:2009) |
| Uncertainty K | 3 dB |
| Ambient temperature range | 0 - 40 °C |
| Maximum relative humidity | 10 - 90% |
| Vibration ahv | 12.8 m/s 2 |
| Uncertainty K | 1.5 m/s 2 |
We reserve the right to make technical changes and improvements without notice.
4 Assembly and function
4.1 Construction
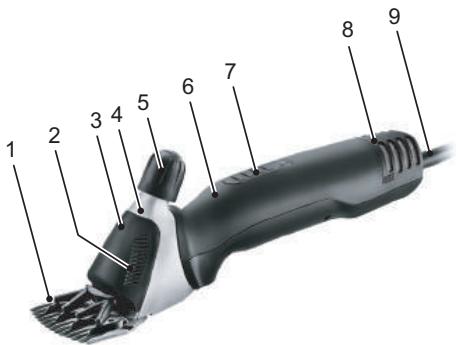
1 Shearing blades
2 Air outlet opening
3 Lubrication opening
4 Shearing head
5 Clipping pressure adjustment
6 Motor unit
7 ON/OFF switch
8 Air filter
9 Cable
Fig. 1
4.2 Functional description
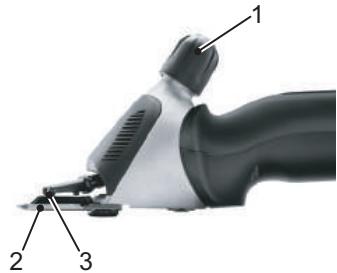
Fig. 2
The shearing machine is used to shear sheep, goats and llamas, alpacas and other camelidae. Two comb-shaped blades are the cutting tool. The comb plate (2) closest to the skin of the animal is fixed and attached to the housing. The top blade (3) is agitated crossways that one. The upper blade is set in motion with the help of two chicken feet. The clipping pressure between the blades is adjusted via the adjustable head (1).
5 Transport, packaging and storage
5.1 Scope of delivery
1 shearing machine
1 pair of shearing blades
1 special screwdriver
1 bottle of special lubricating oil
1 cleaning brush
1 case for transport and storage
1 operating instructions

NOTE!
▶ Check to ensure the completeness of the contents and that there is no damage. Please report incomplete package contents or any apparent damage immediately to your supplier/dealer.
5.2 Packaging
For the packaging, just non-polluting material is being used.

The return of the packaging saves raw materials and reduces the volume of waste. Dispose of packaging materials that are no longer needed in accordance with locally applicable regulations.
5.3 Storage
Store shearing machine and accessories on the following conditions:
▶ Do not store outdoor.
▶ Store dry and dust-free.
▶ Protect against solar irradiation.
▶ Avoid mechanical shocks.
▶ Storage temperature: 0 until 40°C.
▶ Relative humidity: max. 90 %.
- When storing longer than 3 months, check periodically the general condition of all parts.
When not using the shearing machine, store it in the case making sure it is well cleaned, lubricated and that the clipping elements are not spring loaded (risk of corrosion).
6 Operation
6.1 Requirements at the place of use
▶ Observe the manual (see chapter 3 Technical data).
▶ Power outlets in the outer area must be equipped with a residual current circuit breaker (FI).
The work place must have adequate lighting.
The electrical socket must be easily accessible so that the device can be quickly disconnected from the mains.
The charger power cord must not be taut or kinked.
▶ Make sure there is adequate ventilation.
6.2 Adjusting the clipping pressure
Set the clipping pressure as follows before you start clipping:

Fig. 3
Before beginning shearing when the machine is switched off, check to make sure that the tapered pins of the chicken feet exactly engage in the positioning holes of the upper blade.
▶ Turn the adjusting knob in the direction of the arrow until you feel resistance.
▶ Turn the knob another 1/4 turn in the direction of the arrow.
Fig. 3
▶ After each new setting, check the cutting power on the animal and only then continue turning.
If the clipping quality deteriorates, increase the clipping pressure by turning the adjusting knob another 1/4 turn in the direction of the arrow. If this does not produce the desired result, the shearing blades must be replaced or sharpened.

CAUTION!
The upper blade of the shearing head is only held by the tapered pins of the chicken feet. If the shear-pressure adjustment head is released too much, the upper blade can fly off and result in injuries.

NOTE!
If the clipping pressure is too low, hair can gather between the shearing blades. This results in a poor clipping quality. In this case, clean the shearing blades as described in chapter 6.7.
6.3 Switching the shearing machine on and off

▶ To switch the shearing machine on, slide the ON/OFF switch to the position I.
▶ To switch the shearing machine off, slide the ON/OFF switch to the position 0 (see Fig. 4).
Fig. 4
6.4 Using the shearing machine
▶ Approach the animal from the front.
- Secure the animal to be sheared and calm it down.
▶ Plug the power plug into the socket.
- Switch the shearing machine on while you are in the visual range of the animal.
▶ Observe the animal's behaviour while clipping.
- Switch the shearing machine off after you have finished clipping and pull the plug from the socket.
6.5 Replacing the shearing blades

Fig. 5
▶ Switch the shearing machine off by sliding the switch to the position "0".
▶ Pull the plug from the socket.
▶ Turn the adjusting knob in the direction of the arrow until the resistance decreases.
- Place the shearing machine with the comb plate screws facing upwards on a flat surface.

Fig. 6
▶ Release the comb plate screws and pull the comb plate from the shearing head.
▶ Remove the upper blade.

Fig. 7

Fig. 8

Fig. 9
▶ Place the new upper blade in the tapered pins of the chicken feet.
▶ Apply a few drops of oil on the polished surfaces of the upper blade.

NOTE!
- Make sure the shearing blades are positioned correctly when installing the new or sharpened blades.
- The tapered pins of the chicken feet must engage exactly in the positioning holes of the upper blade.

▶ Install the new comb plate. Align it so that the ground surface of the comb plate protrudes by approx. 1.5 - 2 mm above the point of the upper blade.
▶ Tighten the comb plate screws.
Fig. 10

NOTE!
▶ Only work with sharp shearing blades, replace blunt or defective blades without teeth. The correct resharpening of shearing blades is only to do by special machines or by a specialist. In that case, contact your service centre.
6.6 Lubrication

Fig. 11
To ensure a well-clipped animal and to increase the life of the shearing machine including the shearing head, it is necessary to apply a thin coat of oil between the upper blade and comb plate. All other moving parts of the shearing head must also be lubricated.
▶ Apply some drops of oil on to the shearing blades and into the lubrication opening.

CAUTION!
POSSIBLE DAMAGE TO THE SHEARING MACHINE!
Insufficient oiling of the shearing head will lead to warming and will shorten the life of the shearing machine and its blades.
▶ Oil the shearing blades adequately during the clipping session, at least once every 15 minutes, so that they do not run dry.
▶ Only use the special oil supplied or a paraffin oil conforming to the ISO VG 15 specification.
NOTE!
The provided oil is non-toxic and produces no irritation on contact with the skin or the mucous membranes. This paraffin oil degrades to some 20% after 21 days (CEL-L-33-T-82).
▶ Oil the blades prior to, during and after every use.
▶ Oil the blades no later than when the blades leave streaks or slow down.
▶ Apply several drops of oil on the front and on the sides of the shearing blades (see Fig. 11).
▶ Wipe excess oil off with a soft, dry cloth.
▶ Lubrication sprays do not have sufficient oil for a good lubrication, but serve for cooling the shearing blades.
- Immediately replace damaged or notched blades in order to avoid injuries.
6.7 Cleaning

CAUTION!
IMPROPER CLEANING. RISK OF DAMAGING THE SHEARING MACHINE!
- Clean the shearing machine only with a dry cloth and with the brush supplied. To clean the air filter, use exclusively a dry brush or a nailbrush.
▶ Never use compressed air for cleaning the clipper.
Housing of the shearing machine
▶ Clean the housing of the shearing machine with a dry cloth.
Shearing blade and shearing head
▶ Use the brush supplied to clean the shearing blade and the shearing head.
▶ Lubricate the shearing blades as described in chapter 6.6.
Air filter

▶ Remove the air filter from the shearing machine.
▶ Clean the air filter with a dry brush or a nailbrush. Make sure no foreign objects get into the device while cleaning it.
▶ Slide the air filter back onto the shearing machine.
Fig. 12

CAUTION!
POSSIBLE DAMAGE TO THE SHEARING MACHINE!
Operating the shearing machine without the air filter can damage the shearing machine.
▶ Only use the shearing machine with a properly fitted air filter.
7 Troubleshooting
7.1 Safety instructions

DANGER!
DANGER OF FATAL ELECTRIC SHOCK!
Fatal electric shocks can result from contact with electrically live conductors or components!
▶ Switch the equipment off before troubleshooting the problem.
▶ Repairs to electrical devices must only be carried out by the factory service department or specialists who have been trained by the manufacturer.
During the warranty period the device must be opened only by personnel authorised by the manufacturer, otherwise the warranty will be void.
7.2 Causes of malfunctions and their rectification
| Malfunction | Cause | Rectification |
| The upper blade does not move across the full bearing surface. | Retaining spring broken. | Notify customer service. |
| Eccentric shaft and/or ball and swivelling fork are worn (insufficient lubrication). | ||
| Bearings are heavily worn. | ||
| Top blade does not move. | Defective gear wheel. | Notify customer service. |
| Eccentric shaft is broken or bent. | ||
| Ball is missing. | ||
| Shearing pressure adjustment knob is jammed. | Thread dirty or rusty. | Notify customer service. |
| Circlip is jammed. | ||
| Shearing pressure adjustment knob automatically releases. | Circlip missing. | Notify customer service. |
| Threaded insert is loose. | ||
| Not enough pressure can be applied to the upper blade. | Retaining spring broken. | Notify customer service. |
| Sliding sleeve is missing. | ||
| Sliding sleeve is worn. | ||
| Swivelling fork is worn. | ||
| Chicken feet are worn. | ||
| Chicken feet fall out. | Securing cams on the retaining spring are broken. | Notify customer service. |
| Motor runs very slowly. | shearing blades were not oiled sufficiently. | Lubricate the shearing blades. |
| Motor and/or electronics defective. | Notify customer service. | |
| Motor does not run or stops immediately. | Clipping pressure too strong. | Reduce the clipping pressure, as described in chapter 6.2. Have the blades sharpened. |
| Smell of burning from the motor housing. Motor burned out. | Notify customer service. | |
| Motor and/or electronics defective. | ||
| Motor turns off due to overload. | Turn off the device, allow it to cool down and then turn it on again. Notify customer service if the device is not working properly. | |
| Shearing machine cuts badly or not at all. | shearing blade is blunt. | Notify customer service. |
| shearing blades have not been correctly ground. | ||
| Clipping pressure too low. | Increase the clipping pressure as described in chapter 6.2. | |
| Shearing blade is incorrectly installed and/or aligned. | Correctly install the shearing head, as described in chapter 6.5. Align the shearing blades correctly, see Fig. 10. | |
| The animal's hair is wet. | Only shear dry hair. | |
| Hairs stuck between upper and lower blade. | Remove the shearing blades; clean, lubricate and install them again; set the clipping pressure. | |
| Motor unit becomes hot. | Air filter clogged. | Clean or replace the air filter. |
| Clipping pressure too high. | Reduce the clipping pressure. | |
| Bearing faulty. | Notify customer service. |
8
Spare parts
See spare parts list at the end of these operating instructions.

CAUTION!
FAULTY SPARE PARTS MAY CAUSE DAMAGES, MALFUNCTIONS OR TOTAL LOSS AND MAY REDUCE SECURITY.
▶ Use only original spare parts from the manufacturer. Obtain spare parts from an authorised dealer or directly from the manufacturer.

NOTE!
If non-approved parts are used, all warranty, service, compensation and liability claims against the manufacturer or its employees, dealers and representatives will be forfeited.
During the warranty period the device must be opened only by personnel authorised by the manufacturer, otherwise the warranty will be void.
| Pos. No. | Description | Quantity |
| Shearing machine | ||
| 1 | Sheep shearing head, complete | 1 |
| 2 | Adjusting knob, sheep | 1 |
| 3 | Sheep shearing head cover | 1 |
| 4 | Retaining spring | 1 |
| 5 | Swivelling fork | 1 |
| 6 | Gauge plate | 1 |
| 7 | Chicken feet, right | 1 |
| 8 | Chicken feet, left | 1 |
| 9 | Countersunk screw M4 x 8 | 2 |
| 10 | Ball | 1 |
| 11 | Eccentric shaft sheep | 1 |
| 12 | Ball bearing 608-2RS | 1 |
| 13 | Comb plate screw, sheep | 2 |
| 14 | Locknut | 1 |
| 15 | Centre post | 1 |
| 16 | Sheep shearing head case | 1 |
| 17 | Ball bearing 608-2Z | 1 |
| 18 | Gear wheel Z22, sheep | 1 |
| 19 | Lock washer | 1 |
| 20 | Threaded insert | 1 |
| 21 | Circlip | 1 |
| 22 | Sliding sleeve | 1 |
| 30 | Air filter | 1 |
| 31 | Switch lever | 1 |
| 32 | Upper housing cover | 1 |
| 33 | Catch spring for switch with magnet | 1 |
| 34 | Motor complete | 1 |
| 35 | Front bearing flange | 1 |
| 36 | Stator | 1 |
| 37 | Ball bearing 8-19-6 | 2 |
| 38 | Lock washer | 1 |
| 39 | Rotor incl. ball-bearing | 1 |
| 40 | Play compensation disc 626 | 1 |
| 41 | Bearing flange, rear, with carbon brush springs | 1 |
| 42 | Carbon brush spring | 2 |
| 43 | PH-screw M4 x 10 | 1 |
| 44 | Impeller | 1 |
| 45 | Carbon brush | 2 |
| 46 | Motor bracket | 4 |
| 47 | Lower housing cover | 1 |
| 48 | Cable grip | 1 |
| 49 | Anti-kink sleeve | 1 |
| 50 | PCB | 1 |
| 51 | Contact wire | 1 |
| 52 | PT screw KA30 x 16 | 13 |
| 53 | Cable | 1 |
9 Disposal

CAUTION!
Environmental damages when disposing incorrectly!
Electrical waste, lubricants and other consumable materials are subject to special regulations regarding disposal. They can only be disposed of only through qualified specialists!
NOTE!
- Dispose of the shearing machine at a service centre or nearby electrical workshop.

Table des matières
1 Sécurité .... 3
Fig. 2
Fig. 3
Fig. 5
Fig. 6


Fig. 7

Fig. 9
Fig. 8
Fig. 11
Fig. 12
Fig. 2
Fig. 3
Fig. 5

Fig. 6
Fig. 7

Fig. 8

Fig. 9
Fig. 11
Fig. 1
Fig. 2
Fig. 3
Fig. 5
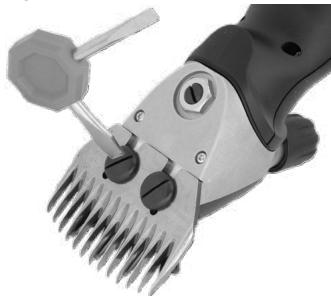
Fig. 6
Fig. 7

Fig. 8
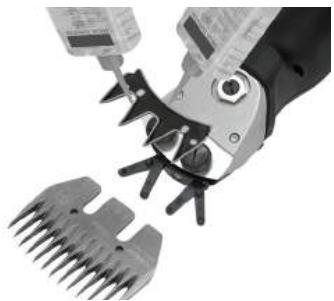
Fig. 9
Fig. 11
Afb. 2
Afb. 3
Afb. 5
Afb. 6

Afb. 7

Afb. 8
Afb. 9

AANWIJZING!
Afb. 11
Fig. 2
Fig. 3
Fig. 4
Fig. 5
Fig. 6
Fig. 7

Fig. 8

Fig. 9
Fig. 3
Fig. 5
Fig. 6
Fig. 7

Fig. 8

Fig. 9
Fig. 3
Fig. 4
Fig. 5
Fig. 6
Fig. 7

Fig. 8

Fig. 9
For å oppnå et godt klipperesultat og forlenge levetiden til klippemaskinen, inkludert klippehodet, er det nødvendig med et tynt lag med olje mellom overkniven og kamplaten. Også alle andre bevegelige deler av klippehodet må smøres.
Kuva. 3
Kuva. 4
Kuva. 5
Kuva. 6
Kuva. 7

Kuva. 8

Kuva. 9
Fig. 1
Fig. 2
Fig. 3
Fig. 5
Fig. 6
Fig. 7

Fig. 8

Fig. 9
Fig. 11
Eik. 2
Eik. 3
Eik. 5

Eik. 6

Eik. 7

Eik. 9
Eik. 8
Eik. 11
| garantia | Item | Artikel | |
| Artículo | Artikel | ||
| Article | Artikel | ||
| Artikel | Artikkel | ||
| Articolo | Tuote | ||
| Artico | Προϊόν | ||
| garantie | Serial no. | Serie nr. | |
| No. de serie | Serie Nr. | ||
| No. de série | Serienr. | ||
| Seriennummer | Serie nummer | ||
| No. di serie | Sarjanro | ||
| No. de série | Αριθμός σειράς | ||
| Date of purchase | Datum van aankoop | ||
| Fecha de compra | Købsdato | ||
| Date d'achat | Köpdatum | ||
| Kaufdatum | Kjøpsdato | ||
| Data di vendita | Ostopäivä | ||
| Data de compra | Ημερομηνία αγοράς | ||
| warranty | Stamp and signature | ||
| Sello y firma | |||
| Cachet et signature | |||
| Stempel und Unterschrift | |||
| Timbro e firma | |||
| Carimbo e assinatura | |||
| Stempel en handtekening | |||
| Stempel og underskrift | |||
| Stämpel och namnteckning | |||
| Stempel og underskrift fra forretningen | |||
| Myyjän leima ja allekirjoitus | |||
| Σφραγίδα και υπογραφή | |||
In case of claim, please return your machine with the instruction manual and the warranty card directly to your local distributor. Please do not cut off the warranty card from the instruction manual.
© 2021 Heiniger AG. All rights reserved.
This instruction manual may not be duplicated or distributed, neither completely nor in extracts, or by electronic or mechanical means (including photocopying), transmitted or used for the purpose of competition without authorisation from Heiniger AG.
Subject to change without notice.
Contact:
Heiniger AG
Industrieweg 8
Translation of the original instructions
- INHALTSVERZEICHNIS
- SICHERHEIT
- GENERALITIES
- TECHNICAL DATA
- ASSEMBLY AND FUNCTION
- TRANSPORT, PACKAGING AND STORAGE
- OPERATION
- TROUBLESHOOTING
- SPARE PARTS
- DISPOSAL
- IMPORTANT SAFETY INSTRUCTIONS
- NOTE
- SAFETY
- DANGER
- SYMBOLS AND WARNING NOTES
- HAZARD SYMBOLS
- WARNING/DANGER
- CAUTION
- INFORMATION SYMBOLS
- STIPULATED USAGE
- PERSONNEL REQUIREMENTS
- UNAUTHORISED PERSONS
- DANGER FOR AND FROM UNAUTHORISED PERSONS
- POWER SUPPLY
- WARNING
- ANIMALS
- DANGER OF INJURY BY ANIMALS
- SHEARING BLADES
- DANGER FROM MOVING COMPONENTS
- DANGER OF BURNS
- PERSONAL PROTECTIVE EQUIPMENT (PPE)
- DANGER OF INJURY THROUGH INCORRECT OR MISSING PROTECTIVE EQUIPMENT
- CHILDREN
- KEEP THESE INSTRUCTIONS IN A SAFE PLACE
- GUARANTEE CONDITIONS
- CUSTOMER SERVICE
- LIMITATION OF LIABILITY
- COPYRIGHT
- PURPOSE OF USE
- DANGER FROM UNAUTHORISED USE
- CONSTRUCTION
- FUNCTIONAL DESCRIPTION
- SCOPE OF DELIVERY
- PACKAGING
- STORAGE
- STORE SHEARING MACHINE AND ACCESSORIES ON THE FOLLOWING CONDITIONS
- REQUIREMENTS AT THE PLACE OF USE
- ADJUSTING THE CLIPPING PRESSURE
- SWITCHING THE SHEARING MACHINE ON AND OFF
- USING THE SHEARING MACHINE
- REPLACING THE SHEARING BLADES
- LUBRICATION
- POSSIBLE DAMAGE TO THE SHEARING MACHINE
- CLEANING
- IMPROPER CLEANING. RISK OF DAMAGING THE SHEARING MACHINE
- HOUSING OF THE SHEARING MACHINE
- SHEARING BLADE AND SHEARING HEAD
- SAFETY INSTRUCTIONS
- CAUSES OF MALFUNCTIONS AND THEIR RECTIFICATION
- TABLE DES MATIÈRES
- SÉCURITÉ
- FIG
- AFB
- AANWIJZING
- KUVA
- CONTACT
Brand : Coburn
Model : Heiniger Xpert
Category : Electric mower