
V5T2AHDS - Digital camcorder AIPTEK - Free user manual and instructions
Find the device manual for free V5T2AHDS AIPTEK in PDF.
| Product Type | Digital Camcorder |
| Brand | AIPTEK |
| Model | V5T2AHDS |
| Power Supply | Rechargeable Li-ion battery (7.4 V) |
| Display | 2.7 inch LCD screen (estimated) |
| Video Resolution | Up to 1080p (depending on model) |
| Photo Resolution | Up to 12 megapixels (interpolated) |
| Storage | Internal memory + SD/SDHC/MMC card (up to 32 GB) |
| Connectivity | USB 2.0, HDMI, AV output (PAL/NTSC) |
| Main Functions | Video, photo, voice recorder, MP3 player, webcam |
| Flash | Built-in (auto, on, off) |
| Zoom | Digital (up/down buttons) |
| Image Stabilizer | Yes (on/off) |
| White Balance | Auto, sunny, cloudy, fluorescent, tungsten |
| Effects | Normal, black and white, sepia |
| Self-Timer | 10 seconds |
| TV Systems | NTSC / PAL |
| Available Languages | French, English, German, etc. |
| Dimensions | Approximately 120 x 70 x 50 mm (estimated) |
| Weight | Approximately 250 g (with battery) |
| Maintenance | Avoid water, shocks, high temperature |
| Safety | Do not disassemble, use original accessories |
| Included Accessories | USB cable, power adapter, AV cable, battery, CD |
Frequently Asked Questions - V5T2AHDS AIPTEK
User questions about V5T2AHDS AIPTEK
0 question about this device. Answer the ones you know or ask your own.
Ask a new question about this device
Download the instructions for your Digital camcorder in PDF format for free! Find your manual V5T2AHDS - AIPTEK and take your electronic device back in hand. On this page are published all the documents necessary for the use of your device. V5T2AHDS by AIPTEK.
USER MANUAL V5T2AHDS AIPTEK
Dear user, thanks for purchasing this product.
Much investment in time and effort has gone into its development, and it is our hope that it will give you many years of trouble-free service.
Safety Notice:
- Do not drop, puncture or disassemble the camcorder; otherwise the warranty will be voided.
- Avoid all contact with water, and dry hands before using.
- Do not expose the camcorder to high temperature or leave it in direct sunlight. Doing so may damage the camcorder.
- Use the camcorder with care. Avoid pressing hard on the camcorder body.
- For your own safety, avoid using the camcorder when there is a storm or lightning.
- Do not use batteries of different specifications. Doing so may lead to the potential for serious damage.
- Remove the battery during long periods between usage, as a deteriorated battery may affect the functionality of the camcorder.
- Remove the battery if it shows signs of leaking or distortion.
- Use only the accessories supplied by the manufacturer.
- Keep the camcorder out of the reach of infants.
- Risk of explosion if battery is replaced by an incorrect type.
- Dispose of used batteries according to the instructions.
FCC Compliance Statement:
This device complies with Part 15 of the FCC Rules. Operation is subjected to the following two conditions: (1) this device may not cause harmful interference, and (2) this device must accept any interference received, including interference that may cause undesired operation.

This equipment has been tested and found to comply with limits for a Class B digital device, pursuant to Part 15 of the FCC rules. These lin
are designed to provide reasonable protection against harmful interference in residential installations. This equipment generates, uses, and can radiate radio frequency energy, and if not installed and used in accordance with the instructions, may cause harmful interference to radio communications.
However, there is no guarantee that interference will not occur in a particular installation. If this equipment does cause interference to radio or television equipment reception, which can be determined by turning the equipment off and on, the user is encouraged to try to correct the interference by one or more of the following measures:
-Reorient or relocate the receiving antenna.
-Move the equipment away from the receiver.
-Plug the equipment into an outlet on a circuit different from that to which the receiver is connected.
-Consult the dealer or an experienced radio/television technician for additional suggestions.
Changes or modifications not expressly approved by the party responsible for compliance could void the user's authority to operate the equipment.
C E


If the time arises to throw away your product, please recycle all the components possible. Batteries and rechargeable batteries are not to be disposed in your domestic waste! Please recycle them at your local recycling point. Together we can help to protect the environment.
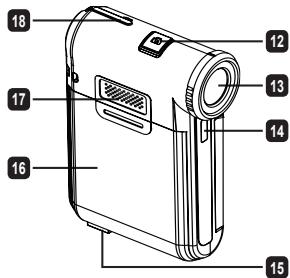
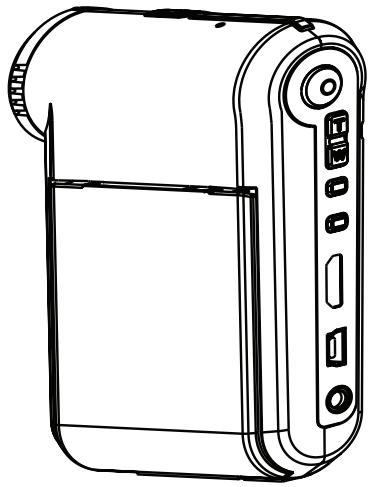
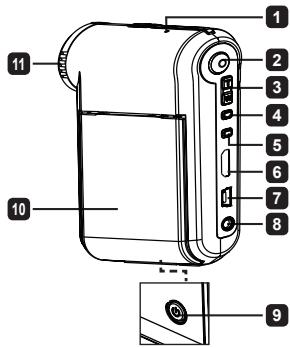
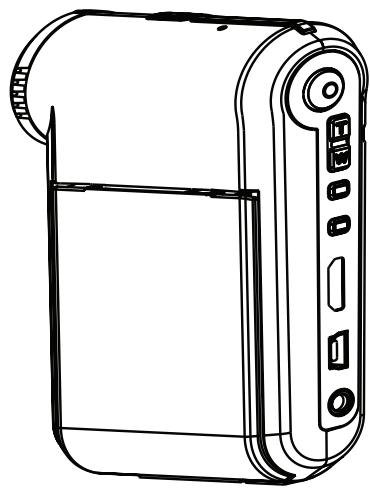
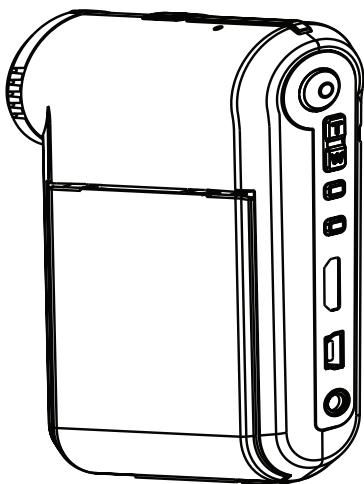
- Parts of the camcorder
1 Microphone
2 Record button (©)
3 Up & Down / Zoom buttons ()
4 Menu/OK button
5 Mode/Return button
6 HDMI port
7 USB port
8 TV-out connector
9 Power button (under LCD panel)
10 LCD panel
1 Focus switch
12 Shutter button (O)
13 Lens
14 Flash strobe
15 Tripod socket
13 Battery compartment / SD/MMC card slot
Speaker
18 LED indicator
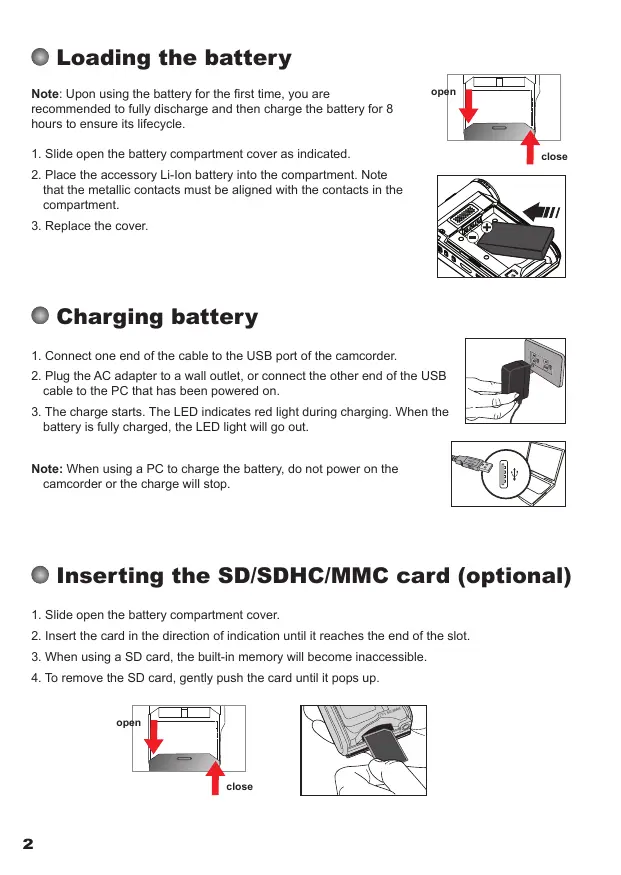
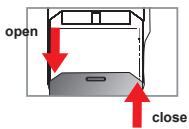
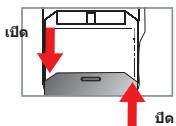
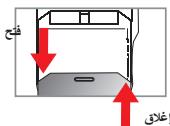
Loading the battery
Note: Upon using the battery for the first time, you are recommended to fully discharge and then charge the battery for 8 hours to ensure its lifecycle.
- Slide open the battery compartment cover as indicated.
- Place the accessory Li-Ion battery into the compartment. Note that the metallic contacts must be aligned with the contacts in the compartment.
- Replace the cover.

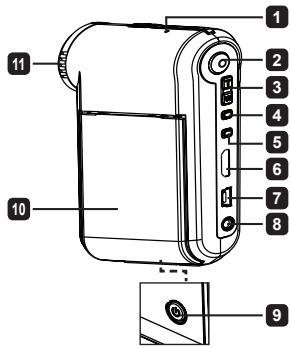
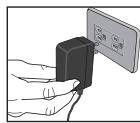
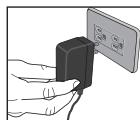
Charging battery
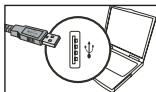
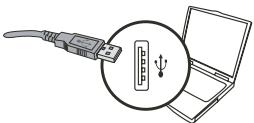
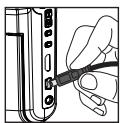
- Connect one end of the cable to the USB port of the camcorder.
- Plug the AC adapter to a wall outlet, or connect the other end of the USB cable to the PC that has been powered on.
- The charge starts. The LED indicates red light during charging. When the battery is fully charged, the LED light will go out.
Note: When using a PC to charge the battery, do not power on the camcorder or the charge will stop.

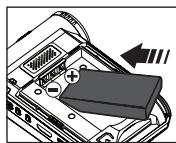
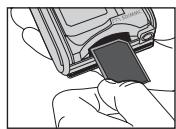
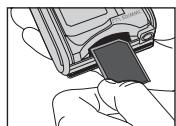
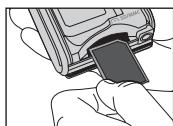
- Inserting the SD/SDHC/MMC card (optional)
- Slide open the battery compartment cover.
- Insert the card in the direction of indication until it reaches the end of the slot.
- When using a SD card, the built-in memory will become inaccessible.
- To remove the SD card, gently push the card until it pops up.
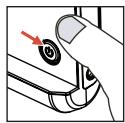
Turning on/off the camcorder
Open/Close the LCD panel to turn on/off; or press and hold down the Power button for 3 seconds.
Mode selection
- Turn on the camcorder.
- Press the Mode button.
- Use the Zoom buttons to select the desired item.
- Press the Menu/OK button to confirm.
- By pressing the Mode button you can switch mode:
Setting; Camera; My Works; Voice Recorder; Music Player★ (H).
★ For select model only. Please refer to the package printing for detailed specification.
Setting language
Power-on Press the Mode button Enter the Setting mode Use the Zoom buttons to select the Language item Use the Zoom buttons to select a suitable language and press the Menu/OK button to confirm.
Battery life indicator
| Icon | Description |
| Full battery life | |
| Moderate battery life | |
| Low battery life | |
| Empty battery life | |
| Charging battery |
Note: To avoid sudden outage of power supply, you are recommended to replace the battery when the icon indicates low battery life.
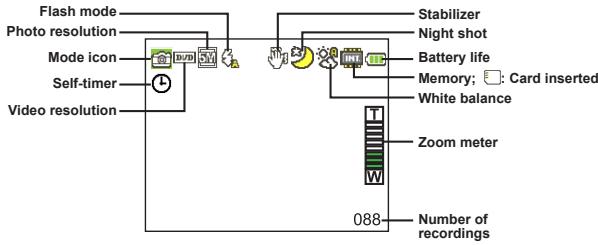
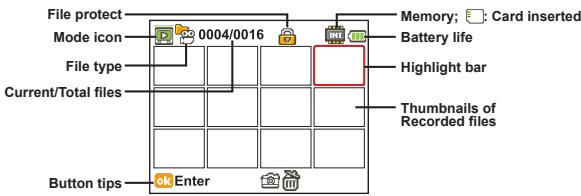
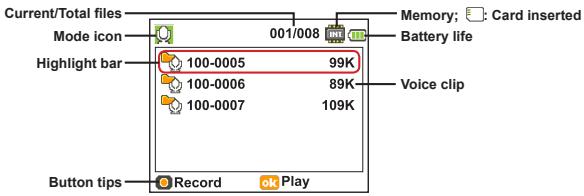
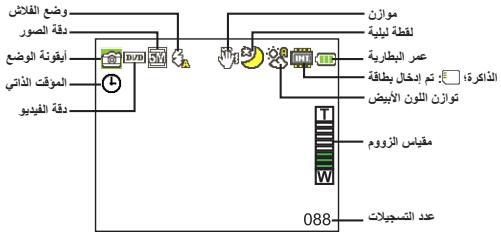
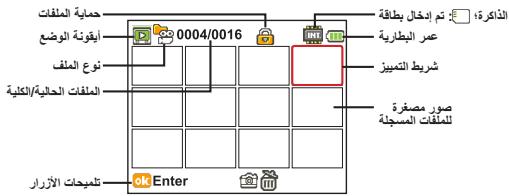
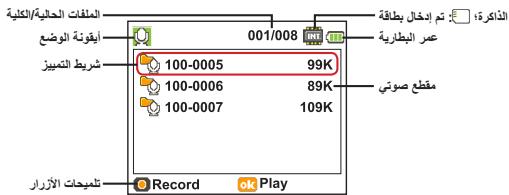
Reading LCD indicators
Camera mode:
My Works mode:
Voice Recorder mode:
Recording a video clip
- Set the focus to an appropriate setting. Normally, you may set the focus to ( ) for most filming conditions. Select ( ) only for close-ups.
- Press the Record button to start recording.
- Use the Zoom buttons to zoom in or zoom out the screen.
- Press the Record button again to stop recording.
Taking a still picture
- Set the focus to an appropriate setting. Normally, you may set the focus to ( ) for most filming conditions. Select ( ) only for close-ups.
- Use the Zoom buttons to zoom in or zoom out the screen.
- Press the Shutter button to take a still picture.
Recording a voice clip
- Press the Mode button.
- Use the Zoom buttons to select Voice Recorder mode.
- Press the Menu/OK button to confirm.
- Press the Record button to start recording.
- When you are done, press the Record button again to stop recording.
Playing back your recordings
- Press the Mode button.
- Use the Zoom buttons to select My Works mode. Select the type of file you want to view in the sub items.
- Press the Menu/OK button to enter.
- Use the Zoom buttons to shift between files.
- Press the Menu/OK button to review/play the file.
Press the Shutter button to delete files.
Playing back your recordings on PC
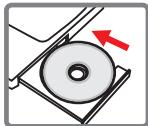
Please notice that the video clips are recorded in MP4 format. To view these videos on your PC, you may need to install some special programs. For first time use, please install the software on the bundled CD.
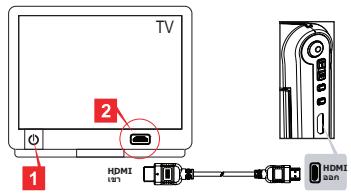
Connecting the camcorder to HDTV
Connect your camcorder and TV via the accessory AV cable for real-time display. You can display your video clips, still pictures, and audio recordings directly on your TV, sharing them with your friends and family.
TV:HDTV with HDMI input port
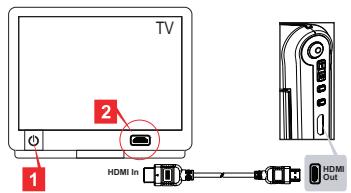
- Turn on your HDTV.
- Connect the HDMI-in connector (the bigger end) of the HDMI cable to the HDTV.
- Turn on the camcorder.
- Connect the other end of the HDMI cable to your camcorder.
- Switch the HDTV to the "HDMI input" mode.
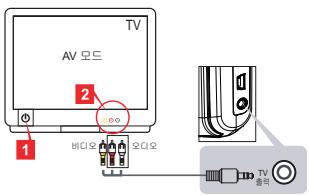
Connecting the camcorder to standard TV
TV: Traditional CRT TV
The TV system is different across areas. If you need to adjust the TV-out setting, please refer to the "Advanced Operations" section for more information. (Taiwan: NTSC; America: NTSC; Europe: PAL; China: PAL)
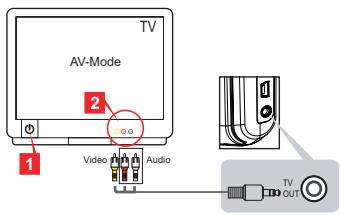
- Turn on your TV and switch the TV to AV mode.
- Connect the audio and video ends of the AV cable to the TV.
- Turn on the camcorder.
- Connect the other end of the AV cable to your camcorder.
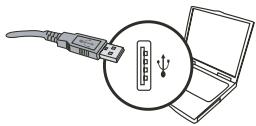
Connecting the camcorder to your PC
- Turn on the camcorder.
- Connect the camcorder to your computer by the USB cable.
The default is set to "Disk" mode. When connected to a PC, the camcorder will automatically enter Disk (Removable disk) mode.
If you set the USB Mode to "Menu" mode, the following items will appear.
PC Cam
Disk
Printer
Please select the desired connection mode.
If you would like to change the setting, please refer to the "Advanced Operations" section for more information.
Playing MP3 music ★
For select model only. Please refer to the package printing for detailed specification.
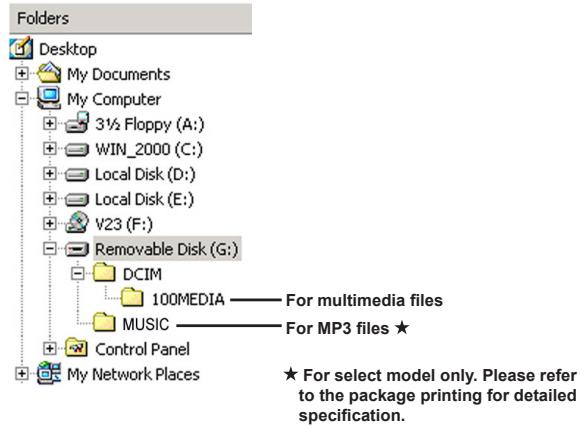
Copy MP3 files to the camcorder
Note: Before you can play MP3 music, you need to copy MP3 files to the camcorder first.
- Turn on the camcorder, and connect the camcorder to a PC using the USB cable.
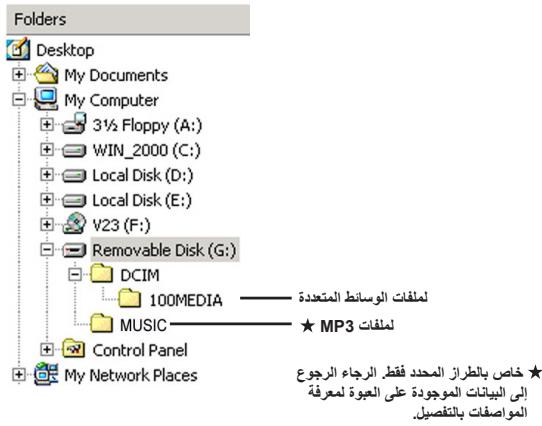
- After the camcorder is connected to the PC, double-click on My Computer and you will find a removable disk. Create a "MUSIC" folder in the disk and then copy MP3 files into the "MUSIC" folder for playing.
Playing music in Music Player mode
- Press the Mode button.
- Use the Zoom buttons to select Music Player mode.
- Press the Menu/OK button to confirm.
Operations in Music Player mode:
| How to... | Action |
| Shift between tracks | Use the Zoom buttons to move up or down. |
| Start playing | Press the Menu/OK button. |
| Pause/Resume playing | During playing/While paused, press the Menu/OK button. |
| Adjust sound volume | Use the Zoom buttons to move up or down while playing. |
| Stop playing | During playing, press the Mode/按钮. |
| Delete files | Press the Shutter button. |
Displaying lyrics
You can play MP3 songs with lyrics displayed. To enable the function, you need to copy LRC format files into the "MUSIC" folder, and name the LRC files after their matched songs. For example, if a song is named A.MP3, then the LRC file should be named A.LRC. You can search the Internet for your desired lyrics files. The LRC file contains both lyrics as text and time tags, so that the music and lyrics can be synchronized. This camcorder supports LRC files with "line time tags".
Note: The format of time tag denotes [minutes]:[seconds]:[milliseconds].
Using menu
The menu items provide several options for you to fine-tune your camcorder functions. The following table gives details on menu operations:
| How to... | Action |
| Bring up the menu in each mode | Press the Menu/OK button. Note that this step is not necessary in the Setting mode. |
| Move the highlight bar | Use the Zoom buttons to move up or down. |
| Confirm an item | Press the Menu/OK button. |
| Exit menu/Go back to upper menu | Press the Mode/按钮 (when in sub-menu). |
- Menu items in Camcorder mode (1)
Power-on Press the Menu/OK button.
| Item | Option | Description |
| * Video Resolution | Please refer to the package printing for resolution specification. | |
| * Picture Resolution | Please refer to the package printing for resolution specification. | |
| Flash Strobe | Auto | The flash automatically fires when the lighting is insufficient. |
| On | The flash is forced to fire in every shot. | |
| Off | The flash is disabled. | |
| NightShot | On/Off | This setting allows you to take a photograph with a dark background. Since the shutter speed will slow down when taking photographs at a dark place, we recommend using a tripod to eliminate blurring from hand shake. |
| Stabilizer | On/Off | Minimize blur caused by hand shake. |
| EV | -2~+2 | Manually adjust the exposure to gain better effect when the preview image appears too bright or too dark. A positive value indicates the image will be brighter than usual; while a negative value makes the image dimmer. |
| Selftimer | On/Off | Enable the selftimer. After the selftimer is turned on, the camcorder will have ten seconds delay before recording when the Shutter button is pressed. |
Menu items in Camcorder mode (2)
| Item | Option | Description |
| White Balance | Auto | The camcorder automatically adjusts white balance. |
| Sunny | This setting is suitable for outdoor recording in sunny weather. | |
| Cloudy | This setting is suitable for recording in cloudy weather or shady environments. | |
| Fluorescent | This setting is suitable for indoor recording with fluorescent lamp lighting, or environments with high color temperature. | |
| Tungsten | This setting is suitable for indoor recording with incandescent lamp lighting, or environments with low color temperature. | |
| Effect | Normal | Make recordings in natural color. |
| Black&White | Make recordings in black and white. | |
| Classic | Make recordings in sepia-toned color. | |
| Photo Frame | 0 - 10 | This setting allows you to add customized frames to photos. 10 background frames (1-10) are available on the LCD monitor. Set 0 to disable this function. |
The "Photo Frame" option and zoom function will be disabled when the picture resolution is set to 12M.
The "Video resolution" and "Picture resolution" menu items are model-dependent. Please refer to the package printing for detailed specifications.
- Menu items in My Works mode
Power-on Press the Mode button Enter My Works mode Press the Shutter button.
| Item | Option | Description |
| Delete One | Yes/No | Delete current file. |
| Delete All | Yes/No | Delete all files of the same type stored in the memory. |
| Lock | On/Off | Enable/Disable protection of the selected file. |
| * Repeat all | - | Start picture slideshow. / Repeat playing all video clips. |
| ** Background Music | On/Off | Enable/Disable playing MP3 music while viewing pictures. |
| ** Set Start-up Picture | - | Use the selected picture as the start-up screen (when the camcorder is powered on). |
| *** Repeat | Off/Single/All | Enable/Disable repeat play of current file/all files. |
- For videos and pictures. ** For pictures only. *** For voice files only.
- Menu items in Setting mode (1)
Power-on Press the Mode button Enter Setting mode.
| Item | Option | Description |
| Clock | - | Set date and time. |
| Date Stamp | On/Off | Enable this feature to print a date mark on each picture. |
| Language | - | Lets you select the language used for OSD. |
| Beep | On/Off | Enable beep sound on/off. |
| Start Movie | Off | Toggle start screen off. |
| On | Use the default start screen. | |
| * Custom | Use a custom picture as the start screen. This item does not show up until you have set up the start-up picture. | |
| Icon | On/Off | Enable/disable OSD icons to display on the screen. |
| LCD Brightness | 0 ~ 4 | Set LCD brightness. A greater value makes the LCD brighter, while a smaller value makes the LCD dimmer. |
Menu items in Setting mode (2)
| Item | Option | Description |
| TV System | NTSC | Set TV system compatibility to NTSC. This option is suitable for America, Taiwan, Japan, and Korea areas. |
| PAL | Set TV system compatibility to PAL. This option is suitable for Germany, England, Italy, Netherlands, China, Japan, and Hong Kong. | |
| Flicker | 50Hz/60Hz | Set flicker frequency to 50Hz or 60Hz. For more information, please refer to the "Flicker Settings" table. |
| Auto Off | Off 1min/3min/ 5min | Set how long the camcorder will automatically shut down when staying inactive. Setting to [Off] will make the camcorder stay powered on until it runs out of power. |
| USB Mode | Menu | When connected to a PC, the camcorder displays a menu for you to choose a desired connection mode. |
| PC Cam | When connected to a PC, the camcorder automatically enters Camera (PC camera) mode. | |
| Disk | When connected to a PC, the camcorder automatically enters Disk (removable disk) mode. | |
| Printer | When connected to a PC, the camcorder automatically enters printer connection mode. | |
| Format | Yes/No | Format the storage medium. Note that all files stored in the medium will be gone. |
| Reset Default | Yes/No | Restore factory defaults. Note that your current settings will be overridden. |
Flicker Settings
| Area | England | Germany | France | Italy | Spain | Russia |
| Setting | 50Hz | 50Hz | 50Hz | 50Hz | 50Hz | 50Hz |
| Area | Portugal | America | Taiwan | China | Japan | Korea |
| Setting | 50Hz | 60Hz | 60Hz | 50Hz | 50/60Hz | 60Hz |
Note: The flicker setting is based on the frequency standard of your local power supply.
Advanced Instructions
Digital Camcorder

Connecting the camcorder to your PC
1. Turn on the camcorder.
2. Connect the USB cable to your computer.
Turn on your computer, and then connect the accessory USB cable to the USB port of your computer. Make sure the cable and the port are correctly aligned.
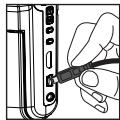
3. Connect the USB cable to your camcorder.
Connect the other end of the USB cable to your camcorder.
The default is set to "Disk" mode, if you would like to set other modes as default, please refer to "USB Mode" section for more information.
USB mode:
Power-on Press the Mode button Enter Setting mode.
| USB Mode | Menu | The camcorder displays a menu. |
| PC Cam | The camcorder automatically enters PC camera mode. | |
| Disk | The camcorder automatically enters Disk (removable disk) mode. | |
| Printer | The camcorder automatically enters printer connection mode. |
Notice for Windows XP/Vista users:
If you want to disconnect the camcorder from your computer, please follow these steps:
- Double-click the USB connection icon in the system tray.
- Click on the USB Disk item, and then click Stop.
- Select the camcorder when the confirmation screen appears and click OK.
- Follow the on-screen instructions to safely disconnect the camcorder from your computer.

File location
After connecting the camcorder to your computer, a removable disk will appear in your computer. The removable disk actually represents the storage medium of your camcorder. In the disk you can find all of your recordings. Refer to the figure below to see where the files are stored.

Using PC Camera

Installing the software
The PC camera driver is included in the accessory CD, and therefore you should install the driver before using the PC camera function.

Starting the application
1. Connect the camcorder to your computer.
Turn on your computer, and then connect the accessory USB cable to the USB port of your computer. Make sure the connector and the port are correctly aligned.
2. Switch to the Camera mode.
Connect the other end of the USB cable to your camcorder. Power on the camcorder, and the following items will appear on the screen:
1) : PC Cam.
2) : Disk (removable disk).
3) : Printer.
Select [PC Cam] and press the OK button to confirm.
3. Launch PC camera program.
After the camcorder is correctly connected to and detected by your PC, you are ready to launch your own favorite software (ex. MSN Messenger, Yahoo Messenger...) to use PC camera function.
Appendix

Troubleshooting
| When using the camcorder: | ||
| Problem | Cause | Solution |
| The camcorder can not be powered on normally. | The battery is out of power. | Replace the battery. |
| The battery is incorrectly installed. | Re-install the battery. | |
| Can not take pictures or video clips when pressing the Shutter or Record button. | Out of memory. | Free some space from the SD/MMC card or the internal memory. |
| The camcorder is recharging the flash strobe. | Wait until the flash strobe is fully charged. | |
| Using a “protected” SD card. | Set the SD card to be writeable. | |
| The LCD screen displays “MEMORY ERROR” or “CARD ERROR” message. Or the camcorder cannot read the memory card. | The format of the memory card is not compatible with the camcorder. | Use the camcorder “Format” function to format the card. |
| The memory card is corrupted. | Replace the memory card with a new one. | |
| I did not delete the pictures and video clips, but can not find them in the memory card. | The lost recordings are saved in the internal memory. | It happens when you insert a memory card after taking a few pictures or video clips. You can access those files after removing the memory card. |
Appendix
| When using the camcorder: | ||
| Problem | Cause | Solution |
| Cannot use the flash strobe. | If the battery icon indicates low battery, the flash strobe may be disabled due to insufficient voltage. | Replace the battery. |
| The camcorder does not respond to any action during operation. | The camcorder encounters software failure. | Remove the battery pack and replace it into the compartment. Then power on the camcorder. |
| The recorded pictures appear too blurred. | The focus is not correctly set. | Adjust the focus to an appropriate position. |
| The recorded pictures or video clips appear too dark. | The environment of shooting or recording does not have adequate light. | Use flash strobe when taking pictures. Add extra light sources when recording video clips. |
| Noises occur when viewing images on the LCD screen or on the computer. | The flicker setting does not match the standard of the country you are staying. | Adjust the flicker setting. For more information, please refer to the "Flicker Settings" table. |
| I want to restart the serial number of the file name (PICTxxxx). | The counting of the serial number is handled by the camcorder firmware. | Use the camcorder "Format" function to format the card. |
| I convert a media file and name it as PICTxxxx.* (xxxx indicates number). Then I copy the file to the camcorder but cannot find it on the camcorder. | There is another file with duplicate serial number (e.g. PICT0001.MP4 and PICT0001.JPG), or the file type is not supported. | Give the file a distinctive serial number and make sure the file type is supported by the camcorder. |
Appendix
| When connecting the camcorder to the computer or TV: | ||
| Problem | Cause | Solution |
| I cannot view the video clips on my computer. | Driver or software is not installed on the computer. | Install DirectX 9.0c or above and Windows Media 9.0 Codecsto solve this problem.Install the software and driver in the bundled CD, or go to http://www.microsoft.com to download the required files. |
| Driver installation failed. | The installation is terminated abnormally. | Remove the driver and other related programs. Follow the installation steps in the manual to re-install the driver. |
| The camcorder has been connected to the PC via the USB cable before installing the driver. | Install the driver before plugging in the USB cable. | |
| The TV screen does not display after connecting the camcorder to the TV. | The camcorder is not correctly connected to the TV. | Reconnect the camcorder to TV correctly. |
| A conflict with other installed camcorder or capture device occurred. | The device is not compatible with the camcorder. | If you have any other camcorder or capture device installed in your computer, please completely remove the camcorder and its driver from the computer to avoid the conflict. |
| Noises occur on my computer screen when using Video Conferencing. | The flicker setting does not match the standard of the country you are staying. | Adjust the flicker setting. For more information, please refer to the "Flicker Settings" table. |
Appendix
Battery Life
| Still picture | Video clip |
| Number of shots | Recording time (minute) |
| 240 | 100 |
| * shoot every 30 seconds ** flash is on *** resolution is set to 5M | * resolution is set to VGA (640x480 pixels) |
Note: This table is for your reference only. The actual battery life depends on your battery type and recharge level.
Storage Capacity
- Please refer to the package printing for the specification of your model.
| Memory | Video (min.) | Audio (min.) | |||
| HD | DVD | VGA | QVGA | Maximum | |
| SD/MMC card (512MB) | 9 | 12 | 28 | 102 | 340 |
| SD/MMC card (1GB) | 18 | 25 | 55 | 200 | 666 |
| SD/MMC card (2GB) | 36 | 50 | 110 | 400 | 1332 |
| Memory | Still picture | ||
| 3M | 5M | 12M | |
| SD/MMC card (512MB) | 640 | 426 | 176 |
| SD/MMC card (1GB) | 1250 | 833 | 344 |
| SD/MMC card (2GB) | 2500 | 1666 | 688 |
Note: The actual value of capacity may vary (up to ± 30% ) depending on the color saturation and complexity of your subject and surroundings.
The contents in this manual are subject to change without prior notification.
Appendix
System Requirements
Windows XP Service Pack 2 or Vista
512MB of system memory, 1GB is recommended
Nvidia Geforcece 7600 / ATI X1600 or above with 256MB of RAM
2.3 GHz Pentium 4 or faster processor
HDCP compliant display devices
CD-ROM SPEED: 4X or above
Other: USB connector
Playing MP3 music ★
Instructions avances

Caméscope numérique

3aHnscb BndeOpOJNKOB
1.YctahOBHTe nepeKIOHOTaBbFokCyPOBKBnHEo6OaHMoe NOJoxEHe. KaK npABHIO, dIy 60bnMhCTBa YcOBN bCEmKcCneYet YctAHaNIBaBb PekIM FOKCypOBKn BnONooHe ()。 Bb6bpAHTe NOJoxEHe ()TOJbKO dI MAKPCoBEMKn.
2.Дязanycka 3anncинхмnte KhoNky 3anncb.
3.IcnoIb3yIte KhoIgKu npabHeHryBvEiueHne IpyBvEiueHn uIyUmeHbSeHn 106paXeHnHa 3kpaH.
4.Дязanycka 3anncинхмnte KhoNky 3anncb.
ΦOTOCbEMKa
1.YctaOBHTe nepeKbHOTeBfOkyCpOBKBn BEOb6OdMIOe NOJOKHeNc. KAc npABINO, nDa 60bIuHNCTBa YCOBn CBEmKn cIeJeT yCTaHaBNIbPekmik OPOyCpOBKBn BOJOKHeNc (). BvBipnate NOJOKHeNc() TOJIbKO dma NKPOcEBMKn
2. Icnobn3yte KhoNKn ynpabEnHyaBENnueHe NdyBENnEHNa YmEhBSeHNA 306bApKHe H a3kPahe.
3.HaXMMTe KhoNky cnYcKa 3aTBopa Cnyck 3aTBopa.
3aanncb roJolca
1.HaxmTe KhoNky PeknM.
2.ИспONSьуг Te KhoTNk ynpaBHeHn YBeIuHneHne IЯ BbIbOpa pexima DnkToΦOH.
3.HaKMnTe KhoNky MeHIO/OK.
4.Дязанусяа заниннхимпгКонку 3anncb.
5.По Okончани 3aписн Нахмite KhoNky 3aHncb[euple pa3дя ee 3aBepseHn.
Bocnpon3BeJeHne 3aHnCe n npocMToP cHmKOB
1.HaxMnTe KhoNky Pexm.
2.ИспONSьуг Te KhoNkyn ynpaBNeHnny BeyIuHneHn nЯ BbyIbopa pexmMa Mon pa6oTbI.
3.HaXMMTe KHOIky MeHIO/OK.
4.ИспONSьуг Te KhoTNk ynpaBNeHn YBeIuHneHn Ipy BbIbopa paJnoB.
5.HaKmTe KhoNkMy MeHIO/OK IJnI npocMOTpa/BocpOIN3BeDeHn paIna.
Hakmte KhoNky cnYcKa 3aTbopa dny ydaenHna paaiIOB.

Bocnpo3BeDHe 3aHnCeN n npocMToP chmKOB Ha PIK
06paTHe BmHAnHe, YTO BnDEOkNInbI 3aNcSbIAoTcB a FopMaTe MP.ДЯ npocMToPa BnDEO3aNcIE H a NK Heo6OxMDyo yCTaHOBHT bEckONbKO cneuaanbHbIX npOrpAMM. Ipeed nePBbIM nCIOJIb3OBAHmEn yCTaHOBHT peoRpaMMHoe oEcbneueHene C KOMnakT-DnCKA, BXOJAEBO B KOMNKeT NOCTaBKM.

ПодключенkeКамерblK TeJIeBN3Opy BBICOKOЧETKOCTH
IoiKnIOUHTe KaMepy K TeNEB3Opy C nOMoIbIy aUYIO-BVIEOka6enI DnI pNOcMOtra 3aIINCEI IN CHIMKOB B peAJIbHM BpeMeHN. Bbl MoKETe npocMaTPrBaT bVIEOpONiKN, FOITOrpaFmN, IPOCNYIIuBaT ay NoH03AniM NHeNoCpeCTBeHHO Ha TeNEB3Ope I DEMOHCTPnpOBaT IH Dpy3bAM n POdCTBeHHNKaM.
TeNeBn3Op : 3TO TeNEBn3Op BbICOKOy YeTkoCTn C nOPTOM BBOda HDMI

- BkIIOHInTe TeneBn3Op BbICOKOyETKoCTN.
- Bctabte pa3bem Ka6eH HDMI (60bIshn KoHeU) B TeIeBn3Op BlicOKOy TkOCTN.
- BkIIOUHTe BmDeOkaMepy.
4.ПодключITE другов Конец Кабеля HDMI K Видаокамеpe. - Iapeeknouhte TeleBn3Op BbICOKo YcTKocTn B pexm HDMl input (Bxod HDMl).

KoHnpoBaHne MP3-ФaIIOB B I NaMryTb VnDEOkamepbI \*
PImmuueHAne:IaBcONPOp3BEmHeNMy3bKuBΦOpMaTe MP3 ChauHaNEbOxoJIMHO CKnOPBaBt FaiJIb MP3 B NaMPTb BInDeokAmpeMb.
- BkIIOUHTe Kamepy n noDKJIIOHTe ee K PIK c nomOuBIO ka6eY USB.
- Iocne nokIIOHcHnKAMeBpI KIKDbAxBdJI cIeNkHITe 3NaOcK MoI KomblIOTep, B nankte Oo6pa3ntc bCemHnK dNCK. CoaJadte Ha cBeHMOn dNcK nanky (MUSIC) n ckOpnpyTe faHb MP3 b 3ny nanky IraonocJeUioero Bocnpom3BEdHeHn.
Bocnpoun3BeDeHne My3bIKn BpeKIme Pneeep
- HaxmTe KhoNky Pekn (MeHIO/OK).
- Mcnonb3yte KONIKI ynpablenya YBENMENIE nIa Bb6papeKIMa My3bika b oopMaTe Pnleep.
- HaxMMTe KHOIIKy MeHIO/OK.
Connecting the camcorder to your PC
1.BkIIOUHTe BnDEOKaMepy.
2.ПодсоeннTe Ka6eNB USK KOMnblTepy.
BkIIOHNTe KOMNbIOTep, aTeM IOIcOeINHnTE npInraaembl Ka6ebN USB K pa3bemy USB IK. Y6eINTeCb, yTO Ka6ebN npabINbHO BCTaBnE H p3bEm.
3.ПодключенkeKaбелЯUSBКВидаokedamepe.
IpoKIIIOHnTe dpyroI KOHeI Ka6eIy USB K BInDeOkaMepe.
TV Ss-1000 34.25.17.18.19.20.21.22.23.24.25.26.27.28.29.30.31.32.33.34.35.36.37.38.39.40.41.42.43.44.45.46.47.48.49.50.51.52.53.54.55.56.57.58.59.60.61.62.63.64.65.66.67.68.69.70.71.72.73.74.75.76.77.78.79.80.81.82.83.84.85.86.87.88.89.90.91.92.93.94.95.96.97.98.99.100
- TV是TVAV或AV或AV
2.AVKJIeIiBnOoDIOOnJHuaWbDIOOnJHuaTVPaEonEnGdNl. - 勾成□将成□。
4.AV 1eIb的n#
PC上邦克士
- aunwn anananaanannnnaaennnnnnae
- nanaanrnaaannnnaaannnnnaaannnnaa
- auunnaaannnnaa aananaan anananaan anananaan anananaan anananaan
- 1234567890123456789012345678901234567890123456789012345678901234567890123456789012345678901234567890123456789
- wannnnaaannnnnnaan nanaan anan anan anan anan anan anan
- aunuuaaauauauauauauuuuuuuuuuuuuuuuuuuuuuuuuuuuuuuuuuuuuuuuuuuuuuuuuuuuuuuuuuuuuuuuuuuuuuuuuuuuuuuuuuuuuuuuuuuuuuuuuuuuuuuuuuuuuuuuuuuuuuuuuuuuuuuuuuuuuuuuuuuuuuuuuuuuuuuuuuuuuuuuuuuuuuuuuuuuuuuuuuuuuuuuuuuuuuuUU
- nnnnnaaannnnnnae annnnnne aennnnnne nnnnne
- nauuuaanannnnaaunnnnnae nnne
- 1aiwzaiunuuiuuyuauuua
- nunannnnae
#
U
山山山()
山J&J/(w)
0 1/OK
山
6 wataHDMI
7 wasa USB
8 TVaan
9 1uwn (nunnu LCD)
10 wu LCD
10 a
山
13
1 WwWz
15
16 yuoyueyueyueyueyueyueyueyueyueyueyueyueyueyueyueyueyueyueyueyueyueyueyueyueyueyueyueyueyueyueyueyueyueyueyueyueyueyueyueyueyueyueyueyueyueyueyueyueyueyueyue
7
18 ànuauovantuz LED

nnaa
- 1
- 1AaAuaaAaAC aannnnnnaaennnnaeaaananaan anan anan anan anan anan anan anan anan anan anan anan anan anan anan anan anan anan anan anan anan anan anan anan anan anan anan anan anan anan anan anan anan anan anan anan anan anan anan anan anan anan anan anan anan anan anan anan anan anan anan
- muaa a uu uu LED a uauauauauauauauauauuuauuuuuuuuuuuuuuuuuuuuuuuuuuuuuuuuuuuuuuuuuuuuuuuuuuuuuuuuuuuuuuuuuuuuuuuuuuuuuuuuuuuuuuuuuuuuuuuuuuuuuuuuuuuuuuuuuuuuuuuuuuuuuuuuuuuuuuuuuuuuuuuuuuuuuuuuuuuuuuuuuuuuuUU
wnuua: uauwauwauwauwauwau, auuuaaauuauuauuau
SD/SDHC/MMC (
- 2.lainlunwamwnwuyuunwuyuunwuyuun
- 与SD n,nunnnnnae
- lunrana SD nna nnnnnaa nnnae
nra/
10/10/10/10 LCD 10/10/10/10; w#n n##n #n nn nnnn 3

#
- 2.naiu
3.1u u waiwaaanrwnrnnn
4.nuun/anaanwau - 10000000000000000000000000000000000000000000000
aannananaananaananaananaananaananaananaananaananaananaananaananaananaananaananaananaananaananaananaananaananaananaananaananaananaananaananaananaananaananaananaananaananaananaananaananaananaananaananaananaananaananaananaananaananaananaananaananaananaananaanara anaae aae eae eae eae eae eae eae eae eae eae eae eae eae eae eae eae eae eae eae eae eae eae eae eae eae eae eae eae eae eae eae eae eae eae eae eae eae eae eae
TV:HDTV WwH HDMI
- HDTV
- 压力调节器HDMI-1(JanssenWijnnij)液压调节器HDMI 1的HDTV
- 1
- 4
- HDTV "HDMI"
- nuaananaanauuTV u
TV:CRT TV
| BABUSS | БАБSДО | БАБSДО |
| БАБSДО | - | БАБSДО |
| БАБSДО | БАБSДО | БАБSДО |
| БАБSДО | - | БАБSДО |
| БАБSДО | БАБSДО | БАБSДО |
| БАБSДО | - | БАБSДО |
| БАБSДО | - | БАБSДО |
| БАБSДО | - | БАБSДО |
| БАБSДО | - | БАБSДО |
| БАБSДО | - | БАБSДО |
| БАБSДО | - | БАБSДО |
| BABY | BABY | BABY |
| NZUNAN | NTSC | NZUNAN TV TUTUAN LEEH NTSC 2018/2019/2020/2021/2022/2023/2024/2025/2026/2027/2028/2029/2030/2031/2032/2033/2034/2035/2036/2037/2038/2039/2040/2041/2042/2043/2044/2045/2046/2047/2048/2049/2050/2051/2052/2053/2054/2055/2056/2057/2058/2059/2100/2101/2102/2103/2104/2105/2106/2107/2108/2109/2110/2111/2112/2113/2114/2115/2116/2117/2118/2119/2120/2121/2122/2123/2124/2125/2126/2127/2128/2129/2200/2201/2202/2203/2204/2205/2206/2207/2208/2209/2300/2301/2302/2303/2304/2305/2306/2307/2308/2309/2400/2401/2402/2403/2404/2405/2406/2407/2408/2409/2500/2501/2502/2503/2504/2505/2506/2507/2508/2509/2600/2601/2602/2603/2604/2605/2606/2607/2608/2609/2700/2701/2702/2703/2704/2705/2706/2707/2708/2709/2800/2801/2802/2803/2804/2805/2806/2807/2808/2809/2900/2901/2902/2903/2904/2905/2906/2907/2908/2909/2910/2911/2912/2913/2914/2915/2916/2917/2918/2919/2920/2921/2922/2923/2924/2925/2926/2927/2928/2929/3000/3001/3002/3003/3004/3005/3006/3007/3008/3009/3100/3101/3102/3103/3104/3105/3106/3107/3108/3109/3200/3201/3202/3203/3204/3205/3206/3207/3208/3209/3300/3301/3302/3303/3304/3305/3306/3307/3308/3309/3400/3401/3402/3403/3404/3405/3406/3407/3408/3409/3500/3501/3502/3503/3504/3505/3506/3507/3508/3509/3600/3601/3602/3603/3604/3605/3606/3607/3608/3609/3700/3701/3702/3703/3704/3705/3706/3707/3708/3709/3800/3801/3802/3803/3804/3805/3806/3807/3808/3809/3900/3901/3902/3903/3904/3905/3906/3907/3908/3909/4000/4001/4002/4003/4004/4005/4006/4007/4008/4009/4100/4101/4102/4103/4104/4105/4106/4107/4108/4109/4200/4201/4202/4203/4204/4205/4206/4207/4208/4209/4300/4301/4302/4303/4304/4305/4306/4307/4308/4309/4400/4401/4402/4403/4404/4405/4406/4407/4408/4409/4500/4501/4502/4503/4504/4505/4506/4507/4508/4509/4600/4601/4602/4603/4604/4605/4606/4607/4608/4609/4700/4701/4702/4703/4704/4705/4706/4707/4708/4709/4800/4801/4802/4803/4804/4805/4806/4807/4808/4809/4900/4901/4902/4903/4904/4905/4906/4907/4908/4909/5000/5001/5002/5003/5004/5005/5006/5007/5008/5009/5100/5101/5102/5103/5104/5105/5106/5107/5108/5109/5200/5201/5202/5203/5204/5205/5206/5207/5208/5209/5300/5301/5302/5303/5304/5305/5306/5307/5308/5309/5400/5401/5402/5403/5404/5405/5406/5407/5408/5409/5500/5501/5502/5503/5504/5505/5506/5507/5508/5509/5600/5601/5602/5603/5604/5605/5606/5607/5608/5609/5700/5701/5702/5703/5704/5705/5706/5707/5708/5709/5800/5801/5802/5803/5804/5805/5806/5807/5808/5809/5900/5901/5902/5903/5904/5905/5906/5907/5908/5909/6000/6001/6002/6003/6004/6005/6006/6007/6008/6009/6100/6101/6102/6103/6104/6105/6106/6107/6108/6109/6200/6201/6202/6203/6204/6205/6206/6207/6208/6209/6300/6301/6302/6303/6304/6305/6306/6307/6308/6309/6400/6401/6402/6403/6404/6405/6406/6407/6408/6409/6500/6501/6502/6503/6504/6505/6506/6507/6508/6509/6600/6601/6602/6603/6604/6605/6606/6607/6608/6609/6700/6701/6702/6703/6704/6705/6706/6707/6708/6709/6800/6801/6802/6803/6804/6805/6806/6807/6808/6809/6900/6901/6902/6903/6904/6905/6906/6907/6908/6909/7000/7001/7002/7003/7004/7005/7006/7007/7008/7009/7100/7101/7102/7103/7104/7105/7106/7107/7108/7109/7200/7201/7202/7203/7204/7205/7206/7207/7208/7209/7300/7301/7302/7303/7304/7305/7306/7307/7308/7309/7400/7401/7402/7403/7404/7405/7406/7407/7408/7409/7500/7501/7502/7503/7504/7505/7506/7507/7508/7509/7600/7601/7602/7603/7604/7605/7606/7607/7608/7609/7700/7701/7702/7703/7704/7705/7706/7707/7708/7709/7800/7801/7802/7803/7804/7805/7806/7807/7808/7809/7900/7901/7902/7903/7904/7905/7906/7907/7908/7909/8000/8001/8002/8003/8004/8005/8006/8007/8008/8009/8100/8101/8102/8103/8104/8105/8106/8107/8108/8109/8200/8201/8202/8203/8204/8205/8206/8207/8208/8209/8300/8301/8302/8303/8304/8305/8306/8307/8308/8309/8400/8401/8402/8403/8404/8405/8406/8407/8408/8409/8500/8501/8502/8503/8504/8505/8506/8507/8508/8509/8600/8601/8602/8603/8604/8605/8606/8607/8608/8609/8700/8701/8702/8703/8704/8705/8706/8707/8708/8709/8800/8801/8802/8803/8804/8805/8806/8807/8808/8809/8900/8901/8902/8903/8904/8905/8906/8907/8908/8909/9000/9001/9002/9003/9004/9005/9006/9007/9008/9100/9101/9102/9103/9104/9105/9106/9107/9108/9109/9200/9201/9202/9203/9204/9205/9206/9207/9208/9209/9300/9301/9302/9303/9304/9305/9306/9307/9308/9309/9400/9401/9402/9403/9404/9405/9406/9407/9408/9409/9500/9501/9502/9503/9504/9505/9506/9507/9508/9509/9600/9601/9602/9603/9604/9605/9606/9607/9608/9609/9700/9701/9702/9703/9704/9705/9706/9707/9708/9709/9800/9801/9802/9803/9804/9805/9806/9807/9808/9809/9900/9901/9902/9903/9904/9905/9906/9907/9908/9909/9910/9911/9912/9913/9914/9915/9916/9917/9918/9919/9920/9921/9922/9923/9924/9925/9926/9927/9928/9929/9930/9931/9932/9933/9934/9935/9936/9937/9938/9939/9940/9941/9942/9943/9944/9945/9946/9947/9948/9949/9950/9951/9952/9953/9954/9955/9956/9957/9958/9959/9960/9961/9962/9963/9964/9965/9966/9967/9968/9969/9970/9971/9972/9973/9974/9975/9976/9977/9978/9979/9980/9981/9982/9983/9984/9985/9986/9987/9988/9989/9990/9991/9992 |
1
| suːnɪnər | sɪŋnɪnər | sɪnɪnɪnɪnɪr | sɪnɪnɪnɪr | sɪnɪnɪr | sɪnɪnɪr |
| suːnɪnər | 50Hz | 50Hz | 50Hz | 50Hz | 50Hz |
| suːnɪnər | sɪŋnɪnər | aɪnɪnɪnɪr | sɪnɪnɪnɪr | sɪnɪnɪr | sɪnɪnɪr |
| suːnɪnər | 50Hz | 60Hz | 60Hz | 50Hz | 60Hz |
wnn: nnnnnnnnnnnnne 1uunnnnnnnnnnnnnnnnnnnnnnnnnnnnnnnnnnnnnnnnnnnnnnnnnnnnnnnnnnnnnnnnnnnnnnnnnnnnnnnnnnnnnnnnnnnnnnn
zunauu
nauvuyuoy
nanaananaananaananaananaananaananaananaananaananaananaananaananaananaananaananaananaananaananaananaananaananaananaananaananaananaananaananaananaananaananaananaananaananaananaananaananaananaananaananaananaananaananaananaananaananaananaananaananaananaanana anana an ana an ana an ana an ana an ana an ana an ana an ana an ana an ana an ana an ana an ana an ana an ana an ana an ana an ana an ana an ana an ana an ana an ana an ana an ana an ana an ana an ana an ana an ana an ana an ana an ana an ana an ana an ana an ana an ana an ana an ana an ana an ana an ana an ana an ana an ana an ana an ana an ana an ana an
Folders

Desktop

My Documents

My Computer

31/2 Floppy (A:

WIN2000C:

Local Disk (D:)

Local Disk (E:)

V23(F)

Removable Disk (G):

DCIM

100MEDIA 一MUSIC MP3

Control Panel

My Network Places

| xinian | madical | ||
| 3M | 5M | 12M | |
| SD/MMC mrate (512MB) | 640 | 426 | 176 |
| SD/MMC mrate (1GB) | 1250 | 833 | 344 |
| SD/MMC mrate (2GB) | 2500 | 1666 | 688 |
w:
aannnnaananaananaananaananaananaananaananaananaananaananaananaananaananaananaananaananaananaananaananaananaananaananaananaananaananaananaananaananaananaananaananaananaananaananaananaananaananaananaananaananaananaananaananaananaananaananaananaananaananaananaanara
nannnn
Windows XP Service Pack 2 v3 Vista
nunuunnuuunnuu 512MB, unuuuunnuu 1GB
Nvidia Geforece 7600 / ATI X1600 uauaunu uauu Ram 256MB
tuuaauau Pentium 4 uauu uauu 2.8 GHz uauuau
aunuunuunuunuunuauu HDCP
ucd CD-ROM: 4X uuuu
duu: uuu USB
:
jaiil 1ai jy, gai jgai j gai lalai
plisnljdiiee 1yollll
1 1
gall yolps gale bial ciie ayiey gill yol s
gall 100000000000000000000000000000000000000000000
- 2.
y
10
-
-
-
-
-
-
-
-
-
-
-
-
-
-
-
-
-
-
-
-
-
-
-
-
-
-
-
-
-
-
-
-
-
- 9
-
-
-
-
-
-
-
-
-
-
-
-
-
-
-
-
-
-
-
-
-
-
-
-
-
-
-
-
-
-
-
-
gssy 1, yalsl jay pai y jay jay jay jay jay jay jay jay
.
(s) SD/SDHC/MMC

A. 24 × 12 B. 24 × 18 C. 24 × 16 D. 24 × 12
Aaiill ayi jll Jai gai yjil olal jai ai ball Jai
Aiaaaai sslil all Uusgl jaxy SD aalay plasuii ic -1
Aaill 10 jai jai SD aaiy

y

a 1
#

yill 1 ydsL ydiy
- joll maill ayil aggl l jj jisnil
yill uill/OK jil bc bil
aaiy iay aegi yie aiaall Jda 0


S AOB = S COD + S_ BOC


a

B
Aajsslll lalgall jusssll gals gds sasgall aalllg 1g jssll jssll gaiill
a

j j j j j j j j j j j j j j j j j j j j j j j j j j j j j j j j j j j j j j j j j j j j j j j j j j j j j j j j j j j j j j j j j j j j j j j j j j j j j j j j j j j
a. jbjjus

| الإستعمال | الإستعمال |
| الإستعمال بعس ↕ ↕ ↕ ↕ ↕ ↕ ↕ ↕ ↕ ↕ ↕ ↕ ↕ ↕ ↕ ↕ ↕ ↕ ↕ ↕ ↕ ↕ ↕ ↕ ↕ ↕ ↕ ↕ ↕ ↕ ↕ ↕ ↕ ↕ ↕ ↕ ↕ ↕ ↕ ↕ ↕ ↕ ↕ ↕ ↕ ↕ ↕ ↕ ↕ ↕ Ↄ ↕ ↕ ↕ ↕ ↕ ↕ ↕ ↕ ↕ ↕ ↕ ↕ ↕ ↕ ↕ ↕ ↕ ↕ ↕ ↕ ↕ ↕ ↕ ↕ ↕ ↕ ↕ ↕ ↕ ↕ ↕ ↕ ↕ ↕ ↕ ↕ ↕ ↕ ↕ ↕ ↕ ↕ ↕ ↕ ↕ ↕ ↕ ↕ ↕ ↜ ↕ ↕ ↕ ↕ ↕ ↕ ↕ ↕ ↕ ↕ ↕ ↕ ↕ ↕ ↕ ↕ ↕ ↕ ↕ ↕ ↕ ↕ ↕ ↕ ↕ ↕ ↕ ↕ ↕ ↕ ↕ ↕ ↕ ↕ ↕ ↕ ↕ ↕ ↕ ↕ ↕ ↕ ↕ ↕ ↕ ↕ ↕ ↕ ↕ ↗ ↕ ↕ ↕ ↕ ↕ ↕ ↕ ↕ ↕ ↕ ↕ ↕ ↕ ↕ ↕ ↕ ↕ ↕ ↕ ↕ ↕ ↕ ↕ ↕ ↕ ↕ ↕ ↕ ↕ ↕ ↕ ↕ ↕ ↕ ↕ ↕ ↕ ↕ ↕ ↕ ↕ ↕ ↕ ↕ ↕ ↕ ↕ ↕ ↕ ↊ ↕ ↕ ↕ ↕ ↕ ↕ ↕ ↕ ↕ ↕ ↕ ↕ ↕ ↕ ↕ ↕ ↕ ↕ ↕ ↕ ↕ ↕ ↕ ↕ ↕ ↕ ↕ ↕ ↕ ↕ ↕ ↕ ↕ ↕ ↕ ↕ ↕ ↕ ↕ ↕ ↕ ↕ ↕ ↕ ↕ ↕ ↕ ↕ ↕ ↖ ↕ ↕ ↕ ↕ ↕ ↕ ↕ ↕ ↕ ↕ ↕ ↕ ↕ ↕ ↕ ↕ ↕ ↕ ↕ ↕ ↕ ↕ ↕ ↕ ↕ ↕ ↕ ↕ ↕ ↕ ↕ ↕ ↕ ↕ ↕ ↕ ↕ ↕ ↕ ↕ ↕ ↕ ↕ ↕ ↕ ↕ ↕ ↕ ↕ ↔ ↕ ↕ ↕ ↕ ↕ ↕ ↕ ↕ ↕ ↕ ↕ ↕ ↕ ↕ ↕ ↕ ↕ ↕ ↕ ↕ ↕ ↕ ↕ ↕ ↕ ↕ ↕ ↕ ↕ ↕ ↕ ↕ ↕ ↕ ↕ ↕ ↕ ↕ ↕ ↕ ↕ ↕ ↕ ↕ ↕ ↕ ↕ ↕ ↕ ↈ ↕ ↕ ↕ ↕ ↕ ↕ ↕ ↕ ↕ ↕ ↕ ↕ ↕ ↕ ↕ ↕ ↕ ↕ ↕ ↕ ↕ ↕ ↕ ↕ ↕ ↕ ↕ ↕ ↕ ↕ ↕ ↕ ↕ ↕ ↕ ↕ ↕ ↕ ↕ ↕ ↕ ↕ ↕ ↕ ↕ ↕ ↕ ↕ ↕ ↆ ↕ ↕ ↕ ↕ ↕ ↕ ↕ ↕ ↕ ↕ ↕ ↕ ↕ ↕ ↕ ↕ ↕ ↕ ↕ ↕ ↕ ↕ ↕ ↕ ↕ ↕ ↕ ↕ ↕ ↕ ↕ ↕ ↕ ↕ ↕ ↕ ↕ ↕ ↕ ↕ ↕ ↕ ↕ ↕ ↕ ↕ ↕ ↕ ↕ ↝ ↕ ↕ ↕ ↕ ↕ ↕ ↕ ↕ ↕ ↕ ↕ ↕ ↕ ↕ ↕ ↕ ↕ ↕ ↕ ↕ ↕ ↕ ↕ ↕ ↕ ↕ ↕ ↕ ↕ ↕ ↕ ↕ ↕ ↕ ↕ ↕ ↕ ↕ ↕ ↕ ↕ ↕ ↕ ↕ ↕ ↕ ↕ ↕ ↕ ↄ ↕ ↕ ↕ ↕ ↕ ↕ ↕ ↕ ↕ ↕ ↕ ↕ ↕ ↕ ↕ ↕ ↕ ↕ ↕ ↕ ↕ ↕ ↕ ↕ ↕ ↕ ↕ ↕ ↕ ↕ ↕ ↕ ↕ ↕ ↕ ↕ ↕ ↕ ↕ ↕ ↕ ↕ ↕ ↕ ↕ ↕ ↕ ↕ ↕ ↮ ↕ ↕ ↕ ↕ ↕ ↕ ↕ ↕ ↕ ↕ ↕ ↕ ↕ ↕ ↕ ↕ ↕ ↕ ↕ ↕ ↕ ↕ ↕ ↕ ↕ ↕ ↕ ↕ ↕ ↕ ↕ ↕ ↕ ↕ ↕ ↕ ↕ ↕ ↕ ↕ ↕ ↕ ↕ ↕ ↕ ↕ ↕ ↕ ↕ ↇ ↕ ↕ ↕ ↕ ↕ ↕ ↕ ↕ ↕ ↕ ↕ ↕ ↕ ↕ ↕ ↕ ↕ ↕ ↕ ↕ ↕ ↕ ↕ ↕ ↕ ↕ ↕ ↕ ↕ ↕ ↕ ↕ ↕ ↕ ↕ ↕ ↕ ↕ ↕ ↕ ↕ ↕ ↕ ↕ ↕ ↕ ↕ ↕ ↕ � |
aaiia aaiiayaaaiyaaaiyaaaiyaaaiyaaaiyaaaiyaaaiyaaaiyaaaiyaaaiyaaaiyaaaiyaaaiyaaaiyaaaiyaaaiyaaaiyaaaiyaaaiyaaaiyaaaiyaaaiyaaaiyaaaiyaaaiyaaaiyaaaiyaaaiyaaaiyaaaiyaaaiyaaaiyaaaiyaaaiy
C
ba()jialy
4.2018全国卷 26
jll jjjie bai
aill 1
Ji jj j j j j
aislw o jgablaill

aajal gaoai jaiie aaygai gaiyaii iia yaiyaiiaie ayaiyai
gagglgejg jggs
aallll llll llll llll llll llll llll llll llll llll
alldal, dlaedai co kis jia jy jali jie aayll gall
baa cyaalaae *** baas yaaalaae **.
(1) baiall gao aiell yalic
aal gai jai i aai
alal alall alal alal alal alal alal alal alal alal alal alal alal alal alal alal alal alal
aiaaa
()
jusssu 1s

- S( 1,34 )
JUSSUBUSBJ
gall USB gaiy jglal USB 1s
iiilll jlll jil jilil 1a a jil jil
USB
.USB JJ
g (Disk)
Lalalalalalalalalalalalalalalalalalalalalalalalalalalalal
:USB
aegyalljglall jglaaiai
aJl Jd jll jll jll jll jll jll jll jll jll jll jll jll jll jll jll jll jll jll jll
C
1 1
1 1 1 1 1 1 1 1 1 1 1 1 1 1 1 1 1
sS1yS1yS1yS1y
Jus 1s sssssssssssssssssssssssssss
- yIaII 1000
auiiie g aaii iiaaiin 1 1 1 1 1 1 1 1 1 1 1 1 1 1 1
S ACD = S COD + S DCE = S ADB +
(1)
Aa labl( r^2B^2C^2)
OK jjie biai [jjiyS1]
.PC camera)
Aallll lalall gall aalg alall gall gall gall