ROADSTER 3 - Stroller HAUCK - Free user manual and instructions
Find the device manual for free ROADSTER 3 HAUCK in PDF.
User questions about ROADSTER 3 HAUCK
0 question about this device. Answer the ones you know or ask your own.
Ask a new question about this device
Download the instructions for your Stroller in PDF format for free! Find your manual ROADSTER 3 - HAUCK and take your electronic device back in hand. On this page are published all the documents necessary for the use of your device. ROADSTER 3 by HAUCK.
USER MANUAL ROADSTER 3 HAUCK
PYKOBOICTBO IPO PIMHEHIO
INSTRUKCAOBSLUGI

Read these instructions carefully before use and keep them safe. If you do not follow these instructions, your child's safety can be impaired.
-
This stroller is meant for 1 child from 0 months upwards, weighting up to 15kg . The maximum load on this stroller may not exceed 15kg .
-
WARNING: Do not leave your child unattended.
-
WARNING: Keep all plastic packaging materials out of the reach of children, in order to avoid any risk of suffocation.
-
WARNING: Before use, make sure that all catches are secured.
-
WARNING: Use a safety belt as soon as your child can sit up unaided.
-
WARNING: Always use the crotch belt in combination with the lap belt.
-
WARNING: Any loads attached to the slider restrict the stroller's stability.
-
WARNING: Always use the parking brake when parking the stroller.
-
WARNING: Remember that small parts can be swallowed by your child and can cause choking.
-
WARNING: Overloading, incorrect folding and use of non-approved accessories may damage or break this stroller.
-
WARNING: It may be unsafe to use accessories, e.g. child seats, bag hooks, rain covers etc., unless those approved by the manufacturer or distributor.
-
WARNING: It may be unsafe to use replacement parts other than those supplied or approved by the manufacturer or distributor.
13.WARNING: Do not lay any additional mattresses on the stroller.
-
Please use only original hauck accessories and original hauck spare parts.
-
Avoid extreme usage situations that restrict your control over the child and the stroller.
-
Warning: This product is not suitable for jogging or skating.
-
Do not ride on any escalators or stairs, and be careful using in the elevator while your child is in the stroller.
18.Only use the space allowed for loading and do not exceed the maximum permitted weight of 15kg
-
This stroller is only designed for transporting 1 child in 1 time.
-
Please make sure that the child's hands are nowhere new the folding area, so as not to risk them from being crashed if you have to fold up, unfold, or otherwise change the stroller or parts of it.
-
The maximum loading weight of the basket is 3kg .
THIS STROLLER COMPLIES WITH STANDARD DIN EN 1888:2003-06.
INSTRUCTIONS FOR USE
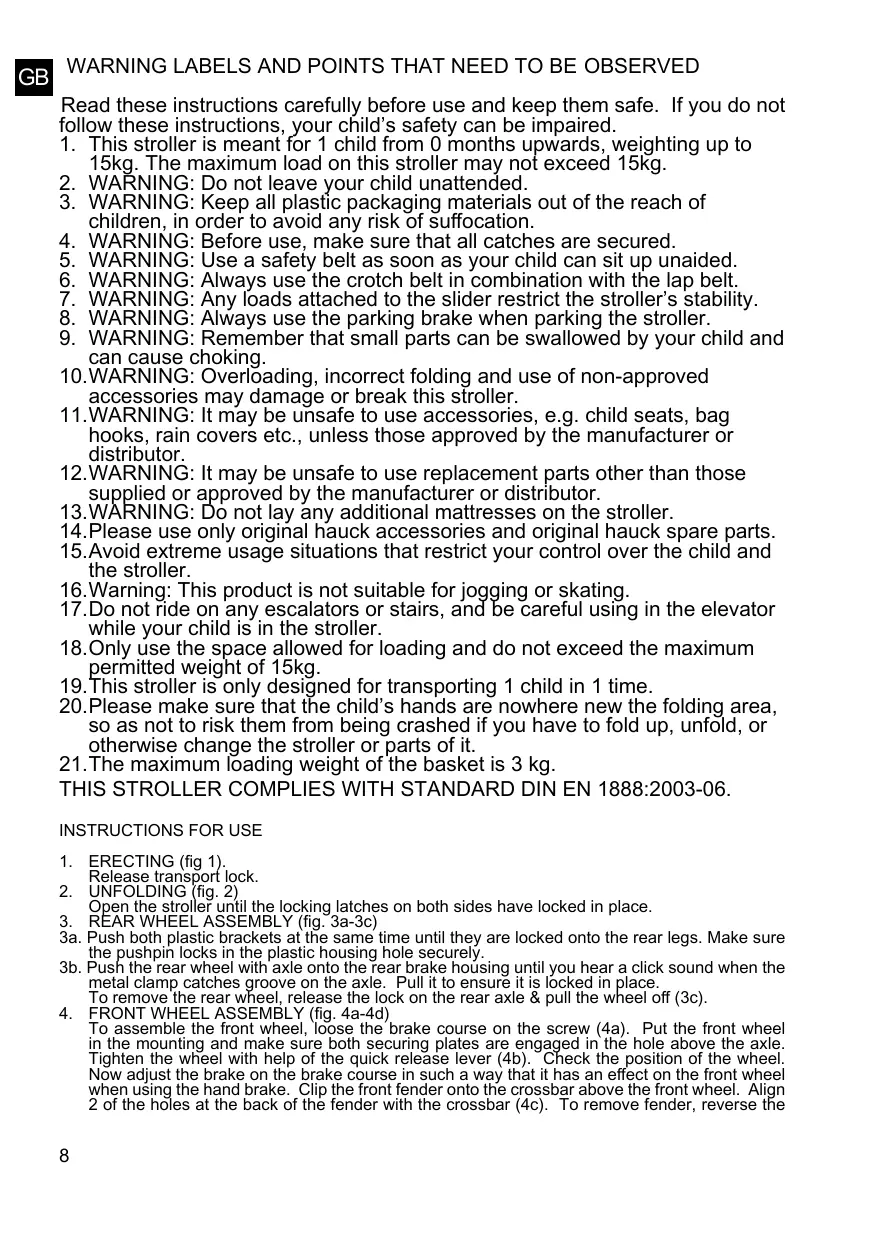
- ERECTING (fig 1).
Release transport lock.
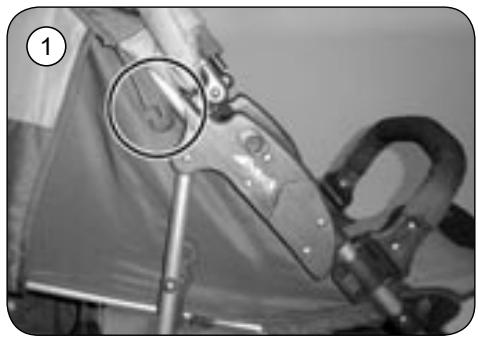
- UNFOLDING (fig. 2)
Open the stroller until the locking latches on both sides have locked in place.
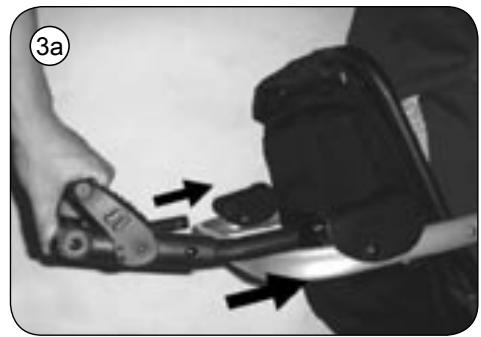
- REAR WHEEL ASSEMBLY (fig. 3a-3c)
3a. Push both plastic brackets at the same time until they are locked onto the rear legs. Make sure the pushpin locks in the plastic housing hole securely.
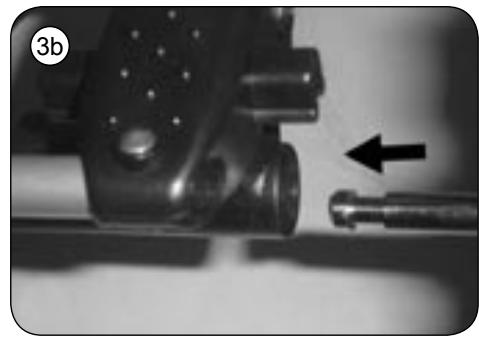
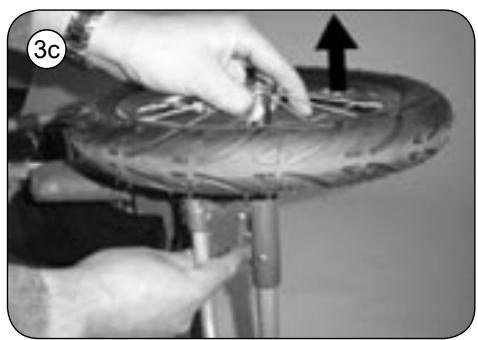
3b. Push the rear wheel with axle onto the rear brake housing until you hear a click sound when the metal clamp catches groove on the axle. Pull it to ensure it is locked in place. To remove the rear wheel, release the lock on the rear axle & pull the wheel off (3c).
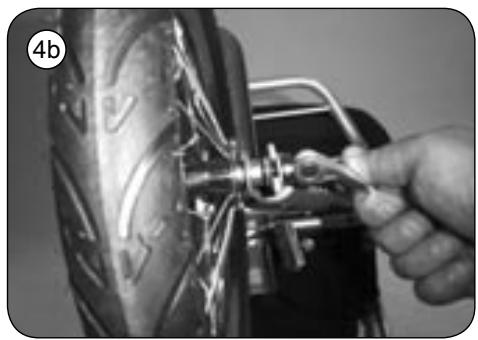
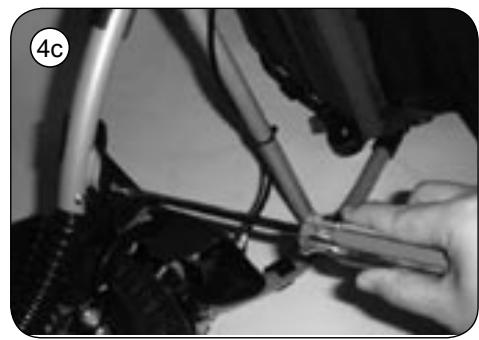
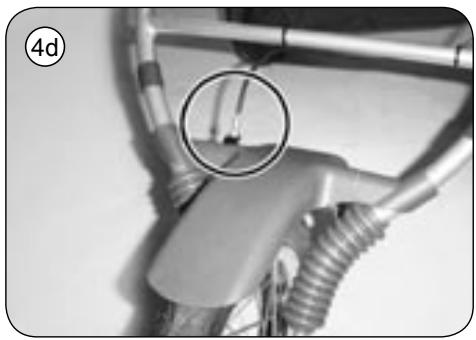
- FRONT WHEEL ASSEMBLY (fig. 4a-4d)
To assemble the front wheel, loose the brake course on the screw (4a). Put the front wheel in the mounting and make sure both securing plates are engaged in the hole above the axle. Tighten the wheel with help of the quick release lever (4b). Check the position of the wheel. Now adjust the brake on the brake course in such a way that it has an effect on the front wheel when using the hand brake. Clip the front fender onto the crossbar above the front wheel. Align 2 of the holes at the back of the fender with the crossbar (4c). To remove fender, reverse the
process. On the upper screw of the brake course, you can adjust the brake again (4d).
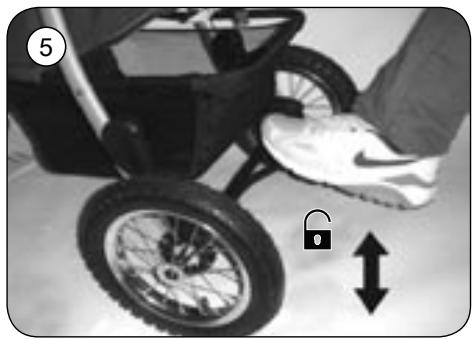
- BRAKE (fig. 5)
Press the rear brake down by foot to stop the rear wheels and push the stroller to check.
Attention: Always apply both brakes when parking the stroller.
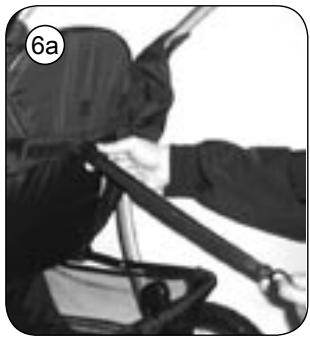
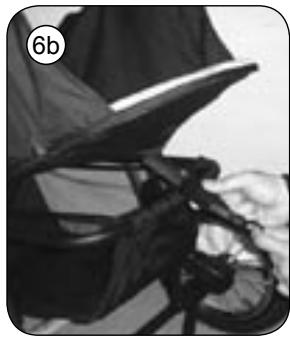
- ADJUSTING THE BACK REST (fig. 6a-6b)
The back rest is adjusted via the pull belt with clasp which is located at the rear part of the seat upholstery. This enables the inclination of the back rest to be individually adjusted. Pull the belt while holding the clasp to set the seat in sitting position. Press the button on the clasp and pull the clasp down to release the seat to lying position.
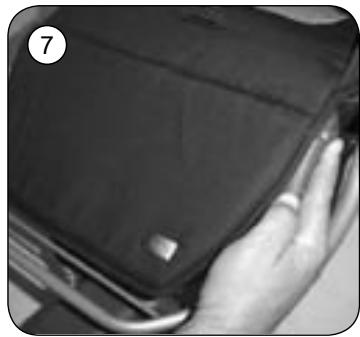
- ADJUSTING THE LEG REST (fig. 7)
Press both (left & right) buttons to bring the leg rest to the desired position.
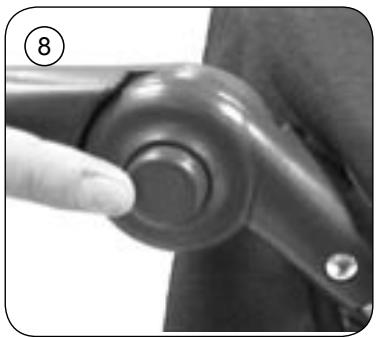
- ADJUSTING THE HANDLES (fig. 8)
Press both (left & right) buttons on the handle and bring the handle height to the desired position.
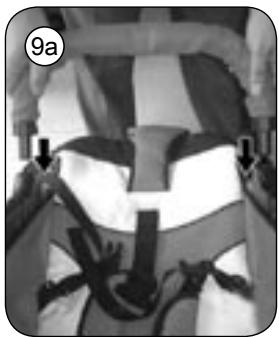
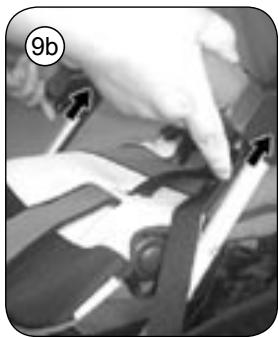
- INSTALL THE FRONT BAR (fig. 9a, 9b)
Install the front bar just below the locking latches by pushing in the front bar into the housings (9a). You will hear a click sound when they are secured onto the frame. Test the front bar by pulling on it to make sure it is locked into place. To release the front bar, push the buttons underneath and pull out the front bar (9b).
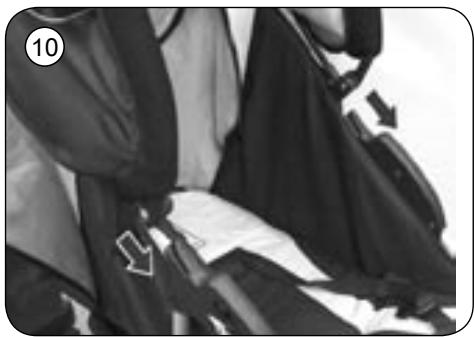
- ASSEMBLE THE CANOPY (fig. 10)
Slide the canopy plastic housings on the catches above the locking latch on each side.
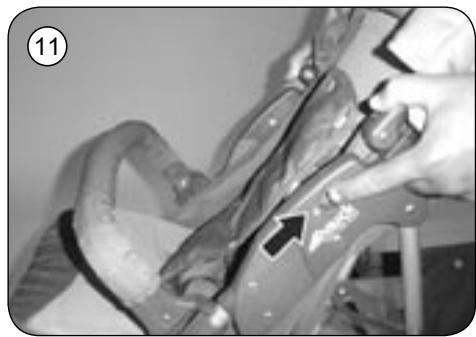
- FOLDING AWAY (fig. 11):
Make sure the backrest is always in a recline position. Fold the canopy backward. Pull the release levers on the right and left up at the same time. Press the handle down and fold the stroller together. Close the transport lock on the side of the frame.
- CHECKING THE PRESSURE OF AIR WHEEL
You can pump up the pneumatic tires with the tire pump provided. The tire pressure must not exceed 2.0 bar (28PSI).
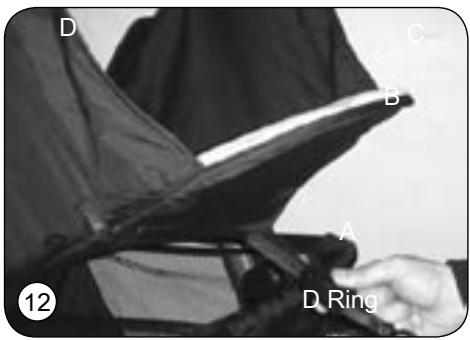
- SECURE THE CHILD IN THE SEAT (fig. 12):
Place the child in the seat and push the clips on the waist belt into the buckle on the crotch belt (the one that comes between the child's legs). Adjust the length of the belt to your child's needs. Always ensure the straps are not twisted or caught on the stroller frame. Check the adjustment every time you place the child in the seat and when the backrest is reclined. To release the harness, squeeze & open the buckle.
Harness adjustment: Insert both fasteners (B) into the buckle (A), ensure that both buttons click into position. Ensure both shoulder straps (C) are attached to the fasteners (B). Each strap has its own length adjuster (D). To undo the harness, press the buttons and pull apart. "D" Rings are provided for fitment of a full safety harness. The attachment points (D-rings) are located on side straps.
WARNING: (A child's safety is your responsibility.) The child should be harnessed in at all times and should never be left unattended. The child should be clear of moving parts while making adjustments. This stroller requires regular maintenance by the user.
Attention: Avoid serious injury from failing and sliding out, always use seat belt & always use as instructed. Never use the harness without the shoulder straps.
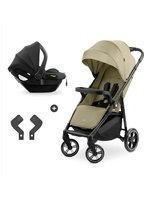
OPTION FEATURES - SHOP N DRIVE TRAVEL SYSTEM:
This stroller is able to adapt our Hauck Zero Plus® Infant Carseat as a Travel System. To adapt the carseat, please follow the following steps:
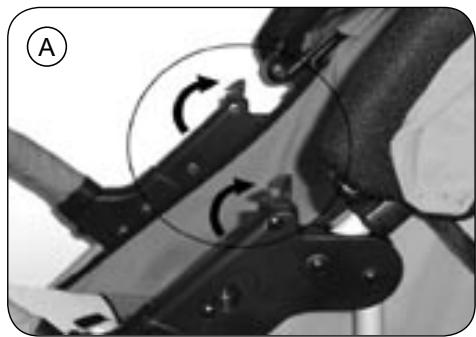
A. There is an adaptor clip on the each side of the stroller's folding plastic, pull both of them up. (figure A).
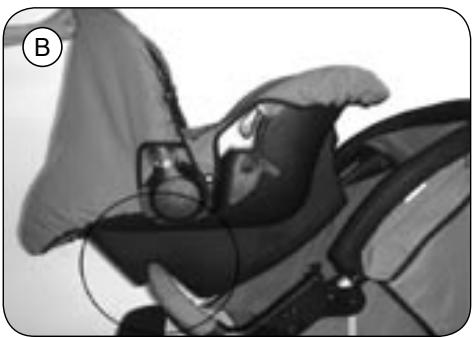
B. Release the stroller seat to the lowest recline position. Place the Zero Plus® Infant Carseat on top of the stroller's front bar. (figure B).
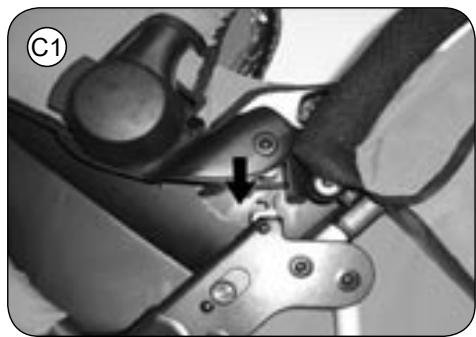
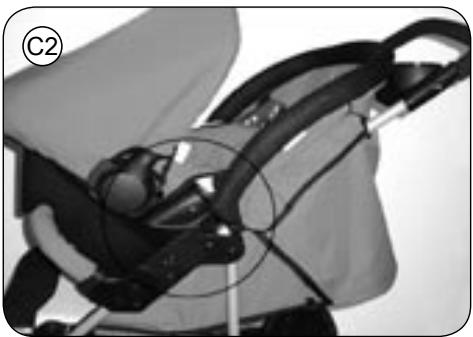
C. Push the Zero Plus® Infant Carseat down until you hear the clip sound on both left & right sides (figure C1, C2). Lift up carefully the carseat to check if the carseat is securely locked in place.
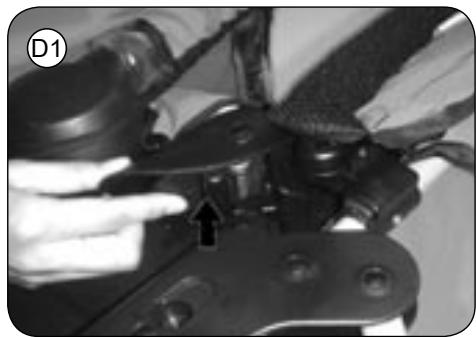
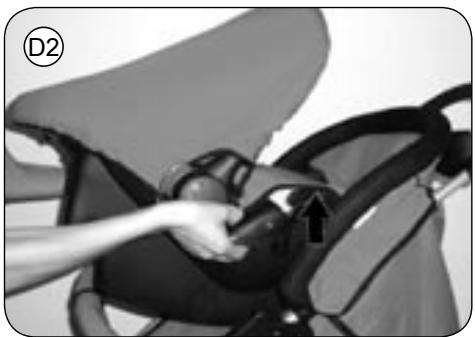
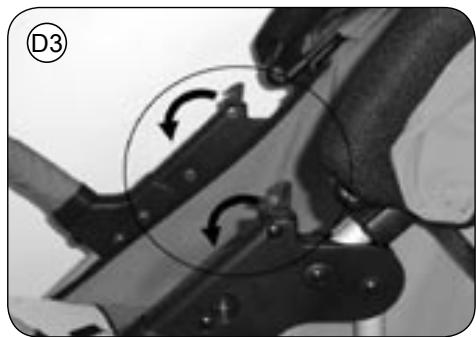
D. To release the carseat, push up the left & right levers, which are located underneath the carseat, and the adaptors can be released. (figure D1). Then lift up the carseat carefully (figure D2), and close the adaptors back to the original housing (figure D3).
IN GENERAL
Please check the stroller functions on a regular basis. Make sure that the frame is stable, the screws are tight, the latching devices are safely locked, the wheels are securely attached and the brakes are in working order. Check the cover occasionally, making sure that the stitching is still firm, and inspect the quality of the plastic parts. Any broken or worn working parts should be replaced immediately. Proceed in the same manner with components that are broken, torn, defect or worn-out. Please use only original hauck replacement parts. Do not subject your stroller to excessive sunshine. This can lead to a fading of textile covers and plastic parts.
CLEANING THE COVERS
Remove the covers from the frame by loosening the loops, press studs or screws. Please read the instructions on the sewn-in label before cleaning.
To clean the cover gently, wipe it down evenly using only a damp cloth. As long as there are no plastic, wood or metal parts on or in the cover, it can be machine-washed at 86^ (30^) and medium speed. The cover should be air-dried, but not exposed to excessive sunshine. Please do not dry the cover in the drier, to avoid shrinking. Do not re-fit the covers until they are completely dried.
CLEANING THE FRAME
Dry the stroller with a soft cloth after cleaning or after use rain or snow. Use only mild soapy water or lukewarm water to clean the frame of your stroller. Plastic parts can be cleaned with mild detergent cleaners.
WHEEL MAINTENANCE
Clean and service the wheels regularly. Apply corrosion or lubricant spray on the rim when necessary, to protect against rust and deposits. Please make sure in winter that road salt residue is removed immediately by using warm water and damp cloth. Remove dirt from the wheels and axles on a regular basis.
- SBLOCCAGGIO (ill. 1)
Bb MoKTe HauKaTb 1uHInC NMOUbI pNnIraAemOro Bo3duHoro HacOca. DabJIeHne BO3duXaB WINHX He DoJNtHO npeBbIaTaB 2.06ap.
- ПИСТЕГИBAHNE PEBEHLKA'В CINDEHIN (Puc. 12):
Iocadnte pe6eHka B cndeHne KOJACKn, HANOKeTHe Ha Hero npeueBoN u HabedpeHHb pemHN, a NOTOM 3acteHTNE pemeHHo 3aMOK HOXHOrO pemeHHa (peMeHB, kOTOpBle npoxoDNT MEX hor pe6eHka). PodroHnTe dnnHy KAKdoTO pemeHH B COOTBETCTBm C pa3Mepom Bawero pe6eHka. Bcerda cneDHTte 3a TEM, qTObbl JeHb pemeHHe N beBIL nepeKpyUHe b UTObbl OHn He 3aueHNbc 3a Chactn KOJACKn. KaJdb pa3, KogDa Bb CAkaeTe pe6eHka B KOJIACKy, npOBepraIte npabInbHOCTb YcTaHOBN pemeHH. TaKke N TOrDa, EcnC nCnHKA cnDEHn HaxODNTCB I JexKaueH no3uHN. YTObbl OCB0BDtB pemeHH, HXYHO HAKATB N OTKpBTb peMeHHO 3aMOK.
IpoIroHka cnCTeMbI peMHei: 3aDbHnBte oba yKpeJIeHna (B) B pemeHHoJ 3amok (A) n npObePbTe, UTO6bl o6e KHOKN 3aUeIKHyInCb ONDOBpeMeHNO - OHNIM 3BykOM. PpOBePbTe, UTO6bl o6e
JIeHTbI pIeueBOro pemHra (C) npOuHO haxoDInncb By kypenneHnix (B). KaJdAJeHTa peMnHaMeET CO6CTBeHHoe pIncNOC6BHeHne dIy INDNiDuYanbHou yctAHOBKn DIIINbI (D). IINrOCBOxKDeHn CNTcEmb pemHne HuxHo hXaTa b Ha KONKn. IINr OChAcTK n DetCKo KOnAckn pemHemE 《5nyHKTOB 6e3onachOCTn》 IMeHOTc B-KoJIbua. YkpePnIouJme qactn (D-KoJIbua) HAXOJaTc Hn Ha6eDpeHHom pemHne.
PPEyIpyEeHHe: Bc camn OTBeTCTBeHHb3a 6e3oNaChocTB BaWero pe6eHa. Pe6eHok DOnJxeh 6bItB Bcerda pnpctetHyr pemHmN HNKOrJa He DoJIxeh OCTaBaTbC8 6e3 npncMOTpa. Pe6eHok He DoJIxeh HaxOAnTbC8 B6JIn3N NOBvKhbix YacTeN DeTCKo KONAcKn, ecIn Bbl PpeDpInHnMaTe Ha KOJaCKe KaKe- nIbO n3MeHeHnA. 3Ta Detckar KONcKa DOJXh apeYnPaHO 0cbNyKBAbTcB e e NOLb3OBaTeJeM.
BHMaHHe: UTo6bI npEoTbpaTnTb HaHeceHnpe6eHky TeNeChbIX NOBpeKdHn C daJIeKO NyUIMN NocJeCTBmMn 13-3a He6peKHO O6paUeHn C DeTcKo KOnJCKo, HxHNo NocToRHN oNoDEOBOMy NpO3OBaTbCpEMHmN 6e3OpAchOCTn. HkOrda He noPb3yTeCb CNCTeMO pEmHe8e3 PneEBO pEMH.
BbIbOPOUHAR CNEUOCHACTKA -IOPOXHAR CNCTEMA C DBOHON FYHKUNEIN (JIN3AKyIOK & INI PyTEWETBNA C MAUNHOI):
3Ta DETcKRA KOJIcKs MOKET 6bITb TAK yCTaHOBHeHa, YTO DETCKOE ABTOCuDEHne FInpMbI «TayKK» Zero Pius MOKET 6bITb yCTaHOBHeHa npAm B Hee. YTObbl cYtAOHbTI DETCKOE ABTOCuDEHne Ha DETcKOB KOLrKcE, BYINONHITNE NOXAYUJcTc CnEDYUOuMe WARM:
A. OTKINHE THe HabePx 3aKePENITeIbHbIe KpOuKn, KOtOpBIE HaxOJaTcRc DByX CTOpOH NDoNOKOTHkoB (PmC.A).
B. Pa36Iokpyte cnHky CnDEHNA DETCKOJ KOJIaCKN I NOCTaBbTe eB CaMyHO HmKHOJ NoJEAyUO nO3nUIO. Tepeb noCTaBbTe DETCKOE aBTOCnDEHNE Zero Plus® Ha nepeDnY npop DETCKO KJIaCKN (Pncio B).
C. Haximamte Ha detckoe aTOBCDHe Me Zero Plus® BHN3 do Tex nop, noka Bbl He ycIbIuNTe C neBOI n npaBOI cToPOH ueK (Pnc. C1, C2). POnrTHnTE OCTOPOXHO detckoe aTOBCDHe H BBePX, YTObI pOBEpITb, YTO OHO pOPOH «CeNo» B n3bI.
D.Чтобл сгъдскoe abTOcHEne, BbldoJIkhblOcIa6nbl 3akpeHnteJbHbIe KpOchKn.HaXmTeДЯЗTO ChM3y BBePx HaJIeBn I npAbln pBluArN, KOToPbIe HaxOJaTc HmKHeN CTopoHedetCkOra ABTOcHEna (Pnc.D1).Tenepb NotraHnte HabePx DeTcKoe ABTOcHEne, OHO CHmEtCra (Pnc.D2),OnycTeTne 3akpeHnteJIbHbIe KpOchKn BnH3 n CHOba OnycTeNTe NDoIIOKOTnIKn (Pnc.D3).
YXODIOBSCJYKIBAHINE
OBLUEI NOJIOXEHNA
ToKanyIcTa npOBepRte fHyHIOHOPOBAHne DetCKoK KOJRAckn C peryIpaHbIMn PpOMeKyTKaAMn BpeMeHN. Y6eIntecB, cT0 TaCHNt HcTAcbINbHa, UpyPb KpeIKo 3akpyeHbI, 3aDBNKk NPOOHO 3akpbItbI, KOIEca HaJeKHO HacAgKeHbI n TopMO3a DeEIOOCBOHb. IpoBepRte BPEM oT BpEMHe ObVKBy Ha IpoHOCTbO BOB, OCBeHNO CNEdTe 3a KaeeCTBOM pAACTIKOBbIX qAteH. COnMAHbIe INI M3HOJEHHbI eACTn DOJIKNbI b6ItbHEMeDJIeHNO 3aMeHEbI. ToHIO TAK JEE NOCTynaiTe n CO BCEMN uactRM, KOTOpBE IMeIOT TpeUINbI, KaMeJIbIO deFeKtbl, pImHakn IN3OcA n T.D. PrimeHaeTIe DnIz 3aMeHbI NOKAIyNTa TOnbKO IN3DeJIIMn FInpMbI 厂 ~ k k (hauck). He NoDpEBraTe DETCKyO KOJCKY Bo3dEJICTBnIO CINbHOrC ONHeHORO IN3JIyEHnA, YTObSI He NOCTpaIAnO KaeeCTBO O5BKMn IN3DeJIIMn IN3PiactMaCCbl.
CHICTKA OOBIKN
CHIMITE obINBky cO tAHINbI, OTyCTNB pEMHN, OTKpyTNB Upybl IIN BByHB UTNtB. IpOHTaITe yka3aHnHa n haPmIHTOn 3TtKeTke ObINBk INpeed e YtCTKO. TIOb6 ObINBKn OJyHnla UdaHcyu Yo CTKy, IPOITaIPAE e peYrPNHO bAHXHO TKAHeOBAN CAnTeDKO. EcnH hObMBKe Hcttey nIaTACTka, DepeBa IIN MetanIIa, TO e MOxHO NOCTnPbAT B CTpAlbHO MAsInHe PnI TemTepaType 30^ BV pexime uiaJeE CTPKR-C mALbIM CNOCN OBOPOTOB BapabSAHa. ObMBky HxHcO cyuNTb Ha BOzDxye, HOpri 3tOM i3BeraiTe cnblHoro BozdeCTBnCoIHua. He cyUHite ObINBky BAmaHnDE nraCykBeIbJa, INaue OH caTeJ. YpcknnIte obINBky h CTANHUY TOLbKO TOrDa NocTe CTPKR, KOrDA OCoBPSeHNO BbICOXET.
YHCTKA CTAHHHbI
IpoTpIte DetcKIO KONsCKY HAcxO TkaHeBc CanpeTko NocLe MoKIM ININ ECIN BbI EIO NtB3oBaNcB BO BPEMdoKJnI INI ChEROnaI. IVcNOJIb3yIte pni 3OTM JINr YCCTKl CTAHINb I KOJIaRCKN TOJIbKO MArIKM MbJbHbI pactBOP ININ BOy KOMHaTHOH TEMpepatpyb.I DeTANI IN3 PIACTMaCCb MOXHO NOMbITc PnIMHeHMe MOUcero CpeCTBa.
YXOД 3A KОЛЕСAMI
Koneca Huykho peryjnpHO uHCTnB n CJIeHTb 3a nX COCTOHnEM. IJr 3aUHTbI O pKxABHHbI n DpynIX OTIOKEHN HUYKHO PnI HeoOxOIMOCNTn OBpABOTab NCKN KOIEAHTNKOP03NOHbIM cpeCTBOM m CMA3ATb COOTBTCTBYUHm CpeCTBOM. IObecnoKoITcB o TOM, YTObI O TIOKeHnCOIN, KOTOpI NOCBnAOT DOpORn, Cpazy JIe NocE INCNoB3OBAHn KONCKN B6bln CMBtI TEINoB BOOD INN ydaJeHb I BlaXHoT TprIKoI. PeryjnpHO ocbo6oxJaTe KONECA n KONEChbI OCN O TprzN.
E-mail : info@hauck.de
Internet: http://www.hauck.de