
P-320W - Wireless Router ZYXEL - Free user manual and instructions
Find the device manual for free P-320W ZYXEL in PDF.
| Product type | Wireless router |
| Brand | ZYXEL |
| Model | P-320W |
| LAN Interfaces | 4 ports 10/100 Mbps |
| WAN Interface | 1 port 10/100 Mbps |
| Wireless Standard | 802.11b/g up to 54 Mbps |
| Frequency Band | 2.4 GHz |
| Wireless Security | WEP 64/128 bits, WPA-PSK |
| Features | OTIST (One-Touch Intelligent Security Technology) |
| WAN Protocols | Ethernet, PPPoE, PPTP |
| Configuration | Via web browser (web interface) |
| Default IP address | 192.168.1.1 |
| Default password | 1234 |
| Power supply | Power adapter (9-12V) |
| Dimensions (L x W x H) | 180 x 130 x 30 mm (estimated) |
| Weight | 300 g (estimated) |
| Operating temperature | 0°C to 40°C |
| Operating humidity | 10% to 90% (non-condensing) |
| Maintenance | Clean with a soft, dry cloth |
| Repairability | Use the Reset button to reset to factory settings |
| Spare parts | Contact ZYXEL support |
Frequently Asked Questions - P-320W ZYXEL
User questions about P-320W ZYXEL
0 question about this device. Answer the ones you know or ask your own.
Ask a new question about this device
Download the instructions for your Wireless Router in PDF format for free! Find your manual P-320W - ZYXEL and take your electronic device back in hand. On this page are published all the documents necessary for the use of your device. P-320W by ZYXEL.
USER MANUAL P-320W ZYXEL
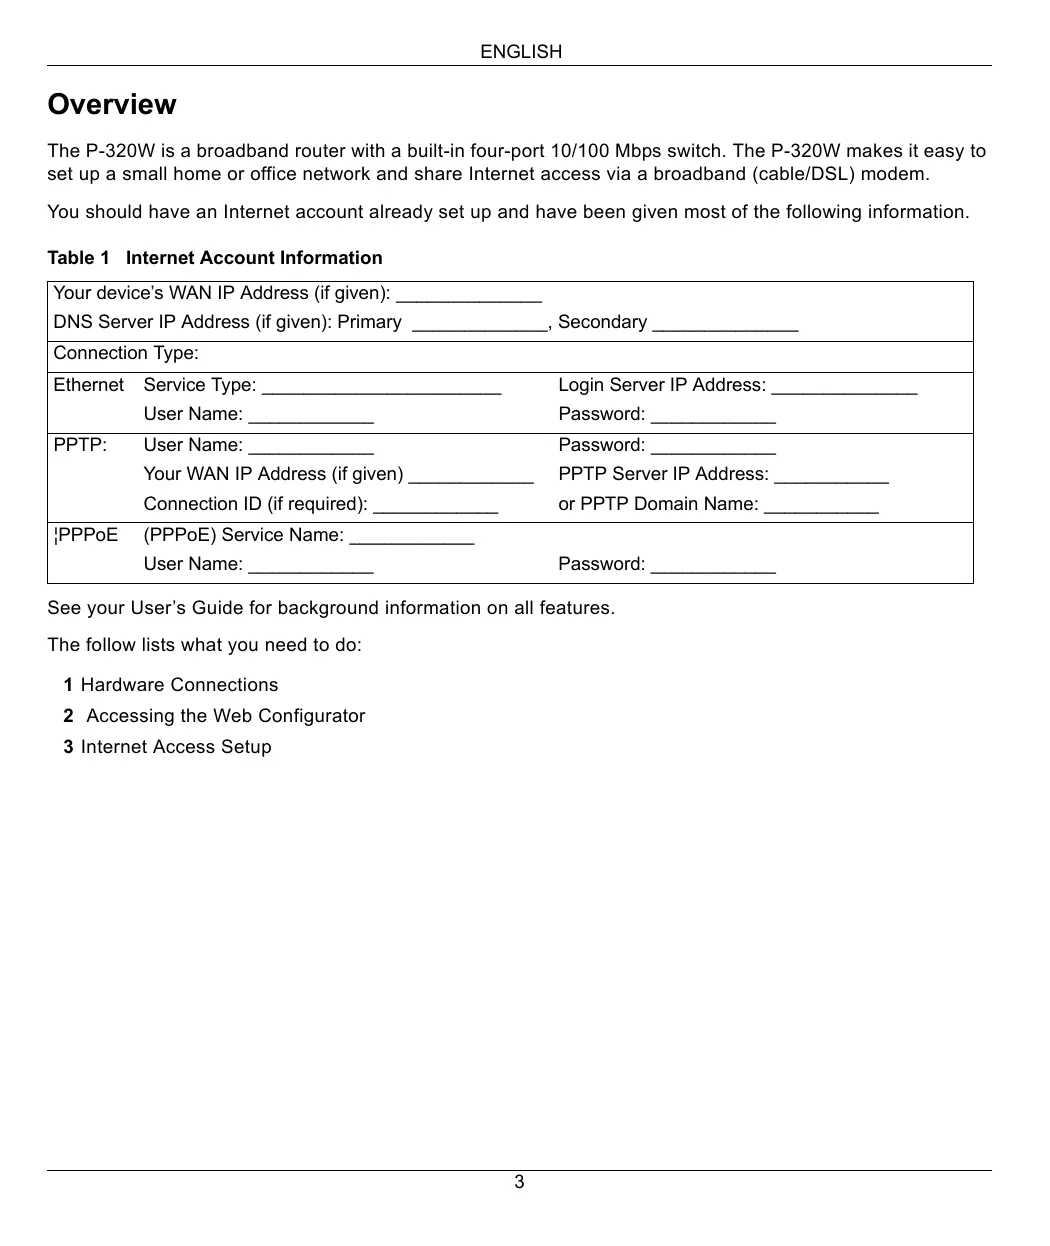
The P-320W is a broadband router with a built-in four-port 10/100 Mbps switch. The P-320W makes it easy to set up a small home or office network and share Internet access via a broadband (cable/DSL) modem.
You should have an Internet account already set up and have been given most of the following information.
Table 1 Internet Account Information
| Your device's WAN IP Address (if given): DNS Server IP Address (if given): Primary _, Secondary | ||
| Connection Type: | ||
| Ethernet | Service Type: | Login Server IP Address: |
| User Name: | Password: | |
| PPTP: | User Name: | Password: |
| Your WAN IP Address (if given) | PPTP Server IP Address: | |
| Connection ID (if required): | or PPTP Domain Name: | |
| !PPPoE | (PPPoE) Service Name: | |
| User Name: | Password: | |
See your User's Guide for background information on all features.
The follow lists what you need to do:
1 Hardware Connections
2 Accessing the Web Configurator
3 Internet Access Setup
1 Hardware Connections
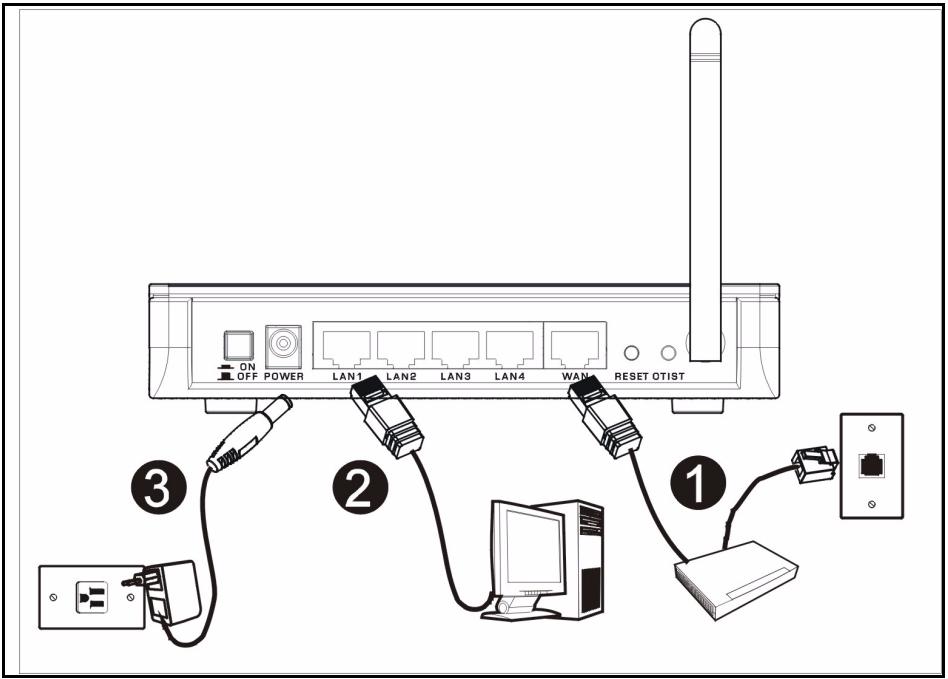
Do the following to make hardware connections for initial setup.
1 WAN Connection
Connect your modem to the "WAN" port using the cable that came with your modem.
2 LAN Connection
Connect your computer to a "LAN" port using the included Ethernet cable
3 POWER Connection
Use the included power adaptor to connect the POWER socket to an appropriate power source (see the User's Guide for power adaptor specifications by region)
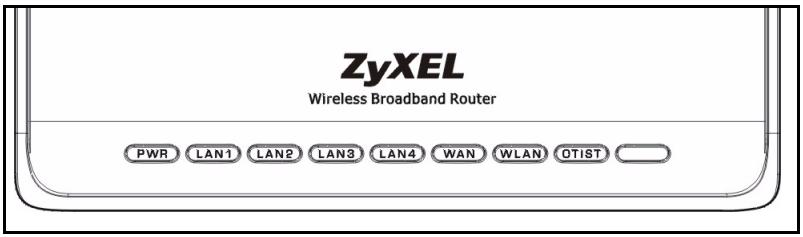
The LEDs
After you've made the connections, push in the power button to turn on the Mer produkthjalp finns pa http:// www.support.zyxel.se.
Look at the front panel LEDs. When you connect the power, the PWR and WLAN LEDs come on.
The LAN and WAN LEDs turn on if the corresponding connections are properly made.
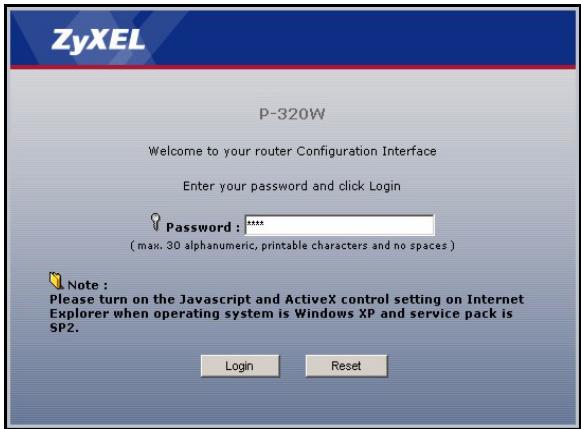
2 Accessing the Web Configurator
1 Launch your web browser. Enter "192.168.1.1" as the web site address.

Note: If you do not see the next screen, then please go to section 4.1.
2 The Password window displays. Enter the password ("1234" is the default) and click Login.
3 Change the password in the screen that follows and click Apply.
4 Choose your language from the drop-down list box. Click Apply.
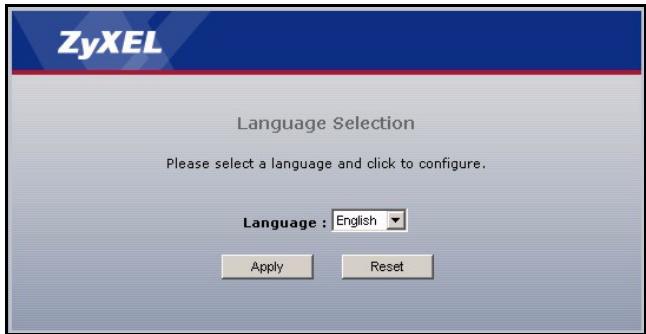
Note: The Next button is located on the bottom right of each screen.
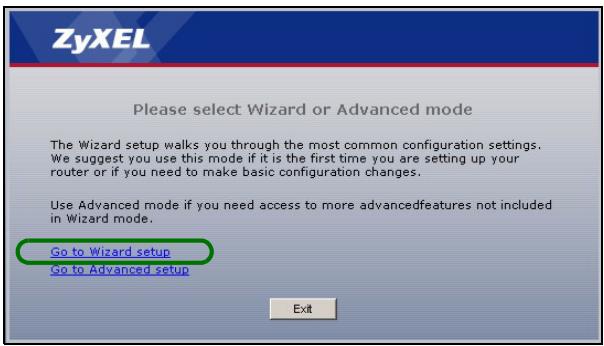
5 Click Go to Wizard setup to set up your P-320W for the first time..
6 Choose your language from the drop-down list box. Click Next to proceed with the Connection Wizard.
Welcome to the ZyXEL Connection Wizard
The connection wizard will walk you through the most common configuration options. This wizard has been broken down into three steps, each of which may have multiple pages.
This wizard will take you through the following steps:
Step 1: System Information Setup.
Step 2: Wireless LAN Setup
Step 3: Internet Configuration Setup
3 Internet Access Setup
Note: Enter the Internet access information exactly as given to you by your ISP in each wizard screen and then click Next to continue or click Back to return to the previous screen.
Current screen information will be lost if you click Back.
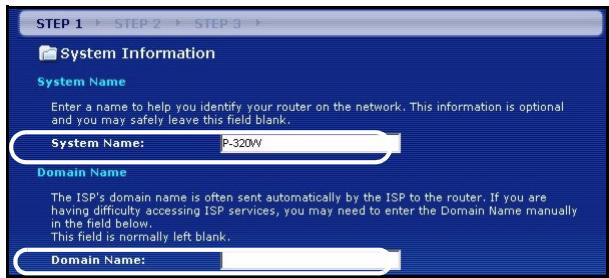
STEP 1: System Information
1 This screen is optional. You can just click Next.
- System Name is for identifying the Mer produktjalp finns pa http://www.support.zyxel.se. You can enter your computer's "Computer Name".
- If you leave the Domain Name blank, the domain name obtained by DHCP from the ISP is used.
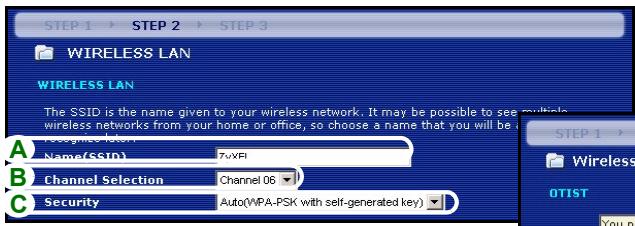
STEP 2: Wireless LAN
Configure ONE of the following wireless security types on the Mer produithjalp finns pa http:// www.support.zyxel.se:
- Auto security: Uses WPA-PSK security with an automatically generated Pre-Shared Key. View the generated Pre-Shared Key in the Wireless LAN screen.
Note: Your wireless clients must support WPA-PSK and use the same key.
- None: Have no wireless LAN security configured. If you do not enable any wireless security on your Mer produitjalp finns pa http://www.support.zyxel.se, your network is accessible to any wireless networking device that is within range.
- Basic security: WEP (Wired Equivalent Privacy) encrypts data frames before transmitting over the wireless network. The higher the WEP Encryption, the higher the security but the slower the throughput.
- Extend (WPA-PSK) security: Configure a Pre-Shared Key. Choose this option only if your wireless clients support WPA-PSK.
Note: The wireless clients and P-320W must use the same SSID, channel ID and WPA-PSK (if WPA-PSK is enabled) or WEP encryption key (if WEP is enabled) for wireless communication.
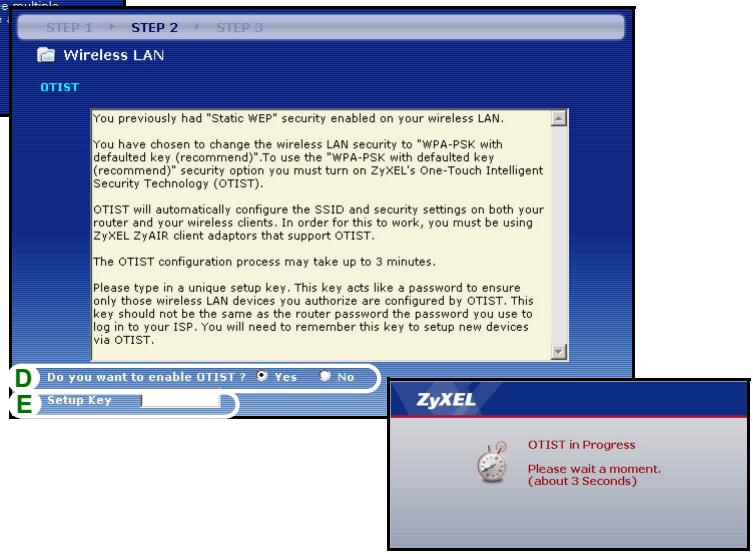
OTIST
- OTIST (One-Touch Intelligent Security Technology) allows your P-320W to assign wireless clients the Mer produkthjalp finns pa http://www.support.zyxel.se's SSID and static WEP or WPA-PSK encryption settings. The wireless client must also support OTIST and have OTIST enabled.
Auto or No Wireless Security
A Enter a unique name to identify the P-320W in the wireless LAN.
B Leave the default setting. The P-320W and wireless client must use the same channel ID.
C Select a level of wireless security. Choose Auto or None.
D For Auto security select Yes to enable OTIST. If you select None select either Yes to enable OTIST or select the No radio button and click Next to configure OTIST later.
E The default OTIST Setup Key is "01234567". This key can be changed in the web configurator. Be sure to use the same OTIST Setup Key on the P-320W and wireless clients.
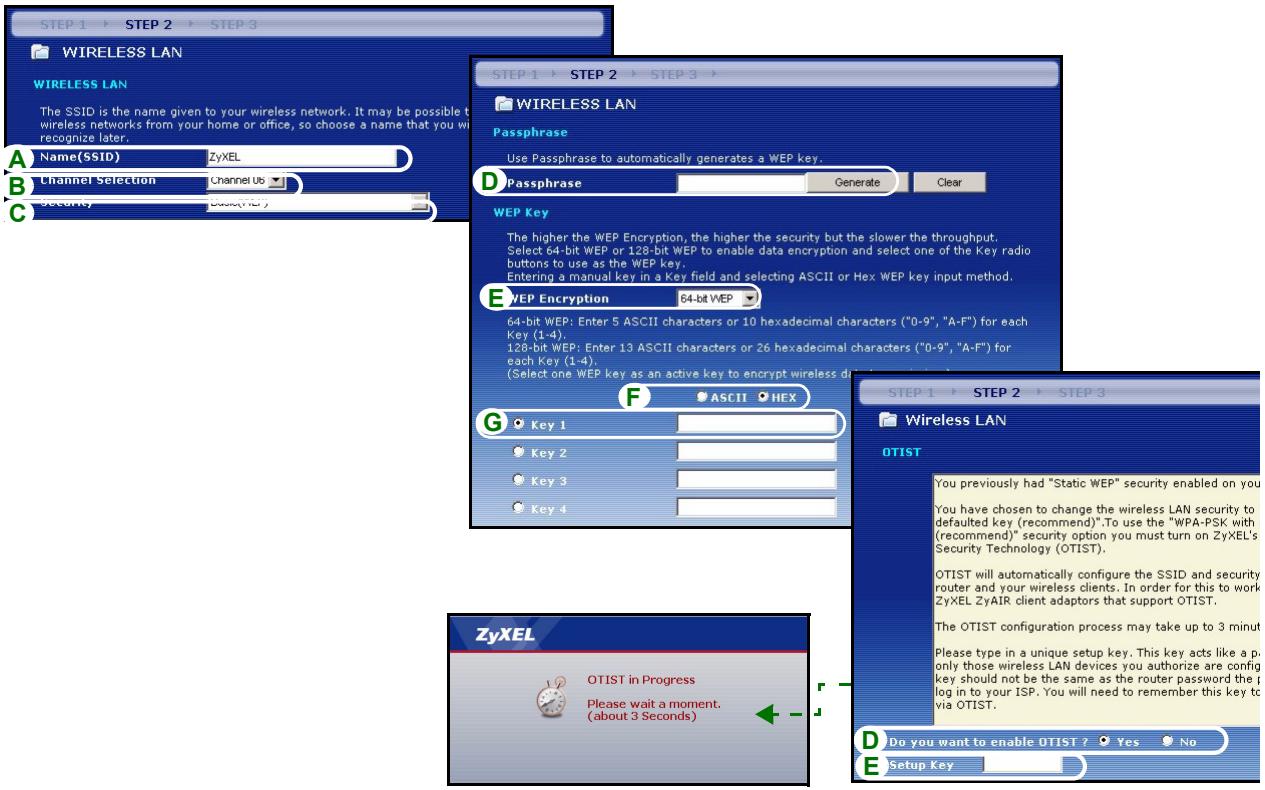
Basic(WEP) Security
A Enter a unique name to identify the P-320W in the wireless LAN.
B Leave the default setting. The P-320W and wireless client must use the same channel ID.
C Select Basic(WEP) security.
D You can generate or manually enter a WEP key by either:
Entering a Passphrase (up to 32 printable characters) and clicking Generate. The P-320W automatically generates a WEP key.
Or entering manual keys in each Key (1~4) field and selecting ASCII or Hex WEP key input method.
E Select 64-bit or 128-bit from the WEP Encryption drop-down list.
F Select ASCII or Hex characters.
G Select one of the Key radio buttons to use as the default WEP key.
H Select Yes to enable OTIST. Select the No radio button and click Next to configure OTIST later.
I The default OTIST Setup Key is "01234567". This key can be changed in the web configurator. Be sure to use the same OTIST Setup Key on the P-320W and wireless clients.
Extend(WPA-PSK) Security
A Enter a unique name to identify the P-320W in the wireless LAN.
B Leave the default setting. The P-320W and wireless client must use the same channel ID.
C Select WPA-PSK security.
D Type a pre-shared key to have a more secure wireless connection than WEP encryption. Type from 8 to 63 case-sensitive ASCII characters. You can set up the most secure wireless connection by configuring WPA in the advanced wireless screen. You need to configure a RADIUS server to do this.
E Yes is enabled by default. Select the No radio button and click Next to configure OTIST later.
F The default OTIST Setup Key is "01234567". This key can be changed in the web configurator. Be sure to use the same OTIST Setup Key on the P-320W and wireless clients.

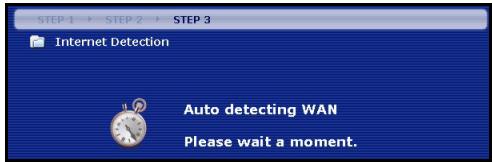
STEP 3: WAN
The wizard attempts to detect which WAN connection type you are using.
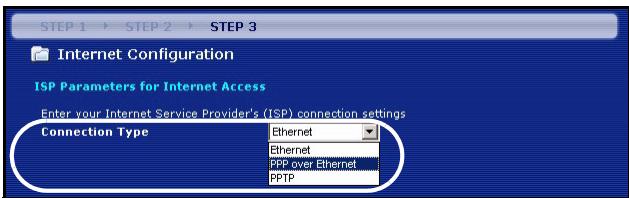
If the wizard does not detect a connection type, you must select ONE from the drop-down list box. Check with your ISP to make sure you use the correct type:
1 Ethernet
2 PPPoE
3 PPTP.
Note: If you were given Internet access settings, enter them in the following fields. Otherwise leave the default settings and just click Next
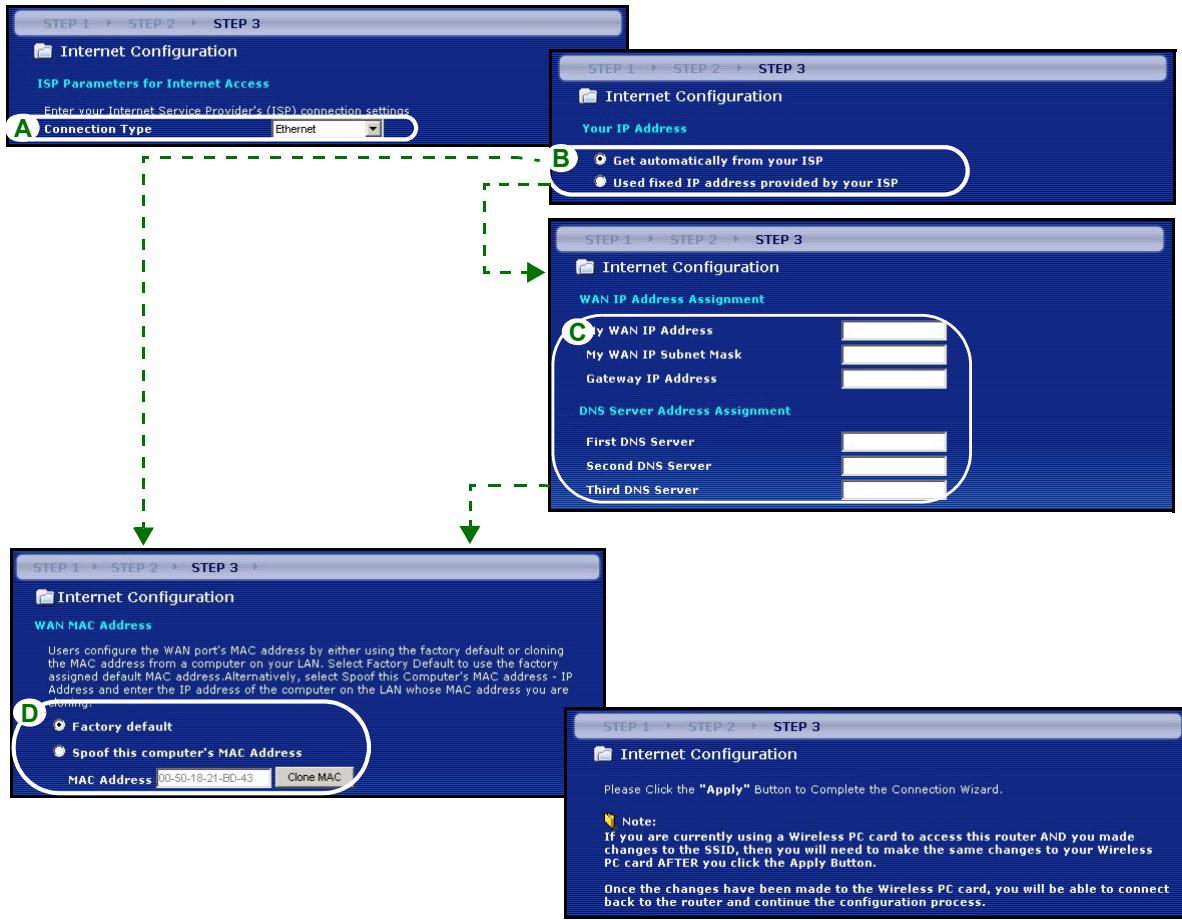
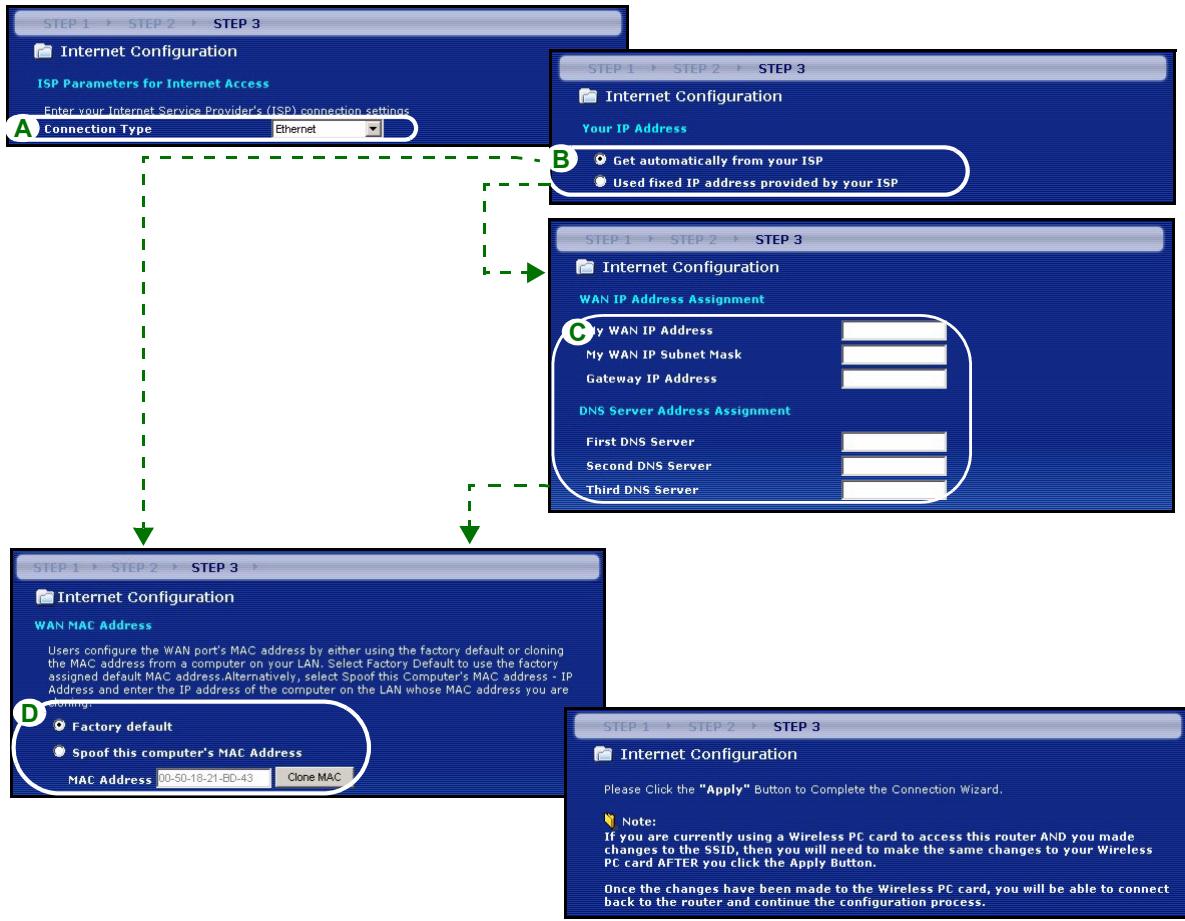
Ethernet Connection
A Select Ethernet as your WAN connection type.
B Select Get automatically from your ISP if your ISP did not assign you a fixed IP address. Skip to D.
Or
Select Use fixed IP address provided by your ISP to give the P-320W a fixed, unique IP address.
C Enter a WAN IP address and WAN IP Subnet Mask of the neighboring device, if you know it. If you do not, leave the default settings.
If you were given an IP address and/or DNS server settings, enter them in the fields. Otherwise leave the default settings and just click Next.
D Select Factory Default to use the factory assigned default MAC address.
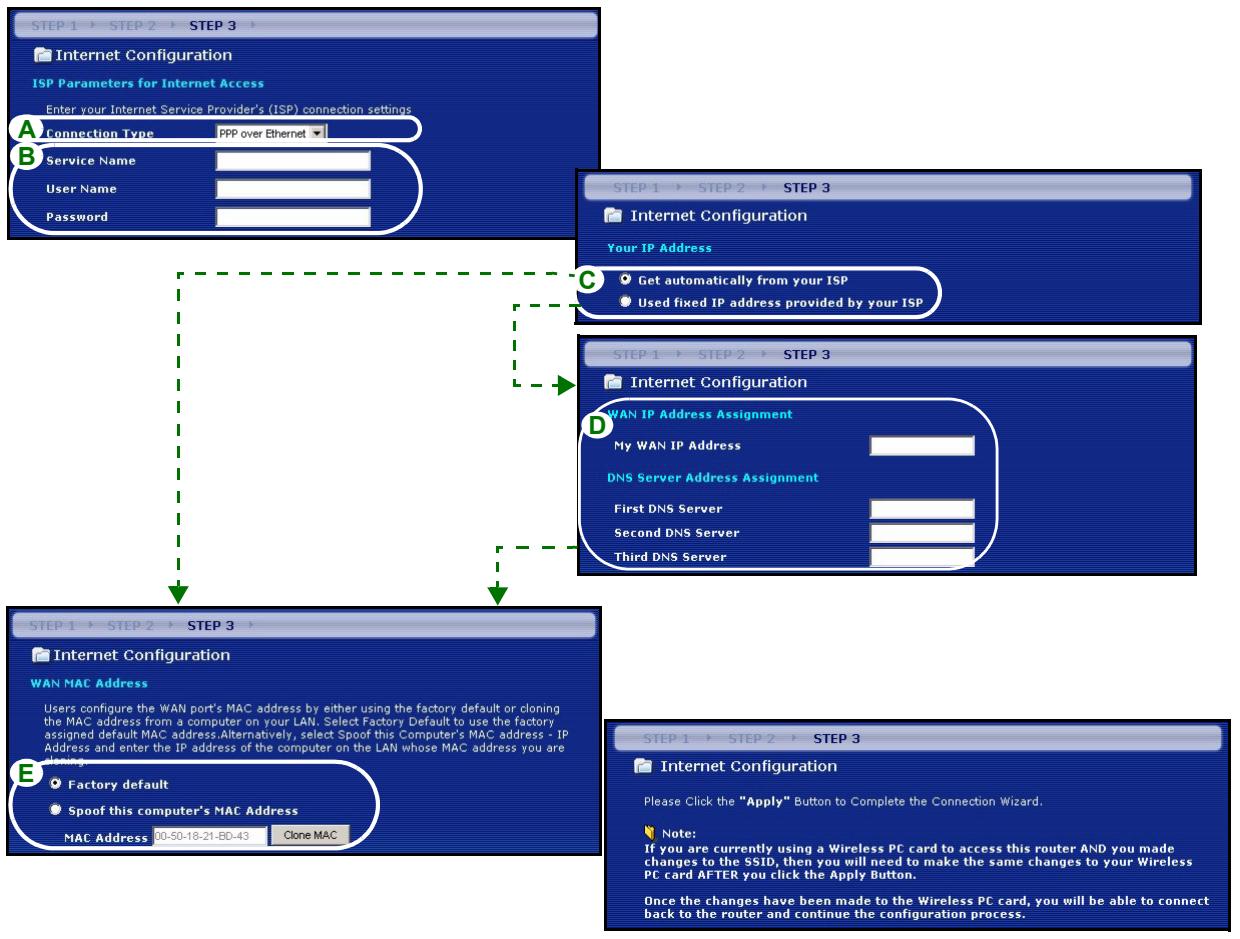
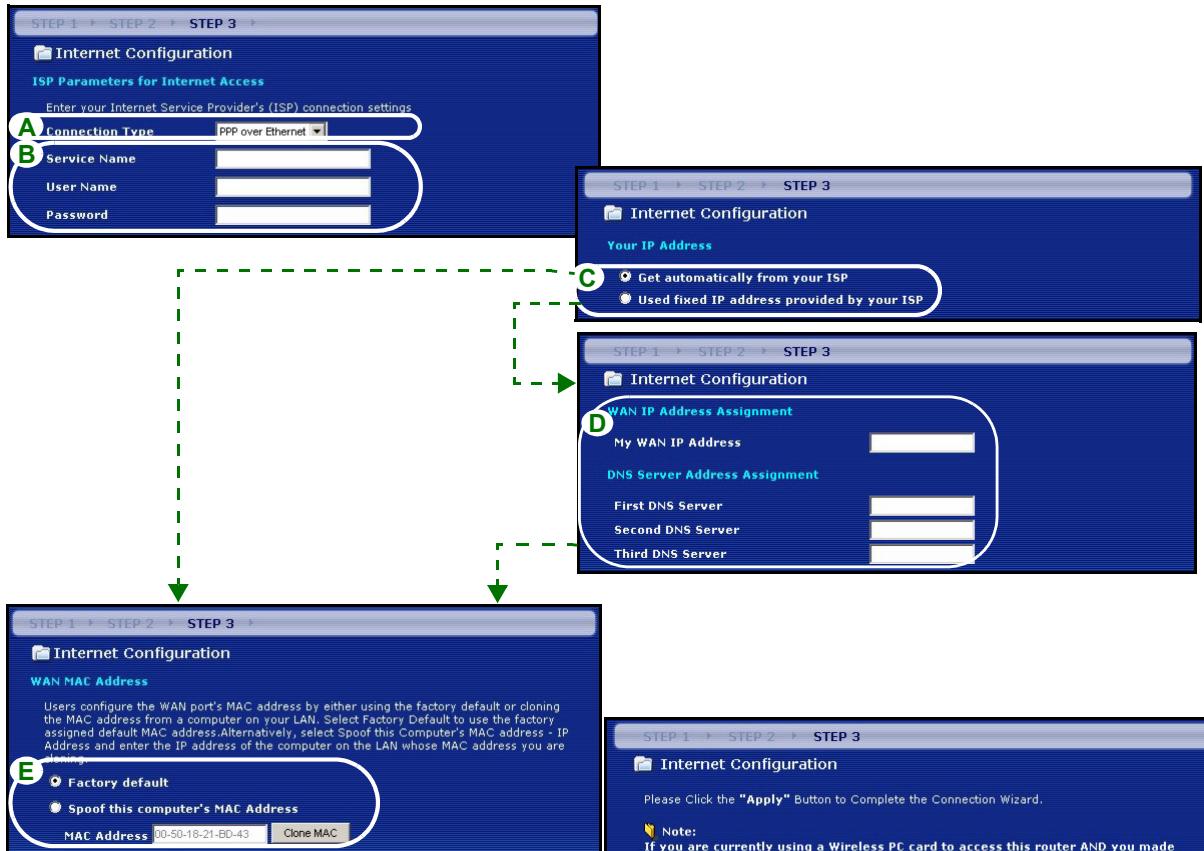
PPPoE Connection
A Select PPPoE as your WAN connection type.
BType a Service Name (Optional), User Name and Password.
C Select Get automatically from your ISP if your ISP did not assign you a fixed IP address. Skip to E. Or select Use fixed IP address provided by your ISP to give the P-320W a fixed, unique IP address.
D Enter the WAN IP address of the neighboring device, if you know it. If you do not, leave the default settings. If you were given IP address and/or DNS server settings, enter them in the fields. Otherwise leave the default settings and just click Next.
E Select Factory Default to use the factory assigned default MAC address.
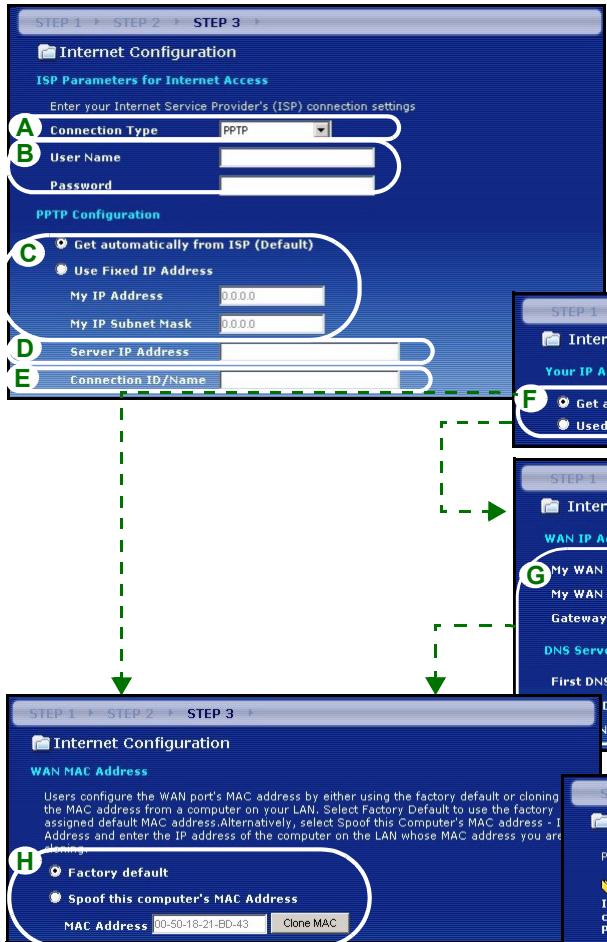
PPTP Connection
A Select PPTP as your WAN connection type.
BType a User Name and Password
C Select Get automatically from ISP if your ISP did not assign you a fixed PPTP IP address.
Or select Use fixed IP address to give the P-320W a fixed, unique PPTP IP address and subnet mask.
D Type a PPTP Server IP Address
E Type a Connection ID/Name (if provided)
F Select Get automatically from your ISP if your ISP did not assign you a fixed IP address. Skip to H.
Or select Use fixed IP address provided by your ISP to give the P-320W a fixed, unique IP address.
G Enter a WAN IP address and WAN IP Subnet Mask of the neighboring device, if you know it. If you do not, leave the default settings.
If you were given IP address and/or DNS server settings, enter them in the fields. Otherwise leave the default settings and just click Next.
H Select Factory Default to use the factory assigned default MAC address.
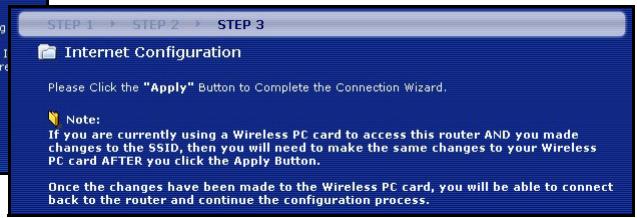
Internet Access Setup Complete
If you have any Internet access problems, follow the on-screen instructions.
Click Finish to complete the Connection Wizard.
Congratulations!
The Connection Wizard configuration is complete.
Please press "Finish" button to complete Connection Wizard.
Check our exciting range of ZyXEL products at www.zyxel.com
Having Internet Access problems?
- Verify your settings in this wizard.
- If your wizard entries are correct, but still cannot access the Internet, then check that
your ISP account is active and that the settings you entered in the wizard are correct. - If you still have problems, please contact customer support.
4 Troubleshooting
Note: If your computer cannot automatically communicate with the device, then see the multimedia tutorial on how to set up your computer to receive an IP address dynamically or give it a fixed one in the range specified in section 4.1.
| PROBLEM | CORRECTIVE ACTION |
| None of the LEDs turn on when you connect the Mer produithjalp finns pa http://www.support.zyxel.se's power. | Make sure that you have the correct power adaptor connected to the Mer produithjalp finns pa http://www/support.zyxel.se, it is plugged into an appropriate power source. Check all cable connections. If the LEDs still do not turn on, you may have a hardware problem. In this case, you should contact your local vendor. |
| Cannot access the P-320W from my computer. | Check the cable connection from your computer to the Mer produithjalp finns pa http://www/support.zyxel.se. If the Mer produithjalp finns pa http://www/support.zyxel.se's IP address has changed, then enter the new one as the website address. Make sure your computer's IP address is in the same subnet as the Mer produithjalp finns pa http://www/support.zyxel.se's IP address (see section 4.1). Ping the P-320W from a computer on the LAN. Make sure your computer's Ethernet adapter is installed and functioning properly. In the computer, click Start, (All) Programs, Accessories and then Command Prompt. In the Command Prompt window, type "ping" followed by the Mer produithjalp finns pa http://www/support.zyxel.se's LAN IP address (192.168.1.1 is the default) and then press [ENTER]. The P-320W should reply; otherwise see section 4.1. |
| Cannot access the P-320W from my computer (continued). | Use Internet Explorer 6.0 and later or Netscape Navigator 7.0 and later with JavaScript enabled. Make sure you enter the password correctly (the field is case sensitive). If you've forgotten the Mer produkthjalp finns pa http://www.support.zyxel.se's password, use the RESET button. Press the button in for about 10 seconds (the WAN light turns off and then on again), then release it. It returns the P-320W to the factory defaults (password is 1234, LAN IP address 192.168.1.1 etc.). |
| Cannot access the Internet. | Verify the Internet connection settings in the wizard. Make sure you entered the correct user name and password if you are using PPPoE or PPPoA. |
4.1 Set Up Your Computer's IP Address
This section shows you how to set your Windows NT/2000/XP computer to automatically get an IP address. This ensures that your computer can communicate with your Mer produitjalp finns pa http:// www.support.zyxel.se. Refer to your User's Guide for detailed IP address configuration for other Windows and Macintosh computer operating systems.
1 In Windows XP, click start, Control Panel. In Windows 2000/NT, click Start, Settings, Control Panel.
2 In Windows XP, click Network Connections. In Windows 2000/NT, click Network and Dial-up Connections.
3 Right-click Local Area Connection and then click Properties.
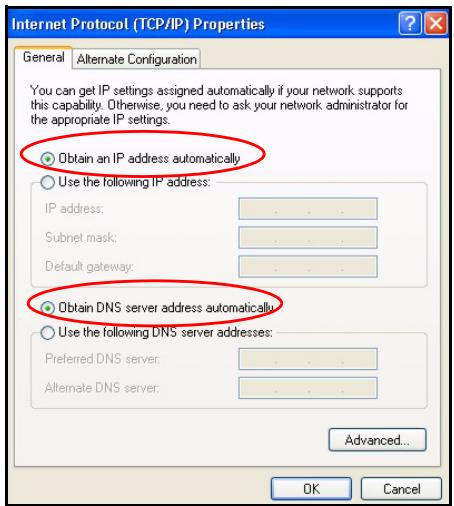
4 Select Internet Protocol (TCP/IP) (under the General tab in Win XP) and click Properties.
5 The Internet Protocol TCP/IP Properties screen opens (the General tab in Windows XP).
6 Select the Obtain an IP address automatically and Obtain DNS server address automatically options.
7 Click OK to close the Internet Protocol (TCP/IP) Properties window.
8 Click Close (OK in Windows 2000/NT) to close the Local Area Connection Properties window.
9 Close the Network Connections screen.
Viewing Your Product's Certifications
1 Go to www.zyxel.com.
2 Select your product from the drop-down list box on the ZyXEL home page to go to that product's page.
3 Select the certification you wish to view from this page.
Übersicht
Welcome to the ZyXEL Connection Wizard
The connection wizard will walk you through the most common configuration options. This wizard has been broken down into three steps, each of which may have multiple pages.
This wizard will take you through the following steps:
Step 1: System Information Setup.
Step 2: Wireless LAN Setup
Step 3: Internet Configuration Setup.
SCHRITT 2: Wireless-LAN
The Connection Wizard configuration is complete.
Please press "Finish" button to complete Connection Wizard.
Check our exciting range of ZyXEL products at www.zyxel.com
Having Internet Access problems?
- Verify your settings in this wizard.
- If your wizard entries are correct, but still cannot access the Internet, then check that your ISP account is active and that the settings you entered in the wizard are correct.
- If you still have problems, please contact customer support.
4 Fehlerbehebung
Please select Wizard or Advanced mode
The Wizard setup walks you through the most common configuration settings. We suggest you use this mode if it is the first time you are setting up your router or if you need to make basic configuration changes.
Use Advanced mode if you need access to more advanced features not included in Wizard mode.
Go to Wizard setup
Go to Advanced setup
Exit
Welcome to the ZyXEL Connection Wizard
The connection wizard will walk you through the most common configuration options. This wizard has been broken down into three steps, each of which may have multiple pages.
This wizard will take you through the following steps:
Step 1: System Information Setup.
Step 2: Wireless LAN Setup.
Step 3: Internet Configuration Setup.
The Connection Wizard configuration is complete.
Please press "Finish" button to complete Connection Wizard.
Check our exciting range of ZyXEL products at www.zyxel.com
Having Internet Access problems?
- Verify your settings in this wizard.
- If your wizard entries are correct, but still cannot access the Internet, then check that your ISP account is active and that the settings you entered in the wizard are correct.
- If you still have problems, please contact customer support.
4 Dépannage
Welcome to the ZyXEL Connection Wizard
The connection wizard will walk you through the most common configuration options. This wizard has been broken down into three steps, each of which may have multiple pages.
This wizard will take you through the following steps:
Step 1: System Information Setup.
Step 2: Wireless LAN Setup
Step 3: Internet Configuration Setup.
The Connection Wizard configuration is complete.
Please press "Finish" button to complete Connection Wizard.
Check our exciting range of ZyXEL products at www.zyxel.com
Having Internet Access problems?
- Verify your settings in this wizard.
- If your wizard entries are correct, but still cannot access the Internet, then check that your ISP account is active and that the settings you entered in the wizard are correct.
- If you still have problems, please contact customer support.
Tabnua 1 NapaMeTpbI coeHHeHnC nHTepHET
| WAN IP Address [ΓВС IP Адес] (ссли predecessorstавли):DNS Server IP Address[IP Адес DNS с铱вера] (ссли predecessorstавли): Вторунный___________ | ||
| Connection Type[Tил coe dingнения]: | ||
| Ethernet | Service Type[Tил с数字货币]:___________ | Login Server IP Address [IP-адес с铱вера достура] |
| User Name[Имя польzoователя]:___________ | Password[Паразь]:___________ | |
| PPTP | User Name[Имя польzoователя]:___________ | Password[Паразь]:___________ |
| Your WAN IP Address[Baus ΓВС IP Адес] (ссли predecessorstавли):___________ | PPTP Server IP Address[IP Адес PPTP-ceвера]:___________ | |
| Connection ID[Имя се dingнения] (ссли predecessorstавло):___________ | Плп PPTP Domain Name[Имя PPTP Домена]:___________ | |
| {PPPoE} | (PPPoE) Service Name[(PPPoE)Имя с数字货币]:___________ | Password[Паразь]:___________ |
| User Name[Имя польzoователя]:___________ | ||
B Buaem PykoBoDCTBe Nolb3OBaTeJIa Bbl MoKeTe HaHTn BCIO Heo6xOIMyU CnpaBOUYu INHΦOpMaIIO.
Jaee cJeIyIOT INHCTpyKcII, KOtOpIe Bbl OJIXHbI BblONIHITb:
Welcome to the ZyXEL Connection Wizard
The connection wizard will walk you through the most common configuration options. This wizard has been broken down into three steps, each of which may have multiple pages.
This wizard will take you through the following steps:
Step 1: System Information Setup.
Step 2: Wireless LAN Setup.
Step 3: Internet Configuration Setup
3 Hactpoika doctyna B INHTepHET
Приимechанee:В кадом OkHe MacTepa BBeIte napaMeTpbl DoCTynaВ ИntepHET ImeHNOВ TAKOM BnDE,B KAKOM INx BamпpeIoCTabNl BaW npOBaIdep,посл чero NaXmITE Next [Дanee] Дпя прдолженя Или Back [Ha3aI] dЯь BO3BpataВ пpebldyuшee OKHO.
EcnBbHaXMeTe KHOKnBy Back [Ha3aD],TO BcR TeKUaA INHOpMaZra B OKe He bYedT yTePraHa.
3TAP1: Cnctemhaj nHopmaçny
1 3To OKHO Heo6raTeIbHoe. Bbl MoKeTe npocTo HkaTb Next [Danee].
System Name [Системhoe Имя] Исповьетая ля有很大ншкаши Mer produkthalp finns pa http://www.support.zyxel.se. Бы можete Всetectи виш "Имя компьотера".
- Ecπn Bbl OCTaBnte NcTbIM NOJIe Domain Name [NmЯДOMeHa],TO 6byTe NcNoJIb3OBAtbcra NmЯДOMeHa, nOlyeHHoe DHCP ot npoBaɪdepa.

Bb6epnte Use fixed IP address provided by your ISP [UcnoIb3OBAbI noCToHHbI IP aDpec, npedocTbAemblpoBaIdepom], yTo6bl npucBOHTb P-320W noCToHHbI, yHnKaJIbHbI IP aDpec.
C BveiTe WAN IP address [IP aDpecc TBC] u WAN IP Subnet Mask [IP macky noDCETn TBC] cocd hero yctpoiCTBa, KOHeuHO, ecn Bb ee 3Haete. Ecn HeT, To OCTaBte yCTaHOBKn IO yMOUaHNIO.
EcnBbI nOyHnIP aDPEC u/nn HacTpoKn DNS cepBepa, BBeDnte ux B COOTBeTCTByUxnx noJx. B npOTNBOM cnyae, OCTaBte yCTaHOBNu NO yMOJuaHNIO IN pOcTO hAXMnTe Next [Jaee].
D Bb6epnte Factory Default [3aBODcKne yCTaHOBKn] nIy IcNoJIb3OBAHnI 3aBOIDcKo HAcTPOIKN MAC aIpeca.
IodKnIoueHne PPPoE
A BbIbePte PPPoE bKaueCTBe Tnna CoeDInHn c ΓBC.
BBeNTe Service Name [IMcIyX6b] (BbIbOpOuHo), User Name [IMnnonb3oBaTe] n Password [Iaponb].
C BbIbePte Get automatically from your ISP [Пolyuatab aBToMaTnueckn y npoBaIepa], ecn npoBaIep He npedocTaBn Bam noctoHHb IP aDpec. NepexOAnTe K 3Tany E.
IIN Bb6epTe Use fixed IP address provided by your ISP [NcnoB3oBaT noCToHHbI IP aDpec, npedocTabnemblnpoabdepom], TTo6bl npcBOuTB P-320W noCToHHbI, yHkaJIbHbI IP aDpec.
D BBeIte WAN IP address [IP-aIpec TBC] 6nKaiJero yCTpoiCTBaecIn OH Bam n3BecTeH. EcIn HeT, to OCTaBBte yCTaHOBKn no yMOJIuaHIO.
EcnBbI nOyuHn IP aIpec n/Inn HAcTpoKn DNS cepBepa, BBeDnte nx B COOTBeCTByUoXn noJx. B npOTNBOM cnyae, OCTaBte yCTaHOBKn nO yMOJIuaHnIO n PPOCTO HAXMITE Next [Danee].
E BbIbepnte Factory Default [3aBODcKne yctaHOBKn] nIy IcNoJIb3OBAHn 3aBOdCKo HacTPOiKn MAC aIpeca.
Повлкюец PPTP
A BbIbePte PPTB KauEcTBe Tuna coeINHn c ΓBC.
BHa6epnte User Name[IMma noIb3ObaTeJra] n Password [IapOnb]
C BbIbePte Get automatically from your ISP [POnyuataB aTOMaTHueckn y npoBaIepa], ecn npoBaIep He npoIOCTaBnB Bam noCTOHHb PPTP IP aDpec.
IIN Bb6epTe Use fixed IP address provided by your ISP [NcnoB3oBaTb noctoHHbIP aDpec, npedocTabnem npoBaJdepom], TTo6bl npncBoNTb P-320W noctoHHbI, yHkaJIbHbPPTP IP aDpec macky nOcETn.
D BBeiTe Server IP Address [IP Apec PPTP-cebepa]
E BveiTe Connection ID/Name[ID coeHHeHraHa3BaHne] (ecnI npedocTabeHo)
F BbIepeTe Get automatically from your ISP [POnyauTb abTomatnueckny npoBaIepa], ecn npoBaIep He npoOCTaBn Bam noCToHnbl IP aDpec. NepexOJTe K 3Tany H.
IIN Bb6epTe Use fixed IP address provided by your ISP [NcnoJIb3OBA Tb noCToHHbI IP aDpec, npeoctabnembl npobaidepom], yTo6bl npncBOHTb P-320W noCToHHbI, yHkaJIbHbI IP aDpec.
G BveiTe WAN IP address [IP aDpecc BC] u WAN IP Subnet Mask [IP macky noDCTeu BC] cocdHeRo yctpoiCTBa, KOHeuHo, ecn BbI ee 3HaTe. EcIn HeT, To ocTabte yctaHOBKn nO yMOJuaHIO.
EcnBbI nOnyuHn IP aIpec n/Inn HacTpoKn DNS cepBepa, BBeDnte nx B COOTBeCTByUoXn noJx. B npOTNBOM cNyue, OCTaBte yctaHOBNKn NO yMOJuaHnIO nPocTo HaxMnTe Next [Danee].
H BbIbepnte Factory Default [3aBODcKne yctaHOBKn] nJa IcNoJIb3OBAHnra 3aBOIDcKo HacTpoiKn MAC aIpeca.

Hac troponka doctyna B INTepheT 3aBepseHa
Ecn y BaC eCT npo6nembI C DocTynpom B INHTepHeT, TO cNeDyIte POnCKa3Kam Ha 3KpaHe.
HaxmTeFinish[ToTOB]IJI3aBepueHnpa6oTbI MacTepecoeHHeHnC INHTepHET.
Congratulations!
The Connection Wizard configuration is complete.
Please press "Finish" button to complete Connection Wizard.
Check our exciting range of ZyXEL products at www.zyxel.com
Having Internet Access problems?
- Verify your settings in this wizard.
- If your wizard entries are correct, but still cannot access the Internet, then check that your ISP account is active and that the settings you entered in the wizard are correct.
- If you still have problems, please contact customer support.
4Поньи устараенье несправност
Приимechанe:ЕслвВашКOMьБИТЕР HeМожET АВТOMATиЧЕСК COЕДИНТСЯ C yCTPOICTBOM,TO OбразИТecь K MyЛБТIMеДиHOMу ПОСБИЮ,ЧTOБы y3HaTb KaK HAcTpoNTb Baш KOMьБИTePOM Ha noJIучЕпe ДИнамЧeCKOrO IP aDpeca ИлN yCtahOBuTb ФИКсИрOBaHHbI IP aDPEC ИЗ ДИнадзOA,УКAZAHHOrO B pa3dJe 4.1.
Please select Wizard or Advanced mode
The Wizard setup walks you through the most common configuration settings. We suggest you use this mode if it is the first time you are setting up your router or if you need to make basic configuration changes.
Use Advanced mode if you need access to more advanced features not included in Wizard mode.
Go to Wizard setup
Go to Advanced setup
Exit
Welcome to the ZyXEL Connection Wizard
The connection wizard will walk you through the most common configuration options. This wizard has been broken down into three steps, each of which may have multiple pages.
This wizard will take you through the following steps:
Step 1: System Information Setup.
Step 2: Wireless LAN Setup.
Step 3: Internet Configuration Setup.
The Connection Wizard configuration is complete.
Please press "Finish" button to complete Connection Wizard.
Check our exciting range of ZyXEL products at www.zyxel.com
Having Internet Access problems?
- Verify your settings in this wizard.
- If your wizard entries are correct, but still cannot access the Internet, then check that
your ISP account is active and that the settings you entered in the wizard are correct. - If you still have problems, please contact customer support.
4 Felsökning
Welcome to the ZyXEL Connection Wizard
The connection wizard will walk you through the most common configuration options. This wizard has been broken down into three steps, each of which may have multiple pages.
This wizard will take you through the following steps:
Step 1: System Information Setup.
Step 2: Wireless LAN Setup.
Step 3: Internet Configuration Setup.
3 網際網路接取設定
The Connection Wizard configuration is complete.
Please press "Finish" button to complete Connection Wizard.
Check our exciting range of zyXEL products at www.zyxel.com
Having Internet Access problems?
- Verify your settings in this wizard.
- If your wizard entries are correct, but still cannot access the Internet, then check that
your ISP account is active and that the settings you entered in the wizard are correct. - If you still have problems, please contact customer support.
4 傳錯
- Hardware Connections
- WAN Connection
- LAN Connection
- POWER Connection
- The LEDs
- Accessing the Web Configurator
- Welcome to the ZyXEL Connection Wizard
- Internet Access Setup
- STEP 1: System Information
- STEP 2: Wireless LAN
- OTIST
- Auto or No Wireless Security
- Basic(WEP) Security
- Extend(WPA-PSK) Security
- STEP 3: WAN
- Ethernet Connection
- PPPoE Connection
- PPTP Connection
- Internet Access Setup Complete
- Congratulations!
- Troubleshooting
- Set Up Your Computer's IP Address
- Viewing Your Product's Certifications
- Übersicht
- SCHRITT 2: Wireless-LAN
- Fehlerbehebung
- Dépannage
- Hactpoika doctyna B INHTepHET
- 3TAP1: Cnctemhaj nHopmaçny
- IodKnIoueHne PPPoE
- Повлкюец PPTP
- Hac troponka doctyna B INTepheT 3aBepseHa
- 4Поньи устараенье несправност
- Felsökning
- 網際網路接取設定
- 傳錯
Brand : ZYXEL
Model : P-320W
Category : Wireless Router