Drumfit Indoor 20000 Race - Fitness Equipment CECOTEC - Free user manual and instructions
Find the device manual for free Drumfit Indoor 20000 Race CECOTEC in PDF.


User questions about Drumfit Indoor 20000 Race CECOTEC
0 question about this device. Answer the ones you know or ask your own.
Ask a new question about this device
Download the instructions for your Fitness Equipment in PDF format for free! Find your manual Drumfit Indoor 20000 Race - CECOTEC and take your electronic device back in hand. On this page are published all the documents necessary for the use of your device. Drumfit Indoor 20000 Race by CECOTEC.
USER MANUAL Drumfit Indoor 20000 Race CECOTEC
DRUMFIT
Safety instructions 8
-
Parts and components 50
-
Before use 51
-
Assembly 51
-
Operation 53
-
Information on exercising 54
-
Cleaning and maintenance 55
-
Technical specifications 55
-
Disposal of old electrical and electronic appliances 55
-
Technical support and warranty 56
-
Copyright 56
SOMMAIRE
Please, keep this instruction manual in a safe place for future reference or new users.
- Read the entire manual before assembling and using the machine. Safe and efficient use can be only achieved if the machine is properly assembled, maintained, and used. It is your responsibility to make sure every user is informed about the warnings and precautions stated in this instruction manual.
- Before starting a training session, it is recommended that you consult your doctor if you have any adverse health or physical condition that may pose a risk to your safety or make it difficult to use the appliance properly. Your doctor's advice is essential if you are taking medication that affects your heart rate, blood pressure, or cholesterol level.
- Be aware of your body signals. Incorrect or excessive exercise can deteriorate your health. Stop exercising if you experience any of the following symptoms: pain, tightness in your chest, irregular heartbeat, extreme shortness of breath, dizziness, or nausea. If you experience any of these conditions, you should consult your doctor before continuing with your training.
- This machine can be used by children aged 8 years and
above and persons with reduced physical, sensory, or mental capabilities or lack of experience and knowledge if they have been given supervision or instruction concerning the use of the machine in a safe way and understand the hazards involved. Children must not play with the machine. Cleaning and user maintenance should not be carried out by unsupervised children.
- Keep children and animals away from the assembling area, as small parts could cause risk of suffocation if swallowed.
- Keep children and pets away from the machine. Do not allow children to use it and/or play with the machine. It is designed for adults only.
- Use the exercise bike on a solid, even surface with a protective cover for your floor or carpet.
- Make sure that the screws and nuts are securely fastened before using the machine.
- The safety level of the machine can be only maintained through regular examination for damage and/or signs of wear and tear.
- Use the machine as indicated in this instruction manual. If you find any defective component while assembling or checking the machine, or if you hear any unusual noise coming from the equipment during use, stop using it. Do not use the equipment until the problem has been solved.
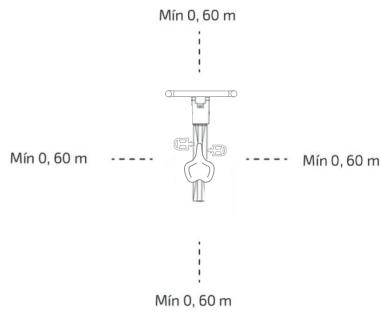
- Make sure you have enough space to lay out the parts before starting. Leave a free space of at least 0.6 m in front of all access areas of the machine in case of emergency. You can share the access areas with other machine nearby. Always ensure there are not any objects blocking the entrance and exit of the machine.
- Wear suitable clothing while using the machine. Avoid wearing loose clothing which may get caught in the equipment.
- WARNING: this machine operates by means of a flywheel. Be careful when in motion and ensure that it completely stops before getting down, as the inertia of the flywheel and pedals could cause injury to yourself or others.
- Maximum user weight: 120 kg.
- It is not recommended for outdoor use.
- This machine is designed for domestic use only and is not intended for bars, restaurants, farmhouses, hotels, motels, and offices.
- The air bike is not suitable for therapeutic use.
- Care must be taken when lifting or moving the equipment so as not to injure your back. Always use proper lifting techniques and/or assistance.
- WARNING: the heart rate sensors may be inaccurate, as it is not a medical device. Sensors can give you estimated heart rate information. If you feel any discomfort, stop exercising immediately. It may be dangerous for your health. If it persists, go immediately to the nearest medical centre.
- If repairs are required, please consult your supplier for further information or contact Cecotec Customer Service.
- If any parts protrude from the machine, they may interfere with the user's movement.
Instructions on batteries
- Do not disassemble, open, or damage the batteries.
- Keep the batteries out of the reach of children.
- Pay particular attention to small batteries. In case of battery ingestion, please seek medical attention immediately.
- Do not expose batteries to heat or fire. Avoid storage in direct sunlight.
- Do not short-circuit the batteries. Do not store batteries in an untidy manner, in a box, or drawer where they can short-circuit each other or be short-circuited by other metal objects.
- Do not subject batteries to mechanical shock.
- Leaks from the batteries can occur under extreme conditions. Do not touch any liquid that leaks from the batteries. If the liquid gets into contact with skin, wash immediately with soap and water. If the liquid gets into the eyes, wash them immediately with clean water for a minimum of 10 minutes and seek medical attention. Wear gloves to handle the battery and dispose of it immediately in accordance with local regulations.
- Pay attention to the positive (+) and negative (-) marks on the batteries and ensure they are used correctly.
- Do not use any batteries that are not designed for use with the appliance.
- Do not use the appliance if powered with batteries that differ in capacity, size, or type.
- The use of the batteries by children must be supervised.
- In case of battery ingestion, please seek medical attention immediately.
- Always buy the batteries recommended by the device manufacturer.
-
Keep the batteries clean and dry.
-
Wipe the battery terminals with a clean, dry cloth if they become dirty.
- Keep the original instruction manual for future reference.
- Use the batteries only for their intended purpose.
- Whenever possible, remove the batteries from the console when not in use.
- Dispose of the battery correctly.
INSTRUCTIONS DE SÉCURITÉ
| No. | Description | Measures | Quantity |
| 1 | Main frame | 1 | |
| 2 | Front stabiliser | 1 | |
| 3 | Rear stabiliser | 1 | |
| 4 | Saddle post | 1 | |
| 5 | Handlebar stem | 1 | |
| 6 | Handlebar | 1 | |
| 7 | Horizontal saddle adjustment bracket | 1 | |
| 8 | Saddle | 1 | |
| 9 | Console | 1 | |
| 10 | Console bracket | ∅ 25 | 1 |
| 11 | Device holder | ∅ 25 | 1 |
| 12 | Right pedal | R | 1 |
| 13 | Left pedal | L | 1 |
| 14 | Adjustment knobs | M16 | 2 |
| 15 | Horizontal saddle adjustment knob | M10 | 1 |
| 16 | Screws | M8x53 | 4 |
| 17 | Plain washer | ∅ 8.5 | 4 |
| 18 | Cap nut | M8 | 4 |
| 19 | Plain washer | ∅ 10.5 | 1 |
| 20 | Round head screw | M8x16 | 4 |
| 21 | Spring washer | ∅ 8.5 | 4 |
| 22 | Heart rate monitor cable | 1 | |
| 23 | Signal cable | 1 | |
| 24 | Self-tapping screw | M4x20 | 1 |
| 25 | Fixed spanner | 13-15 | 1 |
| 26 | Bottle holder | 1 | |
| 27 | Hexagon spanner | 6 mm | 1 |
| 28 | Heart rate plug | 1 |
NOTE:
the graphics in this manual are schematic representations and may not exactly match the device.
2. BEFORE USE
- This appliance is packaged in a way as to protect it during transport. Take the device out of its box and remove all packaging materials. You can keep the original box and other packaging elements in a safe place. This will help you prevent damage to the device when transporting it in the future. In case the original packaging is disposed of, make sure all packaging materials are recycled accordingly.
- Make sure all parts and components are included and in good conditions. If there is any piece missing or in bad conditions, contact the official Cecotec Technical Support Service immediately.
Box content
- Indoor bicycle
- Assembly kit
- Batteries 2 x AAA
- Instruction manual
3. ASSEMBLY
STEP 1
Fig. 2
- Secure the front stabiliser (2) to the main frame (1) using the screws (16), plain washers (17) and cap nut (18). Tighten them with the fixed spanner (25). Make sure all the wheels of the front stabiliser are facing forward, as shown in figure 2.
- Similarly, secure the rear stabiliser (3) to the main frame (1) using the screws (16), plain washers (17) and cap nut (18). Tighten them with the fixed spanner (25).
Warning:
- You can use the feet adjusters on the rear stabiliser (3) to level the machine.
- The wheels on both sides of the front stabiliser (2) allow the machine to be moved over short distances.
STEP 2
Fig. 3
- Position the right pedal (12) with the "R" mark on the main frame (1) and secure it clockwise using the fixed spanner (25).
- Next, similarly, position the left pedal (13) with the "L" mark on the main frame (1) and secure it counterclockwise using the fixed spanner (25).
- Install the adjustment knobs (14) on the front and rear of the main frame (1) respectively as shown in figure 3. It is not necessary to tighten the knobs at this time.
STEP 3
Fig. 4
- Install the saddle post (4) into the main frame (1) and pull the adjustment knob (14) so that it automatically clicks into the corresponding hole in the saddle post (4).
- In a similar way, insert the handlebar stem (5) into the main frame (1) and pull the adjustment knob (14) so that it automatically clicks into the corresponding hole in the handlebar stem (5).
Note:
- Before fitting the saddle post and handlebar stem, make sure that the adjustment knobs are not installed.
- Use the adjustment knobs (14) to adjust the saddle post (4) or the handlebar stem (5) heights. After adjusting the height of both the saddle post and the handlebar stem, the adjustment knobs (14) must be tightened.
STEP 4
Fig. 5
Install the horizontal saddle adjustment bracket (7) into the saddle post (4) and secure it with a plain washer (19) and an adjustment knob (15).
Please note:
- Loosen the adjustment knob (15) to adjust the position of the horizontal saddle adjustment bracket (7) forwards or backwards to the desired position.
- Before using the machine, be sure to tighten the horizontal saddle adjustment knob (15).
STEP 5
Fig. 6.
Secure the handlebar (6) to the handlebar stem (5) using a spring washer (21) and a round head screw (20) and tighten it with the hexagon spanner (27).
STEP 6
Fig. 7
Install the console (9) on the console bracket (10) on the handlebar (6). Connect the heart rate monitor cable (22) with the signal cable (23). The heart rate plug (28) is inserted into the "PULSE" hole on the back of the console (9).
STEP 7
Fig. 8
Install the device holder (11) on the handlebar (6).
CAUTION:
Before using the bike, make sure that all parts are securely fastened and that the machine is placed on a stable surface.
4. OPERATION
Control panel. Fig. 9
- Reset button: press and hold this button for 3 seconds to reset all values.
- Mode button: use this button to toggle between the available functions.
- Set button: use this button to set training goals. Each press of this button will increase the goal you have selected with the Mode button.
Functions
- Automatic Scan (SCAN): press the Mode button to enter the scanning status. All TIME-SPEED-DIST-CAL-ODO-PUL functions will automatically be shown on the display.
- Time of motion (TIME): cumulative calculation of movement time from 00:00 to 99:59. Press the Mode button until the TIME function is displayed. If you wish to set a target time, then press the Set button until the desired training time is selected.
- Distance of movement (DIST): cumulative calculation of the movement distance from 0.0 to 999.9. Press the Mode button again to display the distance. If you wish to set a target distance, then press the Set button until the desired training distance is selected.
-
Calories (CAL): displays cumulative calorie consumption from 0.0 to 9999. Press the Mode button again to display the calories. If you wish to set a calorie target, then press the Set button until the desired training calories are selected. Note: these data are only an approximate description and should not be used for medical treatment.
-
Speed of movement (SPEED): displays the current speed, with a value from 0.0 to 999.9 km/mile per hour.
- Odometer (ODO): displays the total distance travelled since the first use of the bicycle. From 0 to 9999 km.
- Heart rate (PUL): displays instantaneous heart rate, 40 to 240 times per minute. Press the Mode button again to display the heart rate. If you wish to set a target heart rate, then press the Set button until the desired target heart rate is selected. Note: these data are only an approximate description and should not be used for medical treatment.
Replacing the batteries
To replace the batteries, follow these steps:
- Open the battery compartment cover on the back of the console.
- Insert two AAA batteries, making sure they are in the correct direction, noting polarity.
- Close the compartment cover.
Note that after each battery change, all values will be "0".
ATTENTION
- If the console stops working properly, remove and replace the batteries.
- When the batteries are worn out, remove and dispose of them safely and follow local regulations for battery disposal.
5. INFORMATION ON EXERCISING
A proper workout should consist of the following phases:
- Warm-up: consists of a session of stretching and low-intensity exercise lasting 5 to 10 minutes. A proper warm-up increases your body temperature, heart rate, and circulation in preparation for exercise. Fig. 10
- Training: consists of 20 to 30 minutes of exercise. (Note: during the first few weeks of exercise do not keep your heart rate high for more than 20 minutes). Fig. 11
- Cool-down: consists of 5 to 10 minutes of stretching exercises. This will increase the flexibility of your muscles and will help prevent injuries. Fig. 10
Workout routine
To maintain or improve your physical condition, exercise three times per week, with at least one day of rest between workouts. After a few months of regular exercise, you may exercise up to five times a week, if desired. Keep in mind that the key to success is making exercise a regular and enjoyable part of your everyday life.
6. CLEANING AND MAINTENANCE
- Periodically check the machine for loose or damaged parts.
- Periodically lubricate and check connecting and rotating parts.
- Before each use, check that all parts are securely fastened. If there are any loose parts, tighten them. Replace defective parts immediately.
- Clean the machine regularly, using a soft cloth and neutral detergent, and do not use solvents or corrosive detergents.
- Any problems related to the bearing, drive belt or wear and tear of the rotating parts should not be repaired by yourself; contact the official Cecotec Technical Support Service.
- The brake pad wears out. During movement, if you detect a strange noise or unusual resistance, the outer housing must be removed to check if the inner brake pad is worn (when the thickness of the central part of the brake pad is less than 2 mm, then it is worn). If it has worn out, replace it immediately. Contact the official Cecotec Technical Support Service.
- Avoid exposing the machine to direct sunlight, especially the console. Store the machine in a clean and dry place, out of the reach of children and pets.
Note: if you have a problem with the machine, stop using it until the problem is solved.
7. TECHNICAL SPECIFICATIONS
Product reference: 07243
Product: DrumFit Indoor 20000 Race
Maximum user weight: 120 kg
Class: H
AAA batteries (x2)
Technical specifications may change without prior notification to improve product quality.
Made in China | Designed in Spain
8. DISPOSAL OF OLD ELECTRICAL AND ELECTRONIC APPLIANCES
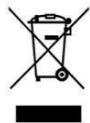
This symbol indicates that, according to the applicable regulations, the product and/or batteries must be disposed of separately from household waste. When this product reaches the end of its shelf life, you should dispose of the cells/batteries/accumulators and take them to a collection point designated by the local authorities.
Consumers must contact their local authorities or retailer for information
concerning the correct disposal of old appliances and/or their batteries.
Compliance with the above guidelines will help protecting the environment.
9. TECHNICAL SUPPORT AND WARRANTY
Cecotec shall be liable to the end user or consumer for any lack of conformity that exists at the time of delivery of the product under the terms, conditions, and deadlines established by the applicable regulations.
It is recommended that repairs be carried out by qualified personnel.
If at any moment you detect any problem with your product or have any doubt, do not hesitate to contact the official Cecotec Technical Support Service at +34 96 321 07 28.
10. COPYRIGHT
The intellectual property rights over the texts in this manual belong to CECOTEC INNOVACIONES, S.L. All rights reserved. The contents of this publication may not, in whole or in part, be reproduced, stored in a retrieval system, transmitted, or distributed by any means (electronic, mechanical, photocopying, recording or similar) without the prior authorization of CECOTEC INNOVACIONES, S.L.
1. PIÈCES ET COMPOSANTS
Image 1
Product: DrumFit Indoor 20000 Race
Fig./Img./Abb./Afb./Rys.1
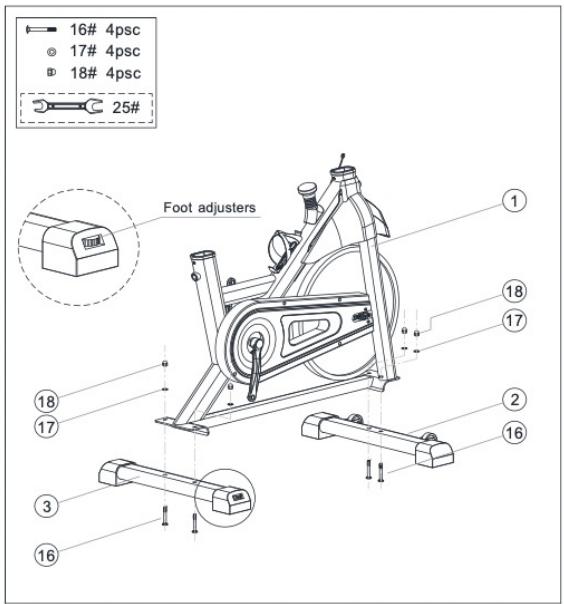
Fig./Img./Abb./Afb./Rys.2

Fig./Img./Abb./Afb./Rys.3
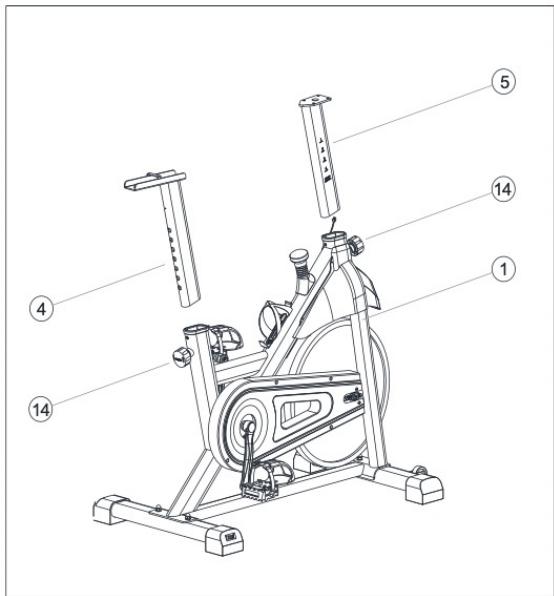
Fig./Img./Abb./Afb./Rys. 4
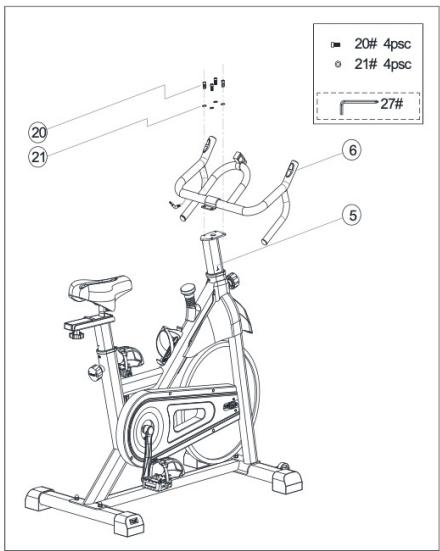
Fig./Img./Abb./Afb./ Rys. 6

Fig./Img./Abb./Afb./ Rys. 5
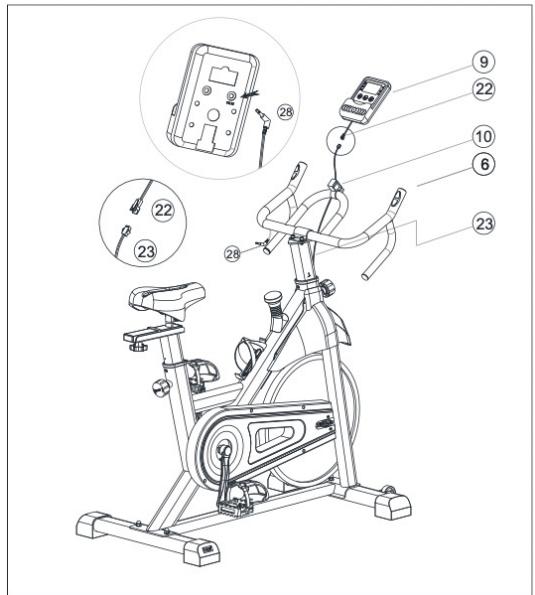
Fig./Img./Abb./Afb./Rys. 7

Fig./Img./Abb./Afb./ Rys. 8

Fig./Img./Abb./Afb./ Rys. 9
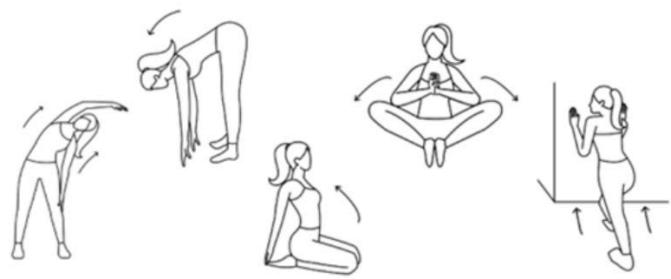
Fig./Img./Abb./Afb./ Rys. 10

Fig./Img./Abb./Afb./ Rys. 11
www.cecotec.es
- SOMMAIRE
- INSTRUCTIONS ON BATTERIES
- INSTRUCTIONS DE SÉCURITÉ
- BEFORE USE
- BOX CONTENT
- ASSEMBLY
- STEP 1
- WARNING
- STEP 2
- FIG. 3
- STEP 3
- FIG. 4
- NOTE
- STEP 4
- FIG. 5
- PLEASE NOTE
- STEP 5
- FIG. 6
- STEP 6
- FIG. 7
- STEP 7
- FIG. 8
- CAUTION
- OPERATION
- CONTROL PANEL. FIG. 9
- FUNCTIONS
- REPLACING THE BATTERIES
- ATTENTION
- INFORMATION ON EXERCISING
- WORKOUT ROUTINE
- CLEANING AND MAINTENANCE
- TECHNICAL SPECIFICATIONS
- DISPOSAL OF OLD ELECTRICAL AND ELECTRONIC APPLIANCES
- TECHNICAL SUPPORT AND WARRANTY
- COPYRIGHT
- PIÈCES ET COMPOSANTS
Brand : CECOTEC
Model : Drumfit Indoor 20000 Race
Category : Fitness Equipment