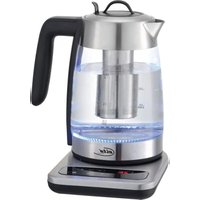
COOL TOUCH - Bread maker ELTA - Free user manual and instructions
Find the device manual for free COOL TOUCH ELTA in PDF.
User questions about COOL TOUCH ELTA
0 question about this device. Answer the ones you know or ask your own.
Ask a new question about this device
Download the instructions for your Bread maker in PDF format for free! Find your manual COOL TOUCH - ELTA and take your electronic device back in hand. On this page are published all the documents necessary for the use of your device. COOL TOUCH by ELTA.
USER MANUAL COOL TOUCH ELTA
Trockenhefe 3/4 Päckchen 1 Päckchen
Programm TEIG
Please read these Operating Instructions through carefully before connecting your device to the mains, in order to avoid damage due to incorrect use. Please pay particular attention to the safety information. If you pass the device on to a third party, these Operating Instructions must also be handed over.
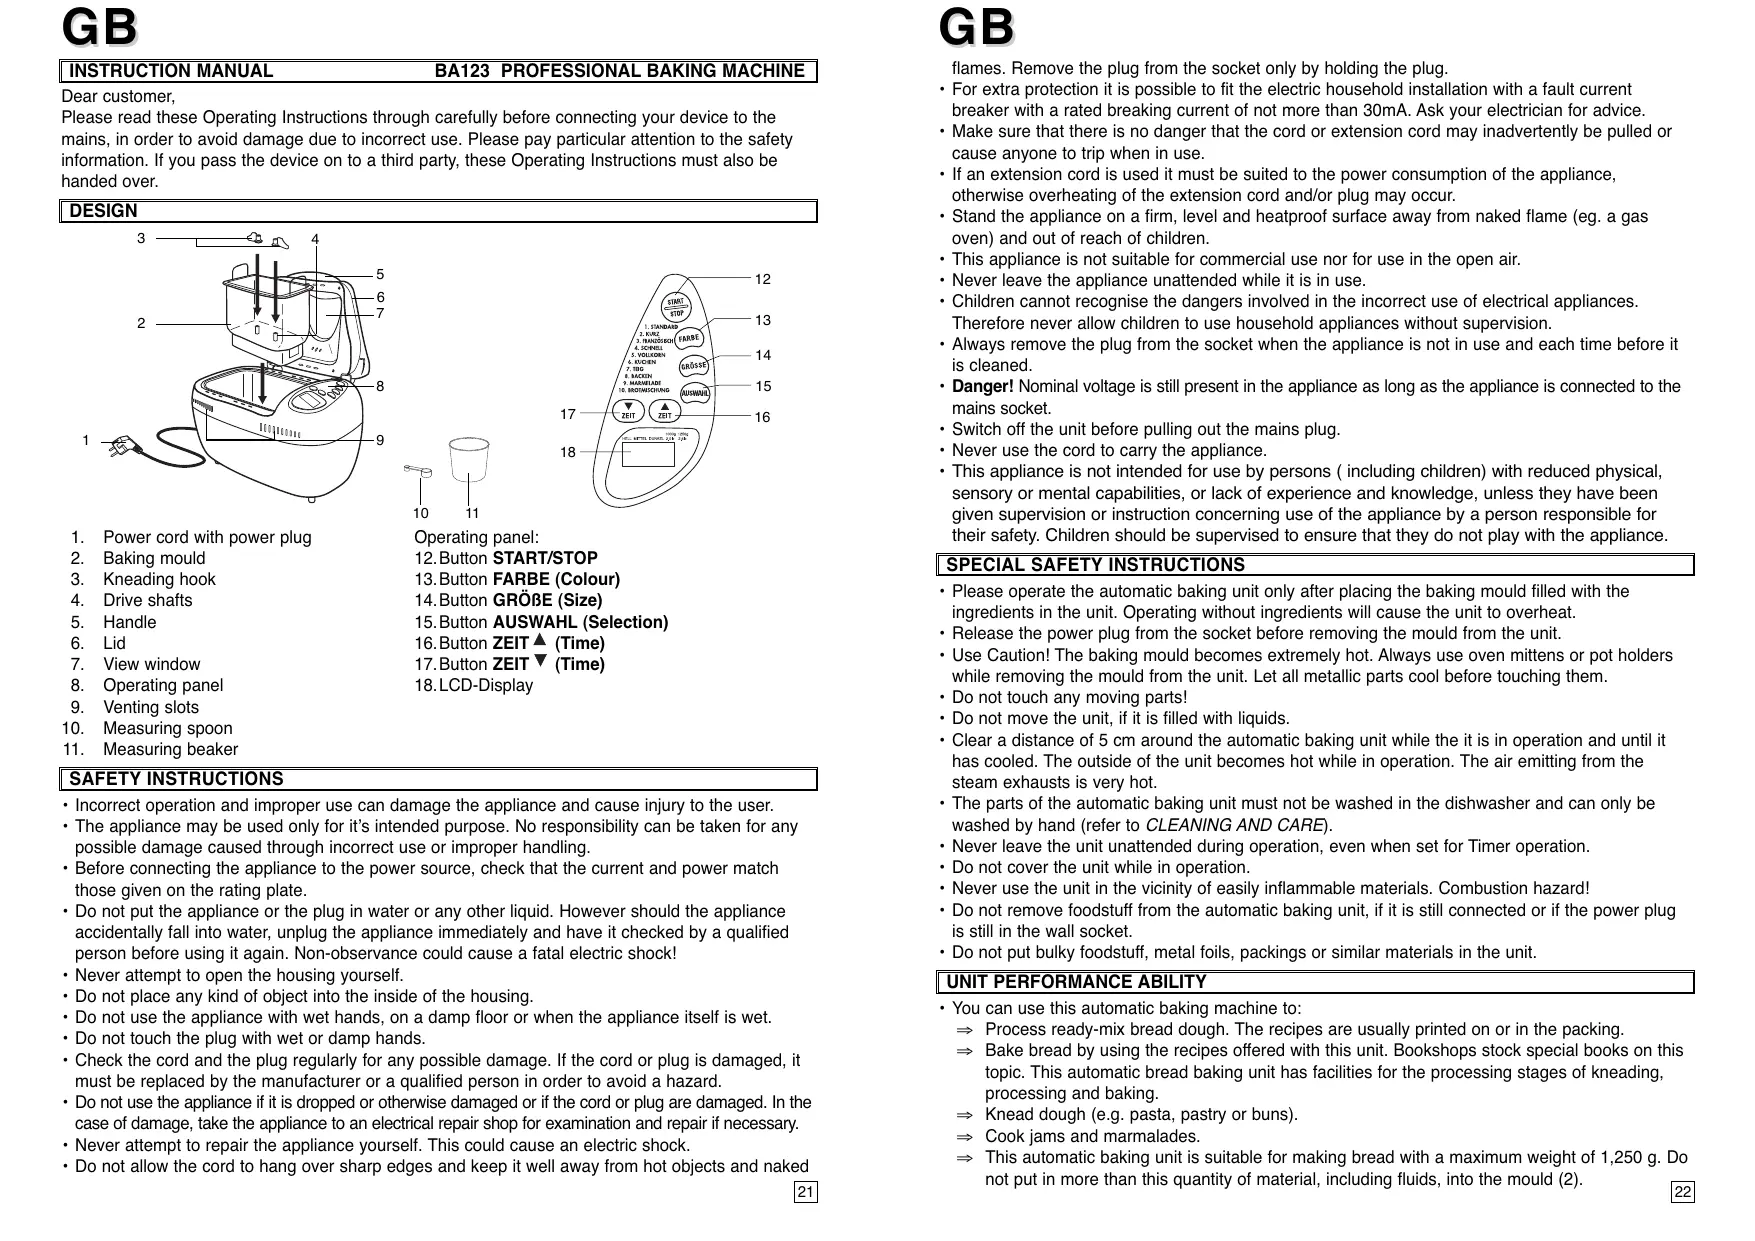
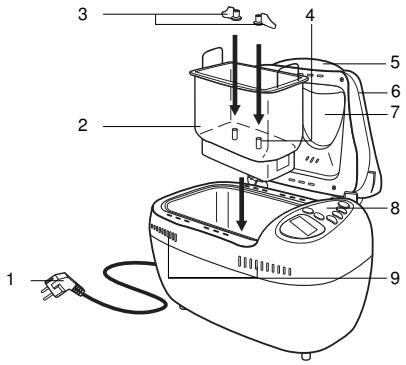
DESIGN
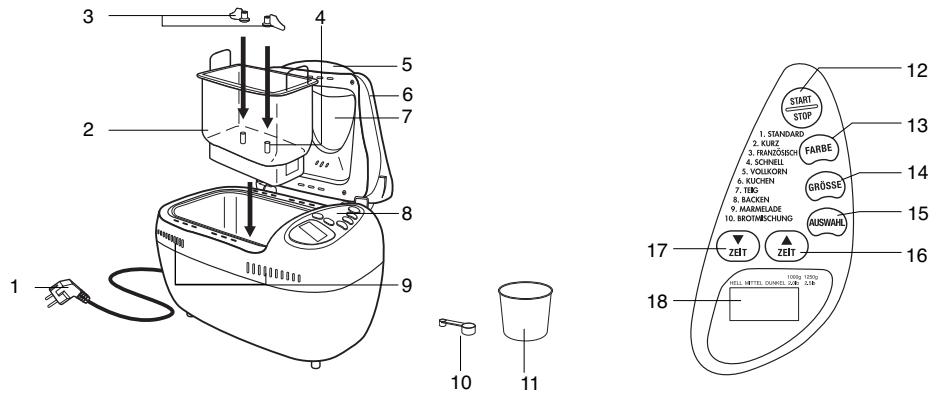
- Power cord with power plug
- Baking mould
- Kneading hook
- Drive shafts
- Handle
- Lid
- View window
- Operating panel
- Venting slots
- Measuring spoon
- Measuring beaker
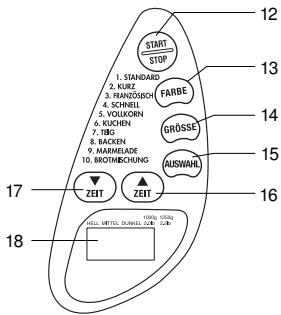
Operating panel:
- Button START/STOP
- Button FARBE (Colour)
- Button GROBE (Size)
- Button AUSWAHL (Selection)
- Button ZEIT (Time)
- Button ZEIT (Time)
18.LCD-Display
SAFETY INSTRUCTIONS
- Incorrect operation and improper use can damage the appliance and cause injury to the user.
- The appliance may be used only for it's intended purpose. No responsibility can be taken for any possible damage caused through incorrect use or improper handling.
- Before connecting the appliance to the power source, check that the current and power match those given on the rating plate.
- Do not put the appliance or the plug in water or any other liquid. However should the appliance accidentally fall into water, unplug the appliance immediately and have it checked by a qualified person before using it again. Non-observance could cause a fatal electric shock!
- Never attempt to open the housing yourself.
- Do not place any kind of object into the inside of the housing.
- Do not use the appliance with wet hands, on a damp floor or when the appliance itself is wet.
- Do not touch the plug with wet or damp hands.
- Check the cord and the plug regularly for any possible damage. If the cord or plug is damaged, it must be replaced by the manufacturer or a qualified person in order to avoid a hazard.
- Do not use the appliance if it is dropped or otherwise damaged or if the cord or plug are damaged. In the case of damage, take the appliance to an electrical repair shop for examination and repair if necessary.
- Never attempt to repair the appliance yourself. This could cause an electric shock.
- Do not allow the cord to hang over sharp edges and keep it well away from hot objects and naked
GB
flames. Remove the plug from the socket only by holding the plug.
- For extra protection it is possible to fit the electric household installation with a fault current breaker with a rated breaking current of not more than 30mA . Ask your electrician for advice.
- Make sure that there is no danger that the cord or extension cord may inadvertently be pulled or cause anyone to trip when in use.
- If an extension cord is used it must be suited to the power consumption of the appliance, otherwise overheating of the extension cord and/or plug may occur.
- Stand the appliance on a firm, level and heatproof surface away from naked flame (eg. a gas oven) and out of reach of children.
- This appliance is not suitable for commercial use nor for use in the open air.
- Never leave the appliance unattended while it is in use.
- Children cannot recognise the dangers involved in the incorrect use of electrical appliances. Therefore never allow children to use household appliances without supervision.
- Always remove the plug from the socket when the appliance is not in use and each time before it is cleaned.
- Danger! Nominal voltage is still present in the appliance as long as the appliance is connected to the mains socket.
- Switch off the unit before pulling out the mains plug.
- Never use the cord to carry the appliance.
- This appliance is not intended for use by persons ( including children) with reduced physical, sensory or mental capabilities, or lack of experience and knowledge, unless they have been given supervision or instruction concerning use of the appliance by a person responsible for their safety. Children should be supervised to ensure that they do not play with the appliance.
SPECIAL SAFETY INSTRUCTIONS
- Please operate the automatic baking unit only after placing the baking mould filled with the ingredients in the unit. Operating without ingredients will cause the unit to overheat.
- Release the power plug from the socket before removing the mould from the unit.
- Use Caution! The baking mould becomes extremely hot. Always use oven mittens or pot holders while removing the mould from the unit. Let all metallic parts cool before touching them.
- Do not touch any moving parts!
- Do not move the unit, if it is filled with liquids.
- Clear a distance of 5cm around the automatic baking unit while the it is in operation and until it has cooled. The outside of the unit becomes hot while in operation. The air emitting from the steam exhausts is very hot.
- The parts of the automatic baking unit must not be washed in the dishwasher and can only be washed by hand (refer to CLEANING AND CARE).
- Never leave the unit unattended during operation, even when set for Timer operation.
- Do not cover the unit while in operation.
- Never use the unit in the vicinity of easily inflammable materials. Combustion hazard!
- Do not remove foodstuff from the automatic baking unit, if it is still connected or if the power plug is still in the wall socket.
- Do not put bulky foodstuff, metal foils, packings or similar materials in the unit.
UNIT PERFORMANCE ABILITIES
- You can use this automatic baking machine to:
Process ready-mix bread dough. The recipes are usually printed on or in the packing.
Bake bread by using the recipes offered with this unit. Bookshops stock special books on this topic. This automatic bread baking unit has facilities for the processing stages of kneading, processing and baking.
Knead dough (e.g. pasta, pastry or buns).
Cook jams and marmalades.
This automatic baking unit is suitable for making bread with a maximum weight of 1,250 g. Do not put in more than this quantity of material, including fluids, into the mould (2).
GB
ABOUT BREAD MAKERS
- The principal benefit of this bread maker is that all the kneading, rising and baking is performed within a space saving, self-contained unit. This bread maker will easily produce superb loaves time and time again provided the user follows the instructions and understands these few basic principles.
ACCESSORIES
- 2 kneading blades (3)
1 measuring cup (11)
1 measuring spoon (10) - The quantities of sugar, oil & other ingredients in these recipes are based upon this metric measuring spoon:
- large end 15ml = tablespoon
- small end 5ml = teaspoon
- The pan (2) must be properly inserted into the machine before the drive cogs can make contact with the kneading shafts. Next, insert the kneading blades (3), regardless of their direction. As you place the blades on to the kneading shaft, rotate them until they lock into place.
CONTROLS
- START/STOP (12): Starts unit operation. To stop the unit part way through press and hold this button for 3 seconds. After which, the machine will reset to programme 1.
FARBE (Colour) (13): Press to select crust colour: light, medium or dark. The arrow on the LCDdisplay (16) will point to the colour you have selected. NOTE: Crust colour is not available with the BREADMIX program (for readymade bread mixtures) - GROBE (Size) (14): Select between 2 lb (approx. 1000 g) and 2.5 lb (approx. 1250 g) loaf size. The small arrow will move to indicate your current selection.
AUSWAHL (Select) (15): Main selector control. Press to cycle through each programme. - ZEIT (Time) (16): Time selection (increase)
- ZEIT (Time) (17): Time selection (decrease)
THE PROGRAMMES
- STANDARD (Basic): This is the first programme displayed when the machine is switched on. This is a good, general-purpose programme for white or brown bread. Most recipes use this programme.
- KURZ (Short): Uses shorter steps to make bread in less time.
NOTE: Loaf size is not available in this mode.
- FRANZÖSISCH (French): This setting is slightly longer than the STANDARD programme, due to the extra kneading and rising time required to give the loaf a 'airy' texture characteristic of French bread.
NOTE: Loaf size cannot be altered in this mode.
- SCHNELL (Quick): This mode is similar to the KURZ programme (Short) in that the steps are shorter for a faster process time.
NOTE: Loaf size cannot be altered in this mode.
SCHNELL mode (Quick) is best for gluten-free recipes.
VOLLKORN (Whole wheat): WHOLE WHEAT: This mode allows more time for the kneading and rising steps in order to obtain better results with the low gluten whole wheat/whole meal flour.
KUCHEN (Cake): Programme for making cakes.
Note: The crust colour control is available in this mode.
- TEIG (Dough): Performs all the steps of kneading and rising but omits the bake cycle.
NOTE: Crust colour control and loaf size selection are not available.
- BACKEN (Bake): Stand-alone bake cycle. Good for sweet bread, baking pre-made dough etc.
- MARMELADE (Jam): Mixing and heating programme ideal for jam making.
GB
- BROTMISCHUNG (Bread mixture): Programme specially designed for pre-packaged bread mixes.
INGREDIENTS
- The most important part of the bread making process is the selection of quality ingredients. Just apply this simple rule: Best ingredients - best results, poor ingredients - poor results. For example: If quality yeast, flour and cold water were thrown together and mixed in an old bucket the mixture would still rise! Nothing the bread maker does will prevent the dough from rising. If your loaf does not rise it is unlikely that the bread maker is to blame. It is probably due to the ingredients. In order to save you time we have included information on each major element used in the making of bread.
- FLOUR: In bread making, the most important element in the flour is the protein gluten, which is the natural agent that gives the dough the ability to hold its shape and retain the carbon dioxide produced by the yeast. The term 'strong flour' means that it has a high gluten content. It has probably been milled from hard wheat and is lends well to bread making.
- BROWN FLOUR (or FARMHOUSE FLOUR): Brown flour contains about 85% of the wheat kernel. Much of the bran part of the wheat kernel has been removed. Loaves made with all brown flour tend to be smaller than white loaves due to the lower gluten content however there tends to be more flavour and texture to brown loaves. When buying this type of flour the strong, finely ground type will obtain better results from the bread maker.
- WHOLEMEAL or WHOLE-WHEAT FLOUR: This type of flour contains all of the original wheat kernel including the bran; the tough outer skin of the wheat which is an excellent source of fibre. As with the brown flour, you should specify a strong fine ground variety when using your bread maker. The bran in the wholemeal flour inhibits the release of gluten so wholemeal loaves tend to be smaller and more dense than white loaves.
- YEAST is the living organism that multiplies in the dough. It produces the carbon dioxide bubbles that make the dough rise. For bread making machines it is best to use the 'Easy Blend' dried yeast that comes in sachets. This yeast does not rely on sugar in order to ferment so it is easier to reduce the sugar content of your loaf without any adverse effects. Avoid yeast in tubs or tins as these tend to perform less well once opened. Sachet yeast is very sensitive to moisture so do not store partly used sachets for more than a day.
- SALT not only adds to the flavour of the bread, but it can also be used to slow down a particularly lively yeast.
- BUTTER (or fat) enhances the flavour and makes the loaf softer. Alternatives to butter are margarine or olive oil. Avoid low fat spreads as these may be as little as 40% fat and will not have the same effect.
- SUGAR adds to the flavour of the bread and helps to make the crust turn a darker shade of brown.
Note: Most sachet yeasts do not rely on sugar to become active.
- WATER: Use soft water if possible but the bread maker will still produce quality bread with hard water. There is much debate on what temperature the water should be. The answer is simple. If the water feels cool to the touch then it's fine. There is no need to warm the water first. If you're worried the water may be too cold from the tap just leave it to sit for an hour in order to reach room temperature. Making the water warm could prematurely kill the yeast.
- OPTIONAL INGREDIENTS could mean anything from dried fruit, cheese, eggs, nuts or yoghurt to other cereals like rye flour, corn meal or any number of herbs and spices. There are a couple of things to consider for best results. Always be aware of the moisture content and adjust accordingly. Things like cheese, milk and fresh fruit contain quite a bit of water, which will determine the look of the finished loaf.
In the beginning you might want to stick to dry substitutes like Parmesan cheese, dried milk or dried fruit. As you become more proficient with the machine you will instinctively know whether the dough looks too wet or too dry and can add flour or water accordingly during the process.
Remember to consider the salt content of the ingredients you add. Salt can slow down the yeast.
GB
Finally, if the added ingredients are wet like yoghurt or powdered like dried herbs they can go into the mixture at the start of the process. For things like nuts or dried fruit there is a time during the process where the machine will beep to let you know it's time to add these to the dough mixture. Refer to the TABLE so you know when to expect the beep.
- ENVIRONMENT: Last but not least is the environment in which the bread is made. The bread maker will work well in a wide range of temperatures but there could be a difference of 15% in loaf size between a very warm room and a very cold room. Do not place your bread maker in a draughty part of the house. The machine will offer some protection to the dough against draughts but it does have limitations. If the humidity in the room is high this too could affect the loaf. As a general rule, if the room is comfortable for you it will be comfortable for your bread maker.
STORING YOUR BREAD
- Homemade bread contains no artificial preservatives. However, if you store the bread in a clean, air-tight container placed in the refrigerator it should keep for 5-7 days. Bread is also good to freeze, but allow finished loaves to cool before placing into a polythene bag and storing in the freezer.
YOUR FIRST LOAF
- The following recipe is for a simple white loaf. Even if you do not usually eat white bread we strongly recommend you make this your first loaf because it is relatively easy to make.
- Follow the steps in the exact order shown on the next page. For a 1000g / 2 lb loaf you will need the following ingredients:
Water 310 ml
Strong white bread flour 560 g
Sugar 2 tablespoons
Butter or margarine 2 tablespoons
Salt 2 tablespoons
Yeast (sachet type) 21/2 tablespoons (usually 1 1/2 7 g sachet)
Hefe (Trockenhefe im Tüchen) 2 1/2 TL (normalerweise 1 1/2 7g-Tüchen)
- Use quality kitchen scales to measure the flour. Use the measuring cup (10) provided for the liquid or, if you prefer, any measuring beaker that's calibrated in ml.
BEFORE STARTING FOR THE FIRST TIME
- Remove all packing material.
- Clean the unit before using it for the first time (see CLEANING AND CARE).
- There can be some slight smoke and/or smell when using it for the first time. Residues left over from the manufacturing process are being burned on the surface of the unit.
OPERATION
- Remove the baking mould (2) from the unit with both hands. Attach the two kneading hooks (large and small) (3) to the drive shafts (4) on bottom of the baking mould (2). Please ensure that the kneading hooks (3) are latched in securely.
- Pour the condiments into the baking mould (2) (refer to the chapters INGREDIENTS and RECIPES). It is absolutely essential that the condiments are in the baking mould (2) before placing the baking mould (2) into the automatic baking unit. Otherwise, it will dirty the unit or damage the heating rods.
- Empty the condiments, in the sequence indicated above, into the baking mould (2). First fill in the fluid, then the flour. It is best to spread the sugar and salt around the edge of the flour. Make a small basin in the flour for yeast. Please see to it that the yeast does not come in contact with the salt or the fluid.
- Insert the baking mould (2) into the unit. Please ensure that it latches with a distinct clicking sound. Close the lid (6).
- Insert the power plug (1) into a suitable socket.
GB
The program STANDARD is displayed:
Baking time: 3:30 hrs.
FARBE (Colour): Medium
GRösSE(Size):2lb(1000g)
- Select another program: Keep the AUSWAHL (Select) button (15) pressed, until the programme number of the desired operation lights up in the LCD display (18).
- Select the desired settings using the buttons GROSSE (Size) (14) and FARBE (Colour) (13) (refer to the section TABLES).
- You can now set the ZEIT (Time) function (see Using the Timer).
- Press the button START/STOP (12). The unit now begins to warm the dough to room temperature. Thereafter, the kneading hooks (3) begin to knead the dough.
- At this point, the selected programme engages. The time remaining for the selected programme is shown in the LCD display (18). The automatic bread baking unit now executes the various operations. Kneading, processing and baking, depending upon the selected programme.
- In the kneading process, the unit mixes the condiments for several minutes. It is quite normal for the unit to vibrate, and make a little noise, during the kneading process.
- Then the unit begins to process the dough. In this period, the yeast begins processing and the viewing window (7) may become lightly clouded during this time.
- If the unit emits some smoke, keep the cover (6) closed. Pull the power plug (1) from the socket. Under no circumstances should you wipe the rising dough in the unit with water. Smoke can be generated if dough rises over the edge of the mould (2) and touches the heating coil.
- To achieve the best baking results, do not, if possible, open the unit during operation. You can observe the baking progress through the viewing window (7).
- A signal is sounded after 1/3 of the time has passed, if you use one of these programs: STANDARD, KURZ (Short), FRANZÖSISCH (FRENCH), VOLLKORN (Whole Wheat), KUCHEN (Cake), TEIG (Dough) and BROTMISCHUNG (Bread mixture) (see the section TABLES). At this time add the optional ingredients to the bread, such as nuts etc. Open the lid (6) carefully, add the optional ingredients and close the lid (6). Please be careful of the rising steam!
After the set program is over, the LCD display (18) shows 0:00. The bread is now fully baked.
- Pull the power plug (1) from the socket.
- Open the lid (6). Remove the baking mould (2) from the unit, using oven mittens.
Caution: The baking mould (2) is very hot!
Again, please mind the rising steam!
- Place the baking mould (2) on a heat-proof surface, never on a table top or plastic surface.
- Let the baking mould (2) cool for about 5 minutes in the unit, before removing the bread from the mould (2). After these 5 minutes remove the baking mould (2) from the unit. Shake lightly to release the bread.
- The unit will keep the baked bread hot for one hour, if it is not removed after 5 minutes.
- If the kneading hooks (3) are still stuck in the bread, you can remove them using a blunt object. In order not to damage the non-stick coating of the kneading hooks (3) use a tool made of wood or the hooks included in the packaging.
After about 30 minutes of cooling, the bread may become distorted.
HOW TO USE THE TIMER
- The most common use for the timer is to make a loaf overnight in order for it to be ready in the morning. Once you have selected your desired programme, simply press the button ZEIT (Time increase) (16) or the button ZEIT (Time decrease) (17) on the control panel and the figure on the display will increase or decrease by 10 minutes. This way you can set programme to suit your needs. The important thing to keep in mind is that the amount of time the display reads is the time from pressing START/STOP (12) to when the loaf will be ready. For example: After selecting the required programme, keep pressing the ZEIT button (Time increase) (16) ZEIT button (Time decrease) (17) until the display reads 5:00. Then press START/STOP (12). It will now be 5 hours before the loaf is ready.
GB
If you press the ZEIT ▲ (Time increase) (16) - until the display reads 8:10 then the loaf will be ready in 8 hours and 10 minutes. You can press and hold the ZEIT (Time) (left/right) buttons to scroll quickly to your desired setting. You can set a maximum of 13 hours.
- NOTES: Once you have pressed START/STOP (12) you cannot alter the timer. If you need to reset the timer press START/STOP (12) button for 3 seconds and the machine will reset, after which you can re-select your programme and timer accordingly.
Note: Do not do this if the process is past the first kneading. Do not use perishable ingredients like milk or eggs when using the delay timer as these will spoil whilst sitting in the bread pan (2). You cannot reduce the delayed time to less than the process time.
CLEANING AND CARE
- In addition to this, you must observe the safety instructions.
- Let the unit cool down completely before starting to clean it.
- If necessary, remove the baking mould (2) from the unit and remove the kneading hooks (3) from the drive shafts (4). The baking mould (2) and the kneading hooks (3) have a non-stick coating. This facilitates cleaning. The baking mould (2) and the kneading hooks (3) should be cleaned with a mild cleaning solution and warm water.
- Never use any abrasive cleaning agents, scouring aids or scratching sponges. If the kneading hooks (3) become encrusted or difficult to remove from the drive shafts (4), fill the baking mould (3) with hot water. After about 30 minutes, try again. Dry the parts well before putting them back into the unit.
- The baking mould (2) and the kneading hooks (3) should not be washed in the dishwasher.
- Do not place the baking mould into water. This might cause damage to the protection on the bottom of the mould.
- Wipe the baking compartment and container using a moist cloth and let dry completely.
FREQUENTLY ASKED QUESTIONS
- Q: The motor did not run when I pressed START/STOP (12).
A: It's not supposed to. All the programmes start with a pre-heat step that ensures all the ingredients are at the right temperature before the process starts.
Q: The machine beeped part way through the process.
A: This is the signal to add optional ingredients like fruit or nuts. Some of the recipes call for extra ingredients. Refer to the appropriate recipe for more information.
Q: I tried to make another loaf right after the first but the process wouldn't start.
A: The machine must be allowed to cool thoroughly before another loaf can be made.
GB
PROBLEMS
- Sunken loaves: Typically, what happens is the dough will rise very well then sinks just as the baking process starts. Most of the time, this is because the dough was not strong enough. Whilst the yeast is still producing gas a weak dough will maintain a good shape but once the yeast is killed by the baking process, the loaf can sink under it's own weight. The mixture is too wet causing weak dough.
Too much water/not enough flour. This will make the dough watery. The dough should be soft but firm.
Some brands may need some adjustment to the ingredients. Some types of flour absorb less water than others. In this case, add an extra 50g of flour to make the dough thicker.
- The gas bubbles produced by the yeast are escaping! Dough without gluten is like water without soap; you cannot make bubbles.
The white flour brand you are using probably does not have sufficient gluten to make a decent dough.
- The yeast is dead or has gone off.
If you use warm water, the yeast may be exhausted before the rising process is complete.
Tap water is usually fine. Be extra careful that the yeast does not come into contact with the water before the mixing process starts. This is particularly important when using the timer.
Check the "best before" date on the yeast sachet. If it is close to expiry it would be best to buy another.
Avoid using yeast from sachets that are already opened. Use a new sachet every time.
- The loaf did not rise! Many of the reasons why bread doesn't rise are outlined above. But first, let us eliminate the obvious:
Whole meal & brown loaves seldom rise as well as white.
You did put the yeast in didn't you? It's easy to forget.
A common error is mistaking teaspoons of salt for tablespoons. The yeast will not work well if you add too much salt.
Both the flour and the yeast must be in good condition.
The mixture may have been too dry. Add 1 tablespoon of water to the mixture if necessary. If you feel that the yeast should be increased then only add an extra 1 tsp - but not more.
- The loaf rose too high and stuck to the lid!
Usually caused by too much yeast, too much water or flour, or forgetting to add the salt. Salt keeps the yeast in check - without it the yeast can cause the loaf to over-rise.
TECHNICAL DATA
Power input: 230V 50Hz
Power consumption: 800 Watt
GUARANTEE AND CUSTOMER SERVICE
Before delivery our devices are subjected to rigorous quality control. If, despite all care, damage has occurred during production or transportation, please return the device to your dealer. In addition to statutory legal rights, the purchaser has an option to claim under the terms of the following guarantee:
For the purchased device we provide 2 years guarantee, commencing from the day of sale. During this period we will remedy all defects free of charge, which can be demonstrably attributed to material or manufacturing defects, by repair or exchange.
Defects which arise due to improper handling of the device and malfunctions due to interventions and repairs by third parties or the fitting of non-original parts, are not covered by this guarantee.
APPENDIX: TABLE ON BAKING PHASE TIMINGS
| Program number | 1 | 2 | 3 | 4 |
| Program name | STANDARD | KURZ | FRANZÖSISCH | SCHNELL |
| 2.0 lb / 2.5 lb / 1,000 g 1,250g | 1:58 | |||
| 3:30 3:40 | 3:50 | 1:52 | ||
| Pre-heat: | 17 min 20 min | 5 min | 22 min | 3 min |
| Stirring: | 3 min | 3 min | 3 min | 3 min |
| Knead 1 | 2 min | 2 min | 2 min | 2 min |
| Knead 2: Heat at 25°C | 13 min Signal at 2:57 (2lb) 3:04 (2,5lb) | 20 min Signal at 1:33 | 21 min Signal at 3:12 | 5 min |
| Open 1 Heat to/at 25°C | 45 min | - | 45 min | - |
| Open 2 | 19 min | 7 min | 26 min | 7 min |
| Open 3 | 46 min | 26 min | 51 min | 27 min |
| Bake | 55 min 62 min | 55 min | 65 min | 65 min |
| Keep warm | 60 min | 60 min | 60 min | - |
| Timer- programming | 13 h | - | 13 h |
| 5 | 6 | 7 | 8 | 9 | 10 |
| VOLLKORN | KUCHEN | TEIG | BACKEN | MARME- LADE | BROTMISCHUNG |
| 2.0 lb / 2.5 lb / 1,000 g 1,250g | 2.0 lb / 1,000 g | 1:50 | 1:00 | 1:20 | 2.0 lb / 2.5 lb / 1,000 g 1,250 g |
| 3:30 3:40 | 2:00 | 3:09 3:20 | |||
| 37 min 40 min | - | 22 min | - | 15 min | 11 min 22 min |
| 3 min | 3,5 min | 3 min | - | 45 min heating | 3 min |
| 2 min | 20 min Fruit signal 1:49 | 2 min | - | Pause: 20 min | 2 min |
| 13 min | - | 16 min Fruit signal 1:12 | - | End | 13 min Fruit signal 2:45 |
| 45 min | - | - | - | 45 min | |
| 19 min | - | 45 min | - | 19 min | |
| 36 min | - | 22 min | - | 40 min | |
| 55 min 62 min | 80 min plus 60 min pause | - | 60 min | 56 min | |
| 60 min | - | - | 60 min | 60 min | |
| 13 h | - | 13 h | 13 h | 13 h |
RECIPES
| White bread | ||
| Loaf size | 1000 g (2 lb) | 1250 g (2.5 lb) |
| Water | 350 ml | 500 ml |
| Salt | 1 teaspoon | 1.5 teaspoons |
| Sugar | 1 teaspoon | 1.5 teaspoons |
| Hard wheat semolina | 150 g | 200 g |
| Bread flour | 350 g | 500 g |
| Yeast | 3/4 packet | 1 packet |
Program: STANDARD or KURZ (Quick) (for quick baking)
French white bread
| Loaf size | 1000 g (2 lb) | 1250 g (2.5 lb) |
| Water | 375 ml | 550 ml |
| Salt | 1 teaspoon | 1.5 teaspoons |
| Bread flour | 525 g | 700 g |
| Hard wheat semolina | 75 g | 100 g |
| Sugar | 1 teaspoon | 1.5 teaspoons |
| Dry yeast | 3/4 packet | 1 packet |
Program: FRANZÖSISCH (French) or KURZ (Quick) (for quick baking)
Nut and raisin bread
| Tip: Add the raisins and nuts after you hear the sound signal | ||
| Loaf size | 1000 g (2 lb) | 1250 g (2.5 lb) |
| Water or milk | 275 ml | 50 ml |
| Margarine or butter | 30 g | 40 g |
| Salt | 1/4 teaspoon | 3/4 teaspoon |
| Sugar | 1 tablespoon | 2 tablespoons |
| Bread flour | 500 g | 650 g |
| Dry yeast | 3/4 packet | 1 packet |
| Raisins | 50 g | 50 g |
| Grated walnuts | 40 g | 60 g |
Program: STANDARD
Poppy bread
Tip: Before the last fermentation, open the lid briefly, apply water on the dough and then distribute the poppy.
Press the poppy lightly with the hands.
| Loaf size | 1000 g (2 lb) | 1250 g (2.5 lb) |
| Water | 375 ml | 570 ml |
| Bread flour | 500 g | 670 g |
| Corn semolina | 75 g | 130 g |
| Sugar | 1 teaspoon | 1.5 teaspoons |
| Salt | 1 teaspoon | 1.5 teaspoons |
| Whole milled poppy | 75 g | |
| Grated nutmeg | 1 pinch | 2 pinches |
| Butter | 15 g | 20 g |
| Grated Parmesan | 1 tablespoon | 1.5 tablespoons |
| Dry yeast | 3/4 packet | 1 packet |
Program: KURZ (Short)
Buttermilk bread
| Loaf size | 1000 g (2 lb) | 1250 g (2.5 lb) |
| Buttermilk | 375 ml | 550 ml |
| Salt | 1 teaspoon | 1.5 teaspoons |
| Sugar | 1 teaspoon | 1.5 teaspoons |
| Bread flour | 500 g | 760 g |
| Dry yeast | 3/4 packet | 1 packet |
Program: FRANZÖSISCH (French)
Wholemeal bread
| Loaf size | 1000 g (2 lb) | 1250 g (2.5 lb) |
| Water | 350 ml | 500 ml |
| Margarine or butter | 25 g | 35 g |
| Salt | 1 teaspoon | 1.5 teaspoons |
| Sugar | 1 teaspoon | 1.5 teaspoons |
| Bread flour | 270 g | 380 g |
| Wholemeal flour | 270 g | 380 g |
| Dry yeast | 3/4 packet | 1 packet |
Program: STANDARD
Coarse grained bread
| Loaf size | 1000 g (2 lb) | 1250 g (2.5 lb) |
| Water | 300 ml | 450 ml |
| Salt | 1 teaspoon | 1.5 teaspoons |
| Dry wheat sourdough | 25 g | 40 g |
| Bread flour | 500 g | 670 g |
| Sugar | 1 teaspoon | 1.5 teaspoons |
| Dry yeast | 3/4 packet | 1 packet |
Program: FRANZÖSISCH (French)
Tip: The sourdough improves the finish, freshness and taste of the dough. It is milder than rye sourdough.
Sourdough bread
| Loaf size | 1000 g (2 lb) | 1250 g (2.5 lb) |
| Dried sourdough | 1/4 packet | 3/4 packet |
| Water | 350 ml | 450 ml |
| Bread spices | 1/4 teaspoon | 1 teaspoon |
| Salt | 1 teaspoon | 1.5 teaspoons |
| Rye flour | 250 g | 340 g |
| Bread flour | 250 g | 340 g |
| Dry yeast | 1 packet | 1.5 packets |
Program: STANDARD
Dried sourdough is concentrated and is available in 15g packing.
White Graham bread
| Loaf size | 1000 g (2 lb) | 1250 g (2.5 lb) |
| Water | 350 ml | 550 ml |
| Salt | 1 teaspoon | 1 teaspoon |
| Butter or Margarine | 25 g | 30 g |
| Honey | 1 teaspoon | 1.5 teaspoons |
| Vinegar | 3/4 teaspoon | 1 teaspoon |
| Wheat wholemeal | 500 g | 700 g |
| Dry yeast | 1 packet | 1,5 packet |
Program: VOLLKORN (Whole wheat)
Coarse grained brown bread
Tip: The spices can be added either full or stomped. Before the last fermentation, open the lid briefly. Moisten the dough with water and add oats or millet. Compress lightly with the hands.
| Loaf size | 1000 g (2 lb) | 1250 g (2.5 lb) |
| Water | 350 ml | 450 ml |
| Rye flour | 170 g | 220 g |
| Wheat wholemeal | 170 g | 220 g |
| Spelt flour | 170 g | 220 g |
| Beet treacle | 1 teaspoon | 1.5 teaspoons |
| Pimento grain | 1/4 teaspoon | 1.5 teaspoons |
| Coriander | 1/4 teaspoon | 1.5 teaspoons |
| Grated nutmeg | 1 pinch | 2 pinches |
| Dried sourdough | 1/4 packet | 3/4 packet |
| Dry yeast | 3/4 packet | 1 packet |
Program: STANDARD
Rye bread
| Loaf size | 1000 g (2 lb) | 1250 g (2.5 lb) |
| Water | 350 ml | 450 ml |
| Dried sourdough | 1/4 packet | 3/4 packet |
| Salt | 1 teaspoon | 1.5 teaspoons |
| Rye malt | 10 g | 15 g |
| Rye flour | 300 g | 400 g |
| Bread flour | 200 g | 260 g |
| Yeast | 1 packet | 1.5 packets |
Program: VOLLKORN (Whole wheat)
GB
Apple walnut bread
Eggs 2
Milk 40 ml
Oil 4 tablespoons
Sugar 1 cup
Granny Smith apples peeled and chafed 2 cups
Hacked walnuts 1 cup
Flour 380g
Sodium bicarbonate 1 teaspoon
Baking powder 1 teaspoon
Salt 1/4 teaspoon
Nutmeg 1/4 teaspoon
Cinnamon 1/4 teaspoon
Sugar 1.5 teaspoons 2 teaspoons
Vinegar 1.5 teaspoons 2 teaspoons
Wholemeal flour 550 g 750 g
7-grain flakes 200g 300g
Dry yeast 3/4 packet 1 packet
Program: VOLLKORN (Whole wheat)
Spelt (German wheat) bread
Tip: Open the lid of the appliance briefly before the last fermentation. Moisten the salt bread with hot water, spread the spelt or oat flakes and press the cumin lightly with the hand.
1000 g (2 lb) 1250 g (2.5 lb)
Buttermilk 400 ml 500 ml
Spelt wholemeal flour 230 g 280 g
Rye wholemeal flour 180 g 230 g
Coarse ground spelt 180 g 180 g
Sunflower seeds 75 g 100 g
Salt 1 teaspoon 1.5 teaspoons
Sugar 1 teaspoon 1.5 teaspoons
Dried sourdough 1 packet
Dry yeast 3/4 packet 1 packet
Program: STANDARD
GB
Sunflower seed bread
Tip: Add the sunflower seeds after the first audible signal. You can also use pumpkin seeds. If the seeds are roasted briefly, the taste is sharper.
Loaf size 1000 g (2 lb) 1250 g (2.5 lb)
Water 375 ml 550 ml
Butter 30g 40g
Bread flour 525 g 700 g
Salt 1 teaspoon 1.5 teaspoons
Sugar 1 teaspoon 1.5 teaspoons
Sunflower seeds 35g 50g
Dry yeast 3/4 packet 1 packet
Program: STANDARD
Fig walnut bread
Tip: If fresh walnuts are used with their seed skin still soft, the bread tastes slightly bitter, but very tasty and goes beautifully with new wine.
Loaf size 1000 g (2 lb) 1250 g (2.5 lb)
Water 350 ml 550 ml
Bread flour 260g 320g
Rye flour 400 g 450 g
Salt 1 teaspoon 1.5 teaspoons
Fine cut
dried figs 50g 60g
Hacked walnuts 50 g 60 g
Honey 1.5 teaspoons 2 teaspoons
Dry yeast 3/4 packet 1 packet
Program: STANDARD
French herb bread
Tip: The quantity of the cloves of garlic can be increased four times, if it is cut in strips and then fried in butter till slightly brown. When cooled, you can them to other condiments. The taste is then better. You can also use herbal salt instead of salt.
1000 g (2 lb) 1250 g (2.5 lb)
Water 350 ml 480 ml
Bread flour 525 g 700 g
Hard wheat flour 75 g 100 g
Sugar 1 teaspoon 1.5 teaspoons
Salt 1 teaspoon 1.5 teaspoons
Cut parsley,
dill and cress 1.5 tablespoons 2 tablespoons
Pressed cloves of garlic 2 units 3 units
Butter 15g 20g
Dry yeast 1 packet 1.5 packets
Program: KURZ (Quick)
Tip: This dough is eminently suited for buns. Use the SCHHELL (Quick) or TEIG (Dough) program to make buns.
Bake in oven.
Corn bread
| Loaf size | 1000 g (2 lb) | 1250 g (2.5 lb) |
| Water | 300 ml | 400 ml |
| Butter | 25 g | 30 g |
| Bread flour | 540 g | 700 g |
| Grain semolina | 60 g | 80 g |
| Cut sour apples with peel | 1 | 1 |
| Dry yeast | 3/4 packet | 1 packet |
Program: STANDARD
Pumpkin bread
| Loaf size | 1000 g (2 lb) | 1250 g (2.5 lb) |
| Pumpkin purée* | 300 ml | 400 ml |
| Bread flour | 500 g | 650 g |
| Salt | 1 teaspoon | 1.5 teaspoons |
| Sugar | 1 teaspoon | 1.5 teaspoons |
| Butter | 25 g | 30 g |
| Pumpkin seeds | 50 g | 100 g |
| Dry yeast | 3/4 packet | 1 packet |
Program:STANDARD
- Make the pumpkin purée from sweet and sour marinated pumpkins. Use the indicated quantity.
Tip: Instead of the apple, you can also use an equal amount of fine cut gherkins. The bread is particularly tasty, when served with herb butter. It is a special surprise at every bread buffet.
Anchovy bread
| Loaf size | 1000 g (2 lb) | 1250 g (2.5 lb) |
| Water | 325 ml | 440 ml |
| Wheat wholemeal | 500 g | 700 g |
| Wheat wholemeal | 75 g | 100 g |
| Fine cut anchovy files | 8 | 11 |
| Red apple with peel, cored | ||
| and cut in slices | 1 | 1,5 |
| Olive oil | 1.5 tablespoons | 2 tablespoons |
| Dry yeast | 1 packet | 1.5 packets |
Program: EXPRESS
BREAD RECIPES WITH BAKING MIXES
Unless otherwise indicated by the bake mix maker, use the EXPRESS program when you bake mixes.
PREPARATION OF THE DOUGH
Dough can be prepared by using the TEIG (DOUGH) program in the bread baking machine. You can then continue to work with the dough and bake it in the oven.
Add the condiments during the 2^nd kneading phase, when the sound signal goes off. There is no difference in the baking stages in the dough program. We indicate the quantities that can be prepared.
French baguette
| Dough size | NORMAL | LARGE |
| Water | 375 ml | 550 ml |
| Dried sourdough | 25 g | 50 g |
| Salt | 1 teaspoon | 1/4 teaspoon |
| Sugar | 1 teaspoon | 1/4 teaspoon |
| Bread flour | 552 g | 700 g |
| Hard wheat flour | 75 g | 100 g |
| Dry yeast | 3/4 packet | 1 packe |
Program: TEIG (DOUGH)
When the dough is ready, split it into 2-4 parts and form long bars. Let them rest for 30-40 minutes. Make a series of slanting cuts on the surface and bake the bread in the oven.
Coffee cakes
| Dough size | NORMAL | LARGE |
| Milk | 170 ml | 225 ml |
| Salt | 1/4 teaspoon | 1/4 teaspoon |
| Egg yellow | 1 | 1 |
| Butter or Margarine | 10 | 20 g |
| Bread flour | 350 g | 450 g |
| Sugar | 35 g | 50 g |
| Dry yeast | 1/4 packet | 3/4 packet |
Program: TEIG (DOUGH)
Take the dough out from the container and knead it.
Make a round or angular shape and add the fillings given below:
Melted butter 2 tablespoons 3 tablespoons
Sugar 75g 100g
Ground cinnamon 1 teaspoon 1.5 teaspoons
Grated nuts 60g 90g
Overglaze as much as desired
Spread the butter on the dough.
Mix sugar, cinnamon and nuts in a bowl and spread on the butter.
Let the dough rest in a warm place for 30 minutes and then bake.
GB
Pretzel
| Dough size | NORMAL | LARGE |
| Water | 200 ml | 300 ml |
| Salt | 1/4 teaspoon | 1/4 tea |
| Bread flour | 360 g | 540 g |
| Sugar | 1/4 teaspoon | 3/4 tea |
| Dry yeast | 1/4 packet | 3/4 pac |
1 egg beaten lightly
Coarse grained salt for spreading.
Put all condiments except the egg and coarse grained salt in the container.
Program: TEIG (DOUGH)
When you hear the audible signal and the indicator shows 0:00, press the START/STOP button.
Preheat the oven to 230^ .
Divide the dough in parts and form a long thin roll with each part.
Form the pretzels and place on a greased backing paper. Then paint with the beaten egg and then spread salt.
Bake the pretzel at 200^ for 12-15 minutes in preheated oven.
Brioche
| Condiments for | 9 units 1 | 12 units 2 |
| Eggs | ||
| Fill with water or milk, up to | 225 ml | 300 ml |
| Butter or Margarine | 55 g | 75 g |
| Salt | 1/4 teaspoon | 3/4 teas |
| Sugar | 40 g | 50 g |
| Bread flour | 400 g | 540 g |
| Dry yeast | 3/4 packet | 1 packet |
Program: TEIG (DOUGH)
Take the dough out from the container, knead and divide it.
Make a small and a large ball out of each part.
Put the large balls in a greased brioche mould. Place the small balls on them. Let it ferment till the volume has doubled.
Mix an egg with a little sugar and paint the brioches and then bake.
Yeast rolls
| Rolls | 9 pieces | 12 pieces |
| Milk | 100 ml | 200 ml |
| Salt | 3/4 teaspoon | 1 teaspoon |
| Water | 30 ml | 45 ml |
| Butter | 30 g | 45 g |
| Whole egg | 1 | 1+1 yellow of th |
| Bread flour | 350 g | 450 g |
| Sugar | 1.5 tablespoons | 2 tablespoons |
| Dry yeast | 1/4 packet | 3/4 packet |
Program: TEIG/PIZZA (DOUGH / PIZZA)
Work the dough into any shape you like or as given below for cinnamon rolls:
Filling
Melted butter/
| Margarine | 50 g | 100 g |
| Sugar | 50 g | 100 g |
| Ground cinnamon | 1/4 teaspoon | 3/4 teaspoon |
Glazing as desired
Take the dough out from the container and knead it thoroughly and well.
GB
Roll out into a rectangle on a working surface coated with flour and spread the butter cream on the dough. Mix sugar and cinnamon and spread on the butter.
Roll up, starting with the broader side. Fold in the edges well.
Cut the roll into individual pieces and place on a baking plate so that they do not touch each other.
Let them rest for 40 minutes.
Bake for 20-25 minutes at 190^ in pre-heated oven.
Glaze them while they are still hot.
MARMALADE
It is easy to make marmalades with the bread baking machine.
Wash fresh, ripe fruits. Peel apples, pears, peaches and other fruits with hard peels.
Always use the exact amounts mentioned, as these are matched specially for the marmalade program. Otherwise the marmalade can boil too early or overcook.
Weigh the fruits and cut into small pieces (max. 1 cm).
Add 2:1 gelatinized sugar into the indicated quantity. Never add normal sugar or 1:1 gelatinised sugar, as then the marmalade is not thick enough.
Mix the fruits with the sugar and start the program. The program runs fully automatically.
The audible signal goes off after 1 hour 20 minutes and the marmalade can be filled in glasses. Close the glasses tightly.
Strawberry jam
Washed and cleaned fresh
strawberries, either cut into small
pieces or pureed 900 g
2:1 gelatinised sugar 500 g
Lemon juice 1 tablespoon
Mix all condiments in the container using a plastic scraper.
Select and start the MARMELADE (Marmalade) program.
Remove the residual sugar on the container using a scraper.
When the audible signal goes off, take the container out from the machine, using hand gloves.
Fill the marmalade into glass jars and close them tightly.
Berry marmalade
Thawed deep-freeze berries 950 g
2:1 gelatinised sugar 500 g
Lemon juice
Mix all condiments in the container using a plastic scraper.
Select and start the MARMELADE (Marmalade) program.
Remove the residual sugar on the container using a scraper.
When the audible signal goes off, take the container out from the machine, using hand gloves.
Fill the marmalade into glass jars and close them tightly.
Orange marmalade
Peeled and thinly cut oranges 900 g
Peeled and thinly cut lemons 100 g
2:1 gelatinised sugar 500 g
Peel the oranges and lemons and cut into pieces.
Add sugar and mix all condiments in the container using a plastic scraper.
Select and start the MARMELADE (Marmalade) program.
Remove the residual sugar on the container using a scraper.
When the audible signal goes off, take the container out from the machine, using hand gloves.
Fill the marmalade into glass jars and close them tightly.
MODE D'EMPLOI
BA123 MACHINE À PAIN PROFESSIONNELLE
Chere Cients, cher Client
QUESTIONS FREQUEMENT POSEES
Ezzel akenyersutovel:
Program: STANDARD (Alap):
Francia fehérkenyér
LIMPEZA E MANUTENCAO
GWARANCJA I ZAKLADY USUGOWE
Pszenny chleb Graham
| Wielkosc bochenka | 1000 g (2 lb) | 1250 g (2,5 lb) |
| Woda | 350 ml | 550 ml |
| Sól | 1 lyzeczka | 1 lyzeczka |
| Maslo lub margaryna | 25 g | 30 g |
| Miód | 1 lyzeczka | 1,5 lyzeczki |
| Ocet | 3/4 lyzeczki | 1 lyzeczka |
| Pelna makesa pszenna | 500 g | 700 g |
| Suche drozdze | 1 torebka | 1,5 torebki |
Program: VOLLKORN
Pol
Boter of margarine 2TL
Zout 2TL
Gist (droge gist in zakjes) 2 1/2 TL (normaal gesproken 1 1/2 7g-zakje)
Soyulmş veince kesilmş Portakal 900g
Soyulmş veince kesilmş Limon 100g
2:1Reçelşekeri 500g
GROSSE (Marime): 2lb (1000g)
GARANTIE S I SERVICE
Program 3/4pachet 1pachet
Program TEIG (ALUAT)
Bbnpoc: Maunnata n3dae 6nIkaa 3Byk no Bpeme Ha roTbeHe.
OTROBOP: ToBa e CuyHana O3NaayBaAun BPemTo 3a NoCTaBHe Na JOnbHnHTenHn CbCTaBKn Kato IIONoBe HnIyKu HbKoN Or peCENTe N3cCKBat JOnbHnHTenHn CbCTaBKn HanpaBete cnpabKa cpeentata 3a NOBEe INHOFOpMaUNO THOCHO DOnbHnHTenHn CbCTaBKn.
Bbnpoc: OINTax ce da hnpabra HOB xIb6 BeDnara cIeI KaTo IIpbNra 6eWe rOtOB, Ho MaunHaTa He CTapTnpa.
OTROBOP: Maunhata Tp6Ba da 6bde octabeHa da ce oxlaHn npedn da 3anoHHe npiroTBHeTo Ha HOB xIb6.
ПОБЛЕМИ
CnHexhan xna6:B hauanoto Tecto Habxba dope, cnei Koeto cnxba.B noboeeto cnyan toBa ce DblnHa HeIOCTaTbUHO TbCTO Tecto. IOKATO MaTa Bce OSe o6pa3yBa ra3, prKOTO Tecto 3ana3n φopMa, Ho aKO MaTa ce yHnToXn Pn neeHTo, Xn8bT ige cnxHe. Ako CmecTa e BnaJHa, TectTO ue ce pa3peNi.
Ппекално Mноро BОДа/небостаТьчно 6разино. Това ще пазрени{TстOTO.TстOTOТрбВа Дa 6БдЕ MEKO, HO ГБСТО.
HЯков Марки Т ecTo Имат Нужda ot ДОпьнHTeHnС bCTaBKn. HЯков ВИДоBE 6paшHa a6copbupat noMaJIko BOа OТ dpyrN. B NOdo6eH cIyaua, CInTe 50 g DOПьнHTeHNo 6paшHo, 3a DA cTbCTHte TECTOTO.
- BaIOnHcTeTAta BbIgpeoJeH DByOKnC O6pa3yBaHn OT MaTa Ce H3napRbAT! Tecto 6e3 rIyTeH e KaTo BOda 6e3 canyH, C KOrTo NCKate Da HapPaBHTe canyHeH Mexypn.
Bb3MOJHO e MapKHTe 6paUHO, KOHTO H3NON3BaTe Da HAMAT DOCTaTbUHO TnyTeH 3a HAnpaBaTa Ha do6po TeCTo.
MaTa e yHnOKeHa nn CbBpHnA.
Ako n3non3BaTe TOnla Boda, MaTAt MoKe Da CbPbN ppei npoueca Ha h6yBaHe da e npNKluyn. YeMnHa Boda oBnKHObeHo CbIo e eoXoJaHa 3a n3non3BaHe. BdTe BnHMaTeJIHn MaTt Da He nOpa Boda ppei MnCKnPaHeTo Da 3anOHe. ToBa e Oco6eHO BaKHO Korato n3non3BaTe TaImepa.
Поберета дата на говост на оданьда на маят. Акocсгп на говост ИЗту скою, подобе e за зунITE Нова мя.
1368raBaiTe da n3noJI3BaTe MaI OT onaKOBKn, KOHTO ca Beue OTbopeHn. BceKn IbT n3noJI3BaIe HOBa onaKOBka.
XJ6bT He 6yXba! HAKOIT npuHnHTe 3a TOBA 6xA o7eHN3aHn no-rope.
Bb3MOxHH ca oUe cIeHNHe npOuHn:
ΠbIHO3bPHeCTn KαΦABN XJIA6OBe 6yXBaT NO-tpyDnO OT 6eHn.
MoKe 6n CTe 3a6paBnI Da nocTaBnTe MaJ.
Дуга чета грахka e синbaнену наautheи nbкии BmecTo cyпeни nbкии cOJ.Маятama da DeiCTBa,akO CTe cnalnnpekaiJeH MHOrO cOJ.
Башно, Кадо И Маят Трбвда БдатВ Добpo CBCTОнHe.
CmecTa MoKe Da e 6nHa npeKaJIeNo cyXa. Ako e Heo6xoJIMo, pnpabete edHa cyneHa JbXuca KbM CmecTa. Ako cmratae, ye KOnIueCTBOTO Maar TpR6Ba da 6bDe yBeJIuHcO, npnbabeTe edHa yaeha IbXuca.
Xn86bT 6yXHa npeKaIeHO n ce 3aJIenH 3a Kanaka!
ToBa o6nKHOBeH e npuHHeO O t yIOTpeBaTa H npeKaJIeHO KOJIueCTBO Ma, BODa NIN 6paJHo NIn HeoCTaTbUHO c0I. Be3 DoctaTbUHO c0I, MaTAt MoKe Da npuHnN ppeKaJIeHO 6yXbaHe.
TEXHNUECKN DAHHN
Elektreceka Mpeka c Bontak n Happehene: 230V\~ 50Hz
Mouhnoct: 800 Watt
TAPAHUNOBCNJXBAHE HA KJINEHTN
IpeiDIOCTaBkata HauHite ypei Ce nOlaar Ha cTpor KauecTBEN KOHTpO. Ako, BbPkeK BCNUKN rpnK, e Bb3HNKHala nobPeJa npn npOn3BOdCTBOTO nn TpaHcNOpTnpaHeto, Bm MoIM Da 3aHeceTe o6paTHo ypeHa TbproBeua, OT KoiTo e 3akynen. Hapei CbC 3aKHOBITE rapaHcNooHHn npTeHcN KyuBaYbT mMa npABoNo HerOB N36Op Ha cnEHNITE rapaHcNooHHyCnyr:
3a 3akynen ypei daBame 2 roDHN rapaun, CHTaHO OT deHn Ha npOaJb6aTa. Ppe 303n nepnoo OCTpAHBaMe 6e3PiATHO, Ype3 peMOHTpaHe nIN 3AmHa, BCNUK HeOCTaTbU, KOtO 6e3CnpHo Ce IblJkAT Ha DeFeKTn Ha MATEPnAla NIN Ha PPON3BODCTBOTO.
HedocTaTbU, B3hNKHaI BCJeCTBHe Ha HnepaBnHc 6opabeHe C ypeDa, n DeΦeKTH, NOBnIe Ce cneI Hameca I NonpaBKn OT cTpaHa Ha TpeTn Liuca, KaKTo n CneI MOHTnpaHeto Ha uXkDn YactN, He ce OxbaatOT Ta3n rapaHua.
AeEBdAn:KAbHJBA BBAeEBeKxAEBKe BA Aa3h
| Номер на порогамата | 1 | 2 | 3 | 4 |
| Номер на порогамата | STANDARD | KURZ | FRANZESISCH | SCHNELL |
| 2.0 lb / 2.5 lb / 1,000 g 1,250g | 1:58 | |||
| 3:30 3:40 | 3:50 | 1:52 | ||
| Заграванe: | 17 min 20 min | 5 min | 22 min | 3 min |
| Разбърванe: | 3 min | 3 min | 3 min | 3 min |
| Месенe 1 | 2 min | 2 min | 2 min | 2 min |
| Месенe 2:Месенe 2:Загей на 25oC | След 13 минут - сигнал на 2:57 (2lb) 3:04 (2,5lb) | След 20 минут - сигнал на 3:13 | След 21 минут - сигнал на 3:12 | 5 min |
| Овори 1 3агей до/на 25oC | 45 min | - | 45 min | - |
| Овори 2 | 19 min | 7 min | 26 min | 7 min |
| Овори 3 | 46 min | 26 min | 51 min | 27 min |
| Пechenе | 55 min 62 min | 55 min | 65 min | 65 min |
| Поздържанe на*xляба товел | 60 min | 60 min | 60 min | - |
| Ппогамиранe на таймера | 13 h | - | 13 h |
| 5 | 6 | 7 | 8 | 9 | 10 |
| VOLLKORN | KUCHEN | TEIG | BACKEN | MAPMAJIад | BROTMISCHUNG |
| 2.0 lb / 2.5 lb / 1,000 g 1,250g | 2.0 lb / 1,000 g | 1:50 | 1:00 | 1:20 | 2.0 lb / 2.5 lb / 1,000 g 1,250 g |
| 3:30 3:40 | 2:00 | 3:09 3:20 | |||
| 37 min 40 min | - | 22 min | - | 15 min | 11 min 22 min |
| 3 min | 3,5 min | 3 min | - | с两款 45 минут - заграванe | 3 min |
| 2 min | с两款 20 минут - сизнал за поставлие на плобve 1:49 | 2 min | - | Палза: 20 минут | 2 min |
| 13 min | - | с两款 16-поставлие на плобve 1:12 | - | Край | с两款 13 минут - сизнал за поставлие на плобve 2:45 |
| 45 min | - | - | - | 45 min | |
| 19 min | - | 45 min | - | 19 min | |
| 36 min | - | 22 min | - | 40 min | |
| 55 min 62 min | 80 минут плес 60- минуtnа палза | - | 60 min | 56 min | |
| 60 min | - | - | 60 min | 60 min | |
| 13 h | - | 13 h | 13 h | 13 h |
PELJENTN
UepeH ITbJIHO3bPheCT XnI6
HdnckO opexue 1/4 yaeHa JbXnca
Kaheha 1/4 yaeHa IbXnua
Heo6pa6oTeH cneT 180g 180g
CbHOrIeIOBn cemKn 75g 100g
Con 1caeHaIbJxuza 1.5 caeHn IbJxuuzi
3axap 1 yaeHa IbXnua 1.5 yaeHn IbXnuc
Cyxa noikbaca 1 onaKOBka
Cyxa mar 3/4 onaKOBka 1 onaKOBka
Поррама: OCHOBHA
BG
CbET: Pn6abeTe CbHcHOrneIOBc CEMK CNeI PbBN3ByKOB CmHaJ.
MoJHe TcBIO TaKa Da n3nOJI3BaTe TIKBeHn CeMKn. Ako CeMKIne Ca npEdbapHTeHNO IeKO n3neueHn, BkycbT mIe e nooc3aem.
| Terno ha xna6a | 1000 g (2 lb) | 1250 g (2.5 lb) |
| Boda | 375 ml | 550 ml |
| Kpabe macno | 30 g | 40 g |
| Bpausho | 525 g | 700 g |
| Con | 1 chaena lybxnca | 1.5 chaeni lybx |
| 3axap | 1 chaena lybxnca | 1.5 chaeni lybx |
| Clbhuyneobn cemkn | 35 g | 50 g |
| Cyxa mar | 3/4 onakOBka | 1 onakOBka |
Поррама: OCHOBHA
XnB6 cBc CMOKHHH opexn
CbET: Ako n3n03BaTe pncn Opexn C BCE Oe MEKn OeJIKN Ha JdkTe, XJABbT ige IMa JleKO rOpuB Bkyc, Ho ige E Bkycen H ue BbPN Do6pe Ha Bkyc C BnHO.
TeroHa xla6a 1000g(2lb) 1250g(2.5lb)
Boda 350 ml 550 ml
Брашно 260g 320g
PbJKeHO 6paHNo 400g 450g
1aeha IbXnca 1.5 aenIbXn
Hap3aHa cHTHO
CyueneH CMOKHH 50g 60g
HapnHaHa cHTHO opexn 50g 60g
Mei 1.5 yaeHn IbJxu2 yaeHn IbJxu
Cyxa Ma 3/4 onaKOBka 1 onaKOBka
Поррама: OCHOBHA
ΦpeHcN xJIa6 cbc CBeHN NOJnpabKN
Cbbet:BkyocBnte KaeeCTBa HcHInDkHe TceBb MoKe Da 6bDe nOoBeHH, Ako rH aapeKTe Ha JeHTN rH a3aTbpKHe B KpaBe MaNo dCBtno KaFb UBcT. CneI Kato hSTchHaT, MOKe Ta rN pNbAbe NTbM OCTaHAnite NoOpPabKn. Taka NoopnAbKnite Ue ca Na-bKynH. MoKeTa DA h3nONBate C 3aMeCtHEn HA cON BmecntHcCTNcKa cON.
TeNoHa xIa 1000g(2lb) 1250g(2.5lb)
Boda 350 ml 480 ml
Брашно 525g 700g
Tbpo nueHnO 6paHNo 75g 100g
3axap 1 yaeHa IbJxuca 1.5 yaeHn IbJxu
1caehaIbXnua 1.5 caeHn IbXnuc
Hap3aHmMaHaHo3,
KoTbpN KpecoH 1.5 yaeHH JbXnCn 2 yaeHH JbXnCn
HaKbIaH YeCbH 2 cKnIuDKn 3 cKnIuDKn
KpaBe macno 15g 20g
Cyxa m1 1 onakobka 1.5 onakobkn
ObenHn CHTHO Hap3aH NIMOHN 100g
2:1 JekatnoBa 3axap 500g
ObeIeTnopToKaJIInTe nIIMoHInTe nIHapeKeTe.
Pn6aBte 3axap n pa3bpaKaiTe CbCTaBKeTE Bcda KATO 3n01BaTe PnaCTMaOBA JbXuca.
I36peTe I 3aaiTe nporpaMaTa MARMELADE (Mapmela)
OCTpaHete octaTbUHaT a3xap ot cBaHa MaunHaTa C NOMoTuHa IbXnuaTa.
Korato yyeTe 3ByKOBnCnHaI, n3BaTe Ce bda O T MaunHata. N3noJ3BaTe roTbapcN pkbAunu.
Hacnene MapmelaB CtbkIeHN 6ypkaHn I n 3aTbOpTe PbTHO.
Rus
HNCHTPYKUNIPO3KCNJYATAUIN
BA123 IpofoecchoHaJIbHaJI ney dIa
BbIeUKN XLe6o-6yIoUHbIX H3denn
YbKaemblnokynatatelb,
BnHMaTeIbNo npOHTne 3Tu INHCTpyKcIIO, npeKeJe Yem NpOKnIOuHTb yCTpoIcTBO K cTe, YTO6bI N36eKaT b erO nobpeJdeHn 13-3a HnepaBnIbHorO IcONb3oBaHn. O6paTIte oco6oe BnHMaHHe Na yKa3aHn rno 6e30NaChocTH. Ecnbl 3axOTne pePeadTa 3To yCTpoIcTBO TpeTbeMy IIny, To BmecTe C yCTPOIcTBOM Heo6xOdmo pepeadTa n 3Tu INHCTpyKcIIO.
KOHΦHΓΥPALUHA YCTPOIUCTBA

- LsHyp nItaHnB, BnIka
- ΦopMaДЯВыпeчКи
- KpOuKoo6pa3HbIe IIOIOCTn Dn 3aMeCa TcTa
4.ПивODновВаI - Puyka
- Kpbiika
- Okho Ha6JIHOdeHn
- Panaelb ynpaBneHnA
- BeHTnlaHIOHHbIe OTBepCTnIa
- Мернад Ложка
- MepnblcctakaH
OTbet: InpoDoljkeHnIcNoJIb3OBAHnI yCTpoIcTbA, neYb DoJIKHa nONHOCTbIO OCTbITb.
BO3HNIKAIOUJIne IPOBJIEMbI
OceBhne Kapabai: TnHnHbIM clyaem RbIeTcN pOnHrTne Tecta Ha nepBoi ctaDNi N erO nocJeDyue oceDaHne cpa3y Je nocHe hauana npouecca BblneKn. B 60bnHnCTBe clyaeb npuHa 3aklnoayetc B TOM, YTO Tecto cnaobe. B TO BpEMK kak dpoKnn daJOT CBOW 3Φfekt, DaJXE cnaobt eTo haBnpaet nbIshnyo fOpMy, HO KAK TOLbKO DeIcTBNe IpOxKne IpeKpaUaETCBA CB3N C HauaON M CTaN BblneKn, Kapabai ocEDAeT NOc6CTBeHHbIM BecOM. PInuHNo cna6oTe TcA rBJIeTcER ope3MePnaB BlaXHOCTb.
CnHkOM MHO BObI/HeIOCTaTOUHO MYK. 3TO DeNaET TcTeO BOdAHNCTbIM. TeCTo DOnKHO 6bITb MRKM, HO ynpYrM.
TaKHe, Bo3MOxHNo, YTO HeKOTOpbIe copTa MyKN Tpe6byOt CneuHaNbHbX yCNOBn OKpyKaHIOSe cpeBb. HeKOTOpbIe copTa MyKN BInTbIBaOHT MeHbUe KOnueCTBO BObI IO cpaBHeHIO C ocTaIbHbIMN. B daHOM cIyae do6abTe eue 50 r MyKn, YTObI cDenaTb TeTo rYue.
- Пулььк, сформоваимные по Воздем Рожим, Вьхогт И.TсТСТСТСТСТСТСТСТСТСТСТСТСТСТСТСТСТСТСТСТСТСТСТСТСТСТСТСТСТСТСТСТСТСТСТСТСТСТСТСТСТСТСТСТСТСТСТСТСТСТСТCSTCSTCSTCSTCSTCSTCSTCSTCSTCSTCSTCSTCSTCSTCSTCSTCSTCSTCSTCSTCSTCSTCSTCSTCSTCSTCSTCSTCSTCSTCSTCSTCSTCSTCSTCSTCS
Bo3MoKHO, Bbl6paHHa Bamn Myka, He cOePKeNT dOCTaTOHOro KJIInueCTBa KJIeIKOBHbI dIra 3aMeCa xopoWero Tecta.
-Дрхоки ПOTЕРДС CBIO aKTHBHOCTb.
PnINcNoJIb3OBAHmI TeIIIOBBoI Ipouecc FepMeHTaunI pOJKeM MoKET 3aKOHHTcbraPahSe,em Heo6XoIMNO dIg NIOHNr.ObuHAR BOa n3 NOI KpaHa IABnRETC cAmO NIOxOJaEe.ByIte OcoBeHHBO BHMAteJIbHI cIeDITe, YTO6bl DpOHXn HE BxoJINB KOHTaKT C BOOIOHO Hauana 3aMeCA tecta.BbIOJIHeHne DaHHOr IpedNcAHn OcO6o BaXHO pIn cNoJIb3OBAHnФyHKUIM TaIMepa.
PpOBePbTe cPoK rOdHocTn dpoXKeH ha yNaKOBKe. EcIn Cpok 6n3OK K nCxOy, To lyuWe BOCnOlB30BaTbCra DpyrHMn dpoKxAMn.
He nCnOJb3yIte DpOxKn, KOTOpBle 6bln OTKpbItb 60onee, yem 3a DeHb Do hauaHa NcNoJIb3oBaHna. KaJbI pa3 OTKpbIbaiTe HOByU ynaKOBky dpoKxKei.
- Kapabai He noHnnc! BoIbIshnCTBO npuHH, NO KOTOpBIM Kapabai He noHnncs, OINcaHb paHee. Ho npexJe, n03BoJIte BblJeNITb CneDyUoOee:
Kapaban n3 cepoM ykn noHnMaHTc MHeBSe IIO cpaBHeHIO C xNe6OM n3 6eNoM yKn.
BbI 3a6bIIn IIO6aBntb IpoKHN, He TaK N? 3To JERko 3a6blTb.
PacnpoctpaHHeHNoOuH6KoI npI DoabLeHNc cOnIyBJIteTcNcIOJIb3OBaHne cToIOBOJIoKKn BmecTO qAHHO.IpOxHHMeHee AKTNBHbI pI nDoabLeHN60JIbUeRO KOnlueCTBa cOnI.
Myka nДpoKxN DoJxHbI 6blT BblCOkOrO KaueCTBa.
CneIeTe, YTO6bI TeCTo He 6bIIO CNIUKOM CyXIM. PIn HEO6xOJNMOCTn IO6aBbTe 1 CTOnOByIO NOKky BOdIy. EcIN Bb CHTaTe, YTO HEO6xOJNMO yBENuNTb DO3y DpOJKe, TO IO6aBbTe He 60Jee 1 YauHNo JIoKKn.
- Kapabai CnIHKOM NODHJIcN HANII Na KpbIe!
06bHNO daHHoe RaJIeHne IpnOCxoIIT npn Do6aBHeHH n3JIuHHeO6bEma BODbl, dpoJxKeI Nl6o MyK, a TaKHe ecIn Bbl 3a6bln Do6aBHT coNb. CoNb ppeDToBpaUaET Upe3MePHoe NOHNrTne Tecta; 6e3 cOnl TcTeO MoKet NpOoiTH upe3MePHo.
TEXHUNECKHEXAPAKTEPNCTIKN
Haprrxhe:230B\~50T
Iotppe6nemma MoUHoc7b:800BT
TAPAHTHHOE OBCJYKHBAHNE I CEPBHC
IpepeBbIpyckOM HaaHnI3dEIny npoxOaT CTporn KOnTpOB KaueCTBa.Ecnn, HeCMOTpr Ha Bce npinHtbe MepbI, pNpON3BODCTBe IIN TpaHCnpOpTIPOBKe BO3HNKla NOLOMKa, OTOJInTe HEnCnpAIBHOe 3dEInne npoabuy, y KOtOPOr OHO bIIO npio6peTeHO. POMMIMO yCTaHOBLeHNbIX 3aOKOHm peKNaMaUOnHHbIX npTeH3n, y NOKyPATAE cTB BO3MOXHOCTb PpeDbYBnTB Tpe6OBAHnB CooTBETCBN C HnKecJeUOnMM rapaTHnHBIMu YcNOBnAMn:Ha npio6peTeHNbI np6Op DeiCTByet rapaHTnB TceHe 2 let, NaHna Co dHn NOKyn. B TeHeHne 3ToR oepnoDa Mbl o83yEmcra 3a CBo Cuet ocUeCTBnB pMeOHn IIN 3aMeHy n3dEInC C IIObIMn HEnCnpAIBHOCTAMn, KOTOpBie RBO HO B3NKII IN BCJeDCTBnDEΦeKTA MaTePnAna IIN 3aBODcKOrO bpaKa. DaHna rapaTHn He paCnpOCTpaHReTcH a DeΦeKtbl, KOTOpBle 6blNBbHb HnpAINbHOh 3KcPiyyataunei np6op, n HA NOBpeXJDeHN, BO3HNKUnE BCJeDCTBnBE BMEaTeJIbCTBa IIN pEMoHTa CO STOPOHb TpeTBnx IIN, a TaXke BCJeDCTBn ENCNb3OBAHnHEOpINHnALbHbX KOMPNeKTyUOnx qactei.
ПРИJOXEHNE: YKA3ATEJIN ПОЛCECCOB BbINEKY
| Погравимьний homeruspeхима | 1 | 2 | 3 | 4 |
| Названные peхима | STAHДAPTHы | КОРOTКИ | ФАHЦУЗСКИ | YСКОPEHHы |
| 1 кг / 1 кг 250 r / 1,000 g 1,250g | 1:58 | |||
| 3:30 3:40 | 3:50 | 1:52 | ||
| Преевателовийпосгөв | 17 мIN 20 мIN | 5 мIN | 22 мIN | 3 мIN |
| Помецваиме | 3 мIN | 3 мIN | 3 мIN | 3 мIN |
| Замес 1 | 2 мIN | 2 мIN | 2 мIN | 2 мIN |
| Замес 2:наг徕 до 25oC | 13 мIN сигнал;2:57 (1 кг), 3:04 (1 кг 250 r) | 20 мIN сигнал;1:33 | 21 мIN сигнал;3:12 | 5 мIN |
| Откръть 1Наг徕 до 25oC | 45 мIN | - | 45 мIN | - |
| Откръть 2 | 19 мIN | 7 мIN | 26 мIN | 7 мIN |
| Откръть 3 | 46 мIN | 26 мIN | 51 мIN | 27 мIN |
| Вылесka | 55 мIN 62 мIN | 55 мIN | 65 мIN | 65 мIN |
| Пождэржka телла | 60 мIN | 60 мIN | 60 мIN | - |
| Установка таймера | 13 h | - | 13 h |
Rus
Xie6 c opexamH H3IOMOM
Xie6H3 HnpoeHHHO MyKu
| Macca | 1 kr | 1 kr 250 r |
| Boda | 350 ml | 500 ml |
| Maprapin H libo | ||
| CINBOCHOE Maclo | 25 r | 35 r |
| CoIb | 1 чийнай loжka | 1.5 чийньх loжки |
| Caxap | 1 чийнай loжka | 1.5 чийньх loжки |
| Myka | 270 r | 380 r |
| HenpoceriaHHaMyka | 270 r | 380 r |
| Cyxhe дрожи | 3/4 пakета | 1 пakет |
Pekim:CTAHdAPTHbI (STANDARD)
Kpynnoosephnctb xie6
| Macca | 1 kr | 1 kr 250 r |
| Boda | 300 ml | 450 ml |
| Cohnb | 1 чийнай loжka | 1.5 чийньх loжки |
| Cyхая заимbacka | 25 r | 40 r |
| Myka | 500 r | 670 r |
| Caxap | 1 чийнай loжka | 1.5 чийньх loжки |
| Cyхая дрожки | 3/4 пakета | 1 пakет |
PezHM: ΦPAHLY3CKN (FRANZÖSISCH)
HanomnHaHHe: Cyxay 3aKBaCa yIyUshaet nocleDHHo CTaHIO NOHNrTna Tecta, erO CBeKeB N Bkyc. Oha mRue pXaHO 3aKBaCKn.
Rus
Xle6 n3 3aBacKn
Cuyxne npokk 3/4 nakeTa 1 nakeT
Реким: CTAHДAPTHын (STANDARD)
Rus
Xie6 C cemeHaMn IODCOJIHeuHnKa
HanomHHaHHe: DObabTe cEmeHa noDcOnHeuHnKa noCne nepBOro 3ByKOBOrO cHrHaJa. TaKke MoXHo HcNoIb3ObaTb cEmeHa tkbbl. Ecni cEmeHa npedapntelbno npokapeHb, to BKyc octpee.
Macca 1Kr 1Kr250
Boda 375 m1 550 m1
CnHbOueHoeMacNo 30r 40r
Myka 525 r 700 r
1caHnA loKKa 1.5 caHbIX loKK
Caxap 1caHnA loKKa 1.5 caHbIX loKKN
CemeHa noDCoJIHeuHnKa 35r 50r
Cyxne npoknn 3/4 nakeTa 1 nakeT
Pekim:CTAHAPTHbI (STANDARD)
XJIe6 c HJHKpOM n IprcKmH opexAmn
HanomHHaHe: EcnI KOKypa MoNoBx opexOB MmRkA, XnE6 PnHOpeTaET CnERKa RopbKObaTbB Kyc. TaKoY Xne6 Oueh BkyceH C MONoBIM BNHom.
Macca 1Kr 1Kr250r
Boda 350 m1 550 m1
Myca 260r 320r
PkaHa Myka 400 r 450 r
1 qaHnA loKka 1.5 qaHbIX loKK
DOnOJIHInTeIbHO
Cyxon nKnup 50 r 60
Mekonopuybene opexn 50 r 60r
Me 1.5 cToIOBbIe loxKu 2 cToIOBbIe loxKu
Cyxne dpoKnn 3/4 naketa 1 naket
Pekim:CTAHAPTHbI (STANDARD)
Xne6 no-phiaunysckn CtpaBamn
HANOHNHHe: KOnIeCTBO OJNEK YCeCHOKa MOeT 6bIty yBNeHcEO B 4 p3a npI ycN0BN, Yo OHN MeNko NOpYbEnHi o6japeha NcIbNOOHmO MaIe Mdo oObpaZOBAHn 3oNolntocrO zBETA. Pocne IORo KAck YechOK OCTbHET, ERO MOKNHO CMeuATb C dpyHMn INrpeDnEHTAMn. B DAHNOM cyueae CByX nEeAONyUaTe cnyuie.
B KaueCTBe aIbTepeHaTbbl O6bUHcOcN B03MOxHO NcOnb3OBAHne TpaBHyIO cNb.
Macca 1kr 1Kr250r
Boda 350 m1 480 m1
Myca 525 r 700 r
HenpoceaHHa Myka 75 r 100
Caxap 1 yaiHnay loKka 1.5 yaiHbix loKKN
Cob 1 yaiHnA J0KKa 1.5 yaiHbIX loKK
HaunHKyTe ntpuKy,
yKpO n Kpecc 1.5 cTOLOBbIX loXKn 2 cTOLOBbIX loXKn
Дольк.YeCHOka 2 roJOBKn 3 roJOBKn
CnBouHoeMacno 15r 20
Cyxne npokk 1 naket 1.5 nakeTa
Pezim: KOPOTKIN (KURZ)
Rus
Kykypy3hnyxie6
HanomnHaHHe: DaHoe Tecto 3aMeaTeBHo IOxOHTIg BbIeKn 6bNoEc. IJIg BbIeKn 6bNoEc HcNoJIb3yIte YCKOPEHHbI PEXKIM (SCHNELL) m60 PEKIM 3AMECA TECTA.
BbineKaTb B dyXOBKe.
BbIeUKA XJIe6A H3 CMECEI
Дяданнои Вileuekn pekomehoBaHO nCnoIb3ObaHne peKIMa 3KCIPECC.
Rus
ПРИГOTOBЛЕNHМТECTA
Korda npoJn roTOBbl, pa3dEnIte nx Ha 2-4 qactn n cdenaIte foPmbl npOdoIroBaTbX 6aToHnKOB.
ДаиTe IM OTcToIbCn B TeueHne 30-40 MmHyT. CdenaIte HeckoIbKO KocbIX cpe3OB Ha NObepxHocTn N BiIneKaIte TecTO B dYXOBKe.
KoFeHbIe nIPOXKeHHbIe
Pa3MaKbTe CInBouHoe MacNo No Tecty.
CmeuTBeBmte caxap, Kopu npopexn B OTeJbHn Tape n pa3MaKbTe CBepxHa MaCNo.
Даite tectу hactoTBcB TeueHne 30 MInHyT n pInCTynaTe K BblneueKe.
Rus
PpeuIbI (KpHdEJIa
IomeCTte BCE HrpeDneHTb (3a NCKJIIOUeHHeM Rua N KpyuHoi COIN) B KOHTeHep.
Pekim: Pekim 3AMECA TECTA (TEIG)
Pocne toro kak yctpoictBO u3dact 3bykoBOn CnHan, a ha dnncIeee oTo6pa3ntc0:00, hAnKMte KhoNky CTAPT/CTOPI (START/STOP). 3apaHepe pa3orpeye duXOBKY do 230^ . Pa3deInTe TcTe no cAaTn and cEnaTe dnnHHb pyNET nKacdo qaTn. PnidaTe FOpMy KpeHdJIuYIOJHnTE Ha cMa3aHHy O bMary dny BIneUKN. CmJaBe cIeHa B6bIbIM rAmO m Nocblte coNbIy. BIneKeAte H3dEINn npri Temnepatype 200^ B npednoDrTOBHeHNO duXOBKe B TeueHne 12-15 MInHT.
Topka
CbeKa YnCTa KJy6HnKa
IokpoWte rOdy Ha meKne yactn IIO6 cdeaTe nHOpe 900r
2:1 JxelatINHObIcaxap 500r
Cok JIMMOHa 1 CTJIOBAI JIOKKA
CmeaTe BCE INHpeIeHb I nlaCTNKOBoTape.
BbIeHte n yctaHOHTe nporpammy PEXKIM IPINTOBOTHEHn IOBNJIA (MARMALADE).
YdJIte octaTK caxapa, npnllneero K kpaam TaBbI.
IIO OKOHauHIN 3ByKOBOrO CnHana BbHBe KOHeHep I3 KaMepbI Neu, INcNoJIb3y TepMOnePcaTkn.
HanoHHte cTeKnaHHbIe 6aHKn NOBUNOM I NpIoTHo 3aKpOte repMeTNUeCKMn KpbUkAm.
JroDHOe IOBnDIO
| 3amopokhenbile rrodl | 950 r |
| 2:1 jhenatnHOBBI caxap | 500 r |
| COK JIMMOHA |
CmeaaiTe Bce INHrpndHeNTbB pIaTikOBoTape.
Bb6epnte n yctaHOblte nporpaMMy PEXKIM IPIHOTOBJIeHnI IOBNJLA (MARMALADE).
YdaIte octatkn caxapa, npnllnweo K kpaam TaBbl.
IIO OKOHaHHN 3ByKOBOrO CnHaJa BbIHbTe KOHeHep N3 KaMepbl NeH, HcNoJIb3yR TepMOpePataK.
HanoHnTe cTeKnaHbIe 6aHNK NOBnIOM I nIIOTHO 3aKpOte repMeTHeCCKMn KpbIuKaMm.
ANIELCBHOBOEIOBNIIO