
ME545V - Lawn mower VIKING - Free user manual and instructions
Find the device manual for free ME545V VIKING in PDF.
| Product type | Electric lawn mower |
| Brand | VIKING |
| Model | ME545V |
| Dimensions (L x W x H) | 147 x 48 x 102 cm |
| Weight | 32 kg |
| Power supply | 230 V, 50 Hz, 1600 W |
| Electrical protection | IPX4, protection class II |
| Cutting width | 43 cm |
| Cutting heights | 25 - 80 mm (7 levels) |
| Grass catcher capacity | 60 L |
| Wheel drive | Vario, speed 2.4 - 4.0 km/h |
| Blade speed | 2800 rpm |
| Guaranteed sound level (LwAd) | 94 dB(A) |
| Vibrations (ahw) | 5.20 m/s² |
| Maximum weight of full grass catcher | 16 kg |
| Blade tightening torque | 10 - 15 Nm |
| Maintenance and cleaning | Clean after each use, do not use a pressure washer, check the blade regularly |
| Safety | Automatic engine stop, thermal protection, 30 mA circuit breaker recommended |
| Common wear parts | Blade (ref. 6340 702 0100), grass catcher, V-belt (ME545V) |
| Maximum permissible slope | 46.6% (25°) |
Frequently Asked Questions - ME545V VIKING
User questions about ME545V VIKING
0 question about this device. Answer the ones you know or ask your own.
Ask a new question about this device
Download the instructions for your Lawn mower in PDF format for free! Find your manual ME545V - VIKING and take your electronic device back in hand. On this page are published all the documents necessary for the use of your device. ME545V by VIKING.
USER MANUAL ME545V VIKING
ME545.1 ME545.0C ME545.0V
ME 545 V
ME 545 C
ME 545
| 2 | 1 | 2 | 3 | 4 | 5 | 6 |
| 7 | 8 | 9 | 10 |

3

4

ME 545 C, ME 545 V

5
ME 545 C
ME 545 V
ME 545


6

7


2002/96/EC, 2004/108/EC,
2006/95/EC, 2006/42/EC
Thank you for choosing a VIKING quality product.
This product has been produced using state-of-the-art production methods and extensive quality assurance procedures, because our goal is only achieved if you, the customer, are satisfied with your appliance.
If you have any questions concerning your appliance, please contact your dealer or our sales department directly.
I hope that your VIKING appliance will give you great enjoyment.

Dr. Peter Pretzsch
Manager
VIKING is continually striving to further develop its range of products; we therefore reserve the right to make alterations to the form, technical specifications and equipment level of our standard equipment.
The information and illustrations in this manual are therefore subject to alterations.
Table of contents
Notes on the instruction manual 2
Appliance overview 2
For your safety 2
Preparatory measures 3
Mowing procedure 4
Maintenance and repairs 5
Warning - dangers caused by electrical current 6
Description of symbols 6, 19
Standard equipment 6
Preparing the appliance for operation 6
Assembling the handlebar 6
Upper handlebar 7
Installing the cable guide 7
Assembling the grass catcher bag 8
Height adjustment of the handlebar 8
Central cutting height adjustment 8
Attaching and detaching the grass catcher bag 8
Notes on mowing and mulching 8
Mowing on slopes 9
Correct motor load 9
Thermal motor overload protection 9
If the mowing blade blocks 9
Initial operation of appliance 9
Electrical connection 10
Strain relief 10
Switching on the lawn mower 10
Switching off the lawn mower 10
Switching on the wheel drive 10
Switching off the wheel drive 11
Level indicator 11
Emptying the grass catcher bag 11
Maintenance 11
Cleaning the appliance 12
Electric motor, wheels and gearbox 12
Upper handlebar 12
Mowing blade maintenance 12
Removing the mowing blade 13
Sharpening the mowing blade 13
Checking the balance of the mowing blade 13
Installing the mowing blade 14
Adjusting the wheel drive cable 14
Storage (winter break) 14
Environmental protection 15
Standard spare parts 15
Minimising wear and preventing damage 15
Troubleshooting 16
Technical specifications 18
Circuit diagram 19
CE - Manufacturer's declaration of conformity 19
Transport 19
Service schedule 20
Note:
This instruction manual constitutes original manufacturer's instructions in the sense of EC Directive 2006/42/EC.
Notes on the instruction manual
Illustration symbols

This symbol serves to link the Figs. on the illustration pages with the corresponding text passages in the instruction manual.
The illustrations can be found at the front of the instruction manual
Designation of text passages
The operating steps described may be designated in different ways.
Operating step without direct reference to a figure.
Example:
- Sharpen blades evenly to prevent vibration due to imbalance.
Operating step with direct reference to the relevant figure to be found in the illustration pages (at the front of the instruction manual), with a corresponding reference to the item number in the figure.
Example:
Loosen
1= bolt
2= lever ...
General lists, which do not refer to the illustrations.
Example:
- use of the product for sporting or competitive events
In addition to descriptions of operating steps, this instruction manual includes text passages containing important additional information. Such passages are identified using the symbols described below in order to especially emphasise them in the instruction manual:

Danger of accident and risk of injury to persons and serious damage to property.

Information for better use of the appliance and in order to avoid possible operating errors, which may result in damage to the appliance or to the individual components.
Viewing direction when "left" and "right" is used in the instruction manual: the user is standing behind the appliance (working position) and is looking forwards in the direction of travel.
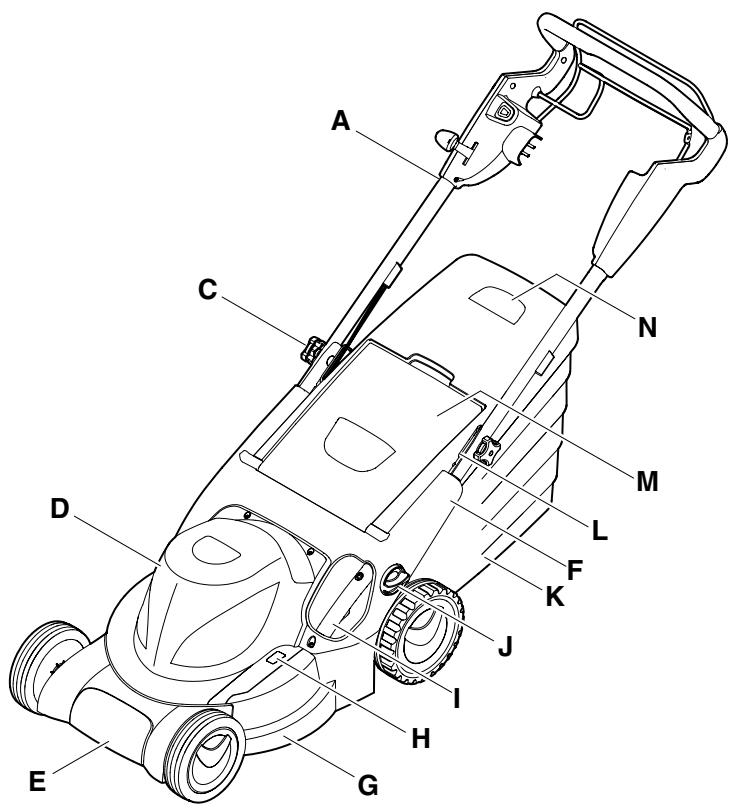
Appliance overview
For your safety

A Upper handlebar with controls
C Rotary handle
D Motor cover
E Carrying handle
F Upper housing
G Protection bumper
H Cutting height display
Central cutting height adjustment
J Rotary handle for handlebar height adjustment
K Grass catcher bag
L Cable anti-kink protection
M Ejection flap
N Level indicator

These safety regulations must be observed when working with the lawn mower.

Read the whole instruction manual before using the appliance for the first
time and keep in a safe place for future reference.
Ensure that you are familiar with the controls and use of the appliance. Never allow children or other persons who are not familiar with the instruction manual to use the lawn mower. The lawn mower must not be used by children under the age of 16. Local regulations may specify a minimum age for using the mower.
Never mow in the vicinity of other persons, particularly children, or animals.
Be aware that the person operating the appliance or the user is responsible for accidents involving third parties or their property.
- This appliance is not suitable for use by persons (including children) with impaired physical, sensory or mental faculties or those lacking the appropriate experience and/or knowledge, unless supervised by a person responsible for their safety or having received instructions on use of the appliance from such person. Children must be supervised, in order to ensure that they do not play with the appliance.
The lawn mower should not be operated after the consumption of alcohol, medications which impair reactions, or drugs.
Before initial use, advice should be obtained from the vendor or another expert.
Caution!
The lawn mower is only intended for mowing lawns; its use for other purposes is not permitted and may be dangerous or result in damage to the appliance.
Risk of accident!
Due to the physical danger to the user, the lawn mower must not be used, for example, for the following applications (incomplete list): for trimming bushes, hedges and shrubs, for cutting creepers, for care of lawn roofs and of balcony boxes, for clearing paths (vacuuming, blowing, clearing snow),
for shredding and chopping tree and hedge cuttings, for levelling earth mounds, e.g. mole hills or for transporting cuttings (except in the grass catcher bag provided).
Preparatory measures

Always wear robust shoes and long
trousers when mowing. Never mow barefoot or in sandals.
- Carefully inspect the complete area on which the appliance is to be used and remove any stones, sticks, wires, bones and other foreign objects which could be thrown up by the appliance.
Before using the appliance, always ensure that the cutting tool, the fastening bolts and the entire cutting unit are in good condition.

- Caution!
Danger of electric shock!
Particularly important for electrical safety are the mains cable, plug, on/off switch and connection cord. Damaged cables, connectors and plugs, or connection cords that do not conform to regulations must not be used, to prevent any risk of electric shocks. Therefore, check the connection cord regularly for signs of damage or ageing (brittleness).
- Never use the mower with damaged safety devices or safety guards, without functioning blade brake or attached safety devices, e.g. without the ejection flap or the grass-catching unit.
-
For safety reasons, always use an undamaged grass catcher bag.
-
The switch mechanisms installed in the appliance must not be removed or bypassed, e.g. by fixing a control lever to the handlebar.
- Only give (or lend) the appliance to persons who are familiar with this model and how to operate it. Always provide them with the instruction manual.
- Please observe the local regulations regarding permitted operation times for motor-driven gardening tools.
Mowing procedure

-
Keep other persons away from the danger area.
-
Place the appliance on an even surface for start-up. The appliance must not be tilted when starting the motor.
-
Follow the instructions for switching on the motor and only switch on when your feet are a safe distance away from the cutting tools.
-
Do not mow wet grass or mow in the rain. The risk of accidents is higher if the grass is wet (Danger of slipping).
Only mow during the day or when there is enough light. - Only mow at walking speed. Working quickly with the appliance increases the risk of injury due to stumbling, slipping etc.
- Always ensure good stability on slopes. Avoid mowing on excessively steep slopes in order to prevent loss of control of the appliance.
- Only mow at right-angles to the slope and never up or down the slope, in order to avoid being run over by the running lawn mower in the case of loss of control of the appliance or of falling.
-
Be particularly careful when changing direction on a slope in order to prevent loss of control.
-
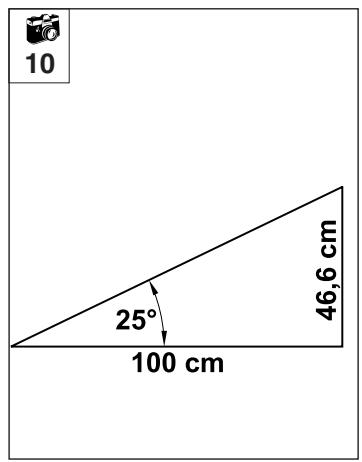
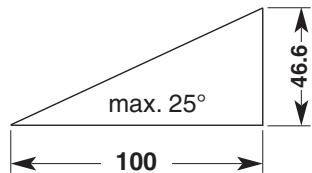
For safety reasons, the appliance must not be used on slopes with an incline of more than 25^ (46.6%).
Risk of injury!
A slope inclination of 25^ corresponds to a vertical height increase of 46.6 cm for a 100 cm horizontal distance.
- Caution!
Be particularly careful when moving backwards and when pulling the lawn mower.
Risk of stumbling!
- Be particularly careful when turning the mower around or pulling it towards you.
- Switch off the motor if tilting of the mower is necessary when transporting over surfaces other than grass, and when pushing the mower to and from mowing areas.

Never open the grass ejection flap and/or the grass catcher the mowing gunning. Rotating can cause injury.
- Avoid switching the appliance on repeatedly within a short period of time; particularly avoid "playing" with the on/off switch. Risk of motor overheating.
- Owing to the voltage fluctuations caused by this appliance during the run-up period, other devices connected to the same circuit may be subject to interference in the case of unfavourable power supply conditions. In this case, appropriate steps should be taken (e.g. connection to a different circuit than the one used by the affected device, or operation of the appliance using a circuit with a lower impedance).
- Never attach any objects to the handlebar (e.g. work clothing). Extension cables must never be wrapped around the handlebar.

- Caution!
Never put your hands or feet on or underneath
rotating parts. Never touch the rotating blade. Always keep away from the ejection aperture. Always observe the safety distance indicated by the handlebar.
Risk of injury!
- Never lift or carry a mower with the motor running or the mains lead connected.
-
Switch off the motor and disconnect the plug:
-
Before remedying blockages, including those in the ejection chute;
-
If the cutting tool has hit a foreign object. The cutting tool needs to be checked for possible damage;
-
Before checking, cleaning or working on the mower;
- If the mower begins to vibrate excessively. The cutting tool must be checked immediately;
Before leaving the appliance unattended;
Before lifting, or carrying the appliance; - Before transporting the appliance.

- Beware of the cutting tool running on for several seconds
before coming to a standstill.
Maintenance and repairs

Before performing any work on the appliance, before
adjusting or cleaning the mower, or before checking whether the connection cord is entwined or damaged, switch off the mower and disconnect the plug.
Only carry out maintenance work that is described in this instruction manual.
All other procedures should be carried out by a specialist dealer.
VIKING recommends that you have maintenance operations and repairs performed exclusively by a VKING specialist dealer.
VIKING specialist dealers regularly attend training courses and are provided with technical information.
Only use high-quality tools, accessories and spare parts. Otherwise, there may be a risk of accidents resulting in personal injury or damage to the appliance.
VIKING recommends the use of original VKING tools, accessories and spare parts. Their properties are optimally adapted to the appliance and the user's requirements.
VIKING original spare parts can be recognised by means of the VIKING spare parts number, the VIKING lettering and where applicable the VIKING spare parts symbol. The symbol alone may also feature on small parts.
- Ensure that all nuts, pins and bolts are securely tightened, so that the appliance is in a safe operating condition.
- If the cutting tool or the lawn mower hits an obstacle or a foreign object, the motor must be switched off, the plug disconnected, and an inspection performed by a specialist.
- The lawn mower must not be operated with a damaged or bent crankshaft.
Risk of injury through defective parts!
- Check the grass-catching unit regularly for wear, damage or for loss of functionality.
In the interests of safety, replace all worn or damaged parts. - Replace danger signs and warnings on the appliance which have become illegible. Your VIKING dealer has a stock of replacement stickers.
Warning - Dangers caused by electrical current
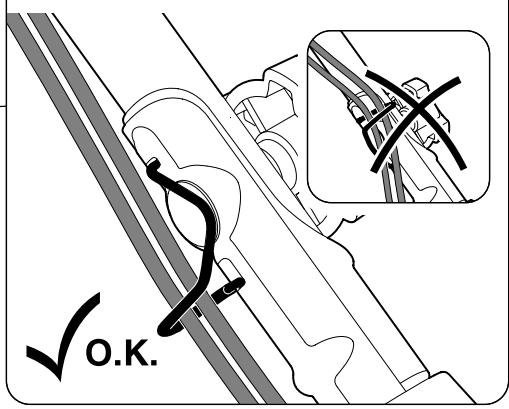
- The cord must be kept away from the blade when mowing.
Only use extension cables that are insulated against moisture for outdoor use (see section: Initial operation).

- Although the drive motor is splashproof,
do not use the lawn mower when it is raining or in wet environments.
- Do not leave the appliance unprotected in the rain.
- Detach connection cords at the plug and socket and not by pulling on the connection cord.
- When operating the appliance, the socket must be fitted with a residual current operated device (max. trigger current: 30 mA), or such a device must be inserted when connecting the appliance. Your electrician can provide further information.
Description of symbols (1)
Caution!
Read the instruction manual before initial use.
Risk of injury!
Keep other persons away from the danger area.
Risk of injury!
Beware of the sharp mowing blade. The mowing blade runs on for several seconds after switching off (motor / blade brake). Before performing any work on the cutting tool, before carrying out maintenance and cleaning work, before checking whether the connection cord is entwined or damaged, or before leaving the mower unattended, switch off the motor and disconnect the plug.
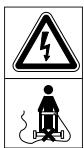
Danger of electric shock!
Keep the connection cord away from the cutting tool.
Standard equipment

Item Designation
Qty.
1 Basic unit 1
2 Cable anti-kink protection ME 545,ME 545 C 1 ME 545 V 2
3 Flat head bolt 2
4 Rotary handle 2
5 Cable guide 1 (ME 545 C, ME 545 V)
6 Upper part of grass catcher bag 1
7 Lower part of grass catcher bag 1
8 Pin 2
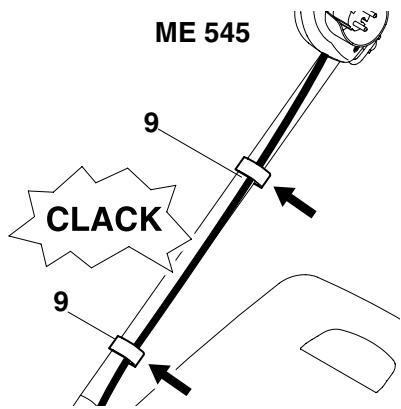
9 Cable clip 2 (ME 545)
10 Washer 2 (ME 545)
Instruction manual 1
Preparing the appliance for operation
NOTE
Place the appliance on level and firm ground to perform this work.

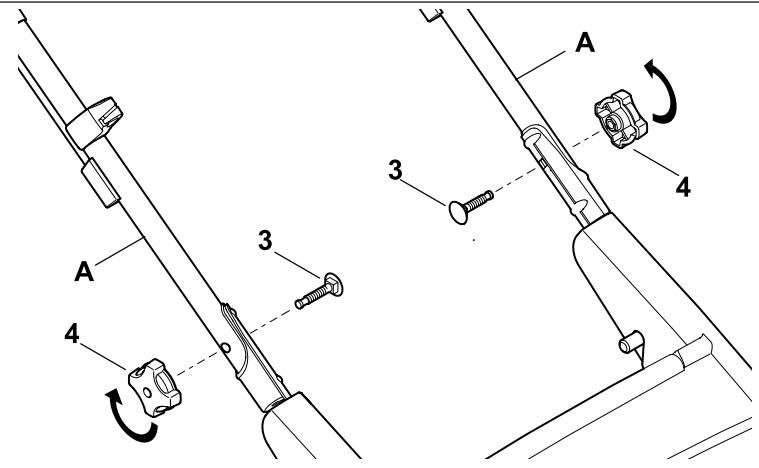
Assembling the handlebar

Assemble the handlebar: Attach
A= handlebar to both parts of lower handlebar. Insert
3= flat head bolts through bore from the inside to the outside and tighten securely with
4= rotary knobs.
NOTE

The machined grooves in the threads prevent the rotary handles from becoming completely detached from the bolts (safeguard against loss).
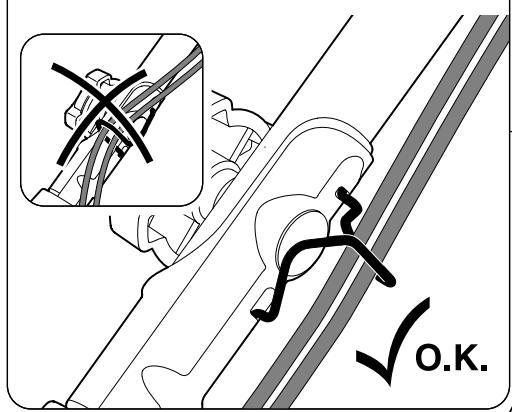
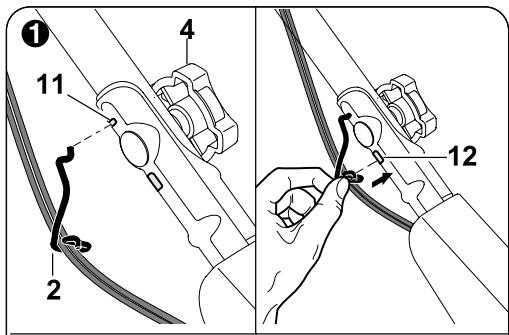
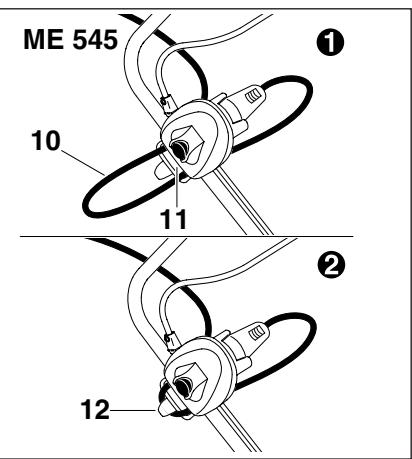
1 Installing left anti-kink cable protection:
NOTE

Attach anti-kink cable protection (2) only as shown. Cables must be routed under the handlebar. Loosen the rotary handle (4) prior to assembly.
Insert all cables in
2= anti-kink ca protection.
First insert the anti-kink cable protection into
11= upper bore of lower handlebar. Then engage anti-kink cable protection in
12= lower slot of lower handlebar.
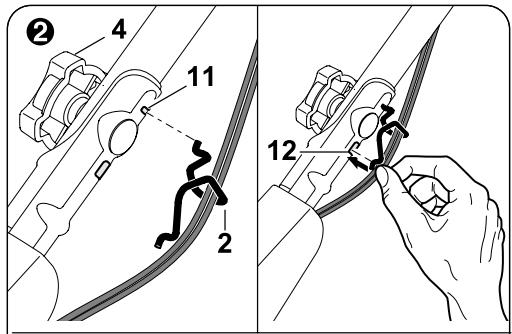
2 Installing right anti-kink cable protection:
NOTE

On model ME 545, there are no cables on the right-hand side of the handlebar. Only the left anti-kink cable protection (2) must therefore be installed on this lawn mower.
Assembly of the
2= right anti-kink cable protection is performed in the same way as on the left side.
Fold down the handlebar:
CAUTION

Risk of injury:
Before folding down the handlebar, switch off the machine and disconnect the power cable. No loads must be placed on the upper handlebar (e.g. hanging work clothing over the handlebar).
Danger of pinching!
The handlebar can be folded down by releasing the rotary knobs. For this reason, always hold the upper handlebar (A) with one hand at its highest point when you unscrew the rotary knobs.
Fold down the handlebar for cleaning, for space-saving transport and for storage of the appliance:
Loosen the 4= rotary handles until they move easily backwards and forwards in the machined grooves.
- Fold down the upper handlebar and rest it on the lower housing.
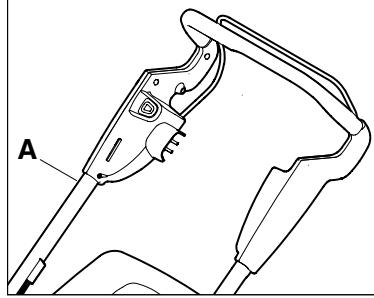
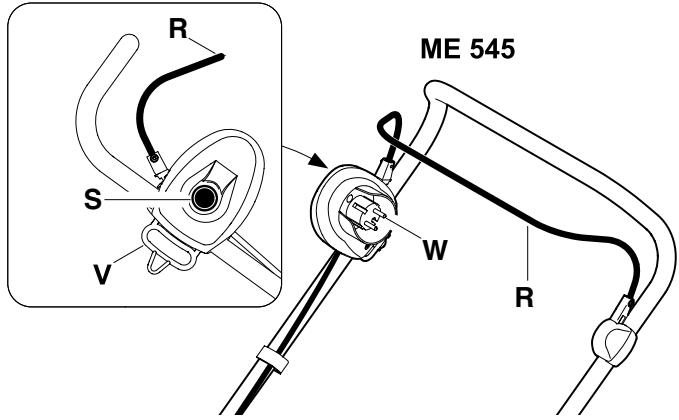
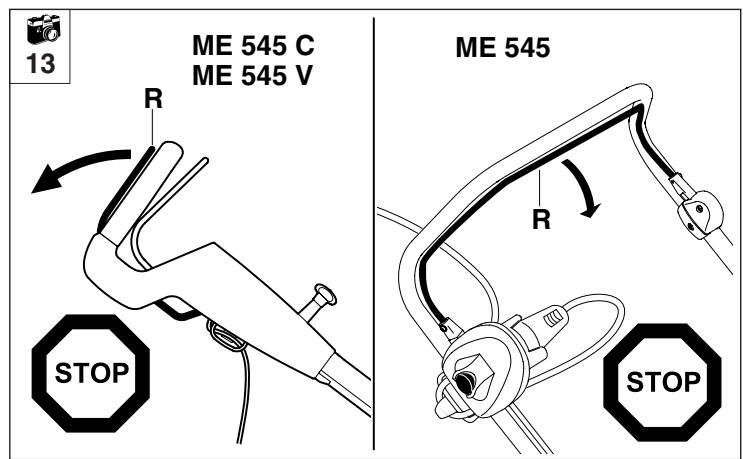
Upper handlebar

R= Motorstop lever
S= Start button
T= Wheel drive lever ME 545 V
U= Vario drive lever ME 545 V
V= Strain relief for connection cord
W= mains connection
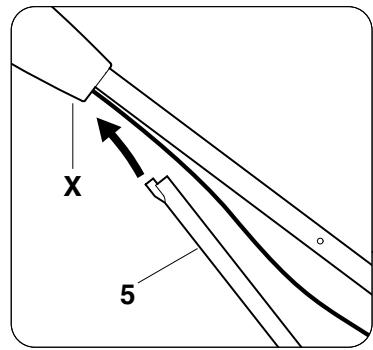
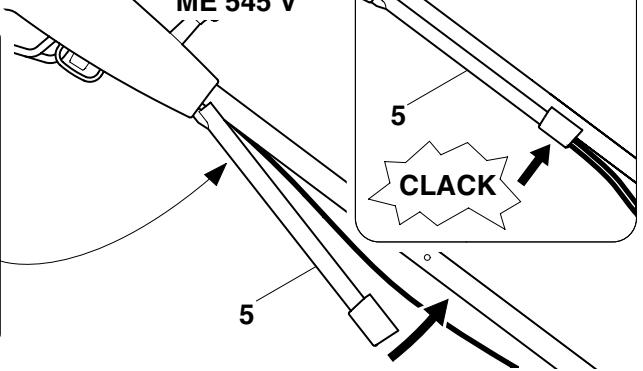
Installing the cable guide

ME 545 C, ME 545 V:
Insert
5= cable guide into the recess in the
X= housing and turn towards the upper handlebar. Make sure that all cables are in the cable guide. Allow the cable guide to engage in the two bores provided using slight pressure.
ME 545:
Fasten cable to the upper handlebar using
9= cable clips.
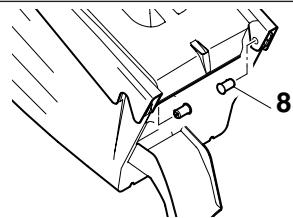
Assembling the grass catcher bag

6
Fit
6= upper part of grass catcher bag onto
7= lower part of grass catcher bag.
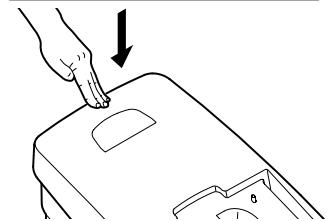
Press
8= pins through the apertures provided from the inside.
Allow the grass catcher bag upper part to engage in the lower part using slight pressure.
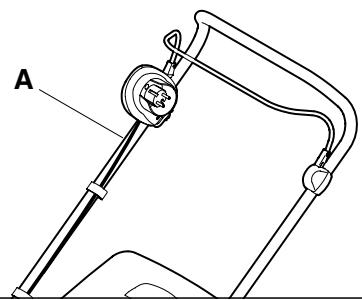
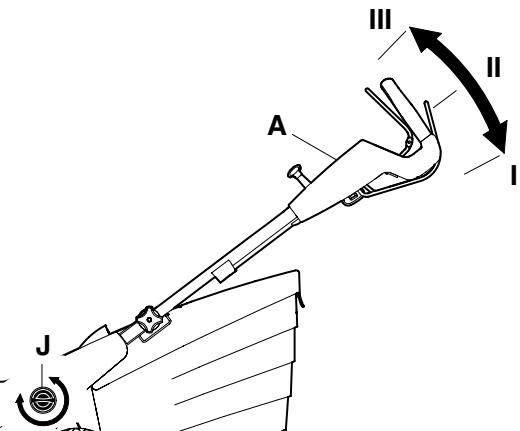
Height adjustment of the handlebar

7
The working height of the handlebar can be set to the following positions
I (low),
II (medium) and
III (high):
Loosen the
J= rotary handle for handlebar height adjustment by turning anti-clockwise (approx. five turns).
Hold the
A= upper handlebar with both hands and bring to the desired position by moving up or down.
NOTE

Ensure that handlebar adjustment is the same on the left and right sides.
Tightenthe J= rotary handle again by turning clockwise.
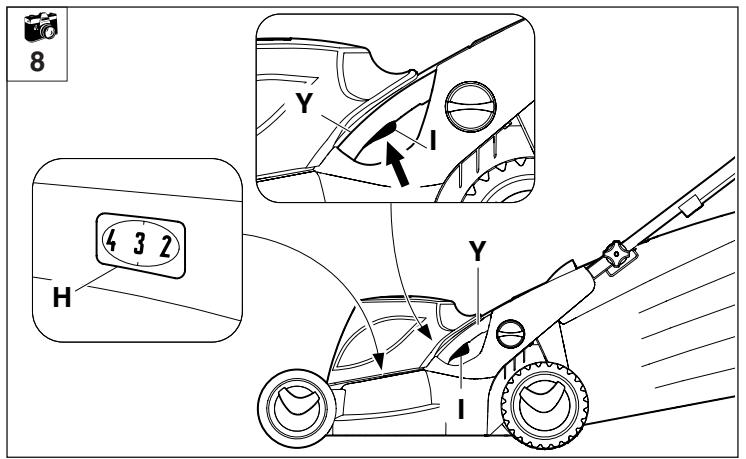
Central cutting height adjustment

8
CAUTION
Risk of injury!
The motor must be switched off before adjusting the cutting height.
Ensure that you keep your feet far enough away from the cutting tool.
There are seven cutting height adjustment settings ranging from 25mm to 80mm .
Level 1 = lowest
cutting height
Level 7 = highest
cutting height
The
I= adjustment lever for the central height adjustment is located on the left side of the appliance (see illustration).
Hold the appliance at the
Y = handle and pull the
I= adjustment lever upwards and hold, in order to release the detent mechanism.
- Set the required cutting height by moving the appliance upwards or downwards.
This can be read off the
H= cutting height indicator. Release the
I= adjustment lever again and allow the height adjustment to engage.

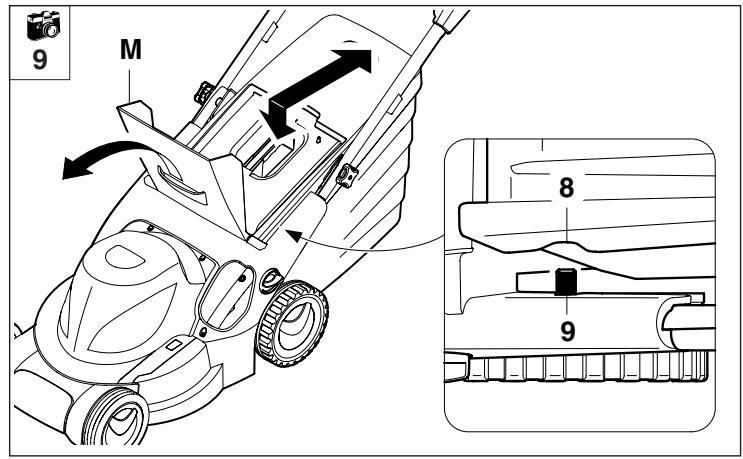
9

Attaching and detaching the grass catcher bag
CAUTION
Risk of injury!
The motor must be switched off before attaching and detaching the grass catcher bag.
Attaching:
Open the
M= ejection flap and hold it open.
The grass catcher bag is attached by engaging the
8= recesses in the grass catcher bag to the
9= mounting on the appliance.
Close the
M= ejection flap again manually.
Detaching:
Open the
M= ejection flap and hold it open.
Lift the grass catcher bag upwards, detach from the
9= mounting and remove.
Close the
M= ejection flap again manually.

NOTE
To ensure a perfect, thick lawn, mow regularly and keep the grass short.
Do not cut too short in hot, dry conditions as the lawn will dry out or burn in the sun and become unsightly.
The cutting pattern will be better with a sharp blade than with a blunt one. The blade must therefore be sharpened regularly (VIKING dealer).
CAUTION

Risk of injury!
Untangle any knots in the cord immediately.
If using a cable drum, the connection cord must be unwound completely, otherwise electrical resistance may cause loss of power and overheating.
Guide the connection cord behind you when mowing. Connection cords can be inadvertently cut when mowing and therefore involve a high accident risk. For this reason, mow so that the connection cord is always visible in the area of grass that has already been cut.
Mowing on slopes

For safety reasons, the lawn mower must not be used on inclines of more than 25^ . A slope inclination of 25^ (46.6%) corresponds to a vertical height increase of 46.6 cm for a 100 cm horizontal distance.
Correct motor load
Do not switch on the mower in tall grass or at the lowest cutting height.
The lawn mower load must never cause the motor speed to drop significantly. If the speed drops, select a higher cutting height setting and/or reduce the rate of feed.
Thermal motor overload protection
If an overload of the motor occurs during operation, the built-in thermal overload protection device automatically deactivates the motor.
Causes for an overload:
- mowing excessively high grass or with cutting height adjusted too low
excessive rate of feed - unsuitable or excessively long connection cord (voltage loss) (see section "Electrical connection")
- inadequate cleaning of the cooling air guide (inlet slots)
To recommence operation:
Resume normal operation of the appliance following a cooling period of approx. 10 min (depending on the ambient temperature) (see section "Initial operation")
If the mowing blade blocks
Switch off the motor immediately and disconnect the plug. Then eliminate the cause of the fault.
Initial operation of appliance
CAUTION

- Carefully inspect the complete area on which the appliance is to be used and remove any stones, sticks, wires, bones and other foreign objects.
- Start the motor in accordance with the instructions.
- Be particularly careful when turning the mower around or pulling it towards you.
- Risk of injury! Never put hands or feet on or underneath rotating parts.
Always wear robust shoes and long trousers when mowing. Never mow barefoot or in sandals. - Never mow in the vicinity of other persons, particularly children, or animals.
Electrical connection
Power supply and operating voltage must correspond (see identification plate).
The mains supply voltage must correspond to the specified rated voltage of the appliance.
The power supply cord must be adequately protected by fuse (see section "Technical specifications").
Only connection cords which are no lighter than rubber sheathed cables H07 RN-F DIN/VDE 0282 and have a minimum cross section of 3 × 1.5 mm^2 for cable lengths up to 25 m and 3 × 2.5 mm^2 for cable lengths up to 50 m must be used.
The connectors of the connection cord must be made of rubber or have a rubber cover and conform to the standard DIN/VDE 0620.
This machine is intended for operation with a power supply having a system impedance of Z_max at the transfer point (house connection) of maximum 0.47 ohms (at 50Hz).
The user must ensure that the machine is only operated with a power supply which meets this requirement. If necessary, this information can be obtained from the local electric power company.
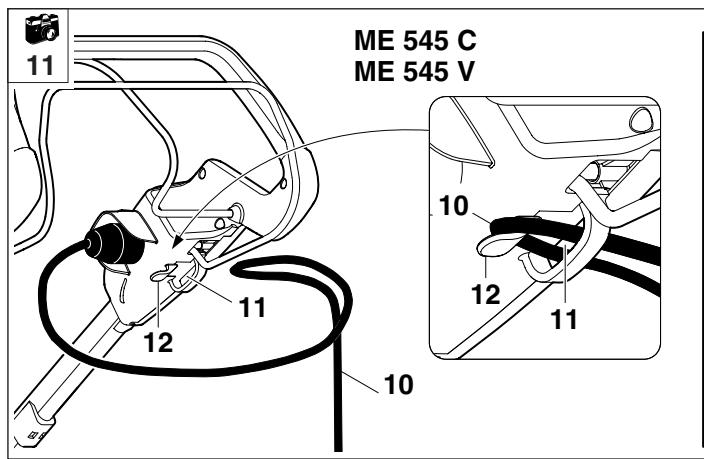
Strain relief

During mowing work, the strain relief prevents any unintentional disconnection of the connection cord and resulting possible damage to the mains connection on the appliance.
For this reason, the connection cord must be fed through the strain relief.
Form a loop with the
10= connection cord and guide it through the
11= opening.
Pass the loop over the
12= hook and tighten.
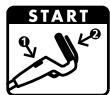
Switching on the lawn mower

NOTE

Do not start the motor in high grass or when the mower is set to the lowest cutting height, as this makes starting difficult.
Step ① :
Press
S= start button and hold it down.
Step 2:
Press
R= Motorstop lever to the handlebar and hold.
The start button can be released again after moving the motorstop lever.
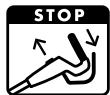
Switching off the lawn mower

Release the
R = motorstop lever.
The motor and blade come to a standstill following a brief rundown time.
CAUTION

Risk of injury!
Always disconnect the mains plug when leaving the lawn mower unattended.
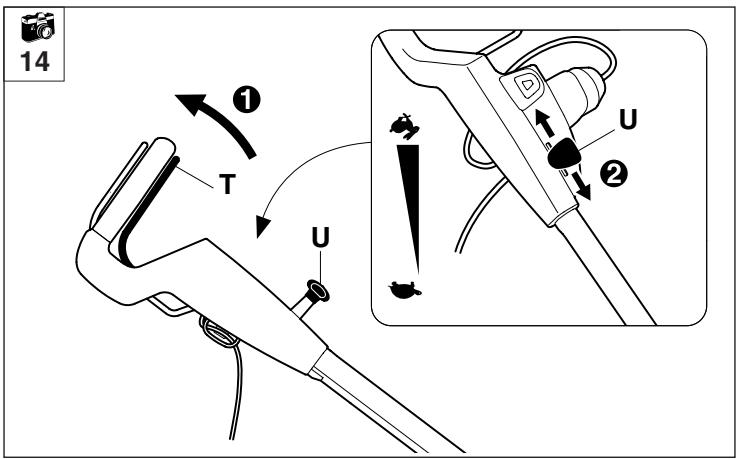
Switching on the wheel drive ME 545 V

NOTE

The wheel drive functions only when the motor is running.
The vario drive lever (U) must not be operated when the motor is stopped as this may result in damage to the drive mechanism (lever is blocked).
Step 1:
Pull the
T= wheel drive lever to the handlebar and hold. The wheel drive engages.
Step 2:
For continuously variable speed increase, pull back the
U= vario drive lever; to reduce the speed, push the lever forwards.
Drive speed:
Continuously variable, from
2.4 km/h to 4.0 km/h
NOTE

The speed of the vario drive can be freely adjusted during drive operation, without switching the wheel drive off.
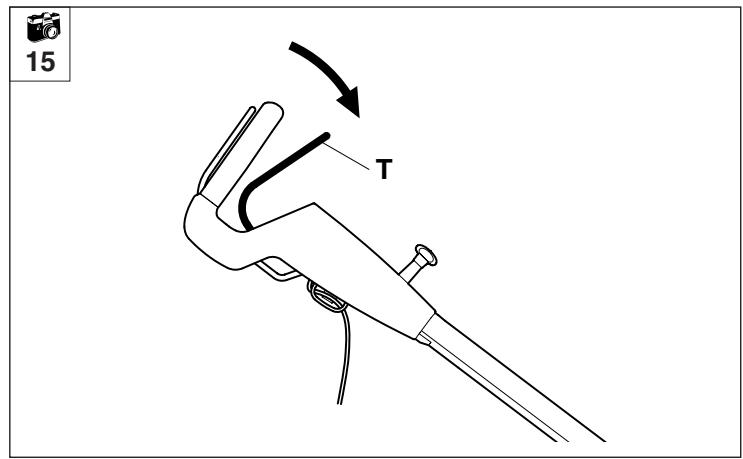
Switching off the wheel drive

To switch off the wheel drive, release the
T = wheel drive lever.
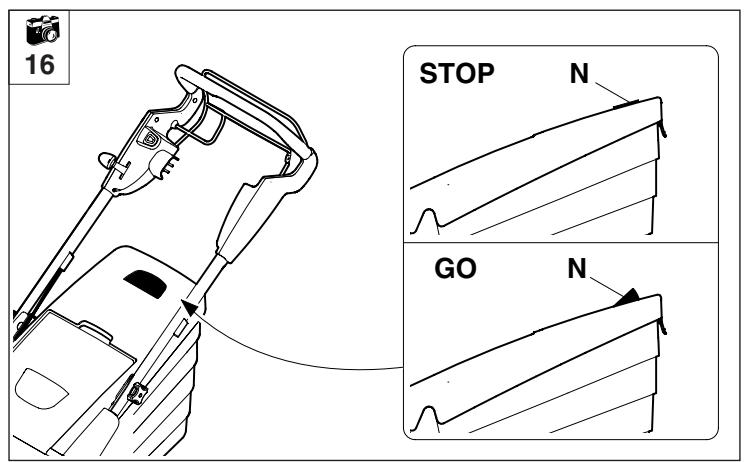
Level indicator

The grass catcher bag is equipped with a
N= level indicator on the upper part of the grass catcher bag.
The flow of air that is created by the rotary movement of the mowing blade and is responsible for filling the grass catcher bag raises the level indicator:
The grass catcher bag is filled with cuttings.
When the grass catcher bag is full, this flow of air is reduced and the level indicator drops:
The grass catcher bag is full and must be emptied (see section "Emptying the grass catcher bag").
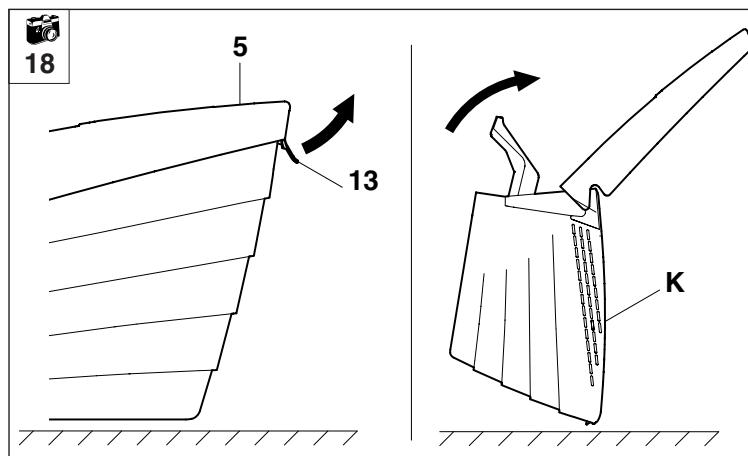
Emptying the grass catcher bag

CAUTION

Risk of injury!
The motor must always be switched off prior to emptying the grass catcher bag.
NOTE

A completely filled grass catcher bag can weigh up to 16kg
- Detach the grass catcher bag from the appliance (see section "Attaching and detaching the grass catcher bag").
Open the grass catcher bag at the
13= tab and open the
5= upper part of the grass catcher bag upwards.
Fold back the full
K = grass catcher bag.
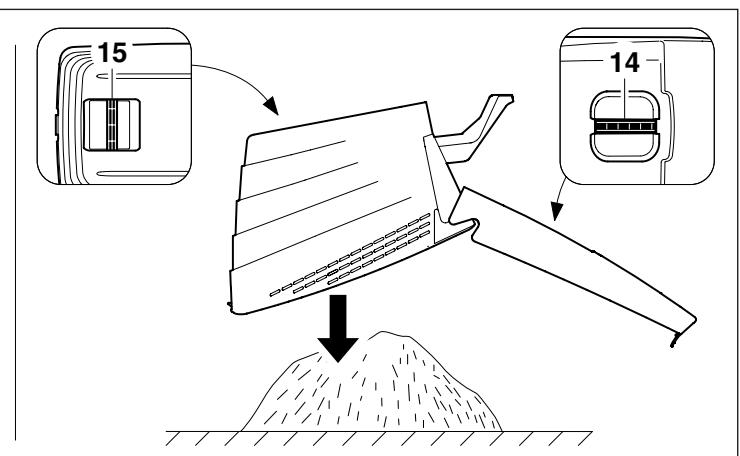
The grass catcher bag can be held securely and emptied easily using the
14= handle (upper part of grass catcher bag) and the
15= handle (lower part of grass catcher bag).
Maintenance

CAUTION

Risk of injury!
In order to prevent inadvertent
starting of the motor, always disconnect the power cord prior to all maintenance and cleaning work, and prior to work on the mowing blade.

Risk of injury! Always wear gloves.
Do not touch the mowing blade until it has come to a standstill.
If you do not have the necessary expertise or auxiliary equipment, please always contact a specialist dealer.
VIKING recommends that you have maintenance operations and repairs performed exclusively by a VKING specialist dealer.
VIKING recommends the use of original VKING tools, accessories and spare parts.
Cleaning the appliance

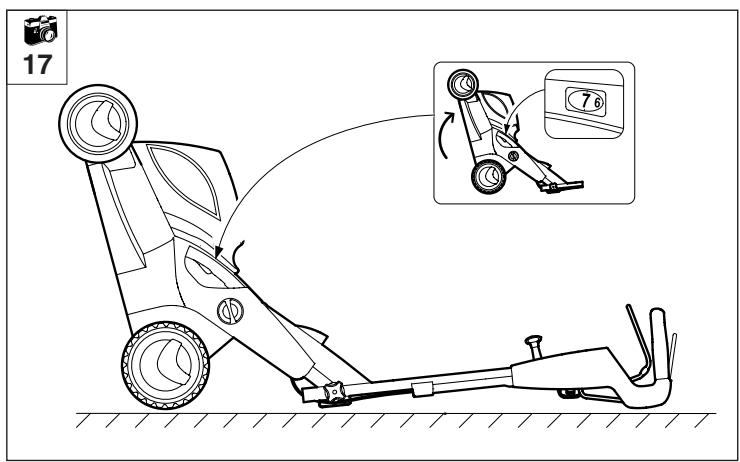
17
Maintenance interval: Each time the appliance is used
Clean the appliance thoroughly each time it has been used. Care of the appliance will protect it against damage and extend its service life.
Remove dirt from the cooling air guide (inlet slots) between the motor cover and the lower housing to ensure that the motor is adequately cooled.
Clean the mowing blade.
Clean the underside of the mower with water and a brush. Detach accumulated cutting deposits in the housing and in the ejection chute beforehand using a stick.
Never spray water onto motor components, seals, bearing points or electrical parts such as switches. This would result in expensive repairs.
Do not use aggressive cleaning agents. These cleaners can damage plastics and metals, impairing safe operation of your VKING mower.
If you are unable to remove the dirt with water, using a brush or a cloth, VIKING recommends the use of a special cleaner (e.g. STIHL special cleaner).
CAUTION

Risk of injury!
Before tilting upwards, place the mower on firm, horizontal and level ground and adjust it to the highest cutting level (level 7), otherwise the mower might tilt forwards again.
NOTE

Tilt up the front of the mower when carrying out cleaning or maintenance work. Before tilting, detach the grass catcher bag, fold down the upper handlebar (see section "Assembling the handlebar") and lift the ejection flap.
Electric motor, wheels and gearbox
The electric motor is maintenance-free.
The ball bearings of the wheels are maintenance-free.
The vario gearbox (ME 545 V) is maintenance-free.
Upper handlebar
Maintenance interval: Before each use
The upper handlebar is covered with a coating of insulation. Should this insulating coating become damaged, the upper handlebar must be replaced.
Risk of injury from an electric shock!
Mowing blade maintenance

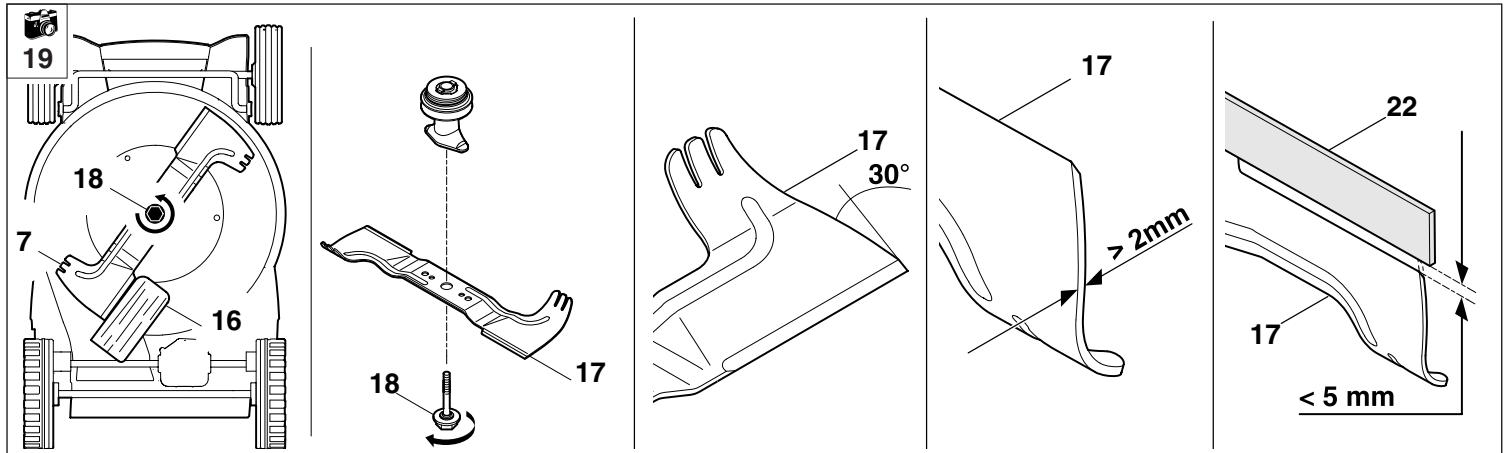
19
CAUTION

Risk of injury!
If you do not have the necessary expertise or auxiliary equipment, please always contact a specialist dealer. (VIKING recommends VKING specialist dealers).
VIKING recommends the use of original VKING spare parts.
Maintenance interval: Before each use
Tilt the mower upwards into the cleaning position.
- Clean the mowing blade and check it for damage (notches or cracks) and wear; replace if necessary.
Wear limits:
The blade thickness must be at least 2 mm at any point. (Check using slide calliper).
The blades may not be ground back by more than 5 mm during sharpening.
When inspecting, place a 22= ruler against the front blade edge and check for wear.
CAUTION

If the supplied standard blade is not installed in the lawn mower, but e.g. the mulching blade, which is available as a special accessory, different wear limits apply.
CAUTION
Risk of injury!
A worn blade may break off and cause serious injuries. The instructions for blade maintenance must therefore always be observed.
Blades are subjected to differing degrees of wear depending on the location and duration of use. If you use the mower on sandy ground or use it frequently under dry conditions, the blade will be subjected to greater loads and will wear more quickly than the average.
Always replace the blade fastening screw (18) when replacing the mowing blade.

Removing the mowing blade

Risk of injury! Always wear gloves.
For removal, use a
16= wooden block (approx.
60 × 60 ~mm to counterclockwise
17= mowing blade.
Unscrew the
18=blade fastening screw using an A/F 24 spanner.
Remove the
17= mowing blade.

Sharpening the mowing blade
The following points must be observed when re-sharpening the mowing blade:
Cool the mowing blade when sharpening, e.g. with water. The blade must not be allowed to display blue colouring, as this would reduce its cutting quality.
- Sharpen blades evenly to prevent vibration due to imbalance.
CAUTION
Risk of injury!
Check blade for damage before installing.
The blade must be replaced if notches or cracks are identified, if the blades are worn back by 5mm or if the blade is thinner than 2mm at any point (wear limits).
The sharpening angle of the blade is 30^ .
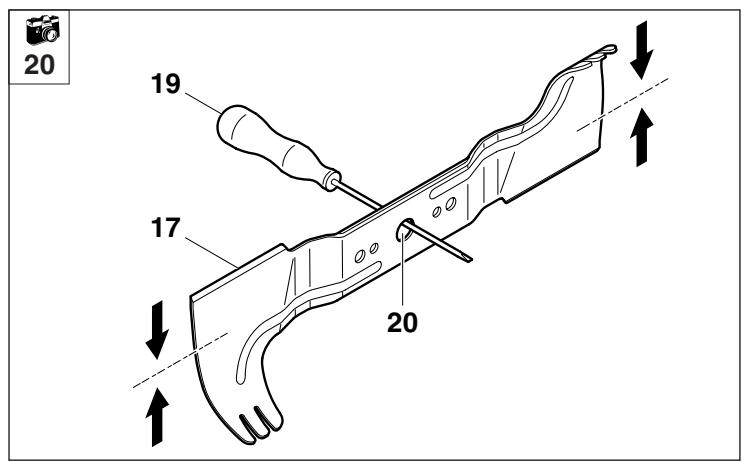
Checking the balance of the mowing blade

Guide the
19= screwdriver through the
20= central bore of the
17= mowing blade and align the blade horizontally. If the mowing blade is properly balanced it will remain in this horizontal position.
If the blade leans to one side, re-sharpen this side until the blade is evenly balanced.
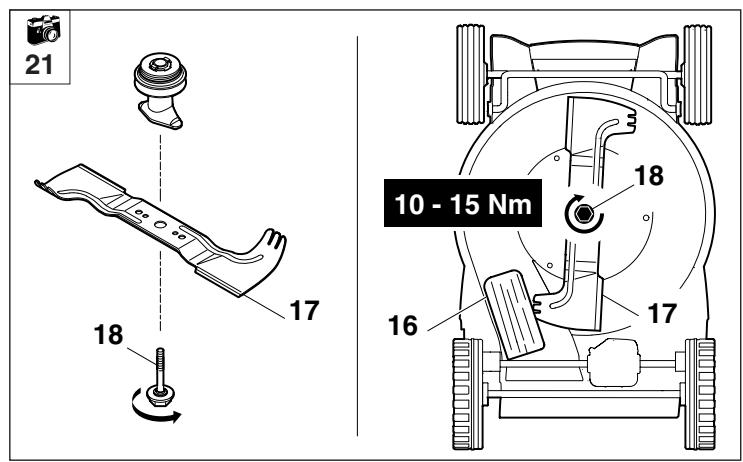
Installing the mowing blade

21

Risk of injury! Always wear gloves.
Install the
17= mowing blade with the curved wings pointing upwards.
For installation, use a
16= wooden block (approx. 60 × 60 mm ) to counterclock the mowing blade.
Tighten the
18= blade fastening screw to a torque of 10 - 15 Nm.
CAUTION

Risk of injury!
Observe the specified torque of 10 - 15 Nm when tightening the blade fastening screws, as the secure attachment of the cutting tool depends on this.
Additionally secure the blade fastening screw (18) with Loctite 243.
Adjusting the wheel drive cable
Maintenance interval: As required (wheel drive does not engage when the wheel drive lever is actuated)
The tension of the cable is adjusted correctly at the factory. However, the cable may have to be adjusted again following an extended period of use.
The adjustment is made via an
21= adjustment screw located on the left of the upper handlebar.
Correct adjustment:
Actuate the drive lever while pulling the lawn mower backwards.
The driving wheels must lock after approx. one third of the lever travel.

22
The cable tension is increased by turning the
21= adjustment screw in the ^ 十 + ^ 一 direction, turning it in the - direction reduces the tension.
CAUTION

Risk of injury!
If, when pulling back, the driving wheels are locked when the drive lever is not actuated, the cable is adjusted incorrectly and the mower drive is permanently activated.
As a result, the mower may start to move unintentionally immediately when started and this may result in injury or damage to the appliance.
The adjustment must be repeated (if necessary, contact a specialist dealer; VIKING recommends VIKING specialist dealers).
Storage (winter break)
The storage room should be dry and free of dust. The mower should also be stored out of reach of children.
Any appliance faults must be remedied prior to storage in order to maintain a safe operating condition.
Note the following points when storing the mower for long periods (winter break):
- Carefully clean all external parts of the appliance.
Thoroughly lubricate/grease all moving parts.
Environmental protection
Minimising wear and preventing damage
Lawn cuttings should be composted and not disposed of in household waste.
The appliance, its packaging and accessories are all produced from recyclable materials and must be disposed of accordingly.
By disposing of materials separately, and in an environmentally-friendly manner, valuable resources can be re-used. For this reason, the appliance should be disposed of for recycling after completion of its useful life.
Standard spare parts
Mowing blade
6340 702 0100
NOTE

The fastening elements of the mowing blade (e.g. blade fastening screw, lock washer) must be replaced when replacing the blade or when installing the blade. Spare parts are available from a VKING specialist dealer.
Important information on maintenance and care of the product group
Electric lawn mowers
Please always observe the following important information for the prevention of damage or excessive wear to your VIKING appliance:
1. Wearing parts
Some parts of the VIKING appliance are subject to normal wear even when used properly and must be replaced in due time depending on type and duration of use.
These include:
- Blade
- Grass catcher bag
Protection bumpers
V-belt (ME 545 V)
2. Observance of the information in this instruction manual
The VIKING appliance must be used, maintained and stored with the care described in this instruction manual. Any damage caused by non-observance of the safety, operating and maintenance instructions is the sole responsibility of the user.
This applies in particular to:
- inadequately dimensioned power cords (cross section)
- incorrect electrical connection (voltage)
- product modifications not approved by VIKING
- the use of tools or accessories which are not approved or suitable for the appliance, or are of inferior quality.
- improper use of the product
- use of the product for sporting or competitive events
resultant damage due to continued use of the product with defective components
3. Maintenance operations
All work listed in the section "Maintenance" must be performed regularly. If these maintenance operations cannot be carried out by the user himself, a specialist dealer must be commissioned to do it.
VIKING recommends that you have maintenance operations and repairs performed exclusively by a VKING specialist dealer.
VIKING specialist dealers regularly attend training courses and are provided with technical information.
If these operations are neglected, faults may arise which are the responsibility of the user.
These include:
- damage to the drive motor as a result of inadequate cleaning of the cooling air guide (inlet slots)
corrosive and other resultant damage caused by incorrect storage
damage to the appliance through the use of inferior-quality spare parts. - damage due to untimely or inadequate maintenance or damage due to maintenance or repair work not performed in the workshops of specialist dealers.
Troubleshooting
| Fault | Possible cause | Remedy | Page | Illustration |
| - Motor will not start | - No mains voltage - Connection cable/plug or plug connector or switch defective - Start button not pressed - Thermal motor overload protection has been triggered - Mower housing is blocked | - Check fuse - Check, replace if necessary | 9 × 10 8, 9, × 11 | 11 16 |
| - Frequently tripped mains fuse | - Unsuitable connection cord - Power overload - Appliance is overloaded due to mowing grass which is too long or too wet | - Use suitable connection cord - Connect the appliance to another circuit - Work at appropriate cutting height and mowing speed for mowing conditions | 9 9 7, 9 | 7 |
| - Excessive vibration during operation | - Blade fastening screw is loose - Motor mounting is loose - Blade imbalance due to incorrect re-sharpening or fracture | - Tighten blade fastening screw - Tighten motor fastening bolts - Re-sharpen (balance) or replace blade | 12, × × 12, × | 19 18, 19 |
| - No response when wheel drive lever is actuated (on ME 545 V) | - Wheel drive cable incorrectly adjusted - V-belt worn - Wheel drive cable damaged (e.g. kinked) - Gearbox is defective | - Re-adjust wheel drive cable - Replace V-belt - Replace wheel drive cable - Replace gearbox | 13 × × × | 20 |
| - Vario drive speed control not functioning (on ME 545 V) | - Lever moved in wrong direction - Vario drive cable disengaged or damaged | - Move lever in right direction - Attach or replace vario drive cable | 10 × | 13 |
| - Poor cut, lawn turning yellow | - Mowing blade is blunt or worn - The rate of feed is too high in relation to the cutting height | - Re-sharpen or replace mowing blade - Reduce rate of feed and/or select correct cutting height | 12, × 7 | 19 7 |
| - Starting problems or deteriorating motor performance | - Mowing grass which is too long or too wet - Mower housing is blocked | - Work at appropriate cutting height and mowing speed for mowing conditions - Clean mower housing (disconnect mains plug before cleaning) | 7 11 | 7 16 |
| - Ejection chute blocked | - Mowing blade is worn - Mowing grass that is too long or too wet | - Replace the mowing blade - Work at appropriate cutting height and mowing speed for mowing conditions | 12, × 7 | 19 7 |
see motor instruction manual
If necessary, contact a specialist dealer; VIKING recommends VIKING specialist dealers.
| Unit | ME 545.1 ME 545.0 C | ME 545.0 V | |
| Serial number | 6340 | 6340 | |
| Motor, design | Electric motor | Electric motor | |
| Manufacturer | ATB | ATB | |
| Type | BSRBF 0,75/2-C74 | BSRBF 0,75/2-C74 | |
| Voltage | Volt [V~] | 230 | 230 |
| Power input | Watt [W] | 1600 | 1600 |
| Fuse | Ampere [A] | 10 | 10 |
| Frequency | Hertz [Hz] | 50 | 50 |
| Protection class | II | II | |
| Type of protection | IPX 4 | IPX 4 | |
| Cutting utilities | Cutter bar | Cutter bar | |
| Cutting width | cm | 43 | 43 |
| Speed of cutting utilities | rpm | 2800 | 2800 |
| Cutter bar drive: | permanent | permanent | |
| In accordance with Guideline 2000/14/EC: | |||
| Guaranteed sound power level LwAd | dB(A) | 94 | 94 |
| In accordance with Guideline 2006/42/EC: | |||
| Sound pressure level at workplace LpA | dB(A) | 78 | 78 |
| Uncertainty KpA | dB(A) | 1 | 1 |
| Specified vibration characteristic in accordance with EN 12096: | |||
| measured value ahw | m/sec² | 5,20 | 5,20 |
| Uncertainty Khw | m/sec² | 2,08 | 2,08 |
| Measurement in accordance with EN 20 643 | |||
| Tightening torque for blade fastening screw | Nm | 10 - 15 | 10 - 15 |
| Wheel drive, rear wheel | - | Vario | |
| Wheel diameter (front) | mm | 180 | 180 |
| Wheel diameter (rear) | mm | 200 | 200 |
| Cutting height | mm | 25 - 80 | 25 - 80 |
| Grass catcher bag | l | 60 | 60 |
| L/W/H | cm | 147x48x102 | 147x48x102 |
| Weight | kg | 26 / 30 | 32 |
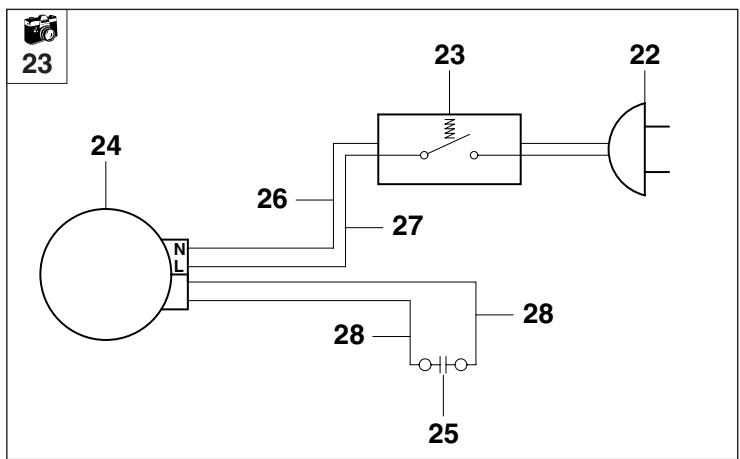
Circuit diagram

23
22 Mains connection
23 On/off switch
24 Motor
25 Capacitor
26 blue
27 brown
28 black
CE - Manufacturer's declaration of conformity
We,
VIKING GmbH
declare, that the machine,
Lawn mower, manually-operated and mains-powered
Name and address of relevant, named location:
TÜV Rheinland LGA Products GmbH
Tillystraße 2
D-90431 Nurnberg
Compilation and storage of technical documentation:
Johann Weiglhofer
VIKING GmbH
Description of symbols (2)
Manufacturer's
brand: VIKING
Type: ME 545.1
ME 545.0 C
ME 545.0 V
Serial number: 6340
Measured sound power level: 92 dB(A)
Guaranteed sound power
level:
94 dB(A)
Start the engine
Stop the engine
ME 545 V
Switch on the wheel drive
conforms to the following EU guidelines:
2000/14/EC, 2002/95/EC,
2002/96/EC, 2004/108/EC
2006/95/EC, 2006/42/EC
The product has been developed in conformance with the following standards:
EN 60335-1.
EN 60335-2-77
Applicable conformity assessment
procedure:
Appendix VIII (2000/14/EC)
The year of manufacture and serial number appear on the identification plate of the machine.
Langkampfen,
02.01.2013
VIKING GmbH

Weighlofer
Research and Product
Development Manager
Transport

Always wear gloves in order to prevent injuries
due to sharp-edged and hot components.
- Switch off the mower prior to transport, disconnect power cable and allow the blade to come to a stop.
- Only transport the appliance once the motor has cooled down.
- The mower must always be carried by two persons.
- Use suitable loading aids (loading ramps, lifters).
- Secure the appliance on the load floor using adequately-dimensioned fastening material (belts, ropes etc.).
- When transporting the machine, always observe regional legislation, especially regarding load security and the transport of objects on load floors.
Please give this instruction manual to your VIKING specialist dealer when you have maintenance work performed on your VIKING product. Your VIKING specialist will confirm the correct performance of the required service operations in the "Service schedule" section.
Model: ME
Serial number:

Handed over
Date:
VIKING dealer stamp
Next service
Date:
Date:
VIKING dealer stamp
Next service
Date:
Date:
VIKING dealer stamp
Next service
Date:
Date:
VIKING dealer stamp
Next service
Date:
Date:
VIKING dealer stamp
Next service
Date:
Date:
VIKING dealer stamp
Next service
Date:
Date:
VIKING dealer stamp
Next service
Date:
Chere cliente, cher client,
2002/96/EC, 2004/108/EC,
2006/95/EC, 2006/42/EC
2002/96/EC, 2004/108/EC,
2006/95/EC, 2006/42/EC
2002/96/EC, 2004/108/EC.
2006/95/EC, 2006/42/EC
Oppbevaring over tid (winter) 14
Miljøvern 15
Vanlige reservedeler 15
Koble inn fremdriften
er i overensstemmelse med falgende EU-retningslinjer:
2000/14/EC, 2002/95/EC,
2002/96/EC, 2004/108/EC.
2006/95/EC, 2006/42/EC
Produkt er utviklet og produsert i overensstemmelse med ffolgende normer:
EN 60335-1,
EN 60335-2-77
2002/96/EC, 2004/108/EC
2006/95/EC, 2006/42/EC
2002/96/EC, 2004/108/EC,
2006/95/EC, 2006/42/EC
TÜV Rheinland LGA Products
GmbH
Tillystraße 2
D-90431 Nurnberg
- Slib kniven ensartet for at undgå vibrationer pga. ubalance.
Risiko for at snuble!
Opbevaring (winterpause)
2002/96/EC, 2004/108/EC,
2006/95/EC, 2006/42/EC
ME 545 V
Start fremdrift
Produktet er uvdiklet i
TÜV Rheinland LGA Products
GmbH
Tillystraße 2
D-90431 Nurnberg
2002/96/EC, 2004/108/EC,
2006/95/EC, 2006/42/EC
2002/96/EC, 2004/108/EC,
2006/95/EC, 2006/42/EC
Vyvoj a konstrukcia tohto
vyrobku prebiehala v sulade s
nasledujucimi normami:
EN 60335-1,
EN 60335-2-77
Použitá metodika hodnotenia zhodnosti vyroby:
Dodatok VIII (2000/14/EC)
TÜV Rheinland LGA Products
GmbH
Tillystraße 2
D-90431 Nurnberg
Zostavenie a ulozenie
2002/96/EC, 2004/108/EC,
2006/95/EC, 2006/42/EC
ME 545 V
TÜV Rheinland LGA Products
GmbH
Tillystraße 2
D-90431 Nurnberg
TÜV Rheinland LGA Products
GmbH
Tillystraße 2
D-90431 Nurnberg
2002/96/EC, 2004/108/EC,
2006/95/EC, 2006/42/EC
2002/96/EC, 2004/108/EC,
2006/95/EC, 2006/42/EC
Tpoxia Touaiaipoiou koinc 13
EeYXoc CuyoOaOIOnc maXapoiou Konng 13
ToTioTeiOn muaiaipou 14
Pouon viciac ouotmuatoa autokivnq 14
IoproTOBka yctpoiCTBa K pa6ote 6
MoHTaxBeyuueyUk6
BepxHЯчacTb Bedyue pyuKn 7
MOnTaK dEprKaTeIa Ka6eIa 7
MoHTax K TpaBoc6OpHnKa 8
PerynipOBKa BbICOTb BeDyue pyuKn 8
LcHTpaN3OBaHHa peYIpOBKa BbICOTbI cpe3aHn8
IIOBBeWbAHne IN CHaTne TpaBoc6OpHnka 8
Yka3aHnno Kocb6e m MylbNpObaHnIO 8
Kocb6a Ha cknlohax 9
PpabunbHaHarpy3Ka DnBraTeIa 9
TePMo3aunTa dBVaTeTn OT nepepy3kn 9
Ppi6IoknpoBkepekUeToHoxa 9
IoproTOBka yctpoicTba K pa6oTe 9
IopcoeHHeHneK 3NeKtpnuecko cetn 10
OrpaHnHTeJIb nnHbI Ka6eJI 10
BkIIOueHHe ra3oHOKOcNIKn 10
BbIKIOUeHne ra3oHOKOcNIKn 10
BkIIOUeHne npIBoJa 10
BbIKJIIOUeHHe npINBOda 11
INdkaTOp 3anOpHeHn 11
OnycToWeHne TpaBoc6bOpnka 11
Texobcnykubahne 11
OuHCTKa yCtpoiCTBa 12
3JIeKToDvBraTeIb, KOJeca N Kopo6Ka nepeDaU 12
Bepxna YacTb BeDyuee pyuKn 12
Texo6cnykBaHne HOka KocnIkn 12
ДемоNTах HOKa KocINKn 13
3aToUka Hoxka 13
1= BnHT OTBnHTNb
2= pyKoIrKa ...
Obuee nepeuucnene, dna KToTopoRo HET pucyHka.
Празмер:
VIKING peKOMeHnyet
IprimeHbOprHnHaJIbHbIe
INCTpyMeHtbl, KOMNKeTKUOuNe
n 3aJuaCTn VIKING. OOn nO
CBOIM KaueCTBaM ONTImaJIbHO
COOTBeTCTBYOT yCTpoiCTBy
In Tpe6oBaHnAM nONb3OBaTeJIa.
OpunHaJIbHbIe 3aIuaCTn
VIKING ono3HaIOcTc IIO HOMepy
3aIuaCTn VIKING,
no HaIpcn VIKING n npri
Heo6xOIMocTn no 3HaKy
3aIuaCTeY VIKING.
Ha MaJIeHbKINx DeTaJIaX 3HaK MoKeT CTOrTb TaKKe OTdIeJIbHO.
-ДпгTOROчTOбыустpoиCTBO pa6oTaloHaDExH0, 3aTЯнBaTb BCEraiKn, 6oNTbIиBnTHbIdoynopa.
- Ecπη pεχύπι ένικτρυμέnt
πιπι rαθούκουσκηλελεπι κακοε-πιδό πρεπητCTBνε
πιπι ποςτορούνην πρεdmετ, TO ΘεοβχούπιΟ OCTaHOBιNTb
ДΒιγατΕŋθ, BынчтБВИΝΚу
ι3 CETι ένηριδενεῖνι OCMΟΤρ.
3anpeuaeTc npBODntb B DeIcTBnE ra3OHOKOJky C NOBpeKDeHbIM ININ NOrHyTbIM KOJIeHHaTbIM BAJOM.
Onachoctb TpaBmaTn3Ma n3-3a deekekThbix y3Iob!
Pergnno npobepa TpaBbHa OTCyTCTBne n3Hoca, nobpeKdEHH na pa60tocncoc6hocb.
- 13 coo6paXeHn 6e30naChOCTn 3aMeHrTb n3HOWeHHbI e IIN IOBpeKdEHHbI dTaJI.
HakneiHa yctpoicTBec npedeynpejXdeHnMn uYka3aHnMn 06 ImeOuXcra onachocTAX,CTabXihe Hepa3bOpCuNbIMn, Heo6xOdImo 06HOBJIaTb. Ipnio6pTeHnHOBbIX HakIeek 6paauTecb B cepBncHy oCnyk6by VIKING.
PpeDynpexKdHne - onaCHOCTb nopaxKeHnA 3JIeKTPnueckm TOKOM
-ПикocьбеKaбьДолжeh HaxOДИТьСЯHa yДаJIeHHOMpacCTOrHIMOTHOka.
- PpIMeHrTb ydIINHtEJIbHbIe npOBoJa TOnIbKO BO BlaIgO3aUHTHom IcPONHeHn (CM. NyHKT: POnIroTBKa K pa60Te).

- 3anpeuaeTcnaONb3OBaTBKocnIKy BOBpeMaIOJxIpynMOkpoi TpaBe.
3aepuehoOCTaBJIaTb KocnIKyIOIdoJoxdEm.
BbInyTb BnIky coeHNHTeNbHOro Ka6enr n3 po3eTKn, He TaHyTb 3a coeHNHTeNbHbI Ka6enb.
- Пи pa6oTe KocuKn Ha OTKpbI TOM BO3dUxpe PO3eTka 3JIeKTPnueCKo CEtN DOJXHa 6bITb CHa6KeHa aBTOMaTHueCKIM npedoxpaHHTeJIbHbIM BblKnIOUaTeJIem, cpa6aTBbIAUOUMnpi NOBJIeHm yTeuKN ToKa (TOK OTKJIIOUeHnMaKc. 30 mA).BoJeE noDpO6Hyo INΦopMaZnO MoXHo ΜOnyUHTb y 3JIeKTPOMHTaXHnKa.
Oncahne CUMBOJOB (1)

BHHMaHne!
Ipeed IepBbIM
IpImeHEnEM
IpoHTaTb INHCTpyKcIIO
IO 3KcNpyatau.
Onachoctb
TpaBMaTn3Ma! 3anpeuHo npucytCTBne nocToPOHHNXIaB paOoye 30He.

Onachoctb TpaBMaTn3Ma!
ObpaatabococtopokHO C OCTpbIM HOKOM Kocnilkn.Hox Kocnilkn npoJolkaeT
BpaaTbCnIO INHep
UIN B TeueHNI
HECKoIbKnx CeKynI
IOcNE BbIKIoUeHNI
(TopMO3 DBIrataTeN/
HOka).IpeEpaBo
TAMn C pexyUIM
INCTpyMeHTOM, a
TAkKe IpeEpaBO
TAMn IO TexO6CnyKu
BaHNIO U ONUCTKe,
IpeEi PPOBePKoI
COeINHInTEJIbHOrO
Ka6eJIHa OTCyTCTBVe
3aNyTbIBAHNI NII
IOBpeJXDeHNI IpeEi
TEM,KaK OCTaBtB
YCTpoiCTBO,
DBrIaTeJIb CneIyET
BbIKJIIOHTb IN BbIHytB
BUNKy I3 CETN.
Onachoctb nopaxeHn8 3JeKtpuyeckmTOKOM!
CoeHINTeIbHbI KabeIb DoJIKeH 6bITb ydaIeH Ha DoCTaTOHoe pacCTOHNHe OT pexyJero MExaHn3Ma.
KOMJIeKT NOCTaBKN

ПОЗ.ΗΝΜΕΝΟΒΑΝΗ ΜΙΤ.
1 Ba3OBoe yctpoiCTBO 1
2 3aunTa ot nepen6a Ka6eMa ME 545,ME 545 C 1 ME 545 V 2
3 BoNT c nlocko kpyrno roNoBko 2
4 NobopoTHa pyka 2
5Держателkaбеля 1
6 BepxHЯ qacTb TpaBoc6OpHnKa 1
7 HnKnHa YacTb TpaBoc6OpHnKa 1
8 Bont 2
9 3axim Ka6eJ (ME 545)
10 2 (ME545)
IHCtpyKuaIaIIO 1
IpoIroTOBka yctpoiCTBa K pa6Ote
YKA3AHNE

ДЯ Вынnotеня STnx pa6ot yCTpoCTBO DoJXHO 6bITb yCTOuHBO yCTaHOBJIeHO ha pOBHOn I TBepDoI NOBepxHOCTn.
MONTAX Bedyueeyuyn

MOnTaK BeDyuIe pyuKn:
A= BeDyUyIO pyUKy yCTaHOBNTb Ha o6e HnKHe YAcTn pyKn.
3= BnHTbIcPiOckoKpyTIOJrOIOBKOIBCTaBNTbN3HyTpNBOTBepCTnN3aKpeNTb
4= NOBOPOTHbIMn pyKamN Do OTKa3a.
YKA3AHNE

IpoToUKN Bpe3b6ax
IpeOxpaHnIO TNOBOpOThIe
pyKn OT NOnHO
cAMoOTbOPaHnBaHnC
BnHTOB (HapuSeHne
6e3oNaCHOCTn).
UcTaHOBKa 6ByeJrIa3auNTbI OT nepeRn6a cJeBa:
YKA3AHNE

UcTaHOBtB 6yTeJIb dIa3aunTbI OT nepeRn6a (2) B COOTBeTCTBmC pucyHKOM. Tpocbl N Ka6eN IOJXHb 6bIT ppOLOKeHb IoD BeDuSei pyKoI Ppi Heo6xOdMocTn pePeYcTaHOBKO Ocna6tB NOBOPOTHyIO pyKy (4).
BcTaBnTb BCE TpOcbI n Ka6eJI N
2= 6yreIb IJIa3aIITbIOT nepern6a. BhaJane BCTaBtB 6yreIb IJIa3aIITbIOT nepern6aB
11= BepxHHe OTBepCTne HnXHeJ YactN BeDyUeJ pyuKn. 3aTeM 3aueJIKNHyTb 6yTreJb DnA 3aunTbI OT nepeRn6aB
12= HNKHem PPOJOLbHOM OTBepCTnHNXHNei Yactn BeDyuee pyuKn.
UyctaHObKa 6yreIaIa3aunTbI OT nepern6a cnpaBa:
YKA3AHNE

Y MoJeIN ME 545 Ha npaBoi CTOpOHe BeDyuei pyuKn He IMeeTcra TpocOB. IToTMoY y3Toi ra3OHOKoNkCneDuET yCTaHaBnBaTb 6ByeIb dJa 3aunTbI OT nepeRn6a (2) TOJbKO CJIeBa.
MOHTaX
2=6yTJIaI3aIITbIOTpeRn6aCnpabaBbIOJIHReTcTaKIMKeIpyTeM,KaIKCJIeBOICTOPOHbl.
OTKnDbIbAHne BeDyuei pyu:
BHIMAHHE!

Onachoctb noJyHeHn TpaBM!
Ipeed TEM KaC CLOXnTb pyKy cIeDyET BbIKIOuHTb KOCINKy I OTCOEINHITb ceTeBOJ Ka6JIb. 3aIpeuaetc HarpYkaTb BepxHIOU qACTb BeDuSei pyKn (Ha npImep, NOBecNB Ha Hee pa6Ouyo OdekJy).
Puck 3aueemlennra!
OTKNHyTB npBNOHO
pbUar MOXHO,pa3o6uINB
NOBOPOTbIe pyKn. Ppi
HaKpyUNBaHmN NOBOPOTbIX
pyEe KpNiDePxNBaTb
BepXHIOU YaCTb
npBODHO rO pbUra (A)
pyKoB B BepXHe TOnKe.
H= INHДИКаTOpe BbICOTbl cpe3aHnI.
I= IpebeoHnoBpHuarCHOBa OTnycTnTB N OTpeyInpoBaHHyOB BbICOTy 3aФNKcnpOBaTb.
Повецьане
I CHATNE
TpaBoc6opHnka
BHIMAHHE!
Onachoctb TpaBMaTn3Ma!
Pn PnDBeuBAHN IN CHaTm TpaBoc6OpHnKa
DnBraTeNbOJXeH 6blTb
OTKJIIOUeH.

9

Побеванье:
M=OTKnDHyIO KpbIiKy
OTKpbTbN
3aФИКСИРОВАТБ.
BCTaBtB TpaBoc6OpHk
8= yIy6JIeHnAIMN B
9= KpenekHbI y3eHa yCTpoiCTBe.
M= OTKnIHyIO KpbIuKy CHOBA 3aKpbITb BpyHyIO.
CHATNE:
M=OTKnDHyU KpbIiKy
OTKDbItbN
3aФИКСИРОВАТБ.
PpnoaHrtb
TpaBoc6OpHKn BBepx,
CHATb eRO C
9= KpeπeχHOro y3na
u ydaJIITb.
M= OTKnIHyIO KpbIuKy CHOBA 3aKpbITb BpyHyIO.

YKA3AHNE
TTO6bIMeTbKpaCnBbIra3OH C rYCTO TpABoH Heo6xOaMIO qACTO NOpe3aTb TpaBy, cKaunBaA ee KopoTKO.
PnJxapKOM n CyXOM KJImaTe He CNeIyET CNIuKOM KOpOTKOcAunBaTb TpaBy, TaK KaR a3OHbI Ha COINHcE BbIropaIOT
n npno6peTaIOT
HENPINBNEKeTAeJIbHbI BN.
Bolnee Kpacnbarg Kaptnha ckaunbaHnOBecneuNbaeTcnpNcnoJb3ObaHnOcTporo
HOKa. IOn3TOMy 3aTaunBaIte HOKn peYrJaPHO
(CnEuaJIIN3IPOBaHHa
cepBvncn a cnjx6a VIKING).
BHIMAHHE!

Onachoctb TpaBMaTn3Ma!
TOBBIAIOUneC
pepepeTeHnKa6eJr
cneJeTyPacnyTbIBaTb6e3
PnPomeIeHna.
Ppi npimenueHHN
ka6eJbHoro 6apabaa
coeHnHTeNbHbKabel
DOnJKeH 6bItb NnHOCTbO
paKpyeH, nHaue n3-3a
3JIeKtpuYeCKoTO
CONPOTNBLEHIN MORYT
BO3HNKHyTb NOTepN
MOUHOCTN INpeperpeB.
Bo Bpem Kocb6bl CneIHTb 3a pacnoIooKeHnEM CoeHNHTelbHorO Ka6eJIa CoeHNHTelbHbIe Ka6eJIIMoKHO npN Koc6be CnyuHaHNOpe3aTb N B CBra3N C 3TNIMMeETc 60lbWOn pNCK TpaBMATn3Ma. BcJeDCTBHe BblweyKa3aHHoro cKaunBaHnE Ipon3BOJNTb TOJbKO B TaKnx ycNoBnX, YTO6bl CoeHNHTelbHbI Ka6eJIb BCerDa JexKaI BNIMbIM Ha yXe CKoUeHHOM yAcTke.
Kocb6a Ha cKJIoHax

10
Из coобрахжени 6e3Опаснocтга3OнokocnIky СлдуET пIMeHЯТьHa СКLOнaх ТОльКСУглOM нakLoHa He 6Олee 25°. YrOla нakLoHa 25° (46,6%) COOTBETCTBYeT ВерТиKaЛьНOMу ПОДБЕМу 46,6 CM рп 100 CM ROPиЗоNTаьнOrу учacTKa.
IpaBnBnaHnHarpy3ka DnRaTeNa
He BKIIOUaTb r3oHOKOcNIky B BVICOKO TpaBe INI IN pNi CAMOI Hn3KoB BvICOTe Cpe3aHna.
Ta3OHOKOcNkU pa3peuaeTcHarpykaTb TOJbKO TaKIMOBpa3OM, YTO6bl YactOTaBpAeHNr DnIRatEINr np3TOM CHNXKaJIacbHe3HaHTeJIbHO.PnCnHXaIOeCNr YactOTeBpAeHNr Bbl6paTB 60neeBbICOKNIyPOBEHb BbICOTblCpe3AHN INI/N yMeHbWITbCKOPoCTb DBNXKeHNr.
Tepmo3aunTa dBnraTeNa OT neperpy3Kn
Ecn npa pa6oTe Bo3nKaet neperpyska DnraTeJRA,TO BCTpoeHHa TepMo3aunTa OT neperpyskn aBtOMaTneCKN OTKnOyaeT DnraTeJb.
PnHnbl neperpyskn:
KOCb6a CNIUKOM BbICOKOITpaBblnCNIUKOM HN3KOyCTAHOBJIeHHoB BbICOTcpe3aHnA
CINIUSKOM BbICOKaCKOPOCTbDINJKeHIN
- HeNoDxOJaIIM IIN CNIUKOM DInHHbI COeINHITBeHbI KAbEJIb (PaJeHne HaprJKeHn) (cM. rIaBy "PiOnCoeINHeHne K 3JIeKTPnuecko cTeN")
HeKaYeCTBeHHaOChCTKa KaHaJa OXJaXdIoUeTo BO3Dyxa (KaHaJ BCaCbIbAHn)
IOBTOPbIy BBOdB 3KcIIpyTaCuIO:
S= NycKObyo KhoNky HaxKaTb u ydePKNBaTb.
War 2:
R= ByreIb ocTaHOBKn DnBraTeIaHaKaTb K BeNyuei pyuKe n ydepxkBaTb.
Ipeed TEM KAK OCTaBnTb ra3OHOKOcNkY, BceIda CLeNyET BblHIMaTb BnKy n3 CETn!
BkIoueHne npuBoa ME 545 V

YKA3AHNE

PnBODfynKUOnHpyET TOIbKO npu paOtaUcEM DBrIaTeNe.
PnOCTaHOBJIeHHOM
DnIraTeIe pyKoRTKy
peRyInpyEmoT npNBoJa (U)
He pa3pe7aetcHaxIMMaTb,
TaK KaK 3TO MOKeT pnpBeCTn
K NOBpexKDeHIO npNBOJHO
MexAHIN3Ma (pyKoRTka
6JLOkOpBaHa).
War 0:
T= PnBODHyO pyKoTky NOTAHyTB K BeDyuee pyuKe N yDePxNBAtB. BKnHouaETc npBDo KocNJKn.
War 2:
INHdNKatOp 3aONJIHeHn

TpaBoc6opHnK cha6xhen
N= INHdNKaTOPOM 3anOpJIHeHHa TpaBbHa BepXHeu cactn TpaBoc6OpHnKa.
Bo3duhblnnotok, Bo3HnKaHOu3a Cuet BpaueHnpejUeRO HOka n cNoC06CTByUoUs 3aOpHHeHIO TpaOBocOpHnKa TpaBOi, npnpOHNMaet INDnKaTOp 3aOpHHeHn:
TpaBOc6OpHNK 3aIOnHReTcR cpe3aHHo TpaBOi.
EcIn TpaBoc6bOpHnK 3aONHeH TpaBOI,TO BO3dUyHbI NOTOK yMeHbShaeTcN INHdNKaTOP 3aONHeHnOnyCKaETc:
TpaBoc6opHnK 3aOpJHeN Do OTka3a n erO Heo6xOJIMo ONyCToWHTb (CM. IJIaBy "OnyctoWeHne TpaBoc6opHnKa").
OnyctoWeHne TpaBoc6opHnka

BHIMAHNE!

Onachoctb TpaBMaTn3Ma!
PnPiOBBeINBaHmN n CHaTm TpaBoc6OpHnKa DBrIaTeJIb DoJXeH 6blb 06a3aTeJIbHO OTKIOUey
YKA3AHNE

3aONHeHHbI Do OTKa3a TpaBOc6OpHk MOKeT IMeTb MaKcMaJIbHbI BEC 16 Kr.
TpaBoc6OpHKn CHaTB C yCTpoiCTBa (CM. rIaNBy "PiDBeWnBaHne n ChrTne TpaBoc6OpHnKa"). OTKpbITb TpaBoc6OpHnK, NotAHyB 3a
13=ФИКСИРУОЛЧИО ППАнКУ, NOTKINHyTb HABePx
5= BepxHIOU yacTb TpaBoc60pHNka.
3aNoJIHeHbIe
K= TpaBoc6opHnK onpOKnHyTb Ha3a.i. Ppi nOmoi
14=pyuKN(BepxHnYaCTb TpaBoc6OpHNka) n
15=pyuKN(HnXHHaYacTb TpaBoc6opHNka) TpaBoc6opHNK MOxHO yOboHo yepxNBaTb NOnyctOwaaTb.
Texo6cnyxmbaHne
BHIMAHNE!


Onachoctb TpaBMaTH3Ma!
YtO6bI NCKJIIOUHTb
HeppeHaMepeHHoe
BkIIOUeHne DVBraTeJI,pepe
BCEMn pa6oTaMn IO
TexO6CJnyKJBaHNIO OCHCTKe, a TaKke pepe np6oTaMn C
HOJKOM KOCUNKI, CJeDyET
063aTeJbHO OTCOeDNHTb
CETeBOI Ka6eJIb.

OnachocTb TpaBmatn3Ma! Pa60taTb TOnbko B nepuATkax.
3aIpeSeHNO pNkacatbCn KHOkyKocuIK,POKa HOK POJIHOCTbHO He OCTaHOBITc. ⅡIaONUyeHnraHeo6XoIMbIX CBeDeHn nn NOMOUsn 06paauTecb Bcerda K COTpydNHky cepBnCHOH cnJx6bl. VIKING peKOMeHNyET BblIOJHrTB pa60tbl NO TexO6cnyXnBaHHIO n PemOHTrToNbKO B CneuaJIIN3nPOBaHHOM cepBnCHOM cENTpe VIKING. VIKING peKOMeHNyET IOJb3OBaTbcOpINHaJIbHbIMn 3aIpuactmVIKING.
OuHCTKa yctpOoiCTBa

17
InTePbA1TexO6cIyXuBaHnA:noCne KaJdoI npImeHeHn
UcTPOIcTB Heo6xOIMMO OuHuaTb NocLe KaKJDOr OpIMHeHnI. IpaBnJIbHbI yXoJ 3a yCTPOIcTBOM 3aunuaet erO T NOBpeKJeHn I yBeJIuYBaET cPOK cnjXbI.
YTo6bI o6ceNeHTb
IOCTaTOUHoe OXnJaXeHne
DBnIraTeJI, CJIeDyET OChuTaTb
OT 3aRpa3HeHNI KaHaI
OxJaXdaIOUeRO BO3dyXa
(KaHaI BCacbIBaHnI) MeJdY
KoKxyOM DBnIraTeJI n HIXKeH
YacTBIO KOpnyCa.
OuHCTNTb HOK KOCUNKn. OUHsTaTb qeTKoN I BOoH NHHHOIO NOBepxHocTb KOCUNK.N DaJIaTb CO6paBUnHeC oCTaTKn TpaBbI B Kopnyce n KaHaJe Bbl6poca depeBraHHo n panoYkoN.
HnKOrda He HnPaBnTb
CTpyn BOdbHa y3JIbI
DBrTaTeJy, yNlOTHeHnI N
ONOpHbIe MeCTa, a TaKxHe Ha
DeTaN 3JeKtpOo6OpdyOBaHnI,
KaK, HApPmEp, BbIKLIOuOaTeJN.
PiN HeCobJIoDeHnI
BbIeuyKa3aHHOrO CNeEdCTBnEM
MOKeT CTaTB DpOroCToUnni peMOHT.
HeIb3Я nCNoJIb3OBAt b arpeccnBhIe YnCTaIuIe cpeIcTbA. TaKne OUnCTntTeI MOryT NOBpeIITb IJaCTMaCCy I MeTaII, YTO MoXKeT BbI3BaTb HapUSeHne 6e3oNaChOn 3KcNpIyaTaIIN yCtpoiCTBa VIKING.
Ecni 3aqr3HeHn He ydaetcYdAJIInb C NMOUbO BOdbI, UETKN INIIN TPRKNI, TO VIKING peKOMeHNyET npImeHnTb CpeZnaJIbHbI OuNCTntelb (HaNPmep, CpeZnaJIbHbI OUnCTntelb STIHL).
BHIMAHHE!

Onachoctb TpaBMaTH3Ma!
IpepeoPOKiDbIBaHHeM KocnIKNoCTaBtBeeHa TBepdyIO,Topn3OHTaJIbHyIO n POBHyIO NOBepxHOCTb, yCTaHOBtB HAnBblCUsNI yPOBeHb Cpe3aHnA (ypOBeHb 7),Tak KaK B INHom CInuYae KocnIKa MOKeT CHOBA OIpOKnHYtCBa Bpepe.
YKA3AHNE

Ppi pa6oTax no Ounchke nTexO6cIyXKINBaHnIO KocnIKyONpOKnIbIBaTB nepeDnHMKnOlecamn Bvepx. IpeedONpOKnIbIBaHNEM CHTBTrpaBOc6OpHNK, CLOXnTBePxHIO YacTB BeDuSeeyuKn (cm. rnaBy "MoNTaxBeDuSeey puKn) n POnHnTbOTKnIDHyO KpbIkwKy.
3NeKtpoBvIraTeIb, Koneca n Kopob6ka nepea
3JIeKtpoDnBnIaTeIb He Tpe6yET texHnueckoro 06cIyXnBaHnA.
UapNKoONDiuINHnKu Konec Htepe6yIOT Texo6CnyxuBaHna.
Perynipyemam Kopo6ka nepea (ME 545 V) He Tpe6yeT texo6cnyxmbaHnA.
Bepxna yactb Beyuue pyuKn
IHTepBaI texo6cnyxuBaHnra: nepeK KaXdbIM npImeHeHnem
BepxHra qactb pyknynpaBHeNn o6THyta n3oJnne. Ecnn OHa NOBpexJaETc,TO BepXHOIO qactb pyKnypaBHeNn He06XoDmO 3aMeHnTb.
Onachoctb TpaBMaTn3Ma n3-3a BO3MOXHOrO NopaxKeHnA 3JIeKTPnueckm TOKOM!
Texo6cnykmbaHne HOXA KOCNJKU

BHIMAHHE!

Onachoctb TpaBMaTn3Ma!
Pn3aTOUKe JIe3BnMOryT CTaYnBaTbCRA MaKcIMMyH Ha 5 MM.
ДлпpoВеркnpinIOxKnTb JINHeKy
22= K IpeHEmy KpaIHOxHa N IPOKOHrpoJINpOBAtB CTeNEHb N3HOca.
BHIMAHHE!

EcnHa ra3oHOKOuKy UCTaHOBJeH He npIlaRaembI HOK, a HOK dIpa3MeJIbYeHnT TpaBbI KaK pINHaJNeXHoCTb, NOCTaBLeHHaNo 3aKa3y, TO COOTBeTCTBeHNO 3TOMy DeIcTByIOT DpyrIe HOpMbI IpeJeNbHorO n3HOca.
BHIMAHHE!

Onachoctb noJyueHn TpaBM!
6aJIaHcNpOBKn HOXa KOCNJK

19=OTBepTKy BBecTN B
20= cpeDHee OTBepCTne
17= HOXa KOCINIKN BbICTaBnTB HOX KOCINIKN rOpN3OHTaJIbHO. EcNI HOX KOCINIKN OTbAJaHCnPOBaH npaBnJIbHO,TO OH OCTaETCB rOpN3OHTaJIbHOM NOJIOKeHN.
Ecn HOK Kocniln HAKLOHReTcB CTOpOHy, TO 3Ty CTOpOHy HOKa 3aTOUHTb, DO NOJHOBOCCTaHOBJIeHn6aJaHca.
MOHTaX HOxA KOCHJIKN


Onachoctb TpaBmatn3ma! Pa60taTb TOnbko B nepuatakax.
17= Hox Kocniln CneIyet MOHTnpOBaTb N30rHytBIMN 3aKpbIKNaMn BBepx. JnMa MoTaxka npImeHrtb
16= DepeBraHHbIb6pycOK (pR6nL.60x60MM)JnA yDePxxBaHNHa HOxa KOcIIKn.
18= BnHT HOka 3aTAYb Do OTKa3a KpyTlUIM MOMeHTOM 10-15HM.
BHIMAHHE!

Onachoctb TpaBMaTn3Ma!
Yka3aHHbIe 3HaueHnA MOMeHTOB 3aTAAKKN BnHTOB HOKa 10-15 Hm ToHOb BblApEXNBaTb, TaK KaK OT 3TOrO 3aBNCNT HaJeXHoe KpeJIeHne peJxUeRo INHCTpyMeHTa.
IOnOHnTeNbHO 3aΦnKcnpoBaTb BnHTbl HOxa (18) KJeeM Loctite 243.
YcTaHOBKa npNbOdHOro Tpoca
HHTepBaI
Texo6cnyxmbaHnA:
no Heo6xOAnMoCTn (PpNBOD
He BKIOUcaETc npN
3aTHyToI pNBODHO
pykoRTke)
HaTaeKeHne Tpoca
yCTaHOBHeO IpaBnIbHO Ha
3aBOe-N3rTOBnTeNe.Ho
MOKeT CnyuHTbcR, YTO nocJe
DInTeJbHOrO BpeMeHN
IOJIb3OBaHn Tpoc
NOTpe6ByeTcA OtperyIpopoBaTb
CHOBa.
PerynipoBky BbINONHrTB haxoJzIMcCneBaHa Beyuie pyKe
21=peryIINIOBOOHBIMBHTOM.
IpaBnJIbHa npeyInpoBka:
HaKaTb npINBOHHyIO pyKoRTKy I OJHOBpeMeHHO NOTAHyTb ra3OHOKOcNIky Ha3a.i.
Haunna, npnbni3ntelbno cOndon TpeTn XoDa pyKoRTKn npNbOHDhle Koneca DOnJXhbl 6IoknpOBaTcR.

Bpe3yIbTaTe BpaSeHnA
21= peRyIInpOBOuHOro BNHTa B HAnpBaJIeHn " ^+ HaTJKeHne Tpoca yBeJIuNBAeTc,
BpaSeHnE B HApPaBJIeHn "-" yMeHbShaet
HaTJKeHnE.
BHIMAHNE!

Onachoctb TpaBMaTn3Ma!
Ecni npi DvIXeHn Ha3aI npINBOIDhIE KOneCa 6JIokuPyUOTcYxke npi HENPUBEDeHHoB DeiCTBnE pINBOHOH pyKOHTKe,TO pINBOHOH TPOC HEnpAByIbHO OTpeRyInpOBaH IN pINBOD KOCNIKI NOCTOHHO BKJIOUeH. B pezyltaTe KocNIka MOXeT pNiDTN B DvIXeHne yXe npi 3aNyScKe, CJIeCTBnEM MOXeT 6blr TpaBMAtm3M IIODeI NLI MaTePnaJIbHbY uSeP6.
Heo6xoDIMO npOn3BecTn NOBtOpHyO pEryIuPobKU (pnp Heo6xoDIOMOCTN oBaTaTbcra B cepBvncHyO cnJx6y, VIkING peKOMeHdyeT CneuaJIaNI3uPoBaHHbI cepBvncHbI ceHTp VIkING).
XpaHeHne B3MHHn nepNoD
IomeeHne IJxpaHeHHaDJIIXHO 6bITb cyXmI HeIbIbHbIM.KpOme TORO, KocNIky CJeIDyET XpaHHTB B HeIOCTYINOM IJr DeTei MecTe.
Bo3MOxHbIe HeNCnpaBHOCTn Ha yCTpOiCTBe CNeDyET yCTpaHrTb, B pInHcUInne, nepeJ yCTaHOBKO MaunHbI Ha xpaHeHne, YTO6bl OHa HaxoDiNlAcb BCerda B COCTOARNN IOTOBHOCTN K 3KcNJyaTaCNI.
Ppi dIInTeBbHom npocToe KocnKn (B nepno3mHero xpanenna) co6JIOaTb CJeDyUOuNe nyHKtbl:
Bce hapyXhble yactu yctpoiCTBa TuaTeIbHO OHCTNTb.
- Bce DnBxKyUeNcEaTeaN cnEduyET XopoOo Cma3aTb maclom nnn Cma3KoI.
Oxpana okpykaioi cpebl

Скошени Трава НЕ OТHCNTСК ОТXDам,е спдуET ИСПЛьЗВАТь ДЛЯ ПИГOTOBЛЕнHA КOMПОCTA.
YnaKOBKn, yCtpoiNCTBO n OChactKa n3rOToBnEhBi n3 MaTePnAIOB, pIpyroDnHbIX dN BTOpUHOro nCNoJIb3OBAHN, INX MOxHO COOTBeTCTBEHNO yCTpaHArb.
Pa3dJIbHoe yCTpaHeHne
OCTaTKOB MaTePnaJIOB,
yIOBnIeTBOpAIOoee
3KONOrUHeCKIM Tpe6OBAHNAM,
CNOOC6CTByET BO3MOXHOCTNI
MHOROkPaTHORIO pRIMHeHENIA
MaTePnaJIOB. IIO 3TOI pRNUHNE
IocNe IcTeUeHnO O6bUHoro
CpOKa Cnyx6bl OTnpaBVtB
yCTpOInCTBO Ha CBAnKy.
CTaHdapThbIe 3aNpaTn
Hoxkocnilkn63407020100
YKA3AHNE

KpeEnxHbIe 3JeMeHtbl KocnloUOHOro HOxa (HaPnIMep, BnHT HOxa, cTOnOpHyU 7aMy6y) HEO6XoDmO 3aMeHrTb Pn 3aMeHe Nn MOHTaKe HOxa. 3aNpactn IMeIoTcB CcpeuaJIIN3uPOBaHHOM cepBnCHOM cENTpe VIKING.
CBeJeHne K MInHMMy N3HOca N ppeDoTbpaueHne IOBpeXdeHn
BaxkhbIe yka3aHnI no Texo6cnyKuBaHNIO u yxOdy dIy cIeNyUOxN rpynn n3dJIiN
K HIM OTHOCATC Cpei Dpynx:
HOK
- TpaBoc6opHnK
HaKJaIKN
- KJIINHOBOI pemeHb (ME 545 V)
2. Co6IIODeHHe npEaHnH DaHHo IHCTpyKcHn No 3KcJIyatauH
IcnoIb3OBAHne,Texo6Cny
KINBaHne I xpaHHeHne yCTpoCTBa
VIKING DOJXHBi
OcuJeCTBJIaTbC TOnHO,KaK
OIIncAHO B3ToI INCTpyKuMn PO
3KcnPiYatauMn. PoiIb3ObaTeJIb
CAM HeCet OTBeTCTBeHHOCt 3a
Bce NOpejDeHn I yUep6,
BbI3BaHbHbIe HecO6JIIODeHnEM
yKa3AHN IO TEXNIke
6e3OpacHOCTn, yKa3aHn IO
TEXHnueCKOMy OcbIyXNBaHIO.
3TO,B nepByIO OuepeDb,
pacnpocTaPraHETCA Ha:
HeBepHO OnpedeJeHnHbIe npaMeTpby UyInHITeJIa (nonepueHoe cehenHe)
HePpABINbHOe PIOKJIIOUeHne K3JIeKTPnueckoCetn (HaNPaJKeHne)
TEXHnueckne N3MeHeHnN 13JeIIN, HecOrJIacOBaHHbIe C npMoi VIKING
-ПгименецнИСТуМЕТОВ
ИЛКOMПЛКТУОПИX,
KOTOPБЕ He ДОПУЧЕHBI ИЛН
приюнБД ДЯ YСТРОМСТВА,
ИЛNЯ YBЛЯЮТСА
HIN3KOKaЧЕCTBEHNHBIMN.
IICNIOJIb3OBAHHe N3JeJIIN HEBCOOTBETCTBnCHa3HaueHnEM
IPIPMHeHHe N3JeJIb BO BpEmCnOpTnBbIX MepoPnIaTm IIN KOHKypcoB
KOCBeHHbIe y6bITKN Bpe3yIbTaTe NocJeDyUoJIeroNCIOJIb3OBAHnIAI3DeJIINACHeNCpPaBbIMN DeTALAMN
3. Pa60tblno texo6cnyxmbaHHIO
Bce pa60tbl, npBBeHbIe Bpa3dJeE"Tex6cnyxuBaHnne, D0JXhbl pOu3BODITbcr peryIrpHo. Ecln 3tn pa60tbl no Tex6cnyxuBaHnIO nOlb3OBaTeIb HE MOKeT pOu3BODITb CAMOCTOARbHO, TO Heo6xOIMo 6bpaITbcr B cepBnCHyU cLyKbY.
VIKING peKomeHdyET BbIOnHArTb
paOToB ITO Texo6CnyXnBaHIO
npeMOHTb TOJbKO
B CNEUAnI3NpOBaHOM
cepBnCHOM CEHTpe VIKING.
ДлгСоТPydнIKOBсрВиСьБИх цentroвVIKINGperyIapHOn пядостаыIOTcnpограмMbI обчEHиNТХ�ИЧЕСКА ИнфорmaцИ.
B cnyae yuepe6a n3-3a NOBpexkdeHn BcIeDCTBne HeBbIOnlNeHbIX pa6OT NO TexOcLnyKunBaHNo, OTBeTCT- BeHHoctb HeCet Ntlo3ObaTeNb. K TAKIM NOBpexkdeHnM, Kpome npOeRo, OTHocATcR:
- NOBpeKdEHNA 3JIeKTpOdBnIaTeJIa BCJIeCTBnE HeKaIcTeBHeHHoU OCHCTKN KaHJAn OXJIaXkDeEHNA (KaHJN BCaCbIBaHHa)
Koppo3nHbIe IOBpeXdEHnI IN DpyrIe NocJIeCTBnI HnPaBnIbHO rO XpaHeHnI
IOBpeKdEHHyUCTpoIcTBa Bpe3yIbTaTe pImMeHHeHH HeKaueCTBeHHbIX 3aIpaCTe.
IOBpeKdEHHB CJIeCTBHe HECBOeBPemEHOCn IIN HeIOCTaTOHOCn Texo6cIyXuBaHnA,IIIN paOb0 IO TEXo6cIyXuBaHnIO IN peMOHTy,KOTOpbl EPOIN3BODINCS HeYIOJHOMOChEHHbIMC CNEUmaNCTAmI cepBnCHOH CUYKbI He B CNEUaJIIN3IpOBaHHbIX MaCTepCKNX.
BkJIOUHTb npBOD DnIXKeHnI
ДeКларачи n3rotobteЯ O COOTBETCTBIM dupeKtNBam EC
Mbl,
VIKING GmbH
Hans Peter Stihl-Strasse 5
A-6336 Langkampfen / Kufstein
3aBJIaEM,HTOMaUNHa
Ta3OHOKOCnIka, IpeMeMaemaBpyHyIO n pa6oTaOuaT O cTeN
3aBOcka
mapka: VIKING
Tin: ME 545.1
ME 545.0 C
ME 545.0 V
CepniHbI
HOMep: 6340
COOTBETCTByET CLENyIOUIMM DInpeKTeNbAM EbponeiCKoro Coo6uectBa (EC):
2000/14/EC, 2002/95/EC, 2002/96/EC, 2004/108/EC, 2006/95/EC, 2006/42/EC
I3dJIe 6bIpo pa3pa6oTaHO B COOTBETCTBUN CO
CNeDyUOUMN HOpMaMn:
EN 60335-1,
EN 60335-2-77
PpIMMeHHeHHb MeToD OceHKn
COOTBETCTBNA
ДиректИВам:
ПрилJOхенье VIII (2000/14/EC)
Ha3BaHne n aDpec
PnINHmAbWeyactne
INHCTaHcIM:
TÜV Rheinland LGA Products GmbH
Tillystraße 2
D-90431 Nurnberg
CocTabJeHne HxpaHeHne
TEXHNUeCKOJOKyMeHTaUIN:
Johann Weiglhofer
VIKING GmbH
IzhmepeHHbI ypoBeHb IyMa:
92 έB(A)
TapaHTnPOBaHHbI yPObEh bUma:
94 έB(A)
Iog BbInycka n cepinHbH HOpem yKa3aHbHa 3aBOdCKo TabnUcKe yCtpoiCTBa.
Langkampfen,
02.01.2013.
VIKING GmbH

Weighlofer
PykoBoOnTeIb OToIeNa
Hayhblix NCCJeObaHn I
pa3pa60Tkn npoDyKcnn
TpaHcnpToPbKa

Dna
npedotbpaueHNA
TpaBM OCTpbIMN
TOPAUM YACTM
yctpoiCTBa pa6oTaB B
nepcaTkax.
- Перад ТрансорТировКои
BbIKIIOUHTb yCTpOINCTBO,
OTCOEINHHTcETeBOI
KabenbI IOXDaTbC8
OCTaHOBKn HOXa.
- TpaHcnpTIpOBaTaB
UCTPOINCTBO TOJIbKO Pn
OCTbIbsem DBrVaTeNe.
He nepeHocntb
yCTpOINCTBOBODINHOChY.
- IcnoJb30BaTb
noDxOJaIe noRpy3OuHbIe cpeIcTBA (nOpy3OuHbIe paMnbl, noDbemHbIe yCTpOiCTBa).
3aKpePnTb yCTpOInCTBO Ha nOrpy3oHNo
πηaṭρομme κρεπεχόm
DOCTaTOUHOI
rpy30nOДьemHOCTN
(pemHn, TpocbI np.).
- Пи Транспортуровke
ycTpoIcTbHeo6xOJI
Co6JIOdaTb MeCTHbIe
3aKoHOdaTeIbHbIe
PpeDncaHnB
OCO6eHHoCTn IO
6e3oNaChOCTn norgy3kn
TpaHcnpOpTuPoBKe
IpeDMeTOB Ha
norpuy30uhx nlaTOpmax.

IpepaTe 3Tu INHCTpyKcHIO NO 3KcPnyatauIN B cneuaJIN3nPOBaHHbI cepBnCHbI ueHTp VIKING,ecIn Bbl o6paaTeCeTb TuJa dJIr npOBeJeHn paBoT IO Texo6cJyXkBaHNIO BaWeero ycTpoiCTBa VIKING.
IpeICTaBNTeIb cepBnCHOrO ceHTpa VIKING 3aHecET noTBePckDeHne B rIabe "IpaΦnK cepBnCHOrO o6cIyXnBaHn" O haIeXaIeM BblONJIHeHn IpeDyCmOTpeHHbIX paBOT nO cepBnCHOMy o6cIyXnBaHnIO.
Moelb:ME
CepinHbI Homep:


PepedaHa
Data:
Peeatb cepBvncHoro zentra VIKING
Cneyuouzhi TexocMoTp
Data:
Дараз:
CleyuouzhiTexocMToTp
Дараз:
Data:
Пechаь сервс Horo ZeHTpa VIKING
Cleyuoum TeXocMToTp
Data:
Дараз: