NT 1500 A - Cordless vacuum AEG - Free user manual and instructions
Find the device manual for free NT 1500 A AEG in PDF.
User questions about NT 1500 A AEG
0 question about this device. Answer the ones you know or ask your own.
Ask a new question about this device
Download the instructions for your Cordless vacuum in PDF format for free! Find your manual NT 1500 A - AEG and take your electronic device back in hand. On this page are published all the documents necessary for the use of your device. NT 1500 A by AEG.
USER MANUAL NT 1500 A AEG
| You demand the best and buy quality - quality provided by Atlas Copco. We have built for you a reliable and lasting tool. Working effectively and without endangering your health is only possible if these instructions for use are being read carefully before first using this tool. We want to satisfy our customers and would like you to buy again AEG Electric Power Tools from Atlas Copco. | ||
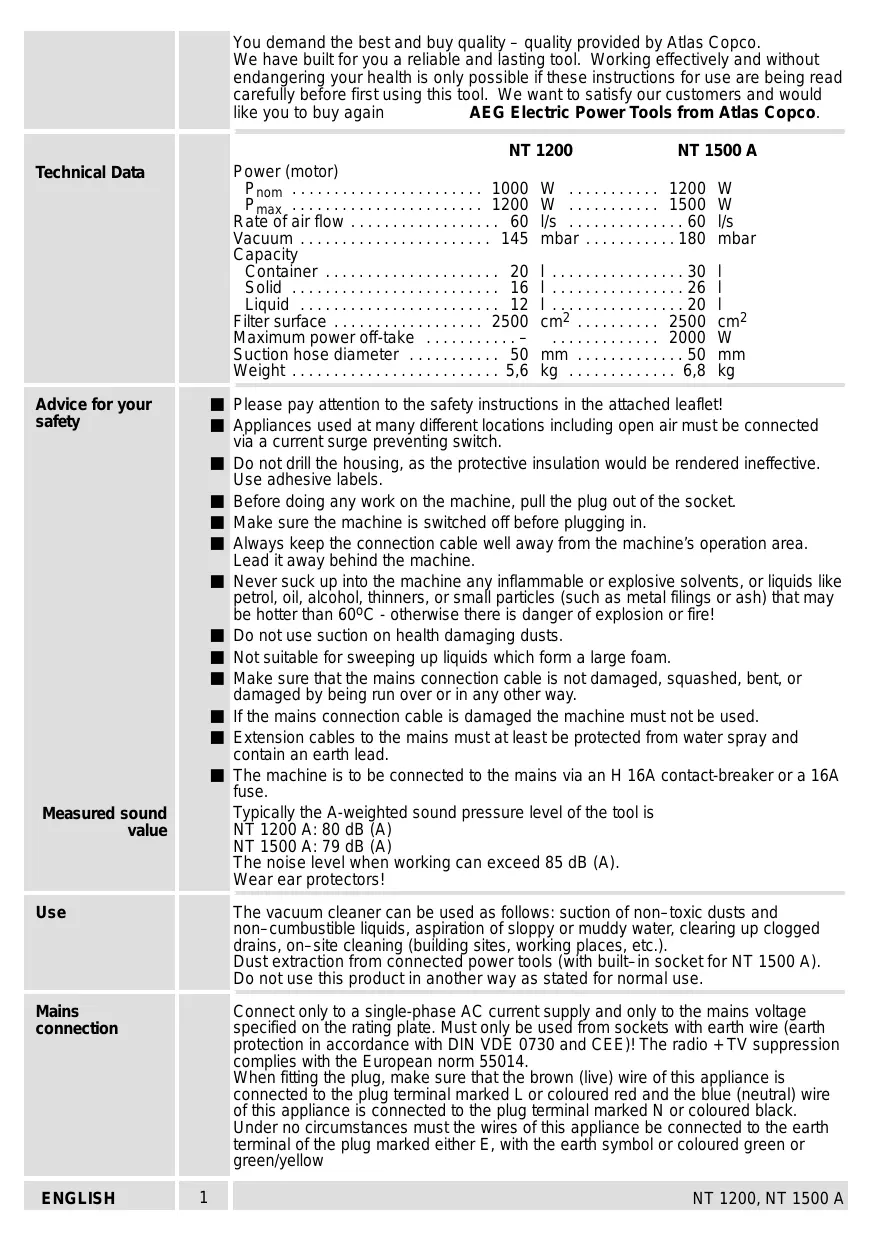
| Technical Data | NT 1200 NT 1500 A | |
| Power (motor) | ||
| Pnom 1000 W 1200 W | ||
| Pmax 1200 W 1500 W | ||
| Rate of air flow 60 l/s 60 l/s | ||
| Vacuum 145 mbar 180 mbar | ||
| Capacity | ||
| Container 20 | 30 | | ||
| Solid 16 | 26 | | ||
| Liquid 12 | 20 | | ||
| Filter surface 2500 cm² 2500 cm² | ||
| Maximum power off-take - 2000 W | ||
| Suction hose diameter 50 mm 50 mm | ||
| Weight 5,6 kg 6,8 kg | ||
| Advice for your safety | Please pay attention to the safety instructions in the attached leaflet! | |
| Appliances used at many different locations including open air must be connected via a current surge preventing switch. | ||
| Do not drill the housing, as the protective insulation would be rendered ineffective. Use adhesive labels. | ||
| Before doing any work on the machine, pull the plug out of the socket. | ||
| Make sure the machine is switched off before plugging in. | ||
| Always keep the connection cable well away from the machine's operation area. Lead it away behind the machine. | ||
| Never suck up into the machine any inflammable or explosive solvents, or liquids like petrol, oil, alcohol, thinners, or small particles (such as metal filings or ash) that may be hotter than 60°C - otherwise there is danger of explosion or fire! | ||
| Do not use suction on health damaging dusts. | ||
| Not suitable for sweeping up liquids which form a large foam. | ||
| Make sure that the mains connection cable is not damaged, squashed, bent, or damaged by being run over or in any other way. | ||
| If the mains connection cable is damaged the machine must not be used. Extension cables to the mains must at least be protected from water spray and contain an earth lead. | ||
| The machine is to be connected to the mains via an H 16A contact-breaker or a 16A fuse. | ||
| Measured sound value | Typically the A-weighted sound pressure level of the tool is NT 1200 A: 80 dB (A) NT 1500 A: 79 dB (A) The noise level when working can exceed 85 dB (A). Wear ear protectors! | |
| Use | The vacuum cleaner can be used as follows: suction of non-toxic dusts and non-cumbustible liquids, aspiration of sloppy or muddy water, clearing up clogged drains, on-site cleaning (building sites, working places, etc.). Dust extraction from connected power tools (with built-in socket for NT 1500 A). Do not use this product in another way as stated for normal use. | |
| Mains connection | Connect only to a single-phase AC current supply and only to the mains voltage specified on the rating plate. Must only be used from sockets with earth wire (earth protection in accordance with DIN VDE 0730 and CEE)! The radio + TV suppression complies with the European norm 55014. When fitting the plug, make sure that the brown (live) wire of this appliance is connected to the plug terminal marked L or coloured red and the blue (neutral) wire of this appliance is connected to the plug terminal marked N or coloured black. Under no circumstances must the wires of this appliance be connected to the earth terminal of the plug marked either E, with the earth symbol or coloured green or green/yellow | |
| ENGLISH | 1 | NT 1200, NT 1500 A |
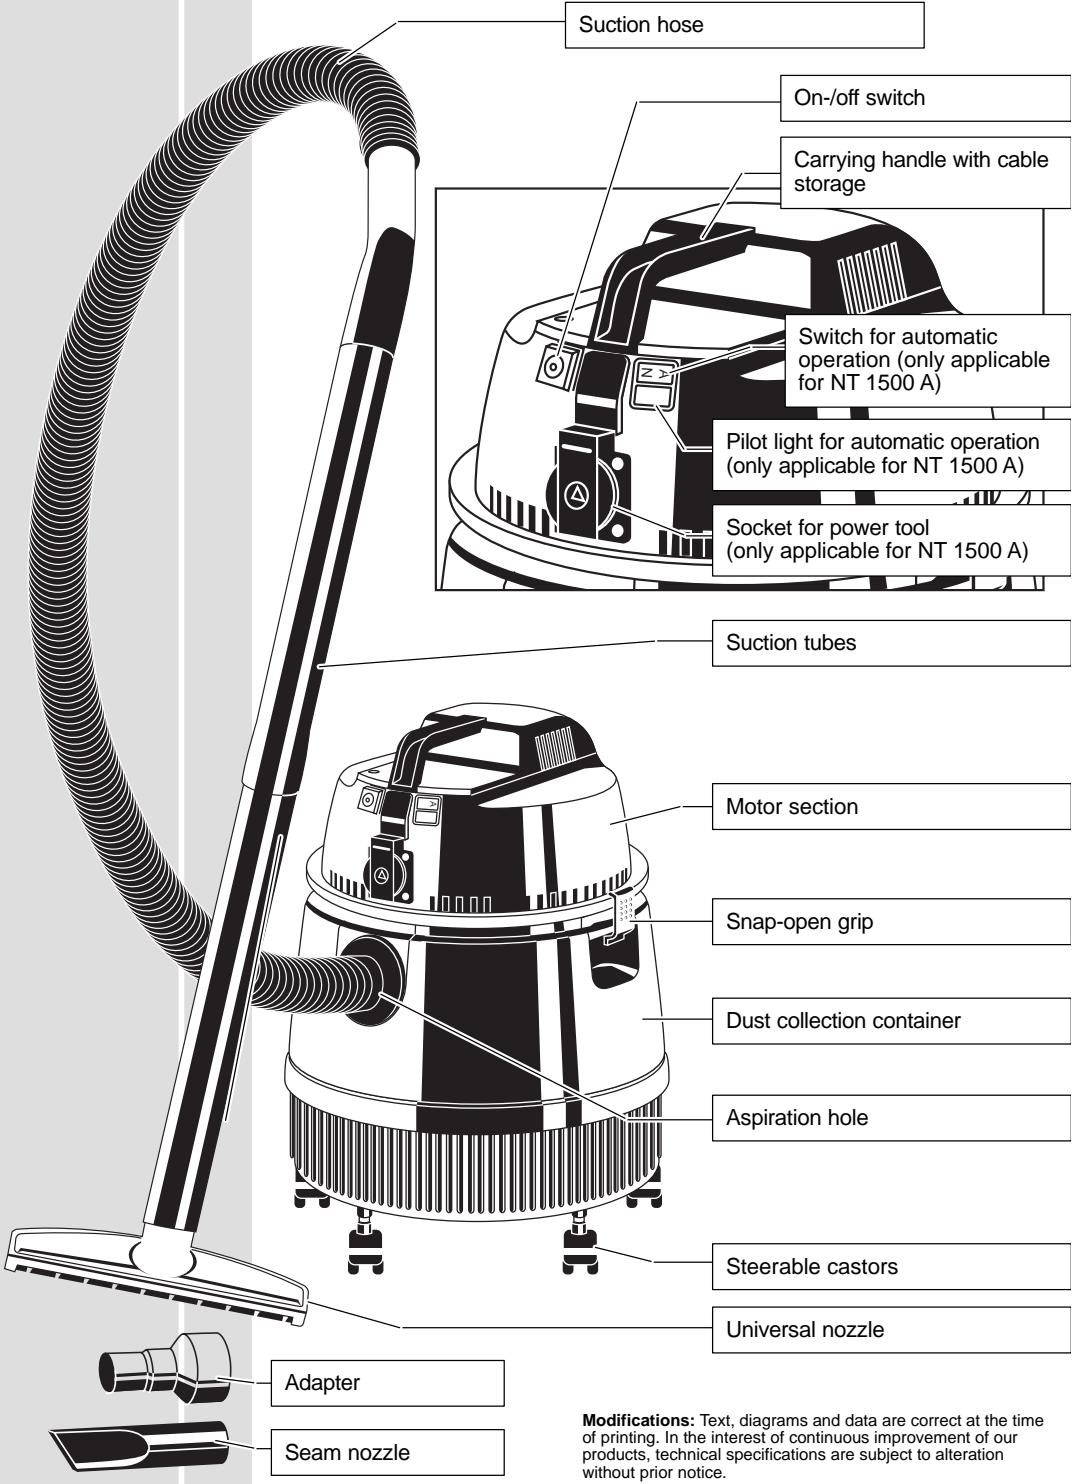
Brief description
| Assembling the machine | Always disconnect the plug from the socket before carrying out any work on the machine. | |
| Mounting the undercarriage | 1. Open the snap-open grip and lift out the motor section. (The container can only be stood on its head for the castors to be mounted.) | |
| Fit the motor section | 2. Press the castors and the respective bolts firmly by hand into the provided borings of the container base, as far as they will go. NT 1200: 4 castors NT 1500 A: 5 castors | |
| 3. Fit the motor section such that the On/Off switch is located above the aspiration hole. | ||
| 4. Snap shut the grips. | ||
| Connect the vacuum hose | 5. Press the vacuum hose into the connector with the markings lined up to one another, and listen for the hose to snap into place. To remove the vacuum hose, turn the connector slightly to the right or the left and pull it out. | |
| Connecting the accessories | The vacuum cleaner can be connected with several accessories res. with a power tool. | |
| All-purpose nozzle | Fit together the all-purpose nozzle, the two suction tubes, and the suction hose. | |
| Upholstery nozzle | Fit the upholstery nozzle directly onto the vacuum hose or onto one of the vacuum tubes. | |
| Power tools | Connect power tools with the adapter onto the vacuum hose. Connect the mains cable of the power tool with the socket of the vacuum cleaner. In automatic operation, the vacuum cleaner starts automatically when the power tool is switched on.(only applicable for NT 1500 A). | |
| ENGLISH | 3 | NT 1200, NT 1500 A |
| Cable storage | For storage, coil up the mains cable and insert it between carrying handle and motor section, as shown in illustration. | ||
| Paper dust-sack | 3 | Use the paper dust-sack as well when sweeping up fine dust such as sawdust, soot, ashes, etc. | |
| Inserting the paper dust-sack | 1. | Open the snap-open grips and remove the motor section. | |
| 2. | Take hold of the paper dust-sack by the cardboard edges and press them firmly against the vacuum hose connector. | ||
| 3. | Fit the paper dust-sack against the wall of the container. | ||
| 4. | Fit the motor section such that the On/Off switch is located above the aspiration hole and snap shut the grips. | ||
| On/off switch | Switching on: Switch the toggle switch to the "l" position. Switching off: Switch the toggle switch to the "0" position. | ||
| Switching on automatic control (only applicable for NT 1500 A) | To switch on automatic control: set switch to "A" and turn the On/Off switch to "l" - the pilot light comes on. If a power tool is connected to the plug, the vacuum cleaner is switched on automatically together with the power tool To switch off automatic control: set switch to "N" - the pilot light goes out. Turn the On/Off switch to "0". | ||
| Vacuuming dry matter | Take care when vacuuming dry matter that all parts are completely dry, particularly the filter cartridge. Additionally use the paper filter bag when vacuuming fine dusts like grinding dust, soot, ashes, or similar. | ||
| Collecting up liquids | Before starting to collect up liquids, clean the dust collection container and the filter cartridge thoroughly of all dry residues, in order to avoid their getting unnecessarily dirty. Remove paper dust-bag, if inserted. When the container is full, a floating valve closes the suction channel and thus prevents the container from running over. When this happens, switch the machine off and empty the container. Should the machine fall over while vacuuming the floating valve closes the suction channel. Put the machine up again and switch it off until the floating valve can be heard opening. Switch the machine on again. Always keep the floating valve clean and accessible. | ||
| ENGLISH | 4 | NT 1200, NT 1500 A | |
| After using the machine to collect up liquids, leave it standing open to dry. Take the accessories apart and dry them as well. This is particularly important if the machine is to be used for sweeping up dry matter later. Due to the machin's high cleaning/air power as well as the optimum flow container form (tangential-cyclone-principle; no obstruction, filter is protected from damage) it is possible that after having switched the machine off some water will flow back from the hose or the container. This can be sucked off when restarting work. | ||
| Emptying the machine | 1. Switch the machine off | |
| 2. Pull the plug out of the socket. | ||
| 3. Open the snap-open grip and lift out the motor section. | ||
| 4. Empty the container and if necessary clean it. | ||
| 5. Fit the motor section and seal the snap-open grips. | ||
| Exchanging the filter cartridge | 1. Open the snap-open grips and remove the motor section. | |
| 2. Fold the fastener to the side. | ||
| 3. Take hold of the filter cartridge by the grip and pull it straight out of the filter guides. | ||
| 4. The filter cartridge can be cleaned with a hand-brush – hold it over a container to catch the dust. If it is very dirty or damaged it should be replaced. | ||
| 5. Insert new or cleaned filter cartridge and push in to its full extent. | ||
| 6. Fix the filter cartridge by folding back the fastener. | ||
| 7. Fit the motor section and seal the snap-open grips. | ||
| Malfunctions | The suction strength decreases. Possible causes: - The collection container is full - The filter cartridge is clogged with fine dust - The suction hose, the suction tubes, or the nozzles are clogged with bulky material. When dust is being swept up the dust is thrown out through the ventilation opening. Possible causes: - Filter cartridge not fitted properly - Filter cartridge damaged. If the malfunction is not caused by any of the above possibilities, please contact your local AEG after-sales services. | |
| Maintenance | Use only AEG accessories and spare parts. Should components need to be replaced which have not been described, please contact one of our AEG service agents (see our list of guarantee/service addresses). If needed, an exploded view of the tool can be ordered. Please state the ten-digit No. as well as the machine type printed on the label and order the drawing at your local service agents or directly at: Atlas Copco Electric Tools GmbH, Postfach 320, D-71361 Winnenden. | |
| ENGLISH | 5 | NT 1200, NT 1500 A |
EC-DECLARATION OF CONFORMITY
We declare under our sole responsibility that this product is in conformity with the following standards or standardized documents. EN 60335, EN 55014, EN 61000-1 in accordance with the regulations 89/392/EEC, 73/23/EEC
DEUTSCH
D-71361 Winnenden Germany
http://www.atlascopco.de