
DSB2E 1500 - Drill AEG - Free user manual and instructions
Find the device manual for free DSB2E 1500 AEG in PDF.

| Product type | Hammer drill |
| Brand | AEG |
| Model | DSB2E 1500 |
| Supply voltage | 220-240 V, 50 Hz |
| Power consumption | 1500 W |
| No-load speed (1st gear) | 0-1100 min⁻¹ |
| No-load speed (2nd gear) | 0-3000 min⁻¹ |
| Speed under load (1st) | 725 min⁻¹ |
| Speed under load (2nd) | 2000 min⁻¹ |
| Max drilling diameter (1st gear) | 162 mm |
| Max drilling diameter (2nd gear) | 90 mm |
| Chuck type | Keyed chuck |
| Drill spindle | M18 |
| Clamping collar diameter | 57 mm |
| Weight | 3.3 kg |
| Noise level | 115 dB(A) |
| Vibration level (DSB2E) | 12 m/s² |
| Hammer function | Yes, switchable |
| Depth stop | Yes |
| Protection | Double insulation (class II) |
| Interference suppression | Compliant with EN 55014 |
| Compliance standards | EN 50144, EN 55014-1, EN 55014-2, EN 61000-3-2, EN 61000-3-3 |
| Included accessories | Auxiliary handle, chuck key, depth stop, SDS-Plus adapter |
| Recommended use | Dry drilling with diamond core bits |
| Maintenance and cleaning | Disconnect before cleaning; use a dry cloth; do not use solvents |
| Safety | Wear safety glasses, gloves and dust mask; use the auxiliary handle; watch out for cables and pipes |
Frequently Asked Questions - DSB2E 1500 AEG
User questions about DSB2E 1500 AEG
0 question about this device. Answer the ones you know or ask your own.
Ask a new question about this device
Download the instructions for your Drill in PDF format for free! Find your manual DSB2E 1500 - AEG and take your electronic device back in hand. On this page are published all the documents necessary for the use of your device. DSB2E 1500 by AEG.
USER MANUAL DSB2E 1500 AEG
| Introduction | You have high standards and expect to purchase quality goods – quality offered by AEG. We have built a durable and reliable electric power tool for you. Please read the instructions for use before first operation so you can handle your power tool effectively and safely. We are sure that buying an Electric Power Tool from AEG was the right choice! | |||
| Technical Data | DB2E 1500 | DSB2E 1500 | ||
| Connecting voltage | 220-240 V | 220-240 V | 110 V | |
| 50 Hz | 50 Hz | 50 Hz | ||
| Nominal power | 1500 W | 1500 W | 1100 W | |
| No-load speed | ||||
| 1st gear | 0-1100 min-1 | 0-1100 min-1 | 0-1100 min-1 | |
| 2nd gear | 0-3000 min-1 | 0-3000 min-1 | 0-3000 min-1 | |
| Speed under load max. | ||||
| 1st gear | 725 min-1 | 725 min-1 | 650 min-1 | |
| 2nd gear | 2000 min-1 | 2000 min-1 | 1900 min-1 | |
| Percussion rate | - | 48000 min-1 | 48000 min-1 | |
| Drilling capacity in | ||||
| 1st gear | 80-162 mm | 80-162 mm | 80-152 mm | |
| 2nd gear | 32-90 mm | 32-90 mm | 32-90 mm | |
| Drill opening range | - | - | 3-16 mm | |
| Drive shank | M18 | M18 | M18 | |
| Chuck neck diameter | 57 mm | 57 mm | 57 mm | |
| Weight | 3,3 kg | 3,3 kg | 3,3 kg | |
| Advice for your safety | Please pay attention to the safety instructions in the attached leaflet! | |||
| Dust that arises when working on material containing asbestos or stonework containing crystalline silicic acid is harmful to the health. Please follow accident prevention regulations. | ||||
| Always wear goggles when using the machine. It is recommended to wear gloves, sturdy non slipping shoes and apron. | ||||
| Do not pierce the motor housing as this could damage the double insulation (use adhesives). | ||||
| Always disconnect the plug from the socket before carrying out any work on the machine. Only plug-in when machine is switched off. | ||||
| Keep mains lead clear from working range of the machine. Always lead the cable away behind you. | ||||
| Always use the auxiliary handle. | ||||
| When drilling in walls ceiling, or floor, take care to avoid electric cables and gas or waterpipes. | ||||
| Measured sound value | Typically the A-weighted noise levels of the tool are: Sound pressure level = 102 dB (A). Sound power level = 115 dB (A). Wear ear protectors! Measured values determined according to EN 50 144. | |||
| Measured vibration value | DB2E 1500: Typically the hand-arm vibration is below 2.5 m/s². DSB2E 1500: Typically the weighted acceleration is 12 m/s². Measured values determined according to EN 50 144. | |||
| Use | Both the electronic drill DB2E 1500 as well as the electronic percussion drill DSB2E 1500 are specially designed for drilling with diamond dry core cutters. Do not use this product in another way as stated for normal use. | |||
| Mains connection | Connect only to a single-phase AC current supply and only to the mains voltage specified on the rating plate. Connection to sockets without earth protection is possible as the appliance features protective insulation to DIN 57 740/ VDE 0740 and CEE 20. Radio suppression complies with the European standard EN 55014. When fitting the plug, make sure that the brown (live) wire of this appliance is connected to the plug terminal marked L or coloured red, and the blue (neutral) wire of this appliance is connected to the plug terminal marked N or coloured black. Under no circumstances must the wires of this appliance be connected to the earth terminal of the plug marked either E, with the earth symbol or coloured green or green/yellow. | |||
| ENGLISH | 4 | DB2E 1500, DSB2E 1500 | ||
| Depth gauge | For drilling to specific depth, slide the depth gauge into the hole provided in the handle and fasten it at the required drilling depth. |
| Changing the three jaw chuck | Always disconnect the plug from the socket before carrying out any work on the machine. 1. Hold the drive shank with the open-jaw spanner. 2. Insert the drill chuck key in the drill chuck and loosen the drill chuck to the left by tapping it lightly with a rubber hammer. 3. Mount the chuck in reverse order. |
| ENGLISH | 5 DB2E 1500, DSB2E 1500 |
| Fitting the working tools | 1. Open chuck by turning. |
| 2. Insert the working tool | |
| 3. Insert chuck key successively into all 3 holes at the chuck month and tighten clockwise. | |
| 4. Insert the hexagonal end of the key into the hexagonal hole in the eccentric cam and rotale clockwise until tight. The chuck is now locked. | |
| Removal of the working tools | Rotate eccentric cam anticlockwise using key. Open chuck with toothed end of key. |
| Mounting the core cutter (Standard system) | Always disconnect the plug from the socket before carrying out any work on the machine. |
| 1. Screw down the SDS-plus adapter on the work spindle. | |
| 2. Screw down the diamond core cutter on the SDS-plus adapter. | |
| Pull back metal sleeve of the SDS-plus adaptor. Push in centre bit (SDS-plus drill bit) rotating it and let go of metal sleeve. | |
| Check that the centre bit is bolted properly. It should be movable 5 mm in longitudinal direction. | |
| The centre bit should surpass the core cutter by at least 5 mm. | |
| Use SDS-plus drill bits with a diameter of 8 mm. | |
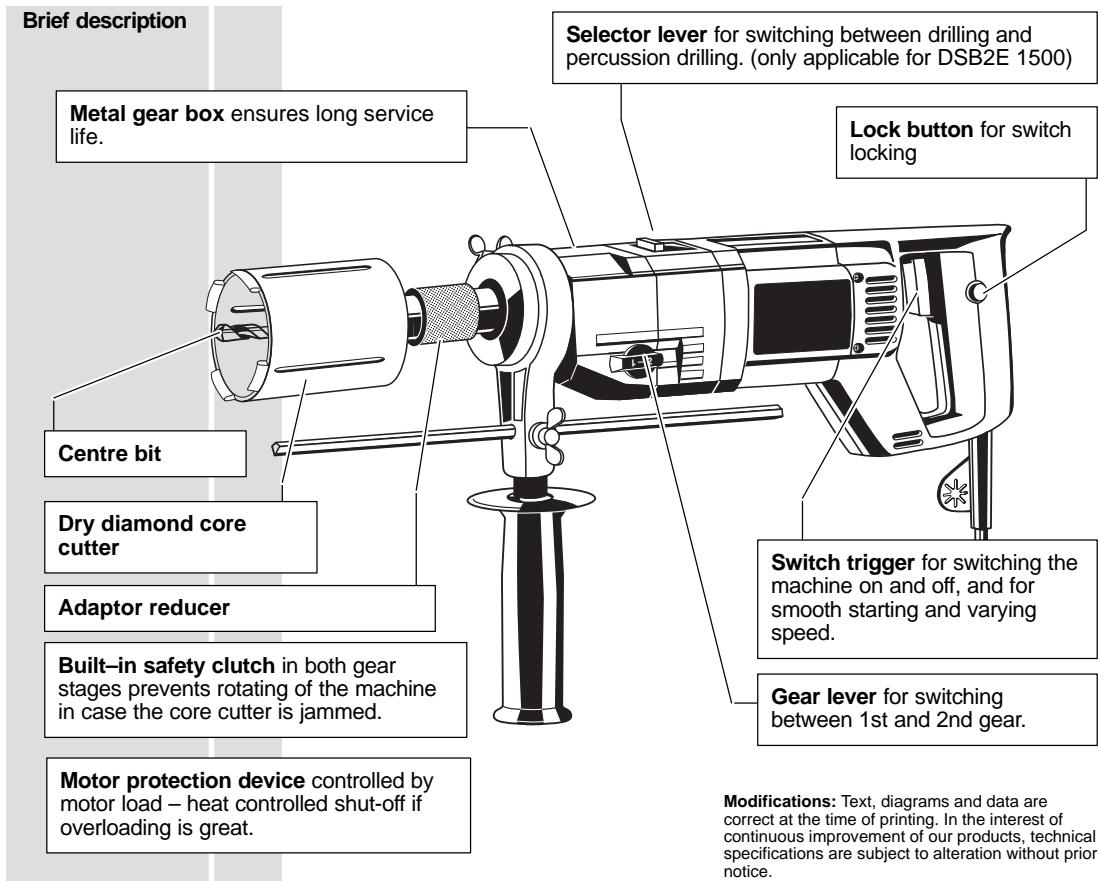
| Switching over drilling percussion drilling (only applicable for DSB2E 1500) | Changeover drilling/hammer drilling with switch |
| Drilling: Turn arrow towards handle | |
| Hammer Drilling: Turn arrow towards chuck | |
| ENGLISH | 6 DB2E 1500, DSB2E 1500 |
| Changing gear | Gear change lever in position : 1st gear Gear change lever in position : 2nd gear. Only change over when machine is slowing down. | DB2E 1500, DSB2E 1500 |
| Switching the machine on and off | Intermittent use Switching on: Press On-/off switch Switching off: Release On-/off switch Continuous use Switching on: Press the On-/off switch and then the locking button, after that release on-off switch. Switching off: Press the On-/off switch and then release. | DB2E 1500, DSB2E 1500 |
| Protection of motor in case of overload | Motor protection device controlled by motor load - heat controlled shut-off if overloading is great. The machine will slowly continue to run in order to cool the motor down. After sufficient cooling machine can be restarted by switching off and on again. | |
| Advice for operation | Only switch the percussion mechanism for piercing. Switch off percussoin mechanism as soon as the core cutter grips completely into the material. To gain a better drill progress take out the centre bit after having reached a depth of about 10-15 mm. Insert core cutter into the existing groove and let machine run up smoothly. Bore-holes which don't have to be applied exactly can be drilled without a centre bit. For that purpose apply the core cutter slantingly and put the machine slowly straight when a depth of about 5 mm has been reached. (This is only possible when using short core cutters!)If drill cores should come loose, take core cutter from the material and remove drill cores. For best performance the diamond segments should be "roughed-up" to expose the fragments of diamond: To expose the diamond fragments rub surface of segments with stone | |
| Further accessories with part numbers are shown in our catalogues. | ||
| Maintenance | The ventilation slots of the machine must be kept clear at all times. Use only AEG accessories and spare parts. Should components need to be exchanged which have not been described, please contact one of our AEG service agents (see our list of guarantee/service addresses). | |
| ENGLISH | 7 | DB2E 1500, DSB2E 1500 |
EC-DECLARATION OF CONFORMITY
We declare under our sole responsibility that this product is in conformity with the following standards or standardized documents. EN 50144, EN 55014-1, EN 55014-2, EN 61000-3-2, EN 61000-3-3, in accordance with the regulations 98/37/EC, 73/23/EEC, 89/336/EEC
DEUTSCH
CE-KONFORMITETSERKL/ERING
Manager Product Marketing and Development


Atlas Copco
Copyright 2002
Atlas Copco Electric Tools GmbH
P.O.Box 320
D-71361 Winnenden Germany
www.atlascopco.de


Brand : AEG
Model : DSB2E 1500
Category : Drill