
RL2000 - Weather Station LEXIBOOK - Free user manual and instructions
Find the device manual for free RL2000 LEXIBOOK in PDF.
| Product type | Weather station with built-in humidifier |
| Brand | LEXIBOOK |
| Model | RL2000 |
| Display | LCD with backlight |
| Indoor temperature range | -9.9 °C to 50 °C |
| Temperature accuracy (0-40 °C) | ±1 °C |
| Indoor humidity range | 20% to 95% |
| Water tank capacity | 550 ml |
| Power supply | 4 LR6/AA 1.5 V batteries (not included) or 230 V ~ 50 Hz mains adapter (included) |
| Radio | FM with 20 programmable stations |
| Alarm | Wake-up by radio or beep |
| Snooze function | Alarm repeat after 7 minutes |
| Sleep timer | Up to 90 minutes |
| Comfort display | Comfort zone icons (temperature and humidity) |
| Day display languages | English, French, Italian, Spanish, German, Portuguese |
| Humidifier | On/off with LED indicator |
| Number of filters supplied | 5 replacement filters |
| Warranty | 2 years |
| Maintenance | Clean with a soft slightly damp cloth; do not use detergents |
| Safety precautions | Use only the supplied adapter; observe battery polarity; do not expose to heat or moisture |
Frequently Asked Questions - RL2000 LEXIBOOK
User questions about RL2000 LEXIBOOK
0 question about this device. Answer the ones you know or ask your own.
Ask a new question about this device
Download the instructions for your Weather Station in PDF format for free! Find your manual RL2000 - LEXIBOOK and take your electronic device back in hand. On this page are published all the documents necessary for the use of your device. RL2000 by LEXIBOOK.
USER MANUAL RL2000 LEXIBOOK
Conditions excellentes
Conditions agreables
Dimensions: 150 x80 x50 mm
Type de piles: 4 piles alcalines de type 1,5V LR6/AA.
Résolution: 0.1^
Humidificateur
Dimensions: 165 × 165 × 120 mm
Alimentation : CA 230V-50HZ 50mA, DC 12V 500mA
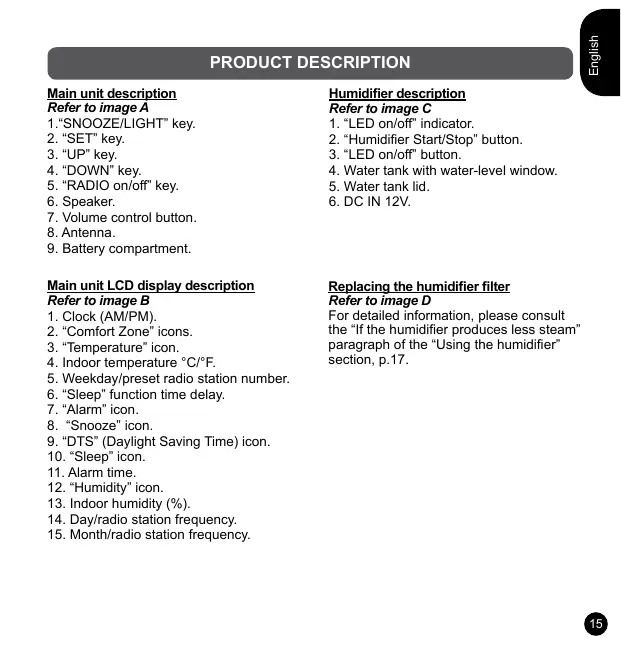
Main unit description
Refer to image A
1."SNOOZE/LIGHT" key.
2. "SET" key.
3. "UP" key.
4. "DOWN" key.
5. "RADIO on/off" key.
6. Speaker.
7. Volume control button.
8. Antenna.
9. Battery compartment.
Humidifier description
Refer to image C
- "LED on/off" indicator.
- "Humidifier Start/Stop" button.
- "LED on/off" button.
- Water tank with water-level window.
- Water tank lid.
- DC IN 12V.
Main unit LCD display description
Refer to image B
- Clock (AM/PM).
- "Comfort Zone" icons.
- "Temperature" icon.
- Indoor temperature ^ C / ^ F
- Weekday/preset radio station number.
- "Sleep" function time delay.
- "Alarm" icon.
- "Snoopze" icon.
- "DTS" (Daylight Saving Time) icon.
- "Sleep" icon.
- Alarm time.
- "Humidity" icon.
- Indoor humidity (%) .
- Day/radio station frequency.
- Month/radio station frequency.
Replacing the humidifier filter
Refer to image D
For detailed information, please consult the "If the humidifier produces less steam" paragraph of the "Using the humidifier" section, p.17.
GETTING STARTED
Humidifier
IMPORTANT: Use distilled water at room temperature to fill in the water tank.
- Make sure the unit is turned off. If the main unit is connected to the humidifier, remove it.
- Pull up the water tank lid to remove it.
- Turn the water pump counter clockwise to unlock it, then pull it up.
- Fill in the water tank with distilled water at room temperature.
- Place back the water pump sideways and turn it clockwise to lock it. Place back the water tank lid.
- Plug the humidifier adapter (included) into any convenient AC 230V - 50Hz power outlet.
- Warning! When using the humidifier for the first time, after filling in the water tank, wait for around 5 minutes before switching on the unit. Otherwise, the product may not operate properly.
IMPORTANT NOTE:
- Only use the adapter supplied with the RL2000. Do not use other adapter.
- The socket-outlet shall be installed near the equipment and shall be easily accessible.
WARNING: Mal-function or loss of memory may be caused by strong frequency interference or electrostatic discharge. Should any abnormal function occur, unplug the AC/DC adapter from the mains socket and replug it again.
Main unit
-
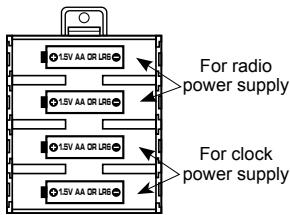
Open the battery compartment located at the back of the main unit.
-
Insert 4 x LR6/AA 1.5V --- type batteries (not included) observing the polarity indicated at the bottom of the battery compartment, and as per the diagram shown opposite.
- Close the battery compartment.
Note: When the main unit's LCD display becomes dim, it indicates that the batteries are low and need to be changed.
Non-rechargeable batteries are not to be recharged. Rechargeable batteries are to be removed from the product before being charged. Rechargeable batteries are only to be charged under adult supervision. Different types of batteries or new and used batteries are not to be mixed. Only batteries of the same or equivalent type as recommended are to be used. Batteries are to be inserted with the correct polarity. Exhausted batteries are to be removed from the product. The supply terminals are not to be short circuited. Do not throw batteries into a fire. Remove the batteries if you are not going to use the product for a long period of time.
WARNING: Mal-function or loss of memory may be caused by strong frequency interference or electrostatic discharge. Should any abnormal function occur, press the RESET button or remove the batteries and insert them again.
Press the "Humidifier On/Off" key to switch on or switch off the humidifier. If the "Led On/Off" button is on the "On" position, the humidifier LED is switched on while the humidifier is operating. When the unit is turned on, it will operate until you press the "Humidifier On/Off" key again, or until the water tank is empty.
Note: When the integrated no-water sensor detects that the water tank is empty, the humidifier cannot be activated. If the LED has been switched on, it will flash until the tank has been refilled. Refill the water tank regularly.
If the humidifier produces less steam, try to:
-
Re-install the filter:
-
Pull up the water tank lid to remove it, turn the water pump counter clockwise to unlock it and then pull it up.
-
Remove then re-install the filter (refer to image D).
- Clean up the humidifier plate (the steam exit) located on the top of the water pump by using a cotton pad.
- Re-fill the water in the water tank.
- If the above methods fail, install a new filter (refer to image D).
Note:
- The RL2000 is supplied with 5 new filters.
- When changing filter, fully insert the new filter inside the water pump (the filter must touch the bottom of the tube).
- Do not press too hard on the top of the filter to avoid deformation.
TEMPERATURE DISPLAY IN ^ C OR ^ F
In clock mode use the or keys to toggle between ^ C or ^ F temperature display.
CLOCK AND DATE SETTING
- In clock mode (time and date display), press and hold the SET key until the hour's digits start flashing.
- Use the and keys to increase or reduce the values, then press SET to confirm and adjust the next setting.
- The setting sequence is displayed in the following order:
Hours Minutes Year Month Day 24hr/12hr display DM (Day/Month) or MD (Month/Day) display DST function On/Off Day-of-week language.
Note:
- The day of the week can be displayed in 6 different languages: English (EN), French (FRA), Italian (ITA), Spanish (ESP), German (DEU) or Portuguese (POR).
-
When the DST function is turned on, the icon is displayed in normal mode.
-
Press the SET key to confirm your selection and go to the alarm setting.
Note: In time setting mode, if you do not press any key for 10 seconds, the unit will automatically go back to clock mode.
ALARM SETTING
- In clock mode, press the SET key once to go the alarm setting.
- Press and hold the SET key until the hour's digits start flashing.
- Use the and keys to adjust the hour, then press SET to confirm and adjust the minutes.
- Use the and keys to adjust the minutes, then press SET to confirm and go to the next setting.
- Use the and keys to select the alarm type: "FM" (to wake up with one of the 20 preset radio stations from "FM01" to "FM20") or "BEEP" (to wake up with the regular alarm ringtone).
- Press the SET key to confirm the new settings and go back to the alarm time display.
- Use the and keys to switch on or switch off the alarm then, press the SET key to confirm and go back to clock mode. When the alarm is switched on, the icon is displayed on the LCD screen in clock mode.
- When the alarm rings, press the SET, RADIO, or keys to stop it. The alarm will ring again the next day at the same time.
- When the alarm rings, press the "SNOOZE/LIGHT" key to switch on the snooze function. The ② icon is displayed on the LCD screen and the alarm will ring again 7 minutes later. To switch off the snooze function and stop the alarm, press and hold the SET, RADIO, ▲ or▼ keys for 2 seconds. The alarm will ring again the next day at the same time.
Note:
- If you don't press any key when the alarm goes off, it will ring for 5 minutes.
- In alarm time setting mode, if you do not press any key for 10 seconds, the unit will automatically go back to clock mode.
RADIO MODE
Radio stations preset manual setting
- In clock mode, press the RADIO key to switch on the radio.
- Press the or keys to select a preset number between the 20 numbers available (from "FM01" to "FM20").
-
Press and hold the SET key until the frequency's digits start flashing.
-
Use the or keys to scan the radio frequencies up or down. Press once to scan in 0.1 increments. Press and hold the keys to auto-scan to the next or the previous radio station.
- Once the desired station is assigned to the selected preset number, press the SET key to confirm and save the change.
- Repeat the above process from step 2 until all the preset numbers are assigned to a radio station.
- When you have finished, press the SET key to save your settings and go back to radio mode.
Radio stations preset automatic setting
- In radio mode, press and hold the SET key until the frequency's digits start flashing.
- Press and hold the SET key once again to start the automatic setting of the stations preset.
- The unit automatically assigns a frequency of a received radio station to a preset number.
- When the automatic setting is completed, the unit will automatically broadcast the first preset radio station ("FM01").
Listening to the radio
- In clock mode, press the RADIO key to switch on the radio.
- Press the or keys to toggle between the 20 preset radio stations.
- Press and hold the or keys to scan the radio frequencies up or down.
Sleep mode
- When the radio is turned on, press the SET key to enter the "sleep" function setting mode.
- Press the or keys to select the time delay before the radio automatically switched itself off. You can choose from "00MIN" to "90MIN" (minutes).
Note: if you select "00MIN", the "sleep" function will be disabled.
3. Press the SET key to save your settings and switch on the "sleep" function. The "sleep" icon and the selected time delay will be displayed on the LCD screen.
4. The radio will operate during the selected time delay, and then it will automatically switch off.
Note:
- While the sleep timer is activated the stations can be changed.
- During the time delay setting, if you don't press any key for 5 seconds, the unit will automatically exit the setting mode.
- If you press the RADIO key, the radio and the sleep timer will be switched off, the unit goes back to clock mode.
COMFORT ZONE
The unit indicates if the conditions inside the room are comfortable. The "snails" icons are easy to read and understand: they indicate when the optimal comfort zone has been reached. The ideal "Comfort Zone" for the human body ranges from 35 to 65% hygrometry for a given temperature between 18^ and 24^ (the temperature and hygrometry conditions are ideal for your well-being and a refreshing sleep).

Excellent conditions
Temperature: 20.0 to 22.0^ Humidity: 45% to 55% .

Good conditions
A) Temperature: 18.0 to 19.9^ or 22.1 to 24.0^ .
Humidity: 45% to 55% .
B) Temperature: 20.0 to 22.0 ^ C . Humidity: 35% to 44% or 56% to 65% .

Acceptable conditions
Temperature: 18.0 to 19.9^ or 22.1 to 24.0^ .
Humidity: 35% to 44% or 56% to 65% .

Not acceptable conditions
Temperature: below 18.0^ and above 24.0^ .
AND/OR
Humidity: below 35% and above 65% .
SPECIFICATIONS
RL2000 main unit
Dimensions: 150(H) x80(W) x50(D) mm
Battery type: 4X1.5V- AA batteries
Temperature range: -9.9 to 50C (Indoor)
Measurement accuracy: 0 to 40C (+/-1C)
-9.9 to -0.1C (+/-1.8C) & 40.1 to 50C (+/-1.8C)
Humidity range: 20% to 95% (Indoor and outdoor)
Resolution: 0.1C
Humidifier
Dimensions: 162(H) x165(W) x120(D) mm
Power supply: CA 230V-50HZ 50mA, DC 12V 500mA
Water tank capacity: 550ml
MAINTENANCE
In order to clean the unit, use only a soft cloth moistened with water; do not use any detergent product. Do not dismantle or drop the unit. Remove the batteries if the unit is not going to be used for an extended period of time.
WARRANTY
NOTE: Please keep this instruction manual, it contains important information. This product is covered by our two-year warranty.
To make use of the warranty or the after-sales service, please contact your retailer and supply proof of purchase. Our warranty covers material or installation-related defects attributable to the manufacturer, with the exception of wear caused by failure to respect the instructions for use or any unauthorised work on the equipment (such as dismantling, exposure to heat or damp, etc.).
Reference: RL2000
Designed and developed in Europe - Made in China
©2009 LEXIBOOK®
Lexibook UK Ltd,
Unit 10 Petersfield Industrial Estate,
Bedford Road, Petersfield,
Hampshire, GU32 3QA,
United Kingdom.
Helpline: 0808 1003015.
www.lexibook.com
Environmental Protection:
Unwanted electrical appliances can be recycled and should not be discarded along with regular household waste! Please actively support the conservation of resources and help protect the environment by returning this appliance to a collection centre (if available).
DESCRIPCION DEL PRODUCTO
Lexibook Ibérica S.L.
- Conditions excellentes
- Conditions agreables
- Humidificateur
- Main unit description
- Refer to image A
- Humidifier description
- Refer to image C
- Main unit LCD display description
- Refer to image B
- Replacing the humidifier filter
- Refer to image D
- GETTING STARTED
- Humidifier
- IMPORTANT NOTE:
- Main unit
- If the humidifier produces less steam, try to:
- Note:
- TEMPERATURE DISPLAY IN ° C OR ° F
- CLOCK AND DATE SETTING
- ALARM SETTING
- RADIO MODE
- Radio stations preset manual setting
- Radio stations preset automatic setting
- Listening to the radio
- Sleep mode
- COMFORT ZONE
- Excellent conditions
- Good conditions
- Acceptable conditions
- Not acceptable conditions
- SPECIFICATIONS
- RL2000 main unit
- MAINTENANCE
- WARRANTY
- Environmental Protection:
- DESCRIPCION DEL PRODUCTO
Brand : LEXIBOOK
Model : RL2000
Category : Weather Station