
SBS-MD-4 - Detector STEINBERG - Free user manual and instructions
Find the device manual for free SBS-MD-4 STEINBERG in PDF.


| Product type | Metal detector |
| Brand | Steinberg |
| Model | SBS-MD-4 |
| Dimensions (unfolded) | 120 cm total length, search coil 25 cm |
| Dimensions (folded) | 70 cm |
| Weight | 1.2 kg |
| Power supply | 2 AA batteries (not included) |
| Battery life | Approximately 20 hours of continuous use |
| Operating frequency | 7 kHz |
| Main functions | Metal discrimination, sensitivity adjustment, all-metal mode, iron detection, depth indicator, tone by metal type |
| Maximum detection depth | Up to 25 cm depending on object size |
| Adjustments | Sensitivity potentiometer, discrimination switch (all metals / iron), volume adjustment |
| Coil type | Waterproof coil, 25 cm diameter |
| Shaft | Telescopic height-adjustable shaft |
| Handle | Ergonomic handle with armrest |
| Display | None (audio only) |
| Care and cleaning | Wipe with a soft dry cloth after each use; do not immerse the control box |
| Safety | Not recommended for use near sensitive electrical equipment; avoid heavy impacts |
| Spare parts and repairability | Search coil and batteries replaceable; contact after-sales service for any repairs |
| Included accessories | User manual, securing cable (optional) |
Frequently Asked Questions - SBS-MD-4 STEINBERG
User questions about SBS-MD-4 STEINBERG
0 question about this device. Answer the ones you know or ask your own.
Ask a new question about this device
Download the instructions for your Detector in PDF format for free! Find your manual SBS-MD-4 - STEINBERG and take your electronic device back in hand. On this page are published all the documents necessary for the use of your device. SBS-MD-4 by STEINBERG.
USER MANUAL SBS-MD-4 STEINBERG
Safety & Operating Instructions
1 - Probe
1 - Torch
2 - Diodes
3 - Loudspeaker
4 - Battery cover
1 - Control panel
2 - Cables
3 - Nut
4 - Union nut
5 - Probe
1 - Probe
2 - Control panel
1 - Device switch:
2 - Probe
1 - Probe
2 - Control panel
1 - Power button
SBS-MD-2
SBS-MD-3
SBS-MD-4
SBS-MD-6
SBS-MD-7
A - Lower tube
SBS-MD-10:

This User Manual has been translated using machine translation. We have made every effort to ensure the translation is accurate, but please note that automated translations are not perfect and are not meant to replace human translators. The official version of the User Manual is in English. Any differences between the translated version and the original English are not legally binding. If you have any questions about the accuracy of the translation, please refer to the English version, which is the official reference. More language versions are available upon request via info@expondo.com.
Technical data
| Parameter description | Parameter value | |||
| Product name | Metal Detector | |||
| Model | SBS-MD-1 | SBS-MD-2 | SBS-MD-3 | SBS-MD-4 |
| Battery | 2x 9V | 6x AA | 6x AA | 1x 9V |
| Headphone jack | YES – 3.5mm | YES – 3.5mm | YES – 3.5mm | - |
| Probe diameter [cm] | 18.8 | 20.5 | 19 | - |
| Search distance [cm] | 200 – large objects25 – small objects, coins | 200 – large objects25 – small objects,coins | 14 10 | |
| Parameter description | Parameter value | |||
| Product name | Metal Detector | |||
| Model | SBS-MD-5 | SBS-MD-6 | SBS-MD-7 | SBS-MD-8 |
| Battery | 2x 9V | 1x 9V | 1x 9V | 1x 9V |
| Headphone jack | YES – 3.5mm | YES – 3.5mm | - | YES – 3.5mm |
| Probe diameter [cm] | 21.5 | 19 | 15 | 19 |
| Search distance [cm] | 120 – large objects18 – small objects,coins | 20 10 15 | ||
| Parameter description | Parameter value | ||
| Product name | Metal Detector | ||
| Model | SBS-MD-9 | SBS-MD-10 | SBS-MD-11 |
| Battery | 2x 9V | 1x 9V | 2x 9V |
| Headphone jack | YES – 3.5mm | ||
| Probe diameter [cm] | 21.4 | 188 | |
| Search distance [cm] | 100-150 – large objects18 – small objects, coins | ||
1. General description
The user manual is designed to assist in the safe and trouble-free use of the device. The product is designed and manufactured in accordance with strict technical guidelines, using state-of-the-art technologies and components. Additionally, it is produced in compliance with the most stringent quality standards.
DO NOT USE THE DEVICE UNLESS YOU HAVE THOROUGHLY READ AND UNDERSTOOD
THIS USER MANUAL.
To increase the product life of the device and to ensure trouble-free operation, use it in accordance with this user manual and regularly perform maintenance tasks. The technical data and specifications in this user manual are up to date. The manufacturer reserves the right to make changes associated with quality improvement. The
device is designed to reduce noise emission risks to a minimum, taking into account technological progress and noise reduction opportunities.
Legend

The product satisfies the relevant safety standards.
Read instructions before use.
The product must be recycled.

PLEASE NOTE! Drawings in this manual are for illustration purposes only and in some details may differ from the actual product.
2. Usage safety

ATTENTION! Read all safety warnings and all instructions. Failure to follow the warnings and instructions may result in serious injury or even death.
The terms "device" or "product" are used in the warnings and instructions to refer to Metal Detector.
2.1. Safety at the workplace
a) If there are any doubts as to the correct operation of the device, contact the manufacturer's support service. b) Only the manufacturer's service point may repair the device. Do not attempt any repairs independently! c) All packaging materials (plastic bags, cardboard, polystyrene, etc.) must be kept out of reach of children as they are a potential source of danger and must be disposed of in accordance with the regulations in force at the place of use of the device.
2.2. Safe device use
a) Device repair or maintenance should be carried out by qualified persons, only using original spare parts. This will ensure safe use. b) To ensure the operational integrity of the device, do not remove factory fitted guards and do not loosen any screws. c) Do not charge batteries that are not suitable for recharging. d) Do not mix different types of batteries, as well as the old ones with used ones. e) Batteries must be mounted according to the direction of polarization indicated on the device and battery symbols. f) Worn batteries must be removed from the device and disposed of in a safe manner compliant with the law provisions. g) It is not allowed to expose the device to strong shocks. h) For safety reasons it is necessary to remove the batteries when the device is not used. i) Remember that devices are exposed to electromagnetic interferences, which may affect usage.
3. Use guidelines
The metal detector is a device designed to support the process of searching for coins, jewellery, gold, silver, etc., other metal elements with magnetic or non-magnetic properties.
The user is liable for any damage resulting from non-intended use of the device!
3.1. Device description
SBS-MD-1:

1 - Probe
2 - Screw fastening the probe / probe tilt adjustment screw
3 - Bottom pipe supporting the probe
4 - Clamping nut
5 - Upper pipe
6 - Cable connecting the probe with the control panel
7 - Control panel
8 - Handle
9 - Elbow-rest
10 - Screw fastening the elbow-rest
11 - Screw fastening the control panel
Description of the control panel:

1 - Display (when the metal is detected, the pointer moves to the right)
2 - Function selection knob: ALL METAL (function for detecting all metals), DISC (function which enables turning off the detection signal for specific types of metal)
3 - Volume control
4 - PINPOINT - precise search mode
5 - Diode of the low level of battery charge (the LED lights up to indicate that the battery has been used, It is necessary to replace the battery with a new one)
6 - Headphone input
7 - Setting the sensitivity of searching for objects / turning the knob maximally to the left will cause the device to turn off, turning the knob to the right will cause the device to turn on
SBS-MD-2:
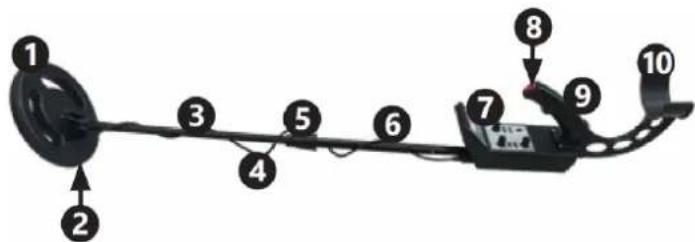
1 - Probe
2 - Screw fastening the probe / probe tilt adjustment screw
3 - Bottom pipe supporting the probe
4 - Cable connecting the probe with the control panel
4 - Clamping nut
6 - Upper pipe
7- Control panel:

A - display
B - switch / volume control
C - setting the sensitivity of searching for objects
D - headphone input
E - function switch: DISC / ALL METAL / TONE:
DISC: function which enables turning off the detection signal for specific types of metal, knob set maximally to the right - the detector discriminates against most metals except silver:
| Setting of the DISC knob | Type of metal that will not be detected |
| Knob in the position " 11:00 o'clock" | Alloys of iron |
| Knob in the position " 13:00 o'clock" | Nickel coins, aluminium cotter pins of drinks cans |
| Knob in the position " 15:00 o'clock" | Zinc coins |
| Knob in the position " 16:00 o'clock" | Copper coins |
ALL METAL (function for detecting all metals);
TONE (function similar to DISC, however, the detection takes place by means of low, medium and high tones:
| DISC/TONE knob settings | Tone of sound |
| Knob in the position " 10:00 o'clock" | Alloys of iron, high tone |
| Knob in the position " 12:00 o'clock" | Nickel coins, aluminium cotter pins of drinks cans, high tone |
| Knob in the position " 13:00 o'clock" | Zinc coins |
| Knob in the position " 14:00 o'clock" | Copper coins, medium tone |
| Maximum position | Silver, high tone |
| Maximum position | Alloys of iron, nickel coins, aluminium cotter pins of drinks cans, low tone |
F - knob for adjusting the sensitivity of mode DISC / TONE
G - diode of low charge level of weak battery (the LED lights up to indicate that the battery has been used, it should be replaced with a new one)
8 - PINPOINT function button
9 - handle
10-elbow-rest
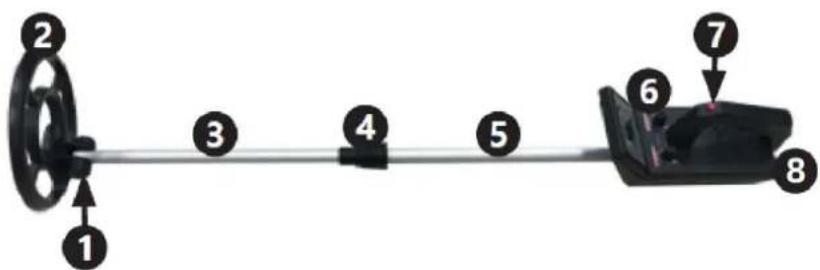
1 - Screw fastening the probe / probe tilt adjustment screw
2 - Probe
3 - Bottom pipe supporting the probe
4 - Clamping nut
5 - Cable connecting the probe with the control panel
6 - Control panel
6 - Upper pipe
7 - Button resetting indication of the display
8 - Input for headphones
Description of the control panel:

1 - Volume control knob / turning the device on
2 - Indicator of low battery charge level
3 - DISCRIMINATION control knob - the function which enables turning off the signalling of detection of specific types of metal. By increasing the value (or turning clockwise) the range of searched materials is narrowed. Knob set maximally to the left - the detector detects all metals, along with increasing the range, the detector will not detect certain metal objects, starting from materials made of iron alloys, then cotter pins of aluminium cans, aluminium foil. After each adjustment of discrimination, it is necessary to press the red button (7) in order to reset the display.
SBS-MD-4:

1 - Torch
2 - diodes
3 - loudspeaker
4 - battery cover
5 - ON / OFF switch
SBS-MD-5

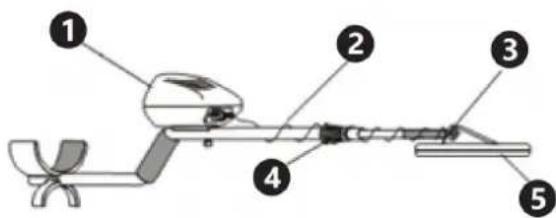
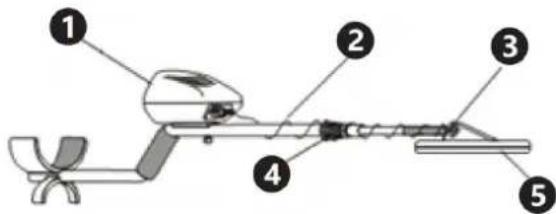
1 - Control panel
2 - Cable
3 - Nut
4 - Clamping nut
5 - Probe
Description of the control panel:

1 - Headphone input
2 - Setting the function (sensitivity, volume, operating mode)
3/6 - Buttons for setting the function values
4 - Selection of the operating mode
5 - P / P (PINPOINT) - precise search mode
7 - Power supply switch
8 - Confirmation of settings
IRON - indicates that the detected object is most likely made of an iron alloy. Some oxidized objects made of iron alloys can be detected as SILVER.
AL. / 5 c / - indicates that the detected object is most likely made of aluminium (can / cotter pin of can) or is a coin.
GOLD / BRONZE /

- indicates that the detected object is most likely made of gold or bronze.
1c - indicates that the detected object is most likely a zinc or copper coin.
SILVER - 10c / 25c / \$ 1 / 50c - indicates that the detected object is most likely a coin / a silver coin.
SOUNDS
The device produces three types of sounds depending on the material from which the detected object is made:
 |  |  |
| Low tone | Medium tone | High tone |
Display description:

1 - Sensitivity indicator
2 - Indicator of the charge level of the battery
3 - PINPOINT indicator
4 - Volume level
5 - Indicator of the depth of the position of objects
SBS-MD-6
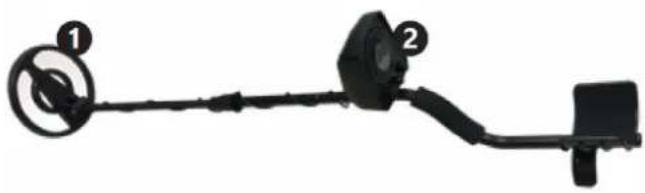
1 - Probe
2 - Control panel
Control panel description:
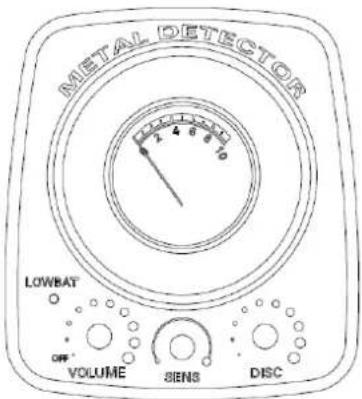
Headphone input (not visible in the picture, located on the back of the control panel)
LOWBAT - diode informing about low battery charge level
VOLUME / OFF - volume control knob / switch
SENS - sensitivity adjustment knob
DISC - function which enables turning off the indication of detection of specific types of metal.
The knob set maximally to the left - ALL METAL mode - the detector detects all metals, the knob set maximally to the right - the detector discriminates against most metals except silver, additional information:
| Setting of the DISC knob | Type of metal that will not be detected |
| Knob in the position " 11:00 o'clock" | Iron alloys |
| Knob in the position " 12:00 o'clock" | Aluminium cotter pins of drinks cans, nickel, |
| Knob in the position " 13:00 o'clock" | Zinc |
| Knob in the position " 15:00 o'clock" | Copper |
SBS-MD-7

1 - Device switch:
2 - Probe
3 - Diode informing about metal detection
4 - Sensitivity setting screw (invisible in the picture)
SBS-MD-8

1-Probe 2 - Control panel
Control panel description:
1 - VOLUME / OFF - volume control knob / switch 2 - LOWBATT - indicator of low battery charge level
3 – AUTO TUNE – automatic tuning - after switching on the device, set the volume knob to "11:00 o'clock", the DISC knob in the middle of the adjustment range. Keep the probe about 30 cm above the ground and away from any metal. Press the AUTO TUNE button, the SENSITIVITY pointer will be set to zero. Repeat this action every time, when the DISC range is changed** or after using the detector in another area.
4 - EAR - headphone input
5 - DISC - the function which enables turning off the detection of signal for specific types of metal.
The knob is set maximally to the left - the detector detects all metals, along with increasing the range, the detector will not detect some metal objects from materials made of iron alloys, then cotter pins of aluminium cans, aluminium foil.
6 - TARGET - diode informing about the detection of the object - red colour - ferromagnetic materials / green - non-ferromagnetic materials
7 - Detection / sensitivity indicator:
1 - Detection of ferromagnetic materials 2 - Detection of non-ferromagnetic materials
SBS-MD-9

- Probe
- Probe mounting screw/probe tilt regulation screw
- Lower pipe supporting the probe
- Cable connecting the probe to the control panel
- Cable plug
- Mounting latch
- Clamping nut
- Middle pipe
- Upper pipe
- Screw mounting the control panel
- Control Panel
- Armrest
Control panel description:

- Sensitivity regulation knob and power switch-off
- The knob set extremely to the left turns the power off. By turning the knob clockwise, the sensitivity is gradually increased.
- Display (a pointer moves to the right when a metal is detected)
- DISC (a knob) - The knob is compatible with the switch (6).
- DISC - a function allows to turn off signalization with different tones of sound concerning specific types of metal have been detected. The knob set extremely to the left – the ALL METAL mode - the device detects all metals. By turning the knob clockwise it is possible to eliminate unwanted metals (the table below).
The knob set extremely to the right - the detector excludes most metals except for silver. Additional information:
| Setting the DISC knob | The type of metal that will not be detected |
| Knob in "11:00 a.m." position | Iron alloys |
| Knob in "12:00" position | Aluminum beverage can pins, nickel |
| Knob in "3:00 p.m. o'clock" | Zinc |
| Knob in "4:00 p.m. o'clock" | Copper |
• TONE (similar to DISC, but detecting is signalized with low, high and double tones):
| Setting the DISC knob | Tone type | The type of metal that will not be detected |
| Knob in "11:00 a.m." position | Low | Iron alloys |
| Knob in "12:00" position | Double | Aluminum beverage can pins, nickel |
| Knob in "3:00 p.m." position | Double | Zinc |
| Knob in "4:00 p.m." position | Double | Copper |
- VOL - Volume control knob.
- PINPOINT- Precise searching mode
• After detecting an object it is possible to narrow down a searching area.
- DISC/TONE mode switch
SBS-MD-10

- Probe
- Lower pipe supporting the probe
- Clamping nut
- Upper pipe
- Control panel
- Display
- Battery cover
- Handle
Control panel description:

- Indicator informing about a detected object
- LCD display
- DISC button - this function allows you to turn off the signalization for specific types of metal that have been detected.
- ON/OFF power button
- Headphone input
SBS-MD-11

- Middle pipe
- Clamping nut
- Coil cord plug
- 5-pin connector
- Mounting knob
- Upper pipe
- Control Panel
- Clamping nut
- Probe
- Probe mounting screw/probe tilt regulation screw
- PINPOINT- Precise searching mode
• After detecting an object it is possible to narrow down a searching area.
Control panel description:
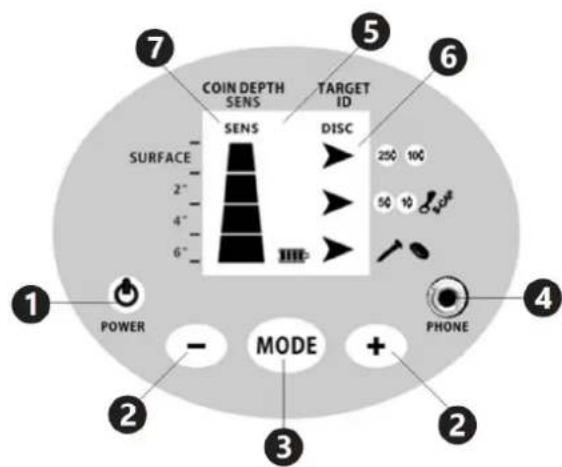
1 - Power button
2 - Decreasing (-)/increasing (+) value buttons
3 - MODE button
• A possibility to change SENS and DISC values
4 - Headphone input
5 - Display
6 - DISC indicator (a metal type indicator)
7 - SENS indicator (a depth and sensitivity indicator)
3.2. Preparing for use
Assembly of the device:
SBS-MD-1 / SBS-MD-5 / SBS-MD-8:
Assemble the frame of the detector and after setting the desired length, secure with the clamping nut:

Slide the control panel onto the frame in the place of the latch and tighten with the fastening nut.
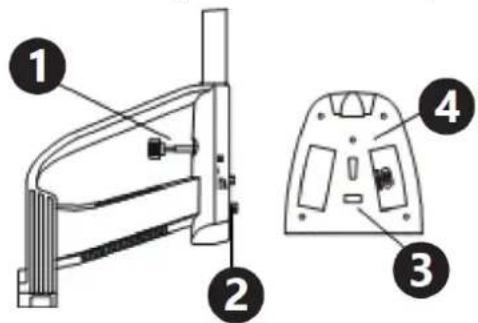
1 - Fastening nut
2 - Latch
3 - Mounting hole
4 - Control panel
Connect the frame with the control panel to the main frame, screw the probe, connect the probe cable to the control panel:

The device is powered by two 9V batteries (SBS-MD-1 / SBS-MD-5). The SBS-MD-8 device is powered by one 9V battery). The battery installation location is at the back of the control panel:

SBS-MD-2
Push the spring latches and slide the upper tube into the control pipe, so that the latches correctly fall into the holes. Unscrew the clamping nut, place the lower tube in the upper tube, and then tighten the clamping nut.
Then fasten the probe with the fastening screw on the lower pipe, wrap the probe cable several times around the lower and upper pipes, and put the end of the cable into the control panel.
The device is powered by six AA-type batteries.

SBS-MD-3
Depending on the needs, adjust the length of the frame by extending or shortening it. Unscrew the
clamping nut.

The device is powered by six AA-type batteries.

SBS-MD-4
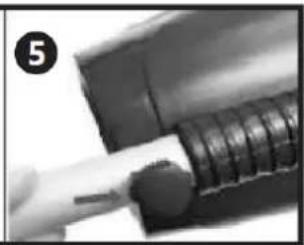
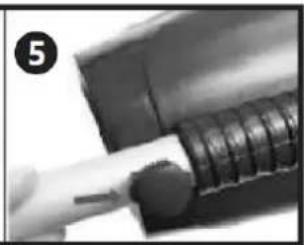
The device is powered by one 9V battery. Unscrew the nut in the grip, connect the battery and tighten the nut.
The device is ready for work.

SBS-MD-6
Assemble the detector frame and, after setting the desired length, secure with a clamping nut:

Unscrew the fastening screw from the control panel:

1 – the screw fastening the control panel
Put the control panel on the frame and tighten with the fastening screw.
Slide the control panel onto the frame in the place of the latch and tighten with the fastening nut. Assemble the remaining parts of the frame, screw the probe and connect it to the control panel:

1 - probe connection socket
2 - headphone input
The device is powered by one 9V battery, the place of battery installation is located at the back of the control panel:

SBS-MD-7
The device is powered by one 9V battery, the battery installation place is in the grip:

Unscrew the screw fastening the battery cover, place the battery and put on the cover.
SBS-MD-9:
Regulating device length:
- Depending on needs, adjust the length of the chassis by lengthening or shortening - unscrew the clamping nut clockwise until it loosens.
- Adjust the detector length so that the probe is 1/2" - 2" above the ground.
- Tighten the locking nut to lock the regulation.

A - Bottom pipe
B – Probe mounting screw
C - Mounting screw nut
D - Pad
E - Bottom pipe hole
F - Pad
CAUTION! Do not overtighten the probe and do not use tools, such as claws, to tighten it. The probe plug fits into the connector only in one way. Do not tuck the plug at a push or pull the cable because it may cause a damage.
- Wrap the probe cord around the boom so that it is loose. Then connect the plug to the 5-pin socket on the control panel.
Regulating device length:
- Depending on needs, adjust the length of the chassis by lengthening or shortening - unscrew the clamping nut clockwise until it loosens.
- Adjust the detector length so that the probe is 1/2" - 2" above the ground.
- Tighten the locking nut to lock the regulation.
The device is powered by two 9 V batteries.
Battery installation:
- Turn the device off by pressing the ON/OFF button.
- Slide the battery cover in the direction indicated by an arrow on the cover.
- Place the battery according to the polarity symbols (+ and -) marked on the compartment. Then insert the cover (the figure below).

SBS-MD-10:
Regulating device length:
- Depending on needs, adjust the length of the chassis by lengthening or shortening - unscrew the clamping nut clockwise until it loosens.
- Adjust the detector length so that the probe is 1/2" - 2" above the ground.
- Tighten the locking nut to lock the regulation.
The device is powered by one 9 V battery.
Battery installation:
- Turn the device off by pressing the ON/OFF button.
- Slide the battery cover in the direction indicated by an arrow on the cover.
- Place the battery according to the polarity symbols (+ and -) marked on the compartment. Then insert the cover.
SBS-MD-11:
Device assembly:
- Connect the 5-pin connector as shown in the figure below (1) and tighten the securing nut (Figure 2).

- Depending on needs, adjust the length of the chassis by lengthening or shortening - unscrew the clamping nut. Figure (3) below.
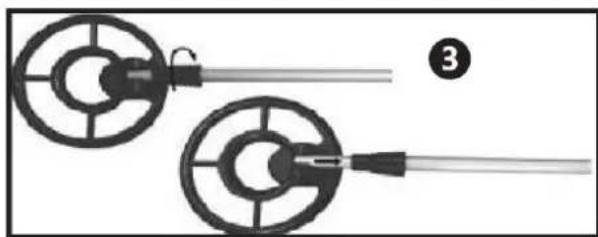
- To install the control panel, place the middle pipe in the upper pipe and align the holes (Figure 4). Then tighten the mounting knob (Figure 5).


- Tighten the counter nut counterclockwise (Figure 6).

- To regulate the position of the probe, loosen the probe mounting screw and set it at the desired angle. Note that the probe should be parallel to the ground. Tighten the mounting screw so that the probe is stable.
The device is powered by two 9V batteries.
Battery installation:
- Turn the detector off with the ON/OFF button.
- Slide the battery cover in the direction indicated by an arrow on the cover. (Figure below).

- Place the battery according to the polarity symbols (+ and -) marked on the compartment. Then insert the cover.
- Replace the battery if the display shows "LOW BATT".

CAUTION! Remember to remove an old or used battery from which chemicals may leak.
If the user does not plan to use the detector for a long time, remove the batteries.
Recommendations for using the detector:
Metal detectors are sensitive to electromagnetic interferences. Disturbances that appear when operating the device can also be caused by external factors, such as electronic equipment, high soil mineralization, or rust.
Note that the quality of the device operation also depends on the user's skills.
3.3. Device use
SBS-MD-1:
Turn the device on using the SENS knob, set the device to the ALL METAL mode. Direct the probe parallel to the ground and move the device to the left and to the right, adjusting the sensitivity of the device by turning the SENS knob gently. Metal detection is signalled by sound and pointer deflection. Then you can use the PINPOINT mode in order to find the exact location of the target. If necessary, use the DISC mode.
SBS-MD-2:
Turn on the detector with the volume control knob.
Start the job by setting the search function to ALL METAL and setting the search sensitivity (SENS) to the middle level.
The metal detection is signalled by a sound.
Use the PINPOINT mode to determine precisely the location of the target; if necessary, use the DISC / TONE mode.
SBS-MD-3:
Set the VOLUME knob to 11:00 o'clock and set the DISCRIMINATION knob to the centre.
Press the red button on the handle so that the pointer will move to the position 0.
Note!
Each time pressing the red button will cause the display pointer to move to position 0.
While using the device, observe the detector indications and adjust the VOLUME and DISCRIMINATION settings according to your preferences.
When indicating the value to the left of position 0, the device has detected magnetic materials and to when to the right of position 0 it indicates non-magnetic materials.
SBS-MD-4:
Turn the device on using the ON / OFF button, after switching on, the device will beep, the control diodes will blink and the torch will gently vibrate and will light up. Approximately 2 seconds after switching on, the device is ready for operation. At the moment of detecting a metal object, the green LED will lights up on the device, the device will start to produce an intermittent sound and slightly vibrate. The closer the device will be to the metal object, the more control lights will flash, the sound and vibrations will be more intense. In order to turn off the device, press and hold the ON / OFF button.
NOTE! When the device is not in use, turn it off and remove the batteries.
SBS-MD-5:
Turn on the detector with the POWER button.
SETTING SENSITIVITY
If you press SET, the sensitivity indicator on the display will flash. Set the desired sensitivity by means of UP / DOWN buttons. Press ENTER in order to confirm the settings.
SETTING THE VOLUME
If you press SET, the volume indicator on the display will flash. Set the desired sensitivity by means of the UP / DOWN buttons. Press ENTER to confirm the settings.
In this mode, the detector will detect all types of metals. Press SET twice, then ENTER in order to set ALL METAL.
DISC mode:
Mode of discrimination. During operation, the detector eliminates some metals (it does not detect them).
Press SET twice, the empty box in the display will flash, using the UP / DOWN buttons select the appropriate box and press MODE - the box will be crossed out. You can select several types of metals by pressing the MODE button in the appropriate boxes (they will be crossed out). In order to deselect the selected metals, proceed in the same way. The boxes indicate the type of metal to be eliminated from detection:

PINPOINT mode:
Precision search mode. After detecting the object, you can narrow down the search area. Press the P / P button - the PINPOINT indicator on the display will light up.
SBS-MD-6:
Turn on the detector with the VOLUME / OFF knob. Before switching on, the DISC knob should be turned maximally to the left (only after switching on and starting operation, you can adjust the DISC settings). Set the desired sensitivity with the SENS knob.
SBS-MD-7:

Turn on the detector with the switch: OFF - device turned off. The loudspeaker symbol - the device works with sound. The crossed-out loudspeaker symbol - the device works without sound. Set the sensitivity of the device depending on your needs:

Set the metal detection sensitivity by means of a flat screwdriver of the right size. Turning clockwise increases the sensitivity, while turning counter-clockwise reduces the sensitivity.
The detector informs about the detection of metal by sound signals and a glowing diode located in the probe (if the sound mode is activated) or only through the diode (in the case of selecting the operating mode without sound).
SBS-MD-8:
Turn on the detector with the VOLUME / OFF knob. Carry out the AUTO TUNE procedure as described above. Adjust the desired volume with the VOLUME / OFF knob. Set the DISC operating mode according to your needs. The detector informs about the detection of metal by sound signals and the glowing TARGET diode.
SBS-MD-9:
- To turn the device on, turn the SENS knob clockwise from the OFF position. Turning the knob to the right increases the probe sensitivity. Reduce sensitivity in the event of disturbances.
- Choose the operation mode with the DISC/TONE switch as desired.
- Use the DISC knob to set the sensitivity to given metals.
- The VOL knob can be used to adjust the volume as desired.
- The detector informs when a metal has been detected with sound signals and an indicator on the display.
PINPOINT- Precise searching mode
Exemplary usage:
In the ALL METAL mode, when a metal object is found, press the PINPOINT button to determine a precise location. While pressing the button, drag the probe over a sound area and release the button. If the probe is above the target again, the device will emit a sound. When the target is found, you can choose DISC or TONE to specify the metal type.
SBS-MD-10:
- Turn the detector on with the ON/OFF button. All symbols appear on the display. After about two seconds, three empty frames and a battery indicator will appear. The device is ready to work and detects all types of metals. If a metal element is found, a target icon on a black background will appear on the display and the detector will beep. The display also shows the approximate depth of the target.
- By pressing the DISC button it is possible to eliminate an unwanted type of metal. DISC setting:
| Settings range |  |  |  |
| Type of a metal to be eliminated | Iron/a nail, a bottle cap | Iron (a nail, a bottle cap)5 ¢ /a pin (a small gold ring) | Iron (a nail, a bottle cap)5 ¢ /a pin (a small gold ring)1 ¢ /10 ¢ (zinc, copper) |
Sound signal and display indicator:
The device produces three types of sounds depending on the material of a found object:
| Tone type | Display indicator | Description |
| Low tone |  | Indicates that the target is probably iron or a nail.Some oxidizedirons may fall under this category 25¢/50¢/1 . |
| Average tone |  | Indicates that the target is probably 5¢, an aluminum can, a pin, nickel or a small gold ring. 1¢ or zinc or a copper coin also falls into this category. |
| High tone |  | Indicates that the target is probably a silver coin, 25 ¢, 50 ¢ or 1USD.Some large aluminum coins may fall into this category. |
SBS-MD-11:
Turn the detector on with the POWER button. Only the battery indicator will appear on the display.
- When pressing the MODE button, SENS is displayed. It is possible to increase/decrease the probe sensitivity using the (+)/(-) buttons. When SENS appears on the display, the probe detects all types of metal.
- Press the MODE button to choose the DISC mode (unwanted metal elimination mode). "DISC" will be displayed on the display. When aiming at a target, an indicator arrow on the display (flashing) indicates the type of metal. The detector does not respond to the indicated type of metal. The situation is analogous in other cases. The flashing arrow in the DISC mode flashes 10 seconds until it detects the type of metal to be eliminated.
DISC settings
| Eliminated metal type | Tone type | A message displayed |
| Iron (a nail, a bottle cap) | High tone: 10¢, 25¢, silver, copperAverage tone: 1¢, 5¢, a pin, a bootle cap | A flashing arrow indicates a nail/a bottle cap |
| 5¢, pins, bottle tops, gold, zinc, nickel | High tone: 25, 10¢Low tone: Iron | A flashing arrow indicates 5,1¢, a pin, a bottle cap |
| A nail/a bottle top (iron), 5¢, pins, bottle tops, foil, gold, zinc, nickel) | High tone: 25, 10¢, silver, copper | A flashing arrow indicates 5,1¢, a pin, a bottle top, a nail/a bottle cap |
PP (PINPOINT) button - Precise searching mode
- When a metal object is found, the user can precisely determine a location. Press the PP button on the handle. The display will show PP (see the figure below). The detector emits a sound and the indicator shows the likely depth of the target. Slowly move the probe above a sound area and release the button. Change a probe position keeping the same distance when the sound fades away. Hold down the PP button again to precisely determine a searching area. Repeat the steps above until the detector displays a stronger signal in the place where the target is located.
3.4. Cleaning and maintenance
• Before starting the cleaning process, it is necessary to turn the device off and to remove the batteries. • Store the device in a clean, dry, cool place protected against moisture, dust and direct sunlight. - Handle the device carefully in order not to cause it dropping and damage. - The detector must be used at normal ambient temperatures, working in extreme conditions may lead to sensor malfunction. • Wipe the detector with a damp cloth without using any chemicals. - When the device is not in use, it is necessary turn it off by means of the main switch and to remove the batteries.
SAFE REMOVAL OF BATTERIES AND RECHARGEABLE
BATTERIES
AA 1.5V / 9 V batteries are installed in the devices. Worn batteries must be removed from the device proceeding analogously to their installation. Recycle batteries.
DISPOSING OF USED DEVICES
Do not dispose of this device to municipal waste systems. Hand it over to electric and electrical device recycling and collection point. Check the symbol on the product, user manual and packaging. The plastics used to construct the device can be recycled in accordance with their markings. By recycling you are making a significant contribution to the protection of our environment. Contact local authorities for information on your local recycling facility.

1 - Probe
1 - Probe
1 - Torch
2 - LEDs
3 - speaker
4 - battery cover
1 - probe
1. Probe
1. Probe
1 - power button
SBS-MD-2
SBS-MD-3
SBS-MD-4
SBS-MD-6
SBS-MD-10:

SETTING THE OPERATING MODE
ALL METAL mode:
1 - probe
1 - probe
A - display
1 - flashlight
2 - LEDs
3 - speaker
4 - battery cover
1 - Control panel
2 - Cable
3 - Nut
4 - Clamping nut
5 - Probe
1 - Sensitivity indicator
1 - Probe
2 - Control panel
SBS-MD-2
SBS-MD-3
SBS-MD-4
SBS-MD-6
SBS-MD-10:
1 - Probe
1 - torch
2 - LEDs
3 - speaker
1 - headphone input
1 - Probe
1.Probe
1.Probe
SBS-MD-2
SBS-MD-3
SBS-MD-4
SBS-MD-6
A - Lower pipe
B - Probe fixing screw
SBS-MD-10:

1 - Probe
1 - Probe
1 - Torch
2 - Diodes
3 - Loudspeaker
1 - Headphone input
1 - Probe
1 - Probe
SBS-MD-2
SBS-MD-3
SBS-MD-4
SBS-MD-6
A - Lower tube
SBS-MD-10:

1 - Probe
1 - Probe
1 - torch
2 - diodes
3 - speaker
1 - Control panel
2 - Cable
3.- Nut
1 - Probe
2 - Control panel
1 - Probe
2 - Control panel
SBS-MD-2
SBS-MD-6
SBS-MD-7
A - Lower tube
B - Probe mounting screw
SBS-MD-10:

1 - Probe
1 - Probe
1 - Flame
2 - LEDs
3 - Speaker
4 - Battery cover
5 - On/Off switch
SBS-MD-5
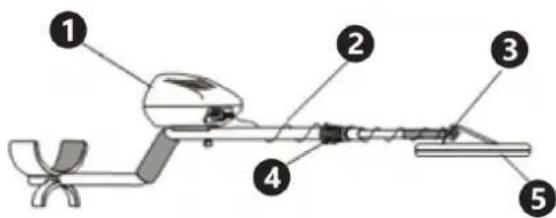
1 - Control panel
2 - Cable
3 - Screw
4 - Lock nut
5 - Probe
1 - Probe
2 - Control panel
1 - Device switch:
2 - Probe
1 - Probe
2 - Control panel
1 - Power button
1 - Lock nut
2 - Latch
3 - Mounting opening
4 - Control panel
SBS-MD-2
SBS-MD-3
SBS-MD-4
SBS-MD-6
SBS-MD-7
A - Lower tube
SBS-MD-10:

1 - Probe
1 - Probe
A - Display
B - Contact/volume control
1 - Burner
2 - Diodes
3 - Speaker
4 - Battery cover
5 - On/off button
SBS-MD-5
1 - Control panel
2 - Cable
3 - Nut
4 - Clamping nut
5 - Probe
1 - Headphone input
1 - Probe
2 - Control panel
1 - Probe 2 - Control panel
1. Probe
1. Probe
- Indicator that informs about a detected object
. LCD screen
1 - On/off button
SBS-MD-2
SBS-MD-3
SBS-MD-4
SBS-MD-6
1 - the screw that secures the control panel
SBS-MD-7
A - Lower tube
SBS-MD-10:
SENSITIVITY ADJUSTMENT
VOLUME ADJUSTMENT
1 - Control
1 - Control
1 - flashlight
2 - LEDs
3 - speaker
4 - cover
5 - ON/OFF switch
SBS-MD-5

1 - Control panel
2 - Cable
3 - Nut
4 - Lock nut
5 - Probe
1 - Probe
2 - Control panel
1 - Power button
SBS-MD-2
SBS-MD-3
SBS-MD-4
SBS-MD-6
SBS-MD-7
A - Base tube
SBS-MD-10:

1 - Probe
1 - Probe
1 - torch
2 - diode
3 - speaker
4 - battery compartment cover
5 - ON/OFF switch
SBS-MD-5
1 - Probe
1 - Probe
1 - On/Off button
SBS-MD-2
SBS-MD-3
SBS-MD-6
SBS-MD-10:
1 - Probe
2 - Screw the probe tilt adjustment screw
1 - Probe
2 - Screw the probe tilt adjustment screw
A - display
B - switch / volume control
1 - Screw the adjustment screw for the probe
2 - Probe
1 - volume control button / turn on the unit
2 - low battery indicator
1 - flashlight
2 - LEDs
3 - speaker
4 - battery cover
5 - ON/OFF switch
SBS-MD-5

1 - control panel
2 - cable
3 - nut
4 - clamp nut
5 - probe
1 - headphone input
1 - sensitivity indicator
1 - probe
2 - control panel
1 - unit switch:
2 - probe
1 - Probe 2 - Control panel
- Probe
- Probe mounting screw/probe tilt adjustment screw
- Lower the tube supporting the probe
- Cable connecting the probe to the control panel
- Cable plug
- Mounting lock
- Clamp nut
- Intermediate tube
- Upper tube
- Screw mounting of the control panel
- Control panel
- Armrest
- Intermediate tube
- Clamp nut
- Coil lead plug
- 5-pin connector
- Mounting button
- Upper tube
- Control panel
- Clamping nut
- Probe
- Probe mounting screw/probe tilt adjustment screw
- PINPOINT - Precise search mode
1 - Power button
2 - Decrease (-)/increase (+) value buttons
3 - MODE button
1 - Fastening nut
2 - Lock
3 - Mounting hole
4 - Control panel
Connect the frame with the control panel to the main frame, screw on the probe, connect the probe cable to the control panel:

SBS-MD-2
SBS-MD-3
SBS-MD-6
Unscrew the fastening screw from the control panel:

1 – the screw that fastens the control panel
Place the control panel on the frame and tighten with the mounting screw.
1 - Probe connection connector 2 - Headphone input
A - Bottom tube
SBS-MD-10:
- Tighten the lock nut counterclockwise (Figure 6).

1 - Probe
2 - Tighten the probe's tilt adjustment screw
1 - Probe
2 - Tighten the probe's tilt adjustment screw
A - Display
1 - Tighten the probe's tilt adjustment screw
2 - Probe
1 - Control panel
2 - Cable
3 - Nut
4 - Lock nut
5 - Probe
1 - Headphone input
1 - Probe
2 - Control panel
1 - Unit switch:
2 - Probe
1 - Probe 2 - Control panel
1 - Power button
1 - Mounting nut
2 - Latch
3 - Mounting hole
4 - Control panel
SBS-MD-2
SBS-MD-3
SBS-MD-4
SBS-MD-6
A - Bottom tube
B - Probe mounting screw
C - Mounting screw nut
D - Pad
E - Lower tube hole
F - Pad
SBS-MD-10:
1 - Probe
1 - Probe
1 - Touch
2 - Diodes
3 - Speaker
1 - Control panel
2 - Cable
3 - Nut
1 - Probe
2 - Control panel
1 - Probe
2 - Control panel
SBS-MD-2
SBS-MD-4
SBS-MD-6
SBS-MD-7
A - Lower tube
SBS-MD-10:
1 - Probe
1 - Probe
A - Display
1 - battery
2 - diodes
3 - speaker
4 - battery cover
1 - Control panel
2 - Cable
3 - Nut
4 - Clamping nut
5 - Probe
Description of the control panel:

1 - Sensitivity indicator
1 - Probe
2 - Control panel
Description of the control panel:

1 - Device switch:
2 - Probe
1 - Locking nut
2 - Latch
3 - Mounting hole
4 - Control panel
SBS-MD-2
SBS-MD-3
SBS-MD-4
The device is powered by a single 9V battery. Unscrew the nut in the handle, connect the battery, and tighten the nut.
SBS-MD-6
Unscrew the locking screw from the control panel:

Unscrew the screw securing the battery cover, insert the battery, and replace the cover.
SBS-MD-9:
SBS-MD-10:


1 - Probe
1 - Probe
A - Display
1 - Flashlight
2 - LEDs
3 - Speaker
1 - Control panel
2 - Cable
3 - Nut
4 - Tightening nut
5 - Probe
1 - Probe
2 - Control panel
1 - Probe
2 - Control panel
1 - Power button
SBS-MD-2
SBS-MD-3
SBS-MD-4
SBS-MD-6
A - Lower tube
SBS-MD-10:
1 - Detector
1 - Detector
A - Screen
1 - Lens
2 - Diodes
3 - Speaker
1 - Control panel
2 - Cable
3 - Nut
1 - Detector
2 - Control panel
1 - Detector
2 - Control panel
SBS-MD-2
SBS-MD-3
SBS-MD-4
SBS-MD-6
SBS-MD-10:

1 - Probe
1 - Probe
A - display
B - switch / volume control
1 - torch
2 - diodes
3 - speaker
4 - battery cover
1 - sensitivity indicator
2 - battery level indicator
3 - PINPOINT indicator
4 - volume level
5 - object depth indicator
SBS-MD-6

1 - probe
1 - device switch:
2 - probe
- probe
- probe mounting screw / probe tilt adjustment screw
- Lower tube supporting the probe
- Cable connecting the probe to the control panel
- Cable plug
- Mounting latch
- Clamping nut
- Middle tube
- Upper tube
- Attach the control panel with screws
- Control panel
- Armrest
- Indicator that notifies about a detected object2
. LCD screen
- Middle tube
- Clamping nut
- Coil cable plug
- 5-pin connector
- Mounting button
- Upper tube
- Control panel
- Clamping nut
- Probe
- Probe mounting screw / probe tilt adjustment screw
- PINPOINT - Precision search mode
Push the control panel onto the frame until it locks into place and tighten with the clamping nut.

The device is powered by two 9V batteries (SBS-MD-1 / SBS-MD-5). The SBS-MD-8 device is powered by one 9V battery. The battery compartment is located on the back of the control panel:

SBS-MD-2
Press the spring catches and push the upper tube into the control tube so that the catches properly engage in the holes. Unscrew the clamping nut, insert the lower tube into the upper tube, and then tighten the clamping nut.
Then attach the probe with the mounting screw to the lower tube, wrap the probe cable several times around the lower and upper tubes, and place the end of the cable into the control panel.
The device is powered by six AA batteries.
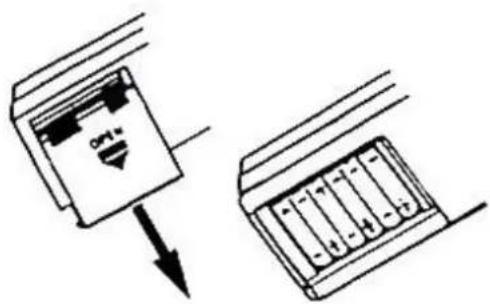
SBS-MD-3
Depending on your needs, adjust the length of the frame by extending or shortening it by loosening the clamping nut.

The device is powered by six AA batteries.

SBS-MD-4
The device is powered by a single 9V battery. Unscrew the nut on the handle, connect the battery, and tighten the nut.
SBS-MD-6
Assemble the detector frame and, after setting the desired length, secure it with the clamping nut:

Unscrew the mounting screw from the control panel:

1 - probe connection socket 2 - headphone input
Unscrew the screw securing the battery cover, insert the battery, and replace the cover.
SBS-MD-9:
A - Lower tube
B – Probe mounting screw
C – Screw nut for fastening
D - Pad
SBS-MD-10:
- Depending on needs, adjust the length of the chassis by extending or shortening it - unscrew the clamping nut. See Figure (3) below.
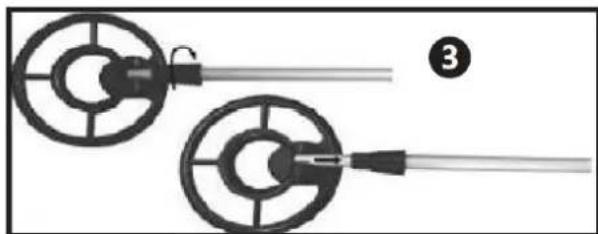
- Tighten the lock nut counterclockwise (Figure 6).

- To adjust the position of the probe, loosen the probe mounting screw and set it at the desired angle. Note that the probe should be parallel to the ground. Tighten the mounting screw so that the probe is stable.
- Install the battery according to the polarity symbols (+ and -) marked on the compartment. Then insert the cover.
- Replace the battery if the display shows "LOW BATT".

CAUTION! Do not forget to remove the old or used battery, as it may leak chemicals.
1 - probe
1 - probe
1 – Screw for adjusting the probe / probe tilt adjustment screw
2 - probe
1 - flashlight
2 - diodes
3 - speaker
4 - battery cover
5 - ON/OFF switch
SBS-MD-5
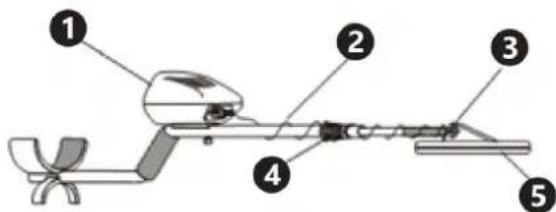
1 - Control panel
2 - Cable
3 - Nut
4 - Clamping nut
5 - Probe
1 – Headphone input
1 – Sensitivity indicator
2 - Battery charge level indicator
3 – PINPOINT indicator
4 - Volume level
1 - Probe
2 – Control panel
1 – Device switch:
2 - Probe
1 - Probe 2 - Control panel
1 - Power button
1 - Mounting nut
2 - Separator
3 - Mounting hole
4 - Control panel
SBS-MD-2
SBS-MD-3
SBS-MD-4
SBS-MD-6
A – Lower tube
SBS-MD-10:
1 - Probe
1 - Probe
1 - torch
2 - diode
3 - speaker
4 - battery cover
5 - ON/OFF switch
SBS-MD-5

1 - Control panel
2 - Cable
3 - Nut
1 - Sensitivity indicator
1 - Probe 2 - Control panel
1 - Device switch: 2 - Probe
1 - Probe 2 - Control panel
1 - Power button
SBS-MD-2
SBS-MD-4
SBS-MD-6
1 - Probe connection socket
A - Bottom pipe B – Probe fixing screw C – Mounting screw nut D - Pad E - Lower pipe opening F - Pad
SBS-MD-10:

1 - Probe
1 - Probe
1 - light
2 - diodes
3 - speaker
4 - battery cover
5 - ON/OFF switch
SBS-MD-5

1 - Control panel
2 - Cable
3 - Nut
4 - Clamping nut
5 - Probe
1 - Probe
2 - Control panel
1 - Device switch:
2 - Probe
3 - Diode indicating metal detection
1 - Power button
Push the control panel onto the frame until it clicks into place and secure it with the retaining nut.

The device is powered by two 9V batteries (SBS-MD-1 / SBS-MD-5). The SBS-MD-8 is powered by one 9V battery. The battery compartment is located on the back of the control unit:

SBS-MD-2
Press the spring catches and push the upper tube into the control tube so that the catches properly fall into the holes. Unscrew the clamping nut, place the lower tube into the upper tube, and then tighten the clamping nut.
SBS-MD-3
SBS-MD-4
The device is powered by one 9V battery. Unscrew the nut on the handle, connect the battery, and tighten the nut. The device is ready for use.

SBS-MD-6
Unscrew the screw that secures the battery cover, install the battery, and replace the cover.
SBS-MD-9:
Length of the adjustment device:
A - Lower tube
SBS-MD-10:
Length of the adjustment device:
- Tighten the lock nut counterclockwise (figure 6).

- Place the battery according to the polarity symbols (+ and -) marked on the compartment. Then insert the cover.
- Replace the battery if "LOW BATT" appears on the display.

Environmental and disposal information
Producer to customer
Dear Sir or Madam,
Let's take care of the environment! The product you own should not be disposed of with household waste. According to applicable regulations (Directive 2012/19/EU and other local regulations), used equipment must be taken to designated collection points for proper disposal and recycling.

How to Handle the Product at the End of Its Lifecycle?
- Electrical and Electronic Equipment: Products marked with the crossed-out wheeled bin symbol must not be disposed of with household waste. You can:
Take it to your local collection point for electrical and electronic equipment. Use the “one-for-one” system (returning the old device when purchasing a new one, if available in your region).
- Batteries and Accumulators: If the product contains batteries, remove them before recycling and take them to designated battery collection points.
- Packaging Materials: Packaging, such as cardboard or plastic, should be sorted and placed in recycling bins.
Why is This Important?
Proper disposal of equipment and packaging materials:
- Protects the environment from harmful substances.
- Enables the recovery of valuable resources.
- Reduces the amount of waste sent to landfills.
Where to Find Information?
Information about waste collection points can be found on local authorities' websites or through your recycling service provider. If needed, contact our customer service team, who will gladly provide further details.
Thank you for your care for the environment and commitment to recycling!
Contact
expondo Polska sp. z o.o. sp. k.


- SAFETY & OPERATING INSTRUCTIONS
- SBS-MD
- GENERAL DESCRIPTION
- DO NOT USE THE DEVICE UNLESS YOU HAVE THOROUGHLY READ AND UNDERSTOOD
- THIS USER MANUAL
- LEGEND
- USAGE SAFETY
- SAFETY AT THE WORKPLACE
- SAFE DEVICE USE
- USE GUIDELINES
- DEVICE DESCRIPTION
- SOUNDS
- PINPOINT INDICATOR
- PROBE
- DEVICE SWITCH
- PREPARING FOR USE
- DEVICE USE
- SETTING SENSITIVITY
- CLEANING AND MAINTENANCE
- VOLUME LEVEL
- ENVIRONMENTAL AND DISPOSAL INFORMATION
- HOW TO HANDLE THE PRODUCT AT THE END OF ITS LIFECYCLE
- WHY IS THIS IMPORTANT
- WHERE TO FIND INFORMATION
- CONTACT
Brand : STEINBERG
Model : SBS-MD-4
Category : Detector