
T.FLIGHT HOTAS X - Flight simulation joystick THRUSTMASTER - Free user manual and instructions
Find the device manual for free T.FLIGHT HOTAS X THRUSTMASTER in PDF.
User questions about T.FLIGHT HOTAS X THRUSTMASTER
0 question about this device. Answer the ones you know or ask your own.
Ask a new question about this device
Download the instructions for your Flight simulation joystick in PDF format for free! Find your manual T.FLIGHT HOTAS X - THRUSTMASTER and take your electronic device back in hand. On this page are published all the documents necessary for the use of your device. T.FLIGHT HOTAS X by THRUSTMASTER.
USER MANUAL T.FLIGHT HOTAS X THRUSTMASTER
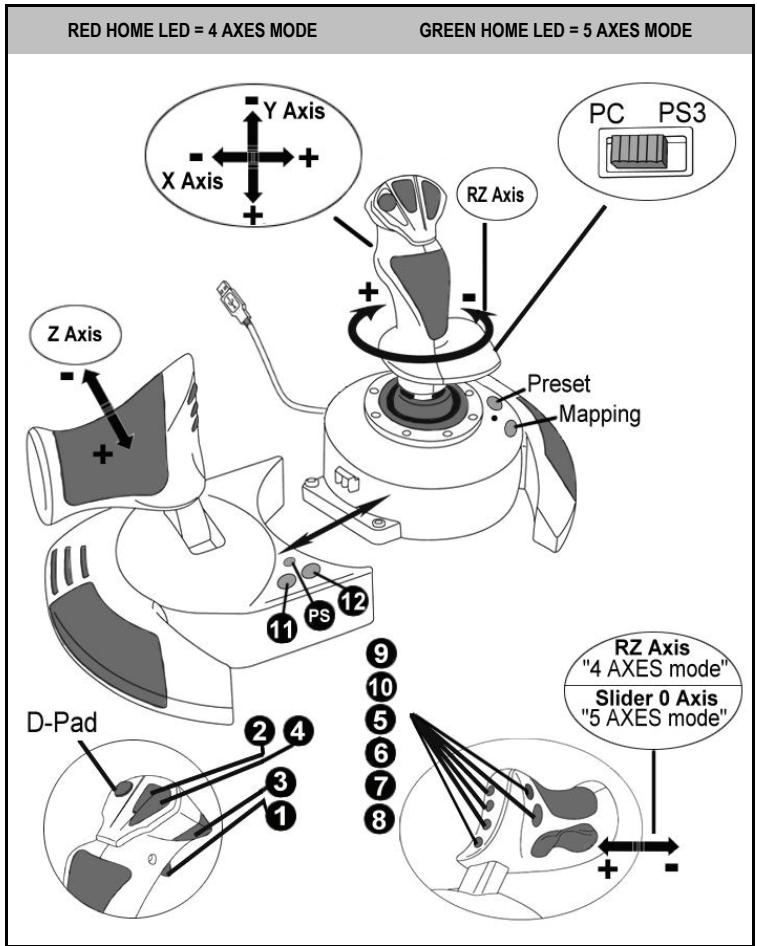
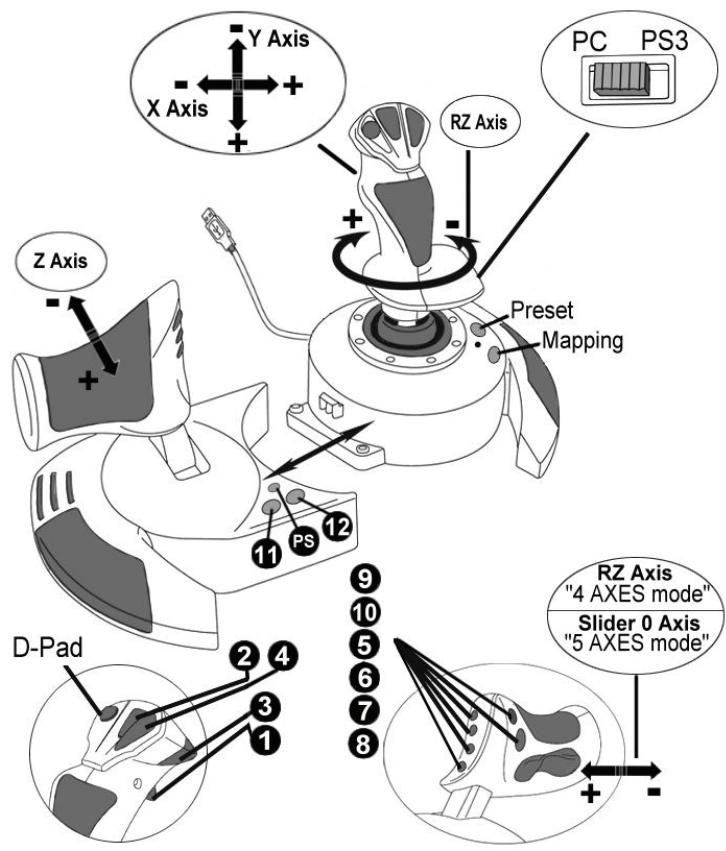
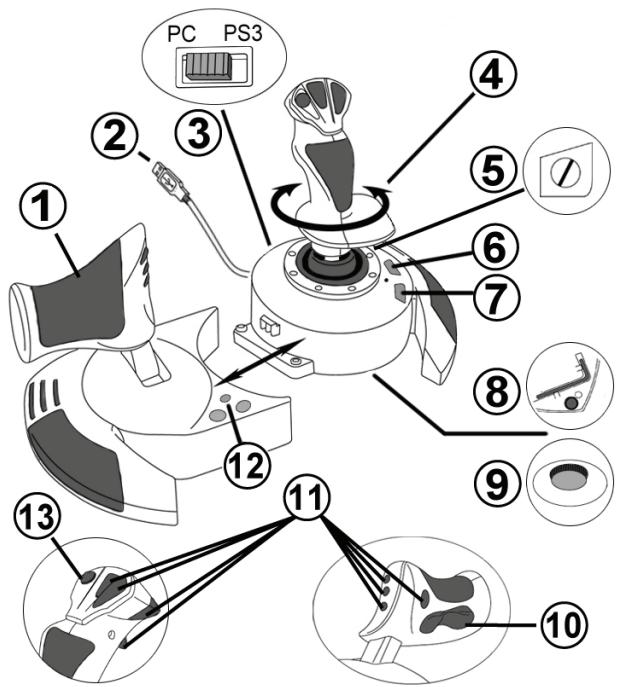
- Throttle
- USB connector
- USB selector "PC" or "PS3"
- Rudder function via twisting handle
- Rudder locking screw on handle
- PRESET button (to select programming)
-
MAPPING button (for programming)
-
Allen key to install or separate the throttle
- Handle resistance adjustment dial
- Rudder via rocking button (or 5^th Axis on PC)
- Action buttons
- HOME / PS button with LED
- Multidirectional "Point Of View" hat-switch
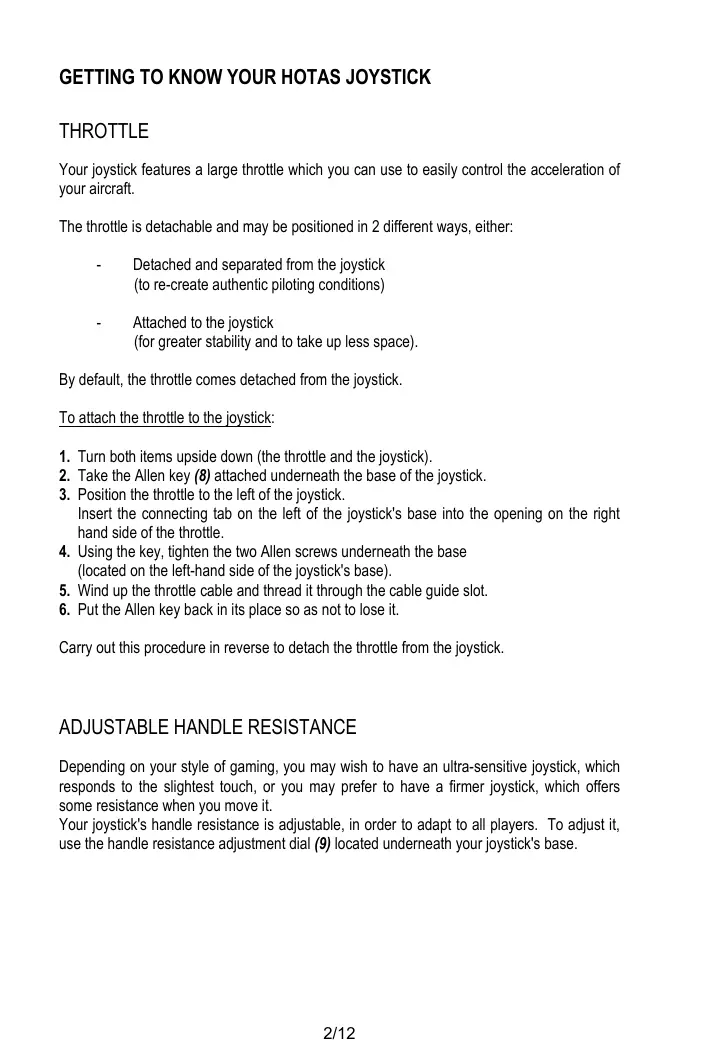
GETTING TO KNOW YOUR HOTAS JOYSTICK
THROTTLE
Your joystick features a large throttle which you can use to easily control the acceleration of your aircraft.
The throttle is detachable and may be positioned in 2 different ways, either:
Detached and separated from the joystick (to re-create authentic piloting conditions)
- Attached to the joystick (for greater stability and to take up less space).
By default, the throttle comes detached from the joystick.
To attach the throttle to the joystick:
- Turn both items upside down (the throttle and the joystick).
- Take the Allen key (8) attached underneath the base of the joystick.
- Position the throttle to the left of the joystick.
Insert the connecting tab on the left of the joystick's base into the opening on the right hand side of the throttle.
- Using the key, tighten the two Allen screws underneath the base (located on the left-hand side of the joystick's base).
- Wind up the throttle cable and thread it through the cable guide slot.
- Put the Allen key back in its place so as not to lose it.
Carry out this procedure in reverse to detach the throttle from the joystick.
ADJUSTABLE HANDLE RESISTANCE
Depending on your style of gaming, you may wish to have an ultra-sensitive joystick, which responds to the slightest touch, or you may prefer to have a firmer joystick, which offers some resistance when you move it.
Your joystick's handle resistance is adjustable, in order to adapt to all players. To adjust it, use the handle resistance adjustment dial (9) located underneath your joystick's base.
RUDDER FUNCTION
Your joystick features a rudder function, which in a plane corresponds to the pedals used by the pilot to turn the steering, allowing the plane to pivot around its vertical axis (therefore making the plane turn left or right). This rudder function is accessible on your joystick by rotating the handle to the left or right.
This rudder function is accessible in two ways:
-
on your joystick by rotating the handle (4) to the left or right.
-
or via the rocking button (10) on the throttle.
If you are only using the rocking button (or if you are not using the rudder function), you can disable the handle's rotation thanks to the locking screw (5) located on the base of the joystick. Use a flat head screwdriver to change the screw's position and thus lock/unlock the rudder function.
Notes:
-
On PlayStation® 3 and on PC in "4 axes" mode, the rocking button is combined with the handle's rotation.
-
On PC in "5 axes" mode, the rocking button is independent of the handle's rotation and therefore provides an additional progressive axis.
MULTIDIRECTIONAL "POINT OF VIEW" HAT-SWITCH
Your joystick features a "Point Of View" hat-switch (13) which, as its name indicates, allows you (in games which permit) to instantly view everything that's going on around your plane. To do so, simply go to your game's configuration menu and program the different views (rear view, left view, right view, and also external views) onto the directions of the "Point Of View" hat-switch.
Of course, you can also use the "Point Of View" hat-switch for other functions instead (firing, etc.).
PC
INSTALLATION ON PC
- Set your joystick's USB selector (3) to the "PC" position.
- Connect the USB connector (2) to one of your computer's USB ports. Windows XP or Vista will automatically detect the new device.
- The drivers are installed automatically. Follow the on-screen instructions to complete the installation.
- Click Start/Settings/Control Panel and then double-click Game Controllers. The Game Controllers dialog box displays the joystick's name with OK status.
- In the Control Panel, click Properties to configure your joystick. Test device: Lets you test and view all of your joystick's functions.
You are now ready to play!
2 AXIS MODES
On PC, your joystick features 2 axis modes:
4 Axes mode (Red Home LED)
The rocking button is combined with the handle's rotation for the rudder function.
- 5 Axes mode (Green Home LED)
The rocking button is independent and can be manually assigned with another function.
To switch from one mode to the other, simply press the HOME button (12).
IMPORTANT NOTES FOR PC
- Your joystick's USB selector (3) must always be set to the "PC" position before connecting your joystick.
- When connecting your joystick: Leave the handle, rudder and throttle centered and do not move them (to avoid any calibration problems).
"AUTOMATIC PRESET" CONFIGURATION - PC
"AUTOMATIC PRESET" diagram on PC
The "4 axes" mode preset corresponds to the default configurations for most aerial simulation games on PC.
It will therefore allow you to start playing your game right away, without having to reconfigure your joystick.
In "5 axes" mode, the function of the rocking button must be manually assigned in your game's options.
PLAYSTATION® 3
INSTALLATION ON PLAYSTATION® 3
- Set your joystick's USB selector (3) to the "PS3" position.
- Connect the USB connector (2) to one of your console's USB ports.
- Switch on your console.
- Launch your game.
You are now ready to play!
USING THE "HOME / PS" BUTTON
Your joystick's "Home / PS" button allows you to exit your games, access menus and directly switch off your PlayStation®3 system.
When using this function, the throttle must always be set to the central position (to avoid the malfunctioning of certain buttons).
It also allows you to switch very quickly between the gameplay and the joystick in games which alternate between "on foot sequences" and "flying sequences".
IMPORTANT NOTES FOR PLAYSTATION® 3
- Your joystick's USB selector (3) must always be set to the "PS3" position before connecting your joystick to the console.
- In "1 Player" mode: If your official gamepad is on, you must switch it to "controller port 2" in order for your joystick to be functional.
- On PlayStation® 3, the joystick is only compatible with PlayStation® 3 games (and will not function with PlayStation® 2 games).
- When connecting your joystick: Leave the handle, rudder and throttle centered and do not move them (to avoid any calibration problems).
"AUTOMATIC PRESET" CONFIGURATION - PLAYSTATION® 3
"AUTOMATIC PRESET" diagram on PlayStation® 3
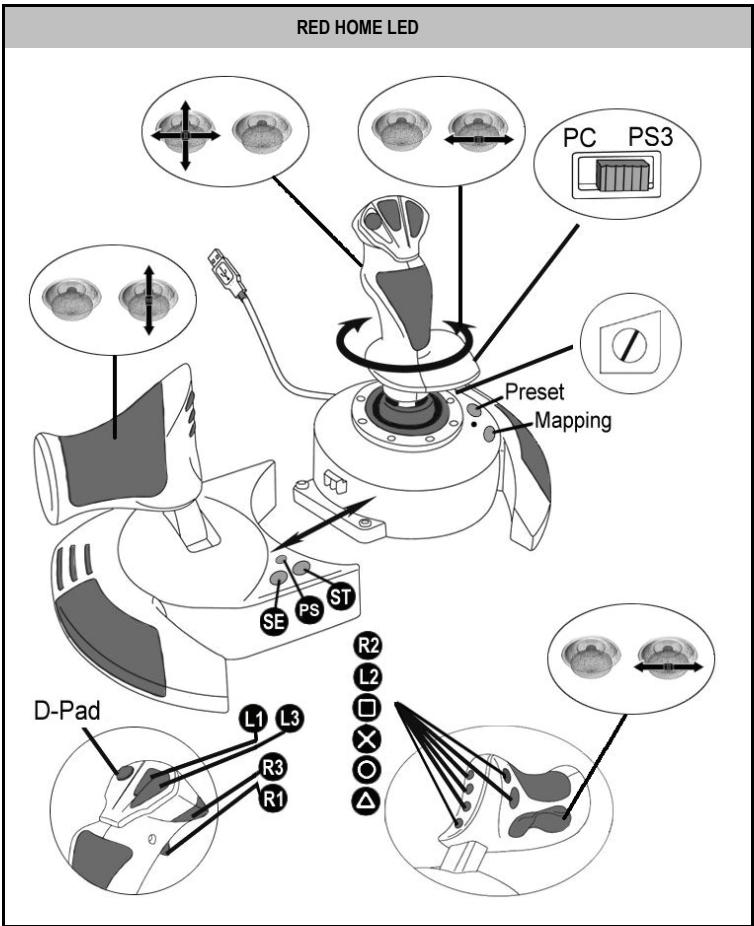
This preset corresponds to the default configurations for most aerial simulation games on PlayStation® 3. It will therefore allow you to start playing your game right away, without having to reconfigure your joystick.
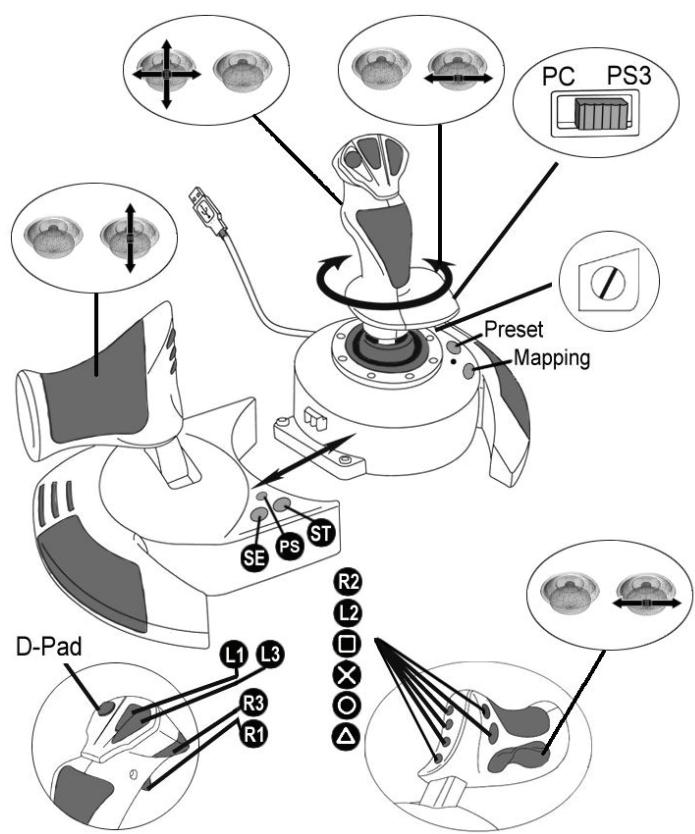
The 4 handle directions correspond to the 4 directions on the PS3 gamepad's left mini-stick.
The throttle corresponds to the Up/Down directions on the PS3 gamepad's right mini-stick.
The rudder (via rotating handle and rocking button) corresponds to the Left/Right directions on the PS3 gamepad's right mini-stick.
ADVANCED FUNCTIONS
2 PROGRAMMING MODES
The PRESET button (6) and its LED allow you to view the type of programming selected:
AUTOMATIC (preprogrammed)
- or MANUAL (programmed by yourself).
A single press of this button will allow you to switch from one programming mode to the other, even during the course of a game.
AUTOMATIC PRESET:LEDIS OFF
This represents the default programming: the axes, positions of the buttons and of the hat-switch are preprogrammed.
PLEASE REFER TO THE "AUTOMATIC PRESET" CONFIGURATION DIAGRAM.
- MANUAL PRESET: LED IS GREEN
This represents your own personal programming:
- The buttons, axes and the hat-switch can be switched between themselves.
- You can modify the programming to suit your taste and whenever you like.
- Programming is automatically saved in your joystick (even when it is disconnected).
- When your "MANUAL PRESET" is blank, it is identical to the "AUTOMATIC PRESET".
EEPROM MEMORY
- Your joystick features an internal chip which saves all of your "MANUAL PRESET" programming (even when your joystick is switched off or disconnected for a long period of time).
-
You can save a different "MANUAL PRESET" for each platform used:
-
one for PC in 4 axes mode
-one for PC in 5 axes mode
-one forPlayStation ⑧ 3
PROGRAMMING/MAPPING
Your programming is carried out using the MAPPING button (7).
Examples of possible applications:
- Switching the positions of buttons.
- Switching axes between themselves = directions of the handle, of the throttle or of the rudder (in this case, you must map the 2 directions of the first axis to those of the second.)
- Switching the 2 directions of the same axis.
- Switching buttons with a direction of an axis or of the hat-switch.
Exception:
The HOME / PS, MAPPING and PRESET buttons cannot be reprogrammed and moved.
PROGRAMMING PROCEDURE
SAVING A "MANUAL PRESET"
| Steps | Action | PRESET LED |
| 1 | Enable MANUAL PRESET (6) by pressing the button. | GREEN |
| 2 | Press and release the MAPPING button (7). | FLASHES GREEN SLOWLY |
| 3 | Press and release the button or direction to program. | FLASHES GREEN QUICKLY |
| 4 | Press and release the button or direction onto which you wish to place your function. | GREEN |
Your "MANUAL PRESET" is now enabled and up to date (with your programming carried out).
ERASING A "MANUAL PRESET"
| Steps | Action | PRESET LED |
| 1 | Enable your MANUAL PRESET (6) | GREEN |
| 2 | Press and hold the MAPPING button (7) for 2 seconds. | FLASHES GREEN 2 SECONDS |
Your "MANUAL PRESET" is now blank (and once again identical to the "AUTOMATIC PRESET").
RETURNING TO "FACTORY SETTINGS"
You can erase all of your programming or settings carried out on both PC (in 4 and 5 axes modes) and PlayStation® 3 with a single step:
| Step | Action | HOME / PS LED |
| 1 | Simultaneously press the MAPPING + PRESET buttons | FLASHES GREEN/RED 3 SECONDS |
All of your "MANUAL PRESETS" (PC + PS3) or settings are now blank.
Note: This operation will completely restart your joystick (on PC, we therefore recommend that you do this outside of games).
TROUBLESHOOTING AND WARNING
- My joystick doesn't function correctly or appears to be improperly calibrated:
- Switch off your computer or your console, disconnect your joystick, reconnect your joystick and then re-launch your game.
- When connecting your joystick: Leave the handle, rudder and throttle centered and do not move them (to avoid any calibration problems).
- Exit your game, disconnect your joystick, verify that the USB selector (PC / PS3) (3) is set to the proper position, then reconnect your joystick.
- When accessing the PS menu on PS3, the throttle must always be set to the central position (to avoid the malfunctioning of certain buttons).
- I can't configure my joystick:
- In your game's "Options / Controller / Gamepad or Joystick" menu: Select the most appropriate configuration or completely reconfigure the controller options.
- Please refer to your game's user manual or online help for more information.
- You can also use your joystick's "MAPPING" function to resolve this type of problem.
- My joystick is too sensitive or not sensitive enough:
- Your joystick self-calibrates on its own after you have made a few movements on the different axes.
- In your game's "Options / Controller / Gamepad or Joystick" menu: Adjust the sensitivity or dead zones for your controller (if this option is available).
- Adjust the handle resistance using the dial (9) located under your joystick's base.
- The rudder function is too sensitive:
- Disable the handle's rotation using the locking screw (5) located on the base of the joystick and use the rocking button for the rudder function.
TECHNICAL SUPPORT
If you encounter a problem with your product, please go to http://ts.thrustmaster.com and click Technical Support. From there you will be able to access various utilities (Frequently Asked Questions (FAQ), the latest versions of drivers and software) that may help to resolve your problem. If the problem persists, you can contact the Thrustmaster products technical support service ("Technical Support"):
By email:
In order to take advantage of technical support by email, you must first register online. The information you provide will help the agents to resolve your problem more quickly. Click Registration on the left-hand side of the Technical Support page and follow the on-screen instructions. If you have already registered, fill in theUsername and Password fields and then click Login.
By telephone:
| United Kingdom | 08450800942Charges at local rate | Monday to Friday from Noon to 4pm and 5pm to 10pm Saturday from 9am to Noon and 1pm to 7pm Sunday from 9am to Noon and 1pm to 4pm |
| United States | 1-866-889-5036Free | Monday to Friday from 7am to 11am and from Noon to 5pm Saturday and Sunday from 7am to Noon (Eastern Standard Time) |
| Canada | 1-866-889-2181 Gratisuit / Free | Monday to Friday from 7am to 11am and from Noon to 5pm Saturday and Sunday from 7am to Noon (Eastern Standard Time) |
| Denmark | 80887690Free | Monday to Friday from 1pm to 5pm and 6pm to 11pm (English) Saturday from 9am to 1pm and 2pm to 8pm Sunday from 10am to 1pm and 2pm to 5pm |
| Sweden | 0200884567Free | Monday to Friday from 1pm to 5pm and 6pm to 11pm (English) Saturday from 9am to 1pm and 2pm to 8pm Sunday from 10am to 1pm and 2pm to 5pm |
| Finland | 0800 913060Free | Monday to Friday from 2pm to 6pm and 7pm to Midnight (English) Saturday from 10am to 2pm and 3pm to 9pm Sunday from 11am to 2pm and 3pm to 6pm |
WARRANTY INFORMATION
Worldwide, Guillemot Corporation S.A. ("Guillemot") warrants to the consumer that this Thrustmaster product will be free from material defects and manufacturing flaws for a period of two (2) years from the original date of purchase. Should the product appear to be defective during the warranty period, immediately contact Technical Support, who will indicate the procedure to follow. If the defect is confirmed, the product must be returned to its place of purchase (or any other location indicated by Technical Support).
Within the context of this warranty, the consumer's defective product will, at Technical Support's option, be either repaired or replaced. Where authorized by applicable law, the full liability of Guillemot and its subsidiaries (including for indirect damages) is limited to the repair or replacement of the Thrustmaster product. The consumer's legal rights with respect to legislation applicable to the sale of consumer goods are not affected by this warranty.
This warranty shall not apply: (1) if the product has been modified, opened, altered, or has suffered damage as a result of inappropriate or abusive use, negligence, an accident, normal wear, or any other cause not related to a material defect or manufacturing flaw; (2) in the event of failure to comply with the instructions provided by Technical Support; (3) to software not published by Guillemot, said software being subject to a specific warranty provided by its publisher.
Additional warranty provisions
In the United States of America and in Canada, this warranty is limited to the product's internal mechanism and external housing. Any applicable implied warranties, including warranties of merchantability and fitness for a particular purpose, are hereby limited to two (2) years from the date of purchase and are subject to the conditions set forth in this limited warranty. In no event shall Guillemot Corporation S.A. or its affiliates be liable for consequential or incidental damage resulting from the breach of any express or implied warranties. Some States/Provinces do not allow limitation on how long an implied warranty lasts or exclusion or limitation of incidental/consequential damages, so the above limitation may not apply to you. This warranty gives you specific legal rights, and you may also have other legal rights which vary from State to State or Province to Province.
COPYRIGHT
© 2008 Guillemot Corporation S.A. All rights reserved. Thrustmaster® is a registered trademark of Guillemot Corporation S.A. PlayStation® is a registered trademark of Sony Computer Entertainment, Inc. Windows®, XP and Vista are registered trademarks of Microsoft Corporation in the United States and/or other countries. All other trademarks and brand names are hereby acknowledged and are property of their respective owners. Illustrations not binding. Contents, designs and specifications are subject to change without notice and may vary from one country to another. Made in China.
ENVIRONMENTAL PROTECTION RECOMMENDATION
At the end of its working life, this product should not be disposed of with standard household waste, but rather dropped off at a collection point for the disposal of Waste Electrical and Electronic Equipment (WEEE) for recycling.
This is confirmed by the symbol found on the product, user manual or packaging.
Depending on their characteristics, the materials may be recycled. Through recycling and other forms of processing Waste Electrical and Electronic Equipment, you can make a significant contribution towards helping to protect the environment.
Please contact your local authorities for information on the collection point nearest you.
FAQs, tips and drivers available at www.thrustmaster.com
TFlight Hotas X
Compatible : PC / PlayStation® 3
INFORMATIONS RELATIVES À LA GARANTIE
RODE HOME-LED = 4 ASSEN-MODUS
GROENE HOME-LED = 5 ASSEN-MODUS
TWEE PROGRAMMEERMODI
EEN MANUAL PRESET OPSLAAN
INFORMATIE MET BETREKKING TOT DE GARANTIE
- MANUAL PRESET: LED VERDE
Competivel: PC / PlayStation® 3
Manual do Utilizador

CHARACTERISTICAS TECNICAS
INFORMACAO DA GARANTIA
PykoBoIDCTBO NOIb3OBATeJIa
TEXHNUECKNEXAPAKTEPNCTIKN
1.YnpaBHeHneCKOpocTbHo
2. USB-pa3bem
3. CenekTop USB (PK/PS3)
4.Функл汞pylenHЯ c POMOьHO NOBOPOTHMyKoTkn
5.BnHT 6IIOKIMPOBKN pyJIa, paCNOIOXeHHbI Ha pyKOJIrKe
6.Khonka PRESET (PENEYCTAHOBKA) (Дяуьбopa ржима nporpaMMroBAni)
7.Khonka (PENEOPNEDEJELEHNE) (npoRpaMnroPobAHN)
- TopceboKJIIOUdIy yCTaHOBKn n CHrTnPyuKn ynpabJIeHnra30M
- Perjntop hactpoikn CoPOTINBHeHn pyKoTkn
- Khoika «rocking» ha 7tpbae (Un 5-ocb Ha PIK)
- Komaundhble KhoPiK
- Khonka HOME / PS c inDnkaTOpOM
- MhorohanpablanHHxat-inepeKlnouateIb Bnida «Toka o630pa»
I3YUHEHNE JXOJCTNKA HOTAS
PYUKA YIIPABILEHINYI A3OM
Ha BaSem JxKoIeNke IMeEeTc 60JIb7aRpyka ynpablenra3OM, KOtOpaI NCnOJIb3yeTc
dIy npablenHn Ha6Opom ckOpocTn BaIero Bo3DyUHOro cpeCTBa.
Pyuka ynpablenna rataom OTdienetc n MOKet 6bItyctahOBnHa 2 cnoocam:
- OTdJIbHoOT JxOoiCTnka
(HTO6bI BOC03aTbpeaJIbHbIe yCIOBnY npabInHeN CaMOTeTOM) - PnikpenHea KdxKoIctNky
(Дя увелоченяставиьноctи и Зковоми меса).
No ymouhanmo pyka ra3a otdeena oTdojokctnka.
UTo6bI npKpeInHb pyKy ra3a K dxKoJCTnKy:
1.Перевернiteобалем enta ВьрхДHom (pykyra3aиДжо�тИK).
2.Bo3bMnteTopceB0KJIIOU8),npIKpeIeHHbI IOD OCHOBAHMe DKOJCTNka.
3. YctahOBITE pyky razcna cneBa ot IXKOCTnka.
YCTAHOBITE COEINHITIELbIi BbICTy (HaJIeBOUaCTN OCHOBAHn JxOJCTMka) BOTBepCTne Ha npabOuactn pyuKn r3a.
4.C NOMOUIKIOUa 3aTAHnTE 2 JIeCTINrDaHHbIX 6oNTa NOJ OCHOBAHnEM
(Ha JIeBOuJCTN OCHOBAHnJ DJOICTNka).
5. Ckpytnte ka6eIb r3a n npodeHbTe ero uepe3 hnpabraioi na3 ka6eIa.
6. YctahOBnTe TOPeBcN KInOu ObpaTHo, YTObI erO He NOTepaTb.
Ipykra0TkoCTnKa BbInolHnte 3Ty npOeDpyB o6pAthom npaKe.
HACTPANBAEMOE COPIPTOBJIEHNE PYKOKTNI
B 3aBcMocTn OT CTINI INpbl MOKHO HAcTPONTb DKOJIeTNIK TAK, YTObI OH pearnpoBaN Ha maneHsue DBIXeHne (CBepxUyBCTBHTeJIbHOCTb), IIN, HAObOpOT, yMeHbIuNTb yUBCTBHTeJIbHOCTb DKOJCTNkA Tak, YTObI OH OKa3bIaN ONpeJeJIeHNO CoNPOTNBHeHne npi urpe.
HactpoKn cOnpOuBHeHn pyuKn DkoIcTnKa MoXHO 3MeHnTb TaK, YTO6bl OHO COOTBcTcBOBaNo INDINbUdyaJIbHOMy CTmIOIrPbI.ДЯ HAcTpOKn ICN0JIb3yTe peryJrTOp cOnpOuBHeHn (9), KOTOpBI paCOnoJIraeTcnoOCHOBaHem DkoIcTnKa.
ФУHКЛИN ⅢТYPВАЛА
Джоьстнк осашихункшиштураи;В нагостяшем салоле тпnot ocutyстблгетakne Mahebpblc nomoцью nepailepyneBOU npablenHnKOTOpbIe N3MeHЯOTnoLOXHeME cAMoLETA OTHOCHTelHo erO bepTknKaIbHOJ OCN,чTO nO3BOJIaRt nobopaHbAtbcamolET BNEBO ININ Bnpabo.Повернite руковджоьстка BNEBO ININ Bnpabo,чTO6blnpOBepNT daHHyOФнКИIO.
Tenepb MoXHO HaunHaTb Hpy!
MCIOJIb3OBAHNE KHOIKN《HOME/PS》
C NOMOJIbIO KHOIIKIN Home / PS, HaxoJIaIeIcH a IdoXoIcTKe, MOxHO BbIITN I3 INPbI, BoITN B MeHIO HAnpMyIO bIKIIOHTb CnCTeM y PlayStation® 3.
PnncnoIb3ObaHnn 3ToN cyHKunp bIurar r3a Bcerda dOnKeH 6bITb yctaHOBEN B ceTpaJIbHOe noJoxHeMe (BO n36exaHne HenoJaOK Ba pa6ote HeKOTOpBX KHOJOK).
Takimobpa3om,BbltaKKeMoKTe6bIcTpoNepeKIOuOaTbCmEkyIrPOBbIM KOHTpOnJIepOM IJKOJIeTcKOM BnIgPax,ΓeIIOpeMeHNO npIXoDITcbcNITn NeIKOM NIN JETaTb Ha CaMOJeTe.
BAXHbIE 3AMEUAHNIO PABOTE C PLAYSTATION® 3
- Cenektorp USB DKoHCTnka (3) BcERda DOnKHeB 6bITb yCTaHOBnEH B NOLOKeHne PS3 nepeD NOKIIouHeHem DKOHTnKa K KOHC0NI.
-B pexime oJHoro irpoka (1 Player): Ecnn oΦmuaIbHaB BepcN KOHTpolpeBa KblouheHa, Heo6xOIMMO nepeKIOuHTbero Ha «NOPT 2 KOHTpolpeA», YTO6bI JxOoiCTNK pa60tan. - B npicstabke PlayStation® 3 джоctнк совмсгим тольк оиграми дя PlayStation® 3 (и не у得住 наPlayStation® 2).
-Пи поюкlioуенджошстка:Оctавьт рукову, ochOBHош утypвал и ручky урравления ckорoctью вцentральnom пложецни и не д辊а对接им (Чтобьизбекаы побьixnpoblenm c калibровков).
CXEMA-PLAYSTATION ③ 3《ABTOMATUNCHECKNEIPEUDCTAHOBKN》
KPACHbI INHДIKATOP HOME
Ha cxEme npedctabnHa npedyctahOBnHnHa KOhnpnyrpauny PlayStation® 3 dans 60nbunHCTBa ntp CmmyaunnoJeTob. 3To no3BOnraet hauatb npyr cy3y je, He meHra HactpOKn dKoJCTNka.
4 NOLOXeHn pyKoTKn COOTBETCTByIOT 4 NOLOXeHnM JIEBOr MHN-IXKOCTNka IHRPOBORO KOHTpONlpea PS3.
PbUar r3a COOTBETCTByET HnPaBJIeHnM Bepx/BnI3 npBaBOr MmH-IXKOJCTNka mRpOBOro KOHTpOJIIEpa PS3.
Utypban(nCnoIb3yI NOBOPOTHyIO pyKoRTKy IIN KHOKNKY《rocking》)COOTBETCTBYET HAnpaBHeHnAM
BnEBO/BnpaBO npaboro MmHn-DKoCtNka IrpOBO KOHTpOllpe PS3.
ФУHKЦИДЛОпblTHblX NOЛьЗВATEJIЕI
2 PEXKIMA IPOIPOPAMMIOBAHIA
KhoIka PNEJYCTAHOBKN (PRESET) (6)c INHdNkATOpOM NO3BOJrEe TPOcMOTpeTb BblbapHHb peXIM pOprpAMMnPoBaHnA:
TEXHnueCKA IODePJKKA
Пи рвоЗнknHOBeHnnp6bEm,C8Ba3aHHbIX C nCNoIb3OBoAHnEM KOHTpOJIpepa,zaIInTeHa Be6-caIT http://ts.thrustmaster.com npeeiDnte no cbbIInke Technical Support (TexMHueckae noOpdepKka).Ha 3ToTcPraHnue IMeETc DOCTyN K pa3NtHbIM yTNiNTAM (pa3dEny "Jacto 3aDaBaEMeBle BONpOcbl" (FAQ),cambIM HObIM BepcNm DpaIbEPOBu npoRpaMMHoro oBeceNeHnE,-3TO MOKeT NOMOBy peUeHnO np6bEmb. EcnI 3to He nomOrrno,MOKHO CB8a3aTbc So cnyk6oB TeXMHueckoi npOdepKKn Thrustmaster ("Technical Support"):
No 3JNeKTPoHnO noUte:
TtO6bI OTnpaBnITb 3anpoc B cnyk6y TexHnueckOn noDpePknNo 3NeKtpHOHNOHTe, Heo6XoJIMo 3apeNCTpnpoBaTc8n Ha Be6-caTe. IpeOCTabJIeHNH8a Bamn HfOpMaJn NOMOXET b6IcTpee peuNTb npO6nemy. IpeEiNITE no Ccblne Registration (PerncTaPun), KOTOPa HaxoNTc3CNEBa HA CTpaHnCe TexHnueckOn noDpePkn, n CneDuYte INCTpyKzNM, BbIbOIMbIM Ha 3KpaH. Ecnbl yke 3apeNCTpnpoBaHbl, BBeDInTe MMn noIb30BaTeRnnapOBn JIOJa UName n Password COOTBETCTBEHHO, NoCne Yero HAKMITE KONIKY Login (Bxod).
INHOPMALIOROTAPAHTN
Bo Bcex ctpanax, Kopnpaunia Guillemot Corporation S.A. ("Guillemot") daet rapaHTno Ha n3dennr Thrustmaster B TOM, yTO 3TN i3dennr He ImeHOT depeKTOB MATEpnaONOB INI npOIM3BOCTBa HA (2) rOda OT dAbyt NOKyKN. PnO bOpayxekHN DEpeKTA B TeueHne rapaHTnHO rpoka HEmeJENHc BcXkNTecb CO cnyk6oB TExNHeCKo NOpDEPKKn, KOTOPAR pa3bAcNHt NocJeDObaTeNbHocT DeiCTBNI. Ecnn HAnuHne DEpeKTA NOITBepINTCs, INeJIe 6ydtE Heo6oDMIO BePhyTb No MeCtTy pIno6peTeHnra (INI no DpyrTOM MeCtY, yka3AHNOy Cnyk6oB TExNHeCKo NOpDEPKKn).
Ecnn HecnpabHoe n3dIe Ine nonadaet noCIOBnra rapaHTnO, OHO 6ydtIIO 3aMeHeHO, IIO60 OTPeMOHTPOBAHO. Pn HAIINu peryUNpyUoJero 3aKOHDoATEJIbCTBA, HAnBOIIuaa YOBETCTBEHHoCTb (BKIOUay KOCBeHNbIE y6blTKn) KOpnpaunu GUILlemot N ee DOpeHHx npEepnpiNaIOrpaHHe pemOHTo mN 3aEMHO INe3dIeTHrustmaster. Yka3aHbIe rapAHTnHbIe OB3aTeJIbCTBa HE BnIAJTOH NaPOnIMueckne npaba NotPe6bnteB bOTHOSeHmN 3aKOHOdaTEJIbCTBa, pImeHMIMO K npOdaKaM NTpe6bnteJIbCKNX TObAPOB.
Danhnra rapaHTnHe paacnpocTpaHareTc: (1) Ha n3dJIyMaOmdnPmIpoBaHbIe, BCKpbItbe, Dopa6oTahHbIe IIN NOBpeXdeHbIe B pe3yIbTaTe HnepaBnIbHorO IIN rpy6oro 6baueHHN, HeOCMOPTpNTeHbOCTN, CnyAHIHO NOBpeXdeHHN, HOPMaIbHOrN 3H0Ca, INn MeIOUne IIOBOI dpyro DeEkeT, HE CB3AHHN C KaYeCTBOM MaTePnAna IIN 3rTOBnEHn; (2) B cnyae HecOBIOJHOeN hCTpyKuN, BbIaHHbIX TexHnueckO IOndepKKo; (3) Na nporpaAMHbIe npOdyKbI, pa3pa6oTahHbIe HekopnapaMeGuillemot, paocnpocTpaHareTc rapaHTn/OTBeTCTBEHNOct bpapa6oTHka nporpaMM.
ABTOPCKOE IIPABO
© 2008 Guillemot Corporation S.A. Bce npaba 3auiuhebl. Thrustmaster® JBnIeTcA zerHCTprpOBAHHOI troPOBm MapKO GuillEMot Corporation S.A. Playstation® JBNIeTcA zerHCTprpOBAHHOI troPOBm MapKO Sony Computer Entertainment Inc. Windows®, XP n Vista JBNIOTcZ zerHCTprpOBAHBMIM TopRObIMM MapKAMM Microsoft Corporation B CoedHHEnHHbIX lTatax AmePKMn H/INn DpyTHX cTpanAX. Bce npOHe TropOBbIe MapKm n FIpMhenHbN HaBaHN, PnIBeDEHhBE B daHOM DoKyMeHTe, JBNIOTc CO6CTBeHNOCTbIO COOTBETCTByUOxH BnaJeBLeCeB. INIIIOCTPraUN MOrYt He COOTBETCTBOBAtb BHEUHEMy BVdy/PhKNiHM KONKpeTHORO N3dEInr. CoedeJXaHne pykoBDCTBA, KOHCTpyKUnn I TeHXueCKeN XapAKTEpICNTKn IN3dEINN IN3MeHAnOTc 6E pIeDABpntbHLHO YbeOMnEHn I 3aBNCRT OT cTpaHbPiNo6pTeHn. CdeLaHO B KItae.
PEKOMEHDAUIMIIO3AUHTEOKPYXAIOUCEI CPEDbI

Ito OKOHAnn Cpoka Cnyk6bl DaHNoe N3dJeNne CneJeYet yTNIN3NPOBaTb OTDeJbHO OT bItOBoro Mycopa B NyKTe cOba OTOXoB 3NeKTprueckoRIO 3NeKTPOHOrO 06OpyDobAHna.
Подтберхдемп.TOMYЯВЛЯТСНаHЛИЧЕ COOTВЕCTBYUОЕ CUMBOla,наHECECHNOHa ИДДЕЛи, руКOBODCTBO NOЛьЗОВATEлУИУNAKOBKY.
B 3aBcHMOCTN O T CBOICTB, MaTePnAbl MORYT nepeDaBaTbCn Ha NOBTOPHUO NepepABOTKU. CnOCo6CTBya NOBTOPOHNIpepaOBtKe OTXODOB 3NeKTPnueckoro N 3NeKTPOnHORO OobpyOboAHNA, Bbl BHOCNTeHaHTeJIbHbIKBkIaB COxpaHeHNE OKyJXaOHSe CpeDbI.
O6paTntecb B MeCThbIe OpraHbI BlaCTn 3a INΦoPmaUnei O
6nIaHem nyHKe npHemaTakHX OTOXoOB.
Ombembl ha yacmo 3adabaemble bopocbl, coebbl u dpaubepbI, bbl hau deme Ha www.thrustmaster.com