T3PA Add-On Gaming Pedal Set - Joystick THRUSTMASTER - Free user manual and instructions
Find the device manual for free T3PA Add-On Gaming Pedal Set THRUSTMASTER in PDF.

| Product Type | Gaming Pedal Set |
| Brand | Thrustmaster |
| Model | T3PA Add-On Gaming Pedal Set |
| Compatible Platforms | PC, PlayStation 4, Xbox One |
| Number of Pedals | 3 (accelerator, brake, clutch) |
| Pedal Adjustment | Height, spacing, inclination |
| Brake Mod | Conical rubber brake mod (optional) |
| Pedal Construction | Metal pedal heads with plastic supports |
| Included Accessories | 2.5 mm Allen key, metal support for conical stop, conical stop, adjustment nut |
| Cockpit Mounting | Two M6 screw threads on underside (screws not included) |
| Connection | Wired to compatible Thrustmaster wheel base |
| Calibration | Automatic after connection to wheel |
| Safety Warning | Use with shoes only to avoid injury; pinch hazard |
| Warranty | 2 years in EU, 1 year elsewhere (subject to local laws) |
| Regulatory Compliance | FCC Part 15 |
Frequently Asked Questions - T3PA Add-On Gaming Pedal Set THRUSTMASTER
User questions about T3PA Add-On Gaming Pedal Set THRUSTMASTER
0 question about this device. Answer the ones you know or ask your own.
Ask a new question about this device
Download the instructions for your Joystick in PDF format for free! Find your manual T3PA Add-On Gaming Pedal Set - THRUSTMASTER and take your electronic device back in hand. On this page are published all the documents necessary for the use of your device. T3PA Add-On Gaming Pedal Set by THRUSTMASTER.
USER MANUAL T3PA Add-On Gaming Pedal Set THRUSTMASTER
THRUSTMASTER 3 PEDALS ADD-ON
T3PA THRUSTMASTER 3 PEDALS ADD-ON
For: PC- PlayStation®4 - Xbox One
User Manual
natural_image
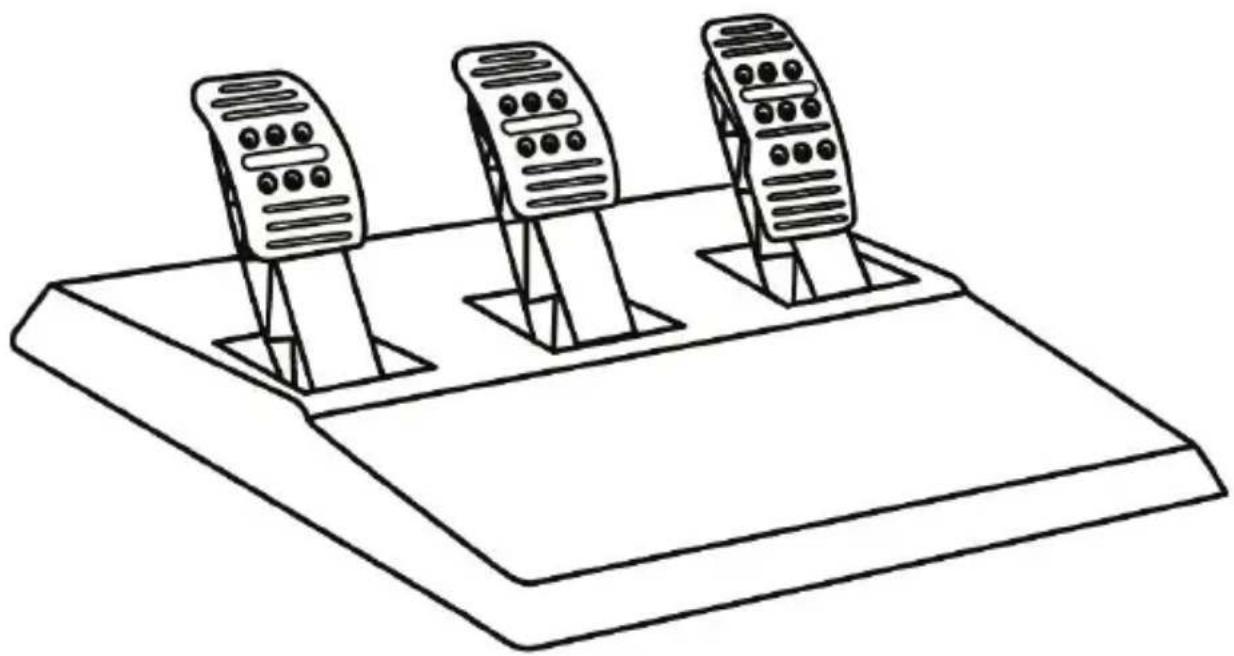
Line drawing of three motor push-ups on a base platform (no text or symbols)TECHNICAL FEATURES

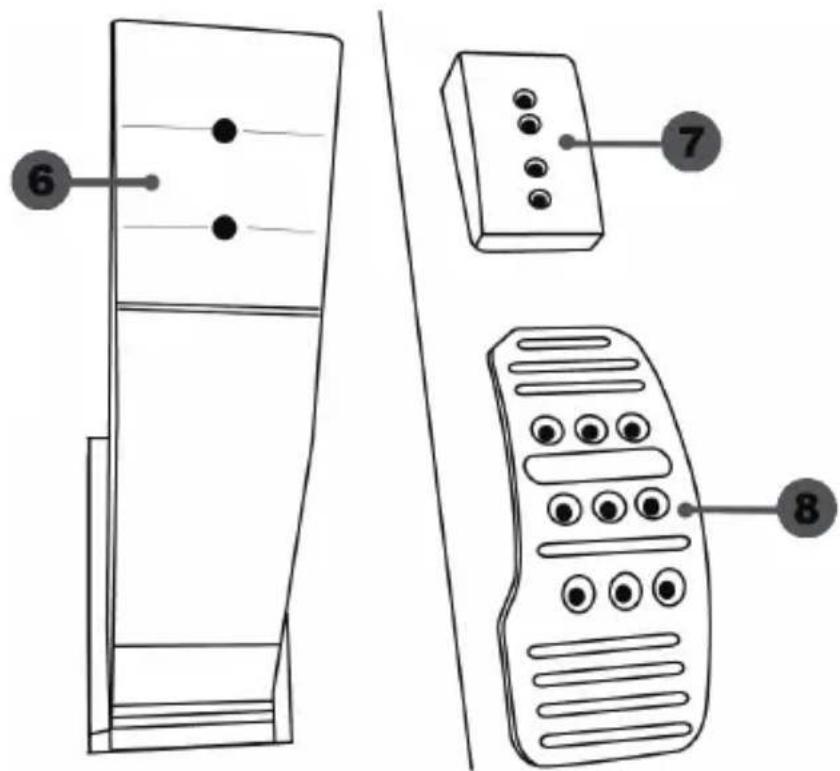
1 Metal support for conical stop (not installed by default)
2 Conical stop
3 Attachment screw for metal support
4 2.5 mm Allen key (included)
5 Position adjustment nut for conical stop
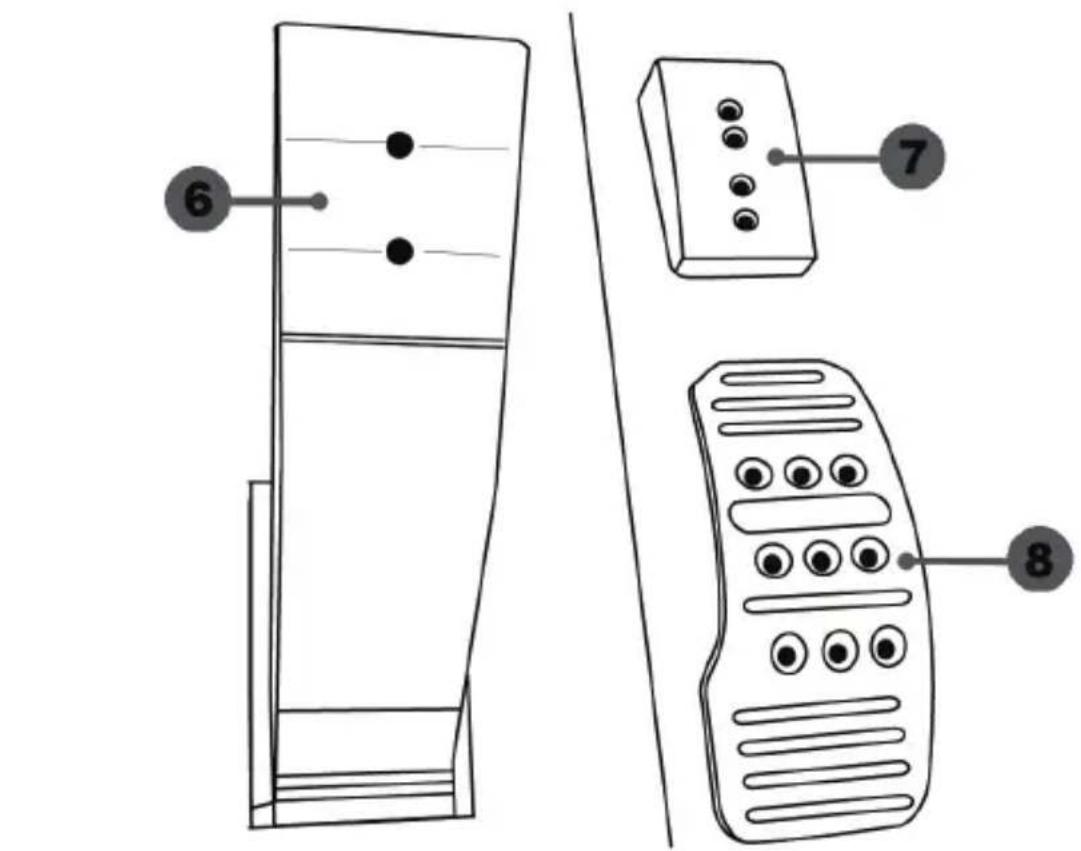
6 Pedal arm
7 Plastic head support
8 Metal pedal head
WARNING
Before using this product, be sure to read these instructions carefully and save them for future reference.

For safety reasons, never use the pedal set with bare feet or while wearing only socks on your feet.
THRUSTMASTER® DISCLAIMS ALL RESPONSIBILITY IN THE EVENT OF INJURY RESULTING FROM USE OF THE PEDAL SET WITHOUT SHOES.

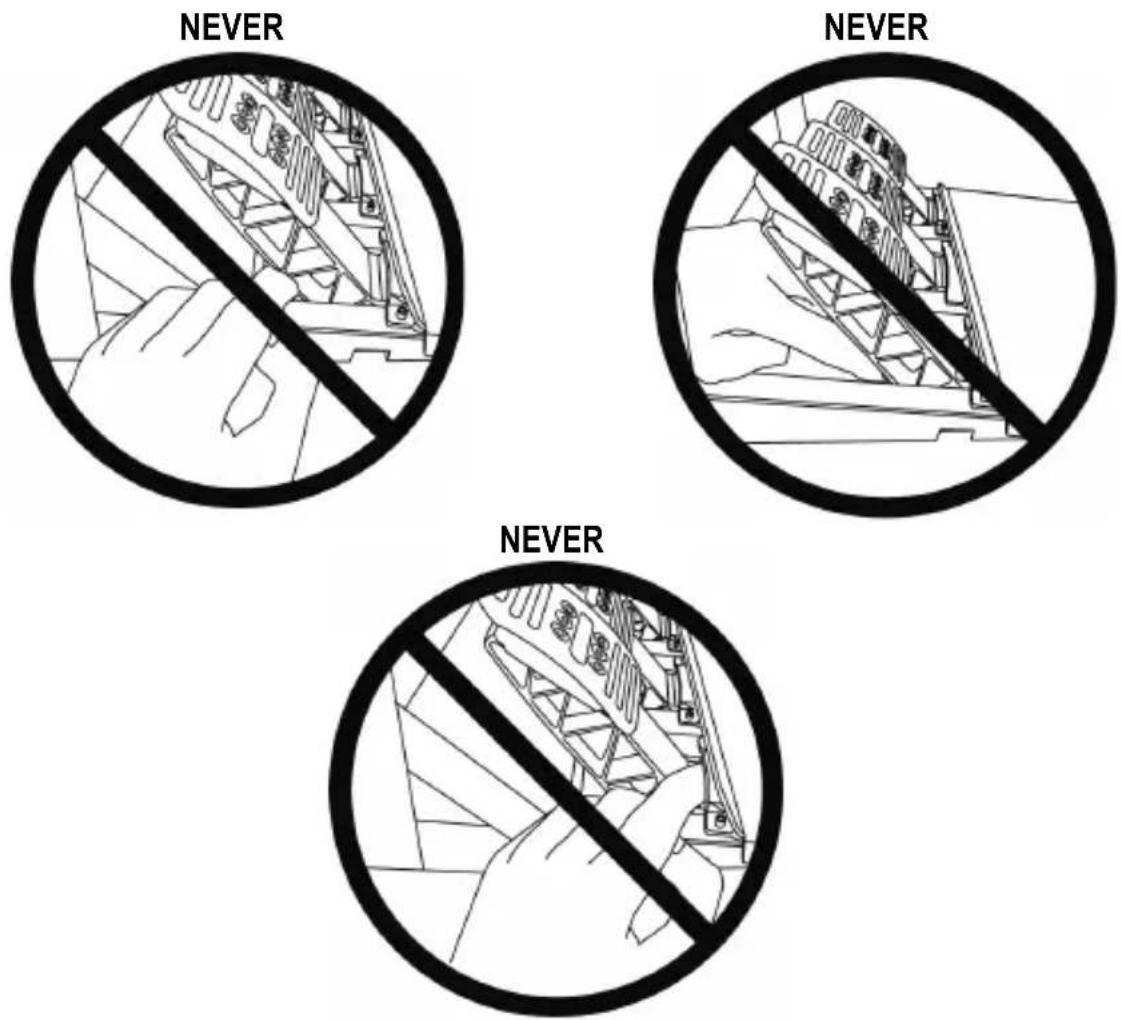
Warning – Pedal set pinching hazard during gaming sessions
* Keep the pedal set out of the reach of children.
* During gaming sessions, never place your fingers or thumbs on or near the sides of the pedals.
* During gaming sessions, never place your fingers or thumbs on or near the rear base of the pedals.
* During gaming sessions, never place your fingers or thumbs on or near the front base of the pedals.
AUTOMATIC CALIBRATION OF PEDALS

- Never connect or disconnect the pedal set from the base of the wheel when the wheel is connected to the console or PC, or during gaming sessions, to avoid calibration problems.
= Always connect the pedal set to the wheel before connecting the wheel to the console or PC.
- Once the wheel has self-calibrated and the game has started, the pedals automatically calibrate themselves after being pressed a few times.
- Never press on the pedals when the wheel is self-calibrating or when your game is starting up, to avoid calibration problems.
- If the pedals are not functioning correctly or appear to be improperly calibrated, power off your console, completely disconnect your wheel, then reconnect all of the cables (including the power supply cable and the pedal set cable), power the console back on and restart your game.
ATTACHING THE PEDAL SET TO A COCKPIT
- Attach the pedal set using the small screw threads located on the underside of the pedal set.
- Screw two M6 screws (not included) into the cockpit's pedal support plate and into the two small screw threads located on the underside of the pedal set.
Important: The length of the two M6 screws must not exceed the thickness of the cockpit's pedal support plate plus an additional 10 mm, to avoid damaging the pedal set's internal components.
ADJUSTING THE PEDAL SET
Each of the three pedals includes:
- A metal head (8) with multiple perforations (nine for the accelerator – six for the brake – six for the clutch).
- A plastic head support (7) (placed between the head and the arm) with four perforations.
- A pedal arm (6) with two perforations.
ATTENTION: To avoid any calibration problems, be sure to always disconnect your wheel's USB cable from the console or PC before making any adjustments to your pedal set.
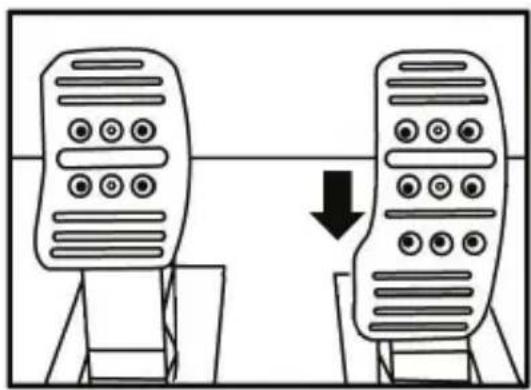
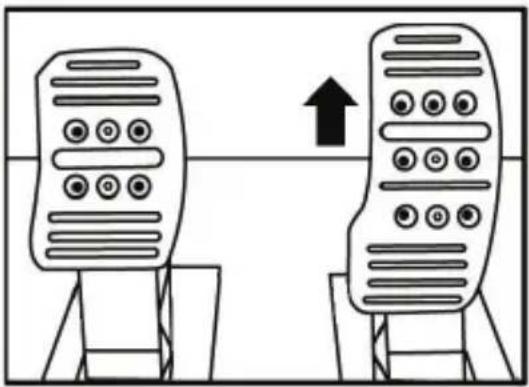
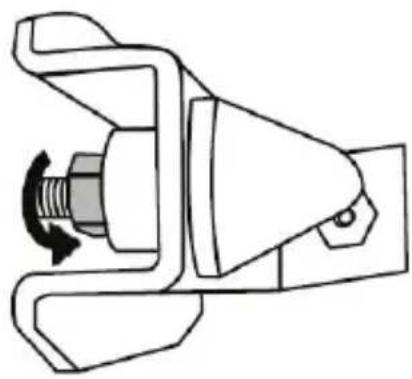
Adjusting the HEIGHT of the accelerator pedal
- Using the included 2.5 mm Allen key (4), unscrew the two screws holding the metal head (8) and its support (7) in place.
- Select your preferred height position, then replace and re-tighten the screws so that the metal head (8) and its support (7) are held firmly in place.
natural_image
Diagram showing two identical devices with circular buttons on top, connected by a downward arrow (no text or symbols)Low position (default)
natural_image
Two identical remote control devices on stands, one with a black upward arrow indicating rotation (no text or symbols)High position
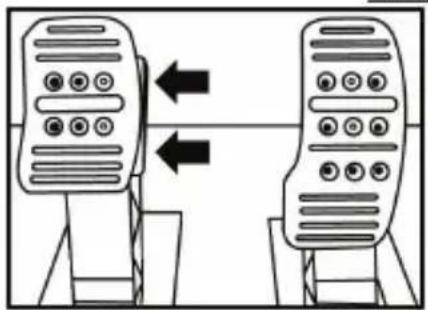
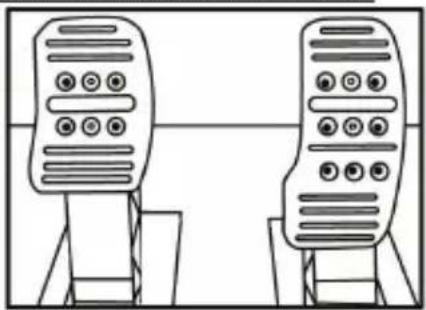
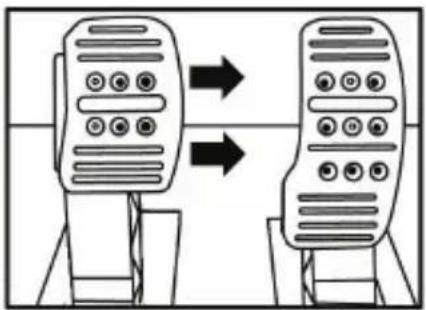
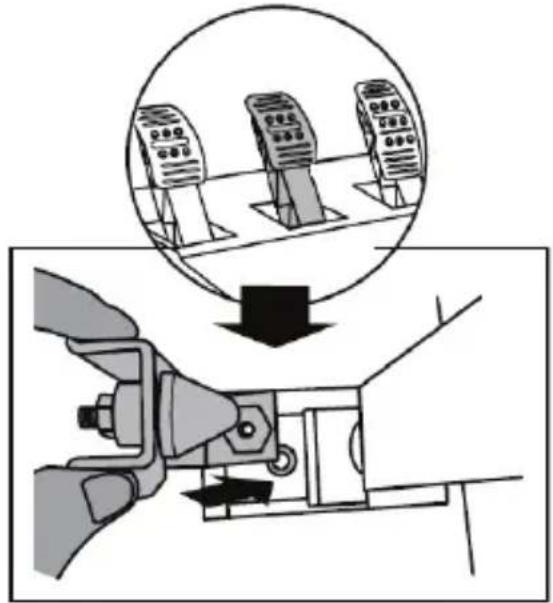
Adjusting the SPACING of the three pedals
- Using the included 2.5 mm Allen key (4), unscrew the two screws holding the metal head (8) and its support (7) in place.
- Select your preferred position (to the left, centered, or to the right), then replace and re-tighten the screws so that the metal head (8) and its support (7) are held firmly in place.
Examples illustrating the brake pedal:
natural_image
Two identical mobile phone controllers with left-hand side arrows indicating bidirectional connection (no text or symbols)Left position
natural_image
Line drawing of two identical mobile phone devices standing upright, no text or symbols presentCentered position (default)
flowchart
graph LR
    A["Device 1"] --> B["Device 2"]
    B --> C["Device 3"]
    style A fill:#f9f,stroke:#333
    style B fill:#f9f,stroke:#333
    style C fill:#f9f,stroke:#333
Right position
Number of possible spacing positions per pedal:
- Three for accelerator pedal
- Three for brake pedal
- Three for clutch pedal
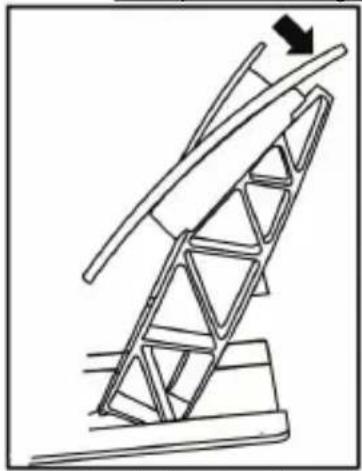
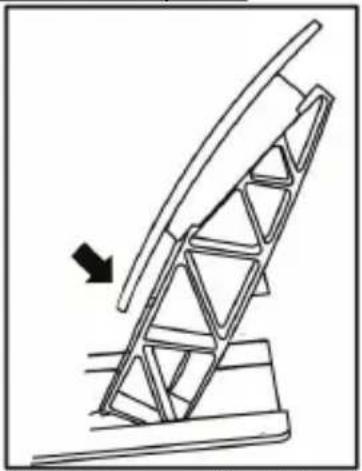
Adjusting the INCLINATION of the pedals
- Using the included 2.5 mm Allen key (4), unscrew the two screws holding the metal head (8) and its support (7) in place.
- Turn the plastic head support (7) 180°, then replace and re-tighten the screws so that the metal head (8) and its support (7) are held firmly in place.
Examples illustrating the accelerator pedal:
natural_image
Diagram of a ladder structure with an arrow indicating upward motion (no text or symbols present)Less inclined position
natural_image
Diagram of a mechanical structure with an arrow indicating direction, no text or symbols presentMore inclined position (default)
Number of possible inclination positions per pedal:
- Two for accelerator pedal
- Two for brake pedal
- Two for clutch pedal
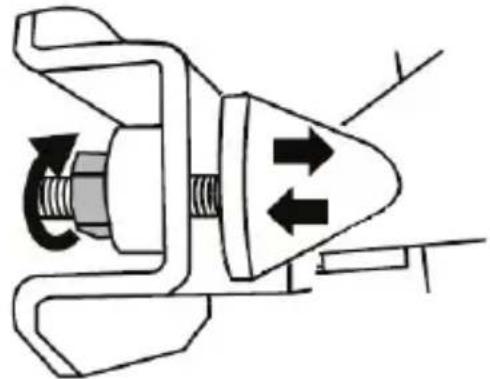
Installing the conical stop ("CONICAL RUBBER BRAKE" mod)
This modification (or "mod") is not essential, and is not installed by default. This means that the brake pedal functions perfectly even if the mod is not installed.
This mod lets you experience a different feeling and resistance when braking. It's up to you whether or not to install it, depending on your own preferences.
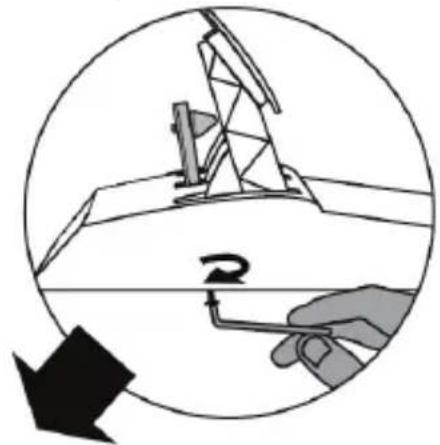
- Screw the conical stop (2) onto its metal support (1).
- Screw the position adjustment nut (5) onto the bottom (onto the conical stop's screw thread).

natural_image
Mechanical component diagram showing a valve mechanism with a rotating knob (no text or symbols)- Position the unit at the back of the brake pedal's arm.


natural_image
Technical line drawing of a mechanical clamp or bracket assembly (no text or symbols)- Using the included 2.5 mm Allen key (4), attach the unit using the attachment screw (3) and the small central screw thread located on the underside of the pedal set.
natural_image
Diagram showing a hand holding a tool inside a circular frame with an arrow indicating rotation (no text or symbols present)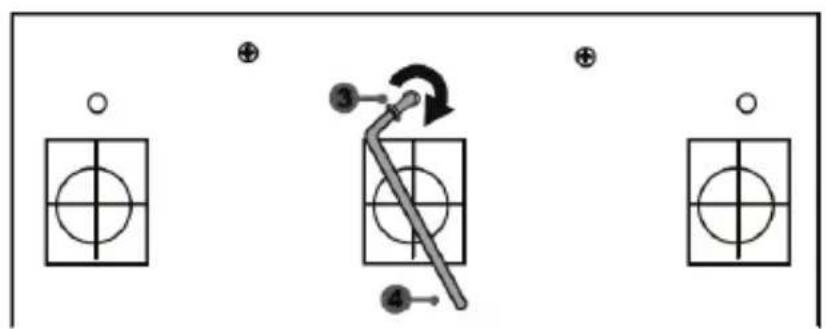
flowchart
graph TD
    A["○"] --> B["○"]
    C["⊕"] --> D["○"]
    E["⊕"] --> F["○"]
    G["●"] --> H["○"]
    I["●"] --> J["○"]
    K["●"] --> L["○"]
    M["●"] --> N["○"]
    O["●"] --> P["○"]
    Q["●"] --> R["○"]
    S["●"] --> T["○"]
    U["●"] --> V["○"]
    W["●"] --> X["○"]
    Y["●"] --> Z["○"]
    AA["●"] --> AB["○"]
    AC["●"] --> AD["○"]
    AE["●"] --> AF["○"]
    AG["●"] --> AH["○"]
    AI["●"] --> AJ["○"]
    AK["●"] --> AL["○"]
    AM["●"] --> AN["○"]
    AO["●"] --> AP["○"]
    AQ["●"] --> AR["○"]
    AS["●"] --> AT["○"]
    AU["●"] --> AV["○"]
    AW["●"] --> AX["○"]
The "CONICAL RUBBER BRAKE" mod is now installed!
Adjusting the brake pedal's RANGE of travel and STRENGTH of resistance
By slightly unscrewing the nut (5), you can further strengthen the resistance of the brake pedal by moving the conical stop (2) closer to the back of the pedal's arm (if necessary, use a 14 mm wrench or pliers to re-tighten the nut and maintain the selected position). The closer the conical stop is positioned to the back of the pedal's arm, the greater the strength of resistance will be.
natural_image
Mechanical component diagram showing a valve mechanism with directional arrows (no text or symbols)Note: When the conical stop is very close to the back of the brake pedal's arm, you may experience difficulties in reaching the maximum calibration value. Should that be the case:
* Slowly, press very hard on the brake pedal so as to reach the maximum value (if necessary, stand very briefly on the pedal – just for a second), then release the pressure; or else
* Move the conical stop a bit farther away from the back of the brake pedal's arm.
CONSUMER WARRANTY INFORMATION
Worldwide, Guillemot Corporation S.A., whose registered office is located at Place du Granier, B.P. 97143, 35571 Chantepie, France (hereinafter “Guillemot”) warrants to the consumer that this Thrustmaster product shall be free from defects in materials and workmanship, for a warranty period which corresponds to the time limit to bring an action for conformity with respect to this product. In the countries of the European Union, this corresponds to a period of two (2) years from delivery of the Thrustmaster product. In other countries, the warranty period corresponds to the time limit to bring an action for conformity with respect to the Thrustmaster product according to applicable laws of the country in which the consumer was domiciled on the date of purchase of the Thrustmaster product (if no such action exists in the corresponding country, then the warranty period shall be one (1) year from the original date of purchase of the Thrustmaster product).
Notwithstanding the above, rechargeable batteries are covered by a warranty period of six (6) months from the date of original purchase.
Should the product appear to be defective during the warranty period, immediately contact Technical Support, who will indicate the procedure to follow. If the defect is confirmed, the product must be returned to its place of purchase (or any other location indicated by Technical Support). Within the context of this warranty, the consumer's defective product shall, at Technical Support's option, be either replaced or returned to working order. If, during the warranty period, the Thrustmaster product is subject to such reconditioning, any period of at least seven (7) days during which the product is out of use shall be added to the remaining warranty period (this period runs from the date of the consumer's request for intervention or from the date on which the product in question is made available for reconditioning, if the date on which the product is made available for reconditioning is subsequent to the date of the request for intervention). If permitted under applicable law, the full liability of Guillemot and its subsidiaries (including for consequential damages) is limited to the return to working order or the replacement of the Thrustmaster product. If permitted under applicable law, Guillemot disclaims all warranties of merchantability or fitness for a particular purpose.
This warranty shall not apply: (1) if the product has been modified, opened, altered, or has suffered damage as a result of inappropriate or abusive use, negligence, an accident, normal wear, or any other cause unrelated to a material or manufacturing defect (including, but not limited to, combining the Thrustmaster product with any unsuitable element, including in particular power supplies, rechargeable batteries, chargers, or any other elements not supplied by Guillemot for this product); (2) if the product has been used for any use other than home use, including for professional or commercial purposes (game rooms, training, competitions, for example); (3) in the event of failure to comply with the instructions provided by Technical Support; (4) to software, said software being subject to a specific warranty; (5) to consumables (elements to be replaced over the product's lifespan: disposable batteries, audio headset or headphone ear pads, for example); (6) to accessories (cables, cases, pouches, bags, wrist-straps, for example); (7) if the product was sold at public auction.
This warranty is nontransferable.
The consumer's legal rights with respect to laws applicable to the sale of consumer goods in his or her country are not affected by this warranty.
Additional warranty provisions
During the warranty period, Guillemot shall not provide, in principle, any spare parts, as Technical Support is the only party authorized to open and/or recondition any Thrustmaster product (with the exception of any reconditioning procedures which Technical Support may request that the consumer carry out, by way of written instructions – for example, due to the simplicity and the lack of confidentiality of the reconditioning process – and by providing the consumer with the required spare part(s), where applicable).
Given its innovation cycles and in order to protect its know-how and trade secrets, Guillemot shall not provide, in principle, any reconditioning notification or spare parts for any Thrustmaster product whose warranty period has expired.
In the United States of America and in Canada, this warranty is limited to the product's internal mechanism and external housing. In no event shall Guillemot or its affiliates be held liable to any third party for any consequential or incidental damages resulting from the breach of any express or implied warranties. Some States/Provinces do not allow limitation on how long an implied warranty lasts or exclusion or limitation of liability for consequential or incidental damages, so the above limitations or exclusions may not apply to you. This warranty gives you specific legal rights, and you may also have other rights which vary from State to State or Province to Province.
Liability
If permitted under applicable law, Guillemot Corporation S.A. (hereinafter “Guillemot”) and its subsidiaries disclaim all liability for any damages caused by one or more of the following: (1) the product has been modified, opened or altered; (2) failure to comply with assembly instructions; (3) inappropriate or abusive use, negligence, an accident (an impact, for example); (4) normal wear; (5) the use of the product for any use other than home use, including for professional or commercial purposes (game rooms, training, competitions, for example). If permitted under applicable law, Guillemot and its subsidiaries disclaim all liability for any damages unrelated to a material or manufacturing defect with respect to the product (including, but not limited to, any damages caused directly or indirectly by any software, or by combining the Thrustmaster product with any unsuitable element, including in particular power supplies, rechargeable batteries, chargers, or any other elements not supplied by Guillemot for this product).
FCC STATEMENT
- This device complies with Part 15 of the FCC Rules. Operation is subject to the following two conditions:
(1) This device may not cause harmful interference, and
(2) This device must accept any interference received, including interference that may cause undesired operation.
2. Changes or modifications not expressly approved by the party responsible for compliance could void the user's authority to operate the equipment.
COPYRIGHT
© 2019 Guillemot Corporation S.A. All rights reserved. Thrustmaster® is a registered trademark of Guillemot Corporation S.A. PlayStation® is a registered trademark of Sony Interactive Entertainment Inc. Microsoft® Windows® is a registered trademark of Microsoft Corporation in the United States and/or other countries. All other trademarks are the property of their respective owners. Illustrations not binding. Contents, designs and specifications are subject to change without notice and may vary from one country to another. Made in China.
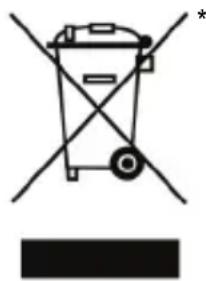
ENVIRONMENTAL PROTECTION RECOMMENDATION
natural_image
Symbol of a trash bin crossed with no text or labels, accompanied by a black rectangle below (no readable text or symbols)In the European Union: At the end of its working life, this product should not be disposed of with standard household waste, but rather dropped off at a collection point for the disposal of Waste Electrical and Electronic Equipment (WEEE) for recycling.
This is confirmed by the symbol found on the product, user manual or packaging. Depending on their characteristics, the materials may be recycled. Through recycling and other forms of processing Waste Electrical and Electronic Equipment, you can make a significant contribution towards helping to protect the
environment.
Please contact your local authorities for information on the collection point nearest you.
For all other countries: Please adhere to local recycling laws for electrical and electronic equipment.
Retain this information. Colours and decorations may vary.
Plastic fasteners and adhesives should be removed from the product before it is used.
www.thrustmaster.com
*Applicable to EU and Turkey only


THRUSTMASTER®
TECHNICAL SUPPORT
https://support.thrustmaster.com