
F-602 - Deep fryer FAGOR - Free user manual and instructions
Find the device manual for free F-602 FAGOR in PDF.
| Product type | Electric deep fryer |
| Brand | FAGOR |
| Model | F-602 |
| Voltage | 230 V |
| Frequency | 50 Hz |
| Power | 2000 W |
| Minimum oil capacity | 2.0 L |
| Maximum oil capacity | 2.5 L |
| Thermostat adjustment | Yes, adjustable |
| Timer | No |
| Thermal safety | Thermal safety switch |
| Micro-switch safety | Yes, prevents operation if heating element is incorrectly positioned |
| Lid | With viewing window |
| Basket | Removable with lockable handle |
| Heating element | Removable, integrated into control unit |
| Indicator light | Indicates heating |
| Recommended preheating | 15 minutes before frying |
| Use with solid fat | Yes, special precautions |
| Tank cleaning | Dishwasher safe |
| Basket cleaning | Dishwasher safe |
| Lid cleaning | Dishwasher safe |
| Control unit | Do not immerse, clean with damp cloth |
| Cord storage | Integrated compartment under the appliance |
Frequently Asked Questions - F-602 FAGOR
User questions about F-602 FAGOR
0 question about this device. Answer the ones you know or ask your own.
Ask a new question about this device
Download the instructions for your Deep fryer in PDF format for free! Find your manual F-602 - FAGOR and take your electronic device back in hand. On this page are published all the documents necessary for the use of your device. F-602 by FAGOR.
USER MANUAL F-602 FAGOR
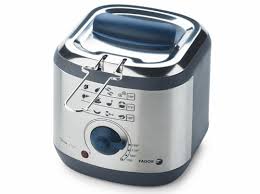
- Cover
- Display window
- Well
- Lid opening Button
- Timer (only mod. FE-603)
- Thermostat
- Light indicator
- Basket
- Handle lock button
- Control panel and resistance
- Resistance
- Thermal switch
- Basket hanging support
2. TECHNICAL CHARACTERISTICS
| F-602 | F-603 | |
| Voltage | 230V | |
| Frequency | 50Hz | |
| Power | 2000W | 2200W |
| MAX. oil capacity | 2.5L | 3.5L |
| MIN. oil capacity | 2.0L | 3.0L |
| Timer | No | Yes |
This product complies with the European Directives on Electromagnetic Compatibility and Low Voltage.
3. SAFETY PRECAUTIONS
- Before using the appliance for the first time, read all the instructions and keep them for future reference.
After removing the packaging, make sure the product is in perfect condition. If in doubt, do not use the appliance and contact an authorised Technical Assistance Centre. - The packaging elements (plastic bags, polystyrene foam, etc.) should be kept out of the reach of children, since they may be hazardous.
- Before using for the first time, check that the voltage in your domestic mains network coincides with that indicated for the appliance.
The electrical safety of the appliance
is guaranteed only when connected to an efficient earth installation, as stipulated in current electrical safety regulations. The manufacturer accepts no responsibility for damage derived from a failure to connect the appliance to an earth installation. If in doubt, contact a qualified professional.
- In the event of the socket being incompatible with the appliance plug, have the socket replaced by a qualified professional.
- We recommend that you do not use adaptors or extension cables. If the use of said elements is unavoidable, only use adaptors and extension cables that comply with current safety regulations, and take care not to exceed the power limit indicated on them.
- If the appliance stops working, contact an authorised Technical Assistance Centre only. In the event of failure and/or improper working, turn the appliance off and do not attempt to repair it. Contact an authorised Technical Assistance Centre and request that they use original replacement parts and accessories.
- The appliance is designed for domestic use only, as described in this Manual. Any other use is considered inappropriate and therefore dangerous.
- The manufacturer accepts no responsibility for any damage caused by the improper, incorrect or irresponsible use of the appliance, or by repairs carried out by unqualified persons.
When using electrical appliances, a series of basic safety regulations should be respected in order to reduce the risk of fire, electrical shocks and/or personal injury:
PARTICULARLY
- Do not use the appliance if your hands or feet are damp or wet, or if you are barefoot.
- To protect against electric shocks, do not submerge the control panel and element in water or hold them under a running tap.
DO NOT TOUCH THE HOT SURFACES. USE THE HANDLES PROVIDED.
WARNING: WHEN THE APPLIANCE IS SWITCHED ON IT REACHES VERY HIGH TEMPERATURES. TAKE ALL NECESSARY MEASURES TO AVOID THE RISK OF BURNS, FIRES AND OTHER DAMAGE TO PEOPLE OR PROPERTY.
DO NOT MOVE THE APPLIANCE DURING USE OR WHILE THE OIL IS COOLING.
- Do not forget that the oil may deteriorate and even catch fire if heated for too long at a high temperature. If the oil were to catch fire, unplug the appliance immediately and place the lid on the pan. This will cut off the oxygen supply, thereby smothering the fire. For your own safety, never use water to put out the fire.
- Unplug the appliance while not in use or before carrying out any maintenance or cleaning operation.
- To switch the appliance off, first turn the switch to its '0' position and then unplug the cable from the mains.
- Do not leave the appliance unattended while in use. Switch the appliance off whenever you leave the room, even if it is only for a brief moment.
- Let the oil cool before cleaning and storing the appliance.
- Do not use the appliance if the power cable or plug are damaged, or in the event of breakdown or improper functioning. Regularly check the power cable for damage.
- The user should never try to replace the appliance's cable. If the cable were to become damaged or need replacing, take the appliance to a Technical Assistance Service authorised by the manufacturer for examination, repair or adjustment.
- Do not let the cable hang over the edge of the table or worktop, or come into contact with hot surfaces.
- Never pull on the cable to unplug the appliance.
- Do not leave the appliance on or near a gas burner or electric hotplate, or inside or near a hot oven or a microwave oven.
While in use, keep the appliance out of the reach of children and the disabled.
- Never use the appliance outside or expose it to the elements (rain, sun, frost, etc.).
- When you decide to dispose of the appliance definitively, unplug it and render it unserviceable by cutting the power cable, for example.
4. RECOMMENDATIONS FOR USE
We recommend that you use vegetable oil suitable for frying at high temperatures. You can also use liquid or solid fat. If you use solid fat, take the necessary precautions to prevent the element from overheating (see 'Using with solid fat').
- Do not use the fryer with too little oil/fat or with no oil/fat. The oil/fat level should be between the minimum and maximum marks indicated on the pan (5). Before switching the fryer on, make sure the oil level is correct.
5. SAFETY
This deep-fat fryer is provided with a thermal safety device which will disconnect the appliance in the case of overheating. This disconnection is usually produced when there is little or no oil or fat in the recipient; overheating can also occur when the solid fat melts. If the thermal device cuts off the electrical supply, do the following:
- Unplug the deep-fat fryer and wait until the oil and fat cools.
- After removing the Control panel + resistance (10) from its housing, push the thermal switch (12) found on the lower part of the resistance unit with a small screwdriver, the deep fat fryer will start to function again.
- The Basket handling operation and its locking, or unlocking position, must always be carried out with the deep-fat fryer Lid closed so as to avoid burns.
This appliance is fitted with a micro-switch which stops the deep fat fryer working if the resistance unit is not correctly assembled.
6. WORKING
Wash the deep fat fryer before using it for the first time, to do so follow the instructions in the "Cleaning" section.
- Once all the components are clean and dry, place the deep-fat fryer on a horizontal, flat, stable surface away from the edge and do not allow the cable to hang from the edge of the table or work surface. Do not touch hot surfaces.
- Open the lid (1) pushing the lid opening button (4).
- Operate the basket handling lock (9) and rotate the handle to the horizontal position.
- Hang the basket (8) on the basket hanging support (13) and pour the oil or fat into the well (3) until it is between the MIN. level and the MAX. level which appears marked on the inside. If solid fat is being used, this must first be melted in a container, before pouring it into the fryer (see section -Using Solid Fat-).
- Close the lid.
- Operate basket handling lock button (9) and rotate the handle to the closed position to lower the position of the basket and submerge it in the oil.
- Remove the lead from the bottom compartment of the appliance and plug in the fryer.
- Select the desired temperature by rotating the thermostat (6). The light indicator will light up (7) and the resistance (11) will start to heat the oil.
WARNING: The deep fat fryer must be pre-heated 15 minutes before use in order to reach the selected temperature. During that time, the light indicator (7) will turn on and off for 3 or 4 cycles. After 15 minutes, the oil temperature will remain stable and can be used to fry food. In this way fryer performance will be enhanced.
- When selecting the temperature check the information on the packet about the
food to be fried or the guide table which appears on the fryer.
- When the light indicator turns off (10-15 minutes), the oil/fat, will have acquired the selected temperature. The light indicator will continue to turn on and off with the thermostat cycles during the entire frying time.
If frying various items one after the other, before starting to fry the next food portion, wait until the light indicator turns off. - Push the open button on the cover (4) and slowly submerge the basket (8) with the food into the oil or fat, hanging it on the basket support attachment.
- Close the Cover (1) push the Button (9) to fold the basket Handle to its resting position, to avoid burning.
Supervise the frying process. - Do not mix different types of oil or fat.
- Do not add new oil or fat to old oil or fat.
BASKET
Rotate the basket handle upwards to raise it and push the handle locking button (9) to unlock it.
TIMER
The FE-603 model provides the option to activate the timer to advise you when the period established has passed. The timer format is 99 mins. and 59 s.
Timer adjustment:
Push the "M" button to adjust the minutes and the "S" button to adjust the seconds. Tip: Just before reaching the correct values, push the "M" and "S" buttons repeatedly but briefly so as not to exceed the correct values.
Once the desired working time has been reached, press the “ ① “ to start the countdown.
When the timer reaches "00:00", the alarm will go off, then push one of the three buttons to stop it.
Should you want to readjust the timer again, press the "M" and "S" buttons while setting the timer to zero and readjust again.
NOTE: first remove the protective paper that comes with the battery.
If the screen is not visible, the timer battery may need replaced. To do so, remove the cover from the battery compartment which can be found on the bottom part of the control panel (fig. 2) and install a new battery with the same specifications. Replace the battery compartment cover by moving it back.
USING WITH SOLID FAT
If you use solid fat for frying, make sure you take the following precautions:
- Melt the fat in a pan over a low heat.
- Carefully pour the melted fat into the fryer, taking care not to exceed the MAX level mark.
See 'Instructions for use'. - If you are going to use the solid fat left over in the fryer from earlier cooking operations, make several holes in it using a fork.
- Next, set the thermostat (6) to 160^ , leave to heat for a minute and then return the thermostat to '0'. Repeat this operation at intervals of various minutes, until the fat has melted completely.
AFTER FRYING:
- Rotate the basket handle to raise it (fig. 3) and drain the oil.
- Open the cover and put the food on a platter with a sheet of absorbent paper. While doing this, the oil will have time to regain a temperature suitable for frying again (when the indicator light starts to turn off).
- With the help of a sieve, remove the loose particles which may have come off the fried food and are in the oil. If left to toast they will have an adverse effect on the quality of the oil.
- When frying has finished, rotate the thermostat (6) to the "0" position and unplug the fryer.
- Wait until the oil is completely cold before starting to dismount and clean the fryer.
- If the fryer is not going to be used frequently, store the oil or the liquid fat in a tightly closed container in the fridge or in a cool place. Fill the container by passing the liquid oil or fat through a fine
sieve to eliminate the food particles.
- If solid fat is being used, leave it to solidify in the well and store the fryer with the fat inside (see section "Using Solid Fat").
7. CLEANING
- Before cleaning, unplug the fryer and wait until it cools.
- Rotate the basket handle upwards and push the Locking button, until fixed in the horizontal position. Open the cover (1), remove the basket and start to clean.
- Remove the control panel and the resistance and if necessary, clean with a damp cloth. Do not submerge in water or any other liquid or put it under the tap.
- Remove the well (3) and pour the oil from the well into the appropriate container holding down the edge of the same. If solid fat is being used, wait until it solidifies and then empty the well with the help of a spatula.
- Clean the cover, the basket and the well with hot soapy water or in the dishwasher. Then rinse and dry carefully
- Never use solvents, abrasive detergents, metal scourers or sharp objects for cleaning the fryer.
- Clean the outside of the fryer with a damp cloth.
- Wind the cable on the bottom part and then assemble the fryer again in the following order: Well, control panels + resistance, basket and closing lid.
- Store the appliance with the cover closed to protect the inside of the fryer from dust and dirt.
8. PRACTICAL ADVICE
Oils and fats
Always use oils/fats appropriate for frying at a high temperature. In other words, use oils that contain polyunsaturated acids or vegetable margarines.
- Replace the oil or fat regularly. Never add new oil to used oil.
- Do not leave the oil/fat at a high temperature for any longer than necessary. If you have to wait for a long time between two frying operations, turn the control knob to a low temperature, otherwise you will have to change the oil/fat more frequently.
In general, the oil/fat will darken in colour more quickly when frying protein-rich food (meat or fish). - If used for frying potatoes, the oil can be reused between 10 and 12 times, providing you remove all loose particles after each frying operation. Never, under any circumstances, use the same oil for more than 6 months. After this period, the oil should be thrown away.
Always replace the oil if it starts to bubble when heated, smells or tastes rancid, has darkened or has lost its fluidity. - If you do not use the fryer often, we recommend that you keep the oil or fat in air-tight glass recipients, preferably in the refrigerator. It is not a good idea to leave the oil in the fryer for long periods of time.
Chips
Follow the instructions given below for flavoursome and crunchy chips:
- Do not use very new potatoes (new potatoes generally give poor results). Cut the potatoes into sticks.
- Rinse the cut potatoes under the cold tap. This will stop them sticking together when fried.
- Dry with a clean cloth or absorbent kitchen paper.
- The chips should be fried in two stages:
- Stage 1: 160^ C for 10-15 minutes.
- Stage 2: 190^ C for 5-8 minutes.
- If the chips are frozen, fry in accordance with the instructions given on the packet.
Frozen foods
- Frozen foods significantly lower the temperature of the oil when inserted into the pan. Therefore, you should never fry large quantities at the same time.
- Let the appliance heat up once again to
the optimum frying temperature before adding another portion of deep frozen food.
- Adjust the thermostat control in accordance with the instructions given on the packet. If no such instructions are given, turn the control knob to the highest temperature (190^) .
- These instructions should also be followed in the case of some types of food which require special treatment, such as croquettes, for example.
- Deep frozen foods often contain an excessive amount of ice, which should be removed before frying.
9. INFORMATION FOR THE CORRECT DISPOSAL OF ELECTRICAL AND ELECTRONIC APPLIANCES

At the end of its working life, the product must not be disposed of as urban waste. It must be taken to a special local authority differentiated waste collection centre or to
a dealer providing this service. Disposing of a household appliance separately avoids possible negative consequences for the environment and health deriving from inappropriate disposal and enables the constituent materials to be recovered to obtain significant savings in energy and resources.
To remind you that you must collaborate with a selective collection scheme, the symbol shown appears on the product warning you not to dispose of it in traditional refuse containers.
For further information, contact your local authority or the shop where you bought the product.
FR
1.DESCRIPTION
2. TEXHnueCKn XAPAKTEPNCNIK
To3n ypei e cna6denn MmKpOnpEkbCBA, KOIto He I03B0JIbRa pa6oTaHa fprntHOpHnKa B clyaaiye HArpeBaTeJrT He e do6pe crlo6eH.
6. PABOTA
Ipei nIbPBA ynoTpe6a nouNCTeTe φpHTOpHnKa, KaTO cJIeDBeTe INHCTpyKcInTe O Tpa3JeI "TouNCBaHe".
CneKaTo Cte N3MnInI NIOcUHnn pa3nHHTe YactN,IOCTaBete cPnTHOpHnKa BbpyXOpi3oHTaHa,paBHa nCTa6nHa NOBbPxHOCT,IaJIeOT KpAnuTaHa KxHeHCKmI PLOT INIM Maca.He OCTabYTe
KaBeNa Da BnCn OT KpaIuIaTa Ha IIOTa NJI MaCaTa, KaTOn I Da Ce IOKOCBa Do IopeUIN IOBbPXHOCTN.
- OTbopete Kanaka (1), KaTo HaTnChTe 6byToHa 3a OTbaprHe (4).
3aDénCTBaIte 6byToHa 3a 6IoknpaHe IpbJkKaTa Ha MpeKmKata (9) n 3aBbPTeTe IpbJkKaTBA XOpIN3OHTaJIH aNo3NcIy. - Okaute Мрекукata (8) Вьрху полората рпюдана за селты (13) и нальные олно пиду мазни в pezeрвоба (3) до НИВО мөждУ MINИ MAX, отбялэзни Вьрху CTeHITe Ha pezeрвоба. B clyчай, ч e n3ПОЛЗВATE TBbрДа мazни ha e Heo6xOДМо пeди ДЯ я сипTe BvB Фртнорнka Дя раТOTINTE B eEDH CBd (ВЖ. Pa3deJ "YNotpe6a Ha TBbPDA мazни).
3aTbOpTe KaNaKa.
3aDénCTBaIte 6yToHa 3a 6IoKnpaHe
ДрьЖКаТа Ha МpeЖИСКАТa (9) И 3aВbPTeTe
ДрьЖКаТa, Taka Ye МpeЖИСКАТa Дсе
NOTOПВ Ma3HINHaTа.
I3BaTeKa6eJaOTrHe3dToMy IN BkJIIOHeTcPnTHOpHnKa KbM eJ.MpeKaTa.
ИзберeteжелаHaTe Temперatype pye3 3aBbPtaHe Na TepMocTa7a (6). CBeTINHHnT DaTuNK(7) Ze CBeTHe n HargBaTeJIa (11) Ze 3anOHe da HargBaMa3HNHaTa.
IPEyPExEHEH: Heo6xOIMo e da 3uKaTe Ma3HNHaTa BbB fprTHOpHnka Da 3aRpee 15 MInHyTu, 3a Da DocTnHe Do 136paHaTa TempeaTypa. ITo BpeMe Ha 3aRpaBaHeTO CBeTINHHrT DaTnK (7), 0603HaauBaMn pa6OTnTE uKnI, Ue CBtHe H yraChe 3 nII 4 nbTu. Cnei n3TuHaTe Ho 15-Te MNHyTu TEMpeaTypa Ta Ha Ma3HNHaTa 1e Ce POnDbpKa IocToHNo Ie MoKe Ja IpemHe T KbM IbpXKeHe.Cna3BaKn ToBa npAInIO ue NoCTnHerTe ONTMaJIHO Do6pa pa6Ota Ha fprTHOpHnka.
-ПиизбораHa TeMпераТура 3a ПьржЕсе ВОдTe NO yka3aHЯТа Дадени ВьрхуОпakOBkATA Na XpaHNTeHЯ ПpoДуКТИЛи NO opneHTaTINBHaТаБлNiцаHaФрTNOPHnKa.
CneI OKOHyATEHNO yracBaHe Ha CBETJINHHNJa DaTnK (10-15 MNHyTN) OJInOTo/ Ma3HNHaTa Ⅲe e DocTnIHnHa I36paHaTa TeMnepaTypa. CBeTJINHHNJa DaTnK Ⅲe npOdbJnxJa CBeTBa N3rAcBa No BpeMe Ha IIpbXKeHETo, C KOeTO Ⅲe OTbEJIa3Ba
pa60THnTe ZIKNHa TepMoCTaTa.
AkoKeJaTe Da I3BbPUnTE HЯKOJIPOncIeIOBaTeHINIbPKeHnI,IpEiNIO6aBJeHTOHaHOBI npOyKTIe Heo6XoIMMo DaI3uKaBATE yraCBAHeTO HaCBETJINHHIA DaTtIK.
HaTnCHeTe 6yToHa 3a OTBapAHe Ha KaNaka (4) INBkapaIte 6abHO B Ma3HnHaTa MpeXnUkata (8) C npOdyKTnTe, KaTO OKaHTe Ha NpDnopaTa 3a OkaYBaHe Ha MpeXnUkata (13).
3aTbOpTe KanaKa (1) nHaTnChTe 6yToHa (9), 3a Da NoCTaBnTE npbXkKaTa B nO3nUu N da N36eHHe Tn4rapHn.
Ha6JIOdAbaIte npOceHa nbpXeHeTo.
He cmeBaIte pa3JIuHn TINObe OJIO JIM Ma3HInHa. He do6aBraTe HOBO OJIO JIM Ma3HInHa KbM Beue N3NOJ3BaHOTO.
MPEKNUKA:
3aBbptTe IpbXkata Ha MpeKnUkata, 3a Ja IOBUNHHeI HAHTNCHE6yTOHa 3a 6IoKnpaHe Ha IpbXkata (9), 3a Ja oCBO6oDnte.
TAI-MEP:
MoJeIbT FE-603 pa3nOJIara c onUZn, npu YneTo aKtINBIPAhe TaIMepa Bn npEynPexkJaBa 3a n3TeKlOTo BpeMe.
TaIMepbTe BbBΦopMaT O T 99 MmHyTu Do 59 CEkyHn.
HaTnlaSHe Ha TaIMepa:
3aДанаглacrteMHyTnte,HATNCHETe 6byToHa“M"и6byToHa“S”3aCEkyHdnte.
CbBET: Tocno npedn doctnrahe Ha xelaHnte cToHIOCTn 3aOnyHeTe Da HATNCkate 3a KpaTko 6byoHTne "M" n "S", 3a da n36erHeTe IpemHaBaHeto HA cToHIOCTnTe.
CneI kaTo HarJIacUte JxelaHOTo BpeMe 3a pa60ta,HaTnCeHET 6yToHa " ① ,3a Ja 3anOuHete 6bpaTHo 6poEhe.
Korato taImepa doCTnHRe Ido "00:00", ue ce BkInOnu anapMaTa. Hatnche Te eINH OT Tpnte 6byToHa, 3a da r cnpeTe.
B cnyaaye kejnaete da hargnate OTHOB TaHmepa,HaTNCHEte eNHOBpeMeHHo 6yToHHTe "M" n S",3a da hynpate n HargaceTe BpeMeTO OTHBO.
3A6EJEXKA: IbpBOHaaJIHO OTCpaHEt
фабруноюctabehata3auntHa xaptnHa 6atepnaTa.
AkoHaDnCnIeHcceNoBnBpeMeTo, MoKc6bceHaNanraJa CmEHNTeBaTePnTa Ha TaMepa.3aZeJItaOTcPaHeTe KaNaKa Ha THe3DoTo 3a BatePiTe, HAMpaIo ce OT DOnHATA CTPaHa HA KOHTpOINnHa NaHei (Cx.2) nocTabeTe BaTePnCBscBuaTa cneuΦnKaun. HarIaceTe OTHOBo KaNaka, KaTO rPiuDbNknte Ha3a.i
YIOTPEBA HA TBbPDA MA3HnHA
Ako 3a nbpxke He nIIOJI3BaTe TBbpJa Ma3HnHa e Heo6xoDnMa Da B3nMaTe CNeIHNHe MePKn:
Pa3ToNeTe Ma3HnHaTa B OToJeHeh CbD Ha 6aBeH OrbH.
I3cInTe BHNMaTeJIHO Ma3HnHaTaB pe3epBoapa Ha φpntHOpHnKa DoOT6eJIA3aHOTo MAkCImaJIHO HnBO MAX.
Bx. "Haun Ha ynoTpe6a".
Ako ce KaHnTe Da n3IOJ3BaTe TBbPaTaMa3HHa, KOrTO Ce HaMnpa BbBΦpntHOPnKa OT ppeXoHa yNtpe6a, HAppaBeTe DpyuNcB HeC NOMOuTa HaBVIIuca.
Clej KaTo HaJIacIte TepMoCTaTa (6) Ha TeMnpePaTypa 160° octaBeTe ypeJa da Ce 3aqrpee B IpoIbJIxKeHne Ha eJHa MInHyTa, CJeI KoETo OTHOBO IOCTaBeTe TepMoCTaTa Ha "0". NIObTOpeTe cbUaTAt OePauNr Ipe3 INTEpBaIi OT NO HЯKoJIko MInHyTu, IOKaTo Ma3HHaTa He ce pa3TONn HAnbJIHo.
CJIEDIPIKJIIOUBAHEHAIBPXEHETO:
3aBbptTeIpbXkKaTaHaMpexNkKaTa(Cx. 3),3a Da NOBINrHeTe MpeXnKKaTa n 3a da ceOTcEIMMa3HnHaTa.
- OTbOpTe KaIaKa I NocTaBete IpoDyKTITe B CbI,Ha YNeTo DbHO CTE NoCTaBnJI NOnNBaTeJIHa XapTna. JOKATO N3BbPbBaTe Ta3N Opeaun, Ma3HnHaTa BBb FpNTHOpHNka Ie NMa BpeMe Da ce 3arpee OTHOBO Do N3bpaHaTa TEMpePaTypa, TaKa Ye Da MoKeTe Da npoDbJnxITE C nbPxKeHeTO (CBeTJIHHnT DaTynK OTHOBO ue yrache).
C nOmoTHa Ha ueKa n3BaJeTe pIyBaIHTe B Ma3HnHaTa YactNtU O T nbpKeHrte npOdykTN. OcTabraHrTo mI Da ce IpeIbPxBaT B Ma3HnHaTa Ue pa3BaJIH HeHNrte KaueCTBa.
Korato npiklouhnte c npjxeheto, 3aBbptete Tepmoctata (6) do n03nna "0" n3kIIOHcTe pOHTOpHnKa OeJ.MpeXkata.
I3yakaIte Ma3HnHaTa Da I3CTnHe HAnbIHO, IpEi Da IpEMnHETe KbMa pa3rJa6BHe N IOuHCTBaHe Ha φpNTOpHnKa.
AkoHMaJaI3NoJI3BaTeФpNTOpHNKa YecTo,eIpeOpbUHTeJIHOJaCbXpaHnTe I3NoJ3BaHaTaMa3HNHaBIO6pe 3aTBOpEN CbDxBXIaINIHnKaIIM Ha XlaHNO.IpiNaHnBAHeTOHaMa3HNHaTa B CbDaI3NoJ3BaNTeΦnHaZeIkA,3a Da OTCTpaHnTe POnaHnHTeB HeaCtNiOT IPOdyKTITe.
- Ako CTe N3No3BaN TbBpJa Ma3HnHa, OCTaBeTeЯ PbPBO Da Ce BTBbPdN, CNeI KoETo npB6peTe pPnTHOpHnKa C Ma3HnHaTb Hero (BXk. pa3Jen "Ynotpe6a Ha TBbPda Ma3HnHa").
7.ПОИСТBAH
- Праздд примнел Кьм почстваенту урдае Нeoбхоимо пьрвддю
- ИЗКПЮЧИТЕ OT сEL.Mpeжкати Ддю
- ИЗчakate ДдИСТИНЕ.
3aBbptTeIpbKkataHaMpexKuKaTa HaropeHaTnChte6byToHa 3a6nokupaHe, TaKa Ye Da Harglacnte B XOpn3oHTaJIHa n03nU. OTbopeTe KaNaka (1), n3BaTeMpeKuKaTa IЯ NOuNCTe.
Bcnya,ye e Heo6xOdmo 3BaTe KOHTPOHnna HaneI N HargBeTaJIe I rNoocTe C BIAJHaTb6a.He rN NotanrTe BB BODa nn KaKbATO Da 6nIO npyra TeuHocT, HnTo rN NoCTABYte NOd Teuaq Kpan.
I3BaIeTe pe3epBoapa (3) nI3JIeTe Ma3HNHaTbA TIOJXOJDaIcBd, KaTO pINDbPkaTe 3a KpaIuTaHa pe3epBoapa. B clyHai,Ye CTe I3NoI3BaII TBbpJaMa3HNHa, I3UaKaIte Ra Da Ce BTBpDn, CJIeN KOETo I3Ipa3Hepe3epBoapa C NOMUIta Ha UInaTyJa.
I OuHcTeTe KaKa, MpeKnUkaTaN pe3epBoapa C Boa N Cayn H IIN B MInHa MaShHa. N3PnAkhTe Do6pe N BnMaTeJHO rN POnCuySeTe. - Пи рпуноства_HETo Na Фпгтюрнika НИКОГа He ИЗПОЛBAйTe pa3ТВОпТЕЛи, АбразИВН NOUСТВаци ппeпapATи, МетаПНи ГБи IINO OCTРи ппeДмETи.
Почисте Вьнша ТОВьхноct Ha
фпитюрни К CBлжени пapал.
HabnTe Ka6eNa B rHe3dOTo My n CrNo6eTe OTHOBo pPnTtOpHnKa B cJeDnHa pei: pe3epBoap, KOHTpOJen NaHeI+HarpeBaTeJ, MpeKuUka, cJeD KoETo 3aTBopeTe Kanaka.
- Пибирaite урда сбс 3аТворенkanak, 3a ДдпдзнтЕ ВьтшноctТа Нфптурнka OТ прах И МьсOTЯ.
8. INPAKTINCHINCBETN
OlnnoMa3HHN
- I3no3BaIte OJIOu Ma3HNHn IOxOJaUa 3a PbXKeHe pRi BVcOKN TeMpePaTyPi, T.E. Ma3HNHn, KOITo CbIbPxAt POJIInHeCaTyPiPaHn KINCEJIInH (OJIO) n paCTtTeJIHN MaprapinH.
CmeHnTepeIOBHO Ma3HNHaTBA KOrTO IIpbXnTe. HnKOra He do6abYnTe HOBO OJNO NJI Ma3HNHa KbM BeYe I3I0NJ3BaHnTE.
He octabrye Ma3HnHaTa Ha BnCoka TemnepaTypa 3a no-dJbIroOT Heo6xOIMOTO Bn 3a nbpxKehe Bpeme. NocTabete npeBkInouBaTeJIHa TemnepaTypaHa HnCKa TemnpaTypa aKO ImaTe HjXJa OT nobce Bpeme MekJy OTJeHNITE nbpxKeHna.AKO He cna3BaTe Te3n uNcKBaHnI ue Bi ce HaIOxKn Da CmHrTe Ma3HnHaTa No- YecTo. - По пинцл мазниота поьмнява
- no-6bp30, korato пьхит e рожкту
- boaru ha npoteHH (MecO nIn p6a).
Ako nbpxnte KapToOpn n NoocCTBaTe BHNMaTeJIHO OCTaTbIHTe OT npOdyKtnte B Ma3HnHaTa MoKeTe Da n3PON3BaTe eJHa N CbUa Ma3HnHa OKoJIo 10-12 nTn. Pnp BCnuKn nOLOXeHn He n3POn3BaIte eJHa N CbUa Ma3HnHa NOBue O T 6 Meceua. CJeD n3TnUaHETo Ha To3N nepNoD Ma3HnHaTa Tp8Ba Da ce N3XBpJIn.
CmeheMa3HHaTa aKo npi 3aqrbaHe 3aNoUBa Da BpN, MnpuJe IIOso NIn NIm BA Kyc Ha rpaHcAJa NIn aKO e IOTbMnJa NIn 3aRy6nla BNCKO3HTeTA cN.
Ako He n3noJ3BaTe φpntHOpHnka
OCO6ENoYeCToE npEnOpbHNTJIHO Da CbXpaHraBaTe Ma3HNHaTa B Do6pe 3aTBOpEH CTbKJIeH CbI,3a PnpEnOpHTaneB XlaDINHnKa.He e npEnOpbHTeJHO Da OCTaBtPe Ma3HNHaTApOdBJLJXHTeJHO Bpeme BB FpntHOPHnKa.
TbpxeHn KapToΦn
3a da ca Bkychni Xpyknabn Pbjxehnte KapToPhi e Heo6xOdmo Da Cna3BaTe CJIeHNTE N3NCKBaHnA:
He n3no3BaIte MHOro IpeCHNI KapTOO (IpeCHNTe KAPTOOIO npnHUN He DaBAt MHOro Do6pN pezIITaN).Hapra3BaIte KapTOOHTe Ha npbUuN (npu3Mn).
I3nJIaKHeTe 6bHIO HAp83aHITe KapToCn CbC CtUdeHa BODa. Taka ue N36ErHeTe 3aJenBaHETo MExdY TEx NO BpEm Ha NbpXKeHe.
Iopcuyte Tn C nct npcaan nn KxhEncka abcopbupaasa xaptnia.
KaptoΦnte Tp6Ba Da 6bDaT pBxKeHn Ha Dba etana:
-Пьрв:160°CBпpoДьлжЕнеHa 10-15 MmHHTN.
Btopn:190°CBnpoDbJxKeHneHa 5-8MnHyTn.
Ako KapToΦnTe ca 3ampa3eHn Tp86Ba Da 6bДaT IIpxKeHn B 3aBNCUMOCT C OT6JIra3aHOTo Bbpxy ONaKOBKaTa NM.
3ampa3eHxpaHn
3ampa3eHNTe xpaHn p3Ko HamaJIbBaT TemnepaIypata Ha cpgHaTa Ma3HnHa. ITo Ta3n npuHnA e npenOpbUHTeJIHO da He ce nbPxkat rOleMn KOJIueCTBa OT T8X HABEDHBx.
I3ukaTe,doKaTo pPnTHOpHnKa DoCTnFHe ONTmMaHaHaTa 3a IIpPxKeHe TEMpePaTypa npEi Da CLOKHTe Da Ce IIpXkAT HOBa DO3a OT 3Ampa3EHn IPOdYKTN (T.e. KOrATo CBETJIHHnJaTCHK e 3aRaChal OTHOBO).
- Harlacete Tempepatyata Ha TepMOCTATA B 3aBNCIMOCT C O76JIa3aHOTo HA ONaKOBKaTt Ha 3aMPa3eHnI npOdyKT. Ako TaKaba HNΦOpMaZnHa ONaKOBKaTa JInCBA NocTabeTe Ra Ha Na-BuCOKaTa Tempepatya (190^)
Te3n INCTpykCmBaxKaT CbSIO nPnIbpxKeHTo Ha HAKOIN TINOBE pOdyKTN,KOITOn I3NCKBaT NO-IPoDJIbJXKHTeJIHaPOdROTBKa,KaTO HApnpMep KpOKETN.
3ampa3eHnTe xpaHn YecTo IIbTu NMAt TOrJaMo KOJIuYeCTBO JIeI, KOITo e Do6pe Da 6bJe IOuHcTeH IpeJN PbPxKeHeTo Ha npOdyKTA.
9. INΦOPMAÇIЯ 3A ПРABNJHOTO EJIIMMHIPAHE HA EJEKTPUÇEKN I EJEKTPOHNI DOMAKINHCKN UPEДN
B KpaHa NoJIe3HnJ XJBOT Ha anapaTa He 6nBa Da ro N3XbPJIaTe B KOHTeHepa 3a O6NKHOBeHn DOMaUHn OTNaIbU. MoKe Da ce OCBo6oDiTe OT Hero, KaTo rO OTHecTe B CneuJaHInTe
yeHTPOBE 3a BTOpUHn CypOBuHN KbM MeCTHNTe aDMHHNCtPaUHn IIN BaUHn IOCTaBvHK, KOINTO Ca IJIbXHn Da YJLeCHyBaT Ta3I DeHocT. Pa3DeJIHOTo N3XBpIHa He aeLEKTPo-OMaKInHcN ypeDn PpeDToBpaTaBaPeI HeRaTINBHN OncIEdUHn 3a OKOIHaTa CpeDa I 3DpaBeTO, IpoN3TNuaHn OT HeaJeKBaTHOTO IM N3XBpJIHa, KaKTO IN03BOJIHaBa peZIKJIpaHcTe Hn MaTePnaJIte, OT KOINTO e HaIIpaBeH ypeDa, KaTO n0 TO3n HaHn Ce NOCTrA CyVBCTBHTeJIHa IKOHOMn Ha CypOBuHN I eHEpRJa.
C ueI da ce nouepTae oUe BeHbX 3aJbJxKeHHeTO 3a pa3dJIHo I3XbPJIHe Ha OTnJaBcHTe Ha BCEKn PPOyKT e OToE6JIa3n CneuaneH 3NaK, KOTo BN PpeDyPrEgJaBa n IODceua Da He To INXbPJIte B KOHTeHepa 3a ObKNHOBeHN DOMaUHN OTnAdbu. 3a NOBEe INHOpMaunCe o6bPHeTe KbM MEcTHNtE BnAcTn Nm KbMaHa,OT KbDeTo cTe KUnnIn pOdykTa.
RU
1.0603HAUHIN
- Kpbilka
- CMOTPOBOE OKUJIO
- Koten
- KhoIIka oTKpbIbAHnKpblIuK
- TaImeP(ToJIbKOДЯМоДeЛN FE-603)
- PeryjTOp TEMpePaTypbI
- CBeTOBOHnHnKaTOp
- Kop3nHa
- KhoIIka 6JIOKINOBKN pyuKN KOp3INHbI
- Панел bупавлени +HarpeBaTeIbHbI ənemENT
- HarpeBaTeIbHbI 3IeMeHT
- TepMOBbIKJIHOaTeJIb
- Soporte cuelgue cestillo
2. TEXHnueCKNe XAPAKTEPNUCTNIKNI
3. MEPbI IPEIOCTOPOXHOCTN
Ipeed nepBbIM IcNoJIb3OBAHnEM DaHHOro np6bopa BHNMaTeJbHO IpOHTiTE HAcTOnIe pyKOBODCTBO NO 3KcIIyatauIN COxpaHInTe eROДЯ NocJeDyUOxN KOHCyJIbTauN.
- Chяв упakobky, убeитесь в
- цлocтноctи пибopa. При
- ВОЗнКовен Comнець
- образаайесь в сегтуниювай
- цentр Тхенисторо obслужиманя.
- ΘΙΕΜΕΝΤβι ΜΥΑΚΟΒΚN (ΠλΑCTΝΚΟΒΙE ΠΑΚΕΤβι, ΠΟΙΝΥΝΥΝΟΡΙβΗΝΑ ΠηΗ Ι T.Д.) ΚΛνάγετ Xραπίνθ Bδαήσι ΜΟ ἀ Ετέη, TΑΚΚΑΚ ΘΗ ΜΟγγτ ΣαΤβ ΠΟΥ Αναλήν ΒΗύ Μι ΚΙΘΥΝΗΚΑΜΟ ΜΑΝΑΧΟΥ Κι.
Ipeepi nepBbIM nCnOJIb3OBAHHeM npnbopa y6eDInTeCb, YTO HApJxKeHne BDOMaUHeN CETN COOTBeTCTByeT 3HaueHIO, yKa3aHHOMy Ha npnbOpE
3JIeKtpUeCKa 6e3oNaCHocTb npi6opa rapaHTnpyeTcTOJbKO B Cnyae,ecJN OH npaBnJIbHO 3a3EMJIeN COIJaCHO DeICTByIOUIM HOpMaM 3JIeKTPuYeCKOJ 6e3oNaChOCtN. IpoIN3BOJNTeJIb He HecET OTBeTCTBeHHOCTN 3a yIep6, pInuHHeHbI BCJeDCTBVe OTCyTCTBnA 3a3EMJIeHnI. Ppi HAnuHn COMHeHNI OTHOCITeJIbHO 3a3EMJIeHnI O6paTntEcB K KBaIIΦnIupOBaHHbIM CNeuaJIInCTAm
B clyuae HecOBMeCTnMoCTn CeTeBOI p03eTKCu OI TeNCEJIbHOI BUNIKOINpIN6opa IPOIN3BeINTe Heo6xOdmyo 3aMeHy p03eTKn, PIn6eRHyB K NOMOICKBAHINCHINPOBaHHbIX CNEUAnlntCB
He pekomeHdyetcNcNoIb3OBAtbaaantepbI n/Inn ydInnHTeJI.N B Cnyuae Heo6xOIMOCn CneDyET NcNoIb3OBAtB TOJbKO aAnTepbl ydInnHTeJI, COOTBeTCTByIOUne DeiCTBYIOUm HopMaM 6e30NaCHOCTN. Ppi 3OM HxKHO CneINb, YTObI He 6bl I pReBbIWeH IpeJe MoUHOCTN, yKa3aHHbI Ha aAnTepe N/Inn Ha ydInnHTeJI.
Ecni npnbop nepectan pa60TaTb,obpaauTeCb TOnbKO B ceTpncuPOBaHbI LcHTp TexnueckoO bcnykuaBaHna. B cnlyae nolomkn u/Inn HnpepaBnIbHoJ pa60tI np6oPa BblIOUHTe erO n He nbTAteCb noHNITb. O6patntecb B ceTpncuPOBaHbI ueHTp TexnueckoO bcnykuaBaHna I Tpe6yIte, yTo6bl 6blN nCNOJIb3OBAHbI opnHaJIbHbIe 3aNaChbIe qactn I npHaJaJeXHOCTn.
Данньий пибор спюктурован Ипре徳назачен Ддя Испльзоваяну.Tольков В домашинх условик, Кам STООписан В насторшем РкуковостBE.Испльзоване пибopa В Лобьхдругх целях расматривaelся Кам Heправильhoeи, Кам следстve,Опасhoe.
ПОНЗВОДИТЕЛС He HecETOTBETCTBEHHOCTN3a BO3MOXHbIe
IOBpeKJeHnHaHeceHHbIe npi
HePpABInbHOM,OuIN6OChOM
NJIN 6e3OTBETCTBeHHOM
NCNoJIb3OBAHnPiPbOpa N/Nil
PiN peMOHTe,PNoIN3BeDeHHOM
HEKBaINΦnUInPOBaHHbIM nepCOHaJOM.
Ppi nCnOJIb3OBAHn 3JIeKtpnuecknx
pnp6OBoTpe6yeTcBbIIOJIHnTb
HECKOJIbKO OCHOBbIX IpaBnI
6e3OpanchocTn C CEJIbTO CHNXeHnRA pNcKa
noJkapa, 3JIeKtpnuecknx pa3pIIOB n/IIIn
HaHeCEHn TpaBM JIOdAm:
BOOCOBEHHOCTN
He npikacaiTecb K npibopy Mokpbim NnBlaJXhbIM pyKaAMN nnHOrAmN, nbo 6dyu pa3yTbIM.
B ueJx 3aunTbO tJneKtpnuecknx pa3pIIOB He nIogpykaIte Kopnyc C 3JIeMeHTaMn ynpaBJIeHn I HarpBeBaTeIbHbIM 3JIeMeHTOM B BOyU He IIpOMbIBaIte 3TN JeTaII N IOB BOIOPOBOIDHbIM KpaHOM.
HE IPIKACAITECb K TOPAYMIOBEPXHOCTaM -NCIOJIb3yItePuyKN.
BHIMAHHE: PIPUEOP BO BPEMRA6OTbIOUeHb CNJbHO HAPPEBAETcI. IO3TOMY CJEduyET PIPINrTb HEO6XODMbIE MEPbI BO I36EXKAHNE PNCKA POJUYEHn OKeFOB, BO3ΓOPAHN I HAHECEHNA DpyNX IOBPEKDEHNI JIOdAm NJI IN MMyuCTBy.
HE IEPEMELIAMTE PIPBOP BO BPEM PA6OTbI NJIN BO BPEM OCTbIBAHNMACLIA.
He 3abBaIte, yTo JnIp MoKeT nCnpOpTnTbCn IIn DaJke 3aRopeTbCra, ecIn eTo HarpBeBaTb B TeueHne DInTeJIbHO BpeMeHN Do BbICOKNX TempepaTyp. B Cnyuae Bo3rOpAHN HeMeDJIeHNO OTKJIIOHTe PnIbOp OT 3JeKTPocETn, 3aKpoIe EMKOCTb DnMaCnA KpbIshKoI, YTO6bl NepeKpbITb DOCTyIN BO3dyXa NOTyUINTB OROHb. DnTaySeHnIg ORHn HNKOrDa He INcNoJIb3yIte BODY.
OTKInOHTe npin6op OT 3JIeKtPoCeTn, ecIN Bbl He co6bpaTeEc bero INCIOJIb30BaTb, a TaKxpe Nepei
JIIObIMN OepaunMn NO yxOy N YIcTKe.
ДлгOTКЛюченяпибopa OT эльктрocETN Chaана пермecTITe ПеpeKЛюЧаTeJB B NOLOжЕнe "0", a 3aTeM OTCOeINHITe SHHyp ПИТанЯ OT pO3etKN.
He octabJnTe pa6oTaUoI np6ob 6e3 npncMoTpa. OTKJIouaIte erO t3JIeKTPocETn, daxKe eCJIu Bbl OTXoDInTe Ha KOPOTKOE Bpemr.
-ДаиTe MacIy OcIbITb,пepeI Tem KaK ПOMыITbИ y6paTb И рибор.
He nCnoJb3yIte np6Op, ecn erO shHyp nITaHnI nn IITeNCJIbHaB BnIka nOBpeXJdeHbI, JIO6 BO CcUyae nOLOmKn nn HnPpABUNbHO paBOtI. PeryJrApo nPoBepyTe uHyp pNTaHnHa Ha NaIIuYe nOBpeXJdeHn.
Пользова teь He Должень
camocToTЯTeBJHo 3amehTb shHyp
питаня данною prinbopa.В clyuae
nobpejdeHnI NeI Heo6xOIMOCtN
3aMeHbI shHypa ПИТАнHЯOBpaUaJIteCb
TOJbKO B ceHTp TexHnueCKoro
obcIyKINBaHnI, cepTnФицpoBaHhbI
Ipon3BOJNTeJIem,ДЯ ERо прОверkn,
peMOHTa nII peRyInPObKN.
He donyckaIte, yTo6bI uHyp nHTaHnBa CBncaI C Kpa CToJa IIN CTOneuHNcIbI INI yTo6bI OH KacJaCra TOpAHyx NOBepXHOCTeI.
BbIHMaJ WtTeNCeJIbHyU BnIky n3 po3ETKn, HnKOrDa He TReHnTe 3a ShHpy nITaHn.
He ocTabJIyTe npIbOp cBepx nII NBJIIM3n ra3OBOrO nII nIeKtpueckOro 6oIorpeBaTeJI, BHyTpNI IIN BO3JIe torpaeyI pIITbI nII MmKpOBoJHOBoi neu.
PacnojaraTe pa6oTaUoI np6Op BdaIOn OT DeTeN INHbJIINIOB.
He nCnOJIb3yIte npIb6Op Ha OTKpbITOM BO3dUye Hr He IOnyckaIte BO3JeCTBna Ha Hero aTMocepHbIX YBJIeHn (IOXJb, COJIHeuHbIe JIyH, JeI N T.I.).
Korda Bbl noxkelaete Haccerda OTka3aTbC8OT npnbopa, peKOMeHdyETc8 OKJIIOHTb erO OT 3JIeKTPOCeTn I CdeJaTb erO Hepa6oYM, HanpIMep, OTe3ab WHypr nITaHn
4. 3AMEUAHINI IO NICIOJIb3OBAHNIIO
- PekomehnyeTcNcNoJIb3OBA Tb paCTnTeJIbHOe MaCNo, pIINrOJHoe IJIg JI KApENHn Iprn BbICOKHX TeMnpePaTypax. TaKKe MoXHNO NcNoJIb3OBA Tb KIaIKne INIIN TBePdIe XInpbl. Iprn NcNoJIb3OBAHmN TBepDOrO XInpa HxJHCO IprnHnTb Mepbl IpeIOCTOpOXHOCTn CZeJIbIO npeDynpexJeHnI nepeRpeBa HArpeBaTeJIbHOrO 3JIeMeHTa (CM. pa3dJI "NcNoJIb3OBAHnE C TBePdBIM JxIPOM").
He nCnoJIb3yIte fprntHOpHnUc mAlbIM KOJIInueCTBOM IIN 6e3 MacJa/ Jnpa. YpOBeHb MacJa/Knpa DOnJKeH HaxOJNTbcM EKJy MmHImaJIbHoI N MaKcImaJIbHOI OTMeTkAmN, HaHeceHHbIMn Ha EMKOCTn (5).Ipeed BKNIOUeHnEM fprntHOpHnUcbl y6eDnITecb B NaJIeXkaUeM ypOBHe MacJa.
5. B3O3NACHOCTb
3Ta 4pntHOpHnca Cha6xHe nCCTeMoI
TeNIOBO 3aUNTb, BvIKHNoAIOue ycTPOiCTBO
B clyae neperpeBa. 3TO MoKET npOn3oITn,
ecnB KOTJIe HET Macla IIN erO MaJIO;
TaKKe nepepeB Bo3MOxEN pRn TOnJIeHN
3AcTBIBSeRo Jkpa.
B clyae, ecnYcTPOiCTBO OTKLIQUaEtcN3-3a
cpa6aTabiBaHnra 3aUNTb, CdeJaTIe CJIeDyUoee:
- OToCoeDInHnTeФpntHOpHnUOTcETN INoOJxINTE, nOKa OHa NoJIHOCTbIO OCTbIHT
BbIHbTe nHaHeIb yIpaBJIeHnC hArpeBaTeIbHbIM 3IeMeHTOM (10) Ic NMOUHO MaIeHbKOI OTBepTKn HaxKMNTe KHOKNKIOUaTeY (12), KOtOpBI HAXOINTcH HNXHe YAcTn HArpeBaTeIbHOro 3IeMeHTa. TeNepb @PrtIOpHIuCy CHOBa MOXHO INCIOJIb3OBA Tb.
He nCnoJIb3yIte KhoNky 6IIOKINPOBKn pyKn KOp3nHbI pNt OTKpbITOn KpbIiKe BO n36eXaHHe OXoROB.
Фпнтсрнца сабжета МКровьИКИЧаTeлЕМ,КOTьн HeДаCTeBКПИCHТСВ,ecIN HaPReBaTeЛьНьИЗЛEMENTyCTaHOBJIEN HENpaBиьHO.
6. INCIOJIb3OBAHME
Ipeed nepBbIM IcnoJIb3OBAHEm NOUcTnTe npTHOpHnCi, KaK OINcaHO B pa3JeNe «UcSTKa».
BbIMbIB N BbICyUINB BCE DeTaJIH, NOMeCTNTe 0pIITHOHNu HA POBHyO IN IIOCKYIO TOpN3OHTaJIbHYIO NOBepxHOCTb, HA paccTcOHNOT CTHe. Y6eINtCeB, YTO cTeBoW UHyp He CBNAET C KpaA CToLa H He KacaetCn HarpeTbIX NOBepxHOCTe.
- OTKpoIte KpbIuKy (1), HauKaB Ha KhoIky OTKpbIBaHnKpbIuKn (4).
- HaxmTe KhoNky 6IIOKIpOBkny puKny Kop3nHbI (9) n IOBepHnTe pyKny B rOpu3OHTaJIbHoE noIoJxHeHne.
ПовесьтКорзИну(8)НаДерЖATEль корзИны(13)иHAJIeTeMaCNoИЛижИрВчашу(3)Тak,ЧTOБИEROуypOBeHb HaxODINLCМжДу OTMeTKaMn MINиMAX,обОЗнauЧEHbIMN Ha BNYTpEHNHeСТОпЕчSi.ЕсИNcPOnIb3yETcЯСТыВшийжИр,ero cIeДуETpACToNITbВOTДeЛьнOHINOCUDEпЕ徳TEm,KAKHaJIIBaTbBOФрИTHOPH尼(CM.Pa3ДeN«ИСпОЛьЗОВанeC 3aCTыBШeroЖИрА").
3aKpoTKe KpbIuKy
- HaxMMTe KhoNky 6IOKnOBKn pyuKn KOp3INbI (9) nIOBepHnTe pyuKy B 3aKpbIToe nIIOJKeHne, yTO6bl KOp3Ha OyucTnlaCb I nOgpy3nlaCb B MaCNo.
BbHbTe CeTeBOI UHyp n3 OTcKa B HnKHeu qactn np60paN BkJIOnHTe erO B pOstKy.
BbIbepnte XeJnaemyTo TemnepaTpyc nOMOuHpopeYJrAToPApTeMnpePaTpybI (8).3aOpNTcBcTeBOiNHNikatOp7) HArpeBaTeJIbHbI 3JIeMeHT (11)HaUHeT HaRpeBaTb MaCNo.
BHIMAHNE:ФрntHOpHnua DoJIXHa
IpeBapNTeJIbHO npOrpTeBcR B TeYeHne
15 MInyT, IpexJe Yem OHa Na HauHET
HaPReBaTbCraDo 3aDaHHoT TempepaTybl.
Bo BpEmI pOrpReBa CBeTOBoi INDnKaTOp
(7)6yEt 3aropatbCra I racHyTB 3-4 pa3a.
Yepe3 15 MInyT TempepaTypa Macna
ctAbNJIN3NpyetcI n Pn6Op MoKHO
NCIOJIb3OBA Tb DJI pIriTOToBJIeHnI pOdyKTOB.
3To IOZBoJIaTe ObecNeuHT MaKcIMaJIbHyO
Ipon3BOJInTeJIbHoCTb FpNTHOpHNUbl.

- TECHNICAL CHARACTERISTICS
- SAFETY PRECAUTIONS
- When using electrical appliances, a series of basic safety regulations should be respected in order to reduce the risk of fire, electrical shocks and/or personal injury:
- PARTICULARLY
- RECOMMENDATIONS FOR USE
- SAFETY
- WORKING
- BASKET
- TIMER
- Timer adjustment:
- USING WITH SOLID FAT
- AFTER FRYING:
- CLEANING
- PRACTICAL ADVICE
- Oils and fats
- Chips
- Frozen foods
- INFORMATION FOR THE CORRECT DISPOSAL OF ELECTRICAL AND ELECTRONIC APPLIANCES
- FR
- 1.DESCRIPTION
- TEXHnueCKn XAPAKTEPNCNIK
- PABOTA
- MPEKNUKA:
- TAI-MEP:
- YIOTPEBA HA TBbPDA MA3HnHA
- CJIEDIPIKJIIOUBAHEHAIBPXEHETO:
- 7.ПОИСТBAH
- INPAKTINCHINCBETN
- OlnnoMa3HHN
- TbpxeHn KapToΦn
- 3ampa3eHxpaHn
- INΦOPMAÇIЯ 3A ПРABNJHOTO EJIIMMHIPAHE HA EJEKTPUÇEKN I EJEKTPOHNI DOMAKINHCKN UPEДN
- RU
- 1.0603HAUHIN
- TEXHnueCKNe XAPAKTEPNUCTNIKNI
- MEPbI IPEIOCTOPOXHOCTN
- 3AMEUAHINI IO NICIOJIb3OBAHNIIO
- B3O3NACHOCTb
- INCIOJIb3OBAHME
Brand : FAGOR
Model : F-602
Category : Deep fryer