
BJM1009 - Sander Ferm - Free user manual and instructions
Find the device manual for free BJM1009 Ferm in PDF.


| Product type | Orbital sander |
| Brand | Ferm |
| Model | BJM1009 |
| Dimensions (L x W x H) | 26 x 12 x 13 cm |
| Weight | 1.5 kg |
| Power supply | 220-240 V ~ 50 Hz |
| Power | 250 W |
| No-load speed | 12,000 rpm |
| Pad diameter | 125 mm |
| Motion type | Orbital |
| Oscillation amplitude | 2 mm |
| Main functions | Sanding of flat surfaces, stripping, polishing |
| Dust extraction system | Vacuum cleaner connection (collection bag included) |
| Maintenance and cleaning | Clean ventilation slots regularly; replace abrasive paper when worn |
| Safety | On/off switch; power cable with standard plug |
| Spare parts and repairability | Abrasive sheets available; replaceable sanding pad |
| General information | Intended use: DIY and amateur worksite; sound level: 85 dB(A) |
Frequently Asked Questions - BJM1009 Ferm
User questions about BJM1009 Ferm
0 question about this device. Answer the ones you know or ask your own.
Ask a new question about this device
Download the instructions for your Sander in PDF format for free! Find your manual BJM1009 - Ferm and take your electronic device back in hand. On this page are published all the documents necessary for the use of your device. BJM1009 by Ferm.
USER MANUAL BJM1009 Ferm
BJM1009
EN Original instructions 05
DE Übersetzung der Originalbetriebsanleitung 10
NL Vertaling van de oorspronkelijke gebruiksaanwijzing 15
FR Traduction de la notice originale 20
ES Traducción del manual original 26
PT Tradução do manual original 31
IT Traduzione delle istruzioni originali 36
SV Översättning av bruksanvisning i original 42
FI Alkuperäisten ohjeiden käännös 47
NO Oversatt fra orginal veiledning 51
DA Oversættelse af den originale brugsanvisning 56
HU Eredeti használati utasítás fordítása 61
CS Překlad původního návodu k používání 66
SK Preklad pôvodného návodu na použitie 71
SL Prevod izvirnih navodil 76
PL Tłumaczenie instrukcji oryginalnej 81
LT Originalios instrukcijos vertimas 87
LV Instrukciju tulkojums no originālvalodas 91
ET Algupärase kasutusjuhendi tõlge 96
SR Prevod originalnog uputstva 101
BS Prevod originalnog uputstva 101
RU Перевод исходных инструкций 106
UK Переклад оригінальних інструкцій 111
AR
تَيْلِصُأَلَا تَامِيْلِعُتُلَا قَمْجَرْت
117
TR Orijinal talimatların çevirisi 121
MK Превод на оригиналните упатства 126
CE
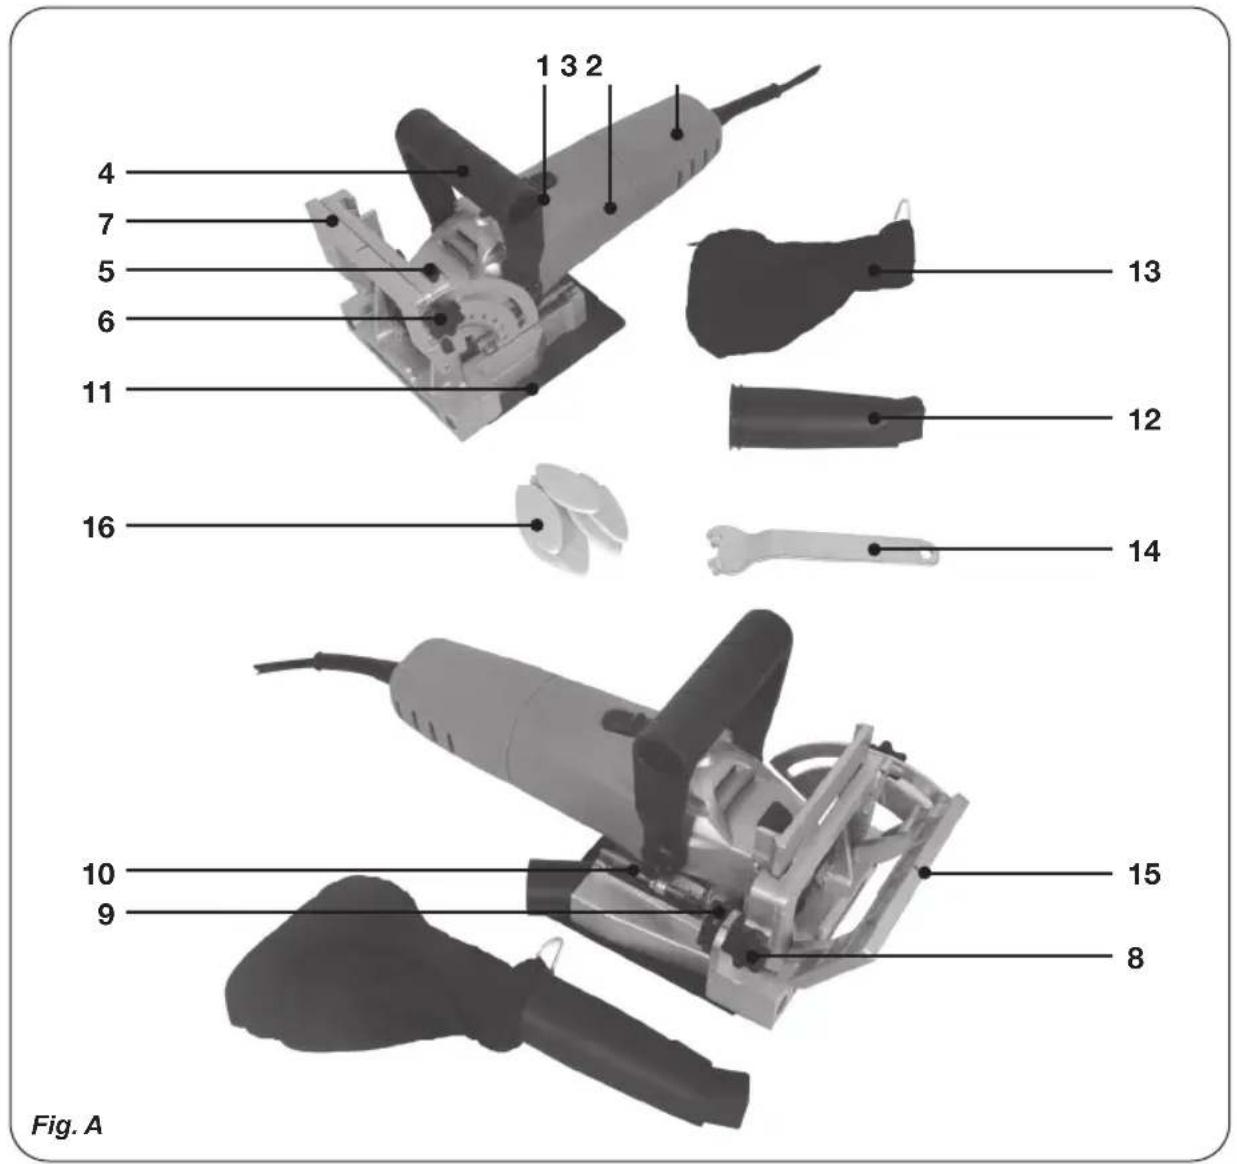

Fig. C

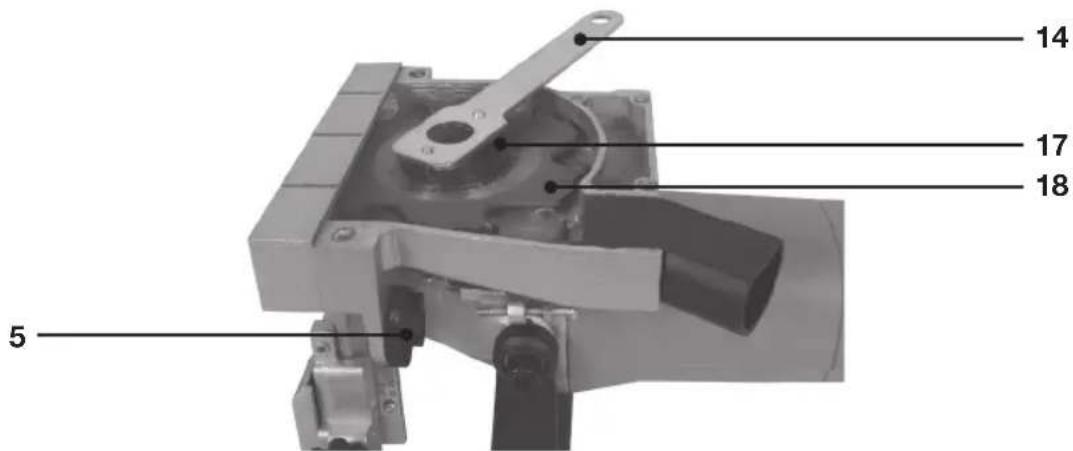
Fig. D

Fig. E


Precision Biscuit Jointer 900W BJM1009
Thank you for buying this Ferm product.
By doing so you now have an excellent product, delivered by one of Europeis leading suppliers. All products delivered to you by Ferm are manufactured according to the highest standards of performance and safety. As part of our philosophy we also provide an excellent customer service, backed by our comprehensive Warranty. We hope you will enjoy using this product for many years to come.
The numbers in the text refer to the diagrams on page 2-4.

Read the operating instructions carefully before using this device. Familiarize yourself with its functions and basic operation. Service the device as per the instructions to ensure that it always functions properly. The operating instructions and the accompanying documentation must be kept in the vicinity of the device.
Introduction
The Biscuit Jointer is suitable for cutting grooves for biscuit dowel joints in solid wood, plywood, chipboard, fibre board, plexiglass and artificial marble.
Contents
- Technical specifications
- Safety instructions
- Adjusting the machine
- Mounting accessories
- Operation
- Maintenance
1. TECHNICAL SPECIFICATIONS
Contents of packing
1 Biscuit Jointer
1 Saw blade
1 Wrench
1 Dust extraction adapter
1 Dust collection bag
1 Instruction manual
1 Safety instructions
1 Guarantee card
Check the machine, loose parts and accessories for transport damage.
Features
Fig.A
- ON/OFF switch
- Rear hand position
- Motor housing
- Front handle
- Spindle lock button
- Angle adjustment knob
- Fence
- Height adjustment knob
- Cutting depth adjustment knob
- Depth fine adjustment screw
- Base plate
- Dust extraction adapter
- Dust bag
- Spanner
- Centerline
- Biscuit dowel
- Flange nut
- Saw blade
- Flange
- Bottom plate
- Angle scale and arrow
- Height scale and arrow
Machinedata
Voltage 230-240 V
Frequency 50 Hz
Power input 900 W
No-load speed 11000/min
Disc diameter ∅ 100 mm
Blade bore diameter ∅ 22 mm
Max. cutting depth 14 mm
Fence adjustment 0 - 90°
Weight 3.2 kg
Lpa (sound pressure) 91 dB(A) K=3dB
Lwa (sound power) 105 dB(A) K=3dB
Vibration value 1.85+1.5 m/s2
Vibration level
The vibration emission level stated in this instruction manual has been measured in accordance with a standardised test given in EN 60745; it may be used to compare one tool with another and as a preliminary assessment of exposure to vibration when using the tool for the applications mentioned.
- using the tool for different applications, or with different or poorly maintained accessories, may significantly increase the exposure level
- the times when the tool is switched off or when it is running but not actually doing the job, may significantly reduce the exposure level
Protect yourself against the effects of vibration by maintaining the tool and its accessories, keeping your hands warm, and organizing your work patterns.
2. SAFETY INSTRUCTIONS
Explanation of the symbols

Denotes risk of personal injury, loss of life or damage to the tool in case of non-observance of the instructions in this manual.

Indicates electrical shock hazard.

Immediately unplug the plug from the mains electricity in the case that the cord gets damaged and during maintenance.

Keep bystanders away
Special safety instructions
- Sawdust and splinters must not be removed while the machine is running.
- Do not use cutting discs or circular saw blades in the machine.
- Protect saw blades against shocks and impacts.
- Only use properly sharpened blades, otherwise increased cutting forces will shatter the work piece.
- Before use, inspect the saw blade for any damage. Do not use saw blades which are cracked, ripped or otherwise damaged.
- Make sure that the work piece is sufficiently supported or clamped. Keep your hands away from the surface to be cut.
-
Use the machine only with the auxiliary handle
-
When saw blades have to be mounted on the thread of the spindle, make sure that the spindle has sufficient thread.
- Make sure that the saw blade has been mounted and fastened properly. Do not use reducing rings or adapters to make the saw blade fit properly.
- Apply the machine to the work piece only when the machine is switched on.
- When working with the machine always hold the machine firmly with both hands and provide for a secure stance.
- Persons under 16 years of age are not permitted to operate this machine.
- Always wear safety goggles and hearing protection. If desired or required also use another protection for example an apron or helmet.
- Always disconnect the plug from the socket before carry out any work on the machine. Only plug-in when the machine is switched off.
- Keep mains lead clear from working range of the machine. Always lead the cable away behind you.
- Do not stop the blade by hand after switching off.
- The base plate must not be clamped down while the blade is extended. Lowering and raising the blade must be a smooth operation.
- Always use the protective shields on the machine.
- Use only cutting discs whose allowable speed is at least as high as the highest no-load speed of the machine.
Electrical safety
When using electric machines always observe the safety regulations applicable in your country to reduce the risk of fire, electric shock and personal injury. Read the following safety instructions and also the enclosed safety instructions.

Always check that the power supply corresponds to the voltage on the rating plate.

Your machine is double insulated in accordance with EN 60745; therefore no earthwire is required.
Replacing cables or plugs
Immediately throw away old cables or plugs when they have been replaced by new ones. It is dangerous to insert the plug of a loose cable in the wall outlet.
Using extension cables
Only use an approved extension cable suitable for the power input of the machine. The minimum conductor size is 1.5 mm2. When using a cable reel always unwind the reel completely.
3. ADJUSTING THE MACHINE
Adjusting the cutting depth
Fig.B
- Move the motor housing (3) as far as possible backwards.
- Set the cutting depth by turning the cutting depth adjustment knob (9).
- The markings on the depth adjustment knob (9) correspond to the biscuit dowel size being used (16).
- You can fine adjust the cutting depth setting by turning the depth fine adjustment screw (10).
- Move the motor base forwards and check if depth fine adjustment screw (10) will fall in the notch of the adjustment knob.
The following table shows the relationship of the markings on the adjustment knob to cutting depth, thickness of material and associated biscuit dowel.
Marking Thickness Biscuit Cutting of material Dowel depth in mm
| 0 8-12 mm No. 0 8.0 | |||
| 10 12-15 mm No. 10 10.0 | |||
| 20 >15 mm No. 20 12.3 | |||
| Max. | - | - | 14.0 |
Adjusting the cutting angle
Fig. A + G
The cutting angle can be set the following way:
- Release the angle adjustment knob (6) by turning it anti-clockwise
- The set angle is shown on the scale (21) below the knob (6)
- After setting to the right angle, tighten the knob (6) again by turning it clockwise.
Adjusting the height to match material thickness
Fig. B
The correct height can be set the following way:
- Release the height adjustment knob (8) by turning it anti-clockwise
- The set height is shown by the scale and the arrow (22).
- After setting to the right height, tighten the knob (8) again by turning it clockwise.
The height must correspond to half of the material thickness of the working piece, the groove for the biscuit dowel must always be in the middle of the working piece.
4. MOUNTING ACCESSORIES

Prior to mounting an accessory always unplug the tool.
How to change the saw blade

Your machine is delivered with the saw blade already assembled on the machine
Fig. C & D
- Put the machine in upside-down position and remove the 4 screws on the bottom plate by using a screw driver (not included)
- Remove the bottom plate (20)
- Press the spindle lock (5) and turn the spindle until it engages in the lock. Keep the spindle lock pressed during this procedure.
- Remove the flange nut (17) from the spindle by using the spanner (14) and turn it counterclockwise.
• Position the saw blade (18) on the flange (17). - Be aware that the arrow on the sawblade indicates the same direction as the arrow on the inside of the housing.
- Place the flange nut (17) on the spindle and tighten it with the wrench.
- Take care the flange nut (17) will be placed the correct way: The collar side must fit inside the saw blade bore, the flat side must be pointing upwards.
- Release the spindle lock and check that the spindle is unlocked by rotating it.
- Assemble the bottom plate (20) again and fix the 4 screws.

Make sure that the top of the base plate is securely closed before operating the machine.
Mounting the dust bag
Fig. A
- For dust extraction the dust bag (13) can be used. Connect the dust extraction adapter (12) to the machine, then connect the dust bag (13) to the adapter.
- Empty the dust bag regularly so that the vacuuming performance remains intact.
- A vacuum cleaner can be directly connected to the dust extraction adapter when use of a vacuum cleaner is preferred.
5. OPERATION

Never use the spindle lock while the machine is running.
Switching on and off
Fig. A
- To switch the machine on slide the on/off switch (1) forwards.
- To switch the machine off, depress the on/off switch (1), the switch will automatically move to the 'off' position.

Never use the spindle lock to stop the motor.
Marking the workpiece
Fig. E
Before starting with the Biscuit Jointer the workpieces must be marked as following.
- Place the two surfaces which must be connected, with their connecting side to each other
- Clamp the work pieces and mark the center of the groove by drawing a perpendicular line
- Several joints will be required for larger workpieces. The distance between two drawn lines should be at least 10cm.
Sawing grooves
Fig. F
- Set and check the cutting depth on the machine
- Set the angle on the machine
- Set the height on the machine, take care for setting the height, the groove for the biscuit dowel must be in the middle of the workpiece.
• Make sure the workpiece is securely clamped - Position the machine on the workpiece, the marked centerline (15) must be in line with the line drawn on the workpiece
- Hold the machine with both hands and switch the machine on.
- Push the motor base carefully forward as far as possible.
- Move the motor base backward and switch the machine off.

For workpieces thinner than 16 mm it is not possible to cut the groove in the middle of the workpiece without adding an adjustment plate below your workpiece (fig. G).
Joining the workpieces
When the grooves in both workpieces have been made the workpieces can be joined together.
- Put glue in both grooves.
- Place the biscuit dowel in the groove of one workpiece.
- Place the other workpiece on the biscuit dowel.
- Fasten the workpieces and wait till the glue is dry.
User tip for connecting two workpieces
- Saw a groove as big as one biscuit into the first workpiece
- Place the biscuit with good glue (according the material) into the groove
- Saw a longer groove into the other workpiece
- Now both workpieces can be positioned easily towards each other (clearance to correct)
- Fasten the workpieces and wait till the glue is dry

Move the machine in the same direction as the direction of rotation. See arrow on top of the machine.
Fine adjusting the cutting depth
Fig. B
When the cutting depth is not correct, it can be adjusted as following.
- Move the motor base (3) as far as possible backwards.
- Loosen the nut on the fine adjustment screw while keeping the screw in position by using a screw driver
- Increase the cutting depth by turning the screw (10) counterclockwise.
- Decrease the cutting depth by turning the screw (10) clockwise
- Repeat the procedure till the cutting depth is correct.
- Fasten the nut on the fine adjustment screw (10) again while keeping the screw in position by using a screw driver
6. MAINTENANCE

Make sure that the machine is not live when carrying out maintenance work on the motor.
The machines have been designed to operate over along period of time with a minimum of maintenance. Continuous satisfactory operation depends upon proper machine care and regular cleaning.
Cleaning
Keep the ventilation slots of the machine clean to prevent overheating of the engine.
Regularly clean the machine housing with a soft cloth, preferably after each use. Keep the ventilation slots free from dust and dirt. If the dirt does not come off use a soft cloth moistened with soapy water. Never use solvents such as petrol, alcohol, ammonia water, etc. These solvents may damage the plastic parts.
Lubrication
The machine requiers no additional lubrication.
Faults
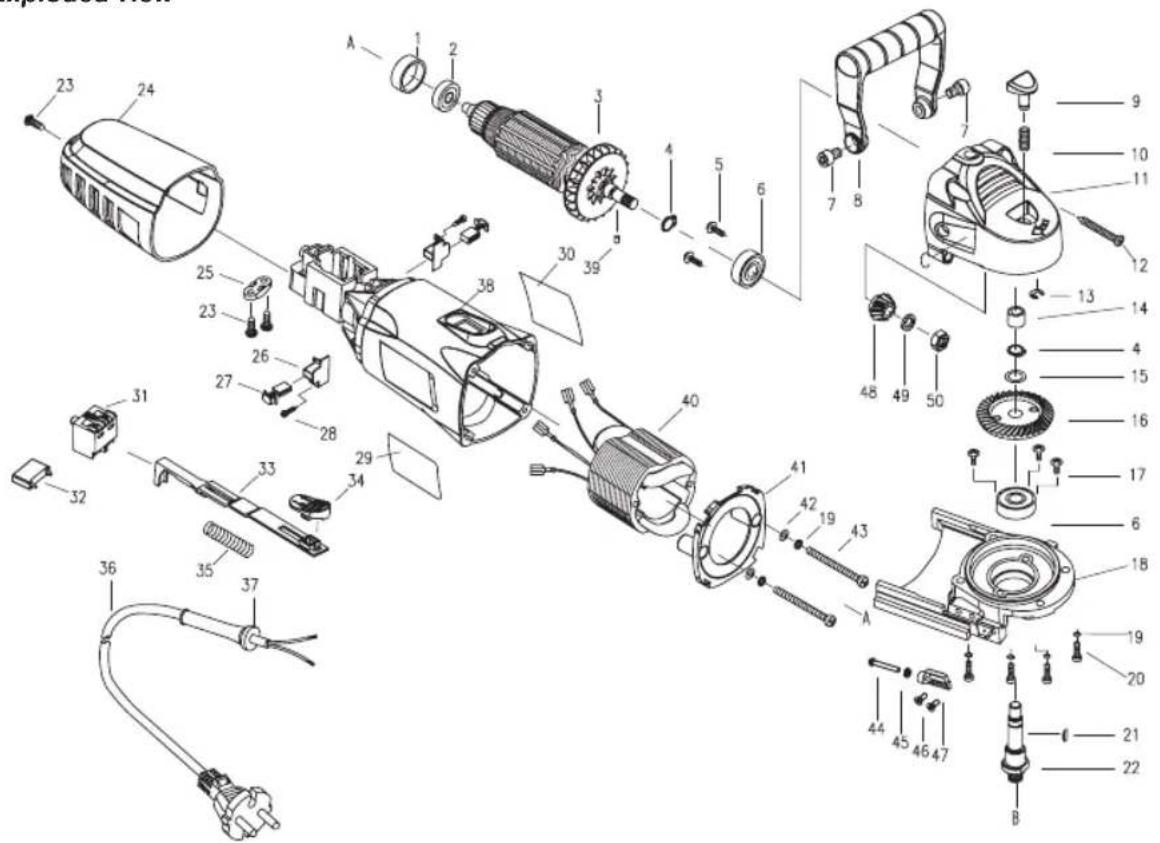
Should a fault occur, e.g. after wear of a part, please contact the service address on the warranty card. In the back of this manual you find an exploded view showing the parts that can be ordered.
ENVIRONMENT
To prevent damage during transport, the appliance is delivered in a solid packaging which consists largely of reusable material. Therefore please make use of options for recycling the packaging.

Faulty and/or discarded electrical or electronic apparatus have to be collected at the appropriate recycling locations.
Only for EC countries
Do not dispose of power tools into domestic waste. According to the European Guideline 2012/19/EU for Waste Electrical and Electronic Equipment and its implementation into national right, power tools that are no longer usable must be collected separately and disposed of in an environmentally friendly way.
WARRANTY
The guarantee conditions can be found on the separately enclosed guarantee card.
| 0 8-12 mm No. 0 8.0 | |
| 10 12-15 mm No. 10 | 10.0 |
| 20 >15 mm No. 20 | 12.3 |
| Max. - | -14.0 |
Boringdiameter freesblad ∅ 22 mm
Max. freesdiepte 14 mm
Afstelling geleider 0 - 90°
Gewicht 3,2 kg
Lpa (geluidsdruk) 91 dB(A) K=3dB
Lwa (geluidsenergieniveau) 105 dB(A) K=3dB
Trillingsniveau 1,85 +1,5 m/s2
Trillingsniveau
| 0 8-12 mm No. 0 8.0 | ||
| 10 12-15 mm | No. 10 | 10.0 |
| 20 >15 mm No. 20 | 12.3 | |
| Max. | - | -14.0 |
Afstellen van de freeshoek
Fig. A + G
10 12-15 mm No. 10 10.0
20 > 15 mm No. 20 12.3
Max.--14.0
| 0 8-12 mm No. 0 8.0 |
| 10 12-15 mm No. 10 10.0 |
| 20 >15 mm No. 20 12.3 |
| Max.--14.0 |
10 12-15 mm No. 10 10.0
20 > 15 mm No. 20 12.3
Max.--14.0
| 0 8-12 mm No. 0 8.0 | |||
| 10 12-15 mm No. 10 10.0 | |||
| 20 >15 mm No. 20 | 12.3 | ||
| Max. | - | - | 14.0 |
| 0 8-12 mm No. 0 8.0 | ||
| 10 12-15 mm No. 10 10.0 | ||
| 20 >15 mm No. 20 12.3 | ||
| Max.- | - | 14.0 |
| 0 8-12 mm No. 0 8.0 | ||
| 10 12-15 mm No. 10 10.0 | ||
| 20 >15 mm No. 20 12.3 | ||
| Max.- | - | 14.0 |
| 0 8-12 mm No. 0 8.0 | ||
| 10 12-15 mm | No. 10 10.0 | |
| 20 >15 mm No. 20 12.3 | ||
| Max. | - | -14.0 |
Tera ava diameeter ∅ 22 mm
| No. Description Position | ||
| 409120 Switch 31 | ||
| 409121 Switch lever bar | 33 | |
| 409122 Switch button 34 | ||
| 409123 Auxiliary handle+bolts 7 + 8 | ||
| 409124 Carbon brush set 27 | ||
| 409125 Height Fix knob 66 | ||
| 409126 Wrench 78 | ||
| 409127 Depth setting revolver set 54-58 | ||
| 409128 Dust adapter+ connector piece 75+77 | ||
| 409129 Dust bag (without adapter) 76 | ||
| 409130 Angle Fix knob 79 | ||
| 409131 Flange set 51+53 |
Exploded view

CE
DECLARATION OF CONFORMITY BJM1009 - BISCUIT JOINTER
(EN) We declare under our sole responsibility that this product is in conformity with directive 2011/65/EU of the European parliament and of the council of 8 June on the restriction of the use of certain hazardous substances in electrical and electronic equipment is in conformity and accordance with the following standards and regulations:
(DE) Der Hersteller erklärt eigenverantwortlich, dass dieses Produkt der Direktive 2011/65/EU des Europäischen Parlaments und des Rats vom 8. Juni 2011 über die Einschränkung der Anwendung von bestimmten gefährlichen Stoffen in elektrischen und elektronischen Geräten entspricht. den folgenden Standards und Vorschriften entspricht:
(NL) Wij verklaren onder onze volledige verantwoordelijkheid dat dit product voldoet aan de conform Richtlijn 2011/65/EU van het Europees Parlement en de Raad van 8 juni 2011 betreffende beperking van het gebruik van bepaalde gevaarlijke stoffen in elektrische en elektronische apparatuur en in overeenstem ming is met de volgende standaarden en reguleringen:
(FR) Nous déclarons sous notre seule responsabilité que ce produit est conforme aux standards et directives suivants: est conforme à la Directive 2011/65/EU du Parlement Européen et du Conseil du 8 juin 2011 concernant la limitation d'usage de certaines substances dangereuses dans l'équipement électrique et électronique.
(ES) Declaramos bajo nuestra exclusiva responsabilidad que este producto cumple con las siguientes normas y estándares de funcionamiento: se encuentra conforme con la Directiva 2011/65/UE del Parlamento Europeo y del Consejo de 8 de junio de 2011 sobre la restricción del uso de determinadas sustancias peligrosas en los equipos eléctricos y electrónicos.
(PT) Declaramos por nossa total responsabilidade-de que este produto está em conformidade e cumpre as normas e regulamentações que se seguem: está em conformidade com a Directiva 2011/65/EU do Parlamento Europeu e com o Conselho de 8 de Junho de 2011 no que respeita à restrição de utilização de determinadas substâncias perigosas existentes em equipamento eléctrico e electrónico.
(IT) Dichiariamo, sotto la nostra responsabilità, che questo prodotto è conforme alle normative e ai regolamenti seguenti: è conforme alla Direttiva 2011/65/UE del Parlamento Europeo e del Consiglio dell'8 giugno 2011 sulla limitazione dell'uso di determinate sostanze pericolose nelle apparecchiature elettriche ed elettroniche.
(SV) Vi garanterar på eget ansvar att denna produkt uppfyller och följer följande standarder och bestämmelser: uppfyller direktiv 2011/65/EU från Europeiska parlamentet och EG-rådet från den 8 juni 2011 om begränsningen av användning av farliga substanser i elektrisk och elektronisk utrustning.
(FI) Vakuutamme yksinomaan omalla vastuullamme, että tämä tuote täyttää seuraavat standardit ja säädökset: täyttää Europan parlamentin ja neuvoston 8. kesäkuuta 2011 päivätyn direktiin- 2011/65/EU vaatimukset koskien vaarallisten aineiden käytön rajoitusta sähkö- ja elektronisissa laitteissa.
(NO) Vi erklærer under vårt eget ansvar at dette produktet er i samsvar med følgende standarder og regler: er i samsvar med EU-direktivet 2011/65/EU fra Europa-parlamentet og Europa-rådet, pr. 8 juni 2011, om begrensning i bruken av visse farlige stoffer i elektrisk og elektronisk utstyr.
(DA) Vi erklærer under eget ansvar, at dette produkt er i overensstemmelse med følgende standarder og bestemmelser: er i overensstemmelse med direktiv 2011/65/EU fra Europa-Parlamentet og Rådet af 8. juni 2011 om begrænsning af anvendelsen af visse farlige stoffer i elektrisk og elektronisk udstyr.
(HU) Felelősségünk teljes tudatában kijelentjük, hogy ez a termék teljes mértékben megfelel az alábbi szabványoknak és előírásoknak: je v souladu se směrníc 2011/65/EU Evropského parlamentu a Rady EU ze dne 8. června 2011, která se týká omezení použití určitých nebezpečných látek v elektrických a elektronických zařízeních.
(CS) Na naši vlastní zodpovědnost prohlašujeme, že je tento výrobek v souladu s následujícími standardy a normami: Je v súlade s normou 2011/65/EÚ Európskeho


- BJM1009
- PRECISION BISCUIT JOINTER 900W BJM1009
- THANK YOU FOR BUYING THIS FERM PRODUCT
- THE NUMBERS IN THE TEXT REFER TO THE DIAGRAMS ON PAGE 2-4
- INTRODUCTION
- CONTENTS
- TECHNICAL SPECIFICATIONS
- CONTENTS OF PACKING
- FEATURES
- FIG.A
- MACHINEDATA
- VIBRATION LEVEL
- SAFETY INSTRUCTIONS
- EXPLANATION OF THE SYMBOLS
- SPECIAL SAFETY INSTRUCTIONS
- ELECTRICAL SAFETY
- REPLACING CABLES OR PLUGS
- USING EXTENSION CABLES
- ADJUSTING THE MACHINE
- ADJUSTING THE CUTTING DEPTH
- FIG.B
- ADJUSTING THE CUTTING ANGLE
- FIG. A + G
- ADJUSTING THE HEIGHT TO MATCH MATERIAL THICKNESS
- FIG. B
- MOUNTING ACCESSORIES
- HOW TO CHANGE THE SAW BLADE
- FIG. C & D
- MOUNTING THE DUST BAG
- FIG. A
- OPERATION
- SWITCHING ON AND OFF
- MARKING THE WORKPIECE
- FIG. E
- SAWING GROOVES
- FIG. F
- JOINING THE WORKPIECES
- USER TIP FOR CONNECTING TWO WORKPIECES
- FINE ADJUSTING THE CUTTING DEPTH
- MAINTENANCE
- CLEANING
- LUBRICATION
- FAULTS
- ENVIRONMENT
- ONLY FOR EC COUNTRIES
- WARRANTY
- TRILLINGSNIVEAU
- AFSTELLEN VAN DE FREESHOEK
- CE
- DECLARATION OF CONFORMITY BJM1009 - BISCUIT JOINTER
Brand : Ferm
Model : BJM1009
Category : Sander