
PSM1024 - Sander Ferm - Free user manual and instructions
Find the device manual for free PSM1024 Ferm in PDF.


| Product Type | Orbital Sander |
| Brand | Ferm |
| Model | PSM1024 |
| Power Supply | 230 V ~ 50 Hz |
| Power Consumption | 240 W |
| Oscillation Stroke | 2 mm |
| Sanding Pad Diameter | 125 mm |
| Sanding Type | Dry Sanding |
| Abrasive Attachment System | Velcro (hook-and-loop) |
| Variable Speed | Yes, built-in electronic |
| No-load Speed | 12,000 – 14,000 oscillations/min |
| Dimensions (L × W × H) | 200 × 130 × 150 mm |
| Weight | 1.2 kg |
| Sound Pressure Level (LpA) | 80 dB(A) |
| Sound Power Level (LwA) | 93 dB(A) |
| Protection Class | II (double insulation) |
| Power Cord Length | 2 m |
| Box Contents | Sander, sanding pad, dust bag, abrasive sheets (assortment) |
| Maintenance and Cleaning | Regularly clean ventilation slots; dust the housing with a dry cloth |
| Safety | Wear hearing protection and safety glasses; do not work in explosive atmospheres |
| Spare Parts and Repairability | Available from Ferm after-sales service; repairability index not provided by the manufacturer |
| General Information | User manual freely downloadable at notice-facile.com |
Frequently Asked Questions - PSM1024 Ferm
User questions about PSM1024 Ferm
0 question about this device. Answer the ones you know or ask your own.
Ask a new question about this device
Download the instructions for your Sander in PDF format for free! Find your manual PSM1024 - Ferm and take your electronic device back in hand. On this page are published all the documents necessary for the use of your device. PSM1024 by Ferm.
USER MANUAL PSM1024 Ferm
natural_image
3D rendered mechanical component with blue and gray parts, no visible text or symbolsPSM1024
EN Original instructions 04
DE Übersetzung der Originalbetriebsanleitung 07
NL Vertaling van de oorspronkelijke gebruiksaanwijzing
FR Traduction de la notice originale 13
ES Traducción del manual original
PT Tradução do manual original
IT Traduzione delle istruzioni originali
SV Översättning av bruksanvisning i original
FI Alkuperäisten ohjeiden käännös 28
NO Oversatt fra orginal veiledning
DA Oversættelse af den originale brugsanvisning
HU Eredeti használati utasítás fordítása 37
CS Překlad původního návodu k používání
10
The results of the present study are presented in Table 1. The mean values of the three parameters were 2.0% (range, 1.5 - 3.0% ) and 2.4% (range, 1.5 - 3.0% ). The mean values of the other parameters were 1.8% (range, 1.5 - 2.5% ) and 1.9% (range, 1.5 - 2.5% ). The mean values of the other parameters were 1.7% (range, 1.5 - 2.5% ) and 1.6% (range, 1.5 - 2.5% ).
16
19
22
25
The results of the present study are presented in Table 1. The mean values of the three parameters were 2.0% (range, 1.5 - 3.0% ) and 2.4% (range, 1.5 - 3.0% ). The mean values of the other parameters were 1.8% (range, 1.5 - 2.5% ) and 1.9% (range, 1.5 - 2.5% ). The mean values of the other parameters were 1.7% (range, 1.5 - 2.5% ) and 1.6% (range, 1.5 - 2.5% ).
31
34
The results of the present study are presented in Table 1. The mean values of the three parameters were 2.0% (range, 1.5 - 3.0% ) and 2.4% (range, 1.5 - 3.0% ). The mean values of the other parameters were 1.8% (range, 1.5 - 2.5% ) and 1.9% (range, 1.5 - 2.5% ). The mean values of the other parameters were 1.7% (range, 1.5 - 2.5% ) and 1.6% (range, 1.5 - 2.5% ).
40
SK Prevod izvirnih navodil 43
SL Preklad pôvodného návodu na použitie 46
PL Tłumaczenie instrukcji oryginalnej 49
LT Originalios instrukcijos vertimas 52
LV Instrukciju tulkojums no oriğinälvalodas 55
ET Algupärase kasutusjuhendi tõlge 58
RO Traducere a instructiunilor originale 61
HR Prevedeno s izvornih uputa 64
SR Prevod originalnog uputstva 67
RU Перевод исходных инструкций 70
UK Переклад оригінальних інструкцій 73
EL Μετάφραση του πρωτοτύπου των οδηγιών χρήσης 76
MK Оригинални упатства 79

A
B
C

D
Orbital Sander 180W
Thank you for buying this Ferm product.
By doing so you now have an excellent product, delivered by one of Europe's leading suppliers.
All products delivered to you by Ferm are manufactured according to the highest standards of performance and safety. As part of our philosophy we also provide an excellent customer service, backed by our comprehensive warranty. We hope you will enjoy using this product for many years to come.
SAFETY WARNINGS

WARNING
Read the enclosed safety warnings, the additional safety warnings and the instructions.
Failure to follow the safety warnings and the instructions may result in electric shock, fire and/or serious injury.
Keep the safety warnings and the instructions for future reference.
The following symbols are used in the user manual or on the product:

Read the user manual.

Risk of personal injury.

Risk of electric shock.

Immediately remove the mains plug from the mains if the mains cable becomes damaged and during cleaning and maintenance.

Wear safety goggles. Wear hearing protection.

Wear a dust mask.

Double insulated.

Do not dispose of the product in unsuitable containers.

The product is in accordance with the applicable safety standards in the
European directives.
ADDITIONAL SAFETY WARNINGS FOR FINISHING SANDERS

Contact with or inhalation of dust coming free during use (e.g. lead-painted surfaces, wood and metal) can endanger your health and the health of bystanders. Always wear appropriate protective equipment, such as a dust mask. Always use proper dust extraction during use.
- Do not work materials containing asbestos. Asbestos is considered carcinogenic.
- Do not use the machine for sanding magnesium workpieces.
- Wear safety goggles, hearing protection and if necessary other protective means, such as safety gloves, safety shoes, etc.
- Be very careful when sanding painted surfaces.
- Before use, remove all nails and other metal objects from the workpiece.
- Make sure that the workpiece is properly supported or fixed.
- Only use sanding paper that is suitable for use with the machine.
- Only use sanding paper with the correct dimensions. Make sure that the sanding paper is properly mounted.
- Inspect the sanding paper before each use. Do not use sanding paper that is worn because of prolonged use.
- Never put the machine down on a table or a workbench before it has been switched off.
ELECTRICAL SAFETY

Always check that the voltage of the power supply corresponds to the voltage on the rating plate.
- Do not use the machine if the mains cable or the mains plug is damaged.
- Only use extension cables that are suitable for the power rating of the machine with a minimum thickness of 1.5 mm^2 . If you use a extension cable reel, always fully unroll the cable.
Mains plug replacement (UK only)
If the moulded 3-pin plug attached to the unit is damaged and needs replacing, it is important that
it is correctly destroyed and replaced by an approved BS 1363/3A fused plug and that the following wiring instructions are followed.
The wires in the mains cable are coloured in accordance with the following code:
blue neutral
brown live
As the colours of the wires in the mains cable of the unit may not correspond to the coloured markings identifying the terminals in the plug, proceed as follows:
- The wire which is coloured blue must be connected to the terminal which is marked with the letter N or coloured black.
- The wire which is coloured brown must be connected to the terminal which is marked with the letter L or coloured red.
TECHNICAL DATA
PSM1024
| Mains voltage V~ 230 | |
| Mains frequency Hz 50 | |
| Power input W 180 | |
| No-load speed min | -1 12,000 |
| Sanding surface mm 187 x 92 | |
| Protection class IP 20 | |
| Weight kg 1.42 | |
NOISE AND VIBRATION
PSM1024
| Sound pressure (Lpa) dB(A) 76 | ||
| Acoustic power (Lwa) dB(A) 90 | ||
| Uncertainty (K) dB(A) 3 | ||
| Vibration m/s | 2 | 6.4 |
| Uncertainty (K) m/s | 2 | 1.5 |

Wear hearing protection.
Vibration level
The vibration emission level stated in this instruction manual has been measured in accordance with a standardised test given in EN 60745; it may be used to compare one tool with another and as a preliminary assessment of exposure to vibration when using the tool for the applications mentioned
- using the tool for different applications, or with different or poorly maintained accessories, may significantly increase the exposure level
- the times when the tool is switched off or when it is running but not actually doing the job, may significantly reduce the exposure level
Protect yourself against the effects of vibration by maintaining the tool and its accessories, keeping your hands warm, and organizing your work patterns
DESCRIPTION (FIG. A)
Your finishing sander has been designed for sanding wood, metal, plastics and painted surfaces.
- On/off switch
- Lock-on button
- Sanding pad
- Sanding paper clamp
- Grip
- Dust extraction connection
ASSEMBLY

Before assembly, always switch off the machine and remove the mains plug from the mains.
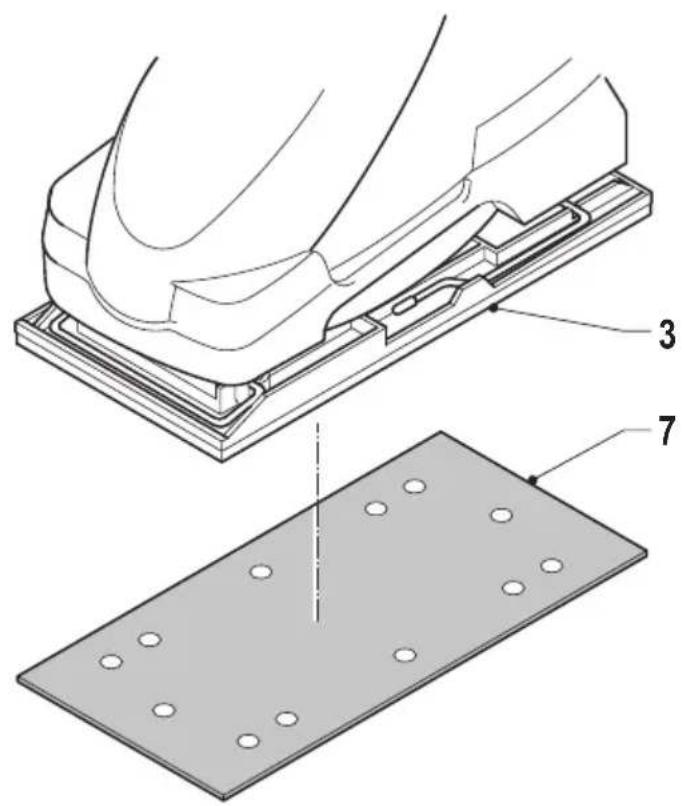
Mounting and removing the sanding paper (hook-and-loop system) (fig. B)
Mounting
- Mount sanding paper (7) with the required grain size onto the sanding pad (3). Make sure that the perforation in the sanding paper (7) corresponds with the perforation on the sanding pad (3).
Removing
- Remove the sanding paper (7) from the sanding pad (3).
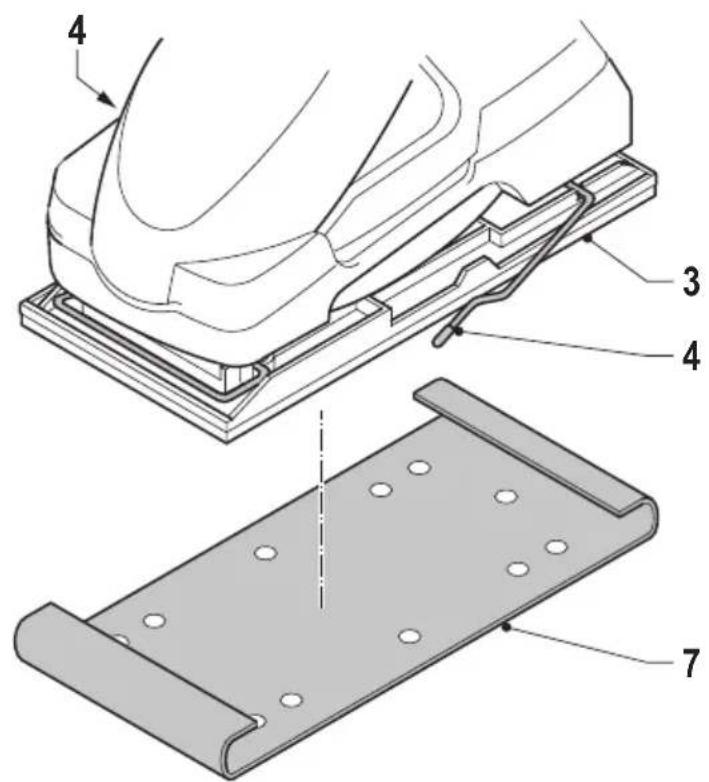
Mounting and removing the sanding paper (sanding paper clamps) (fig. C)
Mounting
- Open the sanding paper clamps (4).
- Mount sanding paper (7) with the required grain size onto the sanding pad (3). Make sure that the perforation in the sanding paper (7) corresponds with the perforation on the sanding pad (3).
- Fold the sanding paper (7) at both ends around the edges of the sanding pad (3).
- Close the sanding paper clamps (4) one by one. Make sure that the ends of the sanding paper (7) are clamped.
Removing
- Open the sanding paper clamps (4).
- Remove the sanding paper (7) from the sanding pad (3).
- Close the sanding paper clamps (4).
USE
Switching on and off (fig. A)
- To switch on the machine, press the on/off switch (1).
- To switch the machine to continuous mode, keep the on/off switch (1) pressed and simultaneously press the lock-on button (2).
- To switch off the machine, release the on/off switch (1).
Dust extraction (fig. D)
- Insert the dust extraction adapter (8) into the dust extraction connection (6).
- Connect the hose of a vacuum cleaner to the dust extraction adapter (8).
Hints for optimum use
- Clamp the workpiece.
- Firmly hold the machine by the grip.
- Switch on the machine.
- Place the sanding pad with sanding paper on the workpiece.
- Slowly move the machine over the workpiece, firmly pressing the sanding pad against the workpiece.
- Do not apply too much pressure on the machine. Let the machine do the work.
- Switch off the machine and wait for the machine to come to a complete standstill before putting the machine down.
CLEANING AND MAINTENANCE

Before cleaning and maintenance, always switch off the machine and remove the mains plug from the mains.
• Regularly clean the housing with a soft cloth.
- Keep the ventilation slots free from dust and dirt. If necessary, use a soft, moist cloth to remove dust and dirt from the ventilation slots.
- Regularly clean the sanding pad to avoid inaccuracies during use.
Replacing the sanding paper (fig. B)
- To remove the old sanding paper (7), proceed as described in the section "Mounting and
removing the sanding paper".
- To mount the new sanding paper (7), proceed as described in the section “Mounting and removing the sanding paper”.
WARRANTY
Consult the enclosed warranty terms.
ENVIRONMENT
Disposal

The product, the accessories, and the packaging must be sorted for environmentally friendly recycling.
Only for EC countries
Do not dispose of power tools into domestic waste. According to the European Guideline 2012/19/EU for Waste Electrical and Electronic Equipment and its implementation into national right, power tools that are no longer usable must be collected separately and disposed of in an environmentally friendly way.
The product and the user manual are subject to change. Specifications can be changed without further notice.
Tellerschleifer 180W
BESCHRIJVING (FIG. A)
DECLARATION OF CONFORMITY PSM1024 ORBITAL SANDER
(EN) We declare under our sole responsibility that this product is in conformity with directive 2011/65/EU of the European parliament and of the council of 9 June on the restriction of the use of certain hazardous substances in electrical and electronic equipment is in conformity and accordance with the following standards and regulations:
(DE) Der Hersteller erklärt eigenverantwortlich, dass dieses Produkt der Direktive 2011/65/EU des Europäischen Parlaments und des Rats vom 8. Juni 2011 über die Einschränkung der Anwendung von bestimmten gefährlichen Stoffen in elektrischen und elektronischen Geräten entspricht. den folgenden Standards und Vorschriften entspricht:
(NL) Wij verklaren onder onze volledige verantwoordelijkheid dat dit product voldoet aan de conform Richtlijn 2011/65/EU van het Europees Parlement en de Raad van 8 juni 2011 betreffende beperking van het gebruik van bepaalde gevaarlijke stoffen in elektrische en elektronische apparatuur en in overeenstem ming is met de volgende standaarden en reguleringen:
(FR) Nous déclarons sous notre seule responsabilité que ce produit est conforme aux standards et directives suivants: est conforme à la Directive 2011/65/EU du Parlement Européen et du Conseil du 8 juin 2011 concernant la limitation d'usage de certaines substances dangereuses dans l'équipement électrique et électronique.
(ES) D eclaramos bajo nuestra exclusiva responsabilidad que este producto cumple con las siguientes normas y estándares de funcionamiento: se encuentra conforme con la Directiva 2011/65/UE del Parlamento Europeo y del Consejo de 8 de junio de 2011 sobre la restricción del uso de determinadas sustancias peligrosas en los equipos eléctricos y electrónicos.
(PT) D eclaramos por nossa total responsabilida-de que este produto está em conformidade e cumpre as normas e regulamentações que se seguem: está em conformidade com a Directiva 2011/65/EU do Parlamento Europeu e com o Conselho de 8 de Junho de 2011 no que respeita à restrição de utilização de determinadas substâncias perigosas existentes em equipamento eléctrico e electrónico.
(IT) Dichiariamo, sotto la nostra responsabilità, che questo prodotto è conforme alle normative e ai regolamenti seguenti: è conforme alla Direttiva 2011/65/UE del Parlamento Europeo e del Consiglio dell'8 giugno 2011 sulla limitazione dell'uso di determinate sostanze pericolose nelle apparecchiature elettriche ed elettroniche.
(SV) V i garanterar på eget ansvar att denna produkt upp fyller och följer följande standarder och bestämmelser: uppfyller direktiv 2011/65/EU från Europeiska parlamentet och EG-rådet från den 8 juni 2011 om begränsningen av användning av farliga substanser i elektrisk och elektronisk utrustning.
(FI) Vakuutamme yksinomaan omalla vastuullamme, että tämä tuote täyttää seuraavat standardit ja säädökset: täyttää Euroopan parlamentin ja neuvoston 8. kesäkuuta 2011 päivätyn direktiivin 2011/65/EU vaatimukset koskien vaarallisten aineiden käytön rajoitusta sähkö- ja elektronisissa laitteissa.
(NO) V i erklærer under vårt eget ansvar at dette produktet er i samsvar med følgende standarder og regler: er i samsvar med EU-direktivet 2011/65/EU fra Europa-parlamentet og Europa-rådet, pr. 8 juni 2011, om begrensning i bruken av visse farlige stoffer i elektrisk og elektronisk utstyr.
(DA) V i erklærer under eget ansvar, at dette produkt er i overensstemmelse med følgende standarder og bestemmelser: er i overensstemmelse med direktiv 2011/65/EU fra Europa-Parlamentet og Rådet af 8. juni 2011 om begrænsning af anvendelsen af visse farlige stoffer i elektrisk og elektronisk udstyr.
(HU) F elelősségünkteljes tudatában kijelentjük, hogy ez a termék teljes mértékben megfelel az alábbi szabványoknak és előírásoknak: je v souladu se směrnici 2011/65/EU Evropského parlamentu a Rady EU ze dne 8. června 2011, která se týká omezení použití určitých nebezpečných látek v elektrických a elektronických zařízeních.
(CS) Na naši vlastní zodpovědnost prohlašujeme, že je tento výrobek v souladu s následujícími standardy a normami: Je v súlade s normou 2011/65/EÚ Európskeho


- PSM1024
- Orbital Sander 180W
- SAFETY WARNINGS
- WARNING
- ADDITIONAL SAFETY WARNINGS FOR FINISHING SANDERS
- ELECTRICAL SAFETY
- Mains plug replacement (UK only)
- Vibration level
- DESCRIPTION (FIG. A)
- ASSEMBLY
- Mounting and removing the sanding paper (hook-and-loop system) (fig. B)
- Mounting
- Removing
- Mounting and removing the sanding paper (sanding paper clamps) (fig. C)
- USE
- Switching on and off (fig. A)
- Dust extraction (fig. D)
- Hints for optimum use
- CLEANING AND MAINTENANCE
- Replacing the sanding paper (fig. B)
- WARRANTY
- ENVIRONMENT
- Disposal
- Only for EC countries
- Tellerschleifer 180W
- BESCHRIJVING (FIG. A)
- DECLARATION OF CONFORMITY PSM1024 ORBITAL SANDER
Brand : Ferm
Model : PSM1024
Category : Sander