
ECOUTE BEBE AUDIO DIGITAL ESSENTIAL - Baby monitor CHICCO - Free user manual and instructions
Find the device manual for free ECOUTE BEBE AUDIO DIGITAL ESSENTIAL CHICCO in PDF.
| Product type | Digital video baby monitor |
| Brand | CHICCO |
| Model | BABY MONITOR AUDIO DIGITAL ESSENTIAL (Model 06626) |
| Parent unit power supply | Rechargeable lithium-ion battery 3.7 V 1800 mAh or mains adapter 100-240 V~ 50/60 Hz, 6.5 V 550 mA |
| Baby unit power supply | 4 alkaline AA/LR6 1.5 V batteries or mains adapter 100-240 V~ 50/60 Hz, 6.5 V 550 mA |
| Screen | 2.4-inch colour LCD, adjustable to 7 brightness levels |
| Range | Approximately 150 m in open field (reduced by obstacles) |
| Transmission frequency | 2400-2454 MHz, Adaptive Frequency Hopping technology |
| Night vision | 8 infrared LEDs, automatic activation in low light, black and white images |
| Nightlight | Fixed or variable intensity (12-minute cycle), automatic shutoff on batteries |
| Voice activation function | Yes, selectable via ON/OFF switch |
| Indicators | 5-LED light bar for sound level, connection and charging indicators |
| Volume control | 10 levels, memorized after shutdown |
| Connection loss signal | Flashing green light + 2 beeps per second after 10 s |
| Package contents | Baby unit, parent unit, 2 mains adapters, lithium-ion battery, instruction manual |
| Safety | Double insulation (class II), compliant with CE directives, keep out of reach of children |
| Maintenance | Clean with a soft dry cloth, do not use solvents |
| Spare parts | Replacement battery: code 20256600100, adapter: model S004LV0650055 |
Frequently Asked Questions - ECOUTE BEBE AUDIO DIGITAL ESSENTIAL CHICCO
User questions about ECOUTE BEBE AUDIO DIGITAL ESSENTIAL CHICCO
0 question about this device. Answer the ones you know or ask your own.
Ask a new question about this device
Download the instructions for your Baby monitor in PDF format for free! Find your manual ECOUTE BEBE AUDIO DIGITAL ESSENTIAL - CHICCO and take your electronic device back in hand. On this page are published all the documents necessary for the use of your device. ECOUTE BEBE AUDIO DIGITAL ESSENTIAL by CHICCO.
USER MANUAL ECOUTE BEBE AUDIO DIGITAL ESSENTIAL CHICCO
Essential Digital Video Baby Monitor


Mod. 06626

Essential Digital Video Baby Monitor
Essential Digital Video Baby Monitor
Digital technology:
Higher Privacy standards - Zero interference
Essential Digital Video Baby Monitor The Essential Digital Video Baby Monitor provides essential performance for seeing your baby at all times, staying in contact with him inside and outside the home. Its large 2.4 inch display and adjustable infrared camera (also works in the dark) offer you excellent vision and a perfect shot. The dual steady or variable intensity function of the small night light keeps the little one company while they sleep or just before. When voice activation is set, the parent unit will start only in the presence of sounds detected from the Baby unit. The digital technology used allows interference-free reception* and a high standard of privacy. Both units (parent and child) can run on batteries (including a rechargeable lithium battery for the parent unit) or by means of the mains adaptor (two included).
Transmission frequency band: 2400-2454 MHz.
Operating range: about 150m^** .
*High immunity to interference from analogue devices.
** In optimal conditions in an open field with no obstacles.
PACK CONTENTS
- One Baby unit (primarily in transmitter mode of images and sounds)
- One parent unit (primarily in receiver mode of images and sounds)
- Two mains switching adapters 100-
240V\~ 50/60Hz /6.5V ——, 550mA
- Rechargeable lithium-ion battery, 3.7V 1800mAh (for the parent unit)
- One instructions manual

GENERALWARNINGS
- Do not leave any packaging materials (plastic bags, cardboard boxes, etc.) within the reach of children as these can be hazardous.
- Before using the device, verify that no products or components are damaged. If it is damaged, do not use the product and contact a qualified technician or your retailer.
- Never attempt to repair the product, but simply follow the instructions provided in the "Troubleshooting" section. Contact Artsana S.p.A. Customer Service for repairs.
- Do not open equipment. The Baby unit (primarily in transmitter mode of images and sounds), the parent unit (primarily in receiver mode of images and sounds), the rechargeable lithium-ion battery and mains adapters do not contain any user serviceable parts. Contact skilled technical personnel or Artsana S.p.A. Customer Service in the event of failure. Opening the above-mentioned devices can cause electric shock.
- The Chicco Essential Digital Video Baby Monitor should not be used as a medical monitor and is not intended to replace the supervision of children by adults; it is designed to provide a way of supporting their surveillance. All other use is to be considered improper.
Place the Baby unit and parent unit out of the reach of the baby on a flat,

stable surface.
- Keep the Baby unit, parent unit, the rechargeable lithium-ion battery and the AC/DC mains adapters out of reach of children (main adapter cords could cause strangulation).
- It is important to regularly check the proper functioning of the Baby unit (primarily in transmitter mode of images and sounds) and the parent unit (primarily in receiver mode of images and sounds), particularly before each use, checking that signal reception is possible in the area and at a maximum distance of the intended use.
- The maximum operating distance is around 150 metres in an open space without obstacles (this range could be reduced considerably indoors according to the environmental situations, the layout of walls and furniture, the presence of metal structures, electromagnetic fields/disturbances of internal or external origin, reinforced concrete walls, when rooms are located on different floors, or when the batteries are not charged completely etc.)
- When the Baby unit and/or parent unit are powered with Alkaline batteries and/or rechargeable lithium-ion battery, the product will stop working if the charging level is not sufficient. It is therefore always advisable to check Alkaline batteries and/or rechargeable lithium-ion battery status when switching on both units.
- In the event of a sudden electricity outage, when the parent unit (primarily in receiver mode) is being powered with the provided mains adapter, the product will stop working only if the charging level of the rechargeable lithium-ion battery is not sufficient or the battery is not inserted in the
battery compartment. It is therefore always advisable to check the status or installation.
- Do not use the Baby unit (primarily in transmitter mode of images and sounds), the parent unit (primarily in receiver mode of images and sounds), the rechargeable lithium-ion battery and adapters in positions exposed to the elements (rain, sun, etc.). Whenever using the unit outdoors, the Baby unit (primarily in transmitter mode of images and sounds) and the parent unit (primarily in receiver mode of images and sounds) must be powered via internal Alkaline batteries and/or rechargeable lithium-ion battery: the mains adapters supplied with the product are not suitable for outdoor use.
- To prevent overheating, keep the Baby unit (primarily in transmitter mode of images and sounds), the parent unit (primarily in receiver mode of images and sounds), the rechargeable lithium-ion battery and, especially, AC/DC mains adapters away from sources of heat, for example radiators, thermostats, stoves, cookers, sunny windows, etc.
- Never use (especially if connected to the mains with the mains adapters) the two units close to areas or situations where water is found, such as bathtubs, washing machines, kitchen sink or wet surfaces. Do not immerse or wet. Do not use the unit and adapters if they have fallen in water. In this case, contact skilled technical personnel.
- Keep the Baby unit (primarily in transmitter mode of images and sounds), the parent unit (primarily in receiver mode of images and sounds)


and the AC/DC mains adapters so as to allow adequate ventilation and to avoid the risk of overheating components.
- Do not use this product near fluorescent lamps (Neon) or other electrical appliances such as televisions, motors, personal computers, cordless telephones, DECT cordless phones etc. Doing so could interfere with its operation.
- Only use the AC/DC mains adapters supplied with the product or an identical type with the same electrical characteristics. Use of other adapters could damage the Baby unit and/or parent unit and cause danger to the user.
- Adapter power cords cannot be replaced and, therefore, in case of damage, do not continue to use the mains adapter but replace it with an identical type adapter.
Attention: Do not use a mains adapter different from the one supplied with this Artsana S.p.A. product, as doing so renders the product non-compliant with technical standard specifications established by the relevant EC directives affecting product safety and integrity. Contact the retailer or Artsana S.p.A. to replace.
- Ensure that AC/DC mains adapters voltage (see data plate located on the AC/DC mains adapters) matches that of the mains electricity and that the mains adapter plug is compatible with your electrical system outlets.
- Connect the AC/DC mains adapters to easily accessible power outlets which are, however, out of reach of children. Position AC/DC mains adapt
er cords so as to prevent the cord from being walked on, from getting caught in items placed upon or against them, or from being accessible to the baby and therefore constituting a risk (tripping, choking).
The AC/DC mains adapters, the Baby unit (primarily in transmitter mode of images and sounds) and the parent unit (primarily in receiver mode of images and sounds) may be become hot to the touch when in use. This is normal.
Always disconnect the AC/DC mains adapters from the power socket when the appliance is not in use.
- The replacement of Alkaline batteries or the rechargeable lithium-ion battery must always be carried out only by an adult and with rechargeable batteries having the same characteristics as those mentioned in this instructions manual.
- The Baby unit (primarily in transmitter mode of images and sounds) is equipped with a light-sensitive sensor that automatically activates the infrared LEDs in case of reduction of ambient light or dark, thus allowing viewing in low light conditions.
- Since the infrared LEDs on the Baby unit (primarily in transmitter mode of images and sounds) do not emit visible light, test function by checking the image transmitted from the parent unit camera unit, when the Baby unit is positioned in a dimly lit room.
The infrared LEDs on the Baby unit (primarily in transmitter mode of images and sounds) are not harmful to health.
ATTENTION!
It is advisable to avoid direct view

ing of the infrared radiation emission along the axis by the naked eye or by optical devices.
ATTENTION!
TO REDUCE THE RISK OF ELECTRIC SHOCK,DO NOT REMOVE THE PROTECTION OR ATTEMPT TO OPEN MAINS ADAPTERS. DO NOT WET MAINS ADAPTERS, THE Baby unit OR PARENT UNIT. DO NOT EXPOSE TO HUMIDITY OR ATTEMPT TO OPEN THEM. THIS MAY BE A SOURCE OF DANGER AND SHALL VOID THE WARRANTY.
1. Configuration & Features
This monitoring device, created with "Adaptive frequency Hopping" digital transmission technology, can be used as an aid in baby monitoring in the home. This baby monitor includes a Baby unit (primarily in transmitter mode of images and sounds) and a parent unit (primarily in receiver mode of images and sounds).
Both these devices use "Adaptive frequency Hopping" digital transmission technology to establish a radio connection that allows the sending and receiving of sounds and images.
1.1 System features
Main system features include:
- Visual and voice transmission via "Adaptive frequency Hopping" digital technology system.
- Outdoor operating range of about 150 metres without obstacles.*
- The maximum operating range is about 150 metres in an open field with no obstacles and with fully charged batteries (the range, however, could be reduced substantially within a home, depending on particular en
vironmental conditions, layout of walls and furniture in the home and the presence of metallic structures, external and internal interference/electromagnetic fields, concrete walls or between rooms on different floors or because batteries are not fully charged, etc.).
1.2 Baby unit (primarily in transmitter mode of images and sounds) Model 06626
- Power via 100-240V\~,50/60Hz /6.5V=—,550mA mains switching adapter or via 4 1.5V AA /LR6 Alkaline batteries (not included).
- On/Off button
- Night light On/Off button
- Nightlight
- Camera lens
- Microphone
- Infrared lighting system (8 LEDs) to allow viewing of the baby in the dark 8. Light-sensitive sensor
- Power and link indicator light:
(a) Steady green: linked with parent unit
(b) Flashing green: absence of or loss of link with parent unit
(c) OFF: Baby unit off
10. Alkaline battery compartment closing panel
11. Baby unit power connector
12. Alkaline battery status indicator light:
(a) Flashing red: Alkaline batteries almost flat
(b) OFF: Alkaline batteries charged or operation via mains adapter (1)

1.3 Parent unit (primarily in receiver mode of images and sounds) Model 06626
-
Power via supplied rechargeable 3.7V, 1800mAh lithium-ion battery or via 100-240V-, 50/60Hz /6.5V ——, 550mA mains switching adapter
-
On/Off button
-
Lit level indicator bar for sounds emitted by the child
-
2.4^ LCD colour display. The LCD display allows real time visualisation of the baby and the following icons:
-
charging and recharging status of the rechargeable Lithium-ion battery of the parent unit
-
proper connection between the Baby unit and parent unit
-
loss or lack of connection between the Baby unit and parent unit
-
volume adjustment level
-voice activation function set
-
Parent unit loudspeaker + (5a), - (5b) volume adjustment buttons
-
Built-in loudspeaker for sound reproduction of sounds emitted by the child.
This performs the following additional functions at the same time:
a) Absence of or loss of link between baby and parent unit signal function: approx. 10 seconds after the power and link indicator light starts to flash green, you will hear 2 consecutive beeps per second. As soon as the link with the Baby unit is restored, the signal switches off and the power and link indicator light will light up steady green.
b) Rechargeable lithium-ion battery status almost flat signal function: you hear 1 beep per second and the rechargeable battery indicator light
begins to flash red. When charging of the rechargeable lithium-ion battery begins, the beep switches off and the rechargeable battery status indicator light lights up steady red until charging is complete.
- ON/OFF voice activation or continuous transmission selector
- Power and link indicator light:
(a) Steady green: linked with Baby unit
(b) Flashing green: absence of or loss of link with Baby unit
(c) OFF: parent unit off - Rechargeable lithium-ion battery status indicator light:
(a) Flashing red: rechargeable battery almost flat
(b) Steady red: charging of rechargeable batteries in progress via mains adapter
(c) OFF: rechargeable battery charged or operation via mains adapter without rechargeable battery - Rechargeable battery compartment closing panel
- Belt hook
- Hole for support cord (not included)
- 3.7V 1800mAh rechargeable lithium-ion battery via 100-240V\~ 50/60Hz /6.5V= 550mA mains switching adapter
- Power connector and/or rechargeable lithium-ion battery charger
- Display brightness control button (7 levels)
1.4 Icons shown on the display

Proper connection between units

Loss or lack of connection between units

Voice Activation Function active

Minimum volume level

Maximum volume level

Rechargeable battery charged

Medium charging level on rechargeable battery

Low charging level on rechargeable battery

Rechargeable battery flat: the parent unit will switch off within a few minutes
2. Description of features
2 Baby unit (primarily in transmitter mode of images and sounds)
2.1.1 Power:
Power via 100-240V\~,50/60Hz /6.5V ——, 550mA (1) mains switching adapter or via 4 1.5V AA /LR6 Alkaline batteries (not included).
When power is supplied with mains adapter (1):
-
verify that the voltage corresponds to the rating plate of the previously indicated adapters.
-
insert the mains adapter jack (1) in the power connector (11) on the side of the unit.
-
insert the mains adapter plug in an easily accessible power socket.
ATTENTION:
- The adapter cord may constitute a risk of strangulation, keep out of reach of children.
Periodically inspect mains adapters (1). If the power cord or plastic parts
show signs of damage, do not use them and contact a qualified technician.
- Do not leave mains adapters (1) plugged into the outlet when devices are not in use and/or not connected to the mains adapters (1).
2.1.2 Modes of use - Switching on and Adjustment
The Baby unit (primarily in transmitter mode of images and sounds) must be positioned about 1 - 1.5 metres from the child, on a flat, stable surface and with the microphone (5) and the camera lens (5) directed toward the child.
Attention: the Baby unit, mains adapter (1) and its power cord must be kept out of reach of children.
Switching the Baby unit on/off
Press the on/off button (2) for about 2 second. The Baby unit (primarily in transmitter mode of images and sounds) will switch on.
The power and link indicator light (9) will begin to flash green to indicate that the Baby unit is searching for a connection to start audio transmission with the parent unit. Once connection has been established between the 2 units, the power and link indicator light will light up steady green.
Keep the button (2) pressed for 2 seconds. The power and link indicator (9) and the Baby unit (primarily in transmitter mode of images and sounds) will switch off.
Nightlight
A night light (4) is present on the Baby unit.
The nightlight can be set with a dual function: nightlight at minimum in

tensity and steady to reassure the baby while he sleeps, and a nightlight with high intensity, variable light to accompany him while he falls asleep.
Nightlight On/Off in Minimum intensity, fixed and variable intensity modes
Press the nightlight On/Off button (2) and the nightlight will switch on at minimum intensity and steady.
If during this operating mode, you press the nightlight On/Off button (3) once, the Variable brightness nightlight mode will be activated.
Brightness will automatically vary from maximum level to minimum level.
At the twelfth minute, nightlight brightness will remain fixed at minimum level.
- 0-4 minutes maximum-medium high intensity
- 4-8 minutes medium-high-medium-low intensity
- 8-12 minutes medium-low-minimum intensity
-over 12 minutes nightlight at minimum intensity and steady
During the Variable brightness nightlight operating mode, if the nightlight On/Off button (3) is pressed once, light brightness will return steady at minimum level.
If the nightlight On/Off button (3) is pressed again in this operating mode, the brightness variation cycle will begin again, starting from maximum level. Press the nightlight On/Off button (3) button again for 2 seconds and the nightlight will switch off, both in minimum, steady brightness and in
Variable brightness nightlight mode. For energy savings, when the Baby unit (primarily in transmitter mode of images and sounds) is being powered via Alkaline batteries, the nightlight, if in minimum intensity and steady mode, switches off automatically 5 minutes after the end of the Variable brightness nightlight operating mode cycle.
If the Baby unit (primarily in transmitter mode of images and sounds) is being powered via mains adapter (1), the nightlight will remain on in both modes until the button (3) is pressed again for 2 seconds.
The nightlight can be switched on even when the Baby unit is off.
Luminous operating status indicators
- The power and link indicator light (9) supplies 3 different pieces of information:
- Indication that the device is on and properly connected to parent unit: the indicator light (9) will light up steady green.
- Indication of loss or absence of link with the parent unit:
the indicator light (9) will light up green and begin to flash.
As soon as the link with the parent unit is restored, the indicator light (9) will light up steady green.
NOTE: when the Baby unit switches on, it searches for the channel to link with the parent unit; therefore the indicator light (9) will flash green until a link is established.
-Indication of device off: the indicator light (9) will switch off.
- The Alkaline battery status indicator light (12) supplies 2 different pieces of information:
-Indication that Alkaline batteries are almost flat:
the indicator light (12) will light up red and begin to flash.
- Alkaline batteries charged or operation via mains adapter (1):
the indicator light (12) will switch off.
Night Vision
In case of darkness or decrease in the brightness of the room where the Baby unit is located, the light-sensitive sensor (8) will automatically activate the infrared lighting system (7) to allow viewing of the baby even in the dark.
Attention:
When night vision is active, the parent unit display (4) image colours will be altered and, in the event of darkness, the images will appear in black and white: this is to be considered normal.
2.2 Parent unit (primarily in receiver mode of images and sounds)
2.2.1 Power and recharging:
Power via supplied rechargeable 3.7V, 1800mAh (1) lithium-ion battery or via 100-240V-, 50/60Hz /6.5V ——, 550mA (1) mains switching adapter.
ATTENTION: The charging of rechargeable batteries should only be done via the supplied mains adapter (1) and can be performed both if the parent unit is switched on and if the parent unit is off.
In the event of power with mains adapter (1) or rechargeable lithium-ion battery charging:
-
verify that the voltage corresponds to the rating plate of the previously indicated adapters.
-
insert the mains adapter jack (1) in
the power connector (14) on the side of the unit.
- insert the mains adapter plug in an easily accessible power socket.
Attention:
- The mains adapter cord (1) may constitute a risk of strangulation, keep out of reach of children.
Periodically inspect mains adapters (1). If the power cord or plastic parts show signs of damage, do not use them and contact a qualified technician. - Do not leave mains adapters (1) plugged into the outlet when devices are not in use and/or not connected to the mains adapters (1)
2.2.2 Modes of use - Switching on and Adjustment
Switching on/off the parent unit (primarily in receiver mode of images and sounds)
Press the on/off button (2) for about 2 second. The parent unit (primarily in receiver mode of images and sounds) will switch on. The power and link indicator light (8) will begin to flash green and the display (4), after briefly displaying the Chicco logo, will show the icon to indicate that the parent unit is searching for a connection with the Baby unit. Once connection has been established between the 2 units, the icon will be shown, the link indicator light (8) will light up a steady green and the image detected in real time by the camera (5) on the Baby unit will be shown.
Keep the button (2) pressed for 2 seconds until the power and link indicator (8) and the parent unit (primar


ily in transmitter mode of images and sounds) switch off.
A long beep will be heard when switching the parent unit on and off.
Volume adjustment + - of the parent unit loudspeaker
The + (5a)_- (5b) volume adjustment buttons (6) regulate the volume of sounds emitted by the Baby unit.
Press + 5a and -5b to regulate parent unit loudspeaker (6) volume and select the desired level.
The unit offers up to 10 volume setting levels. The factory set volume level is 5.
Press the "+" button (5a) to increase one level.
Press the" (5b) button once to decrease one level.
The change in the volume level will be shown on the display (4)
The device stores the volume level selected during previous use in its memory, even after it has been switched off and switched back on.
Note: The volume adjustment icon includes 5 notches: each notch lights up after 2 presses of the + (5a)/- (5b) button.
A beep will be heard each time volume is increased or decreased by a level.
A double beep will be heard each time the maximum or minimum level is met.
Brightness adjustment of the parent unit
Press the brightness adjustment button (15) and the LCD display (4) brightness will vary cyclically by one level. It is possible to select up to 7
brightness levels.
Voice Activation function
The parent unit (primarily in transmitter mode of images and sounds) can function in continuous mode (OFF) or in voice activation mode (ON) (7). When the intensity of the sounds detected by the microphone (6) on the Baby unit exceeds the threshold for voice activation set by the manufacturer, the image of the baby is shown in real time on the display (4) and the loudspeaker (6) on the parent unit (primarily in transmitter mode of images and sounds) is activated. In the presence of sounds with intensity less than this threshold, the LCD display (4) interrupts image visualisation of the baby and the loudspeaker (6) on the parent unit (primarily in transmitter mode of images and sounds) is deactivated. When this function is set, the ⑤ icon is shown on the display (4).
Parent unit portability
The parent unit is equipped with a useful belt hook (11) for carrying it around.
You can carry the parent unit with you, using the support cord (not included), to be inserted in the hole (12).
Luminous and acoustic operating status indicators:
The power and link indicator light (8) supplies 3 different pieces of information:
-
Indication that the device is on and properly connected to Baby unit: the indicator light (8) will light up steady green.
-
Indication of loss or absence of link with the Baby unit:
the indicator light (8) will light up green and begin to flash. At the same time on the display (4) that the image of the baby disappears, the icon appears and, after about 10 seconds, 2 consecutive beeps per second are heard.
As soon as the link is restored, the beep will switch off and the display (4) will show the icon and the indicator light (8) will light up steady green.
NOTE: when the parent unit switches on, it searches for the channel to link with the Baby unit; therefore the indicator light (8) will flash green and the display will show the icon until a link is established.
-Indication of device off: the indicator light (8) will switch off.
- The rechargeable lithium-ion battery status indicator light (9) supplies 3 different pieces of information:
-Indication that the rechargeable battery (13) is almost flat: the indicator light (9) will light up red and begin to flash. At the same time on the display (4), the battery flat icon appears and a beep is heard each second.
If you want to continue using the device, it is advisable to charge the rechargeable lithium-ion battery (13); otherwise, the device will stop working. Charge the rechargeable lithium-ion battery (13) by connecting the mains adapter (1) to the parent unit power and charger connector (14). When charging starts, the beep will switch off.
-Indication that the rechargeable battery (13) is charging: when charging begins, the indicator light (9) switches on steady red and the display shows the icon of a battery with its internal
notches switching on in succession. Leave the battery to charge until the indicator light (9) switches off and until the icon on the display remains steady.
The parent unit can still be used to monitor the baby while the rechargeable battery is charging, but the time required to reach full charge will be longer.
-Indication that the rechargeable battery is charged or of operation via mains adapter (1) without rechargeable battery:
the indicator light (9) will switch off.
- Lit level indicator bar for sounds emitted by the baby (3):
Illuminates progressively from the centre outward, indicating 3 levels of sound intensity coming from the Baby unit (primarily in transmitter mode of images and sounds) microphone (6)
Allows parents to monitor sounds emitted by the baby even when the parent unit loudspeaker volume is switched off.
□□□ the central LED lights up if sounds emitted by the baby are of a relatively low intensity.
3 LEDs light up if sounds emitted by the baby are of medium intensity.
5 LEDs light up if sounds emitted by the baby are of a relatively high intensity.
Attention: After switching on the parent unit (primarily in receiver mode of images and sounds) always check the power status of the Baby unit (primarily in transmitter mode of images and sounds)!
After switching on the unit, always check that reception of the transmit


ted signal is possible at the distance and/or in the areas within where it has been set. It is advisable to carry out a test with the help of a family member from the room where the Baby unit has been placed, moving simultaneously with the parent unit in areas where it has been set, to verify correct reception of the transmitted signal.
- Installation and replacement of Alkaline batteries in the Baby unit (primarily in transmitter mode of images and sounds) and the rechargeable lithium-ion battery in the parent unit (primarily in receiver mode of images and sounds)

Warning: these operations only be performed by an

Attention: RECOMMENDFOR ALKALINE BATTERY USE
- Alkaline batteries must always be replaced by an adult.
- alkaline batteries that are the same or equivalent to the type recommended for the operation of this product (Alkaline 1.5V AA/LR6).
- Insert batteries in the Baby unit, making sure that the insertion polarity is as indicated in the battery compartment.
- Do not mix different types of Alkaline batteries or discharged Alkaline batteries with new batteries.
Do not leave Alkaline batteries or any tools within the reach of children. -
Do not short-circuit the power terminals.
-
Always remove discharged batteries from the product to avoid any possible liquid leaks that may damage it.
In case of prolonged non-use of the product, always remove the batteries. - Remove the Alkaline batteries from the device before disposal.
-Do not throw discharged batteries in fire or dispose of them in the environment; they must be recycled. - If the batteries are leaking liquid, replace them immediately, making sure to clean the battery compartment; thoroughly wash your hands if they have come into contact with the liquid.
- Do not attempt to recharge non-rechargeable batteries: they may explode.
- The use of rechargeable batteries is not recommended as they may reduce the device's operability.
- The device is not designed to run on replaceable lithium batteries.
WARNING: improper use may create hazardous conditions.

Attention: RECOMMENDA-FOR LITHIUM BATTERY USE
- Do not dismantle, open or tear lithium batteries.
- Do not short-circuit lithium battery terminals. Do not store lithium batteries in an improper way inside boxes and/or drawers in which terminals can be short-circuited by each other or can be short-circuited by conductive material.
- Do not remove lithium batteries from their original packaging upon use.
Do not expose lithium batteries to heat or fire. Do not expose to direct


sunlight.
- Do not expose lithium batteries to mechanical shock. In case of accidental falls, always check the status of the container and contacts before proceeding with re-use. Do not use if the lithium battery is damaged as a result of the fall.
- In the case of liquid leakage from the battery, be careful to avoid contact with skin and eyes with the liquid. If contact occurs, wash affected areas with plenty of water and seek medical advice.
- Do not use any charger not specifically provided for use with the equipment.
Observe the markings (±) and (-) on the Lithium battery and on the product to ensure proper insertion and use. - Do not use a lithium battery different from that supplied to power the device.
- Keep Lithium batteries away from the reach of children.
- This device has been designed to prevent and inhibit the incorrect insertion of the lithium battery: always observe the relative polarity markings on the product and on the Lithium battery to ensure proper use.
- Do not use a model of battery that is different than that stated in this instruction manual in the device. The battery purchase reference code is COD.20256600100
-
Recharge the lithium battery only under application and only using the mains adapter supplied (COD.20256600200). Do not recharge the lithium battery using an external battery charger. Follow the instructions in this manual to recharge the lithium battery.
-
Keep the battery and the battery contacts clean and dry. In the event that the contacts become dirty, clean the terminals with a soft, dry cloth. Do not use abrasives, chemicals or solvents to clean the battery and its contacts.
- Lithium batteries require charging prior to use. Always refer to the instructions for correct charging procedures.
- Do not keep charging the lithium battery when not in use.
- Always remove the Lithium battery from the product when not in use.
- Dispose of properly according to the information in this manual.
3.1 Installing Alkaline batteries not included in the Baby unit (primarily in transmitter mode of images and sounds)
Remove the Alkaline battery compartment closing panel placing your finger near the arrow and gently pulling the panel upward (fig.1).
Insert 4 1.5V Alkaline AA/LR6 batteries, respecting the proper insertion polarity as indicated in the battery compartment.
Reposition the Alkaline battery compartment closing panel (10) first inserting the lower panel hooks in their battery compartment housing and gently pushing the panel downward (fig.2).
3.2 Replacing Alkaline batteries not included in the Baby unit (primarily in transmitter mode of images and sounds)
Remove the Alkaline battery compartment closing panel placing your finger near the arrow and gently pulling the


panel upward (fig.3).
Remove the 4 1.5V Alkaline AA/LR6 batteries and replace them with 4 similar batteries, taking care to respect the proper insertion polarity as indicated in the battery compartment. Reposition the Alkaline battery compartment closing panel (10) first inserting the lower panel hooks in their battery compartment housing and gently pushing the panel downward (fig.4).
3.3 Installing the lithium-ion battery supplied with the parent unit (primarily in receiver mode)
Upon purchase, the 3.7V1800mAh rechargeable lithium-ion battery (13) in the parent unit is kept separately in the product packaging.
Carefully remove the lithium-ion battery from its packaging.
Remove the rechargeable battery compartment closing panel (10), placing your finger near the top groove and gently pulling the panel outward (fig.5).
Insert the lithium-ion battery (13), respecting the proper insertion polarity as indicated in the battery compartment.
Reposition the rechargeable battery compartment closing panel (13), first inserting the lower panel hooks in their battery compartment housing and gently pushing the panel toward the product (fig.6).
3.4 Replacing the lithium-ion battery supplied with the parent unit (primarily in receiver mode)
If the duration of the rechargeable lithium-ion battery is reduced excessively, this means that it has run out
and therefore must be replaced (this is to be considered normal because rechargeable batteries run out over time).
Remove the rechargeable battery compartment closing panel (10), placing your finger near the top groove and gently pulling the panel outward (fig.7).
Remove the run out rechargeable battery (13) and replace with another rechargeable battery that is identical to the 3.7V 1800mAh supplied with the product (code20256600100 to be requested directly from Arsana S.p.A.) taking care to place them with the correct insertion polarity indicated on the battery compartment.
Reposition the rechargeable battery compartment closing panel (10), first inserting the lower panel hooks in their battery compartment housing and gently pushing the panel toward the product (fig.8).
TECHNICAL SPECIFICATIONS
Baby unit (primarily in transmitter mode of images and sounds) Mod.06626
Power:
Internal: FOUR 1.5V AA/LR6 ALKALINE BATTERIES
External: via 100-240V~ 50/60Hz /6.5V —— 550mA mains switching adapter
Transmission:
Transmission frequency band: 2400-2454MHz
- Signal strength: 100mW max LED infrared radiation: emissions below LEA Class 1, standard EN 60825-1


Parent unit (primarily in receiver mode of images and sounds)
Mod. 06626
Power:
Internal: 3.7V 1800mAh LITHIUMION BATTERY
External: via 100-240V~ 50/60Hz /6.5V — — 550mA mains switching adapter
Lithium-ion battery charging via 100-240V ~ 50/60Hz /6.5V ——
550mA mains switching adapter Reception:
Transmission frequency band: 2400-2454MHz
Signal strength: 100mW max
Mains adapter
Mod. S004LV0650055
INPUT: 100-240V~, 50/60Hz, 150mA
OUTPUT: 6.5V = - - - ,550mA
Plug polarity: -C-
Made in China
Lithium-ion battery
Mod. 663960 (ICP66/39/60)
Nominal capacity: 1800mAh (6.66Wh)
Nominal voltage: 3.7V
Lithium batteries give best performance when used at normal room temperature (20^ ± 5^)
Made in China
SYMBOLS KEY

monophase alternate current

direct current

for indoor use only

Class II - double insulation equipment
C€0470
Conforms to EC Directive and subsequent pertaining amendments

ATTENTION. Read the instructions for use

TROUBLESHOOTING
If you experience problems, please first check the following list and check that:
- Both units are on
- Both units are properly connected to the power socket via the mains adapter (1), or that batteries are charged.
| FAULT | CAUSE | SOLUTION |
| Parent unit (receiver)/ Baby unit (transmitter) power and link indicator (8) off | - Baby unit (transmitter) and/or parent unit (receiver) off. - Baby unit Alkaline batteries (not included) and/or parent unit lithium-ion battery completely discharged. - Main's adapter disconnected or not connected correctly. - No mains voltage. | - If necessary, switch on the Baby unit (transmitter) and/or the parent unit (receiver). - Replace Alkaline batteries in the Baby unit and/or charge rechargeable lithium-ion battery in the parent unit - If the units are powered via mains adapter, verify that this device is correctly connected to a mains outlet. - Check that the outlet is being powered. |
| The parent unit (receiver) does not emit any sounds | - No discernible sounds are arriving to the Baby unit (transmitter). - The voice activation function has been selected. - Parent unit (receiver) volume set at minimum. - Baby unit Alkaline batteries and/or parent unit lithium-ion battery completely. - The parent unit (receiver) may be off. | - Just as soon as discernible sounds from the environment are present, the transmitter will be activated. In any case, for peace of mind, test transmission with the help of another person who can try to speak in the room the Baby unit (transmitter) is on. - If the display shows the ⑤ icon and selector is set to ON, the voice activation function is active. As soon as sounds present in the Baby unit environment exceed the threshold for voice activation, the parent unit will emit sounds. - Adjust the volume on the parent unit (receiver) until sounds are audible by pressing the + volume adjustment button (5a). - Replace in the Baby unit Alkaline batteries and/or charge lithium-ion battery in the parent unit - Switch on the parent unit (receiver). |

| The parent unit (receiver) display does not show any image (black screen) | Absence of or loss of link with Baby unit. - The voice activation function has been selected. - The parent unit (receiver) may be off. | - If the display shows the • icon, move units closer together and/or relocate the units themselves in order to reduce the number of obstacles, metal structures, reinforced concrete walls, etc. interposed between them and/or check that the Baby unit is on. - If the display shows the ⑤ icon and selector is set to ON, the voice activation function is active. As soon as sounds present in the Baby unit environment exceed the threshold for voice activation, the parent unit will emit sounds and will display an image of the baby again in real time. - Switch on the parent unit (receiver). |
| Image colours on the display are very light | - Too much display brightness. | - Press the key (15) until you find the desired level of brightness. |
| Image colours on the display are very dark | - Too little display brightness. - Night vision activated. | - Press the key (15) until you find the desired level of brightness. - Check the lighting conditions of the room where the Baby unit is located. If the room is dark or in low light conditions, alteration of image colour on the display is to be considered normal. |
| Interference | - In rare cases, even if HOPPING technology ensures high immunity to interference from analogue devices, interference can be caused by the presence of another intercom or similar transmission device switched on nearby or by electromagnetic pollution (proximity to antennas with radio transmitters, high voltage cables, etc.). | Move away from analogue equipment and/or leave the area in which it is located. |

| Reduc- tion of the op- ering area | - Presence of obstacles, metal structures, reinforced concrete walls, etc. inter- posed between the Baby unit (transmitter) and the parent unit (receiver)- - Baby unit Alkaline ba- teries and/or parent unit lithium-ion battery almost flat. | - Move units closer together or relocate the units themselves in order to reduce the number of obstacles, metal struc- tures, reinforced concrete walls, etc. interposed between them. - Replace in the Baby unit Alkaline ba- teries and/or charge lithium-ion battery in the parent unit. |
| Electro- static or elec- tromag- netic noise | Electro-static or electro- magnetic interference due to electrostatic or electro- magnetic fields emitted by other electrical equip- ment: e.g. domestic appli- ances, cellular or cordless phones, etc. | Identify and, if possible, eliminate the cause of interference. |
| Pres- ence of hissing or whis- tling | - Units are too close to- gether. - Parent unit (receiver) volume too high. | - More units further apart. - Lower parent unit (receiver) volume, pressing the volume adjustment button -(5b). |
| The parent unit (re- ceiver) emitting weak sounds | - The baby is too far away from the Baby unit (trans- mitter). - Parent unit volume level too low. | - Move the Baby unit (transmitter) within 1-1.5m away from the child. - Increase the volume level on the parent unit pressing the + volume adjustment button (5a). |
DECLARATION OF CONFORMITY:
Mod. 06626
Artsana S.p.A. hereby declares that this product is in conformity with the essential requirements and the related dispositions established by directive 1999/5/CE. A copy of Declaration of Conformity with European Directive 1999/5/EC is available at: www.chicco.com - Products Section. According to European Commission decision N ^ 2000/299/EC of 06/04/2000, the frequency band used by this product is harmonised in all EU countries; therefore, this is a class 1 product and can be freely used in all countries of the European Community.

This product complies with EU Directive 2002/96/EC.
The crossed bin symbol on the appliance indicates that the product, at the end of its life, must be disposed of separately from domestic waste, either by taking it to a separate waste disposal site for electric and electronic appliances or by returning it to your dealer when you
buy another similar appliance. The user is responsible for taking the appliance to a special waste disposal site at the end of its life. If the disused appliance is collected correctly as separate waste, it can be recycled, treated and disposed of ecologically; this avoids a negative impact on both the environment and health, and contributes towards the recycling of the product's materials. For further information regarding the waste disposal services available, contact your local waste disposal agency or the shop where you bought the appliance.

CONFORMITY WITH EU DIRECTIVE 2006/66/EC
The crossed-out wheeled bin symbol on the battery or its packaging, means that the batteries, at the end of their life, should be disposed of separately from the municipal waste stream via designated collection
facilities appointed by the government or the local authorities, or otherwise returned to the dealer when purchasing new equivalent rechargeable or nonrechargeable batteries. Chemical symbols (Hg for mercury, Cd for cadmium, Pb for lead) printed beneath the crossed-out wheeled bin symbol indicate the type of substance contained in the battery. The user is responsible for bringing batteries, at the end of their life, to the appropriate collection facilities in order to facilitate treatment and recycling. The correct disposal of your old appliance will help prevent potential negative consequences for the environment and human health and favour the recycling of the materials of which the product is made. Illegal disposal of the product by the user will damage the environment and human health. For more detailed information regarding the available waste collection systems, contact your local waste disposal service or the shop where you purchased the item. ARTSANA reserves the right to change information described in this manual at any time and without notice. The reproduction, transmission, transcription or translation into another language, of any part and in any form of this manual is strictly prohibited without prior written consent from ARTSANA Warranty: The product is guaranteed against manufacturing defects for 2 years from the date of purchase.

Baby Monitor Video Digital Essential
Tecnología digital:
Essential Digital Video Baby Monitor


Mod. 06626

Baby Monitor Video Digital Essential
Tecnologia digital:
Piles rechargeables charges

Attention: RECOMMANDATIONS SUR L'UTILISATION DES PILES AU LITHIUM
DECLARATION DE CONFORMITE:
Essential Digital Video Baby Monitor
INPUT: 100-240V\~,50/60Hz,150mA
OUTPUT: 6.5V— — —, 550mA
Essential Digital Video Baby Monitor


Mod. 06626

Essential Digital Video Baby Monitor
1.1 Systeemeigenschappen
DIT PRODUCT IS CONFORM DE EU-RICHTLIJN 2002/96/EG.
Essential Digital Video Baby Monitor
Ψηφιακήτεχονούγia:
YyNAno pnoTOno npnoTaocia Tnc iDlWtIKcC hCn- MnBev npaeBolAc
Essential Digital Video Baby Monitor H ouokeun Essential Digital Video Baby Monitor oac npoogepei tic baoiikc puthetaiaei yia va bieneteto mpoa ova aata onu kai va biakeote ouveuxoc e etinioovuaia ma toi uoea kai eEw an to otnti. H meyaln 0hov2,4 ivtowkai n nepiaptepoevn BVteokaepeu utepuoypuakivuv (nuo laietouye akoa kai tO 0kotadai oac npoogepuvi api- stkn EkoVA kai ma Teiaia kaluwon tau xupou. H dlnan letioupyau ou exe To wafaki VKvToc, OtaBepoov ki Kuajluovievc pwtveitntac, eHITpenei ot noukeun va ovuoebuei to mpo kata T ndapekiaou vnuou kai To xoviko diastma akipmbncpvuTo vnuo.Eav opatee Twnvtknv eveyonoian, novada yova thetaei ae letioupyia movo epooov qvtavouv Eudakpi To jxoi ato nnovda mam
H ynqiaknt texvoiaoyu xon jnooioei n oukeun entipenei tn lnsn ouaotoc wupcapeBolce* oupwva me eva uynlo npoturo pnoataac tnc iwioknCwnc. Ka ot doo movadec (yoea ka uwoou) mopoouv va letoupynououe me mpatapie (pexetai uia enavaopopticevn matapia liou yi tn movda yoea) n te vovnpaooyea iayuc (pexovta doo tni oukeuaia).
Zwyn ouvoitntuv etadoooc: 2400- 2454 MHz
IoXuc 10 upyiac: pEpinou 150^**
Essential Digital Video Baby Monitor
LcfoPobBaTexHOnIorna:
Blyckonik CTaHndart KOHNDAHENLAHb-HOCTN -HyNEBbIe NOMEX
BVDEOHNAKkEssential Digital Video Baby Monitor
Bundeohna «Essential Digital Video Baby Monitor» npednaaert xapaktePNTKIN, neb6xOmbIbe nlaHabIOENIA 3a pe6eHkOM B IIOoB MOMENT BPMEHN, OCTABAIB C HMI B KOHTAKTE B DOME n 3a erO npedeAMn. Ee shipokK 2.4-dIOIMOBIL DCNIIeN IN BPAUOAAJEAH INHPKAPCRASH TENEKAmpa (paobotaioa TAKKE B TEMHOTE) npednaarot BAM ONTImAbHbI NPOCmTO n IeaeAbHbI KADpI. DBOHNA FyHKUa IaMbI-HOCHNka, C NOCTHOHNO NIIPENEMHOH INTHCBNHOCTbIO CBETA, N3BOJANET COPOBJOzDAtb MAnbHa B CTADNI 3aCbInAHNA BO BYBMA CH. PnI yctAOBHeHNI rOLOCBOrO UnpabLENIOPOdntelck SNOK AKTINBVYETCA TOJIbKO pRn HAIYNCH 3BYKOB, NONYeHHbIX OT DETCKO BSNKa. PIPMeHennMaIcPPOBaA TEXOHONIRI OBOBNET BIONIHTb PnIeM 6E3 NOMEx* N CBiCOKMST CTAHDAPROM KOHNIDENuMaIbHOCTM. Oba 6Noka (poNTeNbckn i dTeckm) MORYP aboATb OT batapeB (B KOMNPKT BKLOUeHa ODA NITUEBAH AKKymIANTOPHA 6bAner paOnIOBt BCKORO 6NOKa) nni npi NMOoi cTeBOrO aadTepra (Dba BKNIOUeHb I KOMNPKTEK).
PonocacTOTpepea:
2400-2454 Mf
PaDnyc DeiCTBna: OKOIO 150 m**.
*BbCOKAAYCTOUIYBOCTB K NOMEXAM, CO3aBaEMbIM aHAnIOROBMbIM yCTPOI-CTBAIM.
^84Tr PNI OTNIMANbHx ycNobuXn Ha OTKpbITOM npocTpaHCTBe 6e3 npenrTCTBn.
CODEPJKMOE YNAKOBKN
-ДетскBNOK(COSOBHONФYNKUnei nepedaTnka n3o6paJenna 3BNYa)
- Podintelbskni 6bnok (c OCHOBHOn
Фуннкиприемнда n3Oбрахеня
n 382ka)
-ДаpepekJIOuaeMbIX ceteBbIX aanTepa100-240B\~,50/60Tc /6.5B, 550MA
- AkkyMnytopHnA JIITNI-NOHHAA 6atapera 3.7 B 1800 mAu, (ДЯ рoDITbKORO 6nOKa)
-PykoBoDCTBO NO 3KcnJyatauNN

OBUINE MEPB I PTEIOCTO-OCCTN
- Actn ynaKOBKn (PnaCTMknOBbIne nakeTb, kapTOHbIe Kopo6Kn U.T.) OJANKbHx pArHbITb B HeDcOTyHOM IaI DEte MeCTe, TAK KAK OHN RABIOTcN NOTEHcuaJIbHbIM NcOHTHKMON OANCHOTcN.
- Ppepe nCnoBt3OBAHnEM npN6oPa y6eHbTcB, qTO cam np6oOp n BCE erO KOmONHeHTb HE IMeOT NOBpEKdenn. B npOTnBHOM cIyae, He nCNoBt3oBaTb np6oOp n 6obpatITcb K KBaINΦuINPObAHHOM npcoHany nnnpDabUy.
He NpIaTbCa cam SoCToERbHNo pOunHnTb npN6Op, OrpaHUnHcyBcA deyCTBAMN, yka3aHHbIMn B pa3dJe P'Pa3peSeHne npO6Nm. Ppi He OxobdoMocTo pemOnTa o6paTbCBA CnJx6By cepBNCHORo 06CbYKBA
HIN (Customer Service) KOMNANIN
Artsana S.p.A.
- He BCKpbIbIbI pN6OpB. JTeckn 6bnok (C oCHOBHOn fHyKnUepepeDHTyKIAI3O6PAXEHIN I 3BykA), poDInTeBckn 6bnok (C oCHOBHOn fHyKnUe pePmEHNkIAI3O6PAXEHIN I 3BykA), AKKyMynTOpHAR Nttni-NoHn H batape n CteBeeble aadntpeBhe I cOeDPKAT qactE, KOTOpBE MORYI nCIOJIbOBAcR nONb3OBAteMeN. B Cnyae HcNpPABHOCTNI O6pATITbC 3a NOMIoBko K KaIaNfouPiPOBaHOMY nePcoHAnly nI CNBAtbC co CnyXbO CEpBCHORO O6CNYXBAHnna (Customer Service) KomnAHnns Artsana S.p.A. BckpbIte BblweyKa2aHHbIX yctPOnB CT MoKeT Co3dTa onACHoCTbJeKTPnueCKO Woka.
LdopBBA BnOeHNA Essential Digital Video Baby Monitor KomnHim Chico He JOnkHa NcNoIb3oBatcbBa KauCTBe MEnuHCKORO MOHITOPA H MeKOT 3aMeHHTb PmCmPTp 3a DTeBm CO TcTOPbH B3POCBtBx, NsOKCNbky PpeDa3HaueHa ToJbKO dJa NcNoIb3OBaHn BA KauCTe DOpONHnTHeBn NMOoupi npn PnSCMTpe. IIO6oe dpyroe NcNoIb3OBaHne CHTaETcH HeHaJndKeMaJIM.
P3aMeTbBdTeckn60nKnpoDntbckn60KnBaPOBOHyCTOuMBoNOBepxHOCTNBHeOCTyNbIXDNJDEMeT MeCTax.
-Держатыдетскь 6лok, рогintелбский 6лok, AKKYMЛТРОТИЗУ ПИNTINOHNOHGYбатаю, сeteвьдадптрь AC/DC ви пдаенов досгамоctмдетей (ka6ьн сeteвьдадптров мочет соддь оданochtу ушени).
Oueh Baxhoeyparrno npbepaB pabnBHOctb paobToB det
CKORO 6NOKA (c OCHOBHON yHKUmei nepeaHTKNAI 3IObAKENHNI 3BNYA) nPOdTeNTbCKORO 6NOKA (c OCHOBHON yHKUmei pniemHnKA i3ObAKENHNI 3BNYA), B CACTHOCTNI, Npep KAKDbIM NCIONb3OBAHNm PPOBePrtb, YTObI pniEM CIRHNA 6bl B03MOKENB 3OHE NI HA MAKCUMANbHOM NpeyCMOTpeHHOM paCtOrHNI NCIONb3OBAHNi
- Makcimahoe pabooee paactonnhe coctabniet OKOLO 150 metpoh hAOKpbTOM npocpTaHCTBe 63 nepejTCTBn (ODHAKo padync deJeCTBn MOKET 3AHUYNTBHO yMeHbIMtCB BYHTPNI NOMeUeHHN, B 2ABNCIMOT ON PA3LIHNUx YCNOB IN Cpebl, PACONOLOKeHHN cTeN MEbNIPOBKN NOMeUeHHN, HAIJIINM METANJUeCKNX KOHCTpyKlNJ, BHeuNHIX IN BVHTEPHNX NOME/N3EKPTOPAMHTRHTBHx NONEJ, JANE3O6TOHbX cTeH INI MekJyD NOMEUeHHNMI, PACONOLOKeHHBMN HA P3AIYNUbX TAgkX, BCJeCTBNE HenOpHOB 3apArKn BaTapeN I.T.J.).
EcnI detckn 6bnok n/nnn pOndTbckn 6bnok npoyauot nITAHNE oIeouhBx 6bapetn n/nnn AkkymyIaTOPHoN nITNI-NOHHo 6bapetm, To pRNI HeODatoTHOH 3APKe 6bapETn i3dENne ppeKpaAeT pa6OTy. POnTOMyE peKOMEHpyETc BcerDa npOBepaTb COCTOHNHe 6eONuHbX 6bapETn w/nnn AkkymyIaTOPHoN nITNI-NOHHo 6bapETn nepeB BKIOUeHem 60Nix 6bOKOB.
B Cnlyae BHe3aHOrO tKlnUeHemnaJIeKtPo3neHepnI,ecnI nHTaHnePouJTeBcKOrO bNoka (C oCHOBHOyHKuMe pPiemHnka) ocUeCTbIaETc NOMOUIBOo COOTBEcTByUOJeCEteBoro aAdTpeAp,piNbOp pNekapaaet paOToY toJIbK, eOnI yPoBeHb


3a4pa AKKyMylatPOHNI NHTNI-NOHO 6batape HeNTOCTAOHTHy ININ NOcIeNDA HE BCTAbeHa B6aTePAH bOTCK. PO3Omy PekOMeHdyETCA BcERda npOBepaTb CoCToHNHe 6batape INI ee yctAHOBky.
-
He nCnoB3OBaTb detCKn 6bnok (C ochOBHOn fynKUneI nepeatuNka n3o6baJepHHa 3Bvka), poDInTeBckn 6bnok (C ochOBHO fynKUneI peMmEHNka n3o6baJepHHa 3Bvka), akkymyIATPOHy IINTNI-OHOHY 6bataeIO u adanTepbI B noLOKeHN, npri KOTOPOM OHN IOBDEpAOTc BO3DeCTBNO aTMOCdpeHbIX areHTOB (DOxNb, coJIHe T u.T.I.). Ppi nCnoB3OBAHN iNDENH BNE NOMEHNI pTTAHME DETCKORO 6bOka (C ochOBHO fynKUmeI nepeatuNka n3o6baJepHHa 3Bvka) u POJNTeBckoro 6bOka (C ochOBHO fynKUneI peMmEHNka n3o6baJepHHa 3Bvka) DOJXHO oEcbneYMaBtCB TaONbKO C nOMTOBuI eOnOuHbIX bSaperte n/nnn AKKYMylrTOPH IINTNI-OHOHH 6bapeV: cetBeBle dAnTepbl, NOCTabEMble B KOMPIKeTc C n3dEniMe, HE npedHa3NaueHbI JnI NcONoB3BOAHN BHE NOMEHNI.
-
Bo 366zahane pmska neperpeba depkaTb detckn bokc (c ochOBhoi yHKuiepepeaTHNk a3o6paeHn H 38yka), podtntbckcn bokc (c ochOBhoi yHKuiepe npiemmHnK i3o6paeHHn E 38yka), akyyMnyaTropHyIO tHTNI-HOHHy 6BaTaPeO u, oocboH eCteBaeIaJTpBePb AC/ DC BdAnI NT cTOuHKnOB TeNla, TaKnx KaK: KApOpNfebp, TepMOCTaBl, neHn, PInTbI, OKHa Ha CoJIeHNO CTOPOE H T.D.
3ZapnepaetacncIIOJIb3OBaTbOcO-6BENHO pnpoKIOUeHNN KJIeKTPu-ueckon cet npn nmoOni cTeBbVx
aandaTpeOB) o6a 6noKa no6nI3oCTn O TOBb: BaHNT, CTHpAaBbHXMaHNH, KXOHOHbIX MoEK NIN MOKpbIX NOBepxHocTe. He norpykath IN B VOBy I He cMaYBaTb. He nCpONb3ObaTb 6nOKn i aandaTpeBl, eCNI OHN ynaJI B VOBy, B DAHNOM cNyae o6paTInbck K CneuHaNtCTAm.
- UCTAHOBNTB DNETKNI 6NOK (C OCHOBH ΦyHKUeNE NpePeDAtNHcI N3O6PakHeH N 3BykA), PNDTEBCKN 6NOK (C OCHOBH ΦyHKUeNE PnPEMNHKA N3O6PakHeH N 3BykA) N CETBEbIe aADTepbI AC/DC TAKIM ObpazOM, Tc0bIe 6ObEChuNTB COOTBETCTBYOUYU BENTMIJIUCN IN pJeDToBPaITNb ONaOHCTb NepeRpeBa KOMNoHETOB.
He nCOnIbO3OBaHn3dEne H6BmNn
fHyopocceTHTbX (HeOHOBx) naMn
nIM npdynx NtEkTPuNeCKHN np60oB, TAKNX KAK TEENBIOpI, DnIRATeN, NEPCOHALbHbe KOMNbOTepbl,
6BePNoBOHDhie TeneFOHbl, 6BePNoBOHDhie TeneFOHbl DECT n T.d. TaK OHN MOYr NOBNIyHa pa8Oby
n3dEnJe.
IcN01b30BaT bToJbKO NOCTABJIeMble B KOMnJIkeC n3dEniEM cTeBVe aIaIantReTp bAC/DC nIaIantReTp aHAnOJIvHOrO TnA C TaKIMn JKe 3NeKTPnueCKmM XapakTepNCtKaMn. IcN01b30BaHMe dpyrInx aIaIantReP oMoKET NopBeDntB DETcKn i/Nnn PoIaNtBcckn 6bOkn n Co3dTaB anOChoSTb dIy IONb30BaTeR.
- 3aMeHa KaBeHe NITaHnIe CetEBOReA aadTepa HeB03MOKHa, No3ToM, B cyuYe aOBpeXeHNHe, CETeB aadTep HEnb3a 6oBHe IcNoPb3oBaTb N Heo6xOIMO 3aMeHnTb erO Ha aadTep aHAnorHnHO TmNa.
BHMMAHNE: He IcIIOJIbOZaBt cTeBOB aadTnep dpyrTO TnA, OTIIuHOrO t ONCTABJMEOR B COMKJIeke C uIeDE


JHEM KOMAHINH Artsana S.p.A., noCKoIbky 3TO IaIWI NTdJIeN COOTBETCBNII PnIMHeRbMl CIEUJIaJIbHbT ETHuHEcKIM HOPAM, YCTaHOBJEHH bIM DpEKTMBaMn EC, HauOcH yueep6 6BeOnaCHOtN cNeIOCTHOtN 3dJIeN.II pHeOxOJIMOCr 3aMeHbI o6pTaITbC k PNOADBUY N B KOMaHIno Artsana S.p.A.
- Y6eDntbca, yTO hAnpRaeHnei cTeBbIx aadantepoB AC/DC (cM. daHNthe TabmueK, paONOnoKHeHHx Ha cTeBbIx aadantepax AC/DC), coOTBeTCTByET hAnpRaeHnIO 3JeKtpueckO cTeN, uTO BNkA cTeBbIx aadantepoB COBMeTIma C 3JeKtpueckCIMM PO3etKAMu Baaeu 3JeKtpoPobOdkn.
- PodkniuoytB cetebue aadantepby AC/DC K 3eNekTpnuyeckn m pozetkam, KOptobbe DOnKhb6BtB Ierko doCTynbl, H0 B TO JKe BpEma haoDITbcB BNE ppeDnOB DOcraeMOeCNT deTei. PaaMecTntb npoBOda aadantepob AC/DC TAKIM NB oAp30an, YTObIb npEOTBpaNTb HAcTyNAHne Ha npOBo, 3aYyTBbAHne ppeMetOB, PACNOJoxEHbX CBePxy IN PAIDOM C HMM, ppeDyPpeDnTB DOCTyn K Hm PB6eHNKa, TAK KAK OHNI MOrYT ppeCTABJIbT dIg Hero OAnCHObT (CnoTbKahne, UdyuHeine).
CeteBbIe aadTepbI AC/DC, detckn 6bnok (c OCHOBHOY fynKHeN pepe DaTunka n3o6paKeHn I 3Byka) npOHTenbckN 6bnok (c OCHOBHOY fynKUmei npneMnHa n3o6paKeHn I 3Byka) MOryt HarpEbaTbc BO BpemraaboTb. 3To cHTaTeTc HopMaJbHBM. - Czerda OTkNIOUaTH cTeBbE bAnadTpey AC/DCOT eNeKTPuNEcKO pOeTkn, eCn npri6Op he nCnObn3yETca.
3Ameha 3aeneoHbNx 6batapei nnn AkKymytratropHnn niun-nOhoH067a
pen bcERda OcUyTeBTLaBcB 3bOscblIMn H aIeOnHbIe 6batape INN kAkyMylrTOphYIO batope, IMouIe TAKHe Jx XapakTePrcTNIK,KAK yKa3AHBHe B HAcToIeM pyKOboDCTBe NO KcPnIyAtaIu.
- DcTcKb 6bnok (c fynHKmne nepe- dattnka n3o6paJhenu n 3Byka) OCHaueH CBETOHyBCTBnTeBnHbM daTcKOM, aBTOMaTnueckn AKtBNbIpyUOeum INhPakPaChbIe CBETODIObI b Cnuyae yMeHbUeHN OkPyXiaIO zuero CBETA mNTEMOTbl, NO3BOyra TAKIM o6p3oM OCUyeeCTBJIrbpocMTp B YCNOBnx HEDOCTaTOOH BVDINMOCTn.
Tak Kac INbPacpaChleCBQoMOnbI DetcKOrO bLoKa (c FyHKuMeI nepeDatNtHa N3oBpaKeHn 3vBcy) He NClyCKaIOT BIVIMORO cBeTa, nPoBeNTb pNaBVINbHOCTb nx pa6oTb, KOHTpONpyu N3oBpaZeHne, nepeDaHHe TeteKaMePOpnTeNbckomy B6nOKy, KoNGa TdETCKN bNOk paCnIOJoxEH KOMHaTe C HeNoctaTOchBMOCBESeHnEM.
Инфраксные CBETODид ecKOrO 6noka (cФуншп epeDaTnka n3o6paJxehnHa n3ByKa) He npedctablaHOT onaCHOCTn DnA 3doPobBa.
BHIMAHHE!
TEM He MeHe, peKOMEHyETcN 13-6eRaTb CMOTpeTb HE BOOpUKeHHbIM rna30m UNI C NOMOuBIO ONITNUcckNX pIN6OBOPa H naPpOE HnΦpaKpAcHoe n3NyueHne BDoJIoN OcN n3NyueHIn.
BHIMAHHE!
ДИРПЕДТВРАЦЕНОПАССТУЗ ПЕКТПСЕСКОЗНО SFOKA,HE CHIMATС 3AZUMTU H NE ПБТАТСВС


BCKPbTb CETEBbie ADANTEPbl.
HE CMAHIBATB CETBEBIA AADIANTPEbl,ETCKBNLOKPOINTEBCKN BLOK,HEIOINBEPATb INOBOJENCTBMO BIAXHOCTM IN HE bTbATCBQ TOKPBt bIX.
3TO MOKET IPEDCTABJIbTb OTAC-HOCTb N, KPOME TOTO, JBPIEETCA OCHOBAHEM DnI PPEKPAUHENI RAJHTNI.
1. KOnΦnrgypaun&XapakTepeNCTmK
UCTPOCTBO HABLODEHIN, INOTOBENHOE NO TEXONOHIN UFOPOBONI nepepaan DaHbXn "Adaptive frequency Hopping", MOKET pnpmEBNtCBa KauCBe BCNOmORATEbHOrOcreD3Ba nprnpcMOTpe 3a dTeBmBnDOMAHNHX YCLOBNIA. 3Ta BUNEOHNBA BKIOUaET B c6Ba Detckn 6bnk (c OCHOBHO fynHKuien nepeadaTnka NIO6paehenia n 3Byk) npoJnteBKn 6bnk (c OCHOBHO fynHKuien npmeMNIGA IIO6paehenia n 3Byk). O6pnip6oparaNIOBJyOTn yuctahOBKn paadnoCBr3n TexNOJIOI uHPOBONI nepepaan DAnhBX"Adaptive frequency Hopping", no3BNOJHOUYBbONHnTb pnem/pepauy CnHAnOB nIO6paehenia n 3Byk).
1.1 XapakTepnCTnKn CnCTembl
OCHOBHIMI xapaKTePnCTNkAMn CNTEMbl BANLIOCT:
- Peredea 3prntelbHix N 3BYKO-BbIX CnTHAOB C NOMOIO BICNTMBOHa 6a3e ZIΦpOBoTexHOrONrN "Adaptive frequency Hopping".
- PaMyc DeIeTbBn HA OTKbYtOM nPoCTpaHCTBe 6e3 ppeNATCBn OKOJO 150MetPOB*.
MocKcIMaJIbHoe pa6oOe paCtOnHn - MocKaBCTaJIeN OKIo 150 MetpoB
Ha OKbIbTOM npOCTpaHCTBe 63 npe
NPTCTBNI (OHaKo paDnuc DeIcTBNI MOJET 3aHHTIELbHO yMeHbWITbCBy BHTPNI POMeUeHHNI, B 3ABNCIMOTN OpaJIuHbY xCIOBNI Cpebl, PaCNIOJKeEHINr CHTe N MEbNIPOBKNOMeUeHHNI HAIJIYNM ETAMINIYeCKNX KOHCTpyKlNJ, BHeuHINx IN BVHTEPHNHX NOMEX/3NEKTPOGMARTHbIX NPOJI, JKeJIe3OBeToHNbIX CTEN INI MMeJQy NOMeUeHHNMI, PaCNIOJKeEHbIMN HA PaoJIuHbX 3aTakX, BCJeDCTBNI HeNoJIHOI 3apdKn 6aTapeN T.D.).
1.2 Detckn 6NOK (c OCHOBHOI yHKnue npePaTchna I3O6paXeHNn 3BvKa)
Modenb 06626
1.Питанов OT nepekknoyaemoro cetebo r aanntepa 100-240B\~50-60fU/6.5B 550mA m n c nomoobu 4 uenouhbx bataprei 1.5 B tina AA /LR6 (be KIONOCHyB KMONKJIe).
2.KHONka BKNIOUeHn/ByIKIOUeHn
3. KhoNKA BKNIOUChENI/ByBkIOUChENIA JAMnbl-HoVHnKA
4.лампа-ночник
5.06bektnB TekeKaMepbl
6. Mɪkpoðn
7.Cntema INHpapkacHOROOCBEUEHNA (8CBETMOIDOB)IIN BO3MOHOCTN BIDetb peBekHDAJke B TEMHOTE.
8.CBetoCyBCTBnteHbHdaTcHk
9.CBeTobA HINDAKauN PINTAHN I CB31:
(a)3eHnbl NoctoHHbN, YcTahOBHea CBA3b c PdOttelbCkIM 6bnOkom
(b)3eHbI MraOuIy: OTCYCTBVE
nIOTePc BcRzN C POJNTBckNM
6bOKOM
(c) OFF:ДeТСКИ 6ЛОК ВБИКЛЮУЕN
10. Kpbuka oTceka uenoohbix 6atapei batapere
11. Pazbem nHTaHnJeTcKOrO 6Joka


12.CsbetobarHnndkaunia ypoBnBa 3a-paJda enoOnbHu6 batapej
(a)KpaChbI MMraOuHJI: 6bApen npaKTnueckn PONHOCTbIO pa3pJKeHbl
(b)OFF: ⅢeNoCHbIe 6Batapen 3aqrKeHbI ni paBaO ocUcSeTBlaTeTc cNOMoCbIpoCetEBOrO adantepa (1)
1.3 Podatentbckn 6bnok (c OCHOBHoi fynkuie npneMHnka n30-6paekhenn 3Bvka)
Modelb 06626
1.Питане сnomоьюakmymлэторhoeЛити-noнонбБацей 3.7B 1800Mч,ВКИоMuHNoB H KOMnIeK TocNABKIN,Иисnomоьюпекиюуамero ceteBoro aadantepa 100-240B\~50/60Γu/.6.5B=—550Ma
2.KHONka BKNIOUeHn/ByIKIOUeHn
3. CBETOBAA nonoca INdikaunu yobOBH 3BvKOB, n3daBaembix pe6eH-KOM.
4.LBeTHoJ KK-dIcNnei 2.4 IIOMa. KK-dIcNneI NcBEmH NTOb6paKeHbE peBaIhOB VBeMeH NcBEmH NTOb6paKeHbE peBaH NcBEmH NTOb6paKeHbE peBaH NcBEmH NTOb6paKeHbE
-COCTOHNHE 3APJKN I NO3APJKN AKKYMUTOPHOI NHTMI-NHNOB 6a-tapei POJITENTBCKORO 6bnoka;
- npAIBNbHObTb CBAI MekJy DeTCKMn POdNTeNbCKMn 6NoKAMn;
- OTCYCTBnE INn NTopeR CBAI MekJy DeTCKMn POdNTeNbCKMn 6NoKAMn;
-уровьberpeгуновскийpromokostn;
-заданньий реким rolocoborogoynapbatneia
5. Khotn peryunipovbkn rpoMkoCTN +5(a), - 5(b) nuHaMaKka poDHTeBcKOro 6Noka
6.BCTPOeHnbl DnHAMIK NIA BOCpno3BeDeneHb 3ByKOB, n3daBaEmbIXpeBekOM
OH TaKke OndHOBpeMeHO BbINONHReT cIeDyUoIe DOnOHNHTeNbHBe dyHKu:
a) Hykunuo ciurhlan3aunm 06 OTCYCTBnM nIeTepn CB3N MEKdy DETcKm NPOJITbckCM 6bOKo: npRbMNTeIbHoYepe3 10 cekyHd NOcNE TOR, KAK BKIOUaTaC 3eNEHb MMRaOuINCBET CEBTOBNO IHMNkaUNPiNTAHINCBAYA3NpDAKOTCR2 NOcLDeOBATelbHbX 3BYKOBXbCIRHANBA CekyHd. Kac TKBIOCB3bC DeTcKm B6OKOM BCOTaHaBNBaTaC, CIRHAN OTKIIIOaTaC, INBKOUaTe 3eNEHb NTOCTOBHNCBET CEBTOB INMHKnauINPTAHINCBAYA b) DYHKUOci rurHnla3auqn o Tom, YTO AKMYJLTOPHAR NTNIHNONHAA 6bApae NOHTNOHOctbTo p4paZhe:Apa3aetc1 3BkyOBQrCirHAN BCEKYHy BKNIOaTecM MRaIOuIN KpArhBn CRIHAN CBETOBO RcHANlAaUNCOCTHOHNNK AKKMYJLTOPHOB 6bApae.Ipr BkIOUeHN 3apJKn kAKMYJLTOPHO HINTINMOHN 6bApae 3BkyOBQrCirHAN OTKIOaTeC NcTO3raHNB KpArhB CEBT CEBTOB INMHKnauIN yOpBHA 3apJa DKKMYJLTOPHOB 6bApae BNIObT Do aBePueHn 3apJKn
- Пекглочать ON/OFF pa60tBu: rolocOBoE ynpaBneHne mIи nocto- hnaна nepedaya
8.CBeTobA HNDIKAUINIPTAHNIA CB31R:
(a)3eNeHbNHOCTOHHHB:YCTAHOBHe HCB3b CETCKMN KJOKM
(b)3eIeHbM MraIoUoiM: OTCYCTBNE uNIO TnePc BcHnC JTeCKM6NoKOM, (c) OFF:poDntelbckn 6JIOK BkInIOu-eyH
9. Cebotabla INDINKAZUPOY YBOBVA 3a-ya kAKMYTIPTOHOPN LNTNIHNOH


Hoi 6aTapei:
(a)KpaChnM MmIaOoiu:6BaTaper npKaTnuCkN NOHcTo bOp3AKeHa
(B) KpaChbIy NOCTOHHHB: BblIOHNHTc3aqrJaAaKKyMylTApTOHbOaTaepenC NMOUJIcTeBEOr aDantepa
(c) BblKJ.: AkkymyTatrophaB 6atapera 3aepjEHa Nn pabota ocyuTeBnIETcN C nOMoIbU cTeBOReO aadntPeP npr OTCyTCTBnN AKKYMylAToHOpH 6bapen
10. Kpbliuka OTecka akkyMylarToPbHx 6Batapre
11. KpenJIeHne Ha peMeHb
12. OtbepCTe JIaN qoBechORHO shyPKa (He BkIOJeH KOMmJIeKT)
13.Литин-Mоньа 6aTaper 3.7B 1800MaU 3apJraAmaC mOnoubO cTeBoRo nepeKJIouaemoro aadIaTe-pa 100-240B 50/60Γu./6.5B = - 505Ma
14.Pa3bem NTAnHAnN u/nnzAaprHoe yctpoIcTBO IaKkymyIaTOpHOI nITnI-IOHN Hbatape
15. Khonka peryniropobkn yprokctn dncpnae (7 yoprouhne)
1.4 AKTHBMBI NIKTOKPAMMBI, OTO-6pkaaembIhe Ha DCiJIeNE

AkkymyIaTOpHaa 6aTaPae 3apJxHa

Cpehnny yopoebn 3apraa a kkymylatopnob 6bataen

HnKny yOpeBbHa 3aPJaA aKKyMly- JIATOPHO6 BataPeH

AkhymyTatrophaBatapeaPazraJKeHa:poDInTeBckn6bOKBbKIOUHTcAYePe3HECNeOJIbKO MmHyt
2. Onncahne xapaKTepeNtuk
2.1 Detckm 6nok (c OCHOBHOI fynknein nepedaTnka n3Oba- xenHn 3Byka)
2.1.1 Ntahne:
Pintanae ot nepeKJIOaEMoRc ceteBoro aadTepra 100-240B-50-60U/6.5B=550MA(1)nIc nomoIbQ 4JeouOHyb 6aTeApE 18 B TpaA AA/LR6 (He bKnIOyHb b KomnPKeT)
B Cnyae nIaTHaNc c IOMObU cTeBoro aanTepa (1):
- ПОНБЕРИТ, КTO ЗЛЕКТРИСЕКО НАРЖЕнCU COOTBECTCYET HAPRAЖЕHINU, указан"HOMу HabTmUче раquee yka3a3hBxS cetebIx addanTePOB.
- BCTABNTB ⑦TEKEP CeteBOO aDANTepa (1)B COOTBETCTBYUOUI pa3bEMNITAHNA (11),pacnONIOXeHbN Ha6KOBoB CTOPHE 6NoKA,
- BCTABNtB ①TEKep CETEBO ②aIaTePeB ③AneTpuCekyU po3eKU cyObHbIM DOCTYNM.
BHIMAHINE:
-CBbIe 12 MHyT NOCTOHHA MNHIMaIbHa Cnla CBeta NaMbnIHOHnHa
EINBO BV BPEM PEXIMHA 'JAMNHOHNUCK C NEPEMEHNO CNUMBETA HAKNA


KHONKY BKNIOYEHME/BblKNOYEHME NAMMbHOHYOUPBHO. EcInn B 3OM pekmHK CHOBA 6yETN HAKATA KNOHNI BKNIOYEHME/BblKNOYEHME HOYNHK) (3),zMKN INMehENH NcMb CBETA HAYHETCt ONAKCMAbHORO yOUPBN. PpN NOBTOPHOM HAXATIN NKHONIK BKNIOYEHME/BblKNOYEHNE NAMMb-HOHNHCK (3) nUdepXMBAHIN ee B TeUeHne 2 CSEUYD, NAMPA-HOHNK BblKNOHTC, KAP ppi paboTe C MHHMAHbHM NoCTOHAHbIM YOUPHEM CBETA, TAK IN B pEKMHJ 'AmNA-DOHNK CpepeHMOH CynONCBETA'.EcInn DctKn 6bnk (C oCHOBH OYHKINI nepepaTNUH NIO6PABEXHNE I 3NYKA) NOVaaeyi NITaHne O tJeLOHbIX 6atapeN, no pnpuHnAM 3KOHMOHN 3NKeKTPO3HEPN INAMPA-HOHNK ABTomATNUeCKN OTKIOVAHTECpe35 MNHT - npn paBoTe C MHHMAHbHO IN NOCTOHHO INTHECMBHOCTbIO, NOCE ΜCUNKa INMehENH INTHECMBHOCTN - npn paBoTe B pEKMH' 'AMNA-HOHNK C pepeHMOH C cynONCBETA'.
Ecnn detcKm 6NoK (cOchOBHO
fHyKnuepepeaTuHaNk N3o6pa
XeHnna 38yKa) NoynuAet nTtAnHe
C nomoobc eTeBOro aadntepa (1),
JaMaNa-HouNHK OCTaETc BKNIOHEn
H npn obox pexnMax do Tex
nop, NaO CHObA Ha npotraKeHHm 2
ceKynd He 6yEdt hakata KhoNka (3).
JaMaNa-HouNHM MoKet 6bTb TAKKE
BKLIOUeHa, KORDa detcKm 6NoK Bbl
KIOHcy.
CbeTobaaHdikkaia pa6oTbi
Cetobar HnDnKaZnPiTAnHn I cB3n (9) npdctabJIaET 3 paJInhIbIX BUDA nHOpDMaIIN
- yka3aHne BkIIOueHHOro npi6opa n
npabnblbno CBra3N CpOJNTeBckM6bOKOM:
2aogepa3e 3beneH NOCTOHHB CEBT cEBOTORI hMNdkatopA (9).
- Yka33ane NOTEPNI UONTCYTBWA CB3N CPOJNTENBCKHM NOKOM:
3aogapera3c7eHbN MmraioiC BCTCBETORIO Hnndkatopta) 0
KAK TONBKO CBA3B CPOINTENBCKIM 6NOKOM BOCCTAHABINBAETC 3ARoPAeTc3 3ENHeH NOCTHNHB CBET CBETORIO INHnKAtoPAtO.
PIMMEYAHME: PNI BKNIOHEHN detCkoro 6Noka BbINONHReTc NONCK KaHana CBaRn C pOndTeBcMKM 6NoKOM, N0TOMy CBToBaN INNDKaUra (9) rotnp MMrAiouMm 3eHeNbIM CBetom Do tex nop, NoKa CBa3b He bdyET yCTAOHBNeA.
- Ykaaahme BvblknoyehHoro npu6opa: CBtobra NnDnKaIa (9) BblKIOyeHa.
CBeTobaa HnDnKaUaM yPoBNA 3a- pRda uOuHbIX 6atapEi (12) npedCTaBnAeT 2 pa3nnHbIX BuaNhoOpMaun:
-Ykazahnue, YTO 7eIooHbIe 6aTapenu OoHTN POJIHOCTbIO p3aPrJKeBHe: 3aOraPaeTc KpaCbM MInraouoi CCBETeBOrO MnDnKaTopa (12).
- Yka3aHMe, 7TO ΣeONUHb6Batapez 3aRjAKeHbI niu pObaT OcUSeCTBnEETC nOMoUbIcTeBOrO aadItepa (1): CBeTobAH INDnKaIaN2 (12) BkKnIOyHa.
Houhoe BundeHne
B Cnyae TeHMbToI IIN UMeHbUeHnA CBETA B KOMHATE, B KOtOPO paCIOLOKEN DETCKN 6NOK, CetOUYBCTBHeTbHb DaTUnK (8) ABTomATuNeckn AKTNBUPyET CNTcEMY INHpPakpACHO OCBueHnEHN7), YTObI N3OBInbB BVdTepe6EhKa TAKKeB Y cONBHX


HeIOCTaTOUHOB VNDIMOCTN.
BhimaHne:
Pn akTbuaaHouHO BvDHeHHa HnCtnee (4) pOHTeBCKoro 6NoKa zBTEu n3o6pBeHHa OKaKyTuNcKaHeHHbIMn B IN CnYae TMHeOTbI n3o6pBeHHa 6yDyT OTO6pAaTBcBA YepHo-6enOM CBETe: 3TO CHTaETCRHOPMaBbHbIM.
2.2 Podantbckn 6noK (cOCHOBHOI yHKnei npmHnka n3o-6paKeHN n 3Byka)
KakdjiabpnnyBewenHnIy myeHbseHn rPOMKOCTNHaOn yOpeBHe, paa3eTae3ByKOBOm CnHAn.
Kakdbp a3 npn DoCTNKeHm MAKCMAIbHOrO mIMMHaMbHOrO yOpBbHpa3aTeTc BDoHOBn peJynpExdAousi 3ByKOBoO CInHaN.
Perynipovbka rpkoctn dincnner po-dintenebkoro 6noka
PnHnKaTmHa KONKpyerIIpOBKn npKoCTn YpKOcTB KK-DCnJIeR (4)NkNueCckn N3MeHReTcra H ONDH yPOBHeB.
Moxho Bb6paTb do 7 yopBne npKoCTn.
ФункциюrolocoborOуnpablenehn
Podintebckm6knokc(cФyнкциьпгименkaИЗБбрахенииЗУвсы)МOTKETp6oTbHnepepbIbHOMpeJIMCce(COTOBHNEOFF)INBpeKIMeTOLOCOBORUynpablenehn(COTOBHNeON)(7).KOrdaINTEHcNBHObTe38YKBOK,nepeDabaembIXOTMkPOPhoA(6)dTeTCKOr6bNoKa,IpeBOCxOHTIPpeDnIogOBoiAKtBuBaunu,UTaHOBJENHHNbI30TOBtIeMe,N3OsbPaeKeHnBepe6EhNKaBPeAahBOHMVPeMHnBuBDOnTcHaDnCInNe(4)akTNBpuPyTeTcDNAMHK(6)poNTbIcKO6bNoKa(cФHyNKcmeIpnMeMHNKaI3O6paXeHnI3ByCu)IpnAHmNv38YKBo,ImEouxHmMeHbShyO daHnHO nporaITHeNcBHOCTb,KK-DinCInNe(4)ppebBuTaetNtOKa3IzOBpaXeHnPe6EhNKaDNAMHK(6)poNTbIcKOr6bNoKa(cФHyKcNipePMeMHNKaI3O6paXeHnI3ByKa)OTKnIOaETcK. KOrda3aФyHKZma3aHa,HaCNtCee(4)noBJIABTeCNIKTOFpAMMa
NopratunBnOchb podntenbCKOrO 6NoKa.
Poditentbckn 6bnok ochaenu KpeIeHnEM peMnHa (11), none3bM IaI noTOctHOHHO HOHeHNE Ero c CO


60M. MoJxHO HOCuTb PoDITeBcckn 6bnok C cO6oN, INCOnb3y NpDBeCHOn 5hpyOK (He BKIIOUeH B KOMPNeKT), npOTeBb B cpeMaJIbHOe OTBepCTne(12).
CBeTobA n 3BvKOBa INdIkaZnna paBOTo?
CBeTobay INHINKACNINITAHINCB3N(8)npctabniet 3 pa3NJNbHbIXBUNaHOFOPMAUIN
- Yka3a3Hne BKNJIOeHNO rnp6opn npabNbHOcCB8nC detckmM 6noKOM:
2aetaeata 3enehyn NOCTOHHB CEBT cebTOBOI hNdkHATOpa (8).
- Yka33nne HOTEPII INMOTCYTCTBNA C8HNI C DETCKHM 6NOKOM:
3aQepaerCTaENHbMnIyauoNcBET CBTOBORIO hNdkatopora (8)
OIOBpeMeHNO cNc3eHOBeHMHa dncnlee (4) n3o6paXeHHnepe6ekKa, oTO6paXaTeC nIKTOrpAmma Npe3 ePn6bnIeNo 10 cekyHNDnocENoBaTeNo hpaTaAOTc23bKobbs ciHana B cekHyD.
KAK ToIbKO CBA3b BCOCTA HABINBAETCA, 3BkyOB0u CnHnAL OTKnIOUaTcN, Ha IcNirnEE (4) OTOpKaAaTc NIKTOP RAPMaM N 3ZAgOPaETC NOCTORHHb 3eNEhB CBET CBTOB0u CnHrANIm3a- uin (8);
PIMMEYAHHE: pnp BkIooHEN poDHTeBCKORO 6nOKa BbIOnHHeTcNOMCK KaHana CBzR3 CTecknM 6nKOM, n03OTMy 3eneHbM MrgAoumC CBETCBetOBHnDAKauin (8) ropnt, H na DmcNee OTo6pKaXaTcNtKToRpaMMa 7oTex npok, NOKA CBZ3 He 6bETyctahOBNeHa.
-Ykazahnene BbKIOHHO np6Opa: CBeTobaa INdkaZa (8) BbKIOUeHa.
CBeTOBaa HnDnKaun (9) ypoBn
3a4ja daKkymyIANTOPHOI NITNI-NOHON 6batape npiectablanr 3 paNHNbX BnDA INHOFAPMauIN
- Ioka3aHAn, YTO akyyMnyTOpHna 6atape (13) noTu nIoHocTbU pa3pJxKeHa:
3aogapera3c7enehniMniraouoN CBETCBETORIO hndkaTatop(9).
OnOBVbEmHoHa nDcNpee (4) noBJIaTc nKIOrTpAmMa paaRJaXeHnOH 6BaTape n np3aIaeTc oIIN npDe-ynpEkoJdAoiuONiCnHaN BcEyHyd.
PnI JnEbnN npDIOKAnBaT NCINBON3OBA Tb npNbOp, peKOMEnHyTeC BAblONHtB 3apdKy AKKymyTAETOPHOI NtIIN-NOHn Batapeu (13), B npOTNBOM Cnyae, np6Op npekpaHTpA6OTy.
BbONNHTb 3apRky aKkymyIaTOPOH NtIN-NHOHb6atepn(13), NOckNOHB WOBEOAanTpe (1) K coeINHNTENIO nITAHNA u 4pADHOmy yCTpoCTBY (14) POINTeJbCKORO 6bnoka.
He NtBtBc3aqrAitb 6atapen, He BIAIOUeCnE AKKyMylTOpHbIMN OHN MOrY T B0PbAtcR.
-
He nCnIb3O8aTb AKKyMylTAp0hBe 6aTapei, OHN MOrTy UMeHbUHbTb FyHK-UmOHaJIbHOCT pN6Oba.
-
Pn6bOp He npdHa3Haueyen paoBtcb 3aMeHReMbIMI JNTHeBbIMI 6bataeMM.
BHIMAHINE: HennapinbHoe NcnoBnB0aBHeN Mojet npnbEctN K cO3daHn OPOAChON CNTyaun.
BnHMaHHe:PEKOMEHJALIMI INO IcIOnJIb3OBAHIO JNTMEBbIX BATAPEI
-
He pa36bapar, he BCKpbBatn He nomBatn LntneBbea 8atapen.
-
He 3aMbIkaTb HApokOTKO KOHTAKThIbe BvBObIy IInTeNeBoi 6Batapen.He XpaHITb 6CcnOpraDooHIO NtIeNBeB6 Batapen BHyTpN KOp60K n/nnIaRIOK, Dge OHI ONy TAmKHYtCBaHApokOTKO dpyr Ha dpYra nnIy chepe3 TOKOPBOdNIIe MATEpNaJIb.
-
He ɪnəkætəbʌltɪneBeyʊ batapeo n3 òɒrɪŋhʌbHɔŋ yɪaKOBkɒn də Ḥaʊla nCnɒlβɔBɔAHŋ.
-
He noDBepraTb IInTeBvO 6aTaepo HArpeY bO3eDCTBnO rOhr. IV6Beratb xpaHEnHa NOD B03eNCTBnEM pIAmOro COnHeuHOrO CBeta.
-
He noidbeprataI nIitnebyo 6bataeO meaHnueckmM ydapam. B cnyae cnuyaihoro naedane 6batae BCERA npoBepraTc coToTHne 6obOnu K KOtAKThbIX BbIOBOpe NcNOlb3OBaHnEM. EcnI nIitneBa 6batae BCNeDCTBne naedane 6bla nobpeKdena, he nCIOb3OBatb ee.
B CNYae yteKn KJIOKCTN 3batape H neDonyckatb KOHTaTc KJIOKCTN c KOxekn I rna3amm. PnB OZHNIKHOBEHNI KOHTaK TpONMBtB 3aTPOHybIte yactKn 6oJIbIMM KOINyCTOB MBObl N oPbNTbCR B aYpa
He nCnOJb3OBA Tb 3apdHbIe yCTpoiCTBa,OTNnHbIe OTnpHa3NaueHHbIX JIN NcOJIb3OBAHn C annapaTyPoI.
-
06apntb BHMAHnHa Me hapKOp8K (+) n (-) Ha nltneboi batapee n ha n3delen, Tc0b6 obceNtchey e npaBnblHyoo tyaHOBKn y COOTETCTBYIOuee MCNlObl3OBAHoe.
-
He nCnpoB0aBtДЯнптAnHЯ риббopaЛNTneBee bSapTe,OTNHybte OTOpOaJIReMoi B KOMIINeKTe.
-XpAHINI.HTNBEYIO GATapeBO HE-DOCTYNHOM IDN DETEEN MECTE.
Annapatypa 6bIa pa3pa6OtaHa TAKIM 6bOpam, 706bI pndopTba
UaTb NprrnA TCBoA Tb HnpabunBHOY UCTAHOBKe LHTneBOB 6BaTapeH BCerDa ObaPaaB Tb BHMAMHe Ha MapKIOPOBky IOnpHOCtHa IN3dEInu H NaIHTneBOB 6BaTapee N BCerDa IpoBeprTa IbapBNbOCTb NcNOb3OBAHH.
- He nCnIb3oBtB pRi6Op cOT mUHNOI OT yKazAHOH B DAHNOM PYKOBOCTBE NO EKnClNyaTauzIM MOnBeIO bBatapen. CnpabOyCOH KoiNDouKINy dAn bBatapen COY,20256600100
-3apKaTbI nIyTeBvO 6aTaepIO,ToNko KOrda OHa yCTaHOBeHb BHyTpIn H3JeIN, IcNpIb3y cTeBcOb ADanTep, NocTabnREMbY B KOMPJIeKTE (COD.20256600200). He zpaKaTbI nIyTeBvO 6aTaepIO, IcNpIb3y dpyrme 3apAizHe yCtpoiCTBa.ДЯ ZpaKaDn IyTeBvO 6aTaepEN BblONHHTb INCTpykUIN, pInbEeHNbIe ByPOBOCDTBE.
-Coepejxab 6atapeio KnKoTHAKTbHble BbBOdb cyxMN uNcTBmB. B Cyuaye 3aqr3HeNnKoTHAKTbHxB bByOBod npOtepeBnx MArKO h cyXoTKaHbO.He nCnloB30BaTbI dny NCHKtNs 6atapeu CoOTBeTCTBYouHxie KOHTA KbHx BbIOBD a6pa3nBhne CpeCDBA,XMnueckne IpOdyKTbI n pactOBpTeTI. - LlntnEByO 6batapeo nepeI cncNBoBZBOaHm EHe06XbDImO 3apJdItb. IJa npabInbHorO BbOnIOHeNIO pOeUpyb 3apJDKN BCERda ObaPauTcbK N HcTDPKUYAMIN
- He octablatb liinnebyo 6atapeo B pekimme 3apara, ecln OHa he nCnonlb3yctca.
- Bcerda ydaanrbyI nIeNBeYbO bataeO u3 u3dEIny,ecnO hO He uCnONb3y-etc.
YUINHINPOBATB GATAPEIO B COOTBETCBN C YKAZAHJNRIAM DAHONHO
pykoBODCTBa.
3.1 UCTAHOBKA ⅢeONHbIX Batapei, HE BXOJHXB KOMNNEKT DETCKO BO 6noka (C oCHOBHO FyHKUme nepedatuKNA M3o6paxKeHHa N 3BYka) CHHTB KpbIbKU BatapeHOrHO tOcKa E IeONOHbX Batapei (10), YINPArcB H neHae NaJIbAmr PdAMo CO CTpeKIOB N OTOPOXHO BtIRYNBa NAHEB no HappanBeHHIO BBeP (pnc.1). BCTaBHt 4 IeONUHbE Batapei 1.5 B Tnna AA/LR6, Co6nIOJa npri yctAHOBKE IpaBILHy IO JIAPHOCTb, YkA3AHUYo BatapeHOM OTOcEe. CHOBA UCTAHOBt KpbIbKU 6tapeHOrO OTOcKa E IeONUHbX Batapei (10), Chauana BCTABNV HNKeHne FIKCaTOpBi KpbIbKN CooBTCTBHyOJIe RHe3da BatapeHOrO OTOcKa INepeMeaJg KpbIbKU NO HappanBEHH (pnc.2).
3.2 YctahOBka ⅢeONHbX 6bapei, he BXOaIIxu B KOMNJIeKT DcTKoRo 6NoIa (C oCHOBHO yHKUmeJ nepedatunka I3o6paxenHeNn 3Byka) ChHTb KpbIshky 6aTapeYHoro OTEcKa ⅢeONHbX 6bapei (10), yINpaIcBb H neaIbIaMn pRdOM c TpeKIOHn O octopoxHO npOdBraA KpbIshky no HapBaIeHIO BBeP (pnc.3). YuAnITb 4 pazrKeHHne ⅢeONHbYe 6bapei n 3aMeHbIX h Na 4 aHaONrHbYe 6bapei 1.5 B TnlaAA/RL6, coNIOJda npY cTahOBKe npaBInbHy IO NpIarHOCTy, YkazAHHy IO b AteHHom OTEcE. CHOba YCTAHOBtB KpbIshky 6aTapeYHoro OTEcKa ⅢeONHbX 6bapei (10), ChauAna BCTABW HNKHne FmKCatOpbl B COOTBcTByUOJe The3DA GbATEyHoro OTEcKa I nepEMeuaq KpbIshKy n HapBaIeHEno BH3 (pnc.4).


3.3 YctahOBka JINTH-NHOHHo 6batape, BXOHAUEB C KOMNJEKT PODMTBeckoro 6JOKA (C OCHOBHOY fHKcneu npmEHNAKA)
Ha MOMENT NOKYNIK AKKYMUYIATOPHNA JUNTHMONHA 6atapere 3,7B 1800MAU (13) poNDHTeBCKORO 6noka coedePKNITcT OTeJbHo B yanaKOBKe n3dJIENIA.
OctopoxHO NOCTATB NITTH-NOHNYO 6baTePO 3e ynaKOBKn.
CHrTb KpbIshK U TcEka JnA kkyMyl-ntIOHPOB 6batape (10), yInpAraCb nIbIaAMn B ePxHni na3 n octopoxHO BbITIRBaB KpbIshK no HapnaBEnHO HApKy (pnc.5).
BCTaBnTb PnpIaragaoUyOc B KOMPnEke AKKymIaIopHyo IINTu-HOHHy 6aTaepae (13), 06paazh BHHMaHne Ha CoSIyDHeNpepABINbHOI NOIAPHOCIn TcAHOBN, Yka3AHNO B 6aTaepenH OTCKeE.
CHOba yCTaHOBnB KpbIuKy 6batapeHORO oTOcKaA kKymJYnTOpHOH 6batapeH(13), ChaHaNA BCTaBVN HxNHxue OfHKCaTOpBo KpbIuKN B COOTBeTcByUOHe NTHe3Da 6batapeHOrO oTOcKA nOctopOxoH nepeMeuaq KpbIuKy no NapabLeHIno K I3dEIno (pnc.6).
3.4 3aMeHa IInTm-IHOHb6batape, BXOJIaueB KOMPINEKT POJNTeNbCKORO 6Ioka (c OCHOBHOn FOHNKUmei npMeMNHA)
EcnnpnoJnKtnIbHocB 3apJa aKKymyIANTOPHO NITM-IOHOH 6aTapei Qpe3MeHOYMeHNsAeCTa-3O O3HaJeAET,OTe ee cypcpc Bpa6oTHAn IOtOMy Heo6xOIMMO 3aMeHInb ee (daHHb) kKT CyaHTaEaTc HOpMaBbHbM, TAK KAK aKKymyIANTOPHbIe 6aTapei CO BpemeHem BIPA6aTbIbAOT cbO pecypc).
Chrtb KpbliKy OTeKa IaAkkMy
laTOPHO 6aTapei (10), ynpiaRcB naJIbAmBa M BepxHn na3 nOCTOpOXH NO bITIINBAK KpbIbKu No HapBaNHe NIO HApKyP (pnc.7).
YdaniHb pa3pJxEHHyU kAkyMylTnTophy H6Taapeo (13) n3aMeHytB eeDpyrO kAkyMylTnOpHb 6atapee, nDeHTuHNo 6atapee, noCTabIeMoB KOMJIneKte C n3dennm 3.7B 180MaU (Ko20256600100, 3a npaaBaemO hNocpeDCTBEHO B KOkMANArtsana S.p.A.)co6JIouDaar npabINbHyO nOLpHOCtB,yka3AHHy Bo 6TaapeHOM OTeCe.
Chobya Uctanohbnt KpbiKu7y batapeH Horo OTCeKa AKKyMylTOpHOH 6batape H10), ChaHana BCTABWn HhNkHe OHKCaTObpI KpbiHKn B COOTBETCTBYUOHe THe3a DbatapeHoro OTCeKa I octopOKHo NepemEuaq KpbiKu n HapabLeHnO K hEnDIno (Pnc.8).
TEXHNUECKNE DAHNbIE
BbIXOД:6.5B,——=550mA
PonpaHoctb wTeKepa: -C
CdeNaHO B Kntae
JITNI-NOHNA6aTape
MoI. 663960 (ICP66/39/60)
NacnoptTha emKoctb: 1800MaU(6,66Bt)
HomnHaNbHoe HapJxKeHne: 3.7B
Литnevва Батаре обес Neuвет CBONУшпэ КСКПУТАЦОПНБЕ XapakTepINCHNIPRIN NCSNoB3OBAHInPnOB6bHUYIemTNMHTypeOKpykaUIOeI cpdeby (20^± 5^)
CdeJanaHO B Kntae
UCOBHbIE O6O3HAUENI

NepemEnHHbOJdHofoa3-HbIKoT

NOCTOHHbI TOK

NCKIQUHTeBHOДЯ NCTOJIb3OBaHnB BHTPIM POMEUHEN

Essential Digital Video Baby Monitor


Mod. 06626


Essential Digital Video Baby Monitor
Digital teknik:
ALLMÄNNFA FÖRESKRIFTER
Baby Monitor Video Digital Essential
Dijital teknooji:
Yükssek mahremiyet standardi - Sifir parazit.
"Artana S.p.A"
(glaal) gaaal gaaal gaaal gaaal gaaal gaaal gaaal gaaal gaaal gaaal gaaal gaaal gaaal gaaal gaaal gaaal gaaal gaaal gaaal gaaal gaaal gaaal gaaal gaaal gaaal gaaal gaaal gaaal gaaal gaaal gaaal gaaal gaaal gaaal
aaiyss aannn aennnn aennnn aennnn aennnn aennnn aennnn aennnn aennnn aennnn aennnn aennnn aennnn aennnn aennnn aennnn aennnn aennnn aennnn aennnn aennnn aennnn aennnn aennnn aennnn aennnn aenennn aennnn aennnn aennnn aennnn aennnn aennnn aennnn aennnn aennnn aennnn aennnn aennnn aennnn aennnn aennnn aennnn aennnn aennnn aennnn aennnn aennnn aennnn aennnn aennnn aen nn n ane annne aannee ane ane ane ane ane ane ane ane ane ane ane ane ane ane ane ane ane ane ane ane ane ane ane ane ane ane ane ane ane ane ane ane ane ane ane ane ane ane ane ane ane ane ane ane ane ane ane ane ane ane anee
wio
jie jie jie jie jie jie jie jie jie
(jliuLJyLjwJ 1
jao jao jao jao jao J
gaijia jiu jiu jiu jiu jiu jiu J
jia jia jia jia jia jia jia jia jia J
jia jia jia jia jia jia jia jia jia J
jia jia jia jia jia jia jia jia jia J
jia jia jia jia jia jia jia jia jia J
jia jia jia jia jia jia jia jia J
jia jia jia jia jia jia jia jia J
jia jia jia jia jia jia jia jia J


:aaLgSi
aaii i aaii 1 - aaiiaai ai jie gaii
gaii gaii gaii Jabiai alai jaj
gaii gaii gaii Jabiai alai jaj
gaii gaii alai gaii aaii jaii jaii
jaii jaii ae ai jaii jaii alj
jaii 2,4 aaiii ayllal jaii ayllal ayll
jaii ayllal ayllal ayllal aylll jaii
jaii ayllal ayllal ayllal aylll jaii
jaii ayllal ayllal ayllal aylll
ayllal ayllal ayllal ayllal aylll
ayllal ayllal ayllal ayllal aylll
ayllal ayllal ayllal ayllal aylll
ayllal ayllal ayllal ayllal aylll
Jahll 1g hali ci g
a a a a a a a a a a a a a a a a a a a a a a a a a a a a a a a a a a a a a a a a a a a a a a a a a a a a a a a a a a a a a a a aaa
111 111 111 111 111 111 111 111 111 111 111 111 111 111 111 111 111 111 111 111 111 111 111 111 111 111
jaiyao jayao jll JwJawuwuLLgaiabg Jabiall aag gao *
Lgaiabg Jabiall aaggg Cwajlgyaasll
Cwajlgyaasll Jwauwuuwuuw
Cwai ayaaull /2jll Jauill Aasll
jolao jaiu uuau uuau uuau
LigSalljayall
cll yllll lllll pnnn 2
gaiyll gai gai (ygl) caylll
gaiyll gai gai gai gai gai gai LLs
gai gai gai gai gai gai gai gai
gai gai JauuJauu Jauu Jauu Jauu Jauu
gai uall uall uall "DECT" CLLUll
jlll jlll aaiu uuiu uuiu uuiu uuiu uuiu uuiu uuiu uuiu uuiu uuiu uuiu uuiu uuiu uuiu uuiu uuiu uuiu uuiu uuiu uuiu uuiu uuiu uuiu uuiu uuiu uuiu uuiu uuiu uuiu uuiu uuiu uuiu uuiu uuii
posiullglc
aeglll agglll aaglll aaglll aaglll (w)
yolll yolll aaglll aaglll aaglll alalll
aaglll alalll gagglll gagglll gagglll
yoglll gagglll gagglll alalll
pslll lglg aylln yalele alef alles nie aaeannn ayllnl galee annn aeal aalee aellall ayllnl allld galee galee wiggly galee pgl eel galee galee galee galee galee
jaiy jaiy jaiy jaiy jaiy jaiy jaiy jaiy jaiy jaiy jaiy jaiy jaiy jaiy jaiy jaiy jaiy jaiy jaiy jaiy jaiy jaiy jaiy jaiy jaiy jaiy jaiy jaiy jaiy jaiy jaiy jaiy jaiy jaiy jali y jali y jali y jali y jali y jali y jali y jali y
ailll jall aoll "OFF" 1 (c) plll lllllllllllllllllllll
:
alalal alalal yale! a:clalal ()
a#
Juw! awwuI (gai) JauJIa 2.1
(ajal yjai
06262
Jiaai jia jia jia jia pao: jia jia jia (1)
aIzolalbass:"OFF"glo (7) aIzallalalalalalalalalal alalalalalalalalalal
:aglll lllllllll 1.12
a a a a a a a a a a a a a a a a a a a a a a a a a a a a a a a a a a a a a a a a a a a a a a a a a a a a a
(1) 12 < 12 即 1 ≤ y2 < 2 或 12 > 12 即 1 ≤ y2 < 34
a. L1 : l1 L
(wagjg jlll 6626
1800 37 aolal oal alal 11
Jao 65 2000 2000 2000 2000 2000 2000 2000 2000 2000 2000 2000 2000 2000 2000 2000 2000 2000 2000 2000 2000 200
yoloo 550- -wogj gai/1
jallgll ggl 3
JitauySL iadabcd LCD ego 24 adabcd 40 adabcd 24,42,43,44,45,46,Jitauy
Lcd


a 1
(1)
jaiy a jay y jay a jay a jay a jay a jay a jay a jay a jay a jay a jay a jay a jay a jay a jay a jay a jay a jay a jay a jay a jay a jay a jay a jay a jay a jay a jay a jay a jay a jay a jay a jay a jay a jay a jay a
ailll ayllll lalld ydo 1
a a a a a a a a a a a a a a a

a#
slll clll gall aagg slll lll 1/2 1/2 1/2 1/2 1/2 1/2 1/2 1/2 1/2 1/2 1/2 1/2 1/2 1/2 1/2 1/2 1/2 1/2 1/2 1/2 1/2 1/2 1/2 1/2 1/2 1/
gaii gai i jie yue yue liyue liyue liyue liyue liyue liyue liyue liyue liyue liyue liyue liyue liyue liyue liyue liyue liyue liyue liyue liyue liyue liyue liyue liyue liyue liyue liyue liyue liyue liyue liyue liyue liyue liyee
aagaaal jlll lalj
Jae9) Jlaaill aall Jauu ygaae gaae
: aaii 0o aaii
aagaae Jauaia aagaa Jao jagai jagai
Jaaai jagai
Jaaai jagai
Jaaai jagai
Jaaai jagai
Jaaai jagai
Jaaai jagai
Jaaai jagai
Jaaai jagai
g y aagaaaagaaagaa Jauaijai Lao y aay
y aaii jaiy aaiy (9) gaiyaiyaiy
y aaiy aaiy aaiy aaiy aaiy aaiy aaiy aaiy aaiy aaiy aaiy aaiy aaiy aaiy aaiy
jolaloojol
5b+g20g20g20g20g20g20g20g20g20g20g20g20g20g20g20g20g20g20g20g20g20g20g20g20g20g20g20g20g20g20g20g20g20g20
JLai
1.5,2.5,1 , 1.5,2.5, -
9
(12)aagalllllal
:diolino qingles
aaiy aay aygaiy ayiay iay
jLg 1 g aagaauglaagaaagaaagaa
a.1.11 a2.3.1
yall yall yall yall yall yall yall yall yall yall yall yall yall yall yall yall yall yall yall yall yall yall yall yall yall yall yall yall yall yall yall yall yall yall yall yall yall yall yall yall yall yall yall yall yall yall yall yall yall yall yall
:
a a a a a a a a a a a a a a a a a a a a a a a a a a a a a a a a a a a a a a a a a a a a a a a a a a a a a a a a a a a a a a a a a a
1
1
Jlaiuuiu uuiyue Llao pao j
Ljaiuuiu
eaii agaiuio gaiia iagai ciayai yaiuai
ei o u 1,5 aigai ciayai) aieaiai
jaiiuia iuaia (AA/LR6
Laiuuiu ge jaiuiu yaiu uaiui Laiuui
ge aaiuuiu Uoi ge Jaiuiyaiu aaiuuu yuo
jaiuiuuyau
gaiuiuiu uiuiu uaiiu xiaojaiu
duaiuiuyau ge aiaiue ayaiuyaiu
Jgliuoyue aiaoyi gaiiyaiuiu ciayiu
g aallll lallll alllll g 2
.ayaaa yla
y aaii y aaiiaai ai bai Lai i
. gaii y aai ayaiu uai yai
plaaai pae all gai aai alai Lai i
aaii jie aegw
jglal plalil alolg y c w l 15
aLlALlALL glllglllgllgllg (13) nall
nlllglgllgllgllgllg (1) aLLIgLLgLLgLLgLLgLLg (13) nall
g (14) nlllgllllgllllgllg (9) glll (1)
g (13) nlll allcAALLALLALLALL (9) glll (9) glll (9) g (9) g (9)
glal gall glal glal glal glal glal glal glal glal glal glal glal glal glal glal glal glal glal glal glal glal glal glal glal glal glal glal glal glal glal glal glal glal glal glal glal glal glal glal glal glal glal glal glal glal glal glal glal glal glal glal glcalglalglalglalglalglalglalglalglalglalglalglalglalglalglalglalglalglalglalglalglalglalglalglalglalglalglalglalglalglalglalglalglalglalglalglalglalglalglalglalglalglalglalglalglalglalglalglalglalglalglcalglalglcalglcalglcalglcalglcalglcalglcalglcalglcalglcalglcalglcalglcalglcalglcalglcalglcalglcalglcalglcalglcalglcalglcalglcalglcalglcalglcalglcalglcalglcalglcalglcalglcalglcalglcalglcalglcalglcalglcalglcalglcalglcalglcalglcalglcalglcalglcalglcalglcalglcalgl


Igaiinuigai Ii 10 25 10 10 10 10 10 10 10 10 10 10 10 10 10 10 10 10 10
Jliljll jllio oI Jgaiy I ayla Jblal Jlilj lglw iia jlgil aae aie 15a baa Jzui yj Sjui gaiy I ayla Jeg gaiy Ige I gai I, Iiwl I kllk Jsui plao woi Jo Lsi sIg jgaiy I ayla
Aa 2000 1000000000000000000000000000000000000000000000000000000000000000000000000000000000000
a. c. c. c. c. c. c. c. c. c. c. c. c. c. c. c. c. c. c. c. c. c. c. c. c. c. c. c. c. c. c. c. c. c. c. c. c. c. c. c. c. c. c. c. c. c. c. c. c. c. c.
alel allal ayall alal gao yao yao
(1) (2)
alel allal ayall alal gao yao yao
(3)
alel allal ayall alal gao yao
(4)
alel allal ayall alal gao
(5)
alel allal ayall alal gao
(6)
alel allal ayall alal gao
(7)
alel allal ayall alal gao
(8)
alel allal ayall alal gao
(9)
alel allal ayall alal gao
(10)
alel allal ayall alal gao
(11)
alel allal ayall alal gao
(12)
alel allal ayall alal gao
(13)
alel 3,7 gao yao ayall alal gao
(14)
20256600100 aeeyoo yoo 1800
aeeuull uuuu yoo yoo
Jisxll abe lyo ge "Artanas S.p.A"
yoo yoo yoo
alel allal ayall alal gao yao yao
yao ayall alal ayall alal gao yoo
(15)
yoo yoo yoo
(16)
a aalll
06626 Jg
:ALL LAL
AA/0 1,5x4 1
LR6
240-100 aS W g
550= 6,5/ajy 50-6
JL
JLAL
2454 2400- aai y gla
g 100 aai g
aai ai al lclal oay
jLg 1
EN 60825-1 aai
Jiaawu aawwul Lgaiyag) 1800 3,7 gaiyaiyaiyaiyaiyaiyaiyaiyaiyaiyaiyaiyaiyaiyaiyaiyaiyaiyaiyaiyaiyaiyaiyaiyaiyaiyaiyaiyaiyaiyaiyaiyaiyaiyaiyaiyaiyaiyaiyaiyaiyaiyaiyaiyaiyaiyaiyaiyaiyaiyai yal 240-100 65 Jpaia jao yae yae 550 6,5/2j50-60~
中
(10) aeglll clyllll yg lgy gngcl alllgslgglgglgallclll jy
aagaaagagagagagagagagagagagagagagagagagagagagagagagagagagagagagagagagagagagagagagagagagagagagagagagagagagagagagagagagagagagagagagagagagagagagagagagagagagagagagagagagagagagagagagagagagagagagagagagagagagagag
a aaiy gao yiyu ciuyi ayuy 3.3 (Jiaayyuyiyuyuyuyiyuyiyuyiyuyiyuyiyuyiyuyuyiyuyuy
pajlll cagl jayu ayu yujn 4.3 (jauy)


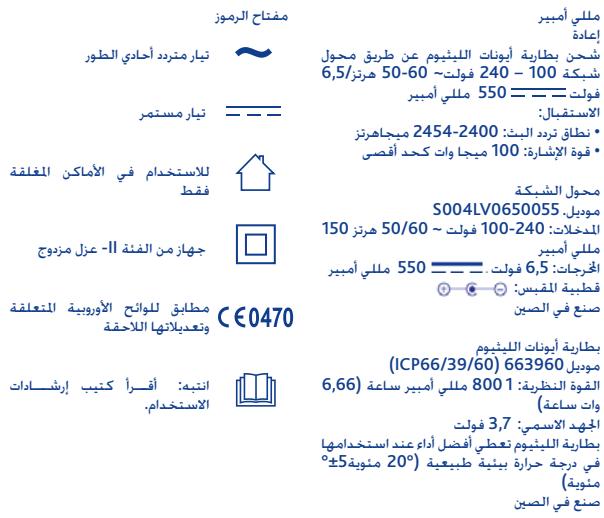

S OBC = S COD + S BOC - S BOC
j 1
xiao jiu liang li LiS
Jus 1.1) Jus Jus Jus Jus Jus Jus Jus Jus Jus Jus Jus Jus Jus Jus Jus Jus Jus Jus
山
/2000/299 1 a a a a a a a a a a a a a a a a a a a a a a a a a a a a a a a a a a a a a a a a a a a a a a a a a a a a a a a a a a a aa
y = - ( x - 2) ^2 + 1 ( 2 < 2)

j j j j j j j j j j j j j j j j j j j j j j j j j j j j j j j j j j j j j j j j j j j j j j j j j j j j j j j j j j j j j j j j j j j j j j j j j j j j j j j j j j j j j j j j j j j j j j j j j j j j jjjjjjjjjjjjjjjjjjjjjjjjjjjjjjjjjjjjjjjjjjjjjjjjjjjjjjjjjjjjjjjjjjjjjjjjjj
aio 115 10
EC/2006/66a1gagagagagagagagagagagagagagagagagagagagagagagagagagagagagagagagagagagagagagagagagagagagagagagagagagagagagagagagagagagagagagagagagagagagagagagagagagagagagagagagagagagagagagagagagagagagagagagagagagagagag
gAertsana"Liuij 45,13
liuyi Liuee Luee agagao Lo Jia
Lug Lelie gie. juao jiau jiau jiau jiau
Laiyig Liuee Jus Jus Jus Jus
Laijiai aai ayaiy iue aiaiy aiaiy
yo yao yao yao yao yao YJiu
"Artsana"Liuij 45,13
yoi oye lio liyao oao


Note
Note
C € 0470
Mod. 06626

Artsana S.p.A.- Via Saldarrini Catelli 1-22070 Grandate (CO) Italy www.chicco.com