TE-5800 - Phone TOPCOM - Free user manual and instructions
Find the device manual for free TE-5800 TOPCOM in PDF.

User questions about TE-5800 TOPCOM
0 question about this device. Answer the ones you know or ask your own.
Ask a new question about this device
Download the instructions for your Phone in PDF format for free! Find your manual TE-5800 - TOPCOM and take your electronic device back in hand. On this page are published all the documents necessary for the use of your device. TE-5800 by TOPCOM.
USER MANUAL TE-5800 TOPCOM
natural_image
Black-and-white photo of a TOPCOM mobile phone floating in water, creating a splash (no visible text or symbols on device)BUTLER OUTDOOR 2010
TWIN/TRIPLE ECO
SHORT USER GUIDE
BEKNOPTE HANDLEIDING
NOTICE D'UTILISATION
KURZANLEITUNG
GUÍA DEL USUARIO ABREVIADA
KORT ANVÄNDARHANDBOK
KORT BRUGERVEJLEDNING
KORT BRUKERVEILEDNING
LYHYT KÄYTTÖOPAS
BREVE GUIDA DELL'UTENTE
To use 'Caller ID' (display caller), this service has to be activated on your phone line. Normally you need a separate subscription from your telephone company to activate this function. If you don't have the Caller ID function on your phone line, the incoming telephone numbers will NOT be shown on the display of your telephone.
Belangrijk
text_image
Technical diagram of a mobile phone with labeled parts including front panel, keypad, and control panelImportante
UK To be connected to the public analogue telephone network.
This product is in compliance with the essential requirements and other relevant provisions of the R&TTE directive 1999/5/EC. The Declaration of conformity can be found on: http://www.topcom.net/support/cedeclarations.php
UK The features described in this manual are published with reservation to modifications.
UK The CE symbol indicates that the unit complies with the essential requirements of the R&TTE directive.
Butler Outdoor 2010 - Twin - Triple Getting started
1 Getting started

Thank you for purchasing this TOPCOM product. This product has been designed and assembled with utmost care for you and the environment. Because we at TOPCOM like to think of the future of our planet and our children, we aim to do our best to help saving the environment. This is why we decided to reduce the number of pages of our user guides and product manuals. If you keep in mind that it takes up to 24 trees to produce 1 ton of paper, publishing product manuals in 14 languages costs our planet a lot of trees. In this short manual provided with your TOPCOM device you can find a brief explanation of how to install and use your TOPCOM device. If you would still like to discover all the features of your new TOPCOM device, please visit our website (www.topcom.net) where you can download the complete user manual in your language. By doing this TOPCOM hopes to do its share to make our planet a better place, but we can only succeed with your help!
2 Installation
2.1 Commissioning the base station
Perform the following steps:
- Plug the mains adapter into a 230 V socket. Plug the connector into the adapter jack on the bottom of the base station.
- Connect the telephone jack on the bottom of the base station to the telephone socket using the supplied telephone cable. (See picture on folding page)
2.2 Charger (only Twin or triple version)
Perform the following steps:
Plug the mains adapter into a 230 V socket. Plug the connector into the adapter jack on the bottom of the charging station.
- Bottom of the charging station
- Mains adapter cable
2.3 Handset activation

No need to install the batteries!!
The batteries are already inside the handset. A switch at the bottom of the handset has disconnect the battery to avoid discharging. You first have to press this swith to connect the battery.
- Remove the cardboard spacer.
- Press the activation pin according to the direction on the label.

natural_image
Illustration of a hand holding a remote control device, showing three sequential steps (no text or symbols)• After activation it takes about 10 seconds before the display turns on.
3. Remove the label ones the handset is activated.
Controls and menu structure Butler Outdoor 2010 - Twin - Triple
3 Controls and menu structure
3.1 Keys / displays / LED's
Handset
- Display 10. Microphone
- Mute key 11. Handsfree key
- Escape key 12. Internal key
- Up key 13. Keypad lock key
- Right key / call list key 14. Answer call / flash key
- Hang-up / on/off key 15. Down key
- Alphanumeric keys 16. Left key / phonebook
- Ringer off / pause key 17. Menu / OK key
- Redial key 18. Event LED
Base station
- Paging key
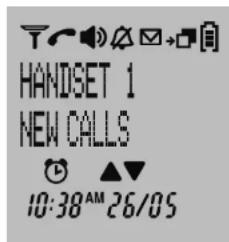
3.2 Display (LCD)
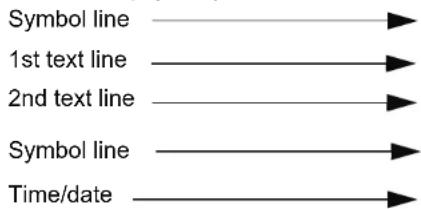
flowchart
graph LR
    A["Symbol line"] --> B["1st text line"]
    B --> C["2nd text line"]
    C --> D["Symbol line"]
    D --> E["Time/date"]
text_image
HANDSET 1 NEW CALLS 10:38AM 26/05The first text line shows the handset name and handset number.
The second text line will show new event messages ('VOICEMAIL', 'NEW CALL', and 'MEMORY FULL').
3.3 Event LED
The front handset LED 18 at the upper left indicates the following:
- Blinking fast: incoming call.
- Blinking slow: intercom call or paging.
- Blinking every 2 seconds: there are new event message in handset (see second text line on the display).
3.4 Menu structure
The handset has an easy-to-use menu structure. Every menu opens a list of options.
To open the main menu, press the menu key OK when the handset is on and in standby mode.
Press the up ▲ down key to scroll through to the menu option you want. The instructions in this user guide show the key symbols and the position number on the device overview. Then press the menu key OKagaininfo open other options or to confirm the setting that is displayed.
Exit menu or go up a menu level
Press escape key ESC ⑧ go to the previous menu option. You can press the ESC ⑨ key at any time to cancel and return to standby mode. If you do not press any key for 30 seconds, the handset automatically reverts to standby mode.
Butler Outdoor 2010 - Twin - Triple Handset - settings and operation
4 Handset - settings and operation

The steps below show the key and display symbols and the position numbers on the device overview.

Possible danger due to faults in the device! Follow the safety notes.
4.1 Powering up (Set up mode)
At the first insertion of the battery, activation of the handset or after a reset operation, the handset shall enter the set up mode. The user should select the country for various country dependent settings:
- 'WELCOME' is shown for the first seconds followed by the country setting menu. Press Okte confirm.
- 'Country' is shown on the display.
- Use ▲or④ to select the country.
- Press Oto-confirm.
- Press Again to confirm or press the escape key ESC to go back.
- Use ▲or④ to select the language
- Press Oto-confirm.
- Enter the date and press Olo-confirm.
- Enter the time and press Oto confirm.
4.2 Switching the handset on/off
- Press the on/off key until the display turn on.
- To switch off the handset, hold down the on/off key 📋⑥ for more than 5 seconds until the device switches off.
4.3 Menu language selection
The telephone has 14 menu languages, to set the language, proceed as follows:
- Press OK→⑰
- Press ▲of④ repeatedly, select 'HS SETTINGS'.
- Press oto confirm.
- Press ▲or④ repeatedly, select 'LANGUAGE'.
-
Press Oto-confirm.
-
The language setting appears in the display
- Press ▲or④ repeatedly, select the desired language.
- Press take confirm.
4.4 Making calls
4.4.1 External calls
- Press R.⑭
• The call symbol appears in the display. - When you hear the dialling tone, dial the telephone number you want.
-
The number appears in the display and is dialled.
-
To end the call, press 🔒 (if auto hang-up is set on) replace the handset on the base station or charging station.
4.4.2 Call preparation
- Enter the telephone number you want to call.
- To correct the number, press ESC .③
-
Press R.⑭
-
The call symbol appears in the display.
- The telephone number is automatically dialled.
- To end the call, press 🔊 (if auto hang-up is set on) replace the handset on the base station or charging station.
Phone book Butler Outdoor 2010 - Twin - Triple
4.5 Answering a call
The handset starts to ring during an incoming external or internal call.
- All registered handsets ring when there is an incoming call.
• The call symbol flashes in the display. - The caller's number appears in the display if you have caller ID (CLIP). Contact your telephone line provider for more information. The caller's name is also shown in the display if:
– the number is stored with the name in the phone book;
– the network transmits the name along with the phone number.
- You have the following options for answering a call:
- Press to answer the call.
- Pick up the handset from the base station or charging station (function only possible if auto talk has been activated).
- During the call, the symbol, the transmitted caller number and name are shown for 10 seconds, then the call duration is shown in the display.
- To end the call, press (or if auto hang-up is set on) replace the handset on the base station or charging station.
4.6 Setting the loudspeaker volume
Press ▲of⁴ down the call to adjust the loudspeaker volume. You can choose between 5 different settings. The default setting is level "3":

The volume is adjusted in the same way in hands free mode.
4.7 Setting the ringer volume on the handset
- Press

- Press ▲or④ repeatedly, select 'HS SETTINGS'.
- Press OK- to confirm.
- Press ▲④ or ▼⑮ repeatedly, select 'HANDSET TONES'.
- Press OK to confirm.
- Press ▲④ or ▼⑮ repeatedly, select 'RING VOLUME'.
- Press OK to confirm.
- The current volume is displayed and can be heard.
- Press ▲④r ▼⑮ repeatedly to select the ringer volume you want.
- Press OK→⑰ to confirm your selection or press ESC ③ to exit the menu without saving.
To turn off the handset ringer permanently, press and hold ⑧ for approx. 3 seconds. The symbol appear in the display. To reactivate the ringer, press and hold ⑧ again for 3 seconds.
5 Phone book
You can store 200 numbers (up to 24 digits long) with an associated name (up to 12 characters long) in the phone book.
5.1 Save a new entry in the phone book by the phonebook menu
- Press 📋 .⑯
- To add a new entry, press the menu key OK→⑰ and select 'NEW ENTRY' with OK→⑰
- 'ENTER NAME' appears in the display. Enter the name using the alphanumeric keys.
- Press OK and enter the telephone number.
- Press OK to store the entry in the phonebook or press ESC ③ to cancel without saving the entry.
Butler Outdoor 2010 - Twin - Triple Line settings
5.2 Save a new entry in the phone book by on-hook dial mode
When you enter a telephone number is standby, and you press afterwards the menu key OK you can store the number direct into the phonebook:
- In standby enter the telephone number you want to store.
- Press OK→⑰
- 'ENTER NAME' appears in the display. Enter the name using the alphanumeric keys.
- Press Other edit if necessary the telephone number.
- Press ① to store the entry in the phonebook or press ESC ② to cancel without saving the entry.
5.3 Finding and calling a number in the phone book
- Press ⑯
- Enter the initial letters of the name using the alphanumeric keys.
- The first name in the list with these letters appears in the display.
- Press ▲or④ repeatedly to scroll through the other numbers in the phone book.
- Call the subscriber found: the desired number is highlighted.
Press R 14
6 Line settings
6.1 Set country
There are various country depending settings and by setting the country these parameters are set correspondingly. Each parameter can be set separately also. Some settings like dial
mode cannot be set if there are no different options in the set country.
To set the country version:
- Press OK→⑰
- Press ▲or④ repeatedly, select 'LINE SETTINGS'.
- Press OK-confirm.
- Press ▲or④ repeatedly, select 'COUNTRY'
- Press OK confirm.
- Press ▲or④ repeatedly to select the country and press Okto confirm.
- Press Again to confirm.
7 Additional handsets and base stations
Up to 5 handsets can be registered to one base station. Additional handset must be registered to the base unit before use. Handsets of a bundled model are already registered to the base.

You can also register handsets of the Ultra range (like the Ultra S1200C)!
7.1 Registering an additional handset

This is only necessary if you have de-registered a handset or bought a new separate handset. You don't have to register handsets of a bundle!
Hold down the paging key 📄 on the base station for more than 5 seconds.
Registration mode on the base station is now activated for approx. 1 minutes. You must perform the following steps to register a handset:
- Press OK→⑰
- Press ▲or④ repeatedly, select 'REGISTRATION'.
Additional handsets and base stations Butler Outdoor 2010 - Twin - Triple
- Press Oto-confirm.
- Press ▲or④ repeatedly, select 'REGISTER'.
- Press Oto-confirm.
- Enter the base station PIN code (system PIN, default 0000) and press OK→⑰
- The handset will now search for the base station and register when it has found it. Following successful registration, the display shows standby mode and the handset name and number.
Butler Outdoor 2010 - Twin - Triple Om te beginnen
1 Om te beginnen

natural_image
Illustration of a mobile phone adapter being adjusted for size, showing three sequential steps (no text or symbols)text_image
HANDSET 1 NEW CALLS 10:38AM 26/05text_image
Diagram showing three-step installation of a mobile phone device, with hand positioning and assembly steps indicated.text_image
HANDSET 1 NEW CALLS 10:38AM 26/05natural_image
Illustration of a hand holding a mobile phone with three steps showing the process (no text or symbols present)natural_image
Illustration of a mobile phone adapter being inserted into a slot (no text or symbols present)text_image
HANDSET 1 NEW CALLS 10:38AM 26/05natural_image
Illustration of a hand holding a mobile phone with three steps showing the process (no text or symbols present)text_image
HANDSET 1 NEW CALLS 10:38 AM 26/05natural_image
Illustration of a mobile phone adapter being adjusted to form a separate device (no text or symbols present)text_image
HANDSET 1 NEW CALLS 10:38 AM 26/05natural_image
Illustration of a hand holding a mobile phone device, showing step-by-step assembly (no text or symbols)text_image
Diagram showing three-step installation of a mobile phone device, with hand positioning and assembly steps indicated.text_image
HANDSET 1 NEW CALLS 10:38AM 26/05natural_image
Illustration of a mobile phone adapter being adjusted to form a separate device (no text or symbols present)PORT' (HS SETTINGS).
- Premere

- Premere
natural_image
Illustration of a mobile phone adapter being inserted into a device, showing step-by-step assembly (no text or symbols)text_image
HANDSET 1 NEW CALLS 10:38AM 26/05natural_image
Illustration of a hand holding a mobile phone with three steps showing the process (no text or symbols present)text_image
HANDSET 1 NEW CALLS 10:38AM 26/05Butler Outdoor 2010 - Twin - Triple
Butler Outdoor 2010 - Twin - Triple
Butler Outdoor 2010 - Twin - Triple