
AC-5498 - Air Conditioning TRISTAR - Free user manual and instructions
Find the device manual for free AC-5498 TRISTAR in PDF.

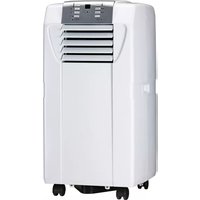
| Brand | TriStar |
| Model | AC-5498 |
| Product type | Mobile monoblock air conditioner |
| Cooling capacity | 12000 BTU / 3.5 kW |
| Power consumption | 1340 W / 6.14 A |
| Power supply | 220-240 V ~ 50 Hz |
| Max airflow | 480 m³/h |
| Timer | 1 to 24 hours |
| Operating temperature range | 18 to 32 °C |
| Water tank capacity | 1.7 L |
| Operating modes | Cooling, fan, auto, sleep |
| Fan speeds | 2 (low, high) |
| Activated carbon filter | Included, washable |
| Sleep function | Gradual temperature increase, auto shut-off after 12 h |
| Self-diagnosis | Error codes E1, E2 |
| Safety | Automatic shut-off if tank full, compressor protection (3 min delay) |
| Remote control | Included (battery not supplied) |
| Installation | Exhaust kit with window spacer (tube Ø152 mm) |
| Maintenance | Filter cleaning with soapy water, drain tank |
| Warranty | 2 years |
| Dimensions (approx.) | 45 x 35 x 70 cm |
| Weight (approx.) | 28 kg |
Frequently Asked Questions - AC-5498 TRISTAR
User questions about AC-5498 TRISTAR
0 question about this device. Answer the ones you know or ask your own.
Ask a new question about this device
Download the instructions for your Air Conditioning in PDF format for free! Find your manual AC-5498 - TRISTAR and take your electronic device back in hand. On this page are published all the documents necessary for the use of your device. AC-5498 by TRISTAR.
USER MANUAL AC-5498 TRISTAR
natural_image
White modular air conditioner unit with ventilation slots and a circular top (no visible text or symbols)EN Instruction manual
NL Gebruiksaanwijzing
FR Mode d'emploi
DE Bedienungsanleitung
ES Manual de usuario
PT Manual de utilizador
PL Instrukcja obsługi
IT Manuale utente
sv Bruksanvisning
cs Návod k použití
SK Návod k použitíu

service
.tristar.eu
TRISTAR Airconditioning


You can find all information and spare parts at service.tristar.eu
Dear customer,
Congratulations and thank you for purchasing this high quality product. Please read the instruction manual carefully so that you will be able to make the best possible use of the appliance. This manual includes all the necessary instructions and advice for using, cleaning and maintaining the appliance. If you follow these instructions you will be guaranteed of an excellent result, it saves you time and will avoid problems. We hope you will have a great deal of pleasure from using this appliance.
service
You can find all information and spare parts at service.tristar.eu!

An answer to all your questions

Tips and tricks on how to use your product

Order spare parts for your product online

Register for software updates for your product
SAFETY INSTRUCTIONS
- Please read the instruction manual carefully before using the device. Please keep these instructions, the guarantee certificate, the sales receipt and, if possible, the carton with the inner packaging.
- This appliance is not intended to be used by persons (including children) with reduced physical, sensory or mental capabilities, or lack of experience and knowledge, unless they have been given
supervision or instructions concerning the use of the appliance by a person that is responsible for their safety.
- By ignoring the safety instructions the manufacturer can not be hold responsible for the damage.
- To protect children against the dangers of electrical appliances, please make sure that you never leave the appliance unattended. Therefore you have to select a storage place for the appliance where children are not able to grab it. Make sure that the cable is not hanging in a downward position.
- The appliance must be placed on a stable, level surface.
- All repairs should be made by a competent qualified repair service(*).
- Make sure that the appliance is stored in a dry environment.
- Check if the voltage of the appliance corresponds to the main voltage of your home. Rated voltage: AC220-240V 50Hz. The socket must be at least 16A or 10 A slow-protected.
- This appliance complies with all standards regarding electromagnetic fields (EMF). If handled properly and according to the instructions in this user manual, the appliance is safe to use based on scientific evidence available today.
- Never move the appliance by pulling the cord and make sure the cord can not become entangled.
- To protect yourself against an electric shock, do not immerse the cord, plug or appliance in the water or any other liquid.
- Do not use this appliance with a damaged cord or plug or when the appliance has malfunctions, or has been damaged in any manner. To avoid a hazard make sure that a damaged cord or plug will be replaced by an Competent qualified repair service(*). Do not repair this appliance yourself.
- The use of accessories that are not recommended by the manufacturer can cause injuries and will invalidate any warranty that you may have.
TRISTAR Airconditioning
- Unplug the appliance from the socket when changing the spare parts or for maintenance.
• Children should be supervised to ensure that they do not play with the appliance.
• The appliance can be used by children aged from 8 years and above and persons with reduced physical, sensory or mental capabilities or lack of experience and knowledge if they have been given supervision or instruction concerning use of the appliance in a safe way and understand the hazards involved. Children shall not play with the appliance. Cleaning and user maintenance shall not be made by children unless they are older than 8 and supervised. - Do not use this appliance outdoors.
* Competent qualified repair service: after sales department of the producer or importer or any person who is qualified, approved and competent to perform this kind of repairs in order to avoid all danger. In any case you should return the appliance to this repair service.
PARTS DESCRIPTION
- Control Panel
- Handle
- Water tank
- Air outlet
- Air filters
- Exhaust air outlet
- Air inlet
- Cable storage
- Drainage point
- Hose
- Connection for hose
- Cover
- Window spacer
- Drain tube
- Carbon filter
- Remote control

natural_image
Close-up of a white curved pipe fitting with a numbered label '10' pointing to its side (no other text or symbols)


CONTROL PANEL
- On/Off (power) button
- Mode (function) button
- Temperature up button
- Temperature down button
- Speed (ventilation) button
- Timer operation indicator
- Sleep function button.
- Display window
- Automatic mode indicator
- Cooling mode indicator
- Fan mode indicator
Instruction manual
EN AC-5498
- High ventilation indicator
- Medium ventilation indicator
- Low ventilation indicator
- Timer mode indicator
- Sleep operation indicator
- Water full indicator
REMOTE CONTROL
Place the battery in the remote behind the flap on the back. Point the remote at the device and select the desired functions on the remote control.
- Display
- On/off button
- Temperature setting button
- Timer function button.
- Sleep function button.
- Function button: cooling, ventilation or automatically.
- Fan speed control.

radar
| Category | Value | |---|---| | 1 | 25 | | 2 | 26 | | 3 | 27 | | 4 | 18 | | 5 | 19 | | 6 | 20 | | 7 | 21 | | 8 | 22 | | 9 | 23 | | 10 | 24 | | 11 | 17 | | 12 | 31 | | 13 | 28 | | 14 | 30 | | 15 | 29 | | 16 | 32 | The chart displays a single data point for category 1. The other columns are not explicitly labeled but are included in the visual field.

BEFORE THE FIRST USE
When fixed or moved, the device can not be set horizontally or declined to more then 45^ or upside-down. The refrigerant circuit is checked for leak tightness.
SPECIFICATIONS
Cooling capacity: 12000BTU / 3,5 KW
Power/Ampere consumption: 1340W / 6.14A
Air Volume (max speed): 480 M³/H
Power supply: 220\~240V, 50 Hz
Timer: 1\~24 hours
Working temperature: 18\~32 °C
BEFORE USE
- Place the appliance on a flat stable surface and hold at least 30 cm. free space around it. Make sure the unit is placed in a upright position.
- Let the unit, after transport, wait for more than 4 hours before it is plugged in into the walloutlet. Prevent the cabinet to get wet.
- Make sure the power cable to the power plug is not curled up on the back of the device, it can be too hot. Place the plug always into a grounded outlet.
- Never place the appliance near any heat sources or direct sunlight.
INSTALLATION OF THE CARBON FILTER

- Remove the air filter frame from the unit.
- Separate the filter holder from the filter frame.
- Remove the carbon filter from its plastic bag.
- Insert the carbon filter into the filter frame.
- Fix the filter by reassembling the fixer onto the filter frame.
- Re-fit the filter frame inside the unit.
MOUNTING THE EXHAUST ACCESSORIES.
- The air conditioning system cools the air in the room where unit is placed. The absorbed heat of the conditioned air, should be removed to outside the room where the unit is placed.
- During cooling of hot air condenswater will be created. Much of the condensation will be transported with the warm air to outside. At high humidity not all the condense will be transported with the warm air to the outside, the water tank must regularly be emptied.
- In the chapter "Condensate Drain" is this defined step by step.
- There are several ways to transport warm air out of the room:
- Attach the hose in the warm air outlet of the device. Hang the hose out the window or a door. The cooling capacity will not be optimal because of warm outside air will flow into the to cool area.
- Place the window spacer in the open section of the window. Insert the hose into the connection for the hose. The cool capacity is optimal. Provide a maximum distance of 36 cm. the device to the windows or exterior wall.
- Drill a hole of 152 mm. diameter in the outer wall and enter the tubing through the hole. The cool capacity is now optimal. Place the wall cover on the outside of the wall. When the appliance is out of use, the cover can be placed on the hole.

- Make sure that the hose is not kinked or that the air flow is obstructed.
- Never extend the hose.

natural_image
Technical line drawing of a mechanical device with a pipe and valve (no text or symbols)DRAINAGE
- During cooling of hot air, condensation can be created. Much of the condensation will be transported with the warm air outside. At high humidity not all the condense will be transported with the warm air to the outside, the water tank must regularly be emptied.
- If the condensation tank is full, the water full indicator light on the control panel will light and a sound goes off, the machine stops automatically. The condensate tank has a maximum capacity of 1.7 liter.

natural_image
Technical illustration of a mechanical device with coiled tubing and a close-up view of its internal components (no text or symbols)Tristar Airconditioning
- Turn the knob condensate drain off the spout. Place a container under the spout and pull the rubber plug from the spout. The water flows out, when the bowl is full, insert the plug, empty the sump and drain the rest of the water.
- If the condensation must be removed continuously, place the condensation drain hose on the spout. Do remove the rubber plug. The condensate drain hose can be extended with another hose (not supplied). It can be connected to a drain or be led outside. Make sure this hose does not go up.

natural_image
Line drawing of a portable air conditioner unit with wheels and a hose, no text or symbols presentUSE
• Always place the plug into a grounded socket.
- Press ON/OFF button, the unit will work in cool mode with low fan speed, the pre-setting temperature is 24^ .
- Indicators of the functions in progress come on at the same time. *NOTE! The display window shows the ambient room temperature from 0oC to 50oC
- To turn the unit off, press ON/OFF button again.
SETTING MODE/FUNCTION
- Press MODE button to select required working mode: cooling, or fan.
• Sign of your selected mode comes on.
SETTING TEMPERATURE
- Press 'Temperature up' or 'Temperature down' button to regulate the temperature you desired.
- The display window will show the temperature you set as you press 'Temperature up' or 'Temperature down' button. Otherwise, it will always show the ambient temperature.
- The pre-setting temperature of this machine is: 24^ for cooling.
SETTING VENTILATION SPEED
Press SPEED button to choose the ventilation speed you need, high or low. The sign of high or low ventilation will light on at the same time.
SETTING TIMER
- Press TIMER button to set the operating hours you desired (1 to 24 hours, the sign of timer will light on). When the set time has been reached, the machine will turn off automatically. The display window will show the hour(s) you set as you press TIMER button. If the timer button is not pressed, the unit will work continuously.
- By pressing the timer but without turning on the other functions, you can PRE-SET the time for the machine to work. For example, if you press the timer to '2', the unit will work automatically after 2 hours.
SLEEP FUNCTION
- In cooling mode, by pressing the SLEEP button, the set temperature will increase 1oC at the 1st hour, another 1 oC at the second hour, then keeps at that temperature.
- In sleep mode, the ventilation will keep at low speed. Re-press the SLEEP button, the setting temperature and ventilation speed will return to the pre-selected one.
- The unit will shut down automatically after the SLEEP function running for 12 hours.
- Please note, the sleep function is not available while the machine is working in ventilation, dehumidification or auto mode. Only available in the Cooling mode.
- When the machine is in Sleeping function, the Fan Speed would turn to be LOW speed.
SELF-DIAGNOSIS
This machine is equipped with self-diagnosis function. If something is wrong in the machine, the LED will show the word "E1" or "E2". As this time, please call your service centre.
EFFICIENCY BOOSTING
This unit is equipped with "energy efficiency boosting" function, by adding the water to the water tank as below, the energy efficiency can be elevated greatly, save energy for the earth, save money for you.
- Open the door for the water tank
- Take out the water tank
- Unscrew the tap for the tap for the tank and fill up the tank with clean water

natural_image
Line drawing of a portable air conditioner unit with a small box and grid panel, showing internal components (no text or symbols)NOTICE
- To prolong the compressor's life, after switch-off of the unit, please wait for 3 minutes (at least) before re-switch.
- The cooling system will switch off if the ambient temperature is lower than the set one. The ventilation, however, keeps working on the set level. If the ambient temperature rises above the selected level, the cooling will return to work.
CLEANING AND MAINTENANCE
• Always remove the plug from the socket when the device is cleaned.
- Clean the outside with a damp cloth. Never use harsh and abrasive cleaners, steel wool or a scouring pad as this will damage the device. Do not immerse in water or other liquid.
- Remove filters from the device and clean it with warm soapy water, let the filters dry completely before being replaced. Turn the appliance without filters. If the unit is stored after the season, drain the condensate water and put the cord on the cord storage area.
FAULT CHECK LIST
THE AIR CONDITIONER DOES NOT RUN
Is the air conditioner plugged in?
Is there a power failure?
Is the comp / 'full water' indicator flashing?
Is the room temperature below the set temperature?
THE MACHINE SEEMS TO DO LITTLE
Is there direct sunshine? (Please put down the curtain.)
Are too many windows or doors open?
TRISTAR Airconditioning
Are there too many people in the room?
Is there something in the room producing lots of heat?
THE MACHINE SEEMS TO DO NOTHING.
Is the filter dusty, contaminated?
Is the air intake or output blocked up?
Is the room temperature below your selected temperature?
TOO NOISY
Is the machine positioned unevenly so as to create vibration?
Is the floor underneath the machine uneven?
THE COMPRESSOR DOESN'T RUN.
If so, it is possible the overheat protection of the compressor is on.
Just wait for the temperature to drop.
GUARANTEE
- This product is guaranteed for 24 months granted. Your warranty is valid if the product is used in accordance to the instructions and for the purpose for which it was created. In addition, the original purchase (invoice, sales slip or receipt) is to be submitted with the date of purchase, the name of the retailer and the item number of the product.
- For the detailed warranty conditions, please refer to our service website: www.service.tristar.eu

GUIDELINES FOR PROTECTION OF THE ENVIRONMENT
This appliance should not be put into the domestic garbage at the end of its durability, but must be offered at a central
point for the recycling of electric and electronic domestic appliances.
This symbol on the appliance, instruction manual and packaging puts your attention to this important issue. The materials used in this appliance can be recycled. By recycling used domestic appliances you contribute an important push to the protection of our environment. Ask your local authorities for information regarding the point of recollection.
PACKAGING
The packaging is 100% recyclable, return the packaging separated.
PRODUCT
This device is equipped with a mark according to the European Directive 2012/19/EU on Waste Electrical and Electronic Equipment (WEEE). By ensuring that this product will be correctly processed into waste, it will help prevent possible negative consequences for the environment and human health.
EC DECLARATION OF CONFORMITY
This device is designed, manufactured and marketed in accordance with the safety objectives of the Low Voltage Directive "No 2006/95/EC", the protection requirements of the EMC Directive 2004/108/EC "Electromagnetic Compatibility" and the requirement of Directive 93/68/EEC.
Geachte klant,
natural_image
Diagram of a device connected to a pipe with a cross symbol (no text or labels)CONDENSWATER AFTAPPEN
natural_image
Technical illustration of a mechanical device with coiled tubing and a close-up view of its internal components (no text or symbols)Tristar Airconditioning
natural_image
Line drawing of a portable air conditioner unit with cooling fans and attached tubing (no text or symbols)GEBRUIK
natural_image
Diagram of a water heater system with a small battery and grid panel (no text or symbols)LET OP
natural_image
Close-up of a white curved pipe fitting with a gray circular annotation labeled '10' pointing to its side (no other text or symbols)
3

14
16

12
11

natural_image
Two vertical gray bars separated by a single white circle (no text or symbols)●

PANNEAU DE CONTRÔLE
natural_image
Hand-drawn sketch of a window with a 36 cm measurement label, no other text or symbols present.


natural_image
Diagram of a device with a coiled tube and a cross symbol, no text or labels presentEVACUATION
natural_image
Technical illustration of a mechanical device with coiled tubing and a side-view inset showing internal components (no text or symbols)Tristar Airconditioning
natural_image
Line drawing of a portable air conditioner unit with cooling pipes and wheels (no text or symbols)UTILISATION
natural_image
Line drawing of a portable air conditioner unit with a small box and grid panel (no text or symbols)REMARQUE
DÉCLARATION DE CONFORMITÉ EC
natural_image
Close-up of a white curved pipe fitting with a gray circular annotation labeled '10' pointing to the side (no other text or symbols)
14
16

13

natural_image
Two vertical gray bars separated by a single white circle (no text or symbols)●

BEDIENFELD
natural_image
Diagram of a portable air conditioner with a coiled tube and valve mechanism (no text or symbols)ABLAUF
natural_image
Technical illustration of a mechanical device with coiled tubing and a zoomed-in view showing internal components (no text or symbols)Tristar Airconditioning
natural_image
Line drawing of a portable air conditioner unit with wheels and a hose (no text or symbols)ANWENDUNG
natural_image
Line drawing of a portable air conditioner unit with a small battery and cooling unit (no text or symbols)HINWEIS
natural_image
Abstract geometric shapes with no text or symbols
PANEL DE CONTROL
natural_image
Diagram of a portable air conditioner with a hose and valve, no text or symbols presentDRENAJE
natural_image
Technical illustration of a mechanical device with coiled tubing and a zoomed-in view showing internal components (no text or symbols)Tristar Airconditioning
natural_image
Line drawing of a portable air conditioner unit with wheels and a hose, no text or symbols presentUSO
natural_image
Line drawing of an air conditioner unit with a small box and grid panel (no text or symbols)NOTA

PAINEL DE CONTROLO
natural_image
Diagram of a portable air conditioner with a hose and valve mechanism (no text or symbols)DRENAGEM
natural_image
Technical illustration of a mechanical device with coiled tubing and a zoomed-in view showing internal components (no text or symbols)Tristar Airconditioning
natural_image
Line drawing of a portable air conditioner unit with wheels and attached tubing (no text or symbols)UTILIZAÇÃO
natural_image
Line drawing of a portable air conditioner unit with a small box and cooling panel (no text or symbols)AVISO

PANEL KONTROLNY

MOCOWANIE WYPOSAŻENIA WYDMUCHU
natural_image
Simple line drawing of a vertical cylindrical device with a 36 cm dimension label, placed inside a room (no text or symbols on the device itself)


natural_image
Diagram of a portable air duct connected to a cylindrical pipe with a cross symbol (no text or labels)DRENAŻ
natural_image
Technical illustration of a mechanical device with coiled tubing and a side-view inset showing internal components (no text or symbols)Tristar Airconditioning
natural_image
Line drawing of a portable air conditioner unit with wheels and a coiled cable (no text or symbols)UŻYTKOWANIE
natural_image
Line drawing of an air conditioner unit with a small battery and cooling unit (no text or symbols)UWAGA:
natural_image
Close-up of a white curved pipe fitting with a gray circular annotation labeled '10' pointing to its side (no other text or symbols)


natural_image
Two vertical gray bars separated by a single white circle (no text or symbols)

PANNELLO DI COMANDO
natural_image
Diagram of a portable air conditioner with a hose and valve, no text or symbols presentSPURGO
natural_image
Technical line drawing of a mechanical device with coiled tubing and a zoomed-in view of its internal components (no text or symbols)Tristar Airconditioning
natural_image
Line drawing of a portable air conditioner unit with wheels and heat exchanger (no text or symbols)UTILIZZO
natural_image
Line drawing of a portable air conditioner unit with a small box and grid panel (no text or symbols)AVVISO

KONTROLLPANEL
natural_image
Diagram of a portable air conditioner unit connected to a coiled hose with a cross symbol (no text or labels)DRÄNERING
natural_image
Technical illustration of a mechanical device with coiled tubing and a zoomed-in view showing internal components (no text or symbols)Tristar Airconditioning
natural_image
Line drawing of a portable air conditioner unit with wheels and heat sinks (no text or symbols)ANVÄNDNING
natural_image
Line drawing of an air conditioner unit with a small battery and cooling unit (no text or symbols)OBSERVERA
KOMPRESSORN GÂR INTE.
natural_image
Close-up of a white curved pipe fitting with a numbered label '10' pointing to its side (no other text or symbols)


OVLÁDACÍ PANEL
natural_image
Diagram of a device connected to a pipe with a cross symbol (no text or labels)DRENÁŽ
natural_image
Technical line drawing of a mechanical device with coiled tubing and a side-view inset showing internal components (no text or symbols)Tristar Airconditioning
natural_image
Line drawing of a portable air conditioner unit with wheels and heat exchanger (no text or symbols)POUŽITÍ
natural_image
Line drawing of a portable air conditioner unit with a small box and cooling panel (no text or symbols)POZNÁMKA
KLIMATIZACE NEFUNGUJE
natural_image
Close-up of a white curved pipe fitting with a numbered label '10' pointing to its side (no other text or symbols)


OVLÁDACÍ PANEL
natural_image
Diagram of a portable air conditioner with a hose and exhaust pipe, no text or symbols presentVYPÚŠTANIE
natural_image
Technical illustration of a mechanical device with coiled tubing and a close-up view of its internal components (no text or symbols)Tristar Airconditioning
natural_image
Line drawing of a portable air conditioner unit with wheels and heat exchanger (no text or symbols)POUŽÍVANIE
natural_image
Line drawing of a portable air conditioner unit with a small box and grid panel, showing internal components (no text or symbols)POZNÁMKA
Quality shouldn't be a luxury!

natural_image
Front and back view of a white Tristar air conditioner unit with circular vent grille (no text or symbols visible)
natural_image
Front view of a white portable air conditioner unit with ventilation slots and wheels (no visible text or symbols)
natural_image
Exterior view of a white and black electronic device (no visible text or symbols)
AC-5487AC-5400
www.tristar.eu
Tristar Europe B.V. | Jules Verneweg 87 | 5015 BH Tilburg | The Netherlands


- service
- You can find all information and spare parts at service.tristar.eu!
- SAFETY INSTRUCTIONS
- TRISTAR Airconditioning
- PARTS DESCRIPTION
- CONTROL PANEL
- REMOTE CONTROL
- BEFORE THE FIRST USE
- SPECIFICATIONS
- BEFORE USE
- MOUNTING THE EXHAUST ACCESSORIES.
- DRAINAGE
- USE
- SETTING MODE/FUNCTION
- SETTING TEMPERATURE
- SETTING VENTILATION SPEED
- SETTING TIMER
- SLEEP FUNCTION
- SELF-DIAGNOSIS
- EFFICIENCY BOOSTING
- NOTICE
- CLEANING AND MAINTENANCE
- FAULT CHECK LIST
- GUARANTEE
- GUIDELINES FOR PROTECTION OF THE ENVIRONMENT
- CONDENSWATER AFTAPPEN
- GEBRUIK
- LET OP
- PANNEAU DE CONTRÔLE
- EVACUATION
- UTILISATION
- REMARQUE
- DÉCLARATION DE CONFORMITÉ EC
- BEDIENFELD
- ABLAUF
- ANWENDUNG
- HINWEIS
- PANEL DE CONTROL
- DRENAJE
- USO
- NOTA
- PAINEL DE CONTROLO
- DRENAGEM
- UTILIZAÇÃO
- AVISO
- PANEL KONTROLNY
- MOCOWANIE WYPOSAŻENIA WYDMUCHU
- DRENAŻ
- UŻYTKOWANIE
- UWAGA:
- PANNELLO DI COMANDO
- SPURGO
- UTILIZZO
- AVVISO
- KONTROLLPANEL
- DRÄNERING
- ANVÄNDNING
- OBSERVERA
- KOMPRESSORN GÂR INTE.
- OVLÁDACÍ PANEL
- DRENÁŽ
- POUŽITÍ
- POZNÁMKA
- KLIMATIZACE NEFUNGUJE
- VYPÚŠTANIE
- POUŽÍVANIE
Brand : TRISTAR
Model : AC-5498
Category : Air Conditioning