
CDM1080 - Drill Ferm - Free user manual and instructions
Find the device manual for free CDM1080 Ferm in PDF.


| Product type | Cordless drill driver |
| Brand | Ferm |
| Model | CDM1080 |
| Battery voltage | 6 V |
| Battery capacity | 1.3 Ah |
| Battery type | Lithium-Ion |
| Charging time | < 5 hours |
| Maximum torque | 3.0 Nm |
| No-load speed | 230 rpm |
| Weight | 380 g |
| Direction of rotation | Reversible (left/right) |
| Spindle lock | Automatic |
| Lighting | White LED |
| Handle | Softgrip |
| Package contents | 1 screwdriver, 1 charger, 1 magnetic bit holder, 18 accessories, 1 manual |
| Protection class | Class II (double insulation) |
| Usage | Indoor use only |
| Sound pressure level | 72.1 dB(A) |
| Sound power level | 86.1 dB(A) |
| Vibration | < 1.235 m/s² |
| Maintenance | Clean with soft cloth, no lubrication |
Frequently Asked Questions - CDM1080 Ferm
User questions about CDM1080 Ferm
0 question about this device. Answer the ones you know or ask your own.
Ask a new question about this device
Download the instructions for your Drill in PDF format for free! Find your manual CDM1080 - Ferm and take your electronic device back in hand. On this page are published all the documents necessary for the use of your device. CDM1080 by Ferm.
USER MANUAL CDM1080 Ferm
natural_image
Close-up of a hand using a drill pen to cut or mark a wooden plank on a workbench, labeled 'Fig. 2 Fig. 3' (no other text or symbols visible)
natural_image
Close-up of hands operating a mechanical tool with a circular disc on the floor (no visible text or symbols)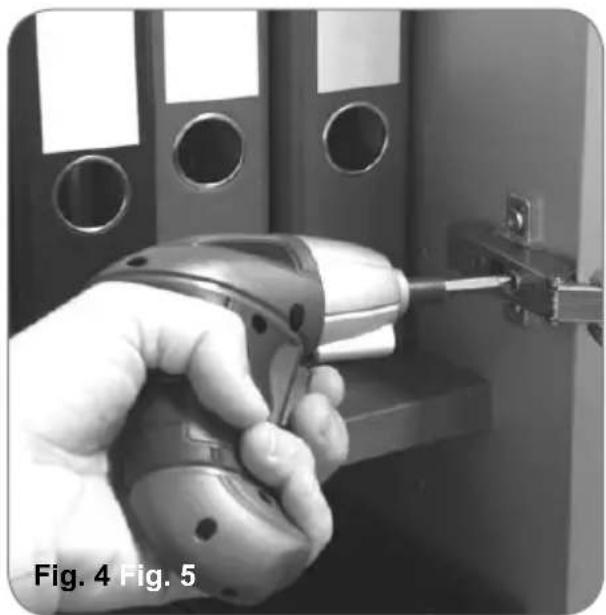
natural_image
Hand using a drill bit to adjust or install a component, no visible text or symbols on the tool or background
natural_image
Close-up of a hand using an electric vehicle to adjust cable from a bicycle (no visible text or symbols)
natural_image
Close-up of hands using a screwdriver to adjust or repair a small electrical plug on a cracked surface (no text or symbols visible)
natural_image
Close-up of hands using a power tool to work on a wooden panel (no text or symbols visible)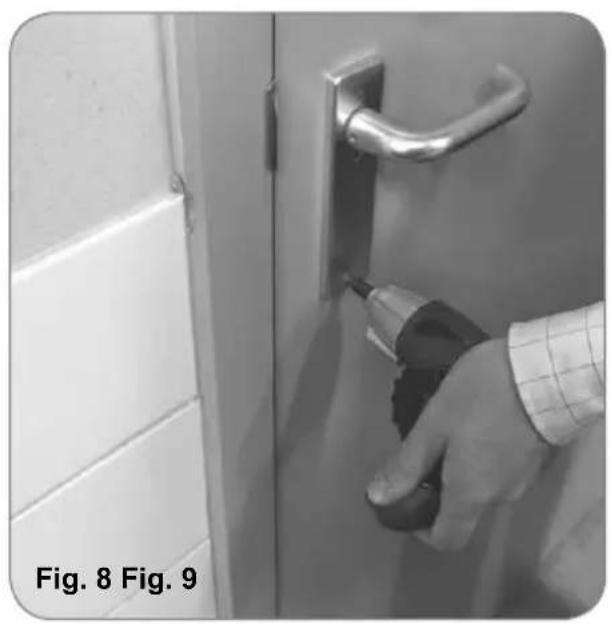
natural_image
Hand using a drill to clean or repair a door panel (no text or symbols visible)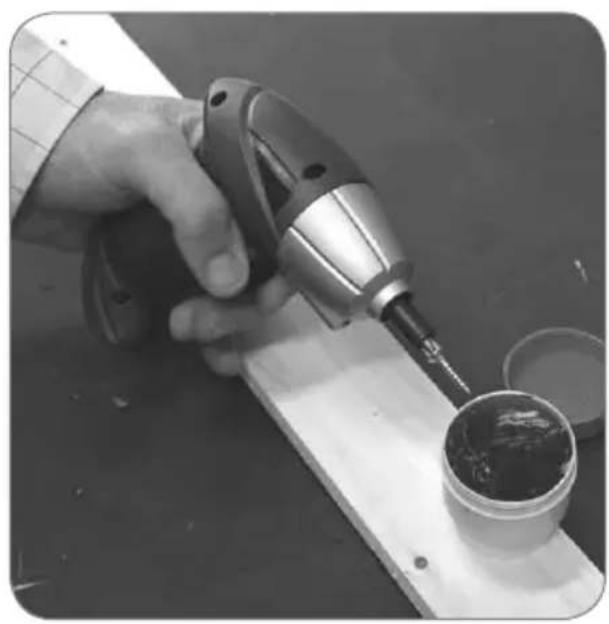
natural_image
Close-up of a hand using a precision tool to apply liquid onto a small container on a wooden surface (no text or symbols visible)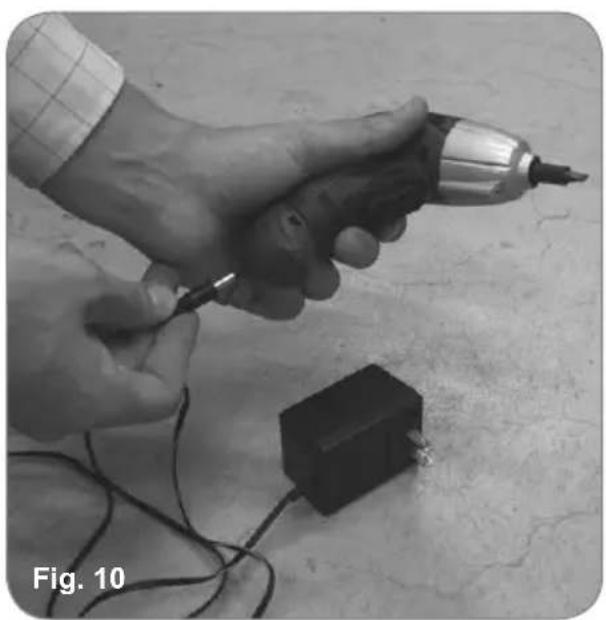
natural_image
Hand holding a screwdriver with wires and a small electronic component nearby (no visible text or symbols)CORDLESS SCREWDRIVER CDM1080
Thank you for buying this Ferm product.
By doing so you now have an excellent product, delivered by one of Europe's leading suppliers.
All products delivered to you by Ferm are manufactured according to the highest standards of performance and safety. As part of our philosophy we also provide an excellent customer service, backed by our comprehensive warranty. We hope you will enjoy using this product for many years to come.
The numbers in the text refer to the diagrams on pages 2 - 3.

Read the operating instructions carefully before using this device. Familiarise yourself with its functions and basic operation. Service the device as per the instructions to ensure that it always functions properly. The operating instructions and the accompanying documentation must be kept in the vicinity of the device.
Introduction
This screwdriver is intended for tightening and loosening screws (fig. 2 - 9). The screwdriver is not suitable for screwdriving heavy constructions, for example repairing a big fence.
Contents
- Technical specifications
- Safety instructions
- Assembly instructions
- Operation
- Charging the battery
- Service & maintenance
1. MACHINE INFORMATION
Technical specifications
Charger input AC230V/50Hz/6W
Charger output 6VDC/300mA
Battery capacity 1.3 Ah
Charging time < 5 hours
Max. torque 3.0 Nm
No-load speed 230 r/min
Weight 380 gr.
L_PA 72.1 dB(A)
L_WA 86.1 dB(A)
Vibration < 1.235 m/s ^2
Vibration level
The vibration emission level stated in this instruction manual has been measured in accordance with a standardised test given in EN 60745; it may be used to compare one tool with another and as a preliminary assessment of exposure to vibration when using the tool for the applications mentioned
- using the tool for different applications, or with different or poorly maintained accessories, may significantly increase the exposure level
- the times when the tool is switched off or when it is running but not actually doing the job, may significantly reduce the exposure level
Protect yourself against the effects of vibration by maintaining the tool and its accessories, keeping your hands warm, and organizing your work patterns
Contents of packing
1 Cordless screwdriver
1 Charger
1 Magnetic bit holder
18 Accessories
1 Instruction manual
1 Safety instructions
1 Warranty card
Check the appliance, any loose parts and accessories for damage caused during transport.
Product information
Fig. 1
- Bit holder
- On/Off-switch
- Softgrip
- LED (Red)
- Charger connection
- Extension piece
- Bit
- LED (White)
2. SAFETY INSTRUCTIONS
Explanation of the symbols

Denotes risk of personal injury, loss of life or damage to the tool in case of non-observance of the instructions in this manual.

Indicates electrical shock hazard.

Indoor use only

In case of failure, the transformer is not dangerous

Thermic protector

Do not dispose of in household waste.
Specific safety instructions
- Only use the accumulator block with the battery charger provided – using other chargers could be dangerous.
- Keep the accumulator block, tool and battery charger away from damp and wet conditions.
- Before using the battery charger, check all wires are properly connected.
- If any wires on the charger are damaged, do not use it until these have been replaced.
- When the charger is not in use it should not be plugged in.
When unplugging, do not pull the plug out by the cable. - If the charger breaks down or suffers from
other technical problems, take it to a recognised dealership to be checked before using it again. Any damaged parts must be replaced.
• Take care when handling the accumulator block, do not drop it or knock it against other things.
- Never attempt to repair the battery charger or accumulator block yourself; this can be extremely dan gerous. Repairs should always be carried out by a recognised dealership.
• Always unplug the charger before cleaning or carrying out any other maintenance on it.
- Do not attempt to charge the accumulator block in temperatures of below 5 degrees or above 40 degrees centigrade.
- Never throw the accumulator block into water or a fire – it may explode.
- Turn the drill immediately off after the screw is fasten ed. Overloading and damaging the battery or motor can be prevented this way. Use the torque to loosen the fastened screw
Electrical safety
When using electric machines always observe the safety regulations applicable in your country to reduce the risk of fire, electric shock and personal injury.
Read the following safety instructions and also the enclosed safety instructions.

Always check that the power supply corresponds to the voltage on the rating plate.

Class II machine. Your machine is double insulated; therefore no earthwire is required.
Replacing cables or plugs
Immediately throw away old cables or plugs when they have been replaced by new ones. It is dangerous to insert the plug of a loose cable in the wall outlet.
3. ASSEMBLING INSTRUCTIONS
Inserting and removing bits
Fig. 1 + 7
The bits can easily be placed directly into the bit holder or on the extension piece. The extension piece can be used for screws that are difficult to reach.
4. OPERATION

Always observe the safety instructions and appli cable regulations.
Firmly hold the machine and ferm the bit with even pressure into the workpiece. Do not force the machine. Use only bits that do not yet show any signs of wear. Worn bits have a negative effect on the efficiency of the machine.
Locking the screwdriver
Fig. 8
The screwdriver is fitted with an automatic spindle lock feature. When the On/Off switch (2) is not pressed, the spindle is locked. Now it is possible to use the screwdriver (even when the battery is empty) as a manual tool.
Screwdriving
Fig. 1
- To switch the tool on, press the On/Off switch (2).
- Press the tumbler switch (R) for clockwise rotation (tightening screws)
- Press the tumbler switch (L) for counterclockwise rotation (loosening screws)
To switch the tool off, release the on/off switch.
The white LED will illuminate when the tumbler switch is pressed.

Warning! Looking straight into LED light for a prolonged period of time from close distance can cause damage to the eyes.
User tips for optimum use
- Always hold the tool and screwdriver bit in a straight line with the screw and always use the correct type and size of bit.
- If screws are difficult to tighten, try applying a small amount of washing liquid or soap as a lubricant (Fig. 9).
- Use the spindle lock feature to loosen very tight screws or to firmly tighten screws.
- When screwing in wood, it is recommended to drill a hole with a depth equal to almost the length of the screw. A pilot hole guides the screw and prevents splintering or distortion of the work piece.
5. CHARGING THE BATTERY
Charging Li-Ion battery
Fig. 10
The battery charger supplied is matched to the Li-Ion battery installed in the machine. Do not use another battery charger.
The Li-Ion battery is protected against deep discharging. When the battery is empty, the machine is switched off by means of a protective circuit: the tool holder no longer rotates. Caution: if the On/Off switch is subject to continued use, the Li-Ion battery can be damaged.
The charging procedure starts as soon as the mains plug of the battery charger is inserted into the socket and the adapter plug is connected to the appliance (the underside of the handgrip).
- Put the adapter plug of the charger into the handle (underside)
- Plug the mains adapter into the (wall) socket
- The charging process starts; the red LED is now on
- The battery is fully charged when the red LED goes out.
- Charging the battery takes maximum 5 hours.
- During the charging procedure, the handgrip of the machine warms up. This is normal.
6. SERVICE & MAINTENANCE

Make sure that the machine is not live when carrying out maintenance work on the motor.
These machines have been designed to operate over a long period of time with a minimum of maintenance. Continuous satisfactory operation depends upon proper machine care and regular cleaning.
Cleaning
Keep the ventilation slots of the machine clean to prevent overheating of the engine. Regularly clean the machine housing with a soft cloth, preferably after each use. Keep the ventilation slots free from dust and dirt. If the dirt does not come off use a soft cloth moistened with soapy water. Never use solvents such as petrol, alcohol, ammonia water, etc. These solvents may damage the plastic parts.
Lubrication
The machine requires no additional lubrication.
Faults
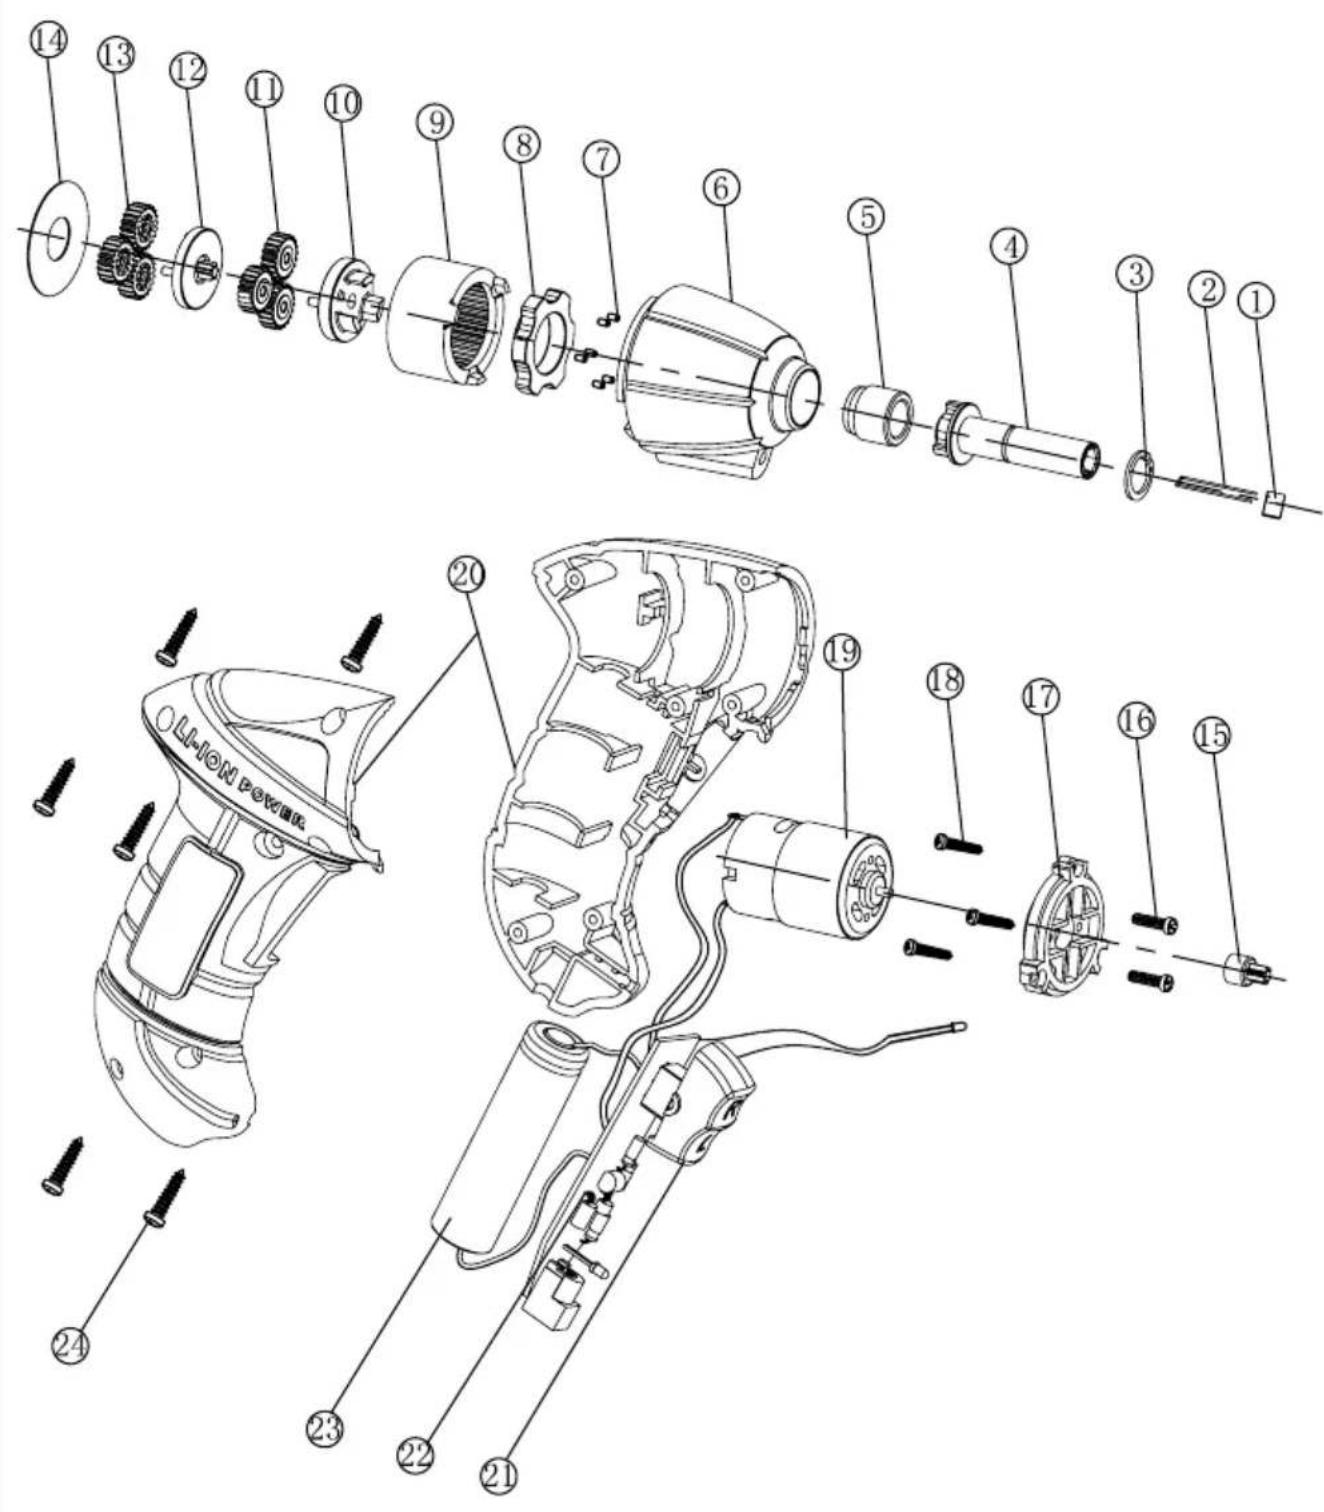
Should a fault occur, e.g. after wear of a part, please contact the service address on the warranty card. Separate you find an exploded view showing the parts that can be ordered.
Environment
To prevent damage during transport, the appliance is delivered in a solid packaging which consists largely of reusable material. Therefore please make use of options for recycling the packaging.

Faulty and/or discarded electrical or electronic apparatus have to be collected at the appropriate recycling locations.
Warranty
The warranty conditions can be found on the separately enclosed warranty card.
The product and the user manual are subject to change. Specifications can be changed without further notice.
AKKU-SCHRAUBER CDM1080
ACCU SCHROEVENDRAAIER CDM1080
1. MACHINE INFORMATIE
Technische specificaties
Acculader ingang AC230V/50Hz/6W
TOURNEVIS SANS FIL CDM1080
APARAFUSADORA SEM FIO CDM1080
Laddare in AC230V/50Hz/6W
Laddare ut 6VDC/300mA
Batterikapacitet 1,3 Ah
OPPLADBAR SKRUTREKKER CDM1080
LEDNINGSFRI SKRUETRÆKKER CDM1080
BEZVADA SKRÜVGRIEZIS CDM1080
JUHTMETA KRUVIKEERAJA CDM1080
Täname, et ostsite selle Fermi toote.
SURUBELNITĂ FĂRĂ FIR CDM1080
DECLARATION OF CONFORMITY
(GB) We declare under our sole responsibility that this product is in conformity and accordance with the following standards and regulations:
(DE) Der Hersteller erklärt eigenverantwortlich, dass dieses Produkt den folgenden Standards und Vorschriften entspricht:
(NL) Wij verklaren onder onze volledige verantwoordelijkheid dat dit product voldoet aan, en in overeenstem ming is met, de volgende standaarden en reguleringen:
(FR) Nous déclarons sous notre seule responsabilité que ce produit est conforme aux standards et directives suivants:
(ES) Declaramos bajo nuestra exclusiva responsabilidad que este producto cumple con las siguientes normas y estándares de funcionamiento:
(PT) Declaramos por nossa total responsabilida-de que este produto está em conformidade e cumpre as normas e regulamentações que se seguem:
(IT) Dichiariamo, sotto la nostra responsabilità, che questo prodotto è conforme alle normative e ai regolamenti seguenti:
(SV) Vi garanterar på eget ansvar att denna produkt uppfyller och följer följande standarder och bestämmelser:
(FI) Vakuutamme yksinomaan omalla vastuullamme, että tämä tuote täyttää seuraavat standardit ja säädökset:
(NO) Vi erklærer under vårt eget ansvar at dette produktet er i samsvar med følgende standarder og regler:
(DA) Vierklærer under eget ansvar, at dette produkt er i overensstemmelse med følgende standarder og bestemmelser:
(HU) Felelősségünk teljes tudatában kijelentjük, hogy ez a termék teljes mértékben megfelel az alábbi szabványoknak és előírásoknak:
(CS) Na naši vlastní zodpovědnost prohlašujeme, že je tento výrobek v souladu s následujícími standardy a normami:
(SK) Vyhlasujeme na našu výhradnú zodpovednosť, že tento výrobok je v zhode a súlade s nasledujúcimi normami a predpismi:
(SL) S polno odgovornostjo izjavljamo, da je ta izdelek v skladu in da odgovarja naslednjim standardom terpredpisom:
(PL) Deklarujemy na własną odpowiedzialność, że ten produkt spełnia wymogi zawarte w następujących normach i przepisach:
(LT) Prisiimdami visą atsakomybę deklaruojame, kad šis gaminys atitinka žemiau paminėtus standartus arba nuostatus:
(LV) Apgalvojam ar visu atbildību, ka šis produkts ir saskaņā un atbilst sekojošiem standartiem un nolikumiem:
(ET) Deklareerime meie ainuvastutusel, et see toode on vastavuses ja kooskõlas järgmiste standardite ja määrustega:
(RO) Declarăm prin aceasta cu răspunderea deplină că produsul acesta este în conformitate cu următoarele standarde sau directive:
(HR) Izjavljujemo pod vlastitom odgovornošu da je strojem ukladan sa slijedešim standardima ili standardiziranim dokumentima i u skladu sa odredbama:
(SR) Pod punom odgovornošću izjavljujemo da je usaglašen sa sledećim standardima ili normama:
(RU) Под свою ответственность заявляем, что данное изделие соответствует следующим стандартам и нормам:
(UK) На свою власну відповідальність заявляємо, що дане обладнання відповідає наступним стандартам і нормативам:
(EL) Δηλώνουμε υπεύθυνα ότι προϊόν αυτό συμφωνεί και τηρεί τους παρακάτω κανονισμο ύς και πρότυπα:
(BG) Ние заявяваме, по своя собствена отговорност, че този продукт отговаря на следните стандарти и директиви
EN50366, EN55014-1, EN55014-2, EN60745-1, EN60745-2-2, EN60335-1, EN60335-2-29, EN61000-3-2, EN61000-3-3
2006/42/EC, 2006/95/EC, 2004/108/EC, 2002/96/EC, 2002/95/EC
Zwolle, 01-11-2011

I. Mönnink
CEO Ferm BV
It is our policy to continuously improve our products and we therefore reserve the right to change the product specification without prior notice.
Ferm BV • Lingenstraat 6 • 8028 PM • Zwolle The Netherlands
Spare parts list
| No. | Description | Position | |
| 406349 | Adapter | * | |
| 406351 | Switch | 21 | |
| 406352 | Battery | 23 | |
Exploded view

- CORDLESS SCREWDRIVER CDM1080
- The numbers in the text refer to the diagrams on pages 2 - 3.
- Introduction
- Contents
- MACHINE INFORMATION
- Technical specifications
- Vibration level
- Contents of packing
- Product information
- Fig. 1
- SAFETY INSTRUCTIONS
- Explanation of the symbols
- Specific safety instructions
- Electrical safety
- Replacing cables or plugs
- ASSEMBLING INSTRUCTIONS
- Inserting and removing bits
- Fig. 1 + 7
- OPERATION
- Locking the screwdriver
- Fig. 8
- Screwdriving
- User tips for optimum use
- CHARGING THE BATTERY
- Charging Li-Ion battery
- Fig. 10
- SERVICE & MAINTENANCE
- Cleaning
- Lubrication
- Faults
- Environment
- Warranty
- AKKU-SCHRAUBER CDM1080
- ACCU SCHROEVENDRAAIER CDM1080
- MACHINE INFORMATIE
- Technische specificaties
- TOURNEVIS SANS FIL CDM1080
- APARAFUSADORA SEM FIO CDM1080
- OPPLADBAR SKRUTREKKER CDM1080
- LEDNINGSFRI SKRUETRÆKKER CDM1080
- BEZVADA SKRÜVGRIEZIS CDM1080
- JUHTMETA KRUVIKEERAJA CDM1080
- SURUBELNITĂ FĂRĂ FIR CDM1080
- DECLARATION OF CONFORMITY
- EN50366, EN55014-1, EN55014-2, EN60745-1, EN60745-2-2, EN60335-1, EN60335-2-29, EN61000-3-2, EN61000-3-3
Brand : Ferm
Model : CDM1080
Category : Drill