
RBC30SBS - Brush cutter RYOBI - Free user manual and instructions
Find the device manual for free RBC30SBS RYOBI in PDF.
User questions about RBC30SBS RYOBI
0 question about this device. Answer the ones you know or ask your own.
Ask a new question about this device
Download the instructions for your Brush cutter in PDF format for free! Find your manual RBC30SBS - RYOBI and take your electronic device back in hand. On this page are published all the documents necessary for the use of your device. RBC30SBS by RYOBI.
USER MANUAL RBC30SBS RYOBI
It is essential that you read the instructions in this manual before mounting and operating this machine.
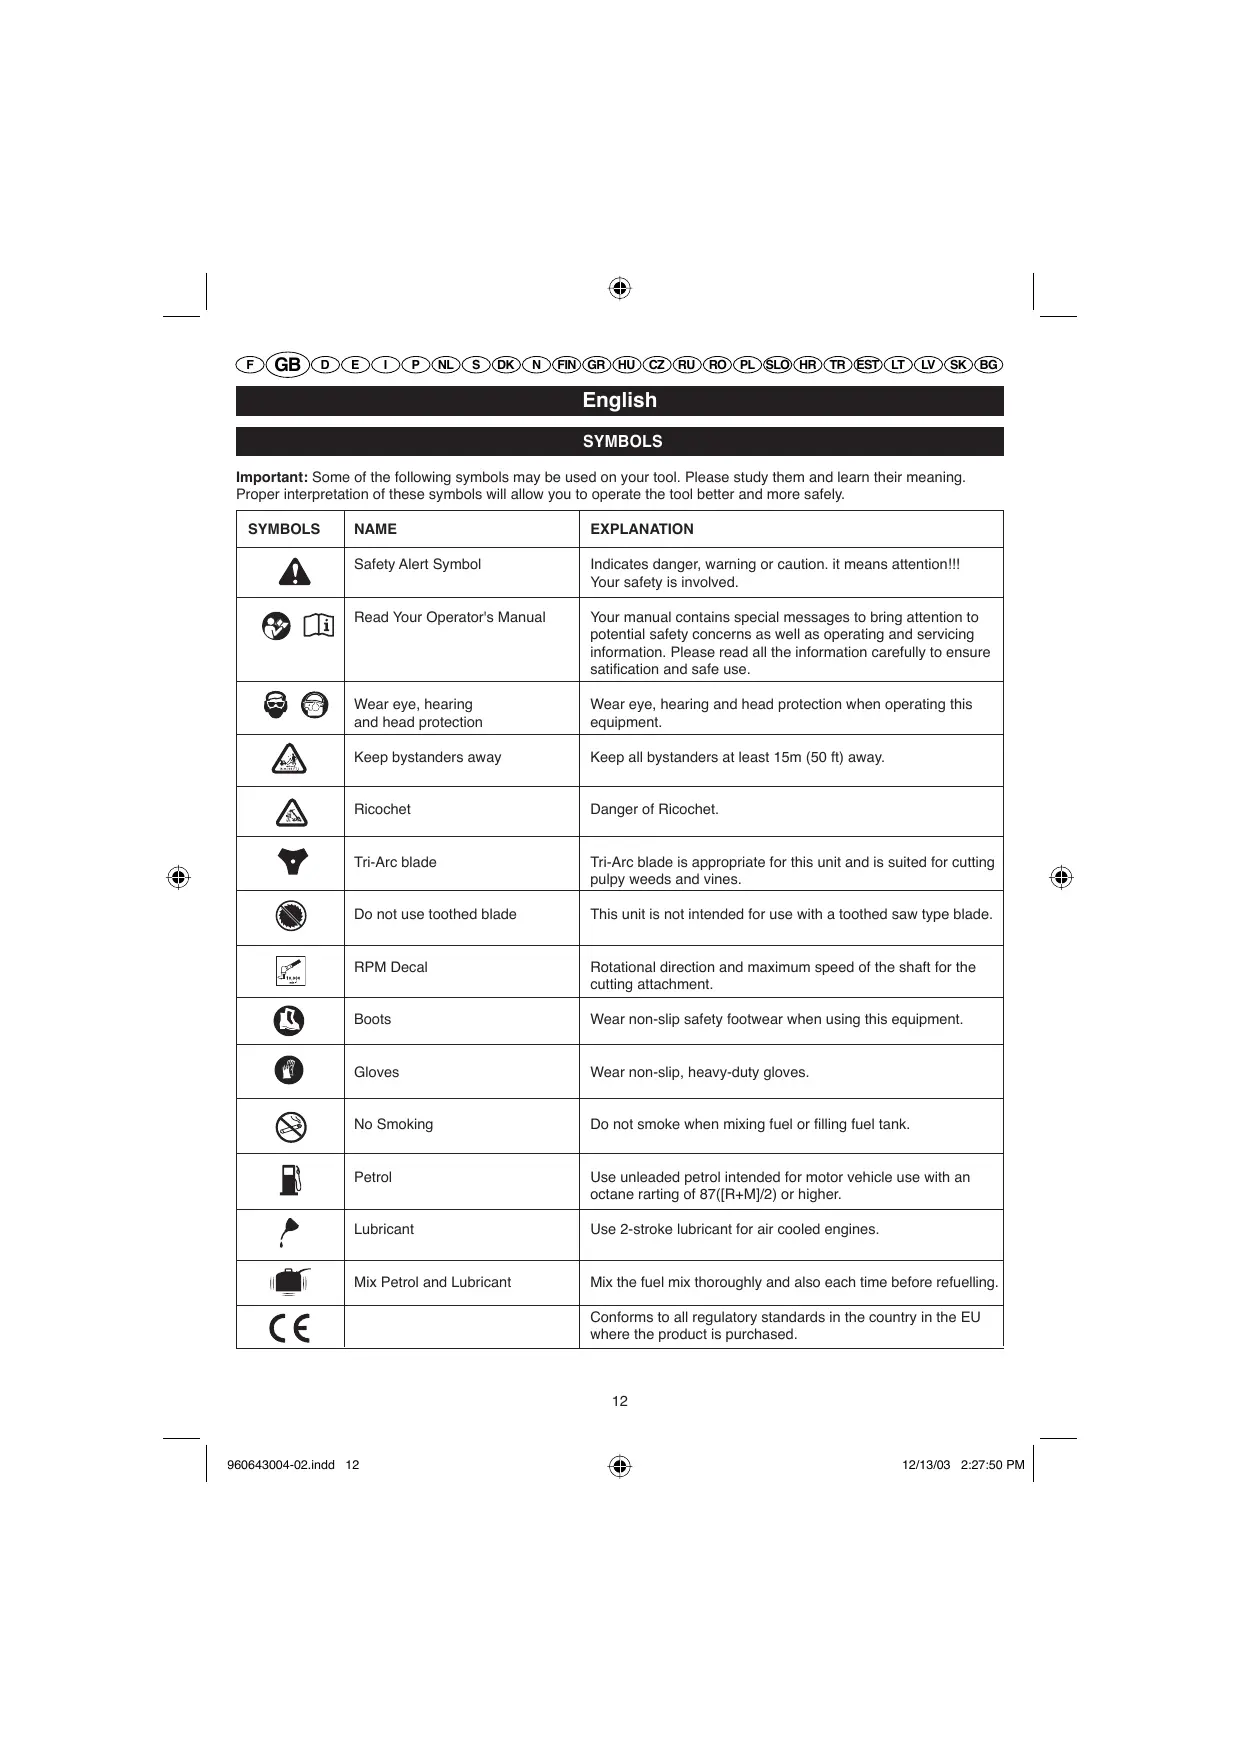
Important: Some of the following symbols may be used on your tool. Please study them and learn their meaning. Proper interpretation of these symbols will allow you to operate the tool better and more safely.
| SYMBOLS | NAME | EXPLANATION |
| A | Safety Alert Symbol | Indicates danger, warning or caution. it means attention!!! Your safety is involved. |
| B | Read Your Operator's Manual | Your manual contains special messages to bring attention to potential safety concerns as well as operating and servicing information. Please read all the information carefully to ensure satification and safe use. |
| C | Wear eye, hearing and head protection | Wear eye, hearing and head protection when operating this equipment. |
| D | Keep bystanders away | Keep all bystanders at least 15m (50 ft) away. |
| E | Ricochet | Danger of Ricochet. |
| F | Tri-Arc blade | Tri-Arc blade is appropriate for this unit and is suited for cutting pulpy weeds and vines. |
| G | Do not use toothed blade | This unit is not intended for use with a toothed saw type blade. |
| H | RPM Decal | Rotational direction and maximum speed of the shaft for the cutting attachment. |
| I | Boots | Wear non-slip safety footwear when using this equipment. |
| J | Gloves | Wear non-slip, heavy-duty gloves. |
| K | No Smoking | Do not smoke when mixing fuel or filling fuel tank. |
| L | Petrol | Use unleaded petrol intended for motor vehicle use with an octane ranting of 87([R+M]/2) or higher. |
| M | Lubricant | Use 2-stroke lubricant for air cooled engines. |
| N | Mix Petrol and Lubricant | Mix the fuel mix thoroughly and also each time before refuelling. |
| C E | Conforms to all regulatory standards in the country in the EU where the product is purchased. |
English
Thank you for buying a Ryobi trimmer/brushcutter.
Your new trimmer/brushcutter has been engineered and manufactured to Ryobi's high standard for dependability, ease of operation, and operator safety. Properly cared for, it will give you years of rugged, trouble-free performance.

WARNING
To reduce the risk of injury, the user must read and understand the operator's manual.

WARNING
Do not attempt to operate this trimmer/brushcutter until you have read thoroughly and understood completely all instructions, safety rules etc contained in this manual. Failure to comply may result in accidents involving fire, electric shock or serious personal injury. Save operator's manual and review frequently for continuing safe operation, and instructing others who may use this tool.
READ ALL INSTRUCTIONS.
GENERAL SAFETY RULES
- For safe operation, read and understand all instructions before using the trimmer/brushcutter. Follow all safety instructions. Failure to follow all safety instructions listed below, can result in serious personal injury.
- Do not allow children or untrained individuals to use this unit.
- Never start or run the engine in a closed or poorly ventilated area; breathing exhaust fumes can kill.
- Clear the work area before each use. Remove all objects such as rocks, broken glass, nails, wire, or string which can be thrown or become entangled in the string head or blade.
- Wear full eye and hearing protection while operating this unit.
- Wear heavy long pants, boots, and gloves. Do not wear loose fitting clothing, short pants, jewellery of any kind, or use with bare feet.
- Secure long hair so it is above shoulder level to prevent entanglement in any moving parts.
- Keep all bystanders, children, and pets at least 15 m away.
- Do not operate this unit when you are tired, ill, or under the influence of alcohol, drugs, or medication.
Do not operate in poor lighting. - Keep firm footing and balance. Do not overreach. Overreaching can result in loss of balance or
exposure to hot surfaces.
- Keep all parts of your body away from any moving part.
- Do not touch area around the muffler or cylinder of the trimmer/brushcutter, these parts get hot from operation.
Always stop the engine and remove the spark plug wire before making any adjustments or repairs except for carburetor adjustments.
Inspect the unit before each use for loose fasteners, fuel leaks, etc. Replace any damaged parts before use.
The string head or blade will rotate during carburetor adjustments.
It has been reported that vibrations from hand-held tools may contribute to a condition called Raynaud's Syndrome in certain individuals. Symptoms may include tingling, numbness and blanching of the fingers, usually apparent upon exposure to cold. Hereditary factors, exposure to cold and dampness, diet, smoking and work practices are all thought to contribute to the development of these symptoms. It is presently unknown what, if any, vibrations or extent of exposure may contribute to the condition. There are measures that can be taken by the operator to possibly reduce the effects of vibration:
a) Keep your body warm in cold weather. When opera-ting the unit wear gloves to keep the hands and wrists warm. It is reported that cold weather is a major factor contributing to Raynaud's Syndrome.
b) After each period of operation, exercise to increase blood circulation.
c) Take frequent work breaks. Limit the amount of exposure per day.
If you experience any of the symptoms of this condition, immediately discontinue use and see your physician about these symptoms.
- Keep the tool well maintained, fasteners tightened and worn parts replaced.
- Mix and store fuel in a container approved for fuel.
- Mix fuel outdoors where there are no sparks or flames. Wipe up any fuel spillage. Move 9m away from refueling site before starting engine.
- Stop the engine and allow to cool before refueling or storing the unit.
- Allow the engine to cool; empty the fuel tank and secure the unit from moving before transporting in a vehicle.
English
SPECIFIC SAFETY RULES FOR TRIMMER USE
- Replace string head if cracked, chipped, or damaged in any way. Be sure the string head or blade is properly installed and securely fastened. Failure to do so can cause serious injury.
Make sure all guards, straps, deflectors and handles are properly and securely attached.
Use only the manufacturer's replacement line in the cutting head. Do not use any other cutting attachment. - Never operate unit without the grass deflector in place and in good condition.
- Maintain a firm grip on both handles while trimming. Keep string head below waist level. Never cut with the string head located over 76 cm or more above the ground.
SPECIFIC SAFETY RULES FOR BRUSHCUTTER AND BLADE USE
After engine stops, keep rotating blade in heavy grass or pulpy weeks until it stops.
- Do not operate the brushcutter unless the blade guard is firmly secured in place and in good condition.
Use heavy gloves while installing or removing blades.
Always stop the engine and remove the spark plug wire before attempting to remove any obstruction caught or jammed in the blade or before removing and installing the blade.
- Do not attempt to touch or stop the blade when it is rotating.
A coasting blade can cause injury while it continues to spin after the engine is stopped or throttle trigger released. Maintain proper control until the blade has completely stopped rotating.
- Replace any blade that has been damaged. Always make sure blade is installed correctly and securely fastened before each use. Failure to do so can cause serious injury.
- Use only the manufacturer's replacement TRI-ARC blade intended for use on this brushcutter. Do not use any other blade.
The TRI-ARC blade is suited for cutting pulpy weeds and vines only. Do not use for any other purpose. Never use the TRI-ARC blade to cut woody brush.
Exercise extreme caution when using the blade with this unit. Blade thrust is the reaction that may occur when the spinning blade contacts anything it cannot cut. This contact may cause the blade to stop for an instant, and suddenly "thrust" the unit away from the object that was hit. This reaction can be violent
enough to cause the operator to lose control of the unit. Blade thrust can occur without warning if the blade snags, stalls, or binds. This is more likely to occur in areas where it is difficult to see the material being cut. For cutting ease and safety, approach the weeds being cut from the right to the left. In the event an unexpected object or woody stock is encountered, this could minimize the blade thrust reaction.
- Never cut any material over 13mm diameter.
Always wear the shoulder strap when using the brushcutter and adjust to a comfortable operating position. Maintain a firm grip on both handles while cutting with a blade. Keep the blade away from body and below waist. Never use the brushcutter with the blade located 76~cm or more above the ground level. - Cover the blade with the blade protector before storing the unit, or during transportation. Always remove the blade protector before using the unit. If not removed, the blade protector could become a thrown object as the blade begins to turn.

FGBD E I P NL S DK N FIN GR HU CZ RU RO PL SLO HR TR EST LT LV SK BG
English
SPECIFICATIONS
| RBC30SES | RBC30SBS | |
| Weight(kg) | ||
| - Without fuel, cutting attachment and guard | 5.63 | 6.79 |
| - Without fuel with string head | 5.80 | 6.96 |
| - Without fuel with blade | 5.80 | 6.96 |
| Fuel tank volume\( [cm^3 \text{ or } (L)] \) | 415 or (0.415) | 415 or (0.415) |
| Cutting swath(mm) | ||
| - String head | 457 | 457 |
| - Blade | 200 | 200 |
| Recommended torque for blade(Nm) | >=13 | >=13 |
| Engine displacement\( (cm^3 / cc) \) | 30 | 30 |
| Line diameter for Reel \( Easy^{TM} \)Head(mm) | 2.4 | 2.4 |
| Line diameter for Pro Cut II™ Head(mm) | 2.7 | 2.7 |
| Maximum engine performance(in accordance with ISO 8893)(kW) | 0.75 | 0.75 |
| Maximum rotational frequencyof the spindle(min-1) | 10,000 | 10,000 |
| Engine speed (rotational frequency)at recommended max. spindlerotational frequency(min-1) | 12,000 | 12,000 |
| Engine speed (rotational frequency)at idle(min-1) | 2,800-3,500 | 2,800-3,500 |
| Fuel consumption (in accordancewith ISO 8893) at max. engine performance [kg/h or (L/h)] | 0.48 or (0.66) | 0.48 or (0.66) |
| Specific fuel consumption(in accordance with ISO 8893)at max. engine performance\( [g/kW.h \text{ or } (L/kW.h)] \) | 640 or (0.87) | 640 or (0.87) |
| Vibration level idling (Trimmer)(m/s2) | ||
| - Front handle / Left handle | 5.7 | 6.0 |
| - Rear handle / Right handle | 3.4 | 6.5 |
| Vibration level racing (Trimmer)(m/s2) | ||
| - Front handle / Left handle | 11.4 | 9.0 |
| - Rear handle / Right handle | 18.4 | 11.4 |
| Vibration level idling (Brush Cutter)(m/s2) | ||
| - Front handle / Left handle | 5.9 | 6.3 |
| - Rear handle / Right handle | 2.6 | 6.6 |
| Vibration level racing (Brush Cutter)(m/s2) | ||
| - Front handle / Left handle | 12.6 | 6.9 |
| - Rear handle / Right handle | 17.1 | 8.9 |
| Sound pressure level at operator's ear(in accordance with EN 27917)dB (A) | 103.4 | 103 |
| Sound power level (in accordancewith ISO 10884)dB (A) | 110 | 110 |

FGBD E I P NL S DK N FIN GR HU CZ RU RO PL SLO HR TR EST LT LV SK BG
English
DESCRIPTION
- Primer Bulb
- Choke Dail
- Fuel Cap
- Starter Grip
- Throttle L
- On/Off Switch
- Throttle Trigger
- Rear Handle (RBC30SES)
- Front Handle (RBC30SES)
- Shoulder Strap
- Shaft
- Blade Guard
- Tri-arc Blade
- Grass Deflector
- Cutting Line
- Idle Speed Screw
- Knob
- Hanger Cap
- Trigger Handle (RBC30SBS only)
- Left Handle (RBC30SBS only)
- Throttle interlock (RBC30SBS only)
- Pro Cut II™
- Reel EasyTM
ASSEMBLY
Please refer to Fig. 2a - 2d.

WARNING
If any parts are damaged or missing, do not operate this tool until the parts are replaced. Failure to heed this warning could result in serious personal injury.

WARNING
Do not attempt to modify this product or create accessories not recommended for use with this product. Any such alteration or modification is misuse and could result in a hazardous condition leading to possible serious personal injury.

WARNING
To prevent accidental starting that could cause serious personal injury, always disconnect the engine spark plug wire from the spark plug when assembling parts.

WARNING
Never attach or adjust any attachment while power head is running. Failure to stop the engine may cause serious personal injury.

WARNING
Be certain the knob is fully tightened before operating equipment; check it periodically for tightness during use to avoid serious injury.
OPERATION

Read the operation manual and follow all warnings and safety instructions.

Wear eye, hearing, and head protection.

Keep all bystanders, especially children and pets, at least 15m from the operating area.
FUEL AND REFUELING
HANDLING THE FUEL SAFELY
Always handle fuel with care, it is highly flammable.
Always refuel outdoors where there are no sparks and flames. Do not inhale fuel vapors.
- Do not let petrol or lubricant come in contact with your skin.
- Keep petrol and lubricant away from the eyes. If petrol or lubricant comes in contact with the eyes, wash them immediately with clean water. If irritation is still present, see a doctor immediately.
Clean up spilled petrol immediately.
MIXING THE FUEL (Fig. 3)
This product is powered by a 2-stroke engine and requires pre-mixing petrol and 2-stroke lubricant. Premix unleaded petrol and 2-stroke engine lubricant in a clean container approved for petrol.
This engine is certified to operate on unleaded petrol intended for automotive use with an octane rating of 87 (R + M] / 2) or higher.
- Do not use any type of pre-mixed petrol / lubricant from fuel service stations, this includes the pre-mixed petrol / lubricant intended for use in mopeds, motorcycles, etc.
Use synthetic 2-stroke lubricant only. Do not use automotive lubricant or 2-stroke outboard lubricant.
Mix 2% synthetic 2-stroke lubricant into the petrol. This is a 50:1 ratio.
- Mix the fuel thoroughly and also each time before fueling.
Mix in small quantities. Do not mix quantities larger than usable in a 30 day period. Synthetic 2-stroke lubricant containing a fuel stabilizer is recommended.


FGBD E I P NL S DK N FIN GR HU CZ RU RO PL SLO HR TR EST LT LV SK BG
English
FILLING THE TANK
Clean surface around fuel cap to prevent contamination.
- Loosen fuel cap slowly to release pressure and to keep fuel from escaping around the cap.
Carefully pour fuel mixture into the tank. Avoid spillage.
Prior to replacing the fuel cap, clean and inspect the gasket.
- Immediately replace fuel cap and hand tighten. Wipe upany fuel spillage. Move 9 m away from refueling site before starting engine.
Note: It is normal for smoke to be emitted from a new engine during and after first use.

WARNING
Always shut off engine before fueling. Never add fuel to a machine with a running or hot engine. Move at least 9 m from refueling site before starting engine. Do not smoke!

Never start or run the engine inside a closed or poorly ventilated area; breathing exhaust fumes can kill.
NOTE: Be sure to return the stop switch to the "I" (RUN) position before trying to start unit.
OPERATING THE TRIMMER (Fig. 5)
RBC30SES : Hold the trimmer with the right hand on the rear handle and the left hand on the front handle.
RBC30SBS: Hold the trimmer with the right hand on the trigger handle and the left hand on the left handle.
Keep a firm grip with both hands while in operation. Trimmer should be held at a comfortable position with the trigger handle about hip height.
Always operate trimmer at full throttle. Cut tall grass from the top down. This will prevent grass from wrapping around the shaft housing and string head which may
cause damage from overheating. If grass becomes wrapped around the string head, stop the engine, disconnect the spark plug wire, and remove the grass. Prolonged cutting at partial throttle will result in lubricant dripping from the silencer.
CUTTING TIPS (Fig. 6)
ADVANCING THE LINE (Fig. 7)
For Reel Easy™ Only
RBC30SES: Hold the brushcutter with the right hand on the rear handle and the left hand on the front handle.
RBC30SBS: Hold the brushcutter with the right hand on the trigger handle and the left hand on the left handle.
Keep a firm grip with both hands while in operation. Brushcutter should be held at a comfortable position with the trigger handle about hip height. Maintain your grip and balance on both feet. Position yourself so that you will not be drawn off balance by the kick-back reaction of the cutting blade.
Adjust the shoulder strap to position the brushcutter at a comfortable operating position and to assure that the shoulder strap will reduce the risk of operator contact with the blade.
Exercise extreme caution when using the blade with this unit. Blade thrust is the reaction which may occur when the spinning blade contacts anything it cannot cut. This contact may cause the blade to stop for an instant, and suddenly "thrust" the unit away from the object that was hit. This reaction can be violent enough to cause the operator to lose control of the unit. Blade thrust may occur without warning if the blade snags, stalls or binds. This is more likely to occur in areas where it is difficult to see the material being cut. For cutting ease and safety, approach the weeds being cut from the right to the left. In the event that an unexpected object or woody stock is encountered, this could minimise the blade thrust reaction.
CUTTING TECHNIQUE - BLADE (Fig. 8)

WARNING
Extreme care must be taken when using blades to ensure safe operation. Read the safety information for safe operation using the blade, refer to "Specific Safety Rules for Brushcutter and Blade Use" earlier in this manual.

FGBD E I P NL S DK N FIN GR HU CZ RU RO PL SLO HR TR EST LT LV SK BG
English
MAINTENANCE

WARNING
Use only original manufacturer's replacement parts, accessories and attachments. Failure to do so can cause possible injury, poor performance and may void your warranty.
- The cutting attachment must not work in idle mode. If this requirement is not satisfied, the clutch has to be adjusted or the machine needs an urgent maintenance by a qualified technician.
- You may make adjustments and repairs described here. For other repairs, have the trimmer serviced by an authorized service agent.
Consequences of improper maintenance may include excess carbon deposits resulting in loss of performance and discharge of black lubricant residue dripping from the muffler.
Make sure all guards, straps, deflectors and handles are properly and securely attached to avoid the risk of personal injury.
STRING REPLACEMENT (Fig. 9)
For Reel Easy™ Only
BLADE PROTECTOR (Fig. 10)
CLEANING THE EXHAUST PORT AND MUFFLER
Depending on the type of fuel used, the type and amount of lubricant used, and/or your operating conditions, the exhaust port and muffler may become blocked with carbon deposits. If you notice a power loss with your petrol powered tool, a qualified service technician will need to remove these deposits to restore performance.
SPARK ARRESTOR
The spark arrester must be cleaned or replaced every 25 hours or yearly to ensure proper performance of your product. Spark arrestors may be in different locations depending on the model purchased. Please contact your nearest service dealer for the location of the spark arrester for your model.
ATTACHING THE STORAGE HANGER (Fig. 11)
CLEANING THE AIR FILTER SCREEN (Fig. 12)
FUEL CAP

WARNING
A leaking fuel cap is a fire hazard and must be replaced immediately.
English
TROUBLESHOOTING
IF THESE SOLUTIONS DO NOT SOLVE THE PROBLEM, CONTACT YOUR AUTHORISED SERVICE DEALER.
| PROBLEM | POSSIBLE CAUSE | SOLUTION |
| Engine will not start. | No spark. No fuel. Engine is flooded. Starter rope pulls harder now than when new. | Check spark. Remove spark plug. Reattach the spark plug cap and lay spark plug on metal cylinder. Pull the starter rope and watch for spark at spark plug tip. If there is no spark, repeat test with a new spark plug. Push primer bulb until bulb is full of fuel. If bulb does not fill, primary fuel delivery system is blocked. Contact a servicing dealer. If primer bulb fills, engine may be flooded, proceed to next item. Remove spark plug, turn unit so spark plug hole is aimed at the ground. Rotate the choke dial to “” position and pull starter cord 10 to 15 times. This will clear excess fuel from engine. Clean and reinstall spark plug. Pull starter three times with choke dial at “”. If engine does not start, rotate choke dial to “-” position and repeat normal starting procedure. If engine still fails to start, repeat procedure with a new spark plug. Contact a servicing dealer. |
| Engine starts but will not accelerate. | Engine requires approximately three minutes to warm up. | Allow engine to completely warm up. If engine does not accelerate after three minutes, contact a servicing dealer. |
| Engine starts but will only run at high speed at half choke. | Carburetor requires adjustment. | Contact a servicing dealer. |
| Engine does not reach full speed and emits excessive smoke. | Check lubricant fuel mixture. Air filter is dirty. Spark arrester screen is dirty. | Use fresh fuel and the correct 2-stroke lubricant mix. Clean air filter. Refer to Cleaning the Air Filter Screen earlier in this manual. Contact a servicing dealer. |
| Engine starts, runs, and accelerates but will not idle. | Idle speed screw on carburetor requires adjustment | Turn idle speed screw clockwise to increase idle speed. (Fig. 14) |
| Blade continues to rotate at idle speed. | Carburetor requires adjustment. | Contact a servicing dealer. |
| Line will not advance. | 1. Line welded to itself. 2. Not enough line on spool. 3. Line worn too short. 4. Line tangled on spool. 5. Engine speed too slow. | 1. Lubricate with silicone spray. 2. Install more line. Refer to “Line Replacement” earlier in this manual. 3. Pull lines while alternately pressing down on and releasing bump head. 4. Remove line from spool and rewind. Refer to “Line Replacement” earlier in this manual. 5. Advance line at full throttle. |

FGBD E I P NL S DK N FIN GR HU CZ RU RO PL SLO HR TR EST LT LV SK BG
English
TROUBLESHOOTING
IF THESE SOLUTIONS DO NOT SOLVE THE PROBLEM, CONTACT YOUR AUTHORISED SERVICE DEALER.
| PROBLEM | POSSIBLE CAUSE | SOLUTION |
| Grass wraps round shaft housing and string head. | 1. Cutting tall grass at ground level. 2. Operating trimmer at part throttle. | 1. Cut tall grass from the top down. 2. Operate trimmer at full throttle. |
| Bump knob hard to turn. | Screws threads dirty or damaged. | Clean threads and lubricate with grease - if no improvement, replace bump knob. |
| Lubricant drips from muffler. | 1. Operating trimmer at part throttle. 2. Check lubricant/fuel mixture. 3. Air filter dirty. | 1. Operate trimmer at full throttle. 2. Use fresh fuel and the correct synthetic 2-stroke lubricant mix. 3. Clean per instruction in Maintenance Section. |
NOTE: If your unit exhibits specific performance problem(s) where the Troubleshooting section recommends a clockwise screw adjustment on the carburetor and no adjustments have been made since original purchase, the unit should be taken to an authorized service center for repair. In most cases, the needed adjustment is a simple task for the trained service representative.


20

FGBDEIIPNLSSDKNFINGRHU CZRUROPLSLOHRTRESTLTVSKBG
Deutsch
SYMBOLE
| 1 Liter | + | 20 ml | = |
| 2 Liter | + | 40 ml | = |
| 3 Liter | + | 60 ml | = |
| 4 Liter | + | 80 ml | = |
| 5 Liter | + | 100 ml | = |
PRECTETESNASLEDUJICIPOKNY.
OBECNÉ BEZPEÇNOSTNI POKYNY
1 litr + 20 ml =
2 litry + 40 ml =
3 litry + 60 ml =
4 litry + 80 ml =
5 litry + 100 ml =
ZAPNUTI / VYPNUTI STRUNOVÉ SEKAČKY (obr. 4a - 4b)

UPOZORNENI
TEXHUNECKHEXAPAKTEPHCTUKI
| 1 Π | + | 20 MΠ | = |
| 2 Π | + | 40 MΠ | = |
| 3 Π | + | 60 MΠ | = |
| 4 Π | + | 80 MΠ | = |
| 5 Π | + | 100 MΠ | = |
3AIIYCK H OCTAHOBKA TPIMMEPA IJI BOPIOPOB (Pnc.4a-4b)

IPEUYIPEXKDEHNE
He 3aynckaiTe MOTOP B 3aKpIbTOM HINI IIOXO npOBeTPBaeMOM OMEIIHHN: BbIXIoIIHbIe Ra3bl HeCyT CMePTeLHyO onaHOCTb.
IpHmeyHn: HcHTpyMeHr OCHAueHbIKJIIOUaTeJEM BKJI/BBHKJI. IpeKHeIe Zem 3anyckatb MOTop, NOCTabJIb BHKIOVAteJIb BNOJOKeHne BKJI "T".
HcIOJIb3OBAHNE TPIMMEPA IJIa BOPIOPOB (Pnc.5)
CITITI TOATE INSTRUCTIUNILE.
MÁSURI DE SIGURANTÀ GENERALE
1 litr + 20 ml =
2 litry + 40 ml =
3 litry + 60 ml =
4 litry + 80 ml =
5 litry + 100 ml =
WJSCIE ZYLKI (Rys. 7)
For Reel Easy™ Only
UZYWANIE SCSINACZA ZAROSLI (Rys. 5)
PRECITAJTE SIVSETKYPOKNY
POSUN STRUNY (Obr. 7)
For Reel Easy™ Only
POUZIVANIE KROVINOREZU (obr. 5)
RBC30SES & RBC30SBS: Držte krovinorez pravou rukou na plynovej páčke a favou rukou na prednej rukováti.
RBC30SBS: Drzte pravu rukovat krovinorezu pravour rukou a'lavu rukovat' flavou rukou.
OCHRANNY KRYT PROTI ISKRENIU
TOPHBOI 3APEXDAHE HA PE3EPBOAPA
БЕЗПАСHA PABOTA C TОПВOTO
БьДeTe MHRO BHHMaTeJIHH c rOpHbOTo -To3H IpoJyKT e H3KJIIOUHTeJIHO 3aJaJIHM.
BHaHn CmecBaIte H cHbIaTe rOpHBOTo Ha OTKpHTO, daJIeU O T hckPn H nIaMbK. He BmHbAIte npHTe OT rohBPOTO.
H36yBaIte BcKaKbB KOHTaKT C 6eH3nHa H MacJIoTO.
BbTe Oc06eHO BHIMATEJIHN B OUYTE BN Ja He IIOJaHE 6eH3HH JIN MacIIO. AKO B OUYTE BN IIOJaHE 6e3HH JIN MacIIO, He3a6aBHO H3IIaKHeTe C YHCTa BOJa. AKO Ipa3HeHHeTo HE IpemHHe, He3a6aBHO ce ObpHeTe KbM JeKap.
Bedhara nooHcTeTe, aKO hMa pa3cnHnHO ropHBO.
CMECBAHE HA FOPHBOTO (Hur.3)
MaHHaTa Bn pa6oTH C JBytaKToB JBHrAteJI, PnH KOHT To6BaJa ce CMEcT 6EH3HH H cHHTeTHUHO MacIO. CMeCeTe 6e3OJIOBeH 6eH3HH cBc CnHTeTHUHO MacJO 3a JbYbTAKTo JBHrAteJI B YHCT cBJI, IpeJBHJeH 3a cXpaHeHHe Ha 6e3HH.
■BnIaTeJIaT pa60TH c 6e3oIOBHe 6eH3HH 3a ABTOMO6HJIN C OKtaHOBO YHcJO 87 ([R + M] / 2) HJIN IIO-BHCOKO.
He 33IOJI3BAIte CMECh 6EH3H/HoPnBO, KOHTO ce npOdaBAT no 6EH3NHOCTaHIHTe, IpeDIBHEH eJHHCTBeHO 3a MOTOUIKJETH, MOTONEH II Jp.
I IINIOJI3BAJIte EJINHCTBEHO CHHTETUVHO MACJO 3a JBYTAKTOB INBHGATEJIH. He IINIOJI3BAJIte ABTOMO6JIHO MACJO HINTO IIbK MACJO 3a JBYTAKTOBIBJHGATEJIH NA JOIKJN.
CmeceTe IyIpoHeHToBO cHTeTHUHO macIO 3a IByTAKTOBn IBHrAteJIH c6eH3HH BcBtOHIOHeHc 50:1.
FGBDEIPNLSSDKNFINGRHUCZRUROPLSLOHRTRESTLTLVSKBG
Блгарский
BceKN IIbT IpeIIN 3apeXJaHe Ha pe3epBoapa cMeceTe xy6aBO roPnBOTo.
CmecBaHrTo rOpHbOTo B MaIKN KOJIHyceCTBa: He CmecBaHTe rOpHb 3a NObYeOT MecEi HnpeI, CbIO TaKa Bn IIpeIopbYBaMe Ja H3IOJI3BaTe CInHTeTHuHO MacJIo 3a IByTaKTOBn IBnRaTeJIH, KoEt CbIbPka Cta6HJIIN3aTOp 3a rOpHbTO.

3APEKDAHE HAPE3EPBOAPA
I OuHcTePe3epBoapa OKoIQAuaKaTa, 3a Ja He ce 3aMbpcn rOpHBOTO.
BabHO pa3BnHTe KaIauKaTa, 3a Ja ce H3NpyHe HaJIraHeTo HJa He ce pa3ChIe rOpHBO OKJIO HeJ.
BHIMaTeJIHO H3CHHnTe roPbHBaTa cMec Bpe3epBoapa, KaTO BHIMaBaTe Ja He Ja pa3CHnTe.
I IpeHn OTHOBO Da 3aBHeTe KaNaKkTa, NOnHCTeTe yIbTHeHHeTo H IpOBepTe DaJIe E B DIObOp CbCToHHe.
IocTabete BeHaHa KaNaKcTa H xy6aBo 3aTeHrHeTe. OoHCTeTe HnBtHo, aKO hMa pa3cnHao rOpHbO. OtPbHHeTe Ce NoHe Ha 9 MOT MxCTOTO, KbJeTO cTe IIbHInH pe3epBoapacrOpHbO, IpeHn Da NycHeTe JBHrAteJIa.
BeIeKka: IbHrataJIaT MoKe Ja 3aIyuII, KOraTo IycheTe MaIHHaTa 3a IIbPBN IIbT, a IIIOHkoRa H CJIeT TOBA.

IPEUYIPEJKJEHNE
IpeJn 3apeJdaHe Ha pe3epBoaap BHHar cinnpaHte IbHraTeJI. HnKora He 3apeJdaTe MaHHaTa, aKO bBnRaTeJI e OIIe B DnBKeHne HIn aKO He e h3CTHaJI. OtpbHHeTe ce NHOe Ha 9 M oT mAcToTO, KbIeTO cTe IIbJIHHJepe3epBoaap C rOpHBO, ppeJn da IycheTe IbHraTeJI. He npHHe!


IIYCKAHE I CIIHPAHE HA TPHMEPA (fHr. 4a - 4b)

IPEyIPEXJEHNE
HnKora He cIapTnpaIe IbIgRatIeJI B 3aTbopeHO IIIN 3JI IOPBcTePO HIOMEIeHI, TBI KATO OTPa6OTehHe T RAOBOE MOJE DA ca CmBpTOHOCHNI.
BeJekka: He 3a6paBnTe Ja NocTaBnTe IIpeBkIIOvBaTeJI B IIOJIoxKeHHe IYCKAHE "I", IIpeDn Da TpbIHeTe Ja IaJIInTe IbHrAteJIa.
HAUHH HA PABOTA CTPUMEPA (Фг.5)
RBC30SES: XBaHete 3aHaTa npbKaHa TpHmepa C JcHata Cn pKa, a npedHaTa dpbKa-cJlaBata.
RBC30SBS: XBaHeTe IЯСнТа TpbЖka Ha TpHmepa C IяСнТа Tc pБKa, aJIЯВATA npБЖKa-cIЯBaTa p'Bka.
IIO Bpeme Ha pa6oTa IpbKTe 3npaBO TprMepa H c DBeTe pIe. IpbKTe TprMepa B yIO6HO 3a pa6oTa IOIOJKeHHe, KaTO IAChATA IpbKJa DA e OKOIO HNBOTa HA xAHIIa. BHaHnIpa6oTe He IbJIHa MoIOHCT. PeKeTe BHCOKATA TpeBA OTrope HAOJy, 3a JIe CE 3aJIpeTpeBA OKOIO TpB6Hata IpbKJa IgIabATA, KOeTO MOKe JIa IIpUHHI IIpeIpyBaHe HA IBHrAteJI. AKO OKOIO IgIabATA Ha TprMepa Ce 3aJIpeTpeBA, CnPteE IIBHrAteJI, I3KIOHeTe JxNlOTo 3a 3anaJIbAHe H 3BaJATEpe TpeBA. Ipn IpoJIbIXHTeJIHa pa6oHa cpeJHa MOIOHCT MOpke JIpaOKane MaCIO OT IpeJINaHIteJIHa H 3N1yCKaTEJIHATA Tp6bA.
C'bBETI IPII PRA3AHE (Phi.6)
H3BAJDAHE HA PEKESHOTO BbXE (Φnir.7)
For Reel Easy™ Only
HAUYH HA PABOTA CTPUMEPA 3A PA3NUCTBAHE (pur.5)
RBC30SES: XbaHEte npbKkata c tprhepa Ha TpHmepa 3a pa3nuHcTBaHe c JaCHaTa cn pKa, a npEHaT a npbKka-c JIbAA.
RBC30SBS: XBaHeTe IaCHATAIbJkaHa TpHMepa 3a pa3uHCTBaHe c IaCHATA Ch pKa, a JBaTa IpBka-K c JBaTa pKa.
По Врeme Ha pa6oTa IprBxTe 3IpaBO HnCTpyMeHTa H cДbeTe pIe.ДрБxTe TpHMePa 3a pa3uHCTBaHE B yIO6HO 3a pa6Ota HOLOXKeHc, KaTO IChHaTApBxKaJa e OKOJI HnBOTO Ha xAHIIa.CtIbNeTe CStaHJIHO,3a JIa 3ana3Hrte paBHOBecHe H KOHTpoJa B'ByP XHCTpyMeHTa.Taka HЯMa JIa 3aYb6Hrte paBHOBecHe IIHrOcKaUaHHe H oKHa.
PeryIIPAaTE xOpH3OHaJIHaTbB3Ka taka, ye Ja MoKete da pa6oHTHe yJIoHO. XOpH3OHaJIHaTbB3Ka cIIO Taka IIbPxN HoKA Ha pa3cToHHNE To TIAOT Bo.
БьдeТИЗКИПОЧТЕЛНВИМATEЛПИ,KORAToIHIIOJI3BAtePexeIIHnHTPymeT.МожеJa ce ПОЛуч NTOKAT ha HOka priKoHTaKT c HeIIIO,KOTo He можеЯбдсрэлANO.ПrtTOI3O KoHTaKT HOKBJ 3aMHМожeBHE3aIIHOДСпeнДЯ Hx3xBpIHnHnCTPymeTbA Nocoka,OBpaTHa NaЗakayehnI pIeMTe.Toba DBNKeHHe можeЯteTOJIKOBA cnIHo,YeonePAPOTbTДЯH3ry6hUnpABJIeHnetoHaHnCTPymeTA.OTkatМожeJa
FGBDEIPNLSSDKNFINGRHUCZRUROPLSLOHRTRESTLTLVSKBG
Бытарски
ce nOlyuH, aKO HOKbT ce yIapn B IpIeYCTBHe, 3aIg6HCKoPoCT HIN bIe 6IOknapA. HMa IIO-TOJIIMa Bepo8rTHocT Ja ce IOnyUOTKAT B YuaCTbK C HeJIObpa BUNHMOC T 3a P3aHe. 3a Da pa60HTte JecHO N IbJIHa 6e3OIIacHocT, peKeTe 6bpeHITe OTJcH0 HAJIbO. Ako H IIbTa Ha HOka IOnJaHpeIpeJMeT HIN NaPae IbPBO, pIpi TaKOBa DIBHXeHne CEHAMJIABAT NocJIeHNITe OT OTKaTa.
CbBETI IPII P3AHE C HOXA

IPEUYIIPEXJEHNE
BbTe H3KJIOUHTeJIHO BHNMaTeJIHH, KORAto H3NIOI3BaTe pEeHs HnCTpyMeHTn. IpoVetete JaIeHnTeNoIrope“CneuHΦuHn npaBHLa 3a 6e3oIacOCT npaBoTa cTIpMeh3pa3aOpHCTBaHe).
IIOPJBPbKKA

IPEUYIIPEXJEHNE
H3IOI3BaIte eIHINCTBeHO opHnHaJIHH YAcTHN, AKCceCoaH INHCtpyMeHTN. AKo He cna3Bate TOBA yka3aHHe, MoKe Na ce NOpOHN pHKN OT HEn3IIpaBHO fYHKIOHOHPaHEeCepHO3N TEJcEHNEIOBpeHn. OCBEN TOBA rapaHUNrTa Bn Ie Ce o6e3cnHn.
HeH3noJ3BaItepeKeeHmMexAHnHbM,KoAtoDHBraTeJIaTpa6OtnHa npa3eHxO.IPi HeCnA3BaHe Na ToBA yKa3aHIne,IIe Tp8BaJa cpepyHipa CbeHNHirTeJIHnJa H3BbpiHcnEiHenn pemOHrOT KbaJIINΦHHanTExHHK.
H3bPbBaIte eHHCTBeHO TaKHBa HacTPOKn H nonpAbKN, KOto ca ONHcAH B HACTOIO TO pKOBOJIcTB0. 3a BCKaKaBA Dpyra NIOIpBkKa/NOpBa Ka NO TpHMepe ce o6bPheTe KbM OTOpINHapnAceBn3.
- PnH loIHa nOIpbXka Ha MaIIHHaTa MoKe Ja ce NIoYNuOTIaIaHa He cakJIN B NO-TIOJIHO KOJIYeCtBO, KoETo MoKeJa haMaHa eEkeFTBHoCTT Ta H Ja DOBeJe Do NHTUaHe Hauehpa MacJeHa yTuKa O NT3NyckaTeJHATA Tp6Ba.
YBepeTe ce, Ye BcHcN HpeIa3HN eJIeMeHTH, peMbIH, npEIIa3HTeJIH IpbJxKc ca IpaBnHO NocTabeHI n fHKcHpaHH. Taka IIe H36erHete H onacHoCTaOT TeKKn TeIEChN IOBpeIJ.
GARANTIE - CONDITIONS
All Ryobi products are guaranteed against manufacturing defects and defective parts for a period of twenty four (24) months from the date stated on the original invoice drawn up by the retailer and given to the end user.
Deterioration caused by normal wear and tear, unauthorised or improper use or maintenance, or overload are excluded from this guarantee as are accessories such as battery packs, light bulbs, blades, fittings, bags, etc.
In the event of malfunction during the warranty period, please take the NON-DISMANTLED product, along with the proof of purchase, to your retailer or nearest Authorised Ryobi Service Centre.
This warranty in no way affects your legal rights concerning defective products.
The above warranty is valid in the UK, the European Union, and Australia only. Outside these regions, a different warranty may apply. Please see your local dealer for warranty details.

CE DECLARATION OF CONFORMITY
We declare in sole responsibility that the product, to which this certificate applies, conforms to the basic health and safety requirements of the Machinery Directive 98/37/EC and other relevant directives, like EMC Directive 2004/108/EC and Directive 2000/14/EC, 79/113/EC.
To effect correct application of the health and safety requirements stated in the EEC directives, the following European and/or national standards and/or technical specifications were consulted: EN ISO 14982:1998, ISO 7916 & 7917, EN ISO 11806:1997, ISO 7918-1995, ISO 8380-1993, ISO 8893-1989, ISO 10884-1995, EN ISO 12100-1:2003, EN ISO 12100-2:2003, EN 563-1994, EN 27917-1991, ISO 7112-1982, ISO 7113-1991
We declare this product complies to the requirements of the Directive 2000/14/EC.
This product has been assessed to conform to the Directive 2000/14/ EC by means of unit verification by TUV Rheinland Product Safety GmbH.
RBC30SES RBC30SBS
Measured sound
power level [dB (A)]:
Guaranteed sound
power level [dB (A)]:
Date of issuance
108.4 108.4
110 110
10/2007 10/2007
Technical documents are kept by Homelite Far East Co., Ltd. 24/F, 388 Castle Peak Road, Tsuen Wan, N. T., Hong Kong.
Declared in 10/2007 by Homelite Far East Co., Ltd.

Teryncheuk KAOJEMYAMHTAUNI XAPHRTB C KOMAHINH Homelite Far East Co., Ltd. 24/4,388 Castle Street Peak Road, Tsuen Wan, N.T., ToKhoN.
3AaBHeHc O COBTBCTBTH CTAJAPTM COCTABHE B 10/2007 r. KOIMAHNE Homelite Far East Co., Ltd.

PROHLÁSENI O SHODE ES
Prohlasujeme na svou odpovednost, ze vyrobek, na ktery se vztahujte toto prohlasieni, ne y svouladu s pozadavky bepezcnosti a ochrani zdrav pi praci smerince pro strojni zaifzeni (98/37/ES) a dalsich zavaznych smeric, jako napr. smernice 2004/108/EHS o elektromagneticke kompatibilite a smernic 2000/14/ES (hluk zaifzeni pouzitych ve venkovnim prostoru) a 79/113/EHS (sblizovani pravnich predpisu tykajich se stanoveni hlukovych emisi stavebnich zaifzeni a vybaveni).
Uvedene EU smernice vychazeji z evropskych a/nebo narodnich norem a/nebo technickych prepredispu v oblasti bezpechnosti a ochrany zdravni praci: EN ISO 14982:1998, ISO 7916 & 7917, EN ISO 11806:1997, ISO 7918-1995, ISO 8380-1993, ISO 8893-1989, ISO 10884-1995, EN ISO 12100-1:2003, EN ISO 12100-2:2003, EN 563-1994, EN 27917-1991, ISO 7112-1982, ISO 7113-1991
Prohlasujeme, ze tento vyrobek je v souladu s pozadavky smernice 2000/14/ES.
Tento vrobek by prohläsen shodnym se smernici 2000/14/ES na základe zkousek provedenych certifikačni firmou TÜV Rheinland Product Safety GmbH.
Castle Peak Road, Tsuen Wan, N. I., Hong Kong.
Deklareerinud 10/2007 Homelite Far East Co Ltd.

EB ATITIKTIES DEKLARACIJA
Prismidami atsakombye, mes deklarujame, kad gaminys, kuriam taikoma s di deklarajca, altinka Mašinć direktvyy 98/37/EB ir tokiu kitu pritaiktinu direktvyk kaip Elektromagnetinio suderamumto direktvyos 2004/108/EB bei direktvy 2000/14/EB ir 79/13/EB pagrindinini rekalavimus del tok, kas liecva siekata i r sauga.
Kad bʊtā tɑkimi reikalavalmi, suformuluoti Europos Bendrijos direktvöse, del to, kəs lieës sweikatir i sauga buvo atsižvelgta j Europos ir/arba nacionales normas ir/arba sjas technines spekificações: EN ISO 14982:1998, ISO 7916 & 7917, EN ISO 11806:1997, ISO 7918-1995, ISO 8380-1993, ISO 8893-1989, ISO 10884-1995, EN ISO 12100-1:2003, EN ISO 12100-2:2003, EN 563-1994, EN 27917-1991, ISO 7112-1982, ISO 7113-1991
Tekhneckata kokymeHTaJIe CE HAMRpa H Comelite Far East Co., Ltd. 24/F, 388 Castle Peak Road, Tsuen Wan, N.T., Hong Kong.
Fieldhouse Lane, Marlow,
Buckinghamshire,
SL7 1TB
UNITED KINGDOM
Tel: +44 (0) 1628 894400
Fax: +44 (0) 1628 894401
Technical Helpline: +44 (0) 800 389 0305
RYOBI TECHNOLOGIES SAS
388 Castle Peak Road
Tsuen Wan, Hong Kong
Tel: +852 2402 6888
RYOBI TECHNOLOGIES GMBH
Itterpark 4
D-40724 Hilden
DEUTSCHLAND
Tel: +49 (0) 2103 2958-0
Fax: +49 (0) 2103 2958-29
RYOBI TECHNOLOGIES GMBH
Building B, Rosehill Industrial Estate,
3 Shirley Street,
Rosehill NSW 2142
AUSTRALIA
Tel: (02) 8892 1800 or 1300 361 505
Fax: 1800 807 993
TECHTRONIC INDUSTRIES (NZ) LIMITED.
27Clemow Drive, Mt Wellington
PO Box 12-806, Penrose, Auckland
NEW ZEALAND
Tel: +64 (0) 9573 0230 Free Call: +64 0800
279624
Fax: +64 (0) 9573 0231
A&M MIDDLE EAST FZCO
P.O.Box 61254
Jedel Ali, Dubai,
UNITED ARAB EMIRATES
Tel.: +971 48861399
Fax: +971 48861400
Machine: 30cc String Trimmer / Brush Cutter
Name of company:
Address:
Homelite Far East Co., Ltd.
24/F, CDW Building,
388 Castle Peak Road,
Tsuen Wan, Hong Kong.
Type: RBC30SES / RBC30SBS
Name/Title:
Signature:
Andrew Eyre
Vice President, Engineering


- English
- Thank you for buying a Ryobi trimmer/brushcutter.
- WARNING
- READ ALL INSTRUCTIONS.
- GENERAL SAFETY RULES
- SPECIFIC SAFETY RULES FOR TRIMMER USE
- SPECIFIC SAFETY RULES FOR BRUSHCUTTER AND BLADE USE
- DESCRIPTION
- ASSEMBLY
- OPERATION
- FUEL AND REFUELING
- HANDLING THE FUEL SAFELY
- MIXING THE FUEL (Fig. 3)
- FGBD E I P NL S DK N FIN GR HU CZ RU RO PL SLO HR TR EST LT LV SK BG
- FILLING THE TANK
- OPERATING THE TRIMMER (Fig. 5)
- CUTTING TIPS (Fig. 6)
- ADVANCING THE LINE (Fig. 7)
- CUTTING TECHNIQUE - BLADE (Fig. 8)
- MAINTENANCE
- STRING REPLACEMENT (Fig. 9)
- BLADE PROTECTOR (Fig. 10)
- CLEANING THE EXHAUST PORT AND MUFFLER
- SPARK ARRESTOR
- ATTACHING THE STORAGE HANGER (Fig. 11)
- CLEANING THE AIR FILTER SCREEN (Fig. 12)
- FUEL CAP
- TROUBLESHOOTING
- Deutsch
- SYMBOLE
- PRECTETESNASLEDUJICIPOKNY.
- OBECNÉ BEZPEÇNOSTNI POKYNY
- ZAPNUTI / VYPNUTI STRUNOVÉ SEKAČKY (obr. 4a - 4b)
- UPOZORNENI
- 3AIIYCK H OCTAHOBKA TPIMMEPA IJI BOPIOPOB (Pnc.4a-4b)
- IPEUYIPEXKDEHNE
- HcIOJIb3OBAHNE TPIMMEPA IJIa BOPIOPOB (Pnc.5)
- CITITI TOATE INSTRUCTIUNILE.
- MÁSURI DE SIGURANTÀ GENERALE
- WJSCIE ZYLKI (Rys. 7)
- UZYWANIE SCSINACZA ZAROSLI (Rys. 5)
- PRECITAJTE SIVSETKYPOKNY
- POSUN STRUNY (Obr. 7)
- POUZIVANIE KROVINOREZU (obr. 5)
- OCHRANNY KRYT PROTI ISKRENIU
- TOPHBOI 3APEXDAHE HA PE3EPBOAPA
- БЕЗПАСHA PABOTA C TОПВOTO
- CMECBAHE HA FOPHBOTO (Hur.3)
- FGBDEIPNLSSDKNFINGRHUCZRUROPLSLOHRTRESTLTLVSKBG
- Блгарский
- 3APEKDAHE HAPE3EPBOAPA
- IPEUYIPEJKJEHNE
- IIYCKAHE I CIIHPAHE HA TPHMEPA (fHr. 4a - 4b)
- IPEyIPEXJEHNE
- HAUHH HA PABOTA CTPUMEPA (Фг.5)
- C'bBETI IPII PRA3AHE (Phi.6)
- H3BAJDAHE HA PEKESHOTO BbXE (Φnir.7)
- HAUYH HA PABOTA CTPUMEPA 3A PA3NUCTBAHE (pur.5)
- Бытарски
- CbBETI IPII P3AHE C HOXA
- IPEUYIIPEXJEHNE
- IIOPJBPbKKA
- GARANTIE - CONDITIONS
- CE DECLARATION OF CONFORMITY
- PROHLÁSENI O SHODE ES
- EB ATITIKTIES DEKLARACIJA
- RYOBI TECHNOLOGIES SAS
- RYOBI TECHNOLOGIES GMBH
- TECHTRONIC INDUSTRIES (NZ) LIMITED.
- A&M MIDDLE EAST FZCO
Brand : RYOBI
Model : RBC30SBS
Category : Brush cutter