USER MANUAL RM50 SAGEM
Thank you for purchasing a Sagemcom WiFi IP Radio; we appreciate your trust in us.
This product was manufactured with the upmost care, should you encounter any difficulties during its use, we recommend that you refer to this user guide. You can also find information on the following site:
http://support.sagemcom.com
The new material is guaranteed (parts and labour) by Sagemcom under the conditions and according to procedures defined on the site www.sagemcom.com heading support.
The Sagemcom site (www.sagemcom.com assistance section) also provides information on how your IP Radio works and how to solve any problems you may encounter. You can also contact our assistance service by E-mail. If the problem persists, you should contact our call centre (see the table below). They will offer an expert appraisal of your material remotely to determine the cause as well as the type of repair required.
For your comfort and safety, please read carefully the paragraphs below on safety recommendations and instructions.
Sagemcom
RECOMMENDATIONS AND SAFETY INSTRUCTIONS


Do not install your IP Radio in a humid room (bathroom, laundry, kitchen, etc.), or within 1.50mof a tap or water source, or outside. Your IP Radio should be used at an ambient temperature of between 15^ and 35^ for optimum sound results.
Do not set up your IP Radio in a dusty environment as dust deposits might adversely affect the sound quality.
Avoid objects or liquids getting into the unit.
Unplug the power lead if the unit will not be used for a long period.
Do not handle your AC cord with wet hands. If liquid spills on your product, unplug immediately and contact your dealer for cleaning instructions.
Only the power supply provided with the IP Radio should be used. Connect this to the mains in accordance with the installation instructions in this user guide and the information on the identification label affixed to the power supply (voltage, current, mains frequency). As a precaution, in case of danger, the mains adapters act as a disconnecting mechanism for the 230V power supply. They should be placed near the device and should be easily accessible.
Do not attempt to use force to plug a connector into the audio jack. If the connector cannot be plugged into the jack easily, the connector is incompatible.
Do not attempt to remove any screws or open the unit. No user serviceable parts are inside.
The length of the USB cables used on this product shall not exceed 3m.
This terminal was designed for private use inside a building (CPE customer premises equipment) in the European Free Trade association (EFTA). It has been tested in accordance with the technical provisions for radio equipment (EN 300328).
The radio frequency bands authorized for Wireless transmission depend on national regulations. The installation of this terminal operating in the 2.4 GHz band is covered by the European recommendation ERC 70-03.
Before use, make sure that the gateway with which you establish a wireless connection from your terminal is set up in accordance with this regulation and with the national regulations where it is used.
Sagemcom no liability if the regulations in force on the installation site are not complied with.
Some sensitive medical equipment and safety equipment may be affected by the radio-frequency transmissions of your radio. In all cases, we ask that you respect the safety recommendations.
The device shall not permanently be installed or used closer than 20~cm from the human body.
The CE marking certifies that the product meets the essential requirements of Directive 1999/5/CE of the European Parliament and of the Council pertaining to microwave radio equipment and telecommunication terminal equipment, for the safety and health of users, for electromagnetic interference. Furthermore, it efficiently uses the frequency spectrum attributed to ground and spatial communication to prevent damaging interference.
The declaration of compliance may be looked up on the www.sagemcom.com site or can be obtained from the following address:
Sagemcom - Customer relations department
| 1. Display Screen | Displays contents on the screen. |
| 2. PRESETS | [1] Press and hold to display a list of available FM stations.
[2] Press to activate auto/manual scan. |
| 3. MODE | Displays the Mode menu. |
| 4. VOL. | Enables volume control on the Wheel. |
| 5. MENU | Displays the submenu. |
| 6. STATIONS | [1]Press to displays the Favorite List
[2]Press and hold to add/remove stations to/from the Favorite List. |
| 7. Navigation Wheel | [1] In playback screen, rotate to increase/decrease the volume. Press to mute the audio volume.
[2] Navigate in the menu list. Press to enter or confirm the highlighted item in the menu list. |
| 8. C | [1] Act as the BACK/CANCEL button in all display screens.
[2] Act as the STOP button in the playback screen. |
| 9. INFO | [1] While listening to an IP Radio music source, press to switch the display the music information.
[2] While listening to the IP Radio, press and hold to set “auto tune”, which allows you to set a tuned station to play again at a certain time. |
| 10. S R S | (SMART RANDOM SWITCH) - Switch randomly to a new station. |
| 11. S R T | (SMART RANDOM THEORY) - Displays a list of all existing themes defined by Internet Radio. |
| 12. Speakers | Provides music sound output. |
| 1. POWER | [1] Press to shut off the music source currently playing and put the device into the Standby mode.
[2] Press and hold to put the device in the Power off mode. |
| 2. USB Port | Connection to USB devices. |
| 3. 5V DC Power Jack | Plug in the power adaptor. |
| 4. Audio Line Out Jack Left/Right | Plug in external speakers. |
| 5. Headset Jack | Plug in an external headset. Speakers do not function while headset is plugged in. |
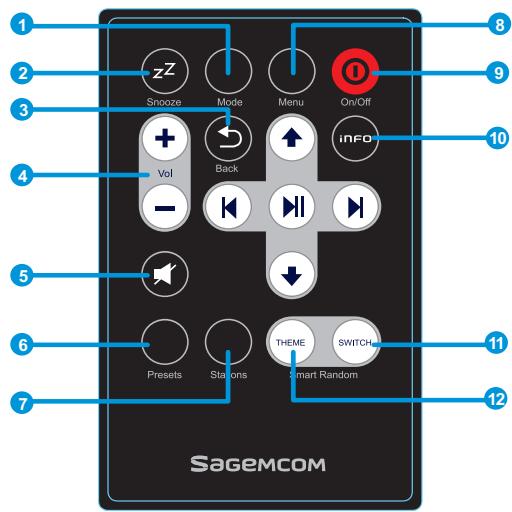
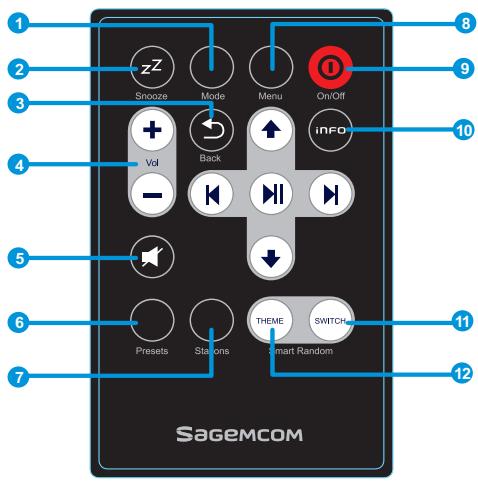
Remote Control
| 1. Mode | Displays the Mode menu. |
| 2. Snooze/Sleep Timer | [1] Snooze - When the alarm is on, press to shut the alarm off and reactivate again later.
[2] Sleep Timer - Set a screen off period of time and stop the current music source then enter the Standby mode. |
| 3. Back | [1] Act as the BACK/CANCEL button in all display screen.
[2] Act as the STOP button in the playback screen. |
| 4. VOL +/VOL - | Enables volume control. |
| 5. Mute | Mute all the sound. |
| 6. Presets | [1] Press and hold to display a list of available FM stations.
[2] Press to activate auto/manual scan. |
| 7. Stations | [1]Press to displays the Favorite List.
[2]Press and hold to add/remove stations to/from the Favorite List. |
| 8. Menu | Displays the submenu. |
| 9. On/Off | [1] Press to shut off the music source currently playing and put the device in standby mode.
[2] When the alarm goes off, presses this button to turn it off and go to the Standby mode. |
| 10. Info | [1] While listening to an IP radio music source, press to switch the display music information.
[2] While listening to the IP Radio, press and hold to set “auto tune”, which allows you to set a tuned station to play again at a certain time. |
| 11. S R S | (SMART RANDOM SWITCH) - Switch randomly to a new station. |
| 12. S R T | (SMART RANDOM THEORY) - Displays a list of all existing themes defined by Internet Radio. |
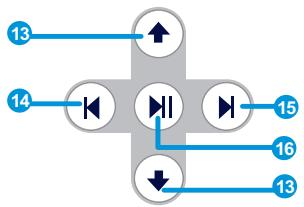
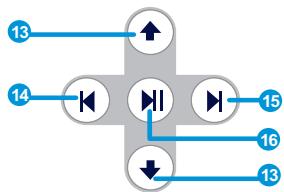
| 13. UP and DOWN | Move to the previous/next item. |
| 14. Previous | Menu list: go to the top of list. |
| 15. Next | Menu List: go to next list. |
| 16. Play/Pause/Select | [1] Menu List: confirm or enter the highlighted item.
[2] FM Radio: stop music and go back to Mode menu.
[3] IP radio/UPnP: Play/ Pause |
Turning On The Device for The First Time
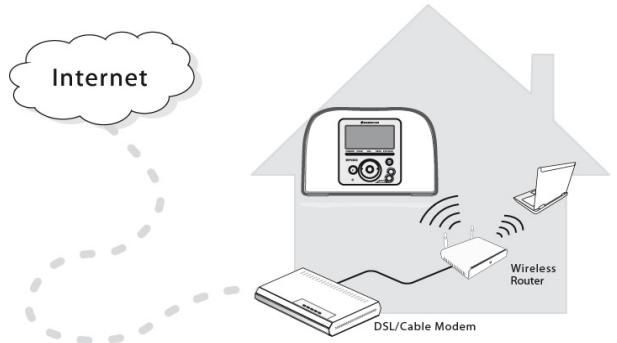
Network Environment
Please confirm that your wireless router or Access Point (AP) is connected to the broadband network. The diagram below describes the network environment that should be established to use your IP Radio.
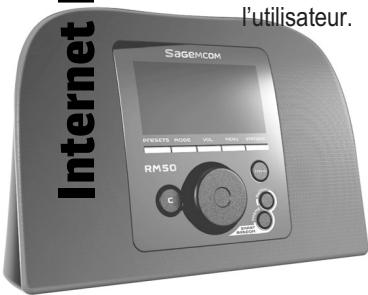
Setting Up The device
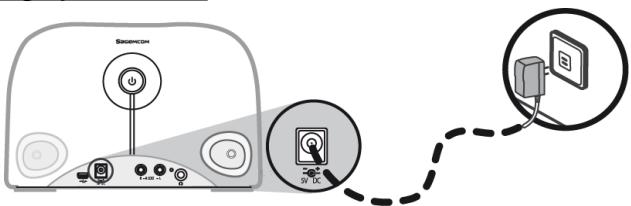
(1) Plug the included power adapter into a wall outlet.
(2) Connect the power adapter to the power jack on the rear panel of the device.
(3) Press and hold the Power button on the rear panel to turn on the device.
After the device is turned on, a welcome screen appears.
SageMcom
Note: Turning on the device for the first time will require you to set up the Network, Language and Time Zone for your device. Please follow the setup guide for proper setup.
The device will scan for network connection automatically.

After A Network Is Found
After scanning and a network connection is found, a Scan for networks menu displays:

Rotate the Wheel to select the desired network connection method.
AP List
(1) Press the Wheel to select the AP list menu.

(2) Select a desired network from the list.
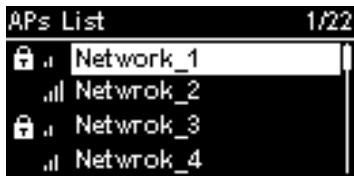
Note: If you have selected a network with a lock icon at the front, you must enter the password for the selected network.
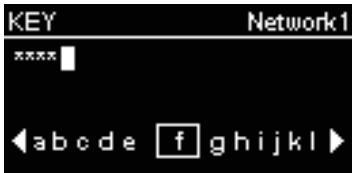
On the text entering screen, rotate the Wheel to choose the characters or numbers from the list at the bottom of the screen. Press the Wheel to select the character.
Rotate the Wheel to select End to quit the edit screen and start connecting to the network.

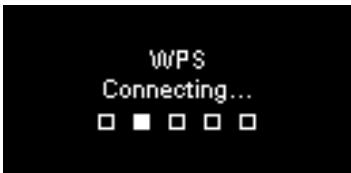
WPS
The IP Radio supports WPS (WiFi Protected Setup). If your AP supports WPS as well, you can choose this network connecting method.
(1) Press the WPS button on your AP.
(2) Select WPS PBC on the menu within the time limit (AP dependent) to establish a connection.
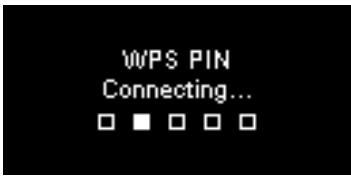
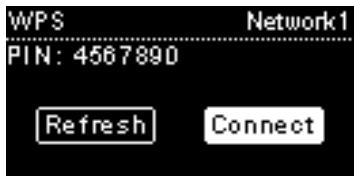
WPS PIN (Personal Identification Number): Use the PIN code to connect to the AP.
(1) Select WPS PIN on the menu.
(2) The PIN code is generated automatically or you can choose Refresh if you need to change the PIN code.
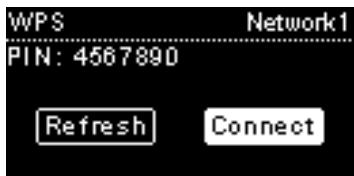
Internet Radio RM50
(3) Open the WPS configuration page of your AP on your computer, and then enter the PIN code to establish a connection.
Connection Established
If the network connection is established, continue adjusting the following settings:
Language
The device will automatically set up the local language. If you need to set up your own preferred display language on the device see step (1). Choose YES to confirm the language selection.

(1) Choose NO to continue the Language setting.
(2) Rotate the Wheel to choose the desired Language.
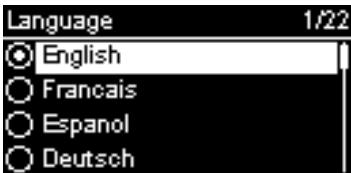
(3) Press the Wheel to activate the setting.
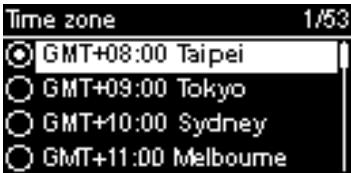
Time Zone
Select your time zone in the device to synchronize the date and time with the Internet. The device will automatically set up the local time zone. Choose YES to confirm the Time zone selection.
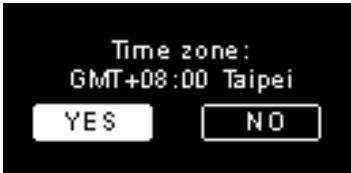
(1) Choose NO to continue the Time zone setting.
(2) Rotate the Wheel to choose your time zone.
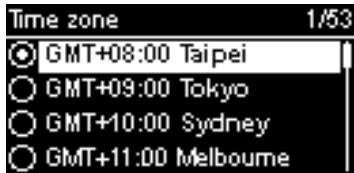
(3) Press the Wheel to activate the setting.
After the Network, Language and Time Zone settings are set, the menu screen will be displayed.
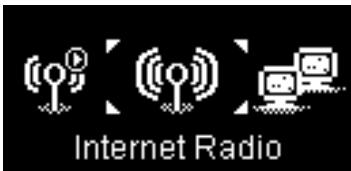
Listening To Internet Radio
With the Internet radio function, you can listen to music or programs from Internet radio stations.
Listening To FM Radio
With the FM Radio function, you can listen to music or programs broadcast from FM radio stations.
Listening To The Music In Your Computer (UPnP)
With the UPnP function, you can listen to music or programs that are stored in your computer.
Setup
In this menu, you can adjust IP Radio settings according to your own preferences. The settings include:
- Audio profile - To set up your preference of music.
- Time setup - To set up the Sleep timer or Alarm.
- Advanced setup - Provides more detailed settings for you to adjust according to your preferences. The settings include:
| Language | Select your preferred display language on the device. |
| Time Zone | Set up the Time Zone for your IP Radio to display the correct time and allow the device to synchronize the date and time with the Internet. |
| Clock | You can choose whether to set the clock manually or synchronize automatically with your IP Radio. |
| Radio Scan | Rotate the Wheel to choose whether to scan the radio stations manually or automatically while you are using the Internet Radio or FM Radio functions. |
| Reset to Default | To return all your settings to default settings. |
| F/W Version | Displays F/W version information of your device. |
| Demo Mode | To set the Demo Mode to On or Off. |
- ECO - Select energy saving related (ECO) settings such as Backlight, Brightness, or Volume Limitation.
Network Config
As mentioned in the chapter Turning On The Device For The First Time, the device will automatically connect to the set network each time the device is turned on.
Bienvenue
Cher client,
Please confirm that your wireless router or Access Point (AP) is connected to the broadband network. The diagram below describes the network environment that should be established to use your IP Radio.

- ECO - Select energy saving related (ECO) settings such as Backlight, Brightness, or Volume Limitation.
Sagemcom - Customer relations department
Sagemcom - Customer relations department
Sagemcom - Customer relations department
Sagemcom - Customer relations department
Sagemcom - Customer relations department
Sagemcom - Customer relations department
Sagemcom - Customer relations department
Sagemcom - Customer relations department
Sagemcom - Customer relations department
Sagemcom - Customer relations department
YcTpoCTBO He DoJIKHO YcTaHabINBaTbCnI IN NoCTOaHHo 3KcIIpyaTnpOBaTbCn Ha paCtOaHHm MeHbSe 20 cm OTeNoBeka.
MapKpOBka CE 03Hauaet, YTO yCTPOIcTBo COOTBcTbYET OCHOBHIM Tpe6OBaHnM DnpeKTHBb1 1999/5/CE EbponeeCKOrO IapnAmeta t Co03a, KacaioxxCpaJIO o6OpDobAHnC MmKpOBtHAMM IN TeLEKOMMyHnKaUHO HORO o6OpDobAHnA, CJIbIy KOToPOn RABJeTcAaHTa 3aUHTa 3dOpOBbI NJIb3OBATeIg OT JIEKTPOMArHETUeCKOrO BO3dEChTBN. YCTPOIcTBo PA6oTaET B DnIaNa3OHe UaCTOT PneINCAHHbIX Ha3eMHn IM KOCMIueckm KOMMyHnKaUHM BO n36eXahne BpeJa 3dOpOBbI YelOBeka. DeKnapaunr COOTBcTbNra Pa3MeuneHa NaHaeem CaIte Wee Ww.Sagemcom.com ININ MOKeT 6bITb NpUyeHa NO cIeDuUeMy aDpecy:
Sagemcom - Customer relations department
PnybT DnctaHcNoHHoro YnpabHeHn
(1) Haxmnte Ha kHOnky WPS Ha BaUeM AP.
(2) Bb6epnte WPS PBC B MeHIO B OgrpAHueHHoe BpeM (B 3aBnCmOCTu OT AP)ДлгocuIecTBHeHnnoPdKnHouHnHn.

PIN-koD WPS (Personal Identification Number [Личнын дд полкungньи Home]): IncnoIb3yIte PIN-koД Дд полкюченя K AP.
(1) BbIbepeTe PIN-KoD WPS B MeHIO.
(2) PIN-кд устанавлвает са Атоматчеси.Еспн HeT,TO Bы можete ВьбраТb Refresh,ecnBыxeлаete nomeHTb PIN-кд.
Paio NHTepHET RM50
(3) OtkpoTe CTpaHnUy KOhФnIpyaun WPS BaWero AP Ha BaWeM KOMNbHTope n BVeDnTE PIN-KoD, UTo6bI ocUseCTBnTb NOkNIOUChHe.

IopKluoyehne ocyeCTBneHo
Ecnn nodknluoyenne cetn ocyuaceTBJeHo, npoDOnjKaITe, yCTaHaBnBaJcIeDuOuHne napaMeTpbl:
3bIK
UCTPOICTBO ABTOMATNUeCKN YCTAHOBNT MecTHbIЯ3bIK. EcII BbI xOTInTe UCTAHOBNT bpyroJЯ3bIK, BbI6epITe B MeHIOЯ3bIK IN nepexOJNTe K 3Tany (1). BbI6epITe Da nI NaTBePxJdEHn PpeIOnKeHHOrOЯ3bIka.

(1)Haxmnte Ha HET, YTO6bI IpeuTn K HAcTpoKe Ra3bika.
(2)Повернite Руку ромков,则обы ВьбpaТжелаевязв.

(3) Haxmte Ha Pyky rpoKoCTn, YTObI aKTHBnPOBaT bYb6paHbI y3bIK.
Hacobov noec
BbIepeTe BaW yacobOIOrC, YTO6bI CINHXPOHN3nPOBaTb DaTy N BpEmc c INTHepHcTOM. UcToPcICTBO ABOTMaTUnCeCKN YCTaHOBNT MeCTHOE BpEmr. BbIepeTe Da IpnIOITBePcxJeHnBbIbOp yacobOro nOra ca.

(1) Bb6epnte HET, YTO6blIpeeiTu K NaCTpoKe YaCoBOro nOraCa.
(2)Повернite Ручу Гомковг,чTo6bI BB6paTb JeJaEMbI YacOBoi NOc.
(3) HaxmTe Ha Pykny rpoMKocTn, YTObI aKTHBnPoBaT bbl6paHbI yacoboi noaC.
Iocne hactpoikn cetn, y3bka n yacoboro nOra ca, BbIBoNTcR 3KpaH MeHO.

PpocJyunBaHne INTepHeT PaHno
BlaoradapyHKuIN IVThepHET PaIIO BbI MoKTe cIyuaTb My3bIky IIN npOrpAMMbI padIOCTaHcIy chee3 IVThepHeT.
Послшване Радо FM
Blaoradapf yHKuPi Paio FM, Bbl moKeTe cIyMaTb My3bIKy IIN npOrpaMMbl, nepeDaBaemble Chee3 paiooctaun FM.
Sagemcom - Customer relations department