HTP-SL050 - Home theater audio system PIONEER - Free user manual and instructions
Find the device manual for free HTP-SL050 PIONEER in PDF.
User questions about HTP-SL050 PIONEER
0 question about this device. Answer the ones you know or ask your own.
Ask a new question about this device
Download the instructions for your Home theater audio system in PDF format for free! Find your manual HTP-SL050 - PIONEER and take your electronic device back in hand. On this page are published all the documents necessary for the use of your device. HTP-SL050 by PIONEER.
USER MANUAL HTP-SL050 PIONEER
Thank you for buying this Pioneer product.
Please read through these operating instructions so you will know how to operate your model properly. After you have finished reading the instructions, put them away in a safe place for future reference.
Before you start
S-SL100-LR/S-SL100CR
- This speaker system has an impedance of 8 , and should be connected only to an amplifier designed with a load impedance of 8 (the amplifier's speaker output connector should clearly be labeled "8 ^ ).
In order to prevent damage to the speaker system resulting from input overload, please observe the following precautions:
- Do not supply power to the speaker system in excess of the maximum permissible input.
- When using a graphic equalizer to emphasize loud sounds in the high-frequency range, do not use excessive amplifier volume.
- Do not try to force a low-powered amplifier to produce loud volumes of sound (the amplifier's harmonic distortion will be increased, and you may damage the speaker).
Caution: installation
- Do not place the speaker on an unstable surface, as doing so may cause the speaker to fall and cause damage or bodily injury.
- Switch off and unplug your AV equipment and consult the instructions when connecting up components. Make sure you use the correct connecting cables.
- Install the center speaker below the TV. When installing the center speaker on top of the TV, be sure to secure it with tape or some other suitable means. Otherwise, the speaker may fall from the TV due to external shocks such as earthquakes, endangering those nearby or damaging the speaker.
Caution: in use
- Do not use the speaker to output distorted sound for long periods of time. This can result in damages to the speaker and poses a potential fire hazard.
- Do not place heavy or large objects on top of the speaker. Doing so could provoke the speaker to fall, causing damages or bodily injury.
- The speaker system grill cannot be removed. Do not try to forcibly remove it since doing so may damage the grille.
- This product incorporates autoregression technology to protect the speakers. If the speakers stop emitting noise when receiving too large a signal, turn the volume down on the amp and wait a few seconds. The protection feature disables itself automatically.
S-SLW500
- This product is a passive subwoofer, and must be combined with the VSX-S300 or other audio device provided with a built-in subwoofer amplifier.
- This speaker system has an impedance of 4 , and should be connected only to an amplifier designed with a load impedance of 4 (the amplifier's speaker output connector should clearly be labeled "4 ").
In order to prevent damage to the speaker system resulting from input overload, please observe the following precautions:
- Do not supply power to the speaker system in excess of the maximum permissible input.
- When using a graphic equalizer to emphasize loud sounds in the high-frequency range, do not use excessive amplifier volume.
- Do not try to force a low-powered amplifier to produce loud volumes of sound (the amplifier's harmonic distortion will be increased, and you may damage the speaker).
Caution: installation
- Do not place the speaker on an unstable surface, as doing so may cause the speaker to fall and cause damage or bodily injury.
- Switch off and unplug your AV equipment and consult the instructions when connecting up components. Make sure you use the correct connecting cables.
- Do not attach these speakers to the wall or ceiling, as they may cause injury in the event of a fall.
Caution: in use
- Do not use the speaker to output distorted sound for long periods of time. This can result in damages to the speaker and poses a potential fire hazard.
- Do not place heavy or large objects on top of the speaker. Doing so could provoke the speaker to fall, causing damages or bodily injury.
- Do not sit or stand on the speaker, or let children play on the speaker. Doing so could provoke the speaker to fall, causing damages or bodily injury.
- The speaker system grill cannot be removed. Do not try to forcibly remove it since doing so may damage the grille.
Pioneer is not responsible for any accidents or damage that result from improper installation, misuse or modification of the product, or natural disasters.
Cleaning the speaker cabinet
With normal use, wiping with a dry cloth should be sufficient to keep the cabinet clean. If necessary, clean with a cloth dipped in a neutral cleanser diluted five or six times with water, and wrung out well. Do not use furniture wax or cleansers.
Never use thinners, benzine, insecticide sprays or other chemicals on or near this unit since these will corrode the surfaces.
What's in the box
S-SL100-LR
- Speaker cord (4 m) x 2
Non-skid pads x 8 - Warranty card x 1 (European model only)
- Operating instructions (this document)
S-SL100CR
- Speaker cord (4 m) x 1
- Speaker cord (10 m) x 2
Non-skid pads x 12 - Warranty card x 1 (European model only)
- Operating instructions (this document)
S-SLW500
- Speaker cord (3 m) x 1
Non-skid pads x 4 - Seal x 4
- Warranty card × 1 (European model only)
Installation
S-SL100-LR/S-SL100CR
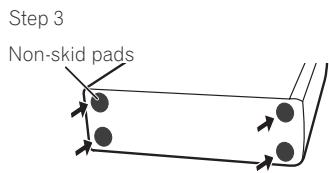
Install non-skid pads
Use the accessory non-skid pads as necessary, depending on your installation location.

CAUTION
Lay the unit on its side on soft cloth or other material that will not scar the unit.
S-SLW500
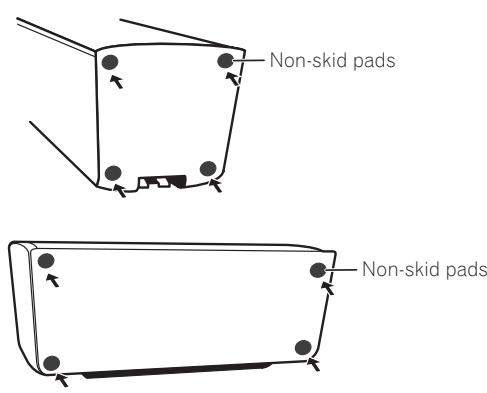
Installing the subwoofer
The subwoofer can be mounted in either vertical or horizontal orientation. The factory default is horizontal orientation.
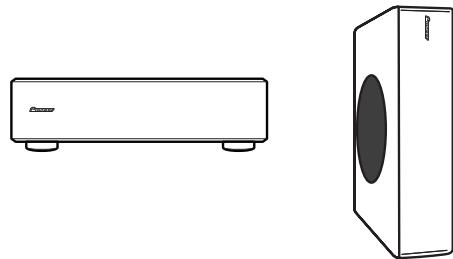
For vertical orientation installation
1 The feet are attached with Phillips screws; use a Phillips screwdriver to remove them.
2 Apply the accessory seals to the place the feet were located to hide the screw holes.
3 Apply the non-skid pads to the four corners of the surface where the subwoofer is to be mounted. Note that the non-skid pads may not be fully effective on all surfaces, so do not install in slippery locations.


CAUTION
- Do not attempt to perform these procedures while tilting the unit at an angle. Lay the unit on its side on soft cloth or other material that will not scar the unit.
Mounting location
Installation example: Horizontal orientation
Installation example: Vertical orientation
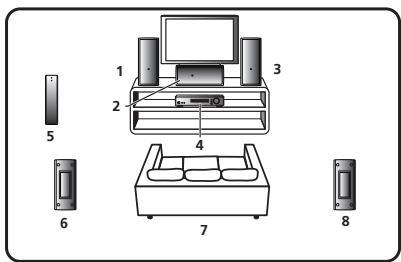
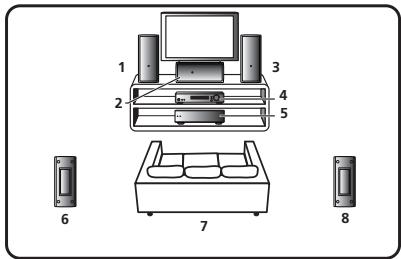
1 Front left speaker
2 Center speaker
3 Front right speaker
4 Receiver
5 Subwoofer
6 Surround left speaker
7 Listening position
8 Surround right speaker
S-SL100-LR/S-SL100CR
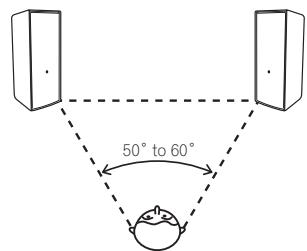
- Front speakers installed to the right and left should be separated by about 1.8m to 2.7m distance. They should be installed at equal distances from the television, and at equal heights from the floor.
- Optional speaker stands can be purchased to facilitate optimal mounting of the surround speakers at or slightly above the listener's ear height.
- The surround effect will be diminished if the surround speakers are mounted at extreme distances from the listener's position.
- This speaker system furnished in this system are designed for use close to a CRT-based TV or color monitor. However, if color distortion is caused due to the installation, try turning off the power to the CRT-based TV or color monitor for 15 to 30 minutes, then turning on the power again. The self-degaussing function built into the CRT-based TV or color monitor should help ameliorate the effect of the speakers on the image. If color distortion continues to be a problem, separate the speakers farther away from the screen. If magnets or devices emitting magnetic fields are installed nearby, the interactive effect with the speaker system may cause color distortion in a CRT-based TV or color monitor.
S-SLW500
-
The subwoofer reproduces ultra-low sounds in monaural, using the fact that the human ear has little directional sensitivity to sounds in the low frequencies. As a result, the subwoofer can be located in a variety of places, but if placed too distant, the linkage between sounds of the subwoofer and other speakers may seem unnatural. The intensity of the sound from the subwoofer can be adjusted by changing the distance from the wall.
-
The subwoofer is not magnetically shielded and so should not be placed near a TV or monitor, as the interaction of magnetic materials can cause distortion of the colors on your TV screen. Devices easily affected by magnetism (magnetic media cards, wrist-watches, video tapes, etc.) should not be placed near the subwoofer.
CAUTION
- When installing the speaker system on a TV rack or AV rack, the rack or other audio components may vibrate due to vibrations generated by the speaker. Caution should be taken to assure that the rack shelves or other components do not shift positions due to the vibration.
- Do not place disc media (DVD, CD) players on top of the subwoofer since sound skipping may occur due to vibration.
- When installing, allow at least 10cm space between the rear of the unit and any wall; when installing vertically, also allow at least 10cm space between the unit's left side and any wall. If insufficient distance is taken, the unit may display inadequate performance, or may malfunction.
- Since the speaker system is heavy, installation in unstable locations is extremely dangerous and should not be attempted. A falling speaker may cause damage or personal injury.
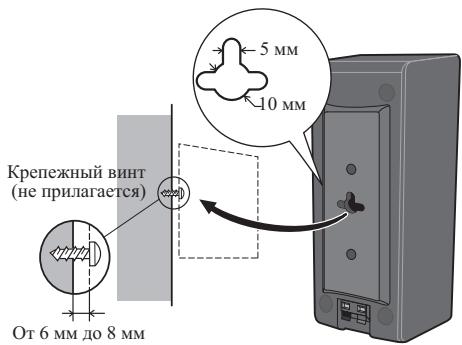
Wall mounting the speakers (S-SL100-LR/S-SL100CR)
The front, center and surround speakers have a mounting hole which can be used to mount the speaker on the wall.
Before mounting
- Remember that the speaker system is heavy and that its weight could cause the screws to work loose, or the wall material to fail to support it, resulting in the speaker falling. Make sure that the wall you intend to mount the speakers on is strong enough to support them. Do not mount on plywood or soft surface walls.
- Mounting screws are not supplied. Use screws suitable for the wall material and support the weight of the speaker.
CAUTION
If you are unsure of the qualities and strength of the wall, consult a professional for advice.
- Pioneer is not responsible for any accidents or damage that result from improper installation.

CAUTION
- Do not mount this product on a wall or hang from a ceiling. If the unit falls it may result in personal injury.
Connection
Connecting the cord
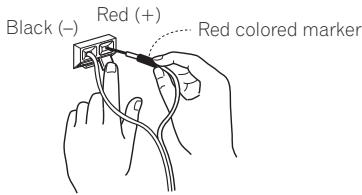
1 Attach one end of the supplied speaker cord to the rear of the each speaker.
- Connect the wire with the colored marker to the red (+) terminal; the plain wire to the black (-) terminal. Press down the spring-loaded tab and insert the wire, as shown below. Release the tab to secure the wire.
2 Connect the other ends of the cords to the amp's speaker output terminals (for more details, refer to your amp instruction manual).
CAUTION
- These speaker terminals carry HAZARDOUS LIVE voltage. To prevent the risk of electric shock when connecting or disconnecting the speaker cords, disconnect the power cord before touching any uninsulated parts.
- After connecting the plugs, pull lightly on the cords to make sure that the ends of the cords are securely connected to the terminals. Poor connections can create noise and interruptions in the sound.
- If the cords' wires happen to be pushed out of the terminals, allowing the wires to come into contact with each other, it places an excessive additional load on the receiver. This may cause the amp to stop functioning, and may even damage the receiver.
- When using a set of speakers connected to an receiver, you won't be able to obtain the normal stereo effect if the polarity (+, -) of one of the speakers (left or right) is reversed.
Operation (S-SL100-LR/S-SL100CR)
Since the S-SL100-LR/S-SL100CR are designed as compact satellite speakers, it is recommended that they be used in combination with a sub-woofer to provide full base sound. In this case, set your amplifier (receiver) speaker setting to "small" and the crossover frequency to 200Hz .
Specifications
S-SL100-LR/S-SL100CR
Enclosure.......Closed-box bookshelf type (magnetically shielded)
Configuration 10 cm x 7 cm, full range
Impedance. 8Ω
Frequency range. 100 Hz to 20 kHz
Sensitivity. 81 dB
Maximum input power 100 W
Exterior dimensions . 86.5 (W) mm x 206 (H) mm x 85.5 (D) mm
Weight 0.7 kg
Supplied accessories (S-SL100-LR)
Speaker cord (4 m) 2
Non-skid pads 8
Warranty card (European model only) 1
Operating instructions (this document)
Supplied accessories (S-SL100CR)
Speaker cord (4 m) 1
Speaker cord (10 m) 2
Non-skid pads 12
Warranty card (European model only) 1
Operating instructions (this document)
S-SLW500
Enclosure. Bass-reflex bookshelf type
Configuration 16 cm cone
Impedance. 4Ω
Frequency range. 35 Hz to 2.0 kHz
Sensitivity. 78 dB
Maximum input power. 100 W
Exterior dimensions
Horizontal orientation. . . . 435 (W) mm x 121 (H) mm x 360 (D) mm
Vertical orientation. .108.5 (W) mm x 435 (H) mm x 360 (D) mm
Weight 4.5 kg
Supplied accessories
Speaker cord (3 m) 1
Non-skid pads 4
Seal 4
Warranty card (European model only) 1

Note
- The S-SL100-LR is shipped with two speaker systems per package.
- The S-SL100CR is shipped with three speaker systems per package.
- Specifications and design subject to possible modification without notice, due to improvements.

is a trademark placed on a product with Pioneer's Phase
Control technology. This technology enables high-grade sound reproduction through each component by improving overall phase matching.
© 2011 PIONEER CORPORATION.
All rights reserved.
For European model

If you want to dispose this product, do not mix it with general household waste. There is a separate collection system for used electronic products in accordance with legislation that requires proper treatment, recovery and recycling.
Private households in the member states of the EU, in Switzerland and Norway may return their used electronic products free of charge to designated collection facilities or to a retailer (if you purchase a similar new one).
For countries not mentioned above, please contact your local authorities for the correct method of disposal.
By doing so you will ensure that your disposed product undergoes the necessary treatment, recovery and recycling and thus prevent potential negative effects on the environment and human health.
K058b_A1_En
Avant de commencer
S-SL100-LR/S-SL100CR
Précautions: Installation
Precautions: Installation
© 2011 PIONEER CORPORATION.
© 2011 PIONEER CORPORATION.
© 2011 PIONEER CORPORATION.
© 2011 PIONEER CORPORATION.
© 2011 PIONEER CORPORATION.
© 2011 PIONEER CORPORATION.
For lodrat installation
© 2011 PIONEER CORPORATION.
Kopiering forbjuden.
© 2011 af PIONEER CORPORATION.
© 2011 PIONEER CORPORATION.
Allerettigheterreservert.

Hvis du onsker Å kaste dette produktet, mä du ikke blande det med vanlig hushholdningsavfall. Det finnes et separat innsamlingssystem for bruke elektronikkprodukter, som i henhold til lovigvningen krever korrekt spezialbehandling, gjenbruk og gjenvinning.
Private hushholdninger i EU-landene, pluss Sveits og Norge kan levere brukte elektronikkprodukter gratis til anlegg for spesialavfall, ell er til forhandleren (ved kjop av et nytt, tilsvarende produit).
© 2011 PIONEER CORPORATION.
Ipeed BbInonHeHnEM MOHTaxa
ПOMHHTe,ТTO AkCTHuecka ChCTeMa HMeET 3HaHTeJIbIbI BEc. ПОд eTЯжecTbIO BnHTbI MOryT ocIa6bTe, a MatepeHAI CTehI He bIaIepKATb Hary3KH,ТTO MOKeT pINBecTb K IaIeHHIO KOLOHKN. Y6eIITeCb TOM,ТTO cTeHa,Ha KOTopoI IlaHInpyetc MoTHIpOBaTb KOLOHKN, HMeET DoCTaTOHHy IOpOHOCTb, YTO6bl yIepKaTaB IH. He MoTHIpUyHe NaAhePbIbIX CTehAx HII CTehax C MArKM INoKpbITHEm.
KpeNekHbIe BnHTbIe He IpiHJIaHaOTcI. HcIOJIb3yIte BnHTbI, COOTBETCTBYIOIIHe MaTePnaIy CTeHbI H cIOOC6HbIe BblEprKHNBaTb BEC KOJIOHKn.

BHIMAHNE
EcJH BbHe yBpeHb B xapaKtepnctHKaH N HecuIe CnOco6HoCTN CTHe, 0bpaTHTecb 3a KOHCyJIbTaIaIIe K cIeHaJIHCTy.
KOMIIaHHI Pioneer He CEET OBTETCTBEHOCHTb 3a KaKHe-JIN60 HeCACTHbE CUYAH HYN y6bITKN, B13BAHHbIE HIN IOHECEHbE B CJIeCTBHe HENAJIeKaHaeYCTAHOBKn.

BHIMAHNE
- He MoTHnTpHyIte 3To H3dJIeHne Ha cTeH e Hc BSeIIHBaIte erO c IIOToJka. IaJeHHe yCtpoIcTbMa Moket IIpHBeCTN K TpaBMam.
CoeHHnHeHn
IopocoeHHeHKe Ka6eJr
1 Поб_COeINHInTe OINK KOHeT npHnArAeMORO KOLHOCHORO Ka6eJI K KOHTaKTam B 3aDHeI qACTn KaXdoI KOJHOKN.
UyBCTBHTeJIbHOCTb 81 JB
MaKCHMaJIbHaB BXOJHnA MOIHOCTb. 100BT
T6apHTbIe pa3Mepe 86,5 (III) MM x 206 (B) MM x 85,5 (Γ) MM
Bec. 0,7 K
IocTaBlaReMbIe B KOMnJIeKTe npHaadJIeXHoCTN (S-SL100-LR)
KoJIIOHOuHbI Ka6eJIb (4 M) 2
IpeIOxpaHHTeJIbHbIe HeCKOJIb3KHe IIOJKAJIKN 8
IapaTHnHbI cepTHΦHKaT (ToJIbKO IJIЯ MoJeIe, paIIpOcTpHaYeMbIX B
Ebpone) 1
Hnctpykun Hno kcnnyataun (daHHbI OOKymeHT)
IocTaBlaeMble B KOMnJIeKTe npHaJdJIeXHoCTN (S-SL100CR)
KoJIOHOuHbI Ka6eJIb (4 M) 1
KoJIOHOuHbIKa6eJIb(10m) 2
IpeOxpaHHTeJIbHbIe HeCKoJIb3KHe IIOJKnJaIKN 12
ГараHTинь сртнфкат (ToIbKOДЯ MODEЛeй,pacIpocTpahReMbIX EBpOne) 1
Hnctpykun Hno Kcnnyataaun (daHHbI OOKymeHT)
S-SLW500
KopIyC IIOJOuHOro TnIIa, c OtpaKaTeJIeM 6acOB
KoHΦnHypaun 16 cm KOhyc
IoiHoe coipoTHBJIeHHe 4Ω
Huaanazonyactot 35IIO2,0K
YvBCTBHTeJIbHOcTb. 78 n6
MaKcHMaJIbHaB BXOJHaB MOIHOCTb 100 Br
TaeapHTbIe pa3mepe
B ropn3oHTaJIbHOI opHeNTaIIH 435 (III) MM x 121 (B) MM x 360 (Γ) MM
B BepTnKaJIbHOJ opHeNTaIIHH 108,5 (III) MM x 435 (B) MM x 360 (Γ) MM
Bec 4,5K
IocTbJIaRbIeB KOMnJIeKTe npHaJdJIeXHcOCTN
KoIOHOuHbI Ka6eJIb (3 M). 1
IpeOxpaHHTeJIbHbIe HeCKoJIb3KHe IIOJIaIKN. 4
3aJIyIIka 4
TapaHTHnHbI cepTHΦHKaT (ToJIbKO DII MA MoJeJIe, paCIIPOCTpaHReMbIX B Ebpone). 1

3aMeuHne
- MoJIeJIb S-SL100-LR IIOCTaJIaIeTcB KOMIIJIeKTe C IByMn AkyCTHueCKHMn CnCTeMaMn.
MoJIb S-SL100CR nOCTaJIeTcB KOMIIJEKTe c TpeMa kAcYCTnueCKHM nCtEmAMH.
TexHHueckhe xapaKtepeHCTKNH KOHcTpyKIIIM MOYr H3MeHrTBc8e3IpeBapHTeJIbHO r yBeIOMJIeHNr, B CBr3H C BHOCHMbIMHyCOBepHECTBOBAHHM.

AJIYIETcTOBAPHbIM 3NAKOM, HAOCHMbIM HA IPOJyKtbl, B K II pIPhMeHTcTexHOJIOTnE pyERIINpOBKn fo3a3I Pioneer Phase DaHaHNA TEXHOJIOTNIO3BOJIeT IOJUyATb
BbICOKOKaueCTBeHHoe 3ByuHaHHe BOCINPOH3BOIDHMbIX KaJbIM KOMIOHEHTOM 3BYKOB IIOpeCTBOM IOBbIeHn TOUHOCTN HAcTPOIKH yopBnAa3HpOBKn.
© PIONEER CORPORATION, 2011.
Bce npaba 3aunuienbI.
Длma moDEJIe, pacnpoctpaHЯEmbIX B Ebpone

EcnBb jxenaete ytni3npoabT daHnoe i3ne, He BbIpa3BaIte erO BmTeCt c 06bIHybM bIbTObIM MycOpom. CyuIeCTByET oIeBbna CHTeMa Cbop IcNIOJIb3oBAnHHbX 3NeKToPbHbX I3dEni B COOTBETCTBN M 3aKHOJAtelbCTBOM, KOTOPa IpeDnolarAe COOTBCTByOe O6baIeHne, BO3BPAT n pepea6OtKy.
Auctbke KInemtbI-B cTpaHax-uehax EC, B IWeBceapnn HOpBermn Moryt 6ecnPaTHo BO3BaPaaTb NcNolb3OBaHHbIe 3JIeKtpOHHbIe n3dEINBA COOTBETCTByIOUne npHKtbI c6Opa nn Dnepy (pnp NKpyKe CXoDHoro HOBOr n3dEINIA).
B ctpaHax, He nepueuucneneHHbix Bblwe, dIy noIpyeHnIhOpMaun O npabINbHbIX cnOCo6ax yTNIH3aun o6paauTeCB b COOTBeCTByOuJe yUpeJdHn.
IocTyna TAKIM 6bAp3OM, Bbl MoKTe 6bItb YbepeHbB TOM, cTo yTuIN3npyEmbI npOyKT 6dyet COOTBeCTByUoiM 6bAp3OM 6bApOtaH, nepeHaN B COOTBeTcTBYIOU pNHT Hnepepa60TaH 6e3 Bo3MOXhBx HeRaTHBIX NocPdCTBn DnIg OKpyKaHOSe CpeBn 3doOpBoBla IIOJe.
K058b_A1_Ru
開始之前
S-SL100-LR/S-SL100CR
http://www.pioneer.co.uk
http://www.pioneer.fr
http://www.pioneer.de
http://www.pioneer.it
http://www.pioneer.nl
http://www.pioneer.be
http://www.pioneer.es
http://www.pioneer.pt
http://www.pioneer.se
http://www.pioneer.dk
http://www.pioneer.no
http://www.pioneer.fi
http://www.pioneer-rus.ru
http://www.pioneer.eu
© 2011 PIONEER CORPORATION.
All rights reserved.
© 2011 PIONEER CORPORATION.
PIONEER CORPORATION, 2011.
Bce npaba 3aunueneHbI.
PIONEER CORPORATION
1-1, Shin-ogura, Saiwai-ku, Kawasaki-shi, Kanagawa 212-0031, Japan
Kopnpaun PaonHp
1-1, CnH-Orpya, CaBai-Ky, r. KaBacAn, npefekkTypa KaHaraba, 212-0031, JnoHna
HmnpTep: OOO "PNOHEP PUC"
125040, Pocnra, r. MockBa, yI. PpaBbI, d.26 TeI.: +7(495) 956-89-01
PIONEER ELECTRONICS (USA) INC.
P.O. BOX 1540, Long Beach, California 90801-1540, U.S.A. TEL: (800) 421-1404
PIONEER ELECTRONICS OF CANADA, INC.
340 Ferrier Street, Unit 2, Markham, Ontario L3R 2Z5, Canada TEL: 1-877-283-5901, 905-479-4411
PIONEER EUROPE NV
Haven 1087, Keetberglaan 1, B-9120 Melsele, Belgium TEL: 03/570.05.11
PIONEER ELECTRONICS ASIACENTRE PTE. LTD.
253 Alexandra Road, #04-01, Singapore 159936 TEL: 65-6472-7555
PIONEER ELECTRONICS AUSTRALIA PTY. LTD.
5 Arco Lane, Heatherton, Victoria, 3202, Australia, TEL: (03) 9586-6300
PIONEER ELECTRONICS DE MEXICO S.A. DE C.V.
Blvd.Manuel Avila Camacho 138 10 piso Col.Lomas de Chapultepec, Mexico, D.F. 11000 TEL: 55-9178-4270
K002_B4_Ru