
S-81B-LR-K - Pregnant PIONEER - Free user manual and instructions
Find the device manual for free S-81B-LR-K PIONEER in PDF.
| Product type | Bookshelf speaker |
| Brand | PIONEER |
| Model | S-81B-LR-K |
| Configuration | 2-way, bass reflex |
| Coaxial unit | 13 cm cone (woofer) / 2.5 cm dome (tweeter) |
| Nominal impedance | 6 Ω |
| Frequency response | 40 Hz - 50 kHz |
| Sensitivity | 84.5 dB (2.83 V) |
| Maximum input power | 130 W |
| Crossover frequency | 2 kHz |
| Dimensions (W x H x D) | 190 x 350 x 280 mm |
| Weight | 7.9 kg |
| Supplied accessories | Decoupling spikes (x6), bases (x6), non-slip pads (x8), grilles (x2), cleaning cloth, instruction manual |
| Special features | Glossy finish, removable magnetic grille, decoupling spikes for isolation |
| Care and cleaning | Clean with a soft, dry cloth; for the glossy finish, use the supplied cloth; avoid chemical products |
| Safety | Do not install high up or on a wall; do not sit or stand on the speaker; do not expose to magnetic objects |
| Repairability / Spare parts | Parts not specified; contact an authorized Pioneer service center |
| General information | Designed for use with an amplifier of 6 Ω to 16 Ω; Phase Control technology |
Frequently Asked Questions - S-81B-LR-K PIONEER
User questions about S-81B-LR-K PIONEER
0 question about this device. Answer the ones you know or ask your own.
Ask a new question about this device
Download the instructions for your Pregnant in PDF format for free! Find your manual S-81B-LR-K - PIONEER and take your electronic device back in hand. On this page are published all the documents necessary for the use of your device. S-81B-LR-K by PIONEER.
USER MANUAL S-81B-LR-K PIONEER
S-81B-LR-K S-81B-LR-QL S-81B-LR-W
Speaker System / Enceintes acoustiques / Lautsprechersystem / Sistema di diffusori / Luidsprekersysteem / Sistema de altavoces / Sistema de Colunas / Högtalarsystem / Højtalersystem / Høyttalersystem / Kaiutinjärjestelmä / Акустическая система / 揚聲器系統
Discover the benefits of registering your product online at http://www.pioneer.co.uk (or http://www.pioneer.eu) Découvrez les nombreux avantages offerts en enregistrant votre produit en ligne maintenant sur http://www.pioneer.fr (ou http://www.pioneer.eu). Bitte nutzen Sie die Möglichkeit zur Registrierung Ihres Produktes unter http://www.pioneer.de (oder http://www.pioneer.eu) Registra il tuo prodotto su http://www.pioneer.it (o http://www.pioneer.eu) e scopri subito quali vantaggi puoi ottenere! Ontdek nu de voordelen van online registratie! Registreer uw Pioneer product via http://www.pioneer.nl - http://www.pioneer.be (of http://www.pioneer.eu) Registre su producto en http://www.pioneer.es (o en http://www.pioneer.eu) Descubra los beneficios de registrarse on-line: Registe o seu produto em http://www.pioneer.pt (ou em http://www.pioneer.eu). Descubra as vantagens de o fazer agora on-line. Registrera din produkt på http://www.pioneer.se (eller på http://www.pioneer.eu). Upptäck fördelarna med att göra det on-line nu. Registrer dit produkt på http://www.pioneer.dk (eller http://www.pioneer.eu). Oplev fordelene ved at gå online nu. Registrer produktet ditt på http://www.pioneer.no (http://www.pioneer.eu). Oppdag fordelene med dette på nettet i dag. Rekisteröi tuote sivustossa http://www.pioneer.fi (http://www.pioneer.eu). Tutustu nyt online-rekisteröitymisen etuihin. Зарегистрируйте Ваше изделие на http://www.pioneer-rus.ru (или http://www.pioneer.eu). Ознакомьтесь с преимуществами регистрации в Интернет
Register your product at:
http://www.pioneerelectronics.com (US) http://www.pioneerelectronics.ca (Canada)
http://www.pioneerelectronics.com (US) http://www.pioneerelectronics.ca (Canada)
Operating Instructions / Mode d'emploi / Bedienungsanleitung / Istruzioni per l'uso / Handleiding /
Manual de instrucciones / Manual de instruções / Bruksanvisning / Brugsanvisning / Bruksanvisning /
Käyttöohjeet / Инструкции по эксплуатации / 操作手册
Thank you for buying this Pioneer product.
Please read through these operating instructions so you will know how to operate your model properly. After you have finished reading the instructions, put them away in a safe place for future reference.
Before you start
- The nominal impedance of this speaker system is 6 Ω. Connect the speaker system to an amplifier with a load impedance ranging from 6 Ω to 16 Ω (a model with “6 Ω to 16 Ω” displayed on the speaker output terminals).
In order to prevent damage to the speaker system resulting from input overload, please observe the following precautions: - Do not supply power to the speaker system in excess of the maximum permissible input.
- When using a graphic equalizer to emphasize loud sounds in the high-frequency range, do not use excessive amplifier volume.
- Do not try to force a low-powered amplifier to produce loud volumes of sound (the amplifier's harmonic distortion will be increased, and you may damage the speaker).
Caution: installation
- Do not attach these speakers to the wall or ceiling. They may fall off and cause injury.
- Do not install your speakers overhead on the ceiling or wall. If improperly attached, the speaker grille can fall and cause damage or personal injury.
- Switch off and unplug your AV equipment and consult the instructions when connecting up components. Make sure you use the correct connecting cables.
- The grille is affixed with magnets. The grille may fall if force is applied to the grille in a horizontal direction. When cleaning the speaker, remove the grille first.
Caution: in use
- Do not place the speaker on an unstable surface. It could present a hazard if it falls, as well as damaging the equipment.
- Do not use the speaker to output distorted sound for long periods of times. This can result in a fire hazard.
- Do not sit or stand on the speaker, or let children play on the speaker.
- Do not put large or heavy objects on top of the speaker.
- Do not place magnetic objects such as screwdrivers or iron parts near the tweeter or woofer. Since the speakers use strong magnets, the objects may be attracted, causing injury or damaging the diaphragm.
For U.S. model
WARNING: Handling the cord on this product or cords associated with accessories sold with the product will expose you to chemicals listed on proposition 65 known to the State of California and other governmental entities to cause cancer and birth defect or other reproductive harm.
Wash hands after handling
D36-P4_A_En
For European model
If you want to dispose this product, do not mix it with general household waste. There is a separate collection system for used electronic products in accordance with legislation that requires proper treatment, recovery and recycling.
Private households in the member states of the EU, in Switzerland and Norway may return their used electronic products free of charge to designated collection facilities or to a retailer (if you purchase a similar new one).
For countries not mentioned above, please contact your local authorities for the correct method of disposal.
By doing so you will ensure that your disposed product undergoes the necessary treatment, recovery and recycling and thus prevent potential negative effects on the environment and human health. K058 4
Cleaning the speaker cabinet
With normal use, wiping with a dry cloth should be sufficient to keep the cabinet clean. If necessary, clean with a cloth dipped in a neutral cleanser diluted five or six times with water, and wrung out well. Do not use furniture wax or cleansers.
Never use thinners, benzine, insecticide sprays or other chemicals on or near this unit since these will corrode the surfaces.
Cleaning the glossy finish of the speaker system
S-81B-LR-K only
- If you use a dusty or hard cloth or if you rub the screen hard, the finish of the product will be scratched.
- If you clean the surface of the speaker system with a wet cloth, water droplets on the surface may enter into the product, resulting in malfunction.
- When cleaning the finish of the speaker system, gently wipe it with a dry soft cloth; the supplied cleaning cloth.
What's in the box
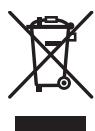
Spikes x 6

Spike bases x 6
Non-skid pads x 8
Grille x 2
Cleaning cloth (for S-81B-LR-K only) x 1
Operating instructions
How to install
Choosing where to place the speaker systems
- Sounds played through speaker systems are easily affected in subtle ways by the conditions in the listening space.
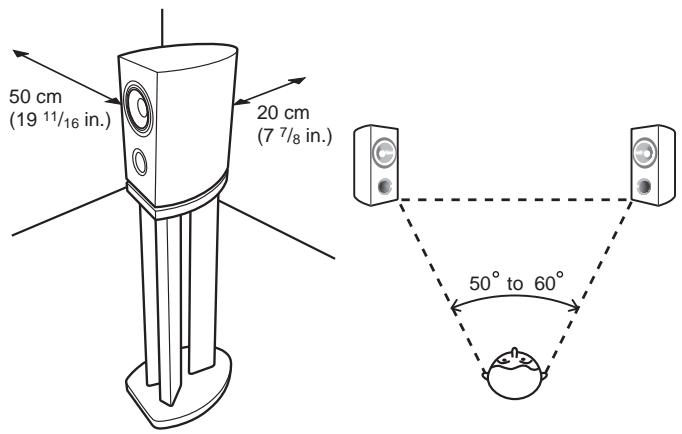
- For best sound, choose a solid floor upon which to place the speakers, and position the speakers as shown below. The level of low sounds can be adjusted by moving the speakers closer to or further from the wall. Adjust the speakers so that they are equidistant from their respective side walls to assure balanced sound.
text_image
50 cm (19 11/16 in.) 20 cm (7 7/8 in.) 50° to 60°- Place the left and right speakers equal distances from your listening position for good stereo sound. Use speaker cords of the same length for each speaker.
- So far as possible, place the front left and front right speakers on the same plane as the TV screen.
- To achieve optimum surround sound, you should place the TV between the left and right speakers, with the speakers pointing at a 50 to 60 degree angle toward the listening position.
- If the room has a lot of reverberation, we recommend hanging heavy fabric on the walls, and/or putting a carpet on the floor to damp the sound. For best results, cover walls completely.
- These speakers are bookshelf-type speakers which will give their best performance when placed on a solid, level surface off the floor. Placing the speakers directly on the floor will result in boomy, undefined sound. Ideally, the tweeters should be at about ear level when seated in your listening position. We recommend using the CP-81B-K/MK speaker stand for optimal sound and stability.
If you choose to use the CP-81B-K/MK speaker stand, make sure you secure it with the screws provided. (for more details, refer to the operating instructions of CP-81B-K/MK)

Important
- Pioneer assumes no liability whatsoever for damages resulting from assembly, improper mounting, insufficient reinforcement, misuse of the product, acts of nature, etc. S-81B-LR-QL/W only
- The cabinet uses sliced veneer made of natural wood. Do not place the speaker where it will be in direct sunlight, and avoid positioning it near heaters and air conditioners. Doing so may cause warping and discoloration of the speaker cabinet and damage to the speaker.
When installing directly on the floor
Use the furnished spikes or non-skid pads when installing the speaker directly on floor surface.
Using the spikes
This speaker system includes spikes that you can use to isolate the speaker from the floor. Use the supplied spike bases to avoid scratching the floor or other surface where the speaker is placed.
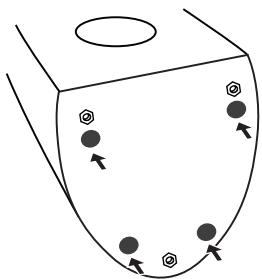
1 Twist the spikes into the threaded metal inserts embedded in the bottom of the speaker.

natural_image
Simple line drawing of a container with a lid and two hanging objects, no text or symbols present.2 Set the spike bases in the positions where the points of the three spikes will strike when the speaker is set down.


3 Set the speaker on the spike bases and check to confirm the speaker does not rock.

Caution
- Always use the spike bases as shown, with the indented surface facing up to receive the spike point.


If you do not use the spike bases when placing the speakers, the spikes may cause damage to the floor. If you plan on using the spikes we highly recommend to use the spike bases.

Important
- It is very dangerous to try and set the spike while tilting the speaker. Be sure to place the unit on a soft area (such as a blanket) so that it does not damage the floor, and carry out the installation with at least two people.
Using the non-skid pads
To assure stable installation, affix the non-skid pads to the bottom surface of the speaker base.
natural_image
Diagram of a container with internal compartments and directional arrows indicating movement (no text or symbols)Attaching/removing the grille
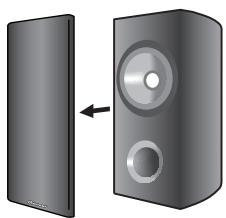
This speaker system comes with grille which may be attached and removed by:
1 To attach the grille, align the grille with the speaker body and press gently.
2 To remove the grille, hold the grille with both hands near the middle and pull gently toward you to separate the grille from the speaker.
natural_image
Diagram showing a speaker with an arrow pointing to the front panel (no text or symbols present)
Caution
- Magnets are used for holding the grille in place. Do not place the grilles near devices that may be susceptible to magnetic influence (CRT televisions, etc.).
Connections
This speaker does not include speaker cables used for connecting to an amplifier.
text_image
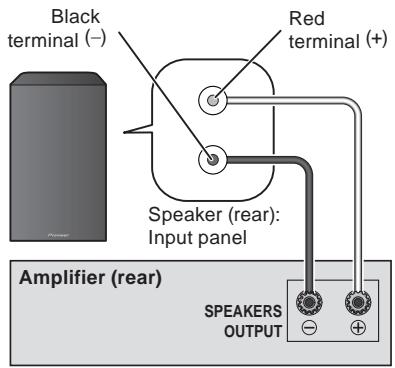
Black terminal (—) Red terminal (+) Speaker (rear): Input panel Amplifier (rear) SPEAKERS OUTPUTConnecting the cables
1 Switch off the power to your amplifier.
2 Connect the speaker cables to the input terminals on the back of the speaker. For input terminal polarity, red is positive (+) and black is negative (−).
Loosen the knobs on the input terminals and insert the speaker cable wires into each of the terminal post holes, then tighten the knobs.
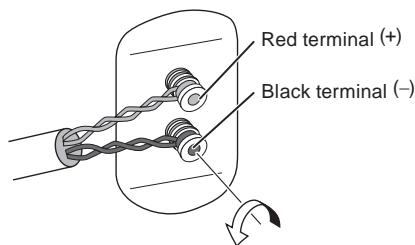
text_image
Red terminal (+) Black terminal (−)3 Connect the other ends of the cables to the amp's speaker output terminals (for more details, refer to your amp instruction manual).
- You can also connect the speaker's terminals with a banana plug. When using a banana plug, be sure to remove the cap at the tip of the input terminal.
- After connecting the plugs, pull lightly on the cables to make sure that the ends of the cables are securely connected to the terminals. Poor connections can create noise and interruptions in the sound.
- If the cables' wires happen to be pushed out of the terminals, allowing the wires to come into contact with each other, it places an excessive additional load on the amp. This may cause the amp to stop functioning, and may even damage the amp.
- When using a set of speakers connected to an amplifier, you won't be able to obtain the normal stereo effect if the polarity (+, −) of one of the speakers (left or right) is reversed.
CAUTION
These speaker terminals carry HAZARDOUS LIVE voltage. To prevent the risk of electric shock when connecting or disconnecting the speaker cables, disconnect the power cord before touching any uninsulated parts. D3-4-2-2
D3-4-2-2-3_A_En
Specifications
Enclosure.... Bass-reflex bookshelf type
Configuration 2-way
Woofer/Tweeter . . . Coaxial unit: 13 cm (5 ^1/_8 in.) cone/2.5 cm (1 in.) dome
Impedance....6Ω
Frequency response 40 Hz to 50 kHz
Sensitivity. 84.5 dB (2.83 V)
Maximum input power 130 W
Crossover frequency....2 kHz
Exterior dimensions ..... 190 (W) mm x 350 (H) mm x 280 (D) mm
7^4/8 (W) in. × 13^13/16 (H) in. × 11^1/_16 (D) in.
Weight 7.9 kg (17 lbs 7 oz.)
Supplied accessories
Spikes. 6
Spike bases 6
Non-skid pads 8
Grille....2
Cleaning cloth (S-81B-LR-K only) 1
Operating instructions

Note
- The S-81B-LR is shipped with two speaker systems included.
- Specifications and design subject to possible modification without notice, due to improvements.

is a trademark placed on a product with Pioneer's Phase Control technology. This technology enables high-grade sound reproduction through each component by improving overall phase matching.
Published by Pioneer Corporation.
Copyright © 2008 Pioneer Corporation.
All rights reserved.
For U.S. model


Dear Customer:
Selecting fine audio equipment such as the unit you've just purchased is only the start of your musical enjoyment. Now it's time to consider how you can maximize the fun and excitement your equipment offers. This manufacturer and the Electronic Industries Association's Consumer Electronics Group want you to get the most out of your equipment by playing it at a safe level. One that lets the sound come through loud and clear without annoying blaring or distortion-and, most importantly, without affecting your sensitive hearing.
Sound can be deceiving. Over time your hearing “comfort level” adapts to higher volumes of sound. So what sounds “normal” can actually be loud and harmful to your hearing. Guard against this by setting your equipment at a safe level BEFORE your hearing adapts.
To establish a safe level:
- Start your volume control at a low setting.
- Slowly increase the sound until you can hear it comfortably and clearly, and without distortion.
Once you have established a comfortable sound level:
- Set the dial and leave it there.
Taking a minute to do this now will help to prevent hearing damage or loss in the future. After all, we want you listening for a lifetime.
We Want You Listening For A Lifetime
Used wisely, your new sound equipment will provide a lifetime of fun and enjoyment. Since hearing damage from loud noise is often undetectable until it is too late, this manufacturer and the Electronic Industries Association's Consumer Electronics Group recommend you avoid prolonged exposure to excessive noise. This list of sound levels is included for your protection.
Decibel
Level Example
30 Quiet library, soft whispers
40 Living room, refrigerator, bedroom away from traffic
50 Light traffic, normal conversation, quiet office
60 Air conditioner at 20 feet, sewing machine
70 Vacuum cleaner, hair dryer, noisy restaurant
80 Average city traffic, garbage disposals, alarm clock at two feet.
THE FOLLOWING NOISES CAN BE DANGEROUS UNDER CONSTANT EXPOSURE
90 Subway, motorcycle, truck traffic, lawn mower
100 Garbage truck, chain saw, pneumatic drill
120 Rock band concert in front of speakers,
thunderclap
140 Gunshot blast, jet plane
180 Rocket launching pad
Information courtesy of the Deafness Research Foundation.


S001_En
natural_image
Simple line drawing of a container with rotating buttons and a circular top (no text or symbols)natural_image
Simple line drawing of a container with internal compartments and directional arrows (no text or symbols)natural_image
Two black speaker units side by side, one with a circular lens and the other with a rectangular head (no text or symbols visible)
Attention
Publication de Pioneer Corporation.
© 2008 Pioneer Corporation.
natural_image
Diagram of a container with two circular objects and curved arrows indicating flow or movement (no text or symbols)natural_image
Simple line drawing of a container with internal circles and arrows indicating flow or movement (no text or symbols)natural_image
Diagram showing a speaker with two speakers and an arrow indicating sound direction (no text or symbols)
Vorsichtshinweise
natural_image
Diagram of a container with rotating ports and directional arrows indicating flow or movement (no text or symbols)natural_image
Simple line drawing of a container with internal compartments and directional arrows (no text or symbols)natural_image
Diagram showing a speaker with an arrow pointing to the front panel (no text or symbols present)
Attenzione
Copyright © 2008 Pioneer Corporation.
natural_image
Diagram of a container with rotating ports and arrows indicating flow or movement (no text or symbols)natural_image
Simple line drawing of a container with internal compartments and directional arrows (no text or symbols)natural_image
Diagram showing a speaker with two speakers and an arrow indicating sound direction (no text or symbols)
Let op
Copyright © 2008 Pioneer Corporation.
natural_image
Diagram of a container with rotating ports and arrows indicating flow or movement (no text or symbols)natural_image
Simple line drawing of a container with internal compartments and directional arrows (no text or symbols)natural_image
Diagram showing a speaker with two speakers and an arrow indicating sound direction (no text or symbols)
Precaución
Copyright © 2008 Pioneer Corporation.
natural_image
Diagram of a container with rotating ports and directional arrows indicating flow or movement (no text or symbols)natural_image
Simple line drawing of a container with internal compartments and directional arrows (no text or symbols)natural_image
Diagram showing a device with a left-side panel and a right-side speaker tower (no text or symbols present)
Precaução
"Copyright" © 2008 Pioneer Corporation.
natural_image
Simple line drawing of a container with a lid and two hanging objects, no text or symbols present.natural_image
Simple line drawing of a container with internal compartments and directional arrows (no text or symbols)natural_image
Diagram showing a speaker with an arrow pointing to the front panel (no text or symbols present)
Observera
Copyright © 2008 Pioneer Corporation.
natural_image
Simple line drawing of a container with a lid and two hanging objects, no text or symbols present.natural_image
Simple line drawing of a container with internal compartments and directional arrows (no text or symbols)natural_image
Diagram showing a speaker with two speakers and an arrow indicating sound direction (no text or symbols)
Forsigtig
Published by Pioneer Corporation.
Copyright © 2008 Pioneer Corporation.
natural_image
Diagram of a container with rotating ports and curved arrows indicating flow or movement (no text or symbols)natural_image
Simple line drawing of a container with internal compartments and directional arrows (no text or symbols)natural_image
Diagram showing a speaker with an arrow pointing to the front panel (no text or symbols present)
Forsiktig
Opphavsrett © 2008 Pioneer Corporation.
Alle rettigheter reserververt.
natural_image
Pure diagram of a container with internal flow arrows and circular ports, no text or symbols presentnatural_image
Simple line drawing of a container with internal compartments and directional arrows (no text or symbols)natural_image
Diagram showing a device with a left-side panel and a right-side speaker tower (no text or symbols)
Huomautus
Copyright-oikeudet © 2008 : Pioneer Corporation.
natural_image
Diagram of a container with rotating ports and arrows indicating flow or movement (no text or symbols)natural_image
Simple line drawing of a container with internal compartments and directional arrows (no text or symbols)natural_image
Diagram showing a speaker with an arrow indicating sound direction (no text or symbols present)
Внимание
Издано Pioneer Corporation.
© Pioneer Corporation, 2008.
Все права защищены.
Примечание:
natural_image
Diagram of a container with rotating ports and directional arrows indicating flow or movement (no text or symbols)natural_image
Simple line drawing of a container with internal compartments and directional arrows (no text or symbols)護網的裝卸
natural_image
Diagram showing a speaker with two speakers and an arrow indicating sound direction (no text or symbols present)
注意
Published by Pioneer Corporation. Copyright © 2008 Pioneer Corporation. All rights reserved.
Publication de Pioneer Corporation.
© 2008 Pioneer Corporation.
PIONEER ELECTRONICS (USA) INC.
P.O. BOX 1540, Long Beach, California 90801-1540, U.S.A. TEL: (800) 421-1404
PIONEER ELECTRONICS OF CANADA, INC.
300 Allstate Parkway, Markham, Ontario L3R 0P2, Canada TEL: 1-877-283-5901, 905-479-4411
PIONEER EUROPE NV
Haven 1087, Keetberglaan 1, B-9120 Melsele, Belgium TEL: 03/570.05.11
PIONEER ELECTRONICS ASIACENTRE PTE. LTD.
253 Alexandra Road, #04-01, Singapore 159936 TEL: 65-6472-7555
PIONEER ELECTRONICS AUSTRALIA PTY. LTD.
178-184 Boundary Road, Braeside, Victoria 3195, Australia, TEL: (03) 9586-6300
PIONEER ELECTRONICS DE MEXICO S.A. DE C.V.
Blvd.Manuel Avila Camacho 138 10 piso Col.Lomas de Chapultepec, Mexico,D.F. 11000 TEL: 55-9178-4270
K002_Ru