USER MANUAL CP-LX70 PIONEER
CP-LX 70 CP-LX 70 TS
Thank you for buying this Pioneer product. The speaker stands CP-LX70 and CP-LX70TS should only be used with the S-LX70-LR Pioneer speaker system. Please read through these operating instructions for proper assembly and use. After you have finished reading the instructions, put them away in a safe place for future reference.
Caution
- Pioneer is not responsible for any accidents or damage that result from improper installation, misuse or modification of the product, or natural disasters.
- Only use the screws supplied when fixing the speaker to the speaker stand. Speakers may fall and incur damages if not fixed in place properly.
- Only use Pioneer S-LX70-LR Speakers with this stand. Other speakers may not balance properly, causing them to fall and potentially injure persons nearby.
- Be careful when assembling and moving the speaker stand, as it may cause damage or injury in the event of a fall.
- Do not place the stand on an unstable and/or sloping surface. The stand and speaker may fall and cause injury.
Care of the speaker stands
- With normal use, wiping with a soft cloth should be sufficient to keep the stand clean. If necessary, clean with a cloth dipped in a neutral cleanser diluted five or six times with water, and wrung out well. Do not use furniture wax or cleansers. Never use alcohol, thinners, benzine, insecticide sprays or other chemicals on or near this unit since these will corrode the surfaces. When using chemically-treated cloths, be sure to carefully read their accompanying instruction manual.
Cleaning the speaker stand bases
- When cleaning the surface of the speaker stand bases, gently wipe with the cleaning cloth supplied with the speaker system S-LX70-LR.
- Wiping with a dusty or hard cloth, or applying too much force when wiping may result in scratching of the surface of the speaker stand base.
CAUTION
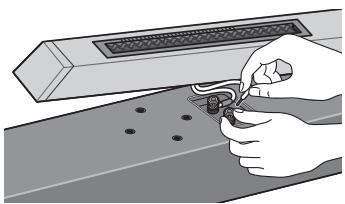
These speaker terminals carry HAZARDOUS LIVE voltage. To prevent the risk of electric shock when connecting or disconnecting the speaker cables, disconnect the power cord before touching any uninsulated parts.
Confirm your Accessories

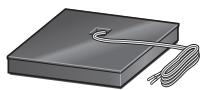
- Speaker security plate x 2


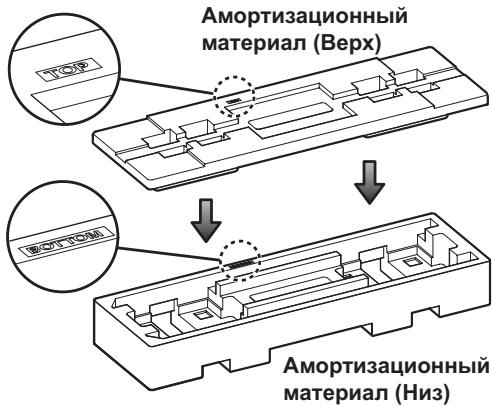
Illustrations of pillars and bases depict those for the CP-LX70. Those for the CP-LX70TS are similar, but of slightly different sizes.
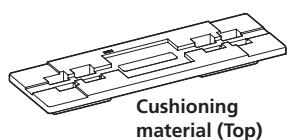
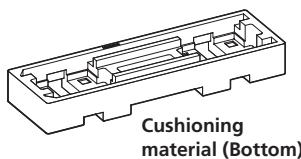
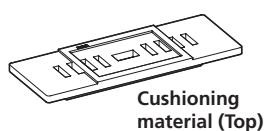
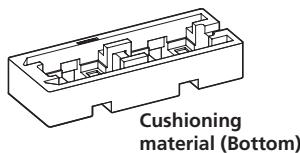
The Styrofoam cushioning material shown is used during assembly.
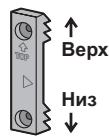
The pillars and speaker stand bases are designed with specific directional orientation for assembly. During assembly, make sure they are attached in the correct directions.
Installing the speaker stands
- Place the stand on a stable, level surface; placing the stand on an unstable surface can be dangerous.
When placing the speaker, keep in mind that the tone is affected by the position of the speaker.
If the bass is insufficient, move the speaker closer to the wall. The richest bass sound is obtained when the speaker is right against the wall. If the bass is too powerful, producing a muffled tone, move the speaker away from the wall. Placing the speaker against a thick curtain may also be effective.
Adjust the position as necessary to obtain optimal sound from your system.
Assembling the speaker stands
Make sure you assemble the stand on a flat surface that is relatively soft (such as a carpet).
A medium-sized Phillips screwdriver is required for assembly.
- The Styrofoam cushions are used during assembly.
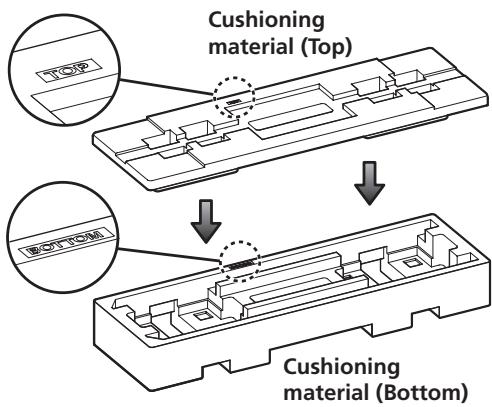
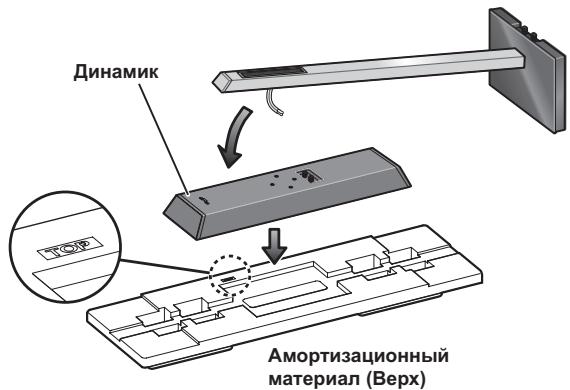
CP-LX70 only: Confirm that the surfaces with printing are facing upwards and oriented as shown, then align the top cushion on the bottom cushion as illustrated.
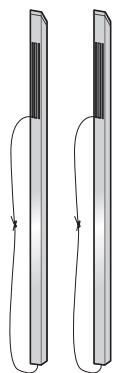
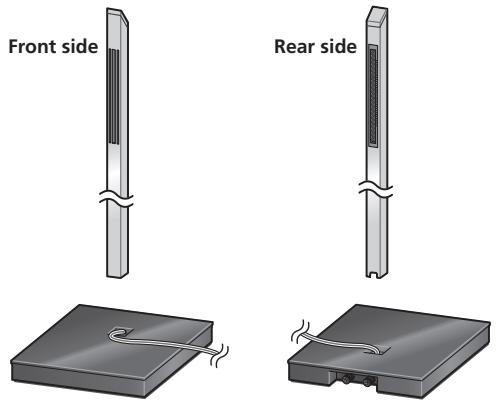
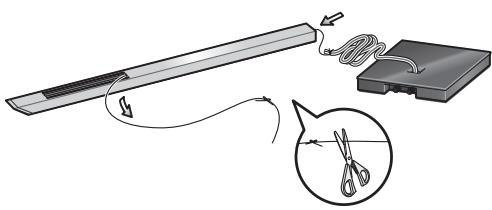
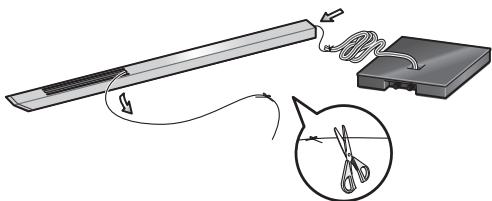
1 Run the speaker cable through the pillar and place the pillar onto the stand base.
Place the pillar on a flat surface and cut the string that is strung through the pillar. Tie the speaker cable coming out of the stand base to the end string at the bottom of the pillar. Pull the end of the string emerging from the top front side of the pillar to pull the speaker cable up through the pillar.
- Remove the string once the speaker cable is through the pillar.
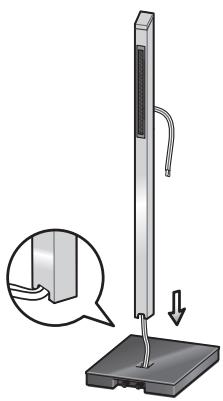
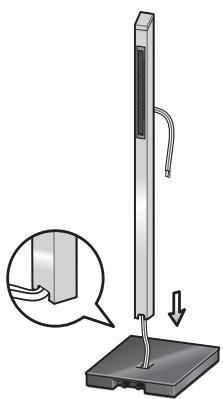
Next, stand the pillar upright and fit the bottom of the pillar into the stand base, making sure that the pillar is aligned with the hole in the stand base.
- When fitting the pillar into the stand base, make sure that the speaker cable comes through the groove on the bottom of the pillar and does not get pinched between the pillar and the stand base.
- Make sure not to scratch the surface of the stand base with the pillar, as the decorative laminate of the stand base may scar easily.
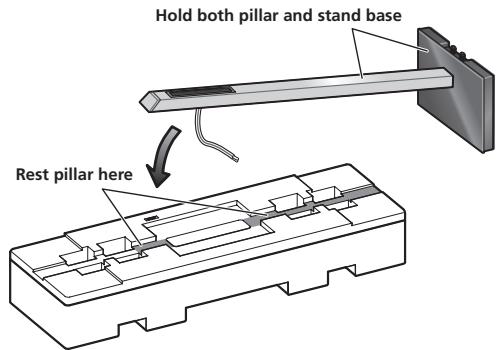
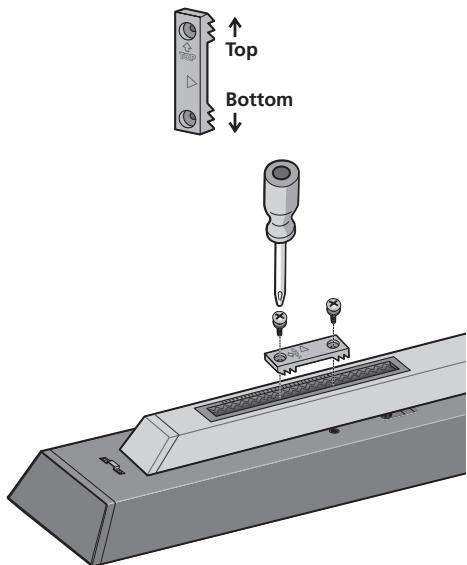
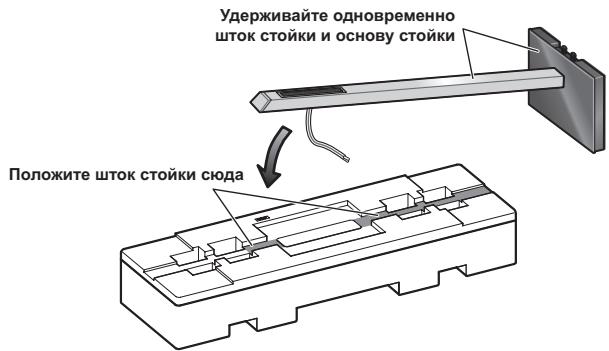
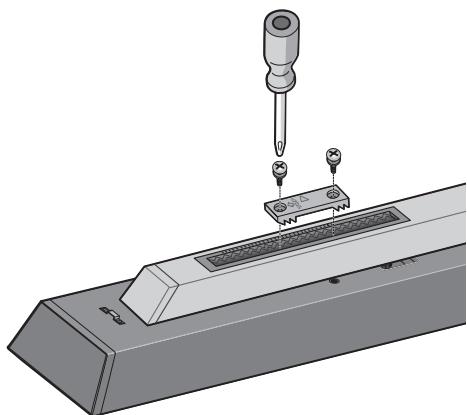
2 Securing the pillar onto the stand base.
While the pillar is fitted into the stand base, slowly place the stand onto the groove of the cushioning material (places indicated in the accompanying illustration) so that the rear side of the stand faces upwards (securely hold both the pillar and the stand base when doing this).
- Pillar and base for CP-LX70
- Pillar and base for CP-LX70TS
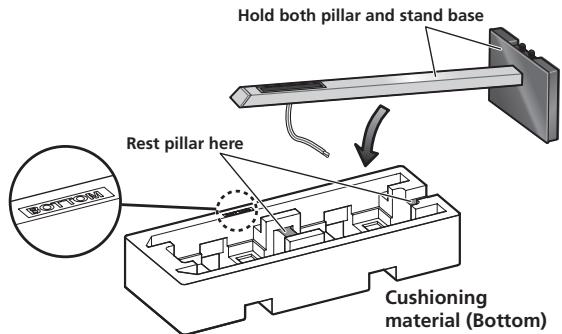
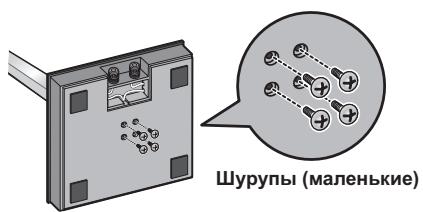
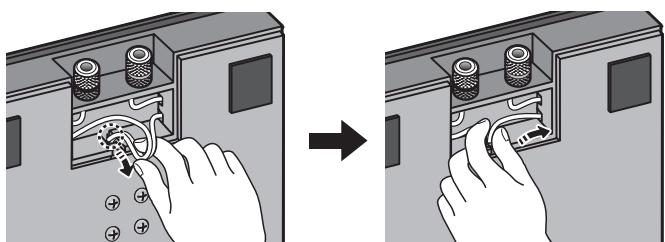
From the bottom side of the stand base, secure the pillar to the stand base by screwing in 4 supplied screws (small).
3 Adjust the length of the speaker cable.
Adjust the length of the speaker cable to suit the height at which the speaker is going to be installed. Viewing the height scale on the backside of the pillar, adjust the length of the exposed speaker cable using the following numbers as reference:
Scale: 0 Approx. 11 cm (4.3 in.)
Scale: 100 Approx. 15 cm (5.9 in.)
Scale: 170 Approx. 22cm (8.7 in.)
- To shorten the speaker cable, adjust the length by pulling the additional cable in the pillar from the hole in the bottom of the stand base, and then push that extra cable into the hole where the right or left cable passes, as shown in the illustration. If all of the extra cable cannot be pressed into the hole, store the remainder of the cable in the open space on the bottom of the stand base.

(When making the cord shorter)
4 Preparing to attach the speaker.
CP-LX70: Temporarily place the speaker stand upright, and detach the bottom cushion material, leaving only the top cushion on the floor. Place the speaker on the top cushion and place the speaker stand on top of the speaker.
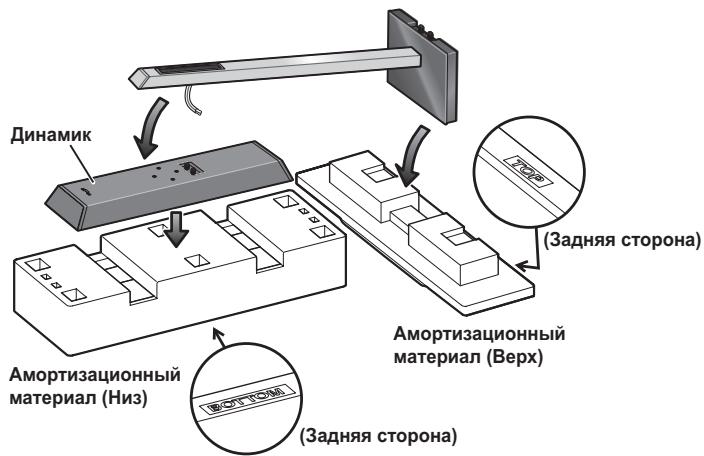
CP-LX70TS: Temporarily stand the speaker stand upright, then turn the bottom cushion material over and place the speaker on it. As shown in the illustration, turn the top cushion material sideways and orient it sideways to the stand, then rest the speaker stand assembled in step 2 on it.
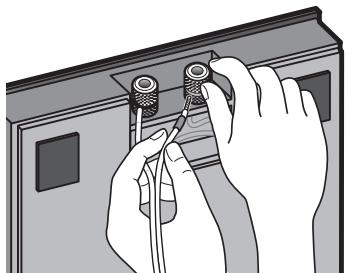
5 Connect the speaker cable to the speaker.
Pull the speaker cable through the front side of the pillar (the bottom side during assembly) and connect to the terminals located on the backside of the speaker.
- Connect the speaker cable with the marking to the (+) terminal, and the cable without the marking to the (-) terminal.
- If connecting the cords proves to be difficult, slightly move the position of the pillar and speaker.
6 Secure the speaker.
Once the speaker is placed in the installation position, pull the slack of the speaker cord and store in the bottom side of the stand base as shown in step 3.
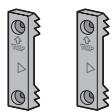
Next, place the speaker security plate on the pillar, and secure to the speaker using the supplied screws (large).
- The speaker security plates are designed with a directional orientation in which they are to be installed. Attach them so that the side printed with "TOP" is oriented toward the top of the speaker and pillar.
Caution
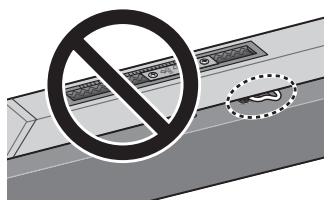
Confirm that the speaker cable does not become pinched between the pillar and the speaker.
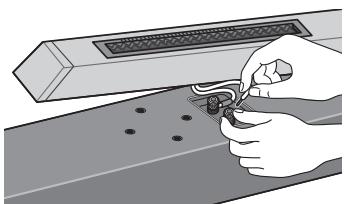
Connect the speaker cable to the amplifier
Connect the speaker cable to the terminals located on the rear side of the stand base.
1 Switch off the power to your amplifier.
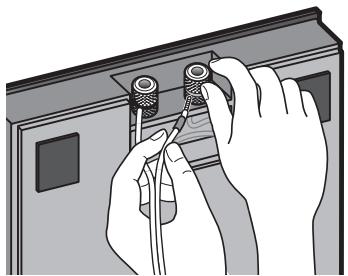
2 Connect the speaker cables to the input terminals on the rear side of the stand base. For input terminal polarity, red is positive (+) and black is negative (-).
3 Connect the other ends of the cables to the amp's speaker output terminals (for more details, refer to your amp owner's manual).
- Grasp the cap knobs on the lower input terminals and rotate them to the left (counter-clockwise), insert the speaker cable wires into the holes in the terminal posts, then tighten the knobs to secure the wires.
- You can also connect the stand base's terminals with a banana plug. When using a banana plug, be sure to remove the cap at the tip of the input terminal.
- If the cables' wires happen to be pushed out of the terminals, allowing the wires to come into contact with each other, it places an excessive additional load on the amp. This may cause the amp to stop functioning, and may even damage the amp.
- After connecting the plugs, pull lightly on the cables to make sure that the ends of the cables are securely connected to the terminals. Poor connections can create noise and interruptions in the sound.
- When using a set of speakers connected to an amplifier, you won't be able to obtain the normal stereo effect if the polarity (+,-) of one of the speakers (left or right) is reversed.
Placement
Finish the installation of the speaker systems in your room by standing them and their attached stands upright. Refer to the section "When Installing the Speaker Stands" on page 3.
- The bottom and top cushioning materials should not be discarded after assembly, but stored in a safe place.
Changing the Speaker Height
When changing the height of the speakers, reassemble the stand while referring to step 3 through 6 of "Assembling the Speaker Stand."
- Do not attempt to adjust the speaker height while the stand is upright. This could cause the speaker to fall, resulting in damage or personal injury.
Specifications
- CP-LX70 (floor stand)
External dimensions.271 mm (W) x 1067 mm (H) x 271 mm (D)
Weight. 8.9 kg
Supplied accessories
Pillars 2
Stand bases 2
Speaker security plates [SNN1069] 2
Screws (Large) [BMH50P350FBN] 4
Screws (Small) [BMZ40P200FTB] 8
These operating instructions [SRD6095] 1
Replacement part numbers
Non-skid pads [SEB1324]
Input terminal (red) [SKX1105]
Input terminal (black) [SKX1]
Top cushioning material [SHA2596]
Bottom cushioning material [SHA2597]
Rubber gasket material [SEC2155]
External packaging box [SHG6326]
Protective sheet (for stand base) [SHC1841]
Polyethylene bag (for screws and speaker security plates)
[SHL1460]
Polyethylene bag (for connection cables) [SHL1296]
Polyethylene bag (for Operating Instructions) [SHL1295]
Polyethylene bag (for pillars) [SHL1426]
The product numbers are listed above in square brackets.
- CP-LX70TS(tabletop stand)
External dimensions.225 mm (W) x 681 mm (H) x 225 mm (D)
Weight. 5.9 kg
Supplied accessories
Pillars 2
Stand bases 2
Speaker security plates [SNN1069] 2
Screws (Large) [BMH50P350FBN] 4
Screws (Small) [BMZ40P200FTB] 8
These operating instructions [SRD6095] 1
Replacement part numbers
Non-skid pads [SEB1324]
Input terminal (red) [SKX1105]
Inputter terminal (black) [SKX1106]
Top cushioning material [SHA2599]
Bottom cushioning material [SHA2600]
Rubber gasket material [SEC2155]
External packaging box [SHG6327]
Protective sheet (for stand base) [SHC1841]
Polyethylene bag (for screws and speaker security plates) [SHL1460]
Polyethylene bag (for connection cables) [SHL1349]
Polyethylene bag (for Operating Instructions) [SHL1295]
Polyethylene bag (for pillars) [SHL1347]
The product numbers are listed above in square brackets.
- Specifications and design subject to possible modification without notice, due to improvements.

If you want to dispose this product, do not mix it with general household waste. There is a separate collection system for used electronic products in accordance with legislation that requires proper treatment, recovery and recycling.
Private households in the member states of the EU, in Switzerland and Norway may return their used electronic products free of charge to designated collection facilities or to a retailer (if you purchase a similar new one).
For countries not mentioned above, please contact your local authorities for the correct method of disposal.
By doing so you will ensure that your disposed product undergoes the necessary treatment, recovery and recycling and thus prevent potential negative effects on the environment and human health.
Rubber pakkingsmaterial [SEC2155]
Buitenverpakkingsdoes [SHG6326]
Rubber pakkingsmaterial [SEC2155]
Buitenverpakkingsdoos [SHG6327]
- CP-LX70TS (bordsstativ)
Yttermatt 225 mm (B) x 681 mm (H) x 225 mm (D)
Vikt 5,9 kg
Polyetylenbag (for bruksanvising) [SHL1295]
Polyetylenbag (for pelare) [SHL1347]
- CP-LX70TS (bordstativ)
Udvendige mål 225 mm (B) x 681 mm (H) x 225 mm (D)
Vaegt. 5,9 kg
Inngangsterminal (sort) [SKX1106]
Ovre stotpute [SHA2596]
Nedre stɒtpute [SHA2597]
Gummipakning [SEC2155]
Ytre emballasje [SHG6326]
Plastose (for soklene) [SHL1426]
Delenummerne er oppfört ovenfor i klammeparenteser.
- CP-LX70TS (bordstativ)
Inngangsterminal (sort) [SKX1106]
Vre stɒtpute [SHA2599]
Plastose (for Bruksanvising) [SHL1295]
Plastose (for soklene) [SHL1347]
- CP-LX70 (lattiateline)
Ulkoiset mitat 271 mm (L) x 1067 mm (K) x 271 mm (S)
Paino 8,9 kg
Vakiovarusteet
Pilarit. 2
Telinepohjat 2
IPOH3BOJCTBA KOMIIaHHN Pioneer. IIOkaJIyIcTa, O3HaKOMbTecb c
Hactoien Hnctpyknee IO KcIyataun, YTObI npaBnBHO co6paTb
HIOJIb3OBAtBcA H3JeJIHEm. IpoUHTaB INHCTpyKuHIO, coXpaHHTe ee B
HaJekHOM MeTe IJIa O6paIeHHN K HeB 6yDuIeM.
Вниманке
KOMIIaHnI Pioneer He Hecet OTBeTCTBHeHOCTH 3a JIO6bIe HeCuaCTHbIe CJIyAn HJIN yIIEp6, BO3HNKIIHne B pe3yJIbTaTe HENpaBnJIbHOY yCTaHOBKN, HENpaBnJIbHOJ 3KcNJIyATAuHN HJIN MOHΦHKaIHH N3DeJIHNA, a TaKKe IIpnpOJbIX KaTAcTpoΦ.
-ДяКрплійнгЯДИнHamнkaHa cTOМKeДИнHamнkaHcПЛьЗуНTeTOЛьКОпнlaIarmaБиЕШуPyПь. HeNAДжХОЗakрплійньeДИнHamнКMOrgyT yПаCTь H ПОВpeДNTbс.
CДанностайковиплььуITETOЛБКОДИНAMHKMODEJIIN S-LX70-LR npOH3BOJcTB Pioneer.ДугHeДИнAMHKMOrYT IOTepaIbYCTOuHBOCTb,HTO BbI3OBETHXIIaIeHHe,HTO,B CBOIO OYepeIb,MOKeTПнчHHITb TpaBMbl OKpyKaIOIIHM.
CobJIOaIte octopokHocTB npn c6OpKe HIN IepMeHHH CTOnKINHHAMKa, TAK KAC B CJIyuae IIaDeHnOHa MoKet HAHeCTN yIIepe6 HIN IIpHUNHTb TpaBMbl.
He IOMeIaIte CToIky Ha HeCyToHbIe H/HJIH HAKJOHHbIe IIOBepxHOCTN. CToIka H DnHaMnK MOrYt yIacTb H IIpHuHHITb TpaBMy.
YXoD 3a CToiKaMn DInHaMnKOB
B O6bIyHbIX yCJIOBHX 3KcIIiyaTaIHIN JIINIOJIePkaHnI YHCTOTbI cToIKN IOCTaTOUHO IPOITHPaTB ee MRAKO TKAHBIO.IPi HEO6XoIMMOCTH IIPOTpHTe MRAKO TKAHBIO,CMOeHHoB HEITpaJIbHOM MOIOIeM CpeICTBE,pa36abJIeHHOM IPIbTO HIN IIIeTbIO UacTAMN BOIb,I XopoIOO OTKaTOI. He NcIOJIb3yIte IIOJIPOJIb HIN MOIOIIHe CpeICTBA DIA ME6JIH. HNKOrJa He NCIOJIb3yIte CInPT,paCTBOPHTeJIH,6EHNH, INHCekTIuINHbIe paCIIbJIHTeJIH INIpyTHe XHMueCKHe BEIeCTBa HA HIN prJOM C DaHHbIM yCTpOCTBOM,IOCKOIbKY 3TO BBI3OBET KoppO3HIO IOBepxHOCTH.PiPi NOJIb3OBAHH CIIeINaJIbHbIMn CaJIΦeTKaMH, IPOIIHTaHHbIMN XHMueCKHM COCTaBOM,BHNMaTeJIbHO IIPOUHTHe IpiNJlaRaEMbIe K HIM HHCTpyKIIHN.
UcTka OCHOB CTOeK DInHaMnKOB
BbIOJIHJRA YIcTky IIOBepxHOCTN OCHOB cTOeK IINHaMnKa, octopOJXHO IIpoTnpaIte ee YIcTIIe TKAhBo, IIpHJaeraMoB B KOMIIJEKeTe IOCTaBKn AkyctHuecko ChCTeMbS-LX70-LR.
- IcIIb3ObaHHe rpr3HOH JINJ KcCTKoT TkaHH, a TaKKe IIpHIOJKeHHe H3JIHIIHeH cJIbI IIpH BbIIIOJIHeHH NcCTKN MoKeT cTaTB IIpHNUHOI IOBJIeHHa Na IOBepXHOCTN OCHOBb CTOHKN DnHaMHKa IapaiHH.
BHIMAHNE
EcIn CnCTema BKJIOUOHEA, npIKoCHOBHeHne K KOHTaKTam rpOMKOrOBOpnteNeI ONACHO.Bo n36exKaHne onaChocTn nopaxHnE 3JIeKTPnuCeKIM TOKOM pRi NODKJIuOHeHn ININ OTKnIOUeHN Ka6eNe I rPOMKOrOBOpnteNeI OTCOEINHnTe Ka6eNB nITaHnE, IpexKeJe HcM npIKacatbca K JIObblm Heu30JInpOBaHHbIM DeTaJAM.
YCTaHOBka CTOeK DnHaMnKOB
Pa3MeaIte cToIky Ha cTa6HJIbHOJ POBHOJ IOBepxHOCTH; pa3MeIeHNHe cToIKH Ha HeCTa6HJIbHOJ IOBepxHOCTH MOKET CO3JaBaTb OIIaCHOCTb.
BbIIOJIHЯIte c6OpKy cToIKN HaPoBHO,OTHOCTeJIbHO MrgKoI IOBepxHOCTN (HaIIpHMep,Ha KOBpe).
IIIy BbIIOJIHeHnIc6OpKn Tpe6yeTcKpIeTOO6pa3HaJ OTBepTKa cpeIHero pa3Mepa.
- IIpy BbIIIOJIHeHH c6OpKN HcIOJIb3yetyeTc IeHOIIJaCTOBbIe amOpTH3aIIOHHbIe IIOJYIIIKn.
TOnbkoIaCP-LX70:Y6eIHTecbBTOM,TOIOBepxHOCTN C OTIIeHATAHHbIMO6paIIeHb BBPx INOpHEHTPOBaHbIKAK3TO IOKa3aHOHaPcHyK,a3aTeM HAIJOKHTe BepXHIOIIOyIiKy Ha HHKHO,KA3TOIOKa3aHOHaPcHyK.
1 Pponyctnte Ka6eIb DnHaMka CKBO3b ITOK N BCTaBbTe ITOK BOCHOBY CToIKN.
ПлJOЖнTe ⅢТOK Ha ровью ПОВерхнocт b Ипepежы Te ПЮВOD, ПОПИУш�нBй CKBОЗ ⅢТOK. ПивьяЖнTe Ka6eЛь ДИНAMHka, ПОПИУш�нБй Chepe3 OTBерстп В OСHObE CTойК, K KOHДу ПЮВОДa с НЖнЧаСТН ⅢТOKa. ПOTЯнВу 3a KoHeи ПЮВОДa, ВIxOДиИIM N3 ВерхнЧаСТН ⅢТOKa, ПОПИУстпte Ka6eЛь ДИНAMHka CKBОЗ ⅢТOK сИИЗY BVEpX.
- OTBJHTE IIPOBOI, KOrJa Ka6eJIb IINHaMHKa 6yJeT IIpoIIuIeHCKBO3b IITOK.
3aTeM IIOCTaBbTE IIITOK BEpTHKaJIbHO IN BCTaBbTE OCHOBaHne IIIToKA B OCHOBY CTOIKN, y6eIINBIIINcB TOM, YTO IIITOK COBIIaJaT C IIa3OM B OCHOBE CTOIKN.
-Пиу установке в основу стойс слдпerte 3a tem,чтобь Kaбeль ДИнhamнka похоДЛ черз bbleMkyВОснOBаHHI ITOKA И He OKa3aJIcR 3aЖаТБIM MekdY IIItOKOM IN OCHOBОВ стойК.
- ByIbTe oCTOpOxHbI, YTO6bI He IIOIapAIIaTb IIITOKOM IOBepXHOCTb OCHOBbl CTOnKN, TaK KaK IeKopaTHBHO EIKpbITHe OCHOBbl CTOnKN JeIFKO IOBpeINrTb.
2 3aKpenJIeHHe wToKa Ha OCHOBE cToiKn.
Держа ШТOK Ha OСНОВе CTойК, MeДLEHNO ПОЛJOXнTe CTойКВ БыEMКY B aМOPТИЗАПОН"HОДУПЕК (MeCTa ПОКаЗаны Ha COПРОБДNTeJIbHOM pHCyHKe) TaKHM OБра3OM, YTOБь 3aДнЯЧаTs CBИЯ OБpaIIHe H BBERX (Прн ЗTom КрЕПКУ yДерЖиВай Te OДНOBРЕмEHNO I STOK И OCHOBY CTойК).
- IIToK H OcHOBa IJIa CP-LX70

Пинкрente ITOK K OCHOBE cToiKN, BCTaBb H 3aTayHyB 4 ПилагаembIX IIpyuIIa (KOPOTKHe) C HnKHe cTOPOHbI OCHOBbI cToiKN.
3 Otperynpyte dinyka6eI nnHaMka.
OtperyIHyIte IINHy Ka6eJIa DnHAMHKa B COOTBeTCTBNN C BVCOTOni, Ha KOTOpoi BbI IJIaHpyeTe yCTaHOBHTb DnHAMNK. CBepeSc co IIkaJIoB BVCOTbHa 3aIDHe CTOPoHE IITOKA, OtperyIHyIte IINHy OTKpbITOrO Ka6eJIa DnHAMHKa, PpH 3TOM HcIOJIb3yIte PpNBedeHHbIe HNKe 3NaueHHN dIIraPbKN:
IIkaJa:0 Ipi6JIa3.11cm
IIkaJa: 100 Ppi6JIIM3.15 cm
IIkaJa:170Ipi6JIIM3.22cm

UTo6bI yKOpOTHTb Ka6eJIb IINHaMnKa, OTepyJInpyuIte IIINHy, BtTgINBaI K6eJIb H3 IITOKa Upe3 OTBepCTne B HnKHeJuaCTN OCHOBbI CTOIKN, a 3aTeM BTOJIKHIne BtTByHTyIO uactb Ka6eJIb B OTBepCTne, Upe3 KOTOpoe IPOXoIH NTpaBBI NII JIeBBI Ka6eJIb, KAK 3TO IIOKA3aHO Ha PncyHKe. EcII INOJIHNHeJIbHO BtTByHTbIK Ka6eJIb He ydaetc IIOJIHOCTbIO Y6paTB B 3TO OTBepCTne, IepKHeCBO6OJHyIO uACTb Ka6eJIb B OTKpbItOM IpoCTpAChTBe B HnKHeJuaCTN OCHOBbl CTOnKH.
(При укорауншура)
4 NpIroTobKa K npKpeHHeHIO dHaMka.
CP-LX70:BpeMeHNOIOCTaBte cTOnKy DHHAMHKABBepTHKaJIbHOe IIOJIOKeHHe H y6epHTe HNKHIOO aMOPTH3aIHONHHU IOIyIKy,OCTabHB Na IIOJy TOJIbKO BepxHIOIOIIOyIKy. IIOJIOHTe DHHAMHK Ha BepxHIOIOIIOyIKy H IIOJIOKHTe cTOnKy DHHAMHK IOBepx DHHAMHKa.
CP-LX70TS:BpeMeHHO IOCTaBbTe cTOnKy IINHAMKa B BepTHKaJIbHoe IOJIOKeHHe, 3aTe IMePBEPHHTe HIXKHO IO aMOPTH3aIIOHOHYIO IOJyIIky IIOJIOKHTe Ha Hee INHAMK. KaI IOKa3aHO HA pHCyHKe, IOBepHHTe BepxHIO IO aMOPTH3aIIOHOHYIO IOJyIIky 6OKOM IpaIIIOJIOKHTe ee 6OKOM K cTOHKe, 3aTe MIOJIOKHTe Ha Hee cTOnKy IINHAMKa, co6paHHU O B IIIare 2.
5 PoiocoeHHnHe uHyp dHaAMKa K dHaAMKy.
BbTiHHTe Ka6eJIb DnHAMHka C JIINIEBOI CTOPHOI IITOKa (BO BpEmc6OpKN BHN3y) HIOIDCOEINHHTE eRO K KOHTAKTHbIM pa3'beMaM,paCIOJIOKeHHbIM B 3aJHei YactN DnHAMHka.
-ПоДсоeДИнHHTe Ka6eЛь ДИНAMнКа,ПОмeЧeHHьМТКоI,К ПОJOЖHTeJIbHOMy KOHTaKTy (+),а Ka6eЛь 6e3 MeTkn -К OТРиIATEJIbHOMy KOHTaKTy (-).
- EcIIN IIOKJIHOUHHe IPOBOIOB CIOJXHO BbIIOJIHNITb, CJeFGa H3MeHHTe IIOJOKeHHe IITOKA INHHAMHKa.
6 3aKpeNITe DnHaMnK.
IocJIe TOrO, KaK IINHAMNK 6yEt IOJIHOCTbIO HAXOINTbCBA IIIOJIOKeHHN yCTaHOBKn, BbIbepHTe CJIa6HHy IHHpya IINAMHKa H y6bepHTe JINIIHH N Ka6eJIb B OCHOBY cToiKN, KaK 3TO OINHcAHO B IIIare 3.
3aTeMaIOKHTe IJIacTHHy 3aKepeIJIeHnHaHHaMHKa Ha IIITOK H 3aKepeHTE C NMOIIbIoo IIpHJIaRaemBIX IIpyPiOB (JINHHBe).
Пл actHb3aKpeJIeHnIINHaMnKa IpeJHa3HaueHbI dIy yctaHOBKn B OIppeJeHHoOpHeTaaHn. YcTaHaBJIHBaIte Hx TaHM o6pa3OM, UTO6bI cToPOHa, Ha KOTopoI OTIEuHaTaHO CLOBO "TOP" bIJa opHeHTpOBAHa B HAnPabJIeHHBepXHe qactH dINHaMnKa nIITOKa.
BHMaHne
Y6eIHTecb B TOM, YTO Ka6eJIb INHAMHka He 3aJkaT MeKJy IITOKOM INHHAMHKOM.

IopcoeHHnTe Ka6eJIb DnHaMaKa K yCJInTeJIHO
ПолсоeиннгteKa6eJBДИнhamнkaКΚΟHTaKTHbIMpa3beMaM, paCIOJIOKeHHbIMB3aIHeN YaCTH OCHOBbl CTOKN.
1 OtknIOHTe nITaHne ycINITeIa.
2 POncOeHnHTe Ka6eJIN DnHaMnKa K BXoHbIM KOHTaKTHbIM pa3beMaM, pacNoIoxKeHHbIM B 3aJHeN qACTN OCHOBbI CToIKN. POnjPhocTb BXoHbIX KOHTaKTHbIX pa3BeMOB 06O3HaayetcCneJeUoIm 06pa3OM: KpacHbI - NoIOXHTeJIbHbI (+), YepHbI - OTPuataTeJIbHbI (-).
3 POnDCoeHNHTe DpyrHe KOHcbl Ka6eNei K BbIXoHDhIM KOHTaKTHbIM pa3beMaM (Ha DNHaMnK) ycHNTeJIa (3a POnDpO6HbIM ONCaHMe m ObaaauTeCb K INCTpyKuIam NO 3KcNpyataun Baawero ycHNTeJIa).
B3aIBHcB 3a roIOBKn Ha HnKHN KOnTaKTbIX pa3beMax, IOBepHnte HX BIEBO (IPOTHVB acoBOi CTpeJIKN); BCTaBBte IPOBOJa Ka6eJI INHAMHKa BOtBepCTHb KOnTAkTHbIX KJIEMMAX, 3aTeM 3aTAHNTe ROIOBKN, YTO6bl 3aΦHKcnpoBaTb IPOBOJa.
- IJIa IOJCOEINHHeHnK KOHTaKTbHbIM pa3bEmAM OCHOBbl CTOnKH BtAKKe MoKete HcIOJIb3OBAbTB BHJky IIteKePHoro («6aHaHOBOrO») THIIa. IIprn HcIOJIb3OBAHHn BnIKN IIteKePHoro THIIa, Heo6xoIhMo yJaJIHTb IToIobKN C BXOHNbIX KOHTaKTbHbIX pa3bEmOB.
- EcJH OTOIIeIIHe OT pa3bEmOB IIPOBOJa Ka6eJI cIyuaHIO BOIyT B KOHTAKM MeKJy co6oJ, 3TO CO3JAcT Upe3MePHyO IIOJIHNTeJIbHyIO HApY3KJy Ha yChJIInTeJIb. 3TO MOKeT IIpNBecTH N KapUHEHHO pa60tBJ N daKe IIOJOMKe yChJIInTeJIa.
-Послеспдсоeннннгштtenceлслгкапогитseзakбл,
чтобублuyбintься,чTO KOHцыkaбeллрочноержатCB
КоэтakThbIX pa3bemax.ПLOXOЛ KOHTaKT MOKet ctaTB IIpruHHO
ПОВБLEHнИshyMOBипрьвICTOROЗbyaHnN.
KorIa HcIOJIb3YeTc KOMIIJEKT DHHAMHKOB, IOIcOeIHHeHHbIX KO IHOMY yCHJINTEJIHO, BbI He CMOJKeTe IOJIyUHTb HopMaJIbHbI cTepeoOHnueckn 3ΦΦeKT, ecJIH IOJIpaHOCTb (+,-) IIOJKIIOHeHH OJHO rH INHaMHKOB (JIeBOrO HIn IIpaBOrO) HapyIeHa.
Pa3MeUeHne
3aBepiHTe yctaHOBky akyctHueckoi cHCTeMbI B KOMHaTe,IOCTaBHB INHAMKIN CToIKN, HA KOtOpbIX OHN 3aKpeIIJIeHbI, B BepTnKaJIbHOE IOJIOKeHne. CM. pa3JeI "YcTaHOBka cToEK dHAMHKOB" Ha cTp. 3.
BepxHIO HnKHO IO aOpTH3aIIOHHbIe IOnyIIKN He cJIeJyET Bb6paCbIBaTb IocJIe 3aBepIeHnIc6OpKn. CoxpaHITe HX B HaJIeXHOM MecTe.
U3MeHeHne BbICOTbI DInHaMnKOB
IJIH3MeHEHHBbICOTbI INHAMHKOBIOBTOPHO BbIIOJIHNTEc6OpKy, CJeJyOINCaHHBO IIIaRaX c 3 IIO 6 pa3JeJa "C6OpKa cToiKN IIHNAMHKA".
He IIbTaIteCb peYJInpOBAtB bICOTy INHaMnKa Ha cToIKe B BePTHKaJIbHOM IOJIOKeHHN.3TO MOKET IpiHBecTH K IaJeHHIO INHaMnKa, YTO MOKET IpiuHHHTb yIepe6 HIN TpaBMbl.
TexHnueckne xapaKtepncTnKn
- CP-LX70 (HanoJbHaA cToiKa)
a 6apHTbIe pa3MepbI.271 MM (III) x 1067 MM (B) x 271 MM (Γ)
Bec 8,9K
IocTabIeMbIe npHaJdJIeKHOCTN
IIToKn. 2
OCHOBBI cTOeK 2
IIaactHbI 3aKpeJIeHHaINHaMHKOB [SNN1069] 2
IIIpyPi (IINHHbIe) [BMH50P350FBN] 4
IIIpyPi (kopoTkHe) [BMZ40P200FTB] 8
Hactoian Hnctpykni np KcIyataa[SRD6095] 1
Homepa 3anachbix qacteyn 3amehbl
Поротивocковьзяшени полдддн [SEB1324]
BxOJHOI KOHTaKTbIy pa3bem (KpaCHbI) [SKX1105]
BxOJHOI KOHTaKTbIy pa3bEm (YeHbI) [SKX1106]
BepxHЯ amOpTH3aIHOHHa IIOyIIka [SHA2596]
HnKna amOpTn3aunOHna IOnyika [SHA2597]
Pe3HHOBbI IpOKJIaIOUHbI MaTePnaJI [SEC2155]
BHeIIHryIaKOBoUHna Kopo6ka [SHG6326]
3aunTHna npoklaJaKa (JIIaOCHOBbI cToiKN) [SHC1841]
BxOДнOH KOHTaKTHbI pa3bEm (YeHbI) [SKX1106]
BepxHra amOpTH3aIHOHHa IOnyIIka [SHA2599]
HnKna amOpTn3aunHOHa nOduIka [SHA2600]
Pe3HHOBbI IpOKJIaIOUHbI MaTePHaJI [SEC2155]
BHeIIHЯ yIpaKOBOuHaNa Kopo6ka [SHG6327]
3aunTHna npoklaJaKa (JIIaOCHOBbI cToiKn) [SHC1841]
Плнэтнлійовьй пakет (Для Шурупов Н плacrTHN 3akpeиlenь ДИнhamнКOB) [SHL1460]
Плнэтплесовьй пaket (Длиа сеоннштельнхкабilei)
[SHL1349]
IIOJIH3THJIeHObBI IaKet (JIIIA HNcTpkykUHN II OKcIIJIyataUN)
[SHL1295]
Плгэговь Палкет (Дяг Stokob) [SHL1347]
Homepa H3JeIIN IIpNBBeHeBb BBePxy KBAJaPaTHbIX cKo6kax.
TexHHueckHe xapaKtepeHCTKN H KOHcTpyKIIIM MOYrMeHrTbC8 6e3 IpeIaBapHTeJIbHO r yBeIDOMJIeHN B CBy3N C BHOCHMbIMN ycOBepHHeHCTBOBaHHaMH.

Ecnn Bbl Jeknaete Ytlnn3npoBaTb daHnoe n3dJIne, He Bbl6paBcBAIte Iero BMCTe C 06bUHbIM b6bTOBbIM MyCOPOM. CyueCTByET OTJebHna CnCTema C6opa NcNOJb3OBAHHbIX 3NeKTPoHHbx IN3dJIIN B COOTBeTCTBmN C 3aKHOJaTeBbCTBOM, KOTopar npEplnlaAet COOTBeTCTBtuOuiee o6paJeHne, BO3Bpat n nepepa60Ty.
YacThbIe KInHeNtbl-B CtpaHax-ThuHax EC, B UBeBicapnnn HOpBermn MoryT beCnPaTHo BO3BaPaaTb NcONoB3ObaHNHbIe 3JIeKTKPOHHbIe n3dEInna B COOTBeTCTByUOnue NyHKTb c6opaa nn Dnepy (pnp NOKynke CxOHO HorOBOr n3dEInna).
B ctpaHax, He nepeuecnleHHbIX BblIe, IJIЯ polnyeHnna INHΦopMaunIO npaBnIbHbIX cnOcO6ax yTNIIN3aUNn ObaPuaTeCb B COOTBeTCTByUOnne yUpeKdEHNIA.
IocTynar TAKIM O6pa3OM, Bbl MoKTe 6bItb yBpeHb I TOM, qTO yTnIN3npyEmbl npOyKT 6byET COOTBeCTByIOUm O6pa3OM o6pa6oTaH, nepeDaH B COOTBeCTByIOU m NpHK T npepa6oTaH 6e3 BO3MOXhBIX HeratNBbIX NocJeCTBm DnA OKpyKaIoUe CpeBIs n3DopOBBa JIODei.
Приимechanicals:
B cooTBeTCTBnC o CtaTbei 3aKoHa Pocnnckoi Φeepaun "O 3auiTe npab notpe6nte" n Yka3aHne IpaBnTeJIbCTBa Pocnnckoi Φeepaun N720 ot 16 nHOJ 1997 roJa Kopnpaun Pioneer Europe NV ycTaHaBnBaET ycNoBne Ha cJeDyUoIyI npOdoJnxTeJIbHocTb cPoka cLyXkbI OfniuaJIbHo NOCTabJIembIX Ha Pocnnckn pbIHOK TOBapOB.
Aydno n BnDeoo6OpyDobAHne: 7 let
Ipehenochoe aydnooobopyoBaHne: 6 jeT
Discover the benefits of registering your product online at http://www.pioneer.co.uk (or http://www.pioneer.eu).
PIONEER ELECTRONICS (USA) INC.
P.O. BOX 1540, Long Beach, California 90801-1540, U.S.A. TEL: (800) 421-1404
PIONEER ELECTRONICS OF CANADA, INC.
300 Allstate Parkway, Markham, Ontario L3R 0P2, Canada TEL: 1-877-283-5901, 905-479-4411
PIONEER EUROPE NV
Haven 1087, Keetberglaan 1, B-9120 Melsele, Belgium TEL: 03/570.05.11
PIONEER ELECTRONICS ASIACENTRE PTE. LTD.
253 Alexandra Road, #04-01, Singapore 159936 TEL: 65-6472-7555
PIONEER ELECTRONICS AUSTRALIA PTY. LTD.
178-184 Boundary Road, Braeside, Victoria 3195, Australia, TEL: (03) 9586-6300
PIONEER ELECTRONICS DE MEXICO S.A. DE C.V.
Blvd. Manuel Avila Camacho 138 10 piso Col.Lomas de Chapultepec, Mexico,D.F. 11000 TEL: 55-9178-4270
K002_B_En
Published by Pioneer Corporation.
Copyright © 2007 Pioneer Corporation.
All rights reserved.
Publication de Pioneer Corporation.
© 2007 Pioneer Corporation.