DR-U124X - CD Player PIONEER - Free user manual and instructions
Find the device manual for free DR-U124X PIONEER in PDF.

| Product Type | CD Player |
| Brand | Pioneer |
| Model | DR-U124X |
| Dimensions (W x H x D) | 420 mm x 110 mm x 280 mm |
| Weight | Approx. 4 kg |
| Power Supply | AC 230 V, 50 Hz |
| Power Consumption | 15 W (standby: <1 W) |
| Playback Formats | CD, CD-R, CD-RW |
| Audio Output | RCA analog stereo, optical digital |
| Headphone Output | 3.5 mm stereo jack |
| Remote Control | Included (CR2025 battery) |
| Disc Loading | Top-loading tray |
| Programmable Tracks | Up to 24 tracks |
| Repeat Modes | One, All, Shuffle, Program |
| Cleaning | Wipe with soft dry cloth; avoid solvents |
| Safety | Use only supplied power cord; keep away from moisture |
| Spare Parts / Repairability | Contact authorized Pioneer service center |
| General Information | User manual available as PDF from notice-facile.com |
Frequently Asked Questions - DR-U124X PIONEER
User questions about DR-U124X PIONEER
0 question about this device. Answer the ones you know or ask your own.
Ask a new question about this device
Download the instructions for your CD Player in PDF format for free! Find your manual DR-U124X - PIONEER and take your electronic device back in hand. On this page are published all the documents necessary for the use of your device. DR-U124X by PIONEER.
USER MANUAL DR-U124X PIONEER
Pioneer ^® New Media Technologies, Inc.
DR-U124X CD-ROM Drive
Note:
This DR-U124X Software Driver Installation Guide was written to be used with the latest Version 2.20 of the
Pioneer IBM-PC & Compatible
DOS/Windows Drivers
DR-U124X Software Driver Installation Guide
January, 1995
TRADEMARKS
Trademarked names appear throughout this manual. Rather than list the names and entities that own the trademarks or insert a trademark symbol with each mention of the trademarked name, the publisher states that it is using the names only for editorial purposes and to the benefit of the trademark owner with no intention of infringing upon that trademark.
COPYRIGHT
Copyright 1994 by Pioneer New Media Technologies, Inc.
All rights reserved. This document contains proprietary information which is protected by copyright. Under the copyright laws, this manual may not be copied in whole or in part, in any media format, without written permission from Pioneer New Media Technologies, Inc. except for normal use by the original buyer(s). This exception does not allow copies to be made for sale to others. Under the law, copying includes translating into another language or format. NOTE: Pioneer New Media Technologies, Inc. is a subsidiary of Pioneer Electronics Corp.
NOTICE
The information in this document is subject to change without notice. Pioneer New Media Technologies, Inc. makes no warranty of any kind with regard to this material. While every precaution has been taken in the preparation of this manual, Pioneer New Media Technologies, Inc. assumes no responsibility for errors or omissions. Neither is any liability assumed for damages resulting from the use of the information contained herein.
License Agreement
PIONEER ELECTRONIC CORPORATION SOFTWARE LICENSE AGREEMENT
I. GRANT OF LICENSE: Pioneer Electronic Corporation (PEC) grants you the right to use one copy of the enclosed software programs (the software) on a single terminal connected to a single computer (i.e. with a single CPU). You may not network the software or otherwise use it on more than one computer or computer terminal at the same time.
II. COPYRIGHT: The Microsoft MS-DOS CD-ROM Extensions Software is the property of Microsoft Corporation; and the Device Driver Software is the property of PEC. These software products are protected by the United States copyright laws and International treaty provisions. You must, therefore, treat the software like any other copyrighted material (e.g. a book or musical recording) except that you may:
- make one copy of the software solely for archival purposes
- you may transfer the software to a single hard disc provided you keep the original copy solely for backup or archival purposes.
If you reproduce the software for either of the reasons stated above, you must reproduce and include the copyright notice with the copy of the software. You may not copy the written materials accompanying the software.
III. OTHER RESTRICTIONS: You may not rent or lease the software, but you may transfer the software and accompanying written materials on a permanent basis provided you retain no copies and the recipient agrees to the terms of this agreement. You may not reverse engineer, decompile or disassemble the software.
IV. DUAL MEDIA SOFTWARE: If the software package contains both 3-1/2" and 5-1/4" discs, then you may use only the disks appropriate for your single-user computer. You may not use the other discs on another computer or loan, rent,
(continued on next page)
License Agreement (cont.)
lease or transfer them to another user except as part of the permanent transfer (as provided above) of all software and written materials.
V. YOU MAY NOT USE, COPY, MODIFY OR TRANSFER THE SOFTWARE, OR ANY COPY IN WHOLE OR IN PART, EXCEPT AS EXPRESSLY PROVIDED IN THIS LICENSE. ALL RIGHTS NOT EXPRESSLY GRANTED ARE RESERVED BY PEC.
U.S GOVERNMENT RESTRICTED RIGHTS
The Software and documentation are provided with restricted rights. Use, duplication, or disclosure by the Government is subject to restrictions as set forth in subparagraph (c)(1)(ii) of the Rights in Technical Data and Computer Software clause at DFARS 252.227-7013 or subparagraphs (c)(1) and (2) of the Commercial Computer Software — Restricted Rights at 48 CFR 52.227-19, as applicable. Contractor/Manufacture is Microsoft Corporation/One Microsoft Way/Redmond, WA 98052-6399, USA. This agreement is governed by the laws of the State of Washington.
Should you have any questions concerning this agreement, or if you desire to contact Pioneer Electronic Corporation for any reason, please write to:
PIONEER NEW MEDIA TECHNOLOGIES, INC.
2265 East 220th Street,
Long Beach, CA 90810, USA
PIONEER ELECTRONIC CORPORATION INDUSTRIAL SYSTEMS DIVISION
I.K. Building, 24-9 Kamiosaki 2-Chome, Shinagawa-Ku, Tokyo 141, JAPAN
Limited Warranty
Pioneer Electronics Corp, Inc. warrants that :
- The software will perform substantially in accordance with the accompanying written materials for a period of ninety (90) days from the date of receipt.
- The hardware which accompanies the software will be free from defects in materials and workmanship under normal use and service for a period of one (1) year from the date of receipt.
PEC makes no express or implied warranties, including and without limitation, the implied warranties of MERCHANTABILITY and fitness for a particular purpose, regarding the software. PEC does not warrant, guarantee, or make any representations regarding the use or the results of the use of the software in terms of its correctness, accuracy, reliability, currentness, or otherwise. The entire risk as to the results and performance of the software is assumed by you. The exclusion of implied warranties is not permitted by some states. The above exclusion may not apply to you.
CUSTOMER REMEDIES:
PECs entire liability and your exclusive remedy shall be, at PECs option to either:
- Return the purchase price; or
- Repair or replace the software or hardware that does not meet PEC's Limited Warranty and which is returned to PEC with a copy of the purchase receipt. This Limited Warranty is void if failure of the software or hardware is the result of an accident, abuse or misapplication. Replacement software or hardware will be warranted for the remainder of the original warranty period or thirty (30) days, whichever is longer. All hardware returned must be accompanied by a return authorization.
Limited Warranty (cont.)
(continued on next page)
NO LIABILITY FOR CONSEQUENTIAL DAMAGES “IN NO EVENT WILL PEC OR THEIR DIRECTORS, OFFICERS, EMPLOYEES, OR AGENTS BE LIABLE TO YOU FOR ANY CONSEQUENTIAL, INCIDENTAL, OR INDIRECT DAMAGES (INCLUDING DAMAGES FOR LOSS OF BUSINESS PROFITS, BUSINESS INTERRUPTION, LOSS OF BUSINESS INFORMATION, AND THE LIKE EVEN IF APPLE COMPUTER, INC OR PEC HAS BEEN ADVISED OF THE POSSIBILITY OF SUCH DAMAGES.” SOME STATES DO NOT ALLOW THE EXCLUSION OR LIMITATION OF LIABILITY FOR CONSEQUENTIAL OR INCIDENTAL DAMAGES, SO THE ABOVE MAY NOT APPLY TO YOU. PEC’S LIABILITY TO YOU FOR ACTUAL DAMAGES FROM ANY CAUSE WHATSOEVER, AND REGARDLESS OF THE FORM OF THE ACTION (WHETHER IN CONTRACT, TORT (INCLUDING NEGLIGENCE), PRODUCT LIABILITY OR OTHERWISE), WILL BE LIMITED TO \$50.
Table of Contents
-
INTRODUCTION 1 - 1
Set-Up and Driver Installation Overview....1 - 2 -
PRE-INSTALLATION NOTES....2 - 1
Back up diskettes....2 - 1
On-Line Help available during driver installation....2 - 2
Selection Methods ......2 - 3 -
DOS / WINDOWS DRIVER INSTALLATION PROCESS....3 - 1
Inspection Checklist ....3 - 1
Quick Installation 3 - 2
Quick Install Parameters....3 - 4
Operations Check 3 - 7
Using Your Pioneer CD-ROM Drive....3 - 8
Custom Installation Options....3 - 9
Installing more than one Pioneer CD-ROM Drive....3 -13
Using XDISC....3 -15
Multi Player Control (MPC) Program 3-15 -
QUESTIONS & ANSWERS....4 - 1
Appendices
Appendix A: Troubleshooting IBM-PC DOS / WINDOWS Driver Installation
Appendix B: Installation Overview — IBM PC & Compatibles
- Device Driver in CONFIG.SYS - Command Line Switches
- MSCDEX File in AUTO EXEC.BAT - Command Line Switches
Appendix C: Pioneer LaserFacts System
Appendix D: Pioneer Technical Resource Numbers
List of Figures
Figure 1 – DOS/WINDOWS Installer: Accessing On-Line Help ......2 - 2
Figure 2 - DOS/WINDOWS Installer: On-Line Help Screen ....2 - 2
Figure 3 – DOS/WINDOWS - Quick Install Process....3 - 2
Figure 4 - DOS/WINDOWS Installer: Main Menu ....3 - 3
Figure 5 - DOS/WINDOWS - Quick Install Default Settings ....3 - 3
Figure 6 - DOS/WINDOWS Installer: Select SCSI Host Adapter .....3 - 4
Figure 7 – “Select Correct SCSI Host Adapter” / Overview ......3 - 5
Figure 8 - DOS/WINDOWS Installer: To Begin Installation ....3 - 5
Figure 9 - DOS/WINDOWS Installer: Installation Complete ....3 - 6
Figure 10 – DOS/WINDOWS - Operations Check on Boot-Up ......3 - 7
Figure 11 – DOS/WINDOWS - Using the Pioneer CD-ROM Changer...3 - 8
Figure 12 – DOS/WINDOWS Installer: Custom Settings Menu ....3 - 9
Figure 13 – DOS/WINDOWS - Driver Parameters Menu....3 -10
Figure 14 – DOS/WINDOWS - MSCDEX Parameters Menu ....3 -11
Figure 15 - DOS/WINDOWS - SCSI ID Parameters Menu....3 -12
Figure 16 – DOS/WINDOWS - NOTICE Changes Not Saved ......3 -13
Introduction
Congratulations on the purchase of your new Pioneer CD-ROM Drive! The unit is packaged with floppy disks that contain device drivers necessary for installing the Pioneer CD-ROM Drive to in IBM-PC or compatible computer. The device drivers allow the CD-ROM Drive and the computer to communicate and exchange data. On the next page is a SET UP & DRIVER INSTALLATION OVERVIEW describing the steps to follow as you install the device driver software and begin using your Drive.
Also, carefully review the instructions in this manual prior to installing the software device drivers. Here is a synopsis of what you will find in each chapter.
Chapter 1 provides the Introduction to this Manual, a synopsis of subsequent chapters, and a Set Up & Driver Installation Overview.
Chapter 2 provides Pre-Installation Notes. This section recommends that you back-up the driver diskettes. It also explains conventions used in the manual and provides some tips for IBM-PC and Compatible computer users: Refer to Context-Sensitive ON-LINE Help during installation of drivers under DOS or Windows; Selection methods.
Chapter 3 provides an IBM-PC and Compatibles Driver Diskette Inspection Checklist; describes Quick Installation; Operations Check; Custom Installation Options; Installing more than one Pioneer CD-ROM Drive and using XDISC; Using the MPC utility included on the driver diskette.
Chapter 4 is Questions and Answers.
Set-Up & Driver Installation Overview
1) Install a SCSI host adapter (interface card) in the IBM PC or compatible computer, as per instructions from interface card Manufacturer.
2) With the computer power turned OFF, attach the proper SCSI cable, connecting the Pioneer drive to the computer SCSI interface card.
3) Set the SCSI ID number on the CD-ROM Drive. When it is the only device attached to an IBM or compatible computer, the factory-set SCSI ID at 0 should work just fine. Otherwise, set the SCSI ID to a number that is not used by any other device on the SCSI bus. NOTE: The Pioneer Installer for IBM-PC and compatibles will automatically search the SCSI bus and indicate the proper SCSI ID number, unless you over-ride this feature. See Chapter 3, page 3-14 for details.
5) Power-ON the computer and back-up the driver diskettes included with the Pioneer CD-ROM Drive.
4) Power-ON the Pioneer CD-ROM Drive.
6) Launch the Installer program included on the driver diskette. This will offer you a few simple options, then install the software drivers. See Chapters 3 for details.
7) Insert a CD-ROM disc, label side UP, into the disc tray and insert the disc try into the CD-ROM Drive. You are ready to use your Pioneer DR-U124X CD-ROM Drive.
8) Reboot your computer. Follow the "Operations Check" for IBM-PC and compatibles. If you encounter any difficulties, refer to Appendix A, Troubleshooting at the back of this manual.
Pre-Installation Notes
Back Up Diskettes
The license agreement that is enclosed with your Pioneer product allows you to make a backup of the driver diskettes, in case your originals become lost, damaged or corrupted. We strongly recommend that you take this precautionary step before you proceed with the installation of your software device drivers.
Your DOS operating system comes with a utility such as a [DISKCOPY] and/or [COPY] command which you can use to make a duplicate disk. Follow the instructions in your DOS manual. Once the files have been backed up, it's a good idea to date and label the disk.
On-Line Help for IBM-PC & Compatible INSTALLATION
The Pioneer IBM-PC DOS/WINDOWS installation software has an On-Line Help feature available from all of the installation menus. This Help feature can be accessed at any time by pressing the [F1] key. On-Line Help is context-sensitive, so the Help Dialog Box that appears after pressing [F1] is directly related to the item highlighted at the time you press the [F1] key. Abbreviated Help information appears in the bar at the bottom of the screen.
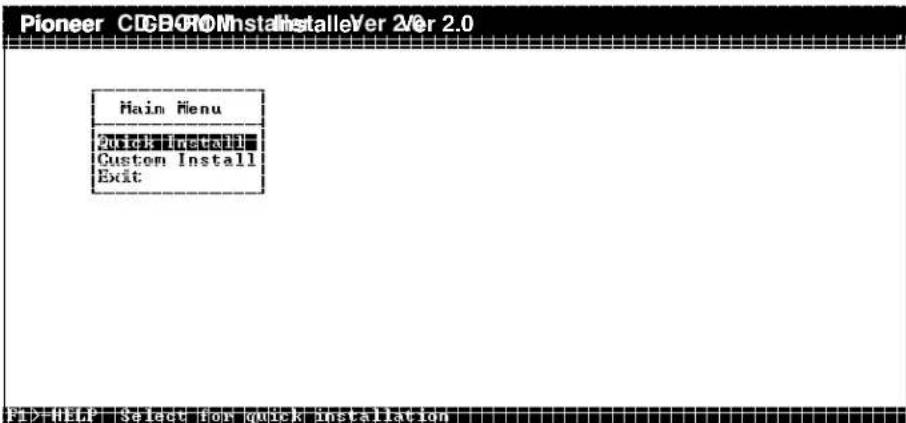
Figure 1 - DOS/WINDOWS Installer: Accessing On-Line Help
For example, if you press [F1] when the highlight bar is on the QUICK INSTALL line, the Help screen in Figure 2 will appear:
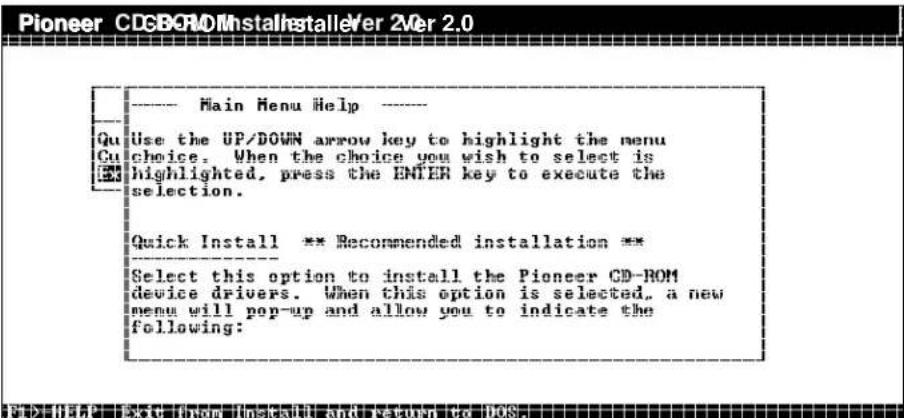
Figure 2 - DOS/WINDOWS Installer: On-Line Help Screen
Selection methods for IBM-PC & compatible users
The table below indicates how to select/deselect menu options and how to move around in the installation screens when installing the IBM-PC DOS/Windows drivers:
| Action Key Stroke | |
| Move to another Menu Use the Up and Down Arrow Keys or the [TAB] for selection Down [SHIFT-TAB] for Up until the correct menu selection becomes highlighted. You can also roll the mouse until the cursor appears on the line you wish to change, then click the left mouse button.Go back one Menu screenPress the “Esc” key or click the right mouse button. | |
| Edit a Menu selection There are four ways to edit a menu item:1. Press the [GREY +] sign on the keyboard number pad.2. Press the [SPACE BAR] then type the new entry.3. Press the [INS] key then type the new information.4. If you’re using a mouse, move the cursor over the selection you wish to change, Click the left mouse button, then type in the new information. | |
| Using the Mouse to make Click or Double Clicka Menu Selection | |
| Confirm the Menu Moving to the next line using the Down arrowkey willSelection confirm your selection. | |
| Bring up an adjacent Press the [SPACE BAR] or press the [F3] key.menu | |
| Confirm an Adjacent Press [ENTER].Menu selection | |
| Return to DOS Select “Exit” from the Installation Menu | |
| [F3] Accesses the Help Screens for currently highlighted item.(See page 2-2 for details about using On-Line Help.) | |
Conventions used in this manual
This Installation Guide uses the following conventions to help you interpret and follow the information provided as you install and use the device driver software:
| Characteristic Comment / Definitionand/or Key | |
| Bold Type Bold type represents a command which you must type. To carry out a command, type the bold-faced word(s) then press [ENTER].Example: If you are instructed to type A:, type the A, type the : (colon) then press the [ENTER] key. | |
| [ ] Square Square brackets are used to surround keys which you must press.brackets DO NOT type the square brackets. | |
| Function Keys Function keys which you must press appear in “non-bold faced” text,in square brackets. Example: Pressing the [F3] key will bring up an adjacent menu. | |
| Italics Italics are used to emphasize a point. Bold Italics are used whenBold Italics referencing another section in this book. | |
| SMALL CAPS BOLD SMALL CAPS in bold are used to indicate Menu Titles. | |
| ALL CAPS All Caps, without bold-faced print, indicate a menu selection to be made.NO BOLD | |
| [ENTER] “Press [ENTER]” means that you must press the ENTER key to confirm a menu selection. Some instructions in this manual do not tell you to “Press” ENTER, they simply state [ENTER]. In those instances, the word “Press” is understood. | |
| √ | The check mark is used to indicate a helpful hint or to note additional and pertinent information. |
DOS /WINDOWS device driver installation
Inspection Checklist / PC
Pioneer CD-ROM drives are packaged with a floppy disk containing software device drivers and the MSCDEX file for IBM-PC and compatible computers. The disk also contains an Installation program, Installation Help file, a file to load and remove the MPC control utility. Also included on the disk is XDISC, a program for use with Pioneer six disc changers that allows assignment of one drive letter to each daisy-chained Pioneer CD-ROM Changer. You do not need XDISC to use the Pioneer DR-U124X single disc drive or to daisy chain several DR-U124X units. Before you proceed with the installation, verify that you have the necessary files on the diskette:
Step 1: Exit your current computer application and go to the DOS prompt.
Step 2: Insert the diskette into the "A" or "B" drive.
Step 3: Type: DIR A: or DIR B: indicating the drive where the diskette has been inserted and press [ENTER]. C:>DIR A:
The following file names should be listed on the screen:
- INSTALL.EXE
- MSCDEX.EXE
- DRD600.SYS
- DRD60PS.SYS
- DRD60ASP.SYS
- INSTALL.CWA
- INSTALL.HLP
- MPC.COM
- MPCRMV.COM
- README.DOC
- XDISC.EXE
If your disk does not contain all of the files listed above, please contact your Authorized Pioneer Dealer or call the Pioneer Bulletin Board System using your computer, modem and computer software to obtain current drivers. (See Appendix D, Pioneer Technical Resource Numbers.) After you've verified the contents of the disk, proceed to the next page, QUICK INSTALLATION instructions.
Quick Installation
Installing software drivers so you can use your Pioneer CD-ROM Drive with your computer is easy! This flow chart details the installation process. If you are installing from the DOS prompt, follow the DOS instruction path on the left side of the chart. If you are installing from WINDOWS, follow the path on the right.
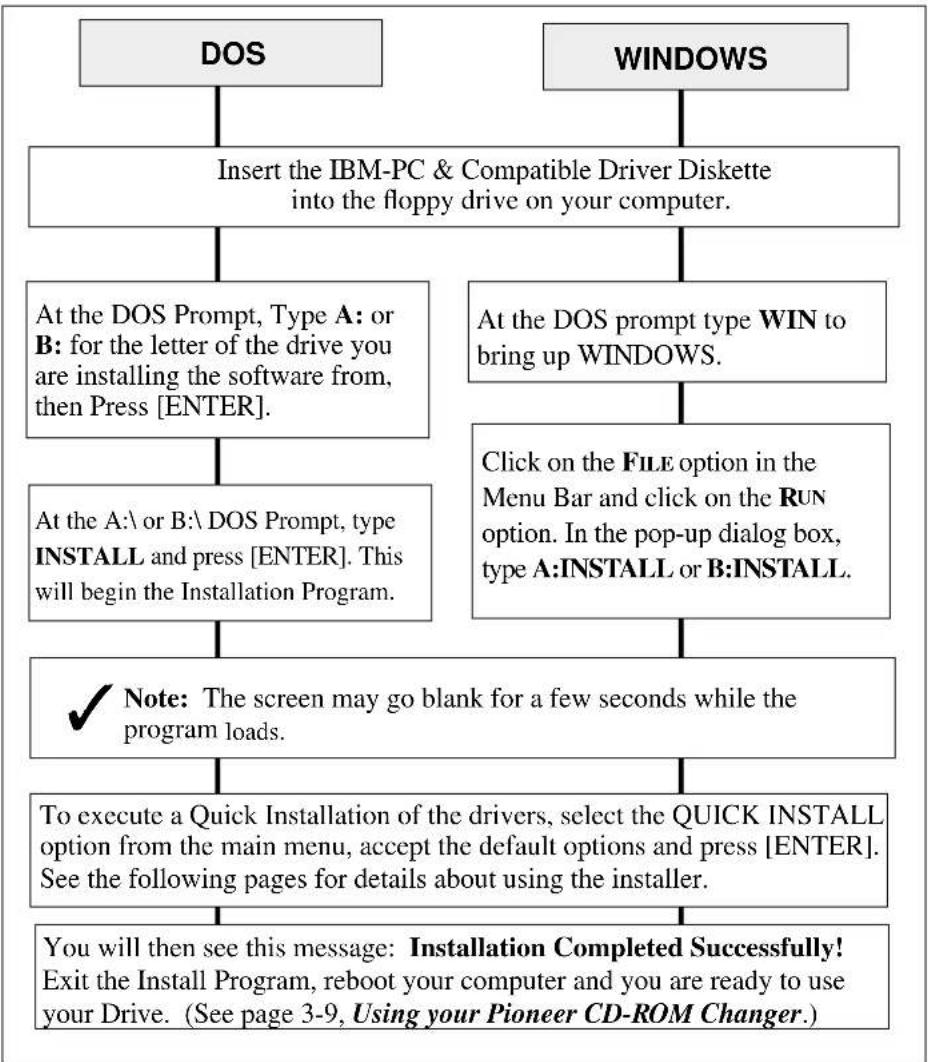
flowchart
graph TD
    A["DOS"] --> B["Insert the IBM-PC & Compatible Driver Diskette into the floppy drive on your computer."]
    C["WINDOWS"] --> D["At the DOS Prompt, Type A: or B: for the letter of the drive you are installing the software from, then Press [ENTER"].]
    C --> E["At the DOS prompt type WIN to bring up WINDOWS."]
    D --> F["At the A:\ or B:\ DOS Prompt, type INSTALL and press [ENTER"]. This will begin the Installation Program.]
    E --> G["Click on the FILE option in the Menu Bar and click on the RUN option. In the pop-up dialog box, type A:INSTALL or B:INSTALL."]
    F --> H["✓ Note: The screen may go blank for a few seconds while the program loads."]
    G --> H
    H --> I["To execute a Quick Installation of the drivers, select the QUICK INSTALL option from the main menu, accept the default options and press [ENTER"]. See the following pages for details about using the installer.]
    I --> J["You will then see this message: Installation Completed Successfully! Exit the Install Program, reboot your computer and you are ready to use your Drive. (See page 3-9, Using your Pioneer CD-ROM Changer.)"]
Figure 3 - DOS/WINDOWS - Quick Install Process
3-2 DR-U124X Software Driver Installation Guide
Click on QUICK INSTALL to bring up the QUICK INSTALL Parameters.
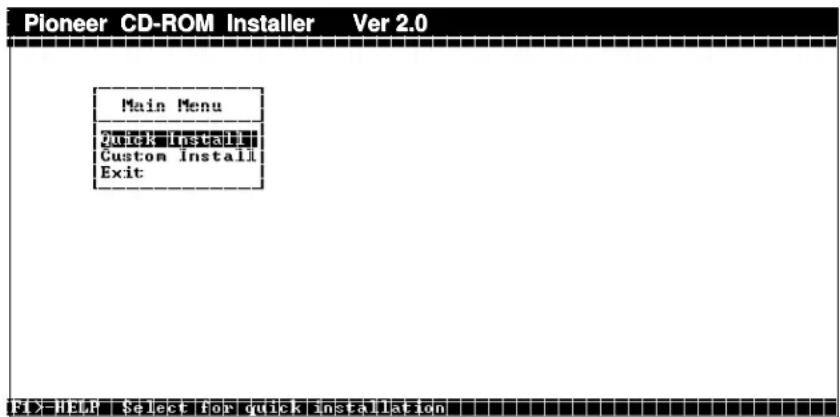
Figure 4 - DOS/WINDOWS Installer: Main Menu
The QUICK INSTALL parameters pop-up as an adjacent menu, as illustrated below:
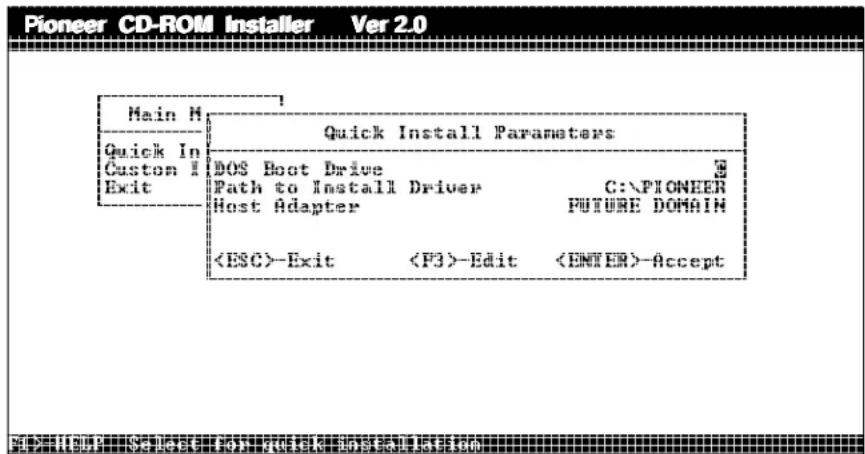
Figure 5 - DOS/WINDOWS - Quick Install Default Settings
These default settings are suitable for most computer configurations. If you need to change the settings, refer to the QUICK INSTALL Parameters on page 3-5.

NOTE: An Auto SCSI ID Search is built into the installation program. This searches the SCSI bus and automatically identifies the SCSI ID number set on the CD-ROM Drive.
DR-U124X Software Driver Installation Guide 3-3
Quick Install Parameters
The default settings work well with most computer configurations. Most basic changes can be made by modifying the Quick Install Parameters, as described below:
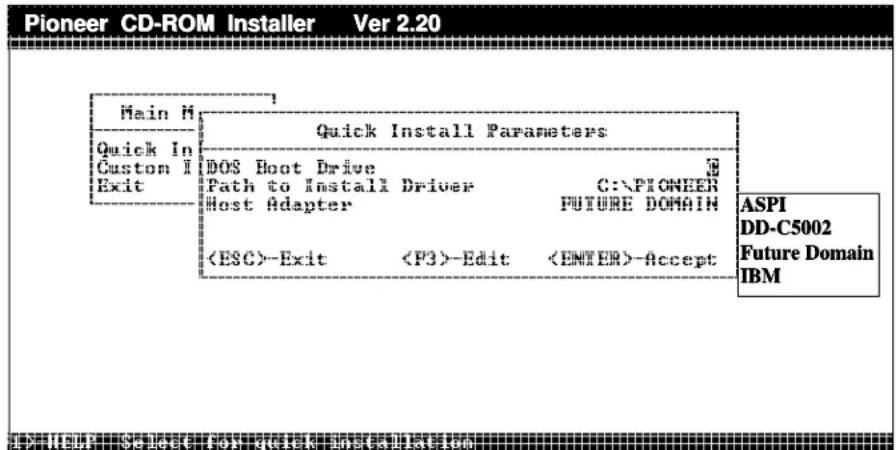
Figure 6 - DOS/WINDOWS - Select SCSI Host Adapter
Boot Drive - The drive from which MS DOS will boot.
The default DOS boot drive is C. To change the drive letter, highlight the menu selection for the DOS BOOT DRIVE, press the [F3] key to edit, type in the replacement drive letter and press the [ENTER] key.
Path - The directory path indicating where all the driver files will be copied. The default path is C:\PIONEER. To change the path, highlight the menu selection for PATH TO INSTALL DRIVER, press the [F3] key to edit and then type in the replacement path name.
SCSI host adapter - Indicates the adapter to which the CD-ROM Drive is connected. The default setting for the SCSI host adapter is Future Domain. Either accept the default selection or Press [F3] to bring up the adjacent menu that allows you to select a different host adapter. Use the UP or DOWN arrow keys, or a mouse to indicate the kind of SCSI host adapter you are using. See Figure 6.
Indicate the SCSI Host Adapter installed
If you are using a Future Domain SCSI Host Adapter, accept the default setting: Future Domain is highlighted. Press [ENTER].
If you are not using a Future Domain SCSI Host Adapter, press the [F3] key to bring up the adjacent menu and then, select the name of the host adapter (interface card) you are using, ASPI, DD-C5002, Future Domain, or IBM. NOTE: ASPI refers to ASPI compatible cards, such as Adaptec, etc.
Keyboard
Use the Up and Down arrow keys to highlight your selection then press [ENTER] to confirm.
Mouse
Click on the selection with the mouse. Double Click to accept, or press [ENTER].

Note: If you are using an ASPI Compatible host adapter, make sure you first load the ASPI Manager provided by the card manufacturer. The ASPI Manager must be loaded BEFORE the Pioneer drivers.
Figure 7 - Select Correct SCSI Host Adapter / Overview
To accept the QUICK INSTALL Parameters press the [ENTER] key from anywhere in the menu, or click on
Pioneer CDGBROMInstallstallever 2Ver 2.0
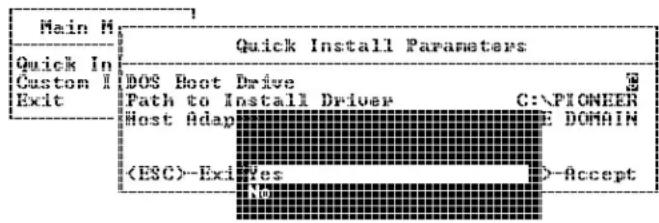
Figure 8 - DOS/WINDOWS Installer: To Begin Installation
If you are not satisfied with the options you chose, select NO. Then press the [Esc] key to go back one menu at a time. If you are satisfied with the options, select YES to start the installation. To abandon the installation, select EXIT, at the main menu.
After you select YES, the installation process will begin. While the program is installing the necessary files, a screen with "PLEASE WAIT" will blink.
Once the installation is complete, the following Dialog Box will appear:

Figure 9 - DOS/WINDOWS Installer: Installation Complete
To exit the installation program, follow these steps:
1: Press the [ESC] key twice to return to the main menu.
2: Press the Down ↓ arrow key to move to the EXIT menu selection and press [ENTER].
This Completes the Quick Installation
Note: If you choose CUSTOM INSTALL, you must still return to QUICK INSTALL, indicate which host adapter you are using, and then answer YES when prompted to execute the installation.
Operations Check
You will have completed a successful installation when:
• The Pioneer software drivers are installed;
- The CD-ROM drive is correctly connected to your computer; and
- Messages similar to those below appear on your monitor during boot up:
PIONEER CD-ROM DEVICE DRIVER VER x.xx for MSCDEX Ver. x.xx - IBM PC-XT/AT/AX PS/2/55, Future Domain Copyright (c) Pioneer Electronic Corporation. 1990-1994 Portion (c) 1986-1994 Future Domain Corporation Inquiry ID=0 : PIONEER CD-ROM DR-U124X XXXX
The LDP/CDP Device Driver for SCSI model Ver. 1.03 Copyright (c) Pioneer Electronic Corporation. 1990, 1991
C:>DOS\MSCDEX.EXE /D:MSCD000 /D:MSCD000 /E /M:4 MSCDEX Version 2.23 Copyright (C) Microsoft Corp. 1986-1993. All rights reserved. Drive E: = Drive MSCD000 unit 0
Figure 10 - DOS/WINDOWS - Operations Check on Boot-Up

NOTE: If the messages scroll by too quickly to read, you can pause the screen by quickly pressing [CTRL + S]. To continue with the boot up, press any key.

NOTE: If you performed a QUICK INSTALLATION, the Installation program will begin with the first available letter on your system. Drive Letter E is often selected as your beginning drive letter. Under CUSTOM INSTALL, you can select a different starting drive letter.

NOTE: Depending on your specific computer configuration, additional lines may be interspersed and some of the lines in the Operations Check
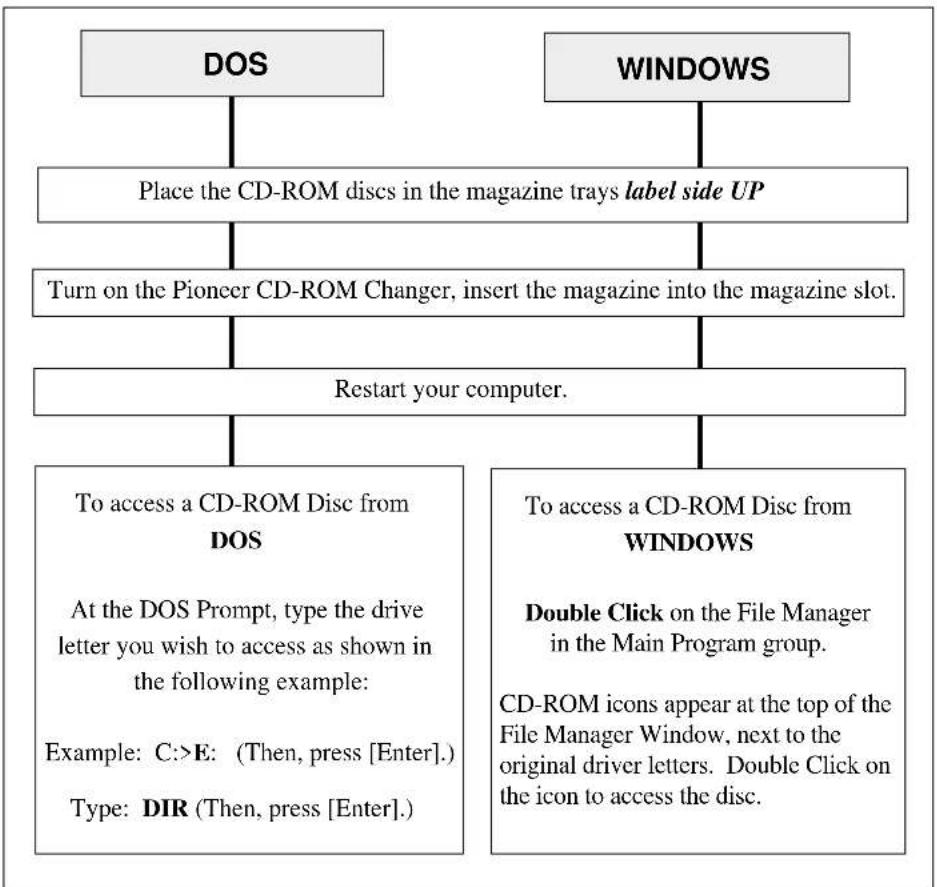
Using Your Pioneer CD-ROM Drive
You are now ready to use the Pioneer CD-ROM Drive connected to your computer system.
For use under DOS follow the instructions shown on the left side of the chart. For use under WINDOWS, follow the instructions on the right:
flowchart
graph TD
    A["DOS"] --> B["Place the CD-ROM discs in the magazine trays label side UP"]
    C["WINDOWS"] --> D["Turn on the Pioneer CD-ROM Changer, insert the magazine into the magazine slot."]
    B --> E["Restart your computer."]
    D --> E
    E --> F["To access a CD-ROM Disc from DOS\nAt the DOS Prompt, type the drive letter you wish to access as shown in the following example:\nExample: C:>E: (Then, press [Enter"].)\nType: DIR (Then, press["Enter"].)]
    F --> G["To access a CD-ROM Disc from WINDOWS\nDouble Click on the File Manager in the Main Program group.\nCD-ROM icons appear at the top of the File Manager Window, next to the original driver letters. Double Click on the icon to access the disc."]
Figure 11 - DOS/WINDOWS - Using the Pioneer CD-ROM Drive
Custom Installation Options
Select CUSTOM INSTALL if you are installing two Pioneer drives in a daisy-chained configuration, or if you want to indicate some specific changes to the driver to complement your specific system configuration. NOTE: You must return to QUICK INSTALL, indicate the type of host adapter you are using, then select INSTALL to complete a CUSTOM INSTALLATION.
Custom Settings
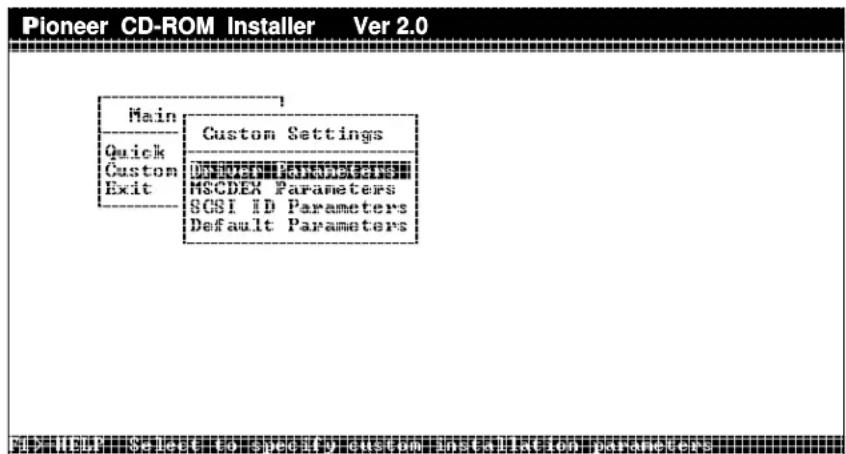
Figure 12 - DOS/WINDOWS Installer: Custom Settings Menu
Device Driver Parameters
This menu allows you to indicate the MSCDEX label name, Use EMS memory or Install Pioneer CDP support. (See page 3-10 for details.)
MSCDEX Parameters
The menu allows you to select MSCDEX parameters. (See pg. 3-11 for details)
SCSI ID Parameters
The Auto SCSI ID Search feature of the driver can locate up to seven daisy chained drives. There is no need to indicate SCSI IDs or number of discs installed using this menu. (See page 3-12 for details.)
Default Parameters
If you make any changes that you are not sure you want to include, select this option and all Custom Settings will be returned to their defaults. When the settings are returned to their defaults, the program returns to QUICK INSTALL. From there you have the option of installing or returning to the main menu to EXIT.
DR-U124X Software Driver Installation Guide 3-9
Device Driver Parameters

Figure 13 - DOS/WINDOWS - Driver Parameters Menu
MSCDEX Device Name
This is the label that will be declared in both the MSCDEX Device Driver line in the AUTOEXEC.BAT and the Pioneer Device Driver line in the CONFIG.SYS. The label name must match in both files.
Use EMS Memory
The drivers and MSCDEX can be loaded into Expanded memory by selecting this option. This will be indicated by the /E switch found in the device driver line of the CONFIG.SYS and in the MSCDEX driver line of the AUTOEXEC.BAT. See Appendix B for details: Driver Command Line Switches and MSCDEX Command Line Switches. If the computer does not have expanded memory, the drivers are loaded into conventional memory.
NOTE: If you are using a memory manager, you may need to reconfigure it after installation unless you switch the EMS Memory option to "NO".
Install Pioneer CDP Support
Installing this option allows the player to be controlled by CD Player Commands, See Pioneer LaserFacts Document #32 170, 4 pages. Refer to Appendix C, Pioneer LaserFacts System..
MSCDEX Parameters
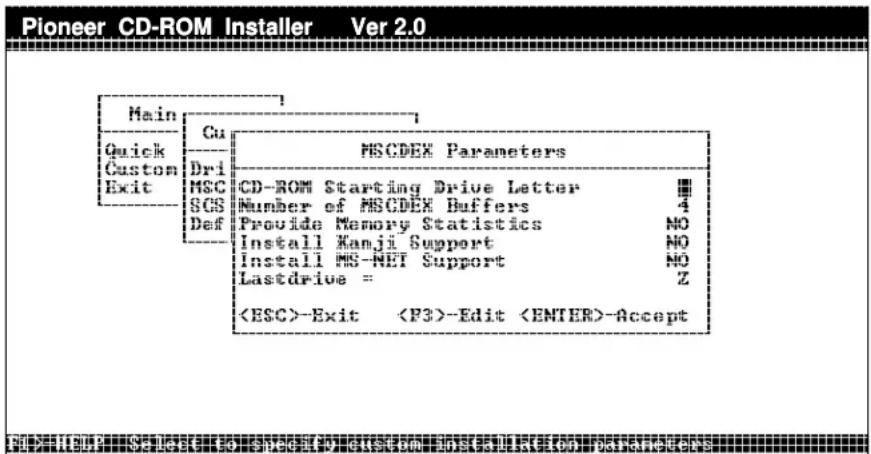
Figure 14 - DOS/WINDOWS - MSCDEX Parameters Menu
CD-ROM starting drive letter
This option allows you to indicate any letter after the hard drives, hard drive partitions, or network volumes as the drive letter for Pioneer CD-ROM drive, or as starting drive letter for individual discs in a Pioneer CD-ROM Changer. This letter is reflected in the /L: switch where the first drive letter is declared. For example: /L:H.
Number of MSCDEX Buffers
This sets the buffer size (caching) for each driver letter. Each buffer uses 2K of memory.
Provide Memory Statistics
Provides memory usage statistics on how much memory is used by buffers, memory resident code, and resident data.
Install Kanji Support
Tells MSCDEX to use Kanji file structures, if present.
Install MS-NET Support
Tells MSCDEX to patch DOS to allow sharing of CD-ROM drives on MS-NET based networks.
Last Drive =
Indicates the final drive letter to be installed. The default is Z.
SCSI ID Parameters
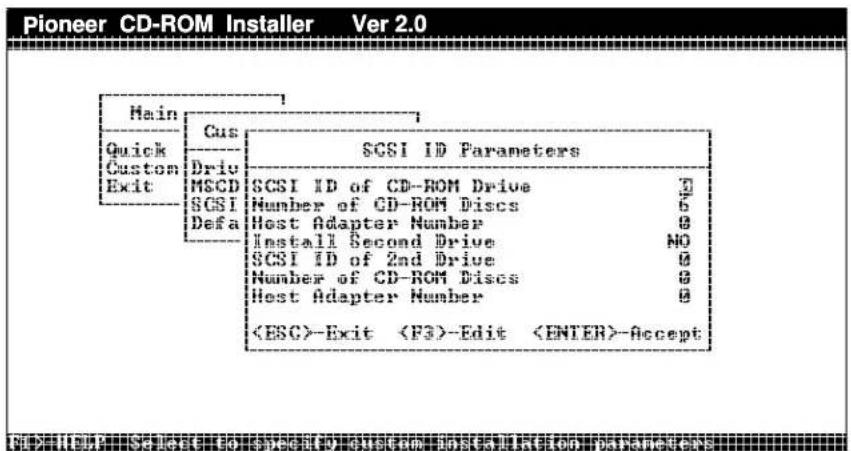
Figure 15 - DOS/WINDOWS - SCSI ID Parameters Menu
SCSI ID of Drive
This indicates the the SCSI ID of the first drive. (0-6). NOTE: Make sure the SCSI ID number entered here matches the number set on the back of the drive.
Number of CD-ROM Discs in 1st Drive
This indicates the maximum number of discs you will be accessing in the first, Pioneer drive installed on a SCSI bus. For the DR-U124X, this number must be 1.
Host Adapter Number
This indicates the ID of a host adapter to which the first drive is attached.
SCSI ID of 2nd Drive
This indicates the SCSI ID of a second, daisy-chained Pioneer drive. (0-6.) NOTE: This number must match the number set on the back of the second Pioneer drive on the SCSI chain.
Number of Discs in 2nd Drive
This indicates the maximum number of discs you will be accessing in a second, daisy-chained drive. For the DR-U124X, this number must be 1.
Host Adapter Number
This indicates the ID of a host adapter to which a second drive may be attached.
Notice – Changes Not Saved
This dialog box will appear whenever you select Custom Install, change some of the parameter settings, and then decide not to save them. It is basically warning you that the changes have not been saved and the default settings have been retained. When you press [ESC] you will be returned to the Main Menu, with QUICK INSTALL highlighted.
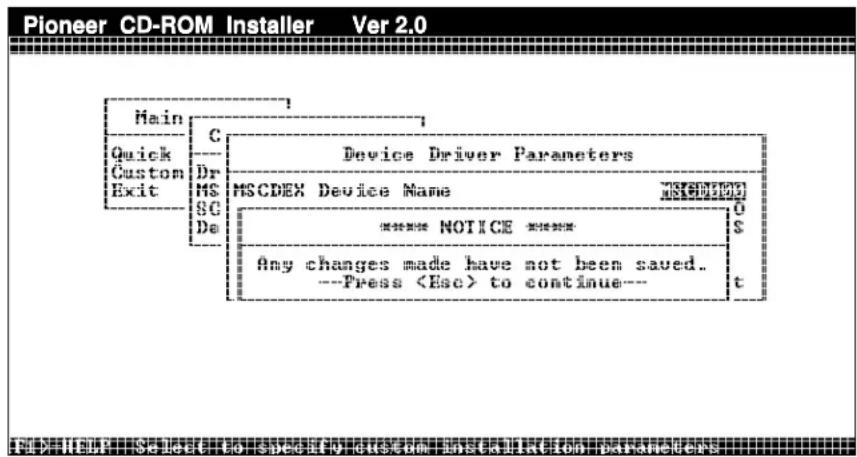
Figure 16 - DOS/WINDOWS - NOTICE Changes Not Saved
Installing More Than One Pioneer CD-ROM Drive
Two or more Pioneer drives can be installed on one SCSI chain by using the Pioneer device drivers for IBM-PCs and compatibles that ship with the unit. Use a 50 Pin SCSI ribbon cable to connect internal drives. Make sure the drives in the middle of the chain are not terminated and the last drive is terminated. Assign each drive it's own specific SCSI ID number.
The Pioneer device drivers contain an Auto SCSI ID Search feature that automatically finds the Pioneer drives on the SCSI chain and assigns the correct number of drive letters for the number of discs installed. (For the DR-U124X, set the SCSI ID using pins on the back of the unit. The number of discs installed, of course, is always one.) NOTE: Any combination of single or six-disc Pioneer CD-ROM drives can be daisy chained: DR-U124X, DRM-604X, etc.
Using XDisc to Assign Single Drive Letters to Each Drive
A special utility, XDISC.EXE, is included on the Pioneer Driver Diskette. It was written to allow a single drive letter to be assigned to Pioneer six-disc changers. If you edit the CONFIG.SYS file and then launch XDISC, one drive letter will be assigned for each Pioneer CD-ROM drive installed on the SCSI Chain. When daisy chaining only DR-U124X single disc drives, XDISC is not needed.
To daisy chain three drives, the DR-U124X, A Pioneer DRM-604X and a Pioneer DRM-602X and assign each drive a single drive letter, edit the CONFIG.SYS Pioneer Device Driver line so it includes an /N: parameter switch set to 0 for each drive.
DEVICE= C:\DEV\DRD600.SYS /D:MSCD000 /N: 0,0,0,0 /C:CDP
Then, activate XDISC by typing C:\PIONEER\XDISC. Once XDISC is launched, type XDISC (space) F (space) 3 to access the third disc in the changer assigned drive letter "F". NOTE: Do not set 0 and other numbers together as /N: settings. To use XDISC the /N: switch must be set to all 0s.
Multi Player Control (MPC) Program
MPC for DOS
The Multi Player Control v 1.2 is a memory resident “audio” remote control program for the Pioneer CD-ROM Drive. Multi Player Control operates the Pioneer CD-ROM Drive as a CD Player during execution of most programs on a PC. Multi Player Control consists of one file to make it resident in memory and another program to remove it from memory. Use MPC.COM to install Multi Player Control Program and use MPCRMV.COM to remove it from memory.
Install it by typing C:\Pioneer\MPC.COM. Once it is installed you can bring it up with the
You can also send direct commands to the player from within MPC. Select the Command function to make the command window pop up. Then type a specific mnemonic command string such as TR3SEPL
Calling MPC within Windows
This program can also be used in Windows. Run the Program Manager and open the MS-DOS Prompt icon. Read instructions and press
MPC for DOS Error Message:
"Device Driver Not installed. MPC Program is not resident"
MPC.COM will not install if the device driver is not installed or if the /C:CDP switch has not been included in the Pioneer device driver line. Check the Pioneer device driver line in the CONFIG.SYS to make sure that the Pioneer driver has been loaded and make sure the /C:CDP switch is at the end of the device driver line. Install the driver if it has not been installed, and/or type in /C:CDP at the end of the device driver line, if it is missing.
Failure to Remove MPC Program
If, for some reason, the MPC program is not removed When you type C:\Pioneer\MPCRMV.COM, don't worry. The next time you boot up our machine it will not appear.
Questions and Answers
Here are some common questions asked about Pioneer CD-ROM Drives.
What if there is no sound audible?
The disc is probably outputting Compressed Audio. This data needs to be transferred from the unit to the host computer for decompression and conversion to audio. Make sure you have a sound card installed to handle these tasks. If you do have a sound card installed and are still unable to hear compressed audio, check with the sound card manufacturer or disc publisher.
If the audio is CD-DA (Compact Disc-Digital Audio), it will be output through the headphone jack on the front of the unit, or through the audio connector on the back of the unit to an amplifier and speakers, powered speakers, or a sound board. To test that these connections have all been made properly, insert a compact audio disc (CD) into the disc tray, make sure the drivers are properly installed, then use MPC or Media Player under Windows to play the CD in the Drive.
Will a combination sound card/SCSI interface card work with Pioneer CD-ROM Drives?
A sound card with a SCSI interface included will work fine with Pioneer drives, as long as the SCSI card is ASPI compliant. Install the ASPI Manager that ships with the SCSI interface card, then install ASPI compatible drivers, Pioneer DRD60ASP.SYS. If possible, make sure the card is compatible with a 50 pin SCSI connector.
Can I use a Pioneer CD-ROM Drive with a sound card?
You can use the Pioneer units with any sound card as long as the card is supported by the actual software on the CD-ROM disc that you are using. Remember, if the CD-ROM disc uses compressed audio, you will need a sound card. Contact the CD-ROM disc publisher or distributor to find out what sound cards the product supports before you purchase a CD-ROM disc that includes compressed audio.
What should I do if the BUSY light flashes at one second intervals and the drive does not respond to commands?
This is a visual indicator from the drive that something is affecting the CD-ROM Drive's ability to perform. It may be a mechanical problem. Call Pioneer End-User Technical Support for more information. See Appendix D, Pioneer Technical Resource Numbers.
What should I do if the disc tray will not eject from the unit?
There are two possible causes of this symptom. One is that the software has locked the disc into the machine and will not let the user eject the disc. The other is that the user has set the last jumper pin to the left to ON, thereby disabling the eject switch on the front panel. In either case, to remove the disc, make sure that the last jumper switch is OPEN/OFF. Then turn your system OFF and back ON. This should allow the front panel eject button to work.
NOTE: If the disc still does not eject, call Pioneer End-User Technical Support. See Appendix D for Pioneer Technical Resource Numbers.
Troubleshooting IBM-PC DOS/WINDOWS Driver Installation
If the Pioneer CD-ROM Drive does not respond after running through the Operations Check on page 3-7 of this Software Installation Guide, note any error messages that may appear in the Inquiry ID line on boot up.
Error messages and how to correct them are described on individual pages of this Appendix as indicated below. If you do need to call for Pioneer End-User CD-ROM Technical Support (See Appendix D for Pioneer Technical Resource Numbers), please be prepared to describe any error messages and the contents of the CONFIG.SYS and AUTOEXEC.BAT files in your system. This will help Pioneer Industrial Representatives solve your problem more quickly.
1. Driver Error Messages page #
- SCSI interface card can't communicate with drive....A-2
- Timeout during selection phase....A-4
- Timeout waiting for initial bus free phase status phase or data phase ....A-5
- Characters on the Inquiry "ID=0" line are jumbled....A-5
- The “Inquiry ID=0 Pioneer CD-ROM DR-U124X” line is blank ......A-6
2. MSCDEX Error Messages
- CDR101 Not Ready Reading Drive D....A-7
- CDR 103 Disk is not ISO 9660 or High Sierra....A-8
- Device Driver Not Found....A-8
- Incorrect DOS Version....A-9
3. DOS Error Message
- Invalid Drive Specification ....A-9
4. Hardware Issues. What to do if.....
- The tray will not eject from the Drive....A-10
- The BUSY light flashes at one-second intervals and the drive does not respond to commands....A-11
- Boot problems ......A-11
flowchart
graph TD
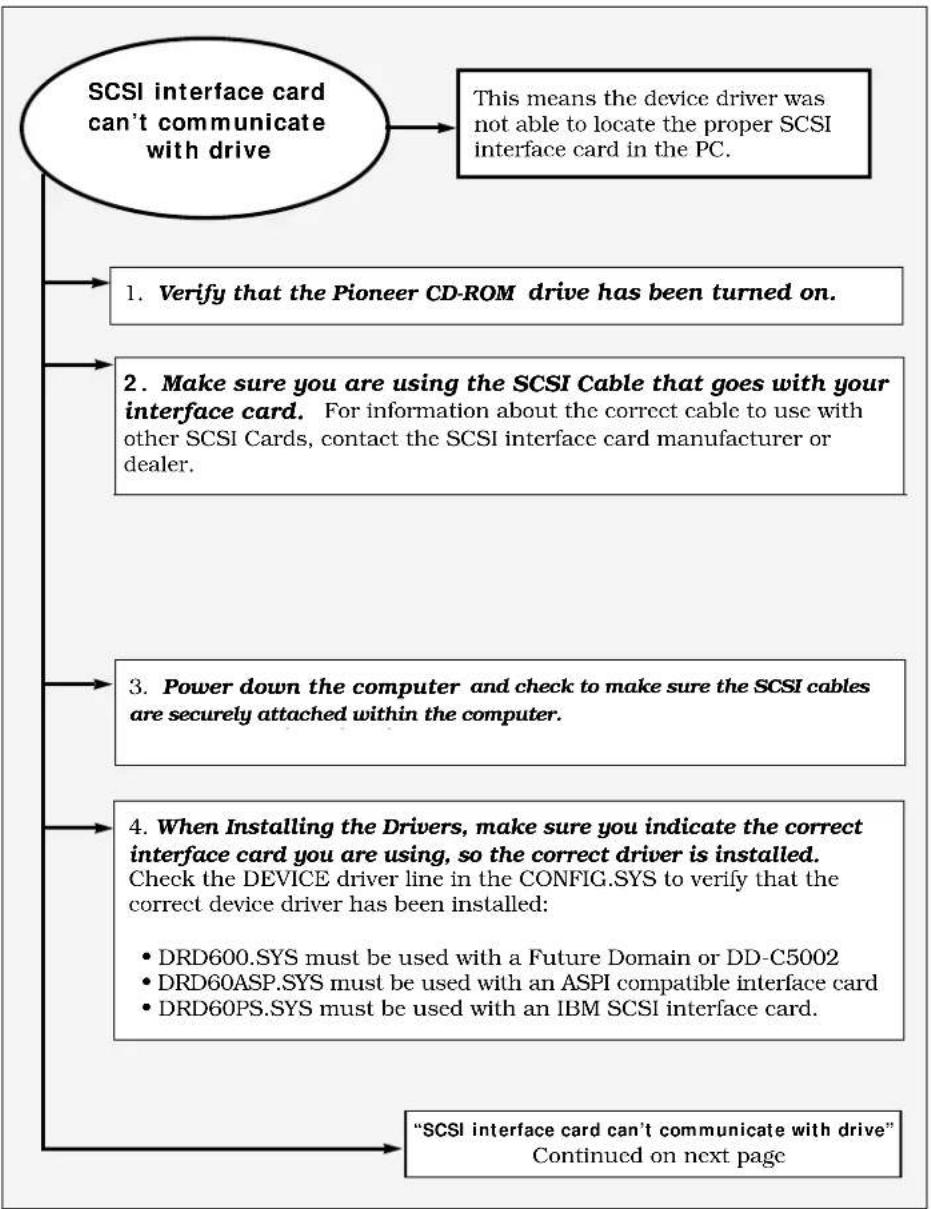
A["SCSI interface card can't communicate with drive"] --> B["This means the device driver was not able to locate the proper SCSI interface card in the PC."]
A --> C["1. Verify that the Pioneer CD-ROM drive has been turned on."]
A --> D["2. Make sure you are using the SCSI Cable that goes with your interface card. For information about the correct cable to use with other SCSI Cards, contact the SCSI interface card manufacturer or dealer."]
A --> E["3. Power down the computer and check to make sure the SCSI cables are securely attached within the computer."]
A --> F["4. When Installing the Drivers, make sure you indicate the correct interface card you are using, so the correct driver is installed. Check the DEVICE driver line in the CONFIG.SYS to verify that the correct device driver has been installed: <br> • DRD600.SYS must be used with a Future Domain or DD-C5002<br> • DRD60ASP.SYS must be used with an ASPI compatible interface card<br> • DRD60PS.SYS must be used with an IBM SCSI interface card."]
A --> G[""SCSI interface card can't communicate with drive" Continued on next page"]
A-2 DR-U124X Software Driver Installation Guide
flowchart
graph TD
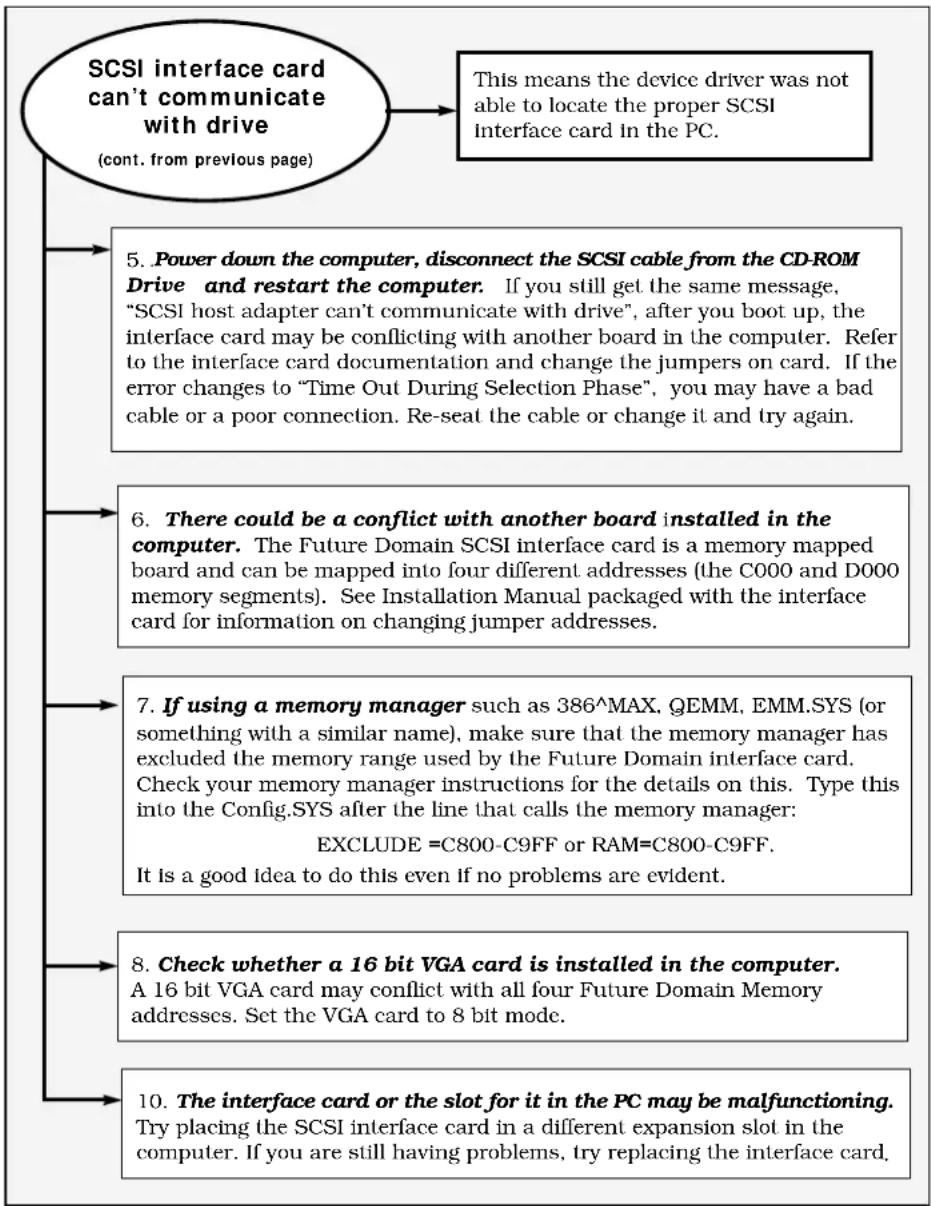
A["SCSI interface card can't communicate with drive<br>(cont. from previous page)"] --> B["This means the device driver was not able to locate the proper SCSI Interface card in the PC."]
A --> C["5. Power down the computer, disconnect the SCSI cable from the CD-ROM Drive and restart the computer. If you still get the same message, "SCSI host adapter can't communicate with drive", after you boot up, the interface card may be conflicting with another board in the computer. Refer to the interface card documentation and change the jumpers on card. If the error changes to "Time Out During Selection Phase", you may have a bad cable or a poor connection. Re-seat the cable or change it and try again."]
A --> D["6. There could be a conflict with another board installed in the computer. The Future Domain SCSI interface card is a memory mapped board and can be mapped into four different addresses (the C000 and D000 memory segments). See Installation Manual packaged with the interface card for information on changing jumper addresses."]
A --> E["7. If using a memory manager such as 386^MAX, QEMM, EMM.SYS (or something with a similar name), make sure that the memory manager has excluded the memory range used by the Future Domain interface card. Check your memory manager instructions for the details on this. Type this into the Config.SYS after the line that calls the memory manager:<br>EXCLUDE =C800-C9FF or RAM=C800-C9FF.<br>It is a good idea to do this even if no problems are evident."]
A --> F["8. Check whether a 16 bit VGA card is installed in the computer.<br>A 16 bit VGA card may conflict with all four Future Domain Memory addresses. Set the VGA card to 8 bit mode."]
A --> G["10. The interface card or the slot for it in the PC may be malfunctioning.<br>Try placing the SCSI interface card in a different expansion slot in the computer. If you are still having problems, try replacing the interface card."]
flowchart
graph TD
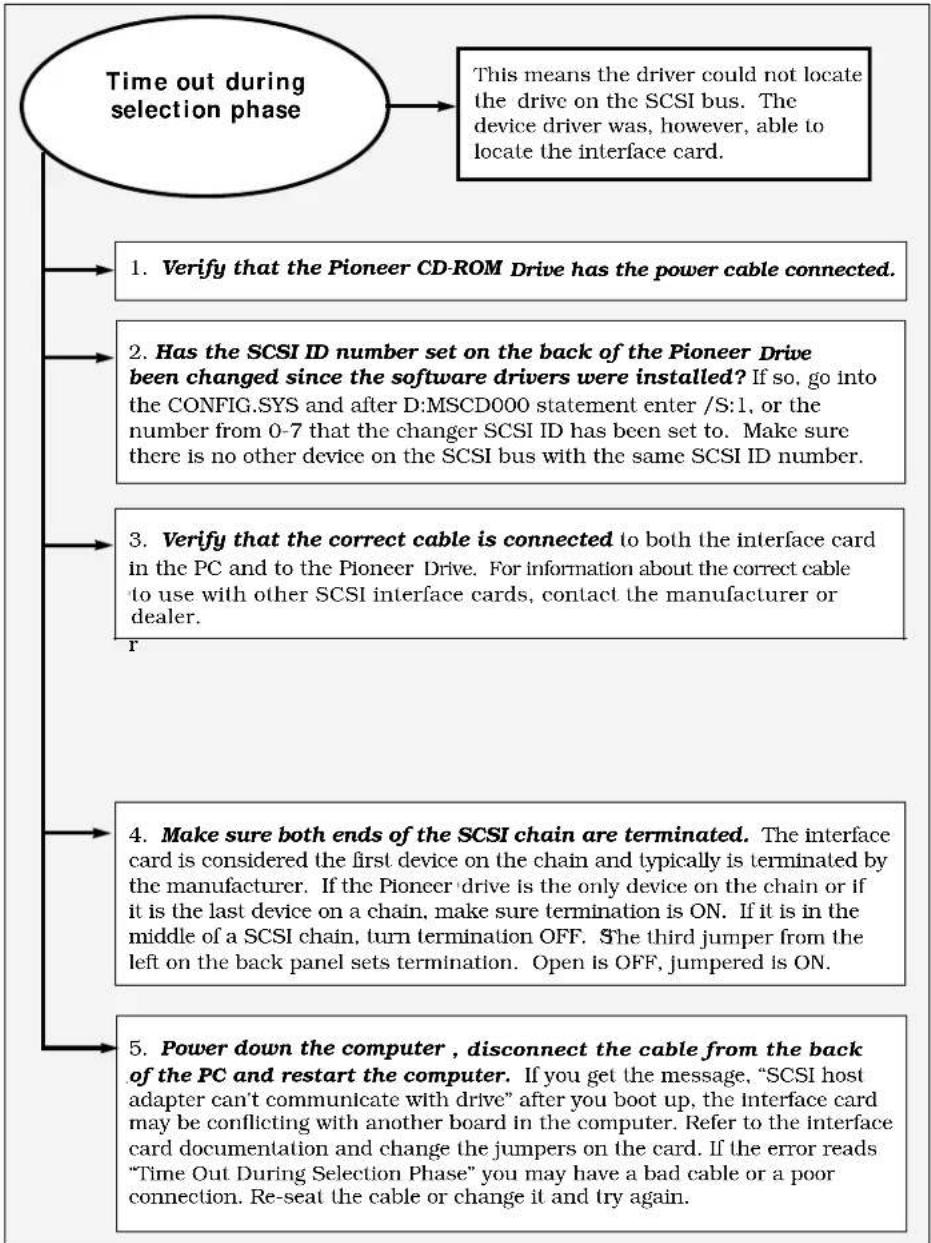
A["Time out during selection phase"] --> B["This means the driver could not locate the drive on the SCSI bus. The device driver was, however, able to locate the interface card."]
B --> C1["1. Verify that the Pioneer CD-ROM Drive has the power cable connected."]
B --> C2["2. Has the SCSI ID number set on the back of the Pioneer Drive been changed since the software drivers were installed? If so, go into the CONFIG.SYS and after D:MSCD000 statement enter /S:1, or the number from 0-7 that the changer SCSI ID has been set to. Make sure there is no other device on the SCSI bus with the same SCSI ID number."]
B --> C3["3. Verify that the correct cable is connected to both the interface card in the PC and to the Pioneer Drive. For information about the correct cable to use with other SCSI interface cards, contact the manufacturer or dealer."]
B --> C4["4. Make sure both ends of the SCSI chain are terminated. The interface card is considered the first device on the chain and typically is terminated by the manufacturer. If the Pioneer drive is the only device on the chain or if it is the last device on a chain, make sure termination is ON. If it is in the middle of a SCSI chain, turn termination OFF. She third jumper from the left on the back panel sets termination. Open is OFF, jumpered is ON."]
B --> C5["5. Power down the computer, disconnect the cable from the back of the PC and restart the computer. If you get the message, "SCSI host adapter can't communicate with drive" after you boot up, the Interface card may be conflicting with another board in the computer. Refer to the interface card documentation and change the jumpers on the card. If the error reads "Time Out During Selection Phase" you may have a bad cable or a poor connection. Re-seat the cable or change it and try again."]
A-4 DR-U124X Software Driver Installation Guide
flowchart
graph TD
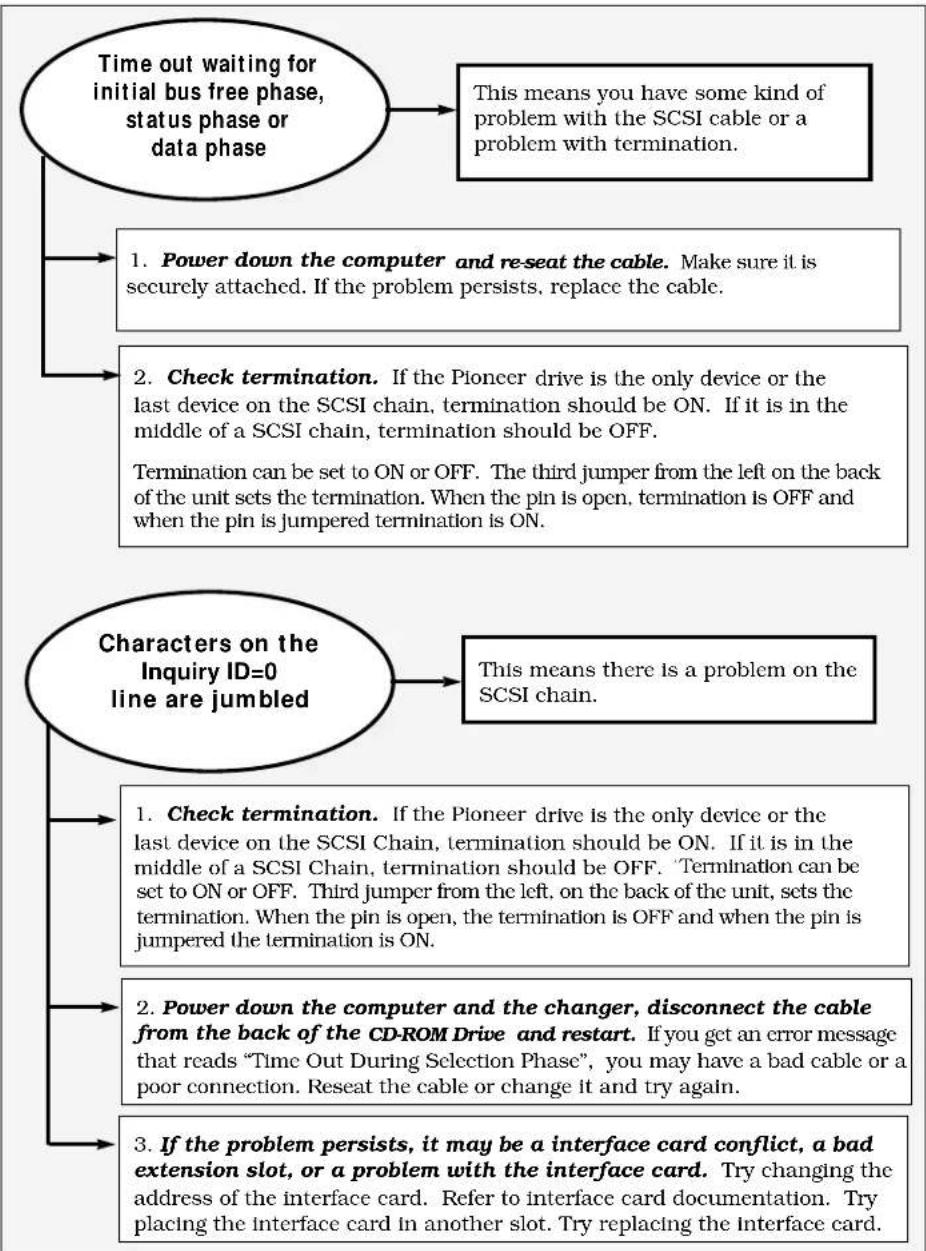
A["Time out waiting for initial bus free phase, status phase or data phase"] --> B["This means you have some kind of problem with the SCSI cable or a problem with termination."]
A --> C["1. Power down the computer and re-seat the cable. Make sure it is securely attached. If the problem persists, replace the cable."]
A --> D["2. Check termination. If the Pioneer drive is the only device or the last device on the SCSI chain, termination should be ON. If it is in the middle of a SCSI chain, termination should be OFF. Termination can be set to ON or OFF. The third jumper from the left on the back of the unit sets the termination. When the pin is open, termination is OFF and when the pin is jumpered termination is ON."]
A --> E["Characters on the Inquiry ID=0 line are jumbled"]
E --> F["This means there is a problem on the SCSI chain."]
E --> G["1. Check termination. If the Pioneer drive is the only device or the last device on the SCSI Chain, termination should be ON. If it is in the middle of a SCSI Chain, termination should be OFF. 'Termination can be set to ON or OFF'. Third jumper from the left, on the back of the unit, sets the termination. When the pin is open, the termination is OFF and when the pin is jumpered the termination is ON."]
E --> H["2. Power down the computer and the changer, disconnect the cable from the back of the CD-ROM Drive and restart. If you get an error message that reads "Time Out During Selection Phase", you may have a bad cable or a poor connection. Reseat the cable or change it and try again."]
E --> I["3. If the problem persists, it may be a interface card conflict, a bad extension slot, or a problem with the interface card. Try changing the address of the interface card. Refer to interface card documentation. Try placing the interface card in another slot. Try replacing the interface card."]
flowchart
graph TD
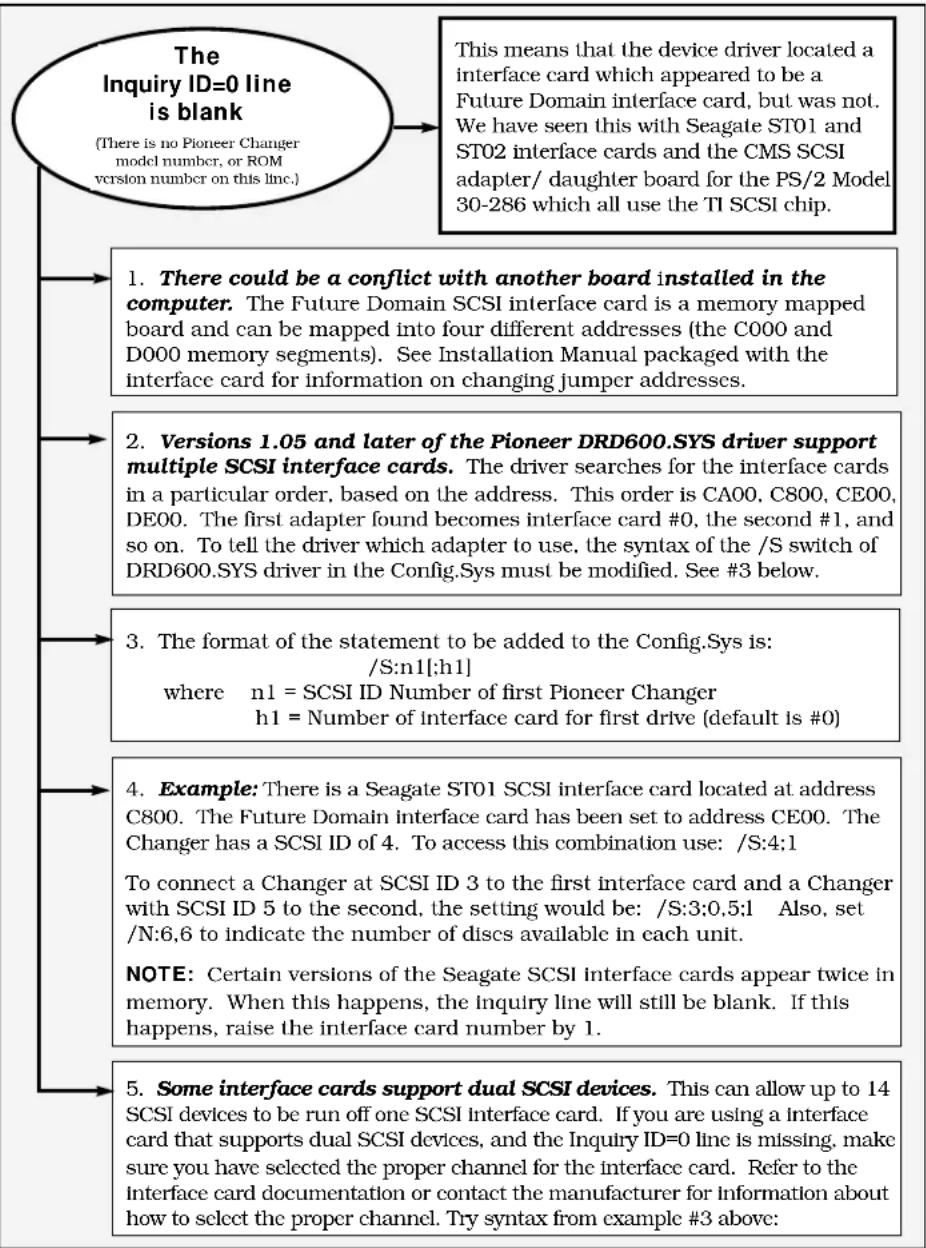
A["The Inquiry ID=0 line is blank\n(There is no Pioneer Changer model number, or ROM version number on this Inc.)"] --> B["1. There could be a conflict with another board installed in the computer. The Future Domain SCSI interface card is a memory mapped board and can be mapped into four different addresses (the C000 and D000 memory segments). See Installation Manual packaged with the interface card for information on changing jumper addresses."]
B --> C["2. Versions 1.05 and later of the Pioneer DRD600.SYS driver support multiple SCSI interface cards. The driver searches for the interface cards in a particular order, based on the address. This order is CA00, C800, CE00, DE00. The first adapter found becomes interface card #0, the second #1, and so on. To tell the driver which adapter to use, the syntax of the /S switch of DRD600.SYS driver in the Config.Sys must be modified. See #3 below."]
C --> D["3. The format of the statement to be added to the Config.Sys is: /S:n1[h1"]\nwhere n1 = SCSI ID Number of first Pioneer Changer\nh1 = Number of interface card for first drive (default is #0)]
D --> E["4. Example: There is a Seagate ST01 SCSI interface card located at address C800. The Future Domain interface card has been set to address CE00. The Changer has a SCSI ID of 4. To access this combination use: /S:4;1\nTo connect a Changer at SCSI ID 3 to the first interface card and a Changer with SCSI ID 5 to the second, the setting would be: /S:3;0,5;1 Also, set /N:6,6 to indicate the number of discs available in each unit.\nNOTE: Certain versions of the Seagate SCSI interface cards appear twice in memory. When this happens, the inquiry line will still be blank. If this happens, raise the interface card number by 1."]
E --> F["5. Some interface cards support dual SCSI devices. This can allow up to 14 SCSI devices to be run off one SCSI interface card. If you are using a interface card that supports dual SCSI devices, and the Inquiry ID=0 line is missing, make sure you have selected the proper channel for the interface card. Refer to the interface card documentation or contact the manufacturer for information about how to select the proper channel. Try syntax from example #3 above:"]
A-6 DR-U124X Software Driver Installation Guide
flowchart
graph TD
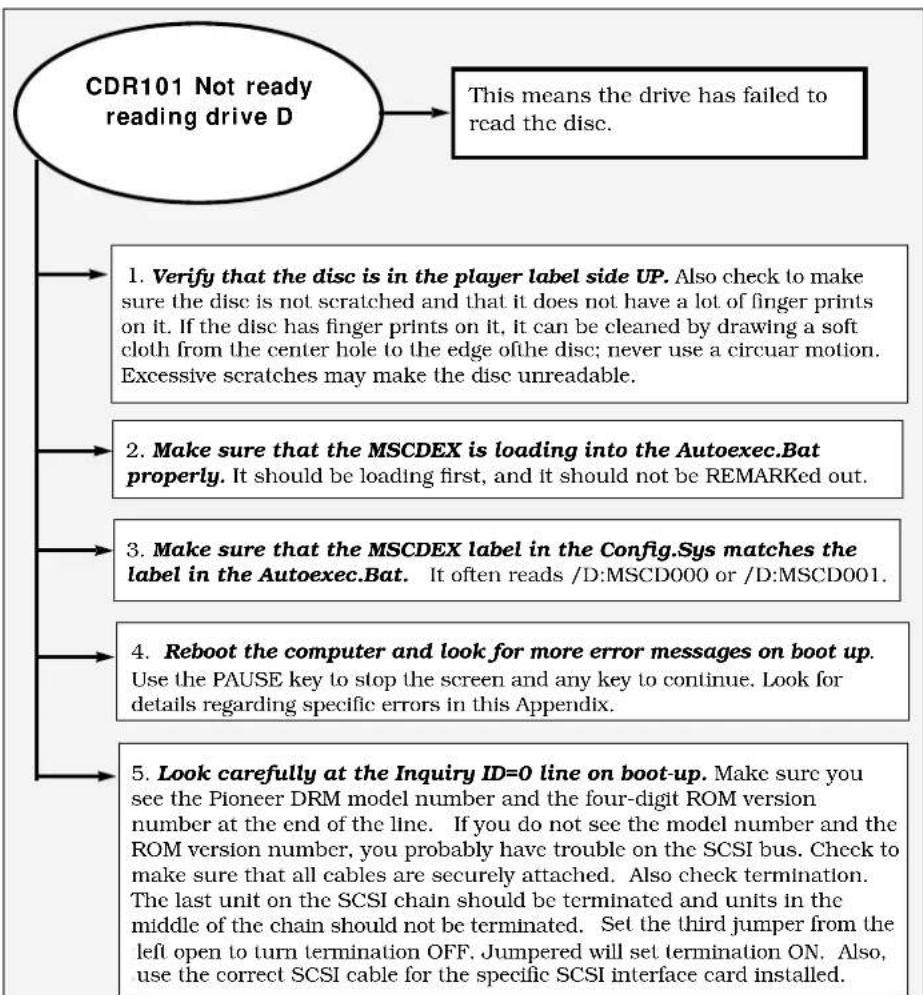
A["CDR101 Not ready reading drive D"] --> B["This means the drive has failed to read the disc."]
A --> C["1. Verify that the disc is in the player label side UP. Also check to make sure the disc is not scratched and that it does not have a lot of finger prints on it. If the disc has finger prints on it, it can be cleaned by drawing a soft cloth from the center hole to the edge of the disc; never use a circular motion. Excessive scratches may make the disc unreadable."]
A --> D["2. Make sure that the MSCDEX is loading into the Autoexec.Bat properly. It should be loading first, and it should not be REMARKed out."]
A --> E["3. Make sure that the MSCDEX label in the Config.Sys matches the label in the Autoexec.Bat. It often reads /D:MSCD000 or /D:MSCD001."]
A --> F["4. Reboot the computer and look for more error messages on boot up. Use the PAUSE key to stop the screen and any key to continue. Look for details regarding specific errors in this Appendix."]
A --> G["5. Look carefully at the Inquiry ID=0 line on boot-up. Make sure you see the Pioneer DRM model number and the four-digit ROM version number at the end of the line. If you do not see the model number and the ROM version number, you probably have trouble on the SCSI bus. Check to make sure that all cables are securely attached. Also check termination. The last unit on the SCSI chain should be terminated and units in the middle of the chain should not be terminated. Set the third jumper from the left open to turn termination OFF. Jumpered will set termination ON. Also, use the correct SCSI cable for the specific SCSI interface card installed."]
flowchart
graph TD
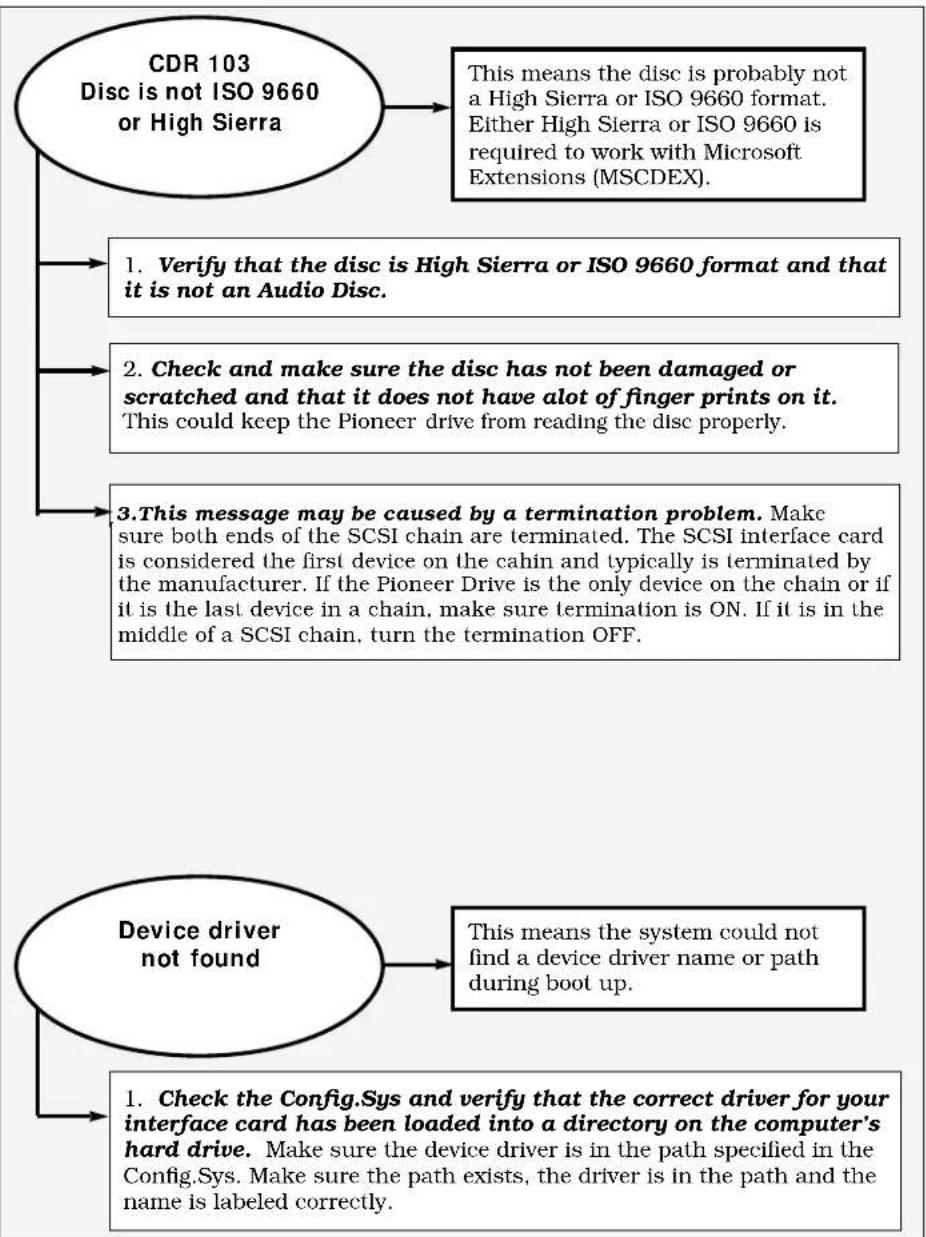
A["CDR 103\nDisc is not ISO 9660 or High Sierra"] --> B["1. Verify that the disc is High Sierra or ISO 9660 format and that it is not an Audio Disc."]
A --> C["2. Check and make sure the disc has not been damaged or scratched and that it does not have alot of finger prints on it. This could keep the Pioneer drive from reading the disc properly."]
A --> D["3. This message may be caused by a termination problem. Make sure both ends of the SCSI chain are terminated. The SCSI interface card is considered the first device on the cahin and typically is terminated by the manufacturer. If the Pioneer Drive is the only device on the chain or if it is the last device in a chain, make sure termination is ON. If it is in the middle of a SCSI chain, turn the termination OFF."]
A --> E["Device driver not found"]
E --> F["1. Check the Config.Sys and verify that the correct driver for your interface card has been loaded into a directory on the computer's hard drive. Make sure the device driver is in the path specified in the Config.Sys. Make sure the path exists, the driver is in the path and the name is labeled correctly."]
A-8 DR-U124X Software Driver Installation Guide
flowchart
graph TD
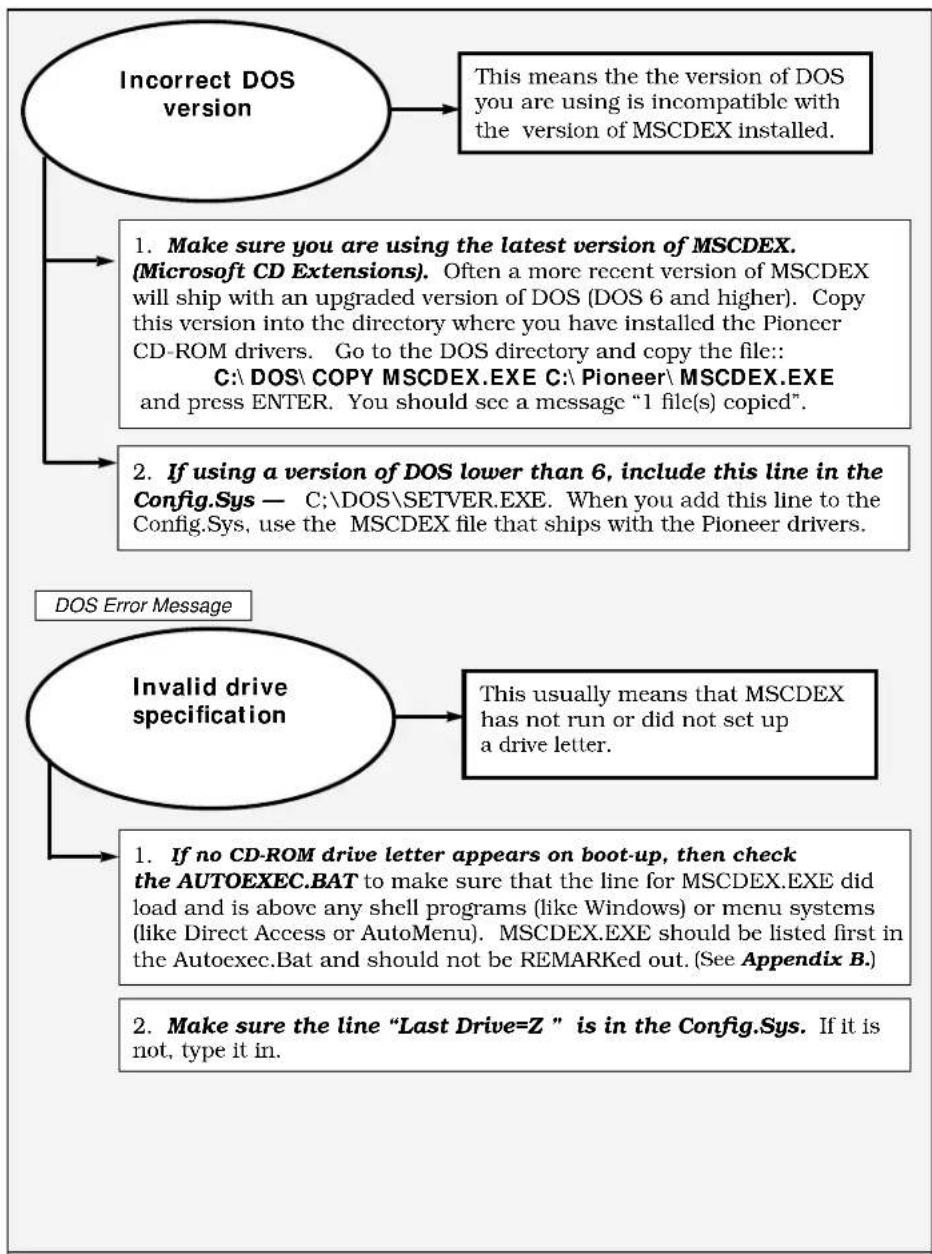
A["Incorrect DOS version"] --> B["This means the version of DOS you are using is incompatible with the version of MSCDEX installed."]
A --> C["1. Make sure you are using the latest version of MSCDEX. (Microsoft CD Extensions). Often a more recent version of MSCDEX will ship with an upgraded version of DOS (DOS 6 and higher). Copy this version into the directory where you have installed the Pioneer CD-ROM drivers. Go to the DOS directory and copy the file::C:\DOS\COPY MSCDEX.EXE C:\Pioneer\MSCDEX.EXE and press ENTER. You should see a message "1 file(s) copied"."]
A --> D["2. If using a version of DOS lower than 6, include this line in the Config.Sys — C;\DOS\SETVER.EXE. When you add this line to the Config.Sys, use the MSCDEX file that ships with the Pioneer drivers."]
A --> E["Invalid drive specification"]
E --> F["1. If no CD-ROM drive letter appears on boot-up, then check the AUTOEXEC.BAT to make sure that the line for MSCDEX.EXE did load and is above any shell programs (like Windows) or menu systems (like Direct Access or AutoMenu). MSCDEX.EXE should be listed first in the Autoexec.Bat and should not be REMARKed out. (See Appendix B)."]
E --> G["2. Make sure the line "Last Drive=Z" is in the Config.Sys. If it is not, type it in."]
flowchart
graph TD
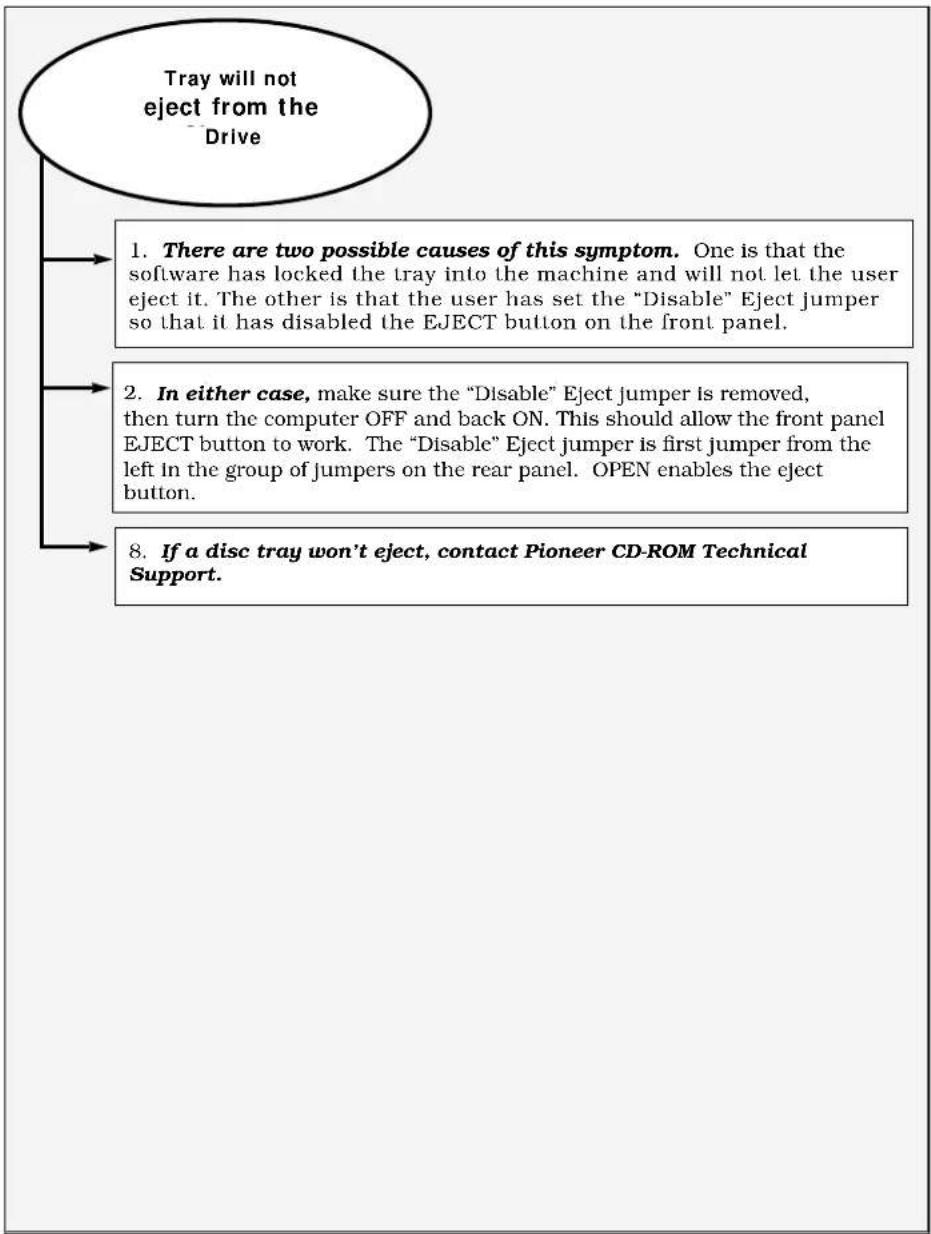
A["Tray will not eject from the Drive"] --> B["1. There are two possible causes of this symptom. One is that the software has locked the tray into the machine and will not let the user eject it. The other is that the user has set the "Disable" Eject jumper so that it has disabled the EJECT button on the front panel."]
A --> C["2. In either case, make sure the "Disable" Eject jumper is removed, then turn the computer OFF and back ON. This should allow the front panel EJECT button to work. The "Disable" Eject jumper is first jumper from the left in the group of jumpers on the rear panel. OPEN enables the eject button."]
A --> D["8. If a disc tray won't eject, contact Pioneer CD-ROM Technical Support."]
A-10 DR-U124X Software Driver Installation Guide
flowchart
graph TD
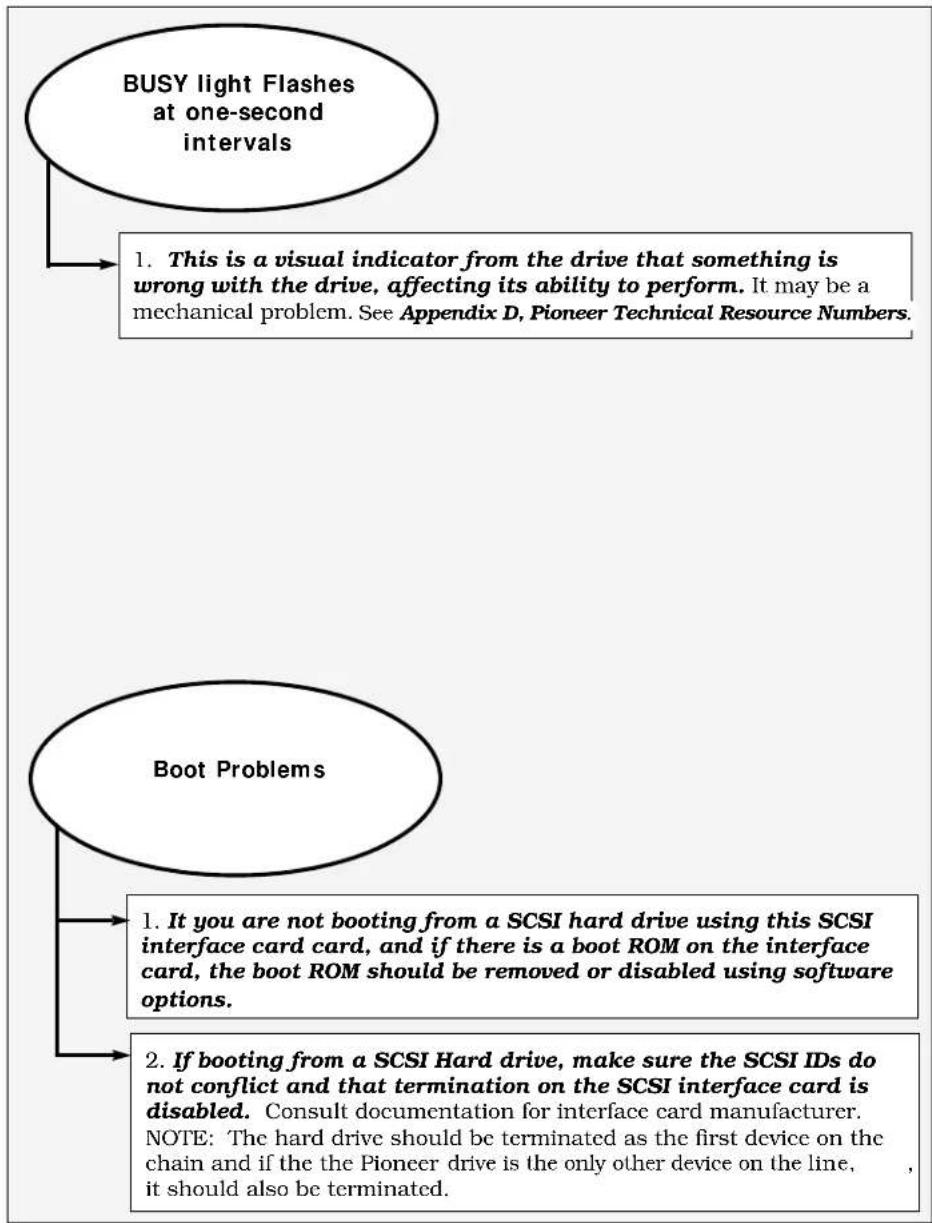
A["BUSY light Flashes at one-second intervals"] --> B["1. This is a visual indicator from the drive that something is wrong with the drive, affecting its ability to perform. It may be a mechanical problem. See Appendix D, Pioneer Technical Resource Numbers."]
A --> C["Boot Problems"]
C --> D["1. It you are not booting from a SCSI hard drive using this SCSI interface card card, and if there is a boot ROM on the interface card, the boot ROM should be removed or disabled using software options."]
C --> E["2. If booting from a SCSI hard drive, make sure the SCSI IDs do not conflict and that termination on the SCSI interface card is disabled. Consult documentation for interface card manufacturer. NOTE: The hard drive should be terminated as the first device on the chain and if the the Pioneer drive is the only other device on the line, it should also be terminated."]
Installation Overview for IBM-PC & Compatibles Device Driver & MSCDEX File
The INSTALL program adds a line to the CONFIG. SYS File which tells the system to load the device driver that is correct for the SCSI host adapter installed in the computer and it adds or modifies a line in the computer's AUTOEXEC.BAT file to access MSCDEX (Microsoft CD Extensions).
Device Driver Loaded into CONFIG.SYS
The device driver line in the CONFIG.SYS indicates the Directory and PATH where it is located, as well as the SCSI ID number of the CD-ROM Changer, and it installs the CDP commands. The CONFIG.SYS File should look similar to this:
$$ \text { DEVICE } = \text { C: } \backslash \text { DEV } \backslash \text { DRD600.SYS } / \text { D: } \text { MSCD000 } / \text { C: } \text { CDP } $$
The device driver allows communication to take place between a computer system and a peripheral device. It is loaded when the system is booted. Pioneer supplies the following three device drivers for use with several common SCSI host adapters:
1. DRD600.SYS
This device driver works with the Future Domain SCSI host adapters (the TMC and MCS series) and with the Pioneer DD-C5002 SCSI host adapter.
2. DRD60PS.SYS
This device driver works with the IBM SCSI host adapters for PS/2s.
3. DRD60ASP.SYS
This device driver works with any ASPI compatible host adapter. NOTE: When using an ASPI compatible host adapter, obtain the ASPI Manager file from the host adapter manufacturer or distributor. Install the ASPI Manager before you run the Pioneer Driver Installation Program.
During the QUICK INSTALLATION procedure, indicate the type of SCSI host adapter installed in your computer: ASPI Compatible, DD-C5002, FUTURE DOMAIN, or IBM. (The default is Future Domain). The INSTALL program then loads the proper driver into the CONFIG.SYS file.
See page B-2 for a descriptions of the Device Driver Command Line Switches.
See page B-3 for a description of the MSCDEX Command Line Switches
Device Driver command line switches:
DEVICE = C:\DEV\DRD600.SYS /D:MSCD000 /C:CDP
Switch Description Example
/D:(device name) Specifies the device name of the /D:MSCD000 CD-ROM device. This name MUST agree with the device name declared in MSCDEX.
/N:n1[,n2] Specifies the number of CD-ROM /N:1 discs that are in the magazine. This is installed automatically with Version 2.0 and above of the drivers. You may not see this switch in the device driver line.
/C:(device name) Specifies the device name of the /C:CDP character device for CDP control
/S:n1[;h1][,n2[;h2]] Specifies the SCSI ID and the host /S:0 adapter number of the DRM-600. This must be the same SCSI ID as the one set by the dip switches. This is installed automatically with Version 2.0 and above of the drivers. You may not see this switch in the device driver line.
/B or /E Specifies whether or not the device driver should load in a look ahead buffer for prefetch. /B -> Conventional Memory /E -> Expanded Memory
MSCDEX.EXE command line switches:
MSCDEX /D:MSCD000
Switch Description Example
/D: Specifies the device name of the /D:MSCD000 (device name) CD-ROM device. This name MUST agree with the device name declared in driver.
/M:n Specifies the number of cache /M:24 buffers for MSCDEX to allocate.
/E Tells MSCDEX to use EMS (Expanded) memory for the cache buffers. If EMS is available, this can save lots of RAM.
/L: Specifies for MSCDEX the drive /L:M (drive letter) letter to start assigning the CD-ROM discs.
/V Provides memory usage statistics on how much memory is used by buffers, memory resident code, and resident data.
/K Tells MSCDEX to use Kanji file structures if present.
/S Tells MSCDEX to patch DOS to allow sharing of CD-ROM drives on MS-NET based networks.
Pioneer LaserFacts ^SM System
Pioneer New Media Technologies, Inc., has placed a full library of technical resource materials on a Pioneer LaserFacts System. This is a FAX retrieval system that makes technical documents available 24-hours per day.
Please refer to the LaserFacts Directory of Documents to obtain the number of the document you wish to order. You can obtain a Directory by calling the LaserFacts line or by calling End-User CD-ROM Technical Support. See Appendix D, Pioneer Technical Resource Numbers.
To use the Pioneer LaserFacts System, follow these easy steps:
1.) Call: 1-201-327-9273 from your FAX phone.
When you call the Pioneer LaserFacts System from your FAX phone, your documents will be FAXed to you immediately; you can request up to 3 documents in one day.
2.) Respond to the system's voice instructions.
Enter a five-digit Document Number from the Pioneer LaserFacts Document Directory to indicate the document you wish to receive. If you do not have a directory to identify a specific Document Number, follow the menu options and have the directory FAXed to you. By responding to other menu options, you can access some of the most frequently requested documents without entering a document number.
3.) Hang up and wait for documents to be FAXed.
Your documents will be sent immediately when you call from your FAX phone.
Pioneer Technical Resource Numbers for US Customers
We hope that this Software Driver Installation Guide will be your first reference should questions arise about installing drivers for your Pioneer CD-ROM drive. There are, however, other valuable resources you can contact. Here are the Pioneer Technical Resource Numbers effective January, 1995:
End-User CD-ROM Technical Support — 1-800-872-4159
Call this number for information on driver installation, hardware set-up, specific hardware configurations and troubleshooting. Speak with a Pioneer Industrial Products Representative.
Pioneer Bulletin Board — 1-310-835-7980
Call this number using your computer, a modem and modem software. You can download the latest software drivers for Pioneer CD-ROM products.
Pioneer LaserFacts System — 1-201-327-9273
Technical Documents are available 24-hours per day when you dial this number from your FAX phone. See Appendix C for more information about the Pioneer LaserFacts System.