DRA14S - CD Player PIONEER - Free user manual and instructions
Find the device manual for free DRA14S PIONEER in PDF.

| Product Type | Internal CD-ROM Drive |
| Brand | Pioneer |
| Model | DRA14S |
| Dimensions (W x H x D) | 148 x 42.3 x 207.5 mm |
| Weight | 0.97 kg |
| Power Supply | +12 V DC (0.9 A peak / 0.55 A normal) and +5 V DC (1.2 A peak / 0.75 A normal) |
| Interface | IDE (ATAPI) 40-pin |
| Configuration | Master / Slave / Cable Select (jumper) |
| Transfer Rate (sustained) | 2,100 to 5,400 KB/s |
| Average Access Time | 70 ms (random) |
| Buffer Memory | 128 KB |
| Compatible Disc Formats | CD-ROM Mode 1, CD-ROM XA Mode 2 (Form 1,2), CD-DA, CD Extra, Video CD, CD-I Ready, CD-XA Ready, CD-RW, Kodak Photo CD |
| 8 cm Disc Reading | Yes, with dedicated adapter |
| Analog Audio Output | 0.7 Vrms ± 0.1 Vrms (10 kΩ) |
| Digital Audio Output | 2-pin connector |
| Headphone Jack | Stereo Mini Jack, with volume control |
| Acoustic Noise | Less than 70 dB (ISO7779/DIN45635) |
| Operating Temperature | +5 °C to +45 °C |
| Operating Humidity | 5% to 85% (non-condensing) |
| Laser Safety | Class 1 laser diode, do not open |
| Cleaning | Damp cloth only, no liquids or aerosols |
| Repairability | Refer to qualified personnel, do not open yourself |
| Included Accessories | Software diskette, 2 jumpers, audio cable, 4 mounting screws, user manual, installation instructions |
| Compliance | EU Directives (EMC 89/336/EEC, marking 93/68/EEC); Class B (Canada) |
Frequently Asked Questions - DRA14S PIONEER
User questions about DRA14S PIONEER
0 question about this device. Answer the ones you know or ask your own.
Ask a new question about this device
Download the instructions for your CD Player in PDF format for free! Find your manual DRA14S - PIONEER and take your electronic device back in hand. On this page are published all the documents necessary for the use of your device. DRA14S by PIONEER.
USER MANUAL DRA14S PIONEER
natural_image
Line drawing of a CD-ROM drive chassis (no text or symbols on the device body)English
Français
Deutsch
Italiano
Thank you for buying this PIONEER product. Please read through these operating instructions so you will know how to operate your unit properly. After you have finished reading the instructions, put them away in a safe place for future reference.
WARNING: TO PREVENT FIRE OR SHOCK HAZARD, DO NOT EXPOSE THIS APPLIANCE TO RAIN OR MOISTURE.
IMPORTANT NOTICE: RECORD THE MODEL NUMBER AND SERIAL NUMBER OF THIS EQUIPMENT BELOW. THE NUM- BERS ARE ON THE TOP PANEL. MODEL NO. DR-A14S SERIAL NO. ____ KEEP THESE NUMBERS FOR FUTURE USE.
IMPORTANT
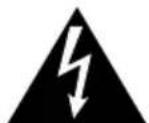
The lightning flash with arrowhead symbol, within an equilateral triangle, is intended to alert the user to the presence of uninsulated "dangerous voltage" within the product's enclosure that may be of sufficient magnitude to constitute a risk of electric shock to persons.
CAUTION
RISK OF ELECTRIC SHOCK DO NOT OPEN
CAUTION: TO PREVENT THE RISK OF ELECTRIC SHOCK, DO NOT REMOVE COVER (OR BACK). NO USER-SERVICEABLE PARTS INSIDE. REFER SERVICING TO QUALIFIED SERVICE PERSONNEL.

The exclamation point within an equilateral triangle is intended to alert the user to the presence of important operating and maintenance (servicing) instructions in the literature accompanying the appliance.
This product complies with the EMC Directives (89/336/EEC, 92/31/EEC) and CE Marking Directive (93/68/EEC).
To ensure your personal safety and to maximize the full operating potential of your Drive, read and follow these safety precautions:
ENVIRONMENT - Please do not use the unit at places with much dust, high temperature, or high humidity. Please use the unit at a place where it is not subjected to vibrations or shocks.
POWER - Power-off your system and attached hardware devices before installation.
READ INSTRUCTIONS - Read all safety and operating instructions before the Drive is operated.
RETAIN INSTRUCTIONS - Retain the safety and operating instructions for future reference.
FOLLOW INSTRUCTIONS - Follow all operating and use instructions.
HEED WARNINGS - All warnings must be adhered to.
CLEANING - DO NOT use liquid, aerosol cleaners, or alcohol. Use only a damp cloth to clean the exterior housing.
WATER AND MOISTURE - DO NOT use this product near water.
POWER SOURCES - Operate this product from the type of power source indicated on the marking label. If you are not sure of the type of power available, consult your Authorized Pioneer Dealer.
OVERLOADING - DO NOT overload wall outlets and extension cords. Doing so can result in fire or electric shock.
OBJECT AND LIQUID ENTRY - Never push objects of any kind into this product. Touching dangerous voltage points may cause a short resulting in fire or electric shock. Do not spill liquid of any kind on this product.
CONDENSATION - Moisture will form in the operating section of the product causing performance to be impaired if it is brought from cool surroundings into a warmer environment. If you are moving the unit to a location with a warmer temperature, let the product stand for 1-2 hours in the new location before turning it back on.
SERVICING - Do not attempt to repair this product yourself. Opening or removing covers may expose you to dangerous voltage or other hazards. Refer all servicing to qualified service personnel. (Refer to the enclosed Service and Support Card.)
IMPORTANT
CAUTION
This product contains a laser diode of higher class than 1. To ensure continued safety, do not remove any covers or attempt to gain access to the inside of the product.
Refer all servicing to qualified personnel.
The following caution label appears on your unit.
Location: on top of the cover
CLASS 1 LASER PRODUCT LASER KLASSE 1
For pluggable equipment the socket-outlet shall be installed near the equipment and shall be easily accessible.

RADIO SIGNAL INTERFERENCE - This equipment has been tested and found to comply with the limits for a Class B digital device, pursuant to Part 15 of the FCC Rules. These limits are designed to provide reasonable protection against harmful interference in a residential installation. This equipment generates, uses, and can radiate radio frequency energy and, if not installed and used in accordance with the instructions, may cause harmful interference to radio communications. However, there is no guarantee that interference will not occur in a particular installation. If this equipment does cause harmful interference to radio or television reception, which can be determined by turning the equipment off and on, the user is encouraged to try to correct the interference by one or more of the following measures:
→Reorient or relocate the receiving antenna.
→Increase the separation between the equipment and receiver.
Connect the equipment into an outlet on a circuit different from that to which the receiver is connected.
→Consult the dealer or an experienced radio/TV technician for help.
[For Canadian model]
This Class B digital apparatus meets all requirements of the Canadian Interference-Causing Equipment Regulations.
LASER DIODE - This product contains a laser diode. To assure continued safety, DO NOT remove any convers or attempt to gain access to the inside of the product.
CAUTION:
USE OF CONTROLS OR ADJUSTMENTS OR PERFORMANCE OF PROCEDURES OTHER THAN THOSE SPECIFIED HEREIN MAY RESULT IN HAZARDOUS RADIATION EXPOSURE.
CAUTION:
USE OF OPTICAL INSTRUMENTS WITH THIS PRODUCT WILL INCREASE EYE HAZARD.
Information to User
Alteration or modifications carried out without appropriate authorization may invalidate the user's right to operate the equipment.
The Generation of Acoustical Noise Is Less Than 70dB.
(ISO7779/DIN45635)
En

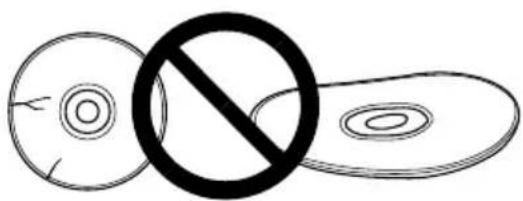
DO NOT use damaged, cracked, or warped discs. If they break inside the unit, they may damage the optics. Discs rotate at high speed inside the changing mechanism.
natural_image
Simple line drawing of three abstract shapes with a prohibition symbol (no text or labels)
DO NOT use non-standard discs, as these may adversely influence this unit and other equipment.

DO NOT play a CD having other shape than a circular disc, such as heart shaped disc. Otherwise malfunction may occur.
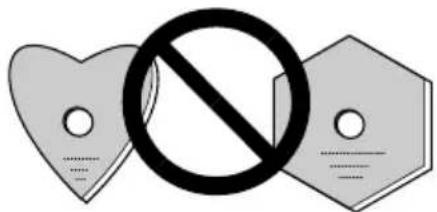
text_image
Symbolic image showing a prohibition sign crossed over two heart-shaped labels with placeholder text belowThe enclosed device driver is for use with MS-DOS/Windows 3.XX. This driver is not required for use with Windows 95.
* MS-DOS and Windows are trademarks of Microsoft Corporation.
FEDERAL COMMUNICATIONS COMMISSION DECLARATION OF CONFORMITY
This device complies with part 15 of the FCC Rules. Operation is subject to the following two conditions: (1) This device may not cause harmful interference, and (2) this device must accept any interference received, including interference that may cause undesired operation.
Product Name: CD-ROM DRIVE UNIT
Model Number: DR-A14S
Responsible Party Name: PIONEER ELECTRONICS SERVICE, INC.
Address: 1925 E. DOMINGUEZ ST. LONG BEACH, CA 90810 U.S.A.
Phone: (310) 952-2359
Transfer rate (sustained):
2,100 kBytes/sec. - 5,400 kBytes/sec. (CAV 36X max)
●High-speed access
Random average: 70 ms
●Low vibration mechanism
●ATAPI correspondence
●Buffer size: 128 kBytes
●Applicable discs
CD-ROM Mode 1
CD-ROM XA Mode 2 (Form 1, 2)
CD-DA (Digital audio output)
CD Extra, Video CD, CD-I Ready and CD-XA Ready support
CD-RW disc reading
NOTES:
This product can read out CD-RW disc data. Note the following:
(1) A little longer time is needed to sense a CD-RW disc when the operation starts, compared with normal CD-ROM discs.
(2) The read-out speed of CD-RW discs is usually 4 times higher than that of normal discs. However, according to the quality of the disc or under extremely hot or cold conditions, the player may reduce the speed of rotation of the disc during read-out. (Because the reproduced signal level from CD-RW discs is lower than that of normal discs.)
(3) Blank discs, discs where you failed to write data or discs where session close processing has not been made - these discs cannot be used.
(4) The operations may not start or the data may not be read out under the following conditions: The quality of the recorded signal has deteriorated due to the dirt or scratches on the disc, or frequently rewrote discs. If you fail to start the operation, take out the disc and reinsert it to try again to start.
●Correspondence to Kodak Photo CD (single and multisession)
●Conforming to MPC-3 specifications
●Half-height size
- Slot in loading
●Windows 95 and Windows 98 (Plug and Play) supported
* Windows is a trademark of Microsoft Corporation.
Precautions on plying CD singles (8 cm Discs)
(1) When playing CD singles (8 cm discs), always use the adapter for 8 cm discs. Before loading the disc into the CD-ROM drive unit, be sure to check that it is secured properly by the catches of the adapter. If discs have been inserted without the adapter by mistake, remove the disc immediately by pressing the eject button. If the disc does not come out with one press, press another time.
(2) Use 8 cm disc adapters labeled with the [COMPACT] DISC digital audio mark (recommended standard product). Do not use adapters which cause the disc to idle, nor adapters which are bent or curved.
Illustrations are provided in this chapter as a visual introduction to the Drive.
Please Familiarize yourself with these illustrations and refer to them when necessary to complete the installation and operation of the unit.
FRONT VIEW
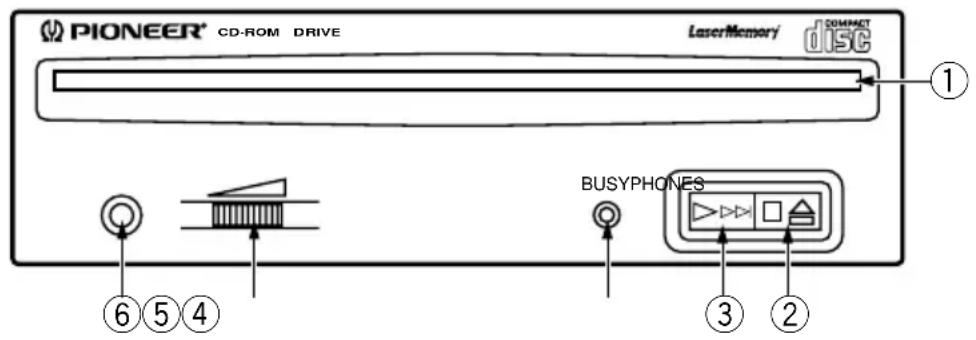
text_image
PIONEER® CD-ROM DRIVE LaserMemory COMPACT disc ① ⑥ ⑤ ④ BUSYPHONES ③ ②Fig. 1
①Disc loading slot
Insert the CD-ROM with the label facing up.
When using 8 cm discs, attach a CD adapter (available at stores) to the disc, and insert the disc into the disc loading slot.
②Stop (■)/ Eject (▲) button
This button is used to eject the disc. When this button is pressed once during playback of an audio disc, the playback will be stopped, and when it is pressed in stopped condition, the disc will be ejected.
③ Play (▶)/ Skip (▶▶) button
This is used for direct playback of audio discs. When an audio disc is inserted and this button is pressed, play status will be reached, and when this button is pressed in play status, the playback will skip to the next track. Data discs will not be played back.
④BUSY indicator
This flashes during data access.
⑤Volume Control (headphone level)
This is used to adjust the volume level of the headphone jack.
⑥Headphone jack (PHONES)
This is a stereo minijack for headphones.
REAR VIEW
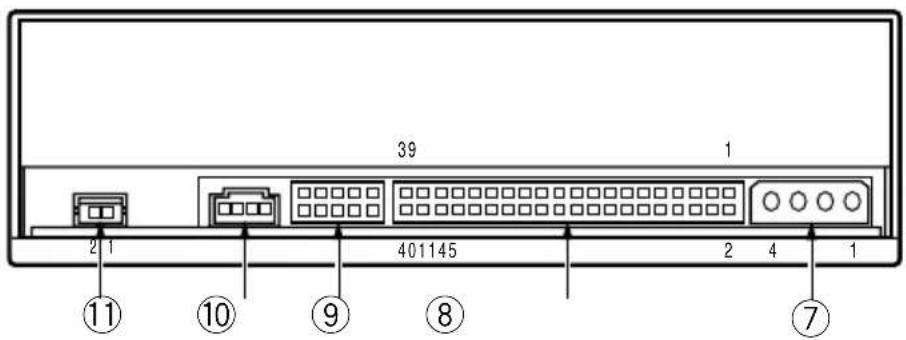
text_image
39 1 2 1 401145 2 4 1 ⑪ ⑩ ⑨ ⑧ ⑦Fig. 2
⑦DC Input
This is the power supply input for DC +5 V and +12 V.
| Pin Name Function | |
| 1 + 12 Power supply input for DC +12 V. | |
| 2 G Ground. | |
| 3 G Ground. | |
| 4 +5 Power supply input for DC +5 V. |
⑧ Host IDE Interface
This is a 40 pin I/O connector according to the ATA specifications.
⑨Device Configuration Jumper
This is the jumper switch for selection of the drive use mode and supporting PC. Short-circuit socket is attached for the setting
attached : on not attached : off
| Pin | Name | Function | |
| 1 | MASTER* | on | The drive is used in master mode. |
| 2 | SLAVE | on | The drive is used in slave mode. |
| 3 | CABLE SELECT | on | Mode for drive setting by CABLE SELECT of the IDE interface. |
| 4 | Reserved. | ||
| 5 | Reserved. | ||
* Only MASTER is ON at the time of shipping from the plant.
⑩Audio Output
This is a connector for output of analog audio.
As a Molex 70553 type connector is used, select a matching connection cable.
| Pin | Name | Function |
| 1 | L | Left channel audio output. |
| 2 G | Ground. | |
| 3 G | Ground. | |
| 4 R | Right channel audio output. |
⑪Digital Audio Output
This is a connector for output of digital audio signal.
| Pin | Name Function | |
| 1 | GND | Ground. |
| 2 | Digital Out | Digital audio signal output. |
natural_image
Technical line drawing of an open computer drive chassis with labeled components (no text or symbols)- Switch off the power of the personal computer and remove the cover or the front panel.
- Remove the blank panel installed at the front of the 5.25 inch slot. Installation is not possible when there is no empty slot.
●Install the fixation slide rails on the drive. (If slide rails are required, contact the shop where you bought the computer or the computer manufacturer.) - Insert the drive into the slot.
- If fixing is required, fix the drive according to the instruction manual for the computer.

Use mounting screws with a length of 5 mm (3/16 in.) or less. Use of long screws may damage the drive.
Install the drive after the power supply of the personal computer has been switched off.

When the mounting screws are loose etc., the vibrations from disc rotation can generate a ripping noise, so that the screws should be tightened securely.

The drive installation method differs according to the computer type. For details, please refer to the manuals of your computer.
text_image
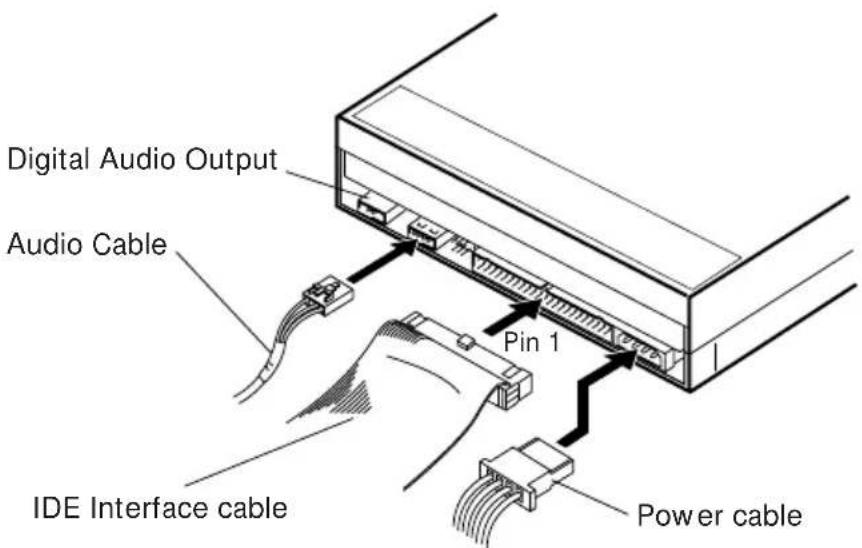
Digital Audio Output Audio Cable Pin 1 IDE Interface cable Power cableFig. 4
●Switch off the power supply of the personal computer.
- Connect the power supply cable from the personal computer. At the time of connection, please pay attention to the cable polarity.
- Connect the IDE interface cable. At this time, confirm that the pin 1 of the IDE connector is connected correctly to pin 1 of the cable.
- When a sound board is used, connect the audio output with an audio cable to the sound board.

WARNING
The power supply of the personal computer always must be switched off before cables are connected.
[General functions]
Disc diameter 12 cm (4.72 in), 8 cm (3.15 in)
Transfer rate
Sustained 2,100 - 5,400 kBytes/sec*
* The data transfer rate may not be output for some disc conditions (scratches, etc.).
Seek time
Line 0.7 Vrms ± 0.1 Vrms (at 10 kΩ load)
[Others]
Power supply DC +12 V, 0.9 A (peak), 0.55 A (normal)
(With the built-in terminator) DC +5 V, 1.2 A (peak), 0.75 A (normal)
External dimensions 148 (W) x 42.3 (H) x 207.5 (D) mm
5-27/32 (W) x 1-11/16 (H) x 8-6/32 (D) in
Weight 0.97 kg (2.1 lb)
Operation temperature +5°C to +45°C (41°F to 113°F)
Operation humidity 5% to 85% (no condensation)
Storage temperature -40^ to +60^ ( -40^ to 140^ )
Storage humidity 5% to 90% (no condensation)
[Accessories]
- Software device drive disk x 1
● Short-circuit socket x 2 - Audio cable x 1
- Mounting screw x 4
- Operating instructions x 1
● Installation instructions x 1
NOTE:
Specifications and design subject to possible modifications without notice, due to improvements.
INSTRUCTIONS DE SECURITE
CLASS 1 LASER PRODUCT LASER KLASSE 1
natural_image
Simple line drawing of a crossed-out circle with a prohibition symbol (no text or labels)
text_image
Symbolic image showing a prohibition sign crossed over two heart-shaped labels with placeholder text below2.100 KO/sec. - 5.400 KO/sec. (CAV maximale: 36X)
natural_image
Technical line drawing of an open computer drive chassis with exploded view and mounting bracket (no text or symbols)text_image
CLASS 1 LASER PRODUCT LASER KLASSE 1natural_image
Simple line drawing of two circular objects with a prohibition symbol (no text or labels)
text_image
Symbolic image showing a crossed-out circle with the word 'NO' and two heart-shaped labels below, indicating no prohibition or rejection.natural_image
Technical line drawing of an open computer drive chassis with labeled components (no text or symbols on the diagram itself)text_image
CLASS 1 LASER PRODUCT LASER KLASSE 1natural_image
Simple line drawing of a circle crossed with a prohibition symbol, next to an elongated oval shape (no text or labels)
text_image
Symbolic image showing a prohibition sign crossed over two heart-shaped labels, indicating no restrictions or violations.2.100 kByte/sec. - 5.400 kByte/sec. (CAV 36X max)
natural_image
Technical line drawing of an open computer drive chassis with exploded view and mounting bracket (no text or symbols)AFTER-SALES SERVICE FOR PIONEER PRODUCTS
Please contact the dealer or distributor from where you purchased the product for its after-sales service (including warranty conditions) or any other information. In case the necessary information is not available, please contact the Pioneer's subsidiaries (regional service headquarters) listed below:
PLEASE DO NOT SHIP YOUR PRODUCT TO THE COMPANIES at the addresses listed below for repair without advance contact, for these companies are not repair locations.
AMERICA
PIONEER ELECTRONICS SERVICE, INC.
CUSTOMER SUPPORT DIVISION
P.O. BOX 1760, LONG BEACH, CA 90801-1760, U.S.A.
EUROPE
PIONEER ELECTRONIC (EUROPE) N.V.
EUROPEAN SERVICE DIVISION
HAVEN 1087, KEETBERGLAAN 1, 9120 MELSELE, BELGIUM
ASEAN
PIONEER ELECTRONICS ASIACENTRE PET. LTD.
SERVICE DEPARTMENT
501 ORCHARD ROAD, #10-00
WHEELOCK PLACE, SINGAPORE 238880
JAPAN AND OTHERS
PIONEER ELECTRONIC CORPORATION (HEAD OFFICE)
CUSTOMER SUPPORT CENTER
France: tapez 36 15 PIONEER
Published by Pioneer Electronic Corporation.
Copyright © 1998 Pioneer Electronic Corporation.
All rights reserved.
PIONEER ELECTRONIC CORPORATION
Business Systems Company, Overseas Sales Department: 4-1, Meguro 1-Chome, Meguro-ku, Tokyo 153-8654, Japan PIONEER NEW MEDIA TECHNOLOGIES, INC.
Multimedia and Mass Storage Division: 2265 East 220th Street, Long Beach, CA 90810, U.S.A. TEL:800-444-OPTI (6784)
PIONEER ELECTRONICS SERVICE, INC. 1925 East Dominguez St. Long Beach, CA 90810, U.S.A. TEL: 310-952-2820
PIONEER ELECTRONIC [EUROPE] N.V.
Multimedia Division: PIONEER House, Hollybush Hill, Stoke Poges, Slough SL2 4QP, U.K. TEL: +44-1753-789-789
PIONEER ELECTRONICS OF CANADA, INC.
Industrial Products Department: 300 Allstate Parkway, Markham, Ontario L3R 0P2, Canada TEL: 905-479-4411
PIONEER ELECTRONICS AUSTRALIA PTY. LTD. 178-184 Boundary Road, Braeside, Victoria 3195, Australia TEL:+61-3-9586-6300
PIONEER ELECTRONICS ASIACENTRE PTE. LTD. 501 Orchard Road, #10-00, Lane Crawford Place, Singapore 0923 TEL: +65-735-9011
<98D00SF0W00> Printed in Japan /Imprimé au Japon