
TRAVELMATE 5335 - Laptop ACER - Free user manual and instructions
Find the device manual for free TRAVELMATE 5335 ACER in PDF.
| Product type | Laptop |
| Brand | ACER |
| Model | TRAVELMATE 5335 |
| Screen | LCD screen (type unspecified) |
| Webcam | Acer Crystal Eye (on some models) |
| Microphone | Internal stereo microphone |
| Speakers | Built-in stereo speakers |
| Keyboard | Keyboard with special keys (Fn combinations) |
| Touchpad | Touchpad with left and right buttons |
| USB ports | 3 USB 2.0 ports |
| Video output | 1 VGA port, 1 HDMI port |
| Audio | Microphone jack (input), headphone/speaker jack (output) |
| Network | RJ-45 Ethernet port 10/100/1000 |
| Card reader | 2-in-1 (Secure Digital and MultiMediaCard) |
| Optical drive | Built-in CD/DVD drive |
| Battery | Built-in rechargeable battery, lockable |
| Power supply | External AC adapter (dedicated power jack) |
| Security | Kensington lock slot |
| Environment (operating) | Temperature: 5°C to 35°C; Humidity: 20% to 80% |
| Environment (non-operating) | Temperature: -20°C to 65°C; Humidity: 20% to 80% |
Frequently Asked Questions - TRAVELMATE 5335 ACER
User questions about TRAVELMATE 5335 ACER
0 question about this device. Answer the ones you know or ask your own.
Ask a new question about this device
Download the instructions for your Laptop in PDF format for free! Find your manual TRAVELMATE 5335 - ACER and take your electronic device back in hand. On this page are published all the documents necessary for the use of your device. TRAVELMATE 5335 by ACER.
USER MANUAL TRAVELMATE 5335 ACER
TravelMate Notebook Series
Quick Guide
Model number:
Serial number:
Date of purchase:
Place of purchase:
First things first
We would like to thank you for making an Acer notebook your choice for meeting your mobile computing needs.
Your guides
To help you use your Acer notebook, we have designed a set of guides:
First off, the setup poster helps you get started with setting up your computer.
The TravelMate Series Generic User Guide contains useful information applying to all models in the TravelMate product series. It covers basic topics such as using the keyboard and audio, etc. Please understand that due to its nature, the AcerSystem User Guide mentioned below will occasionally refer to functions or features which are only contained in certain models of the series, but not necessarily in the model you purchased. Such instances are marked in the text with language such as "only for certain models".
This Quick Guide introduces you to the basic features and functions of your new computer. For more on how your computer can help you to be more productive, please refer to the AcerSystem User Guide. This guide contains detailed information on such subjects as system utilities, data recovery, expansion options and troubleshooting. In addition it contains warranty information and the general regulations and safety notices for your notebook. It is available in Portable Document Format (PDF) and comes preloaded on your notebook. Follow these steps to access it:
1 Click on Start > All Programs > AcerSystem.
2 Click on AcerSystem User Guide.

Note: Viewing the file requires Adobe Reader. If Adobe Reader is not installed on your computer, clicking on AcerSystem User Guide will run the Adobe Reader setup program first. Follow the instructions on the screen to complete the installation. For instructions on how to use Adobe Reader, access the Help and Support menu.
Your Acer notebook tour
After setting up your computer as illustrated in the setup poster, let us show you around your new Acer notebook.
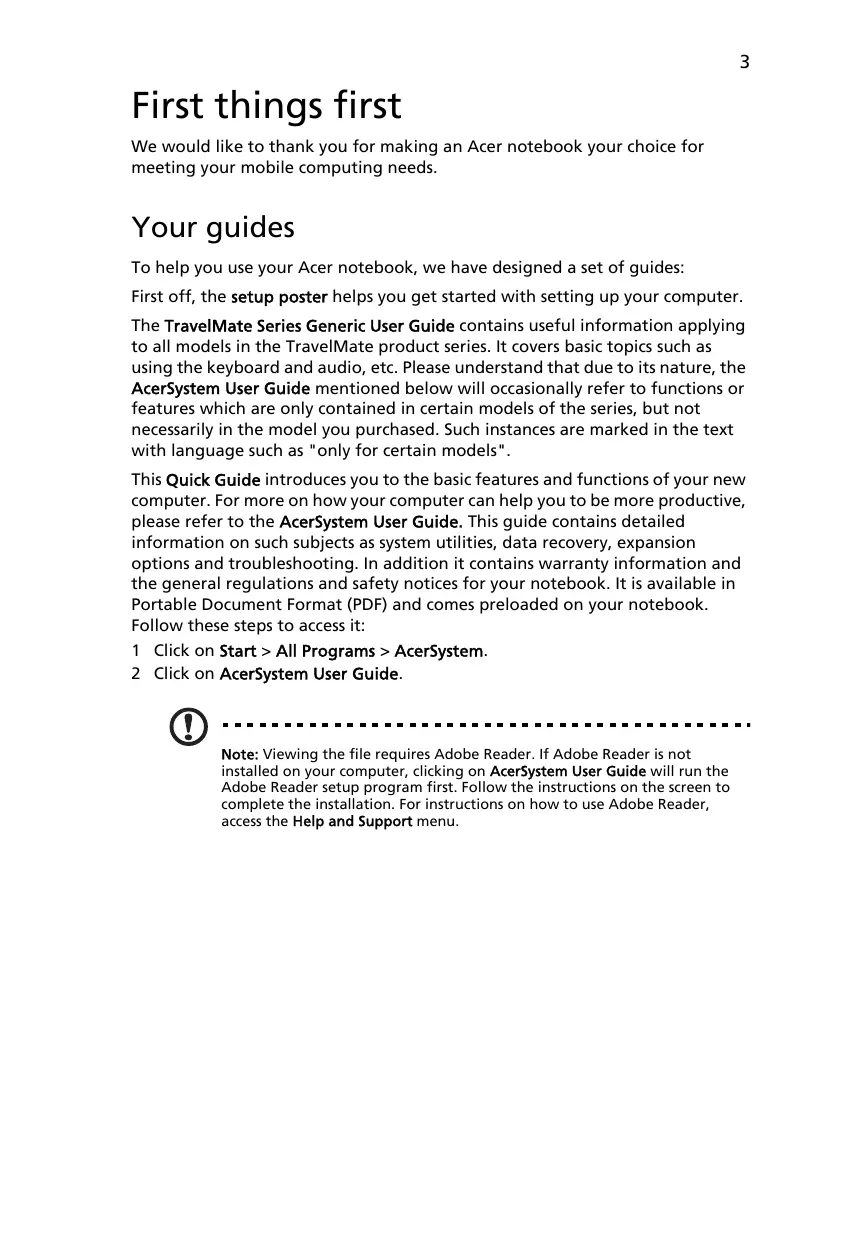
Top view
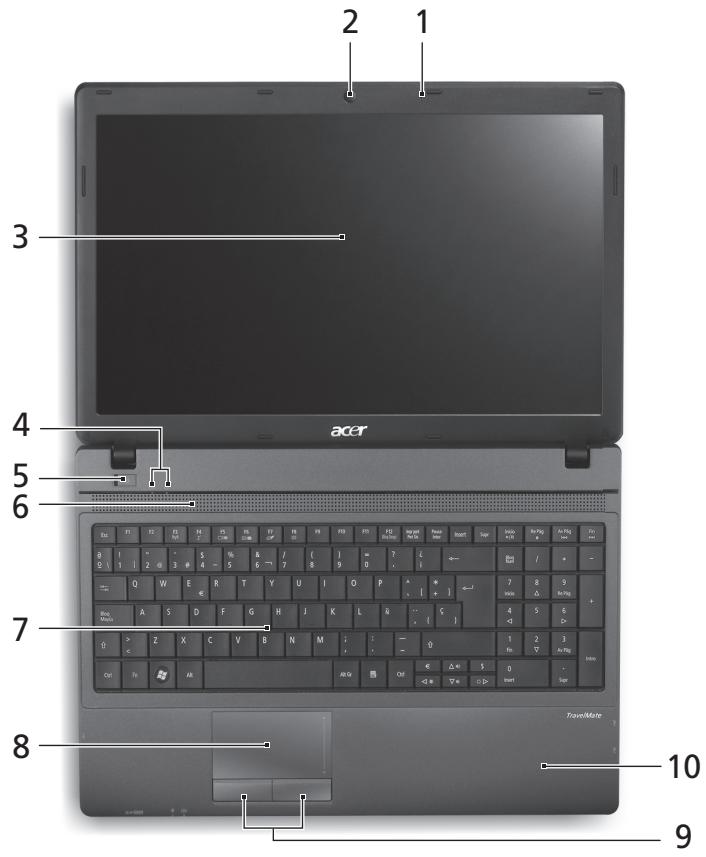
| # | Icon | Item | Description |
| 1 | Microphone | Stereo internal microphone for sound recording. | |
| 2 | Acer Crystal Eye webcam | Web camera for video communication. (only for certain models) | |
| 3 | Display screen | Also called Liquid-Crystal Display (LCD), displays computer output (Configuration may vary by models). | |
| 4 | Communication indicator | Indicates the computer's wireless connectivity device status. | |
| HDD indicator | Indicates when the hard disk drive is active. | ||
| 5 | Power switch | Turns the computer on and off. | |
| 6 | Speaker | Delivers audio output. | |
| 7 | Keyboard | For entering data into your computer. | |
| 8 | Touchpad | Touch-sensitive pointing device which functions like a computer mouse. | |
| 9 | Click buttons (left and right) | The left and right buttons function like the left and right mouse buttons. | |
| 10 | Palmrest | Comfortable support area for your hands when you use the computer. |
Hotkeys
The computer employs hotkeys or key combinations to access most of the computer's controls like screen brightness and volume output.
To activate hotkeys, press and hold the
| Hotkey | Icon | Function | Description |
| +Fn> + <F3> | ((●) | Communication | Enables / disables the computer's communication devices. (Communication devices may vary by configuration.) |
| <Fn> + <F4> | Z² | Sleep | Puts the computer in Sleep mode. |
| <Fn> + <F5> | □|□ | Display toggle | Switches display output between the display screen, external monitor (if connected) and both. |
| <Fn> + <F6> | +→■ | Display off | Turns the display screen backlight off to save power. Press any key to return. |
| <Fn> + <F7> | ○▲ | Touchpad toggle | Turns the touchpad on and off. |
| +Fn> + <F8> | Speaker toggle | Turns the speakers on and off. | |
| +Fn> + <△> | Volume up | Increases the sound volume. | |
| +Fn> + <▽> | Volume down | Decreases the sound volume. | |
| +Fn> + <▷> | Brightness up | Increases the screen brightness. | |
| +Fn> + <◁> | Brightness down | Decreases the screen brightness. |
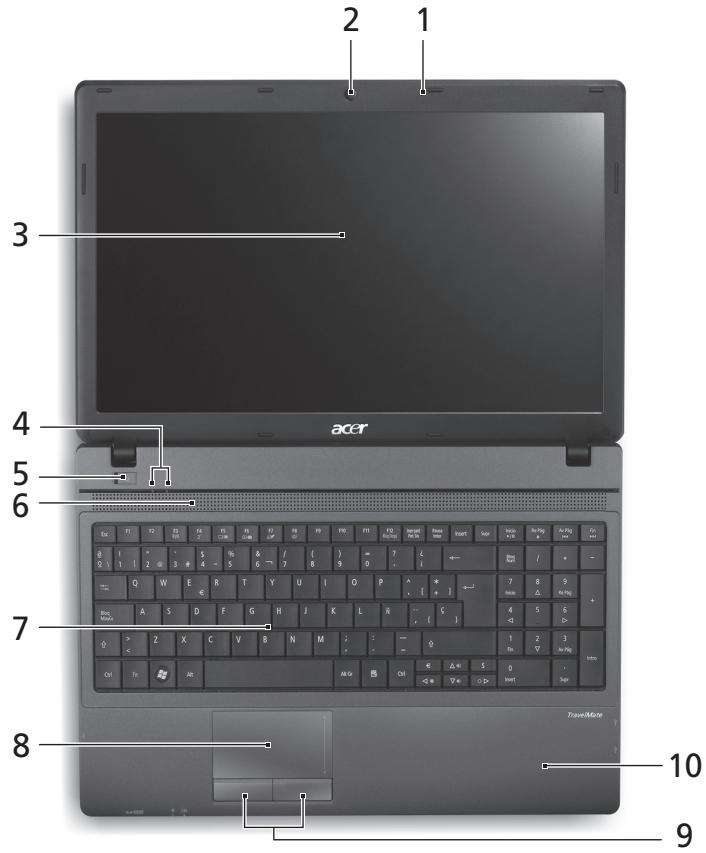
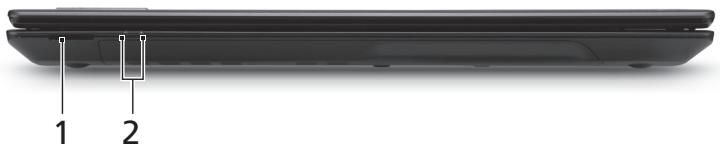
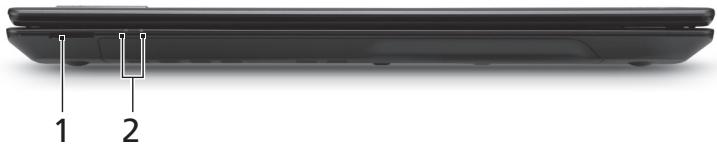
Closed front view
| # | Icon | Item | Description |
| 1 | MULTIMEDICARD | 2-in-1 card reader | Accepts Secure Digital (SD), MultiMediaCard (MMC). Note: Push to remove/install the card. Only one card can operate at any given time. |
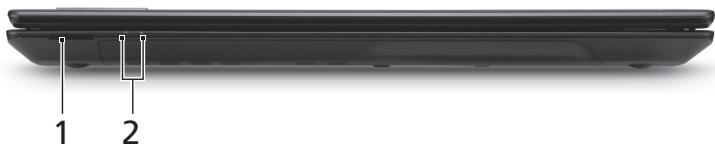
| 2 | Power indicator | Indicates the computer's power status. | |
| Battery indicator | Indicates the computer's battery status. 1. Charging: The light shows amber when the battery is charging. 2. Fully charged: The light shows blue when in AC mode. | ||
Rear view

| # | Icon | Item | Description |
| 1 | Battery | Provides power for the computer to be used while unplugged. |
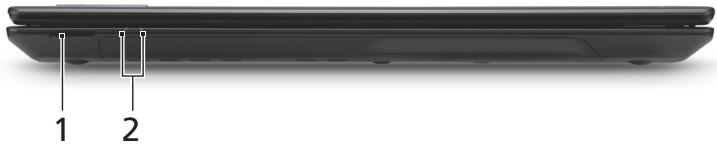
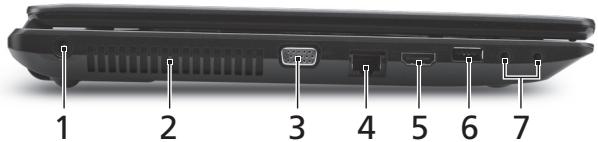
Left view
| # | Icon | Item | Description |
| 1 | DC-in jack | Connects to an AC adapter. | |
| 2 | Ventilation slots | Enable the computer to stay cool, even after prolonged use. | |
| 3 | External display (VGA) port | Connects to a display device (e.g., external monitor, LCD projector). | |
| 4 | Ethernet (RJ-45) port | Connects to an Ethernet 10/100/1000-based network. | |
| 5 | HDMI | HDMI port | Supports high-definition digital video connections. |
| 6 | USB 2.0 port | Connects to USB 2.0 devices (e.g., USB mouse, USB camera). | |
| 7 | Microphone-in jack | Accepts inputs from external microphones. | |
| Headphone/speaker/line-out jack | Connects to audio line-out devices (e.g., speakers, headphones). |
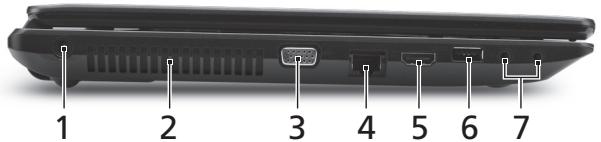
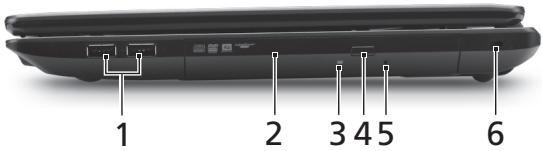
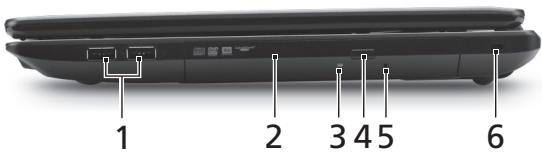
Right view
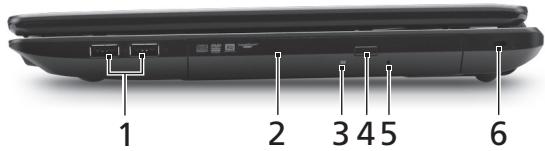
| # | Icon | Item | Description |
| 1 | + | USB 2.0 ports | Connect to USB 2.0 devices (e.g., USB mouse, USB camera). |
| 2 | Optical drive | Internal optical drive; accepts CDs or DVDs. | |
| 3 | Optical disk access indicator | Lights up when the optical drive is active. | |
| 4 | Optical drive eject button | Ejects the optical disk from the drive. | |
| 5 | Emergency eject hole | Ejects the optical drive tray when the computer is turned off. Note: Insert a paper clip to the emergency eject hole to eject the optical drive tray when the computer is off. | |
| 6 | K | Kensington lock slot | Connects to a Kensington-compatible computer security lock. Note: Wrap the computer security lock cable around an immovable object such as a table or handle of a locked drawer. Insert the lock into the notch and turn the key to secure the lock. Some keyless models are also available. |
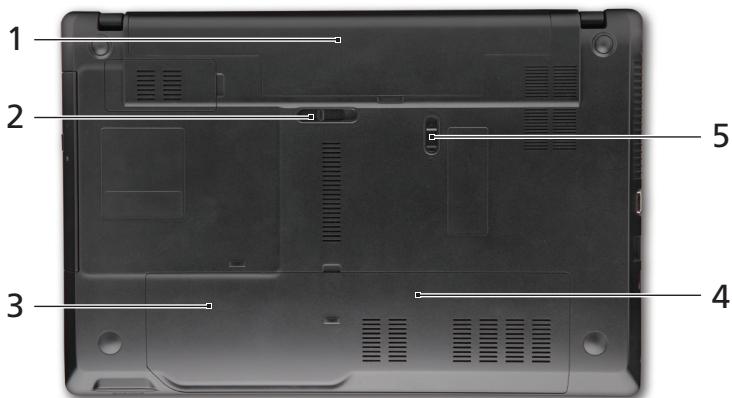
Base view
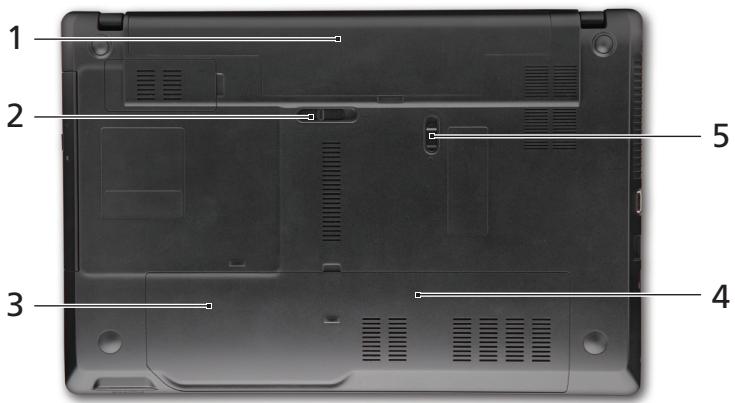
| # | Icon | Item | Description |
| 1 | Battery bay | Houses the computer's battery pack. | |
| 2 | Battery release latch | Releases the battery for removal. | |
| 3 | Hard disk bay | Houses the computer's hard disk (secured with screws). | |
| 4 | Memory compartment | Houses the computer's main memory. | |
| 5 | Battery lock | Locks the battery in position. | |
| Environment | • Temperature: • Operating: 5 °C to 35 °C • Non-operating: -20 °C to 65 °C • Humidity (non-condensing): • Operating: 20% to 80% • Non-operating: 20% to 80% | ||
Gammede notebook TravelMate
Guide rapide
Pour commencer
| Tecla de acceso directo | Icono | Función | Descripción | |
| <Fn> + <F3> | ( ) | Comunicación | Activa/desactiva los dispositivos de comunicación del ordinador. (Los dispositivos de comunicaciónSEOSEOSEOSEOSEOSEOSEOSEOSEOSEOSEOSEOSEOSEOSEOSEOSEOSEOSEOSEOSEOSEOSEOSEOSEOSEOSEOSEOSEOSEOSEOSEOSEOSEOSEOSEOSEOSEOSEOSEOSEOSEOSEOSEOSEOSEOSEOSEOSEOSEOSEOSEOSEOSEOSEOSEOSEOSEOSEOSEOSEOSEOSEOSEOSEOSEOSEOSEOSEOSEOSEOSEOSEOSEOSEOSEOSEOSEOSEOSEOSEOSEOSEOSEOSEOSEOSEOSEOSEOSEOSEOSEOSEOSEOSEOSEOSEOSEOSEOSEO SEOSEOSEOSEOSEOSEOSEOSEOSEOSEOSEOSEOSEOSEOSEOSEOSEOSEOSEOSEOSEOSEOSEOSEOSEOSEOSEOSEOSEOSEOSEOSEOSEOSEOSEOSEOSEOSEOSEOSEOSEOSEOSEOSEOSEOSEOSEOSEOSEOSEOSEOSEOSEOSEOSEOSEOSEOSEOSEOSEOSEOSEOSEOSEOSEOSEOSEOSEOSEOSEOSEOSEOSEOSEOSEOSEOSEOSEOSEOSEOSEOSEOSEOSEOSEOSEOSEOSEOSEOSEOSEOSEOSEOSEOSEOSEOSEOSEOSEOSEOseoSEOSEOSEOSEOSEOSEOSEOSEOSEOSEOSEOSEOSEOSEOSEOSEOSEOSEOSEOSEOSEOSEOSEOSEOSEOSEOSEOSEOSEOSEOSEOSEOSEOSEOSEOSEOSEOSEOSEOSEOSEOSEOSEOSEOSEOSEOSEOSEOSEOSEOSEOSEOSEOSEOSEOSEOSEOSEOSEOSEOSEOSEOSEOSEOSEOSEOSEOSEOSEOSEOSEOSEOSEOSEOSEOSEOSEOSEOSEOSEOSEOSEOSEOSEOSEOSEOSEOSEOSEOSEOSEOSEOSEOSEOSEOSEOSEOSEOSEOSEQEOSEOSEOSEOSEOSEOSEOSEOSEOSEOSEOSEOSEOSEOSEOSEOSEOSEOSEOSEOSEOSEOSEOSEOSEOSEOSEOSEOSEOSEOSEOSEOSEOSEOSEOSEOSEOSEOSEOSEOSEOSEOSEOSEOSEOSEOSEOSEOSEOSEOSEOSEOSEOSEOSEOSEOSEOSEOSEOSEOSEOSEOSEOSEOSEOSEOSEOSEOSEOSEOSEOSEOSEOSEOSEOSEOSEOSEOSEOSEOSEOSEOSEOSEOSEOSEOSEOSEOSEOSEOSEOSEOSEOSEOSEOSEOSEOSEOSEOSEOEOSEOSEOSEOSEOSEOSEOSEOSEOSEOSEOSEOSEOSEOSEOSEOSEOSEOSEOSEOSEOSEOSEOSEOSEOSEOSEOSEOSEOSEOSEOSEOSEOSEOSEOSEOSEOSEOSEOSEOSEOSEOSEOSEOSEOSEOSEOSEOSEOSEOSEOSEOSEOSEOSEOSEOSEOSEOSEOSEOSEOSEOSEOSEOSEOSEOSEOSEOSEOSEOSEOSEOSEOSEOSEOSEOSEOSEOSEOSEOSEOSEOSEOSEOSEOSEOSEOSEOSEOSEOSEOSEOSEOSEOSEOSEOSEOSEOSEOEO SEOSEOSEOSEOSEOSEOSEOSEOSEOSEOSEOSEOSEOSEOSEOSEOSEOSEOSEOSEOSEOSEOSEOSEOSEOSEOSEOSEOSEOSEOSEOSEOSEOSEOSEOSEOSEOSEOSEOSEOSEOSEOSEOSEOSEOSEOSEOSEOSEOSEOSEOSEOSEOSEOSEOSEOSEOSEOSEOSEOSEOSEOSEOSEOSEOSEOSEOSEOSEOSEOSEOSEOSEOSEOSEOSEOSEOSEOSEOSEOSEOSEOSEOSEOSEOSEOSEOSEOSEOSEOSEOSEOSEOSEOSEOSEOSEOSEOSEO SEO SEO SEO SEO SEO SEO SEO SEO SEO SEO SEO SEO SEO SEO SEO SEO SEO SEO SEO SEO SEO SEO SEO SEO SEO SEO SEO SEO SEO SEO SEO SEO SEO SEO SEO SEO SEO SEO SEO SEO SEO SEO SEO SEO SEO SEO SEO SEO SEO SEO SEO SEO SEO SEO SEO SEO SEO SEO SEO SEO SEO SEO SEO SEO SEO SEO SEO SEO SEO SEO SEO SEO SEO SEO SEO SEO SEO SEO SEO SEO SEO SEO SEO SEO SEO SEO SEO SEO SEO SEO SEO SEO SEO SEO SEO SEO SEO SEO SEO SEOSEO SEO SEO SEO SEO SEO SEO SEO SEO SEO SEO SEO SEO SEO SEO SEO SEO SEO SEO SEO SEO SEO SEO SEO SEO SEO SEO SEO SEO SEO SEO SEO SEO SEO SEO SEO SEO SEO SEO SEO SEO SEO SEO SEO SEO SEO SEO SEO SEO SEO SEO SEO SEO SEO SEO SEO SEO SEO SEO SEO SEO SEO SEO SEO SEO SEO SEO SEO SEO SEO SEO SEO SEO SEO SEO SEO SEO SEO SEO SEO SEO SEO SEO SEO SEO SEO SEO SEO SEO SEO SEO SEO SEO SEO SEO SEO SEO SEO SEOSEO | |
| <Fn> + <F4> | Z | Suspisión | Activa el modo de suspisión del ordinador. | |
| <Fn> + <F5> | ☐ | Selector de planta | Permitte cambio la calidad entre la planta y el monitor externo (si está conectado) o(ambos). | |
| <Fn> + <F6> | # | Apagado de planta | Apaga la luz de fondo de la planta para ahorrar energia. Pulse cualquier tecla para encenderla. | |
| <Fn> + <F7> | # | Panel táctil | Permitte activar y desactivar el panel táctil. | |
| <Fn> + <F8> | # | Alternar altavoces | Activa o desactiva los altavoces. | |
| <Fn> + <△> | # | Subir volumen | Sube el volumen. | |
| <Fn> + <▽> | # | Bajar volumen | Baja el volumen. | |
| <Fn> + <▷> | # | Augentar brillo | Augenta el brillo de la planta. | |
| <Fn> + <◁> | # | Disminuir brillo | Disminuya el brillo de la planta. | |
Vista frontal cerrada
TravelMate Notebook Series
Snelgids
TravelMate Notebook-serial
Hurtigguide
Mby pa3pa6oTaII pI dy pyKOBoIcTB, KOToPbIe NOMOryT Bam B IcNoIb3OBAHIN HoyT6yKa Acer:
Bo-nerpbbix, yctaHOBOUHbI nnakat NOMOKeT Bam BblIOJIHNITb nepBOHaJbHyO HactpoiKy KOMNbHTepa.
TInnoBoe pyKoBOcTBo DnIe cepNr TravelMate coOpKnT nOJIe3HyIOHΦopMaIIO, pIIMeHmMyIO KO BcEM MoIeJIaM cepNr TravelMate. B HeMONcBbIAOTcO OCHOBHbIe TeMbI, TaKHe KaK pa6Ota C KJIaBnAtypO, 3ByKOM I T.I.D.PIoKaJyIcTa, IMeIte B BVdu, YTO yNOMaHyToe HnKe AcerSystem User Guide ABJraTeC oObUeHNbIM, PO3tOMy B HeM INHOgda 6bydY TOncBbAITbcSyHKnIIN cBOiCTBa, peAnI3OBaHHbIe He B KypIeHNHO BamM MoJeI, a JINsB B ONpeJenEHbIX MOeJIax 3ToI cepN. B TAKNX cIyuaX B TeKCTe ImeETc POMetka "ToIbKO dIgONpeJenEHbIX MoJeIeN".
Данhoe KpatKoe pykoBOcTBo 3HaKOMIT BAC C OCHOBHbIMX XapaKTepnCTNkAmn I ФункцЯMn Baшero HOBOrO KOMNbIOTepa.Чтбы y3HaTb 60JIbWe O TOM,ΚΑК ПОВICNTb ПpoDyKTmbHOCt bBaWe pa6ToB c NOMOuIbKO KOMNbIOTepa, Bbl MOKeTe БбрТьСгс K AcerSystem User Guide.ЗTo pykoBOcTBo COpexNIT NOДрОБHyU Информачио O cSteMHbIX Функцяnx, BOCSTaHOBJIeHm N daHHbIX, BO3MOXHOCTxR PacShInpeHn I yCtpanEHeHm HeNCpabHOCTe.КpOME TOrO, OHO COpexNIT rpaHTnHyU INΦopMaUciNo, a TAKKe Oblue NpeDncaHn I npaBnla Бe3OanacHocTn пп pa6To c BaшIM HoyT6yKom.PykoBOcTBo ppeOCTaBlIeTcB Вид e phJa PDF, ИЗнчально 3агpyжehнoro B KomNbIOTep.Дпяdoctyna K hemy ВынОннITE сеуюшee:
1 HaKMMTe KHOIIKy Iyck > Bce nporpaMMbl > AcerSystem.
2 ⅢeπKHTe AcerSystem User Guide.

Причиманne: Дяп посмотр Файна НебхODIMо установьnpограму Adobe Acrobat Reader.Еся поргамma Adobe Acrobat Reader He yctahOBNeHa Baшем komKombIbtepe, ueHOK МblБю NO AcerSystem User Guide 3aynCTNTСпразьУстановky npограмь Acrobat Reader.Cneудун ИНЧТРКИЯМ на Зкранe,ЧТБыЗавершьnpоцecc установки.3a ИНСТРУКИЯМОТМ, КAK ПОЛБЗВОВьсьnpограмmo Adobe Acrobat Reader,образптесь KMehIO Справka и подөржka.
3HaKOMCTBO C HoyT6ykom Acer
Tenepb, KOrda BbI BbINHnHn HacToPouKn, KaK nOKa3aHO Ha nJaKaTe no HAcToPoiKe, daBaIte NoBnIXe No3HaKOMMmC bBaIIM HObIM HoYbYKOM Acer.
BnD cBepxu
BnD cpeeni C 3aKpbIToi KpbIiKoI
BnaxkHOCTb (6e3 KOHDeHcauN):
- Pa6oua: ot 20% do 80%
- Heraбоча: ot 20% до 80%
Notebook seriii TravelMate
Skrócony poradnik
Rada notebookù TravelMate
StručnéPokyny
| # | Simge | Öğe | Açıklama |
| 1 | DC-in seksi | AC adaptöré®,®,®,®,®,®,®,®,®,®,®,®,®,®,®,®,®,®,®,®,®,®,®,®,®,®,®,®,®,®,®,®,®,®,®,®,®,®,®,®,®,®,®,®,®,®,®,®,®,®,®,®,®,®,®,®,®,®,®,®,®,®,®,®,®,®,®,®,®,®,®,®,®,®,®,®,®,®,®,®,®,®,®,®,®,®,®,®,®,®,®,®,®,®,®,®,®,®,®,®,® | |
| 2 | Havalandırma yuvaları | Bilgisayarınüzün uzun kullanımlar sonrasi bile ilesinmaması®,®,®,®,®,®,®,®,®,®,®,®,®,®,®,®,®,®,®,®,®,®,®,®,®,®,®,®,®,®,®,®,®,®,®,®,®,®,®,®,®,®,®,®,®,®,®,®,®,®,®,®,®,®,®,®,®,®,®,®,®,®,®,®,®,®,®,®,®,®,®,®,®,®,®,®,®,®,®,®,®,®,®,®,®,®,®,®,®,®,®,®,®,®,®,®,®,®,®,%, | |
| 3 | Harici görtunjü (VGA) portu | Bir görtunjü aygütina®,®,®,®,®,®,®,®,®,®,®,®,®,®,®,®,®,®,®,®,®,®,®,®,®,®,®,®,®,®,®,®,®,®,®,®,®,®,®,®,®,®,®,®,®,®,®,®,®,®,®,®,®,®,®,®,®,®,®,®,®,®,®,®,®,®,®,®,®,®,®,®,®,®,®,®,®,®,®,®,®,®,®,®,®,®,®,®,®,®,®,®,®,®,®,®,®,®,®,-, | |
| 4 | Ethernet (RJ-45) portu | Ethernet 10/100/1000-temelli aça bağlar. | |
| 5 | HDMI | HDMI portu | Yüksek çözünurlüklu (High Definition) dijital video böglantilarindestekler. |
| 6 | USB 2.0 portu | USB 2.0 cihazlarına®,®,®,®,®,®,®,®,®,®,®,®,®,®,®,®,®,®,®,®,®,®,®,®,®,®,®,®,®,®,®,®,®,®,®,®,®,®,®,®,®,®,®,®,®,®,®,®,®,®,®,®,®,®,®,®,®,®,®,®,®,®,®,®,®,®,®,®,®,®,®,®,®,®,®,®,®,®,®,®,®,®,®,®,®,®,®,®,®,®,®,®,®,®,®,®,®,®,®,⁄, | |
| 7 | Mikrofon-in seksi | Harici mikrofon girilerini kabul eder. | |
| Kulakkı/hoparlör/hat;cıkışııkı | Sesli hat;cıkışılcı hizalarına®,®,®,®,®,®,®,®,®,®,®,®,®,®,®,®,®,®,®,®,®,®,®,®,®,®,®,®,®,®,®,®,®,®,®,®,®,®,®,®,®,®,®,®,®,®,®,®,®,®,®,®,®,®,®,®,®,®,®,®,®,®,®,®,®,®,®,®,®,®,®,®,®,®,®,®,®,®,®,®,®,®,®,®,®,®,®,®,®,®,®,®,®,®,®,®,®,. Kılıklük/hoparlör/hat;cıkışı;$ı,kılıklıkı. |
Sag görünüm
BaRoGaIiKJIeHbSHeHaHrReAnBaRoGaIiKlJozHaHcDdAaRnE
Seri Notebook TravelMate
Panduan cepat
Nomor model:
Nomor seri:
Tanggal pembelian:
Alamat pembelian:
Informasi penting
| # | laanu | raanu | raanu |
| 1 | laonluw | laonluwauauauauauauauauauauauauauauauauauauauauauauauauauauauauauauauauauauauauauauauauauauauauauauauauauauauauauauauauauauauauauauauauauauauauauauauauauauauauauauauauauauauauauauauauauauauauauauauauauauauauAU | |
| 2 | launuAcer Crystal Eye | launuAcer Acer Crystal Eye | |
| # | ### | ### | ### |
| 3 | ### | Liquid-Crystal Display (LCD) ### | ### |
| 4 | ### | ### | ### |
| ### | HDD | ### | |
| 5 | ### | ### | ### |
| 6 | ### | ### | ### |
| 7 | ### | ### | ### |
| 8 | ### | ### | ### |
| 9 | ### | ### | ### |
| 10 | ### | ### | ### |
J 1
Wauuulwurwuaanuunu
| ### | ### | ### | ### |
| +Fn> + <F3> | (###) | ### | ### |
| +Fn> + <F4> | Z | ### | ### |
| +Fn> + <F5> | □ | ### | ### |
| +Fn> + <F6> | * | ### | ### |
| +Fn> + <F7> | ### | ### | |
| +Fn> + <F8> | ### | ### | |
| +Fn> + <△> | ### | ### | |
| +Fn> + <△> | ### | ### | |
| +Fn> + <△> | ### | ### |
1
| # | ### | ### | ### |
| 1 | ### | ### | ### |
| 2 | ### | ### | ### |
| 3 | ### | ### | ### |
2

| # | ### | ### |
| 1 | ### | ### |
2
| # | ### | ### | ### |
| 1 | ### | DC-in | ### AC |
| 2 | ### | ### | ### ### |
| 3 | ### | (VGA) | ### (### ) |
| 4 | ### | Ethernet (RJ-45) | Ethernet 10/100/1000 |
| 5 | HDMI | HDMI | ### |
| 6 | ### | USB 2.0 | USB 2.0 (### ) |
| 7 | ### | ### | ### |
| ### | ### | ### |
2
| # | ### | ### | ### |
| 1 | ### | USB 2.0 | ### USB 2.0 (### ###) |
| 2 | ### | ### | CD DVD |
| 3 | ### | ### | ### |
| 4 | ### | ### | ### |
| 5 | ### | ### | ### |
| 6 | K | Kensington | Kensington |
2
| # | ### | ### | ### |
| 1 | ### | ### | ### |
| 2 | ### | ### | ### |
| 3 | ### | ### | ### |
| 4 | ### | ### | ### |
| 5 | ### | ### | ### |
2
- 5°C
- -20°C
- 65°C
- (100%)
- TravelMate Notebook Series
- First things first
- Your guides
- Your Acer notebook tour
- Top view
- Hotkeys
- Closed front view
- Rear view
- Left view
- Right view
- Base view
- Gammede notebook TravelMate
- Pour commencer
- Vista frontal cerrada
- TravelMate Notebook-serial
- 3HaKOMCTBO C HoyT6ykom Acer
- BnD cBepxu
- BnD cpeeni C 3aKpbIToi KpbIiKoI
- Notebook seriii TravelMate
- Rada notebookù TravelMate
- Sag görünüm
- Seri Notebook TravelMate
- Informasi penting
- J 1
- 2
Brand : ACER
Model : TRAVELMATE 5335
Category : Laptop