880.0LCD - Food processor Zelmer - Free user manual and instructions
Find the device manual for free 880.0LCD Zelmer in PDF.


| Product Type | Food Processor |
| Model | 880.0LCD |
| Brand | Zelmer |
| Dimensions (approx.) | 30 x 30 x 40 cm |
| Weight | 5 kg |
| Power Supply | 220-240 V, 50/60 Hz |
| Power Consumption | 800 W |
| Bowl Capacity | 2 L |
| Speed Settings | Variable with pulse function |
| Main Functions | Chopping, slicing, grating, blending, kneading, whisking |
| Material | Plastic housing, stainless steel blades |
| Safety Features | Lid lock safety switch, overload protection, non-slip feet |
| Cleaning | Removable parts dishwasher safe (excluding motor base) |
| Accessories Included | Chopping blade, slicing disc, grating disc, kneading hook, spatula |
| Storage | Cord storage compartment, accessory box |
| Repairability | Spare parts available; user-replaceable blades and bowls |
| General Information | Manual available for free download in multiple languages |
Frequently Asked Questions - 880.0LCD Zelmer
User questions about 880.0LCD Zelmer
0 question about this device. Answer the ones you know or ask your own.
Ask a new question about this device
Download the instructions for your Food processor in PDF format for free! Find your manual 880.0LCD - Zelmer and take your electronic device back in hand. On this page are published all the documents necessary for the use of your device. 880.0LCD by Zelmer.
USER MANUAL 880.0LCD Zelmer
zelmer


natural_image
Product photo of a white blender with a side table and colorful kitchen utensils (no visible text or symbols)

880.0LCD
Food processor
zelmer
www.csc108.com
A

B

©
E

F

F

H

The following section is a series of 100% values.
He morning, ugazia, kill rapid attack.
For the platform on a path, spread, and position
The following table provides the original text: "This is a series of words. It is to be written by the English text."
The following table provides the original text:
The following table is provided in the image:
No insuran, kts. okalawsoo, 64 suha", 82
proble
The text in the source image is illegible due to extreme blurriness and low resolution. No characters can be confidently identified.
- 2017年1月1日
for the 81.12% of the
The following table is provided in the image.
vrt. laja: kazl tozal i kazlanyi kowars volwara mola crotelycejneu wroch
王若河对宋
L. 2017
- 1000000 and 2000000 under the
[48].
- 24.000000000000000000000000000000000000000
TARBOZIE SRY BIKGLEN W GOURI KOD
- 2014年1月1日
1
s#y##e##
the day, you are doing this information
Notes
Important safety and proper use instructions
The safety rules specified in this instruction manual must be absolutely observed.
Plug the food processor only to a 230 V AC electrical outlet.
Do not unplug by pulling on cord.
Do not operate the appliance if the cord, the housing or the handle is visibly damaged. In such a case, return the appliance to a service center.
If the non-detachable part of the cord is damaged, it should be replaced by the producer or at a proper service point or by a qualified person in order to avoid any hazards.
The appliance can only be repaired by qualified service personnel. Improper servicing may cause a serious hazard to the user. In case of defects please contact a qualified service center.
Before operating check if no hard object (e.g. a spoon) is accidentally placed in the container.
urn off the device and unplug it from an outlet before replacing the equipment or approaching moving parts during use.
Always unplug the appliance before cleaning.
Day special attention while handling the attachments with cutting blades (i.e. the food processor blade, the slicing discs and the liquidizer).
Use only the pusher to push the product.
Use the spatula that comes with the food processor to empty the container.
Do not overload the appliance with too much product or by pushing it too hard.
Do not stop the food processor by opening the container's lid or by turning the container (emergency stop). This causes the motor to wear out faster.
Do not expose the appliance to temperatures over 60°C.
Do not operate the liquidizer without food inside.
This appliance is not intended for use by persons (including children) with reduced physical, sensory or mental capabilities, or lack of experience and knowledge, unless they have been given supervision or instruction concerning use of the appliance by a person responsible for their safety.
Children should be supervised to ensure that they do not play with the appliance.
After operation switch off the appliance with the power switch and unplug the appliance.
The food processor blade is very sharp – always store it in the casing.
Do not immerse the motor into water. Do not wash it under running water.
Do not use abrasive detergents such as emulsions, cream cleaners, polishes, etc. to clean the housing. They may remove the graphic information symbols such as: scales, marks, warning signs etc.
Do not wash the blade and the slicing discs directly by hand.
Use a soft brush to wash the metal parts especially the sharp blade and the slicing discs.
Do not wash metal parts in the dishwasher. Aggressive detergents used in the dishwasher cause these parts to darken. Wash them manually using traditional dishwashing liquids.
Technical parameters
The technical parameters are indicated on the rating label. Noise level:
| with food processor L – with the liquidizer L – with the dough kneader | L – | WA=80 dB/AWA=85 dB/AWA=78 dB/A |
The appliance does not require grounding ☐.
ZELMER food processor meets the requirements of the applicable norms.
The appliance is in conformity with the requirements of the directives:
Low voltage appliance (LVD) - 2006/95/EC. -
– Electromagnetic compatibility (EMC) – 2004/108/EC.
The appliance was marked by a CE sign on the rating label.
Product description
The food processor 880.0LCD is a multi task appliance designed for household use.
The parts having contact with the processed products were made of materials approved for food contact.
The appliance is equipped with:
- a safety interlock device which prevents the start-up of the motor when the appliance is not ready for operation.
- a safeguard in case of an attempt to open the lid or to remove the container during operation,
– gear change function up and down,
– rotational speed stabilization for each gear.
NOTE: After stopping the appliance with the use of the ① button, the default gear is 1.
Set the PULSE mode before operating the motor.
The function AUTO PULSE automatically starts the motor.
Motor control (Fig. A)
1 PULSE – the motor operates only when you press the ① button.
2 AUTO PULSE – the motor automatically switches on and off for a specified period of time, in a manner programmed by the manufacturer, at the currently set speed.
3 Gear change buttons ▲▼.
4 TIMER – sets the motor operating time (15 s, 30 s, 45 s, 60 s, 75 s, 90 s).
5 ON/OFF – is used to switch the motor on or off.
6 TURBO – temporary increase of the rotational speed while pressing the button, up to the value about 20% higher than the speed available at top gear. Maximum time – 25 s.
LCD display (Fig. A)
⑦ Appliance status: (flashing- not ready, glowing- ready for operation).
8 Motor operation
9 TURBO operation mode
10 Timer
11 AUTO PULSE operation mode
12 PULSE operation mode
13 Current gear (1-12)
TIMER function (Fig. B)
① Press the button while the appliance is operating.
② The symbol will flash on the display.
③ Set the appropriate time (90 s, 75 s, 60 s, 45 s, 30 s, 15 s) using the buttons ▲▼
④ Press the button again. The motor will switch on upon the lapse of the set time.
Food processor accessories (Fig. A)
Food processor
14 Pusher/dispenser
15 Food processor lid
16 Food processor container
17 Coarse and fine shredding disc
18 Coarse and fine slicing disc
19 Pureeing disc
20 French fry slicing disc
21 Blade casing
22 Food processor blade
23 Disc driver
24 Spatula
Liquidizer
25 Cup / dispenser
26 Liquidizer lid
27 Gasket
28 Liquidizer container
Dough kneader
29 Pusher/dispenser
30 Kneader lid
31 Kneader container
32 Gasket
33 Whisk head
34 Mixing whisk
35 Dough hook
How to use the accessories
Food processor blade – is used to process meat, mix dough and other functions.
Slicing disc – is used to cut fruits and vegetables into thin and thick slices. Slicing and shredding discs are round, with two-sided blades (one side for thin slices, the other for thick slices).
Shredding disc – is used to shred fruits and vegetables into fine or coarse shreds.
French fry slicing disc – is used to cut potatoes for French fries.
Pureeing disc – is used to pulp fruits and vegetables.
Disc driver – is used to install changeable discs.
Food pusher, dispenser – is used to push ingredients that are grinded by the slicing discs, to dispense loose or liquid ingredients and to close the feed tube of the lid. A small opening at the bottom of the food pusher allows to evenly dispense liquids (e.g. oil while preparing mayonnaise).
Liquidizer – is used to prepare food of liquid or semi-liquid consistency such as: soups, creams, sauces, cocktails and others.
Dough hook – is used to knead heavy dough
Mixing whisk – is used to prepare creams and to whisk eggs or whipped cream.
Preparing the food processor for operation
Wash the parts that have contact with the processed food before initial use.
Place the motor on a hard, clean and dry surface near the electrical outlet.
Onwind a sufficient length of the cord. The remaining cord can be stored in the housing. Put the remaining cord in the housing through the opening at the back of the housing.
Operating the food processor (Fig. C)
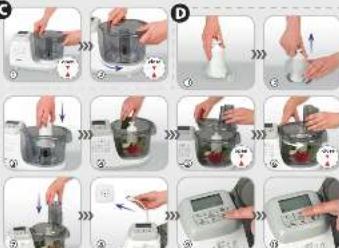
① Insert the food processor container on the fastening hooks of the motor.
② Block the container.
Operating the food processor blade (Fig. D)
① Put the blade in the casing on a hard surface (put in on the casing).
② Press the blade and remove the casing by pulling it upwards.
③ Place the blade in the container so that it is connected to the motor shaft.
④ Place the food products to be processed inside the container.
⑤ Place the lid on the fastening hooks of the container.
⑥ Block the lid.
⑦ Put the food pusher into the feed tube of the lid.
⑧ Plug in the appliance.
⑨ Switch on the motor using the button.
⑩ Set the desired speed using the ▲ buttons (the default gear is 1).
Operating the slicing disc (Fig. E)
① Put the selected slicing disc on the hooks of the disc driver so that the blades that are to be used during operation are on top.
② Block the disc on the disc driver.
③ Place the accessory in the container so that it is connected to the motor shaft.
④ Place the lid on the fastening hooks of the container.
⑤ Block the lid.
⑥ Plug in the appliance.
⑦ Switch on the motor using the button.
⑧ Set the desired speed using the ▲ Buttons (the default gear is 1).
The feed tube of the lid is used to add solid and liquid ingredients to the container. It is divided into two parts of different sizes. The wide part is for larger products and the narrow part is for smaller products. Add the processed products gradually, pushing them slowly and with a steady thrust down the feed tube with the pusher.
Operating the liquidizer (Fig. F)
① Insert the liquidizer on the on the fastening hooks of the motor.
② Block the liquidizer on the fastening hooks.
③ Place the food products to be processed inside the container.
④ Make sure the gasket is properly installed in the groove by the edge of the lid. The rectangular protrusion of the gasket is used to remove the gasket from the lid.
⑤ Place the lid on top of the liquidizer.
⑥ Block the lid.
⑦ Press the cup-dispenser into the opening of the lid.
⑧ Plug in the appliance.
⑨ Set the desired speed using the ▲ buttons (the default gear is 6).
⑩ Switch on the motor using the button.
NOTE: The TURBO mode can only be switched on when the motor is operating.
Operating the dough kneader (Fig. G)
① Insert the dough kneader container on the fastening hooks of the motor.
② Block the container on the fastening hooks.
③ Insert the gasket on the end of the feed tube of the central container and turn it clockwise.
④ Attach the selected accessory (the dough hook or the mixing whisk) to the motor shaft. If you want to use the mixing whisk, you have to first attach it (snap shot) to the whisk head shaft.
⑤ Place the food products to be processed inside the container.
⑥ Place the lid on the fastening hooks of the container.
⑦ Block the lid on the fastening hooks.
⑧ Plug in the appliance.
⑨ Switch on the motor using the button.
⑩ Set the desired speed using the ▲ buttons (the default gear is 1).
NOTE: While using the dough kneader do not operate the appliance above the 6 gear and in the TURBO mode. It may cause damage to the attachment.
After operation (Fig. H)
① Switch off the motor using the ① button.
② Unplug the appliance.
③ Unblock the lid (after the attachment completely stops rotating).
④ Open the lid.
⑤ Unblock the container.
⑥ Remove the container from the motor.
⑦ Detach the attachment.
⑧ Empty the container.
Cleaning and maintenance
Wash the parts of the food processor that have contact the processed food thoroughly after each use.
- Mixing warm water with dishwashing liquid makes the cleaning of the liquidizer easier.
Wipe the housing with a damp cloth with dishwashing liquid. Do not immerse the housing into water. Do not wash it in the dishwasher.
Remove the dirt from the slots and the corners using a bottle brush or a toothbrush.
Always store the food processor blade in the casing.
Plastic elements may discolor as a result of excessive use. Do not teat this as a defect. Orange stains caused by carrot juice can be easily removed with the use of a cloth soaked with edible oil.
Dry all parts thoroughly after washing.
Pay special attention to transparent plastic parts. They are very sensitive to strokes and dropping and may be damaged.
Operation tips
The food processor grinds the products very quickly. Switch on the appliance for a short period of time. Do not use the food processor blade to grind too big product pieces. Before placing the product in the container divide the product into cubes of about 3 cm.
Do not allow the food processor to operate too long while grinding cheese, butter, margarine. Such products may heat and melt.
the products stick to the blade or the inner sides of the container turn off the appliance, take off the lid and remove the ingredients from the blade and the sides of the container (using the spatula).
Grinding hard products such as: coffee beans, nutmeg and ice cubes etc. may adversely affect the condition of the blade (e.g. the blade may become blunt).
Slicing discs
In order to receive uniform round slices put wide vegetables into the larger feed tube and the thin ones into the smaller feed tube – separately into the smaller feed tube and a couple of pieces at a time into the larger one.
You will receive regular slices without torn edges when the appliance is switched off while filling the feed tube. To do so you can use the PULSE function.
- soft and juicy vegetables should be cut at lower speed, hard vegetables at a faster one.
You can cut 0.8 - 1kg of fruit or vegetables at a time to completely fill the container.
Shredding discs
You can fill the feed tube during operation.
While shredding you can use all available gears. Use lower gears for soft fruits and vegetables and higher gears for harder ones.
You can cut 0.8 - 1kg of fruit or vegetables at a time to completely fill the container.
Pureeing disc
You can fill the feed tube during operation.
After processing approximately 0.5 kg of the products, stop the appliance and remove the pulp gathered on the lid.
French fry slicing disc
Will the feed tube when the appliance is switched off.
Switch on the appliance using the PULSE function.
You can cut 1kg of potatoes at a time to completely fill the container.
Examples of using the appliance (Table 1, Table 2, Table 3)
The examples of using the appliance, the maximum quantities of basic ingredients, the approximate operation time and the gears to be used are presented in the tables. Please do not treat it as a cook book. Proceed according to your individual taste and the culinary rules in the literature and guides. The actual operation time depends on the quality and quantity of the products and the desired level of mixing or grinding.
Ecology – Environment protection
Each user can protect the natural environment. It is neither difficult nor expensive.
In order to do it: put the cardboard packing into recycling paper container; put the polyethylene (PE) bags into container for plastic.
When worn out, dispose the appliance to particular disposal centre, because of the dangerous elements of this appliance, which can be hazardous for natural environment.
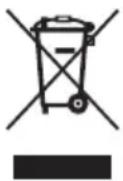
Do not dispose into the domestic waste disposal!!!
The manufacturer does not accept any liability for any damages resulting from unintended use or inappropriate handling.
The manufacturer reserves his rights for modifying the product any time in order to adjust it to law regulations, norms, directives, or due to construction, trade aesthetic or other reasons, without notifying it in advance.
Table 1 FOOD PROCESSOR – FOOD PROCESSOR BLADE
| Product Max. | quantity Preparation Gear | Operation** Operation time | |||
| Boiled eggs 10 | Put whole eggs in the container. 6-9 P 25-30 times. | ||||
| Carrots 1000 | g Cut into 3 cm pieces. 12 | C up to 30 s. | |||
| Parsley | 4 bunches | Wash, dry, remove stems. | 12 | C | 30 s |
| Chocolate | 400 g (4 bars per 100 g) | Break chocolate bars into pieces. | 12 | C | up to 45 s. |
| Almonds | 1000 g | Skin may be peeled off before processing. | 12 | C | up to 60 s. |
| Mixed beverages | 1 liter (3/4 liter of liquid + fruits) | -Mix fruits.-Add liquid (milk, kefir etc.). | 10-1212 | PC | up to 30 times.60 s |
| Tatar sauce | -600 ml of mayonnaise,-170 g of mushrooms,-170 g of gherkins,-2 boiled eggs. | Put all ingredients in the container. | 12 P | 7 times Pabout 20 s | |
| Mayonnaise | -1.5 liter = (1 liter of oil+4 eggs + lemon juice) | -Whip eggs and oil at room temperature with lemon juice.-Add oil (pour into the smaller chamber of the food pusher which has an opening at the bottom)-Final blending. | 10-12 | C | 30 suntil oilis used up+30 s |
| Pancake batter | -1.5 cup of milk,-1.5 cup of water,-3 cups of flour,-3 eggs. | Put all the ingredients in the container.Blend During blending (if necessary) remove flour from the sides of the container using the spatula. | 8-12 C | 30-45 s | |
| Cheesecake | 1 kg of cheese | -Cream butter (margarine) with sugar and yolks.-Gradually add cheese cut into small pieces through the feed tube.-Cream the cheese paste.-Whip the egg whites using the dough kneader.-Combine the cheese paste with the whipped egg whites and the rest of the ingredients in a separate bowl. Carefully stir with a spoon. | 101064-6 | CCC | about 1 min.about 2 min.about 1 min.2 min. |
| Dumpling dough | -500 g of flour,-1-2 eggs,-200 ml of water,-2 tablespoons of oil. | Put all the ingredients in the container and bled. | 6 | C | 60 s |
| Creamed cake | -3 cups of flour (about 450g),-3 partially filled cups of powdered sugar (about 400 g),-400 g of butter,-9 eggs,-1 teaspoon of baking powder. | -Cream butter (at room temperature) with sugar and yolks.-Whip the egg whites using the dough kneader.-Add flour, baking powder and stir.-Pour the mixture into two narrow rectangular tins.-Bake for 45 min at approximately 180°C. | 662 | CCC | 7 min.1 min.about 2 min. |
| Yeast dough* | -500 g of flour,-150 g of sugar,-125 g of butter,-250 ml of milk,-30 g of yeast,-3 eggs. | Blend yeast with warm milk, 1 tablespoon of sugar and 1 tablespoon of flour. Wait until dough rises, add flour, eggs, fat and knead dough. Wait about 30 min until dough rises.Bake for 40 min at approximately 160°C. | 9 | C | 2 min. |
| Meat stuffing | -500 g of beef cooked in vegetable stock,-2 boiled eggs,-1 onion cut into cubes and fried,-salt, pepper. | -Cook meat, cut in cubes (about 3 cm).-Divide eggs into fours.-Put all the ingredients in the container and mix (if the stuffing is too dry add stock and mix). | 12 C | 30-45 s | |
* Yeast dough
NOTE: Dough prepared according to the above recipe is very watery and cannot be formed in a ball; it sticks to the hand and the sides of the container. Its consistency does not resemble one of a typical yeast dough; it cannot be formed or rolled. While preparing a yeast pie according to the above recipe the dough should be transferred to the tin right after blending the ingredients (kneading the dough). After baking you will receive a tasty, spongy, well risen sweet yeast bun.
** Operation: P – pulse C – continuous
Table 2 LIQUIDIZER
| Product Max quantity Preparation Gear Operation* Operation time | |||||
| Fruit cocktail 1 | liter = 0.50–0.75l of milk + fruits | Grind fruits. –Add milk, blend. – | 10–1212 | PC | 5–10 times.30 s |
| Pancake batter | 1 liter = 1 cup of milk + 1 cup of water + 2 eggs + flour | Put all the ingredients in the container and blend. | Increase from 8–12 | C up to | 30 s. |
| Vegetable soup | 1 liter = 30 decagrams of –cooked vegetables,10 decagrams of lean meat, –2 cups of stock. – | Cook meat and vegetables, cool down –and blend.Add stock. – | 10–1212 | PC | 5–10 times.30–40 s |
* Operation: P – pulse C – continuous
Table 3 DOUGH KNEADER
| Product | Max. quantity | Preparation | Gear | Operation* | Operation time |
| DOUGH HOOK | |||||
| Yeast dough | -1500 g of flour | Put flour, eggs and sugar in the container.Add milk with melted fat and yeast through the feed tube in the lid.Knead | 15-6 | CCC | 30 s5 min. |
| Shortcrust pastry | -750 g of flour | -Put all the ingredients in the container. | 5-6 | C | 2 min. |
| Noodle dough | -1000 g of flour | -Put all the ingredients in the container. | 5-6 | C | 5 min. |
| Dumpling dough | -1000 g of flour | -Put all the ingredients in the container. | 5-6 | C | 5 min. |
| MIXING WHISK | |||||
| Sponge cake | -from 8 eggs | Whip egg whites,Add powdered sugar,Add 2 yolks at a time,Add flour. | 4-64-64-61 | CCC | 2 min.2 min.2 min.30 s |
| Creamed cake | -from 500 g | Cut margarine at room temperature cut into about 2 cm cubes and cream with sugar.Gradually add eggs.Add flour. | 4-64-61 | CCC | 4 min.1-4 min.30 s |
| Cheesecake | -1 kg of cheese | Cut butter at room temperature cut into about 2 cm cubes and cream with powdered sugar and yolks.Add 1 spoon at a time of cheese grinded in the meat grinder.Finish creaming the cheese pastry.-Transfer the cheese pastry to a different container.Wash the container of the dough mixer and the mixing whisk.Whip egg whitesAdd whipped egg whites to the cheese pastry and gently stir with a spoon. | 4-64-64-6 | CCC | 4 min.4 min.1 min.2 min. |
| Whipped egg whites | Egg whites from 10 eggs | Put egg whites at room temperature in the container and whip. | 4-6 | C | Up to 2 min. |
| Whipped cream | 700 ml of whipping cream (32-34% fat) | Cool cream to 8-10°C, put in the container and whip. | 1-2 | C | Up to 2 min. |
| Product Max. | quantity Preparation Gear Operation* | Operation time | |||
| LIQUIDIZER | |||||
| Fruit cocktail | liter = 0.5-0.75l of milk + fruits – | Grind fruits. –Add milk, blend. – | 10–1212 | AC | 5–10 times.30 s |
| Pancake batter | 1 liter = 1 cup of milk + 1 cup of water + 2 eggs + flour | Put all the ingredients in the container and blend. | Increase from 8–12 | C up to | 30 s. |
| Vegetable soup | 1 liter = 30 decagrams of – cooked vegetables,10 decagrams of lean meat, –2 cups of stock. – | Cook meat and vegetables, cool down and blend.Add stock. | 10–1212 | AC | 5–10 times.30–40 s |
| Mayonnaise | 4 liter = 450 ml of oil + 3 yolks + lemon juice | Whip yolks with lemon juice.Add oil (pour into the cup in the lid)Add salt, sugar, optionally cream and mustard. | 101012 | CCA | 1 min until oil is used up + 30 s5 times. |
| Tatar sauce | 4 liter= mayonnaise + pickled mushrooms + gherkins | Prepare mayonnaise as above, add the remaining ingredients and optionally an egg. | 12 | A | 5 times. |
* Operation: P - pulse C - continuous A - AUTOPULSE

- Important safety and proper use instructions
- Always unplug the appliance before cleaning.
- Technical parameters
- Product description
- Motor control (Fig. A)
- LCD display (Fig. A)
- TIMER function (Fig. B)
- Food processor accessories (Fig. A)
- Food processor
- Liquidizer
- Dough kneader
- How to use the accessories
- Preparing the food processor for operation
- Operating the food processor (Fig. C)
- Operating the food processor blade (Fig. D)
- Operating the slicing disc (Fig. E)
- Operating the liquidizer (Fig. F)
- Operating the dough kneader (Fig. G)
- After operation (Fig. H)
- Cleaning and maintenance
- Operation tips
- Slicing discs
- Shredding discs
- Pureeing disc
- French fry slicing disc
- Examples of using the appliance (Table 1, Table 2, Table 3)
- Ecology – Environment protection
Brand : Zelmer
Model : 880.0LCD
Category : Food processor