986 - Food processor Zelmer - Free user manual and instructions
Find the device manual for free 986 Zelmer in PDF.


| Product Type | Food Processor |
| Model | 986 |
| Brand | Zelmer |
| Power Rating | 700 W |
| Bowl Capacity | 1.5 L |
| Dimensions (H x W x D) | 36 x 22 x 22 cm |
| Weight | 3.2 kg |
| Main Functions | Chopping, Mixing, Blending, Slicing, Shredding, Whipping |
| Speed Settings | 2 speeds plus pulse |
| Attachments Included | S-blade, dough hook, whisk, slicing disc, shredding disc |
| Bowl Material | Plastic (BPA-free) |
| Feeding Tube | Large feeding tube for whole fruits/vegetables |
| Safety Features | Safety lock on bowl, non-slip feet, overload protection |
| Cord Length | 1.2 m |
| Dishwasher Safe Parts | Bowl, lid, and most attachments |
| Cleaning Instructions | Wipe motor base with damp cloth; wash removable parts in warm soapy water or dishwasher |
| Warranty | 2 years |
Frequently Asked Questions - 986 Zelmer
User questions about 986 Zelmer
0 question about this device. Answer the ones you know or ask your own.
Ask a new question about this device
Download the instructions for your Food processor in PDF format for free! Find your manual 986 - Zelmer and take your electronic device back in hand. On this page are published all the documents necessary for the use of your device. 986 by Zelmer.
USER MANUAL 986 Zelmer
4

7

5

8

natural_image
Three white kitchen utensils with directional arrows indicating motion (no text or symbols visible)9
10

11

12

PL
Stanowni Eliand!
Gold, w; you range 100% to 50% and 20% to 70%.
In our case, we have just spread wide range of colds and colds in the past week. We are a very rare.
Jahal pomeris molygus kredinolaty clyse, asuncada, to pomeris in tpy serykdy a serytoryi b sp. apicalyem arilbors supramyti abu zent vypnivmitya octby a ceh rinklatis zuprata. Ampia acubota neta deiknyal pejna pomeris lyciparum. Iqunavitana ayutana netae xuc apicalnai pomeris agustea da uplatuva i rata apicala uveet mota e of coagulata geta suta aua mena.
In 1960, a man was in the way of the world's history. The company is now being able to get it from the country.
In a way of the superconductor, a cable wire is an open 30°C. The circuit remains that was closed to the following circuit:
and every person is doing a direct copy of the first book, which is also available to all the authors.
M. 2017, 36:45–46:46
A
Notes
No. 1 – kisebb lyukakkal
Razina buke (LWA) 77 dB/A.
Congratulations on your choice of our appliance, and welcome among the users of Zelmer products.
In order to achieve best possible results we recommend using exclusively original Zelmer accessories. They have been specially designed for this product.
Please read this instruction manual carefully. Pay special attention to important safety instructions. Keep this instruction manual for future reference.
Safety instructions and instructions concerning the proper use of the appliance
Do not unplug by pulling on cord.
Plug the appliance only to a grounded 230 V electrical outlet.
Do not operate the appliance if the cord, the housing or the handle is visibly damaged. In such a case, return the appliance to a service center.
If the non-detachable part of the cord is damaged, it should be replaced by the producer or at a proper service point or by a qualified person in order to avoid any hazards.
The appliance can only be repaired by qualified service personnel. Improper servicing may cause a serious hazard to the user. In case of defects please contact a qualified service center.
nplug the appliance after operation. Put away the cord, pushing it gently through the opening and place the plug in the compartment.
Do not expose the mincer and the accessories to temperatures above 60^ C. It may cause damage to the mincer.
Day special attention while operating the appliance near children.
This appliance is not intended for use by persons (including children) with reduced physical, sensory or mental capabilities, or lack of experience and knowledge, unless they have been given supervision or instruction concerning use of the appliance by a person responsible for their safety.
Children should be supervised to ensure that they do not play with the appliance.
Turn off the device and unplug it from an outlet before replacing the equipment or approaching moving parts during use.
Always unplug the appliance before cleaning or changing the accessories.
Use only the pusher to push food. Using objects other than the pusher may cause damage to the mincer and the motor.
Do not overload the appliance with too much product. Do not push too hard with the pusher.
Carefully install the mincing unit, as improper installation results in poor mincing quality and may cause the cutter and the screen to become blunt. Replace a blunted cutter or screen.
Do not cover the ventilation openings in the housing during operation.
Place the appliance only on a hard, stable surface.
Return the appliance to a service center if it fails to switch on.
Separate the meat to be minced from bones, sinews, gristles and strings.
- Out larger products into pieces before mincing.
Do not mince dry poppy seed. The poppy seed must be scalded and soaked for several hours before mincing.
Do not immerse the motor in water, do not wash it under running water.
Do not wash accessories installed on the motor unit.
Do not use abrasive detergents such as emulsions, cream cleaners, polishes, etc. to clean the housing. They may remove the graphic information symbols such as: scales, marks, warning signs etc.
Use a soft brush to clean metal parts.
Do not wash metal parts in the dishwasher. Abrasive detergents used in the dishwasher may cause these parts to darken. Wash these parts manually using traditional dishwashing liquids.
Technical parameters
The technical parameters are indicated on the rating label.
Permissible duration of uninterrupted operation 15 minutes.
Break before the next use 30 minutes.
Noise level ( L_WA ) 77 dB/A.
The appliance features double electrical insulation (Class II) and does not require grounding ☐
ZELMER mincers fulfill the requirements of the existing norms.
The appliance is in conformity with the requirements of the directives:
– Low voltage appliance (LVD) – 2006/95/EC.
– Electromagnetic compatibility (EMC) – 2004/108/EC.
The appliance was marked by the CE sign on the rating label.
TYPES OF ZELMER MINCERS
| Typ 986 | Accessories | |||||
| Mincing unit Citrus juicer Shredder | Juicer | Quern grinder | Pasta and pastry set(only for 986.5x) | |||
| 986.50 / 986.80 | ● | ● | ● | ● | ● | ●/— |
| 986.52 / 986.82 | ● | ○ | ○ | ● | ○ | ●/— |
| 986.53 / 986.83 | ● | ● | ● | ● | ○ | ●/— |
| 986.54 / 986.84 | ● | ○ | ● | ○ | ○ | ●/— |
| 986.56 / 986.86 | ● | ● | ● | ○ | ○ | ●/— |
| 986.57 / 986.87 | ● | ● | ○ | ○ | ○ | ●/— |
| 986.58 / 986.88 | ● | ○ | ○ | ○ | ○ | ●/— |
| 986.88MMSL | Mincing unit witha metal tray and3 screens: 2,7; 4; 8 | — | ○ | — | — | — |
| 986.84MMSL | ● | |||||
| ● – basic accessories, ○ – additional equipment, which you can buy in shops, — – unavailable accessories | ||||||
The mincer is equipped with one mincing unit.
The manual and the description concerning the pasta and pastry set is additionally included to mincers equipped with this set.
Description (Fig. 1)
The food mincer consists of:
Mincer motor – each motor is adapted to install each ZELMER mincing unit, citrus juicer, juicer, coffee grinder and shredder.
The mincer unit consists of:
I. Mincer body
II. Scroll with clutch
III. Cutter
IV. Mincer screen with 4mm openings
V. Ring nut
VI. Tray
VII. Pusher
And additional accessories:
VIII. Base plate
IX. Sausage filler nozzle
X. Mincer screen with 8mm openings
XI. On/Off button.
Mechanical safety device for the motor (Fig. 2)
I. Scroll
II. Clutch
III. Screw M5x20
The mincer is equipped with a mechanical safeguard, which protects the motor against damage – the teeth in the clutch break when the mincer is overloaded (e.g. when bones get inside).
Replace the damaged clutch:
●vist off the screw from the scroll with the damaged clutch,
- remove the damaged clutch,
- attach the new clutch and tighten it with the screw.
"Reverse" function
The motor has a special function allowing to temporarily change the direction of the scroll. It is used if mincing is limited and/or if there is too much product in the mincer body (the scroll does not take the product). Press the „R” switch for a short period of time, the product will be removed from the inside of the mincer body. Press the „I” button once again to continue operation.
If the scroll is still blocked by the excess of product, use the „R” switch once again, remove the product from the mincer body and next remove product parts which make it difficult to mince (e.g. sinews, etc.).
In some cases it is necessary to dismantle the mincer body and remove the above-mentioned obstacles.
Preparing the appliance for operation and switching on the appliance
Take out a sufficient length of the supply cord and the appropriate accessories from the compartment.
Place the motor near the socket, on a hard, stable surface. Do not cover the ventilation openings of the housing.
- open the compartment on the back of the housing and take out an appropriate screen.
A screen with 4mm openings is installed in the mincer body as a standard.
Wash all accessories thoroughly before the initial use.
assemble the appropriate accessories and install them on the motor.
Plug in the appliance.
- switch on the appliance using the „I” switch (the appliance starts to operate after about 2 seconds).
Mincing unit (Fig. 4)
Fit the following elements in the mincer body:
The scroll with the clutch facing to the inside of the body.
The cutter to the bolt with the blades facing the screen.
The screen so that the protrusion of the body fits the groove in the circumference of the screen.
Tightly fit all the elements of the mincer body.
Place the assembled mincer body on the motor and turn left until you hear a click. It means that the body has been properly installed.
Fit the tray to the mincer body.
Operation with the sausage filler nozzle (Fig. 5)
Place the following elements in the mincer body:
The scroll with the clutch facing to the inside of the body.
The base plate to the bolt.
The sausage filler nozzle.
Tightly fit all the elements with the ring nut.
Soak the casing for about 10 minutes before fitting.
Fit the wet casing on the sausage filler nozzle.
Make sure the not to block the ventilation openings on the nozzle.
The meat cannot be „too thin”. A large liquid content may cause its leakage to the inside of the mincer.
Citrus juicer (Fig. 6)
The citrus juicer is an additional appliance, which enables to squeeze juice from citrus fruits together with the pulp.
Citrus juicer unit:
I. Clutch
II. Bowl
III. Screen
IV. Squeezer
Open the lid of the compartment on the back of the housing, which enables to operate the appliance in a vertical position. Place the appliance on a hard, even surface.
Fit the following elements onto the motor:
Clutch.
☑ix the bowl to the motor and turn left until you hear a click. It means that the bowl has been properly installed.
attach the screen and the squeezer to the protruding part of the bowl.
Prepare the fruits by cutting them into halves.
Plug in the appliance.
Switch on the appliance using the „I” switch and place the fruit on the squeezer with the pulp facing the squeezer.
Bush to start the squeezing process.
CAUTION! In case the sieve is blocked with the pulp of extracted fruit, it is necessary to switch off the
appliance, disassemble the sieve and empty it, as the excess of the pulp can cause leakage to the motor chamber of the appliance.
CAUTION! The citrus juicer spins during operation. Pay special attention to your fingers while pushing the fruits on the squeezer.
Shredder (Fig. 7)
I. Fine grating disc
II. Coarse grating disc
III. Slicing disc
IV. Pureeing disc
V. Locking tab
VI. Body
VII. Tray
VIII. Pusher
The shredder is equipped with two grating discs for fine (I) and coarse (II) grates (cheese, carrot, celery, cooked beetroots etc.). The slicing disc (III) is used to slice vegetables (potatoes, cucumbers, onions, etc.). The purée disc (IV) is used to purée potatoes, beetroots, fruits, etc.
In order to prepare the shredder for operation:
Dull the locking tab (V) and place one of the discs with the clutch facing the inside of the body.
●nap the tab shut.
assemble the shredder body in the same way as the mincer body.
Out larger products into pieces.
Do not grind soft fruits with hard stones.
- switch off and unplug the appliance after operation.
Remove the remaining products from the inside of the disc or body using a wooden spoon.
The blades of the discs do to require renovation.
Replacing the discs (Fig. 8).
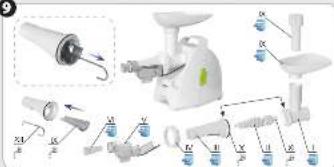
Juicer
(Fig. 9)
The juice squeezer is an equipment included to some types of mincers. It allows to squeeze juice from fruits such as: raspberries, currants, strawberries, gooseberry and additionally from grapes and tomatoes. Berry fruits such as currants can be squeezed with stalks. Fruits with large stones for example plums, cherries etc can be squeezed in the appliance after removing the stones.
Appliance elements:
I. Chamber
II. Worm
III. Body
IV. Nut
V. Juice channel
VI. Adjusting screw
VII. Bowl (from the mincing unit)
VIII. Pusher (from the mincing unit)
IX. Screen - 2 pieces
No. 1 – smaller openings
No. 2 – larger openings
X. Large sealing ring for the body (3)
XI. Small sealing ring for the worm (2)
XII. Hook
NOTE: Use only the pusher to push fruits (VIII).
Preparing for operation and operation
Make sure the sealing rings(X) and (XI) are installed on the body (III) and worm (II). If not, please install the sealing rings in the openings of these elements (the body and the worm).
Insert the screen (IX) into the body (III) and push until stop.
In order to remove the sieve (IX) out of the body (III), it is helpful to use the hook (XII). Put the shorter end of the hook (XII) into the hole of the sieve (IX), and pull the sieve (IX) outside.
Insert the worm (II) into the squeezer chamber (I) and insert the body with the screen onto the worm paying attention that the sieve is placed downwards, and the positioning opening fits the protrusion of the squeezer chamber.
●crew the nut (IV) onto the squeezer chamber (I).
●crew the adjustment screw (VI) into the body (III) and insert the juice channel (V) until it snaps shut on the body (III) and you hear a click.
Insert the assembled squeezer onto the motor, proceeding in the same way as in the description of the mincing chamber.
Insert the bowl (VII) and the pusher (VIII) – from the mincing unit onto the feeding tube.
But some appropriate vessels for juice and pulp under the juice channel outlet (V) and adjusting screw (VI).
Plug in the appliance.
Turn on the appliance by pressing the „I” button and next insert the fruits pushing them with the pusher.
In order for the juice squeezing process to run properly do not screw the adjustment screw too deeply in the initial operation phase. After assessing the amount of juice in the processed fruits, adjust the screw in order to obtain an adequate effectiveness and to avoid clogging the appliance.
- Observe the pulp dryness during squeezing. If they are too dry, unscrew the adjusting screw (VI), to avoid clogging the appliance.
The screw adjustment depends on the type of processed fruits, in case of juicy and ripe fruits adjust the screw deeper, and for fruits that are not as juicy, the level of screw adjustment should be lower.
If the screw adjustment does not provide an adequate squeezing effectiveness, you can process the processed fruits once again.
The clogging of the chamber outlet (in the adjustment screw (III)) with juicy processed fruits can cause the juice to contact the motor.
Unplug the appliance if the chamber outlet becomes clogged. Pay special attention during the juice squeezing process, make sure the screen openings are not clogged. Dismantle the juicer from the motor (as in the case of the mincing chamber), dismantle the squeezer, clean (wash) the squeezer elements. Use the included brush to clean the appliance, especially the screen.
Quern grinder (Fig. 10)
I. Nut
II. Quern regulator
III. Body with handle
IV. Internal quern
V. External quern
VI. Worm
VII. Grinder chamber
VIII. Pan
IX. The groove of the body has to hit the protrusion of the grind chamber
Device description
Presented device can be used to grinding such products as: corns, oily seeds and the dry comestibles
The quern grinder enables grinding of such products as: wheat, oat, rice, granular coffee, all-spice, charlock, walnuts, hazelnuts dried mushrooms, almonds, soya. linseed, buckwheat groats, peeled sunflower seeds etc.
IMPORTANT: Don't grind the oily products by the minimal granulation set up. Grinding device can be glued or blocked.
IMPORTANT: Device is not dedicated for grinding the very hard products as f. e. dried pea, maize, popcorn.
The installation of the grinder on the device
When the grinder chamber is turned right through the angle of 45, put the assembled grinder on the drive by putting the protrusions of grinder chamber (VII) on the recesses of the drive, and then, turn left to the position in which you will hear "clicking" of the blocking. It means that the grinder has been assembled correctly.
Usage and regulation of the grinder
Before the first use, wash (see "CLEANING") and dry a disassembled grinder, and then grind around 50 grams of product (f. e. corns) - set-up the grinding option of the device with the medium comminute. The grinded product is not fit to use cause it's polluted and its necessary throw it away.
IMPORTANT: Maximal time of uninterrupted work is around 15 minutes.
This condition is connected with maximal work time of machine, for which it should be done the 45 minutes of pause after 15 minutes of operation.
IMPORTANT: The devices cannot operate without loading. Each time before staring the device, fill it up with product.
Put the corns into the pan (VIII), set up the handle of the body (III) on the thicker grinding, set up the machine engine. The grinded product will start pouring out through the hole.
Regulate the quern regulator (II), depending on the demanded grinding level or using seeds, with the handle of the body for obtain the product with the adequate granulation level.
By turning it clockwise you will get the fine grind product. By turning it counter-clockwise – the thick grind product.
The finest (minimal) grinding level is achieved by setting it up with the handle on the line 1, and the hugest (maximal) by setting it up with the handle on the STOP line. See the graphic on the body (III) and quern regulator (II).
Too strong twisting or turning of the handle out of STOP line during the work time can cause the device failure.
CAUTION: It's recommended to set the quern regulator during the grinder work time between the line 1 and STOP line.
IMPORTANT: It's FORBIDDEN to use the REVERSE function in the machine when the grinder is installed.
CAUTION: Remember about the accurate washing the grinder before grinding of the different products. It will permit to avoid the mutual penetration of odors.
CAUTION: For the soft corns as oat or linseed it's necessary to select the coast-grained set up.
ATTENTION! Do not look into the grinding chamber during operation, as the beans which pop out sometimes, can hurt you (i.e. your eye).
Cleaning and maintenance
The grinder does not require the cleaning after each operation (if it's grinded one kind of product), cause the worm prevents falling the seeds residues into grinder. Dry the steel quern (4, 5) using a soft cloth after cleaning to prevent corrosion. In case of long-term storage, conserve the quern by greasing them (you can use edible oil). Do not immerse the quern into boiling water. The part of plastic (don't containing the graphic) can be washed in the dish-washer (max. of 60°C).
After operation (Fig. 11)
- switch off and unplug the appliance.
Remove the pusher and take out the tray from the mincer body, the shredder body or the juicer body (in case of the citrus juicer separately remove the squeezer and screen).
Press the lock button (1), turn (2) the mincing unit, the shredder body (or the citrus juicer bowl) to the right and remove it.
case of the citrus juicer take out the clutch from the motor.
Dismantle the elements of the mincing unit, the body with the sausage filler nozzle, the juicer body or the shredder.
Store the clean and dry screens in the compartment. In order to do so:
Open the compartment on the back of the housing.
- Press the compartment lock on both sides and pull (as shown earlier).
- (3) Store up to two screens and close the compartment and the back lid (4).
(5) Put away the cord, pushing it gently through the opening.
(3) Place the plug in the compartment.
Cleaning and maintenance
Wipe the motor with a damp cloth with dishwashing liquid.
Wash plastic elements in warm soapy water or in the dishwasher according to the denotations.
Wash metal elements in hot soapy water.
Dry all elements thoroughly.
●rease the screens and cutter with cooking oil to protect from rusting.
Assemble dry elements of the mincer body or the shredder.
Ecology – Environment protection
Each user can protect the natural environment. It is neither difficult nor expensive.
In order to do it: put the cardboard packing into recycling paper container; put the polyethylene (PE) bags into container for plastic.

When worn out, dispose the appliance to particular disposal centre, because of the dangerous elements of this appliance, which can be hazardous for natural environment.
Do not dispose into the domestic waste disposal!!!
The manufacturer does not accept any liability for any damages resulting from unintended use or inappropriate handling.
The manufacturer reserves his rights for modifying the product any time in order to adjust it to law regulations, norms, directives, or due to construction, trade aesthetic or other reasons, without notifying it in advance.

- Stanowni Eliand!
- Safety instructions and instructions concerning the proper use of the appliance
- Technical parameters
- Description (Fig. 1)
- Mechanical safety device for the motor (Fig. 2)
- "Reverse" function
- Preparing the appliance for operation and switching on the appliance
- Mincing unit (Fig. 4)
- Operation with the sausage filler nozzle (Fig. 5)
- Citrus juicer (Fig. 6)
- Shredder (Fig. 7)
- Juicer
- (Fig. 9)
- Preparing for operation and operation
- Quern grinder (Fig. 10)
- Device description
- The installation of the grinder on the device
- Usage and regulation of the grinder
- Cleaning and maintenance
- After operation (Fig. 11)
- Ecology – Environment protection
Brand : Zelmer
Model : 986
Category : Food processor