CR 465 - Lecteur CD CLATRONIC - Notice d'utilisation et mode d'emploi gratuit
Retrouvez gratuitement la notice de l'appareil CR 465 CLATRONIC au format PDF.

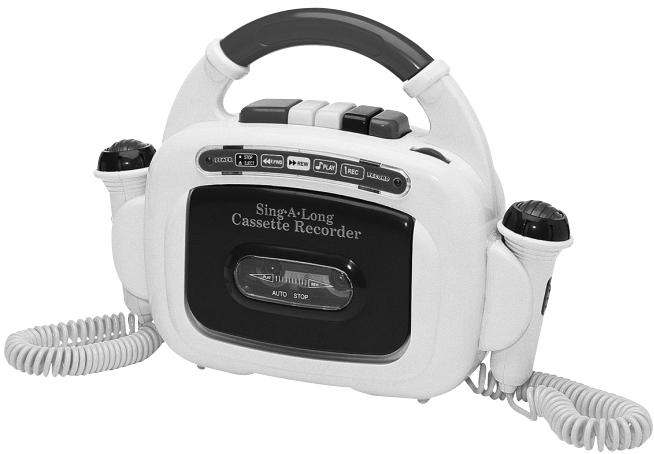
| Type de produit | Lecteur/enregistreur de cassettes pour enfants avec fonction karaoké |
| Marque | CLATRONIC |
| Modèle | CR 465 |
| Alimentation | 4 piles 1,5V type UM2/R14 ou adaptateur secteur (non fourni) |
| Fonctions de lecture | Lecture, arrêt, éjection, avance rapide, retour rapide |
| Fonctions d'enregistrement | Enregistrement via micro(s) intégré(s) |
| Microphones | 2 micros intégrés avec interrupteur marche/arrêt |
| Sortie audio | Haut-parleur intégré et prise casque |
| Réglage du volume | Molette de volume |
| Voyants | Voyant d'alimentation (POWER) et voyant d'enregistrement (RECORD) |
| Compartiment piles | À l'arrière, fermé par vis, requiert tournevis cruciforme |
| Entretien et nettoyage | Essuyer avec un chiffon humide, ne pas utiliser de produits abrasifs |
| Sécurité | Ne pas exposer à l'humidité, ne pas ouvrir le boîtier, débrancher en cas d'inutilisation prolongée |
| Garantie | 24 mois à compter de la date d'achat (sous réserve des conditions) |
| Pièces détachées et réparabilité | Réparations par un professionnel après garantie ; pièces d'usure non couvertes |
| Dimensions | Environ 20 x 15 x 8 cm (estimation) |
| Poids | Environ 500 g avec piles (estimation) |
| Conformité | CE |
| Langues du manuel | Allemand, anglais, polonais, espagnol, danois, italien |
FOIRE AUX QUESTIONS - CR 465 CLATRONIC
Questions des utilisateurs sur CR 465 CLATRONIC
0 question sur cet appareil. Repondez a celles que vous connaissez ou posez la votre.
Poser une nouvelle question sur cet appareil
Téléchargez la notice de votre Lecteur CD au format PDF gratuitement ! Retrouvez votre notice CR 465 - CLATRONIC et reprennez votre appareil électronique en main. Sur cette page sont publiés tous les documents nécessaires à l'utilisation de votre appareil CR 465 de la marque CLATRONIC.
MODE D'EMPLOI CR 465 CLATRONIC
CIC
CLATRONIC
Bedienungsanleitung/Garantie
Instruction Manual/Guarantee
Instrukturija obfsugi/Gwarancja
Instrucciones de serviceo/Garantía
Beteningsvejledning/garanti
Istruzioni per l'uso/Garanzia
Kinder-Cassetten-Recorder
Children toy cassette recorder Magneto-fon kasetowy dla przycie Grabadora de cassetas para niños Borne-kassette-recorder Registratore a cassetta - Karaoke per bambini
CR 465
Inhalt
Contents · Spis tresci · Indice · Inhold · Indice
D Übersicht Bedienelemente .Seite 3
Bedienungsanleitung .Seite 4
Garantie .5
GB Control element overview Page 3
Instruction Manual .Page 7
Guarantee 8
PL Przeglad elementów obsługi . Strona 3
Instrukcja obsfugi .Strona 10
Gwarancja . 12
E Vista de?).Pagina 3
Instrucciones de service . 14
Garantia . 16
DK Beskrivelse af de enkelte dele . . . . . . . . . . . . . . . . . . . . . . . . . . . . . . . . . . . . . . . . . . . . . . . . . . . . .
Betjeningsvejledning .Pagina 17
Garanti . 19
Descrizione dei singoli pezzi . 3
Istruzioni per l'uso . 20
Garanzia .22
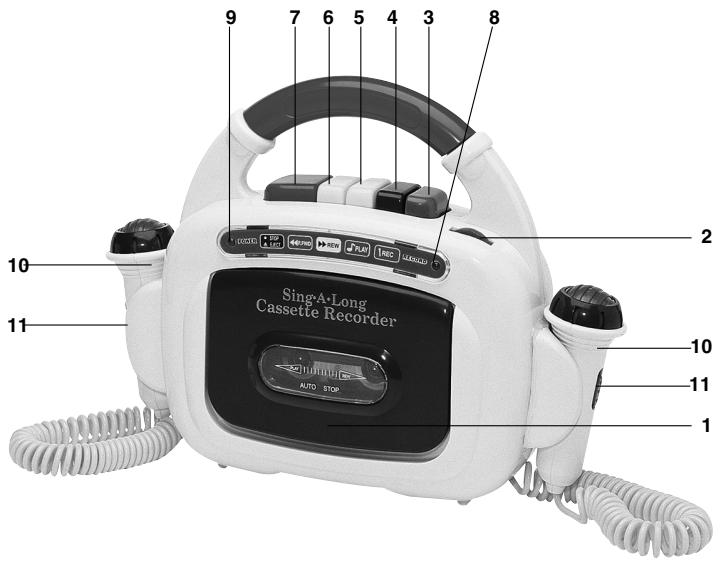
Übersicht der Bedienelemente
1 Kassettenfach
2 Lautstarkeregler (VOLUME)
3 Aufnahmetaste (RECORD)
4 Wiedergabetaste (PLAY)
5 Schneller Rücklauf (REW)
6 Schneller Vorlauf (F.FWD)
7 Stop/Auswurf-Taste (STOP/EJECT)
8 RECORD-Lampchen
9 POWER-Lampchen
10 Mikrofone
11 Ein-/Ausschalter (Mikrofone)
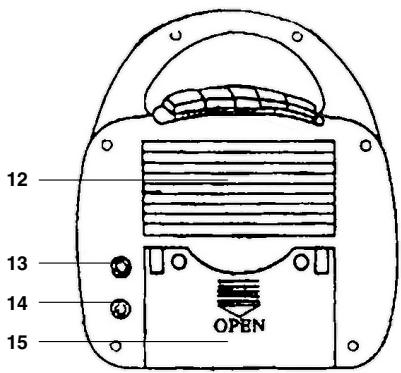
12 Laatsprecher
13 Buchse für Netzadapter (Netzgerät nicht mitgeliefert)
14 Kopfhörer-Anschluss
15 Batteriefach
D
Allgemeine Sicherheitshinweise
Um das Risiko von Feuer oder einem elektrischen Schlag zu vermeiden, sollenn Sie das Gerät nicht Regen oder Feuchtigkeit aussetzen. Das Gerät daher nicht in unmittelbarer Höhe von Wasser benutzten - beispelsweise in der Höhe einer Badewanne, eines Schwimmbeckens oder einem feuchten Keller.
Verwenden Sie das Gerät nur für den vorgesehenen Zweck.
Das Gerat ausschieblich an eine vorschrifsmäßig installierte Steckdose anschließen. Achten Sie darauf, daß die angegebene Spannung mit der Spannung der Steckdose übereinstimmt.
Bei Verwendung von externen Netzeiten auf die richtige Polarität und Spannung achten, Batterien stets richtig herum einlagen.
Das Gerät so aufstellen, daß vorhandene Lüftungsöffnungen nicht verdeckt werden.
Niemals das Gehäuse des Gerätes öffnen. Durch unsachgemäße Reparaturen konnen erhebliche Gefahren für den Benutzer entstehen. Bei Beschäftigung des Gerätes, insbesondere des Netzkabels, das Gerät nicht mehr in Betrieb besteht, sondern von einem Fachmann reparieren lessen. Netzkabel regelmäßig auf Beschäftigungen hin prufen.
Ein defektes Netzkabelarf nur vom Hersteller, unserem Kundendienst oder einer ahnlich qualifizierten Person durch ein gleichwertiges Kabel ersetzt werden, um Gefährdungen zu vermeiden.
Wenn das Gerät langere Zeit nicht benutzt wird, ziehen Sie den Netzstecker aus der Steckdose bzw. entnahmen Sie die Batterien.
Batterien einlagen
Auf der Rückseite des Gerätes befindet sich das Batteriefach. Um es zu öffnen, müssen bereits Schrauben (mit einem Schraubendrethersymbol gekennzeichnet) entfern werden. Sie benöttigen dazu einen kleinen Kreuzschlitzschraubendreher. Nachdem Sie die Schrauben entfern haben, drücken Sie auf die schaffierte Flüche des Batteriefachdeckels (OPEN) undziehen gleichzeitig den Deckel nach unten.
Legen Sie 4 X 1,5 V Batterien Typ UM 2 bzw. R 14 ein, wie auf dem Batteriefachboden abgebildet. Beachten Sie die Polung der Batterien! Falsch eingelegte Batterien können dem Gerät Schaden zufugen.
Gerat betreiben
Wiedergabe
- Öffnen Sie mit der roten Taste (STOP / EJECT) das Kassettenfach.
- Legen Sie eine Kassette mit der abzuspielenden Seite nach vorne und der Bandöffnung nach oben in das Kassettenfach.
-
SchlieBen Sie das Kassettenfach.
-
Folgende Funktionen können Sie nun ausführten:
rote Taste (STOP / EJECT) = Stop und Kassette auswerfen
gelbe Taste (REW) = Kassette zurückspulen
gelbe Taste (F.FWD) = Kassette vorspulen
blaue Taste (PLAY) = Kassette wiedergeben
grüne Taste (Aufnahme) = Aufnahme starten
- Stellen Sie mit dem roten Regler (rechts besoin der grünen Aufnahmetaste) die gewünschte Lautstärke ein.
- Schalten Sie, während eine Kassette wiedergegeben wird, den Schalter eines bzw. befinder Mikrofone auf ON'. Nun konnen Sie zu der wiedergegebenen Musik durch die Mikrofone singen. Ihr Stimme und die Musik ertönen gleichzeitig aus dem Lautsprecher.
- Drücken Sie nach der Wiedergabe auf die rote Taste. Die Wiedergabe stoppt und das Gerät ist nun ausgeschaltet.
Aufnahme
- Mit der grünen Taste (REC) haben Sie die Möglichkeit, ihre Stimme bzw. ihren Gesang über ein oder beiden Mikrofonce aufzehmen. Achten Sie daraufauf, dass bei der eingelegten Kassette die Lösenschutzlaschen nicht hereausgebrochen sind. Die grüne Taste lasst sich sonst nicht herunterträcken!
- Mit der roten Taste (STOP / EJECT) beenden Sie die Aufnahme.
Reinigung und Aufbewährung
- Reinigen Sie das Gerät nur mit einem feuchten Lappen.
- Benutzen Sie keine scharfen Reinigungsmittel.
- Wenn das Gerät über eine längerere Zeit (eine Monate) nicht benutzt wird, sollen Sie die Batterien aus dem Batteriefach enthalten, um ein Auslaufen von Batteriesäure zu verhindern.
Dieses Gerät entspricht den einschlägigen CE-Richtlinien und ist nach den neuesten sicherthechnischen Vorschriften gebaut.
Technische Änderungen vorbehalten!
Garantie
Wir übernehmen für das von uns vertriebene Gerät eine Garantie von 24 Monaten ab Kaufdatum (Kassenbon).
Innerhalb der Garantiezeit beseitigen wir unentgeltlich Mängel des Gerätes, die auf Material- oder Herstellungsehler berufen, durch Reparatur oder Umtausch.
Als Garantienachweis gilt der Kaufbeleg. Ohne diesen Nachweis kann ein Austausch oder eine Reparatur nicht kostenLOS erfolgen.
D Im Garantiefall geben Sieitte das vollständige Gerat in der Originalverpackung zusammen mit dem Kassenbon an ihren Handler.
Glasbruchschaen und Defekte an Zubehörteilen führen nicht zum Umtausch des Gerätes, sondern werden kosten im Austausch zugesendet. In dieser Fall nicht das Gerät einschicken, sondern nur das jeweilige defekte Zubehörteil bestellen!
Reinigung, Wartung oder der Austausch von Verschleißteilen fällt nicht in den Rahmen der Garantie und ist deshalb kostenpflichtig.
Die Garantie erlischt bei Fremdeingriff.
Nach der Garantie
Nach Ablauf der Garantiezeit konnen Reparaturen vom entsprechenden Fachhandel oder Reparaturservice kostenpflichtig ausgeführten werden.
General safety instructions
GB
To avoid the risk of fire or an electric shock, you should not expose the device to rain or moisture. Consequently, do not use the device in the immediate vicinity of water - for example near a bath tub, a swimming pool or in a damp cellar.
Use the device only for the intended purpose.
Only connect the device at a properly installed plug socket. Pay attention that the specified voltage corresponds to the voltage of the plug socket.
When using external mains supply, pay attention to the correct polarity and voltage.
Always place the batteries in the correct direction.
Assemble the device in such a way that the available ventilation openings are not covered.
Never open the housing of the device. Incorrect repairs can constitute a considerable risk for the user. Should the device become damaged, in particular the mains supply cable, do not operate the device any longer, but rather have it repaired by an expert. Check the mains supply cable regularly for damage.
For safety reasons a broken or damaged mains lead may only be replaced by an equivalent lead from the manufacturer, our customer service department or a similar qualified person.
If the device is not used for a longer period, remove the plug connector from the plug socket or take out the batteries.
Overview of Components
1 Cassette vane
2 Volume knob (VOLUME)
3 Record button (RECORD)
4 Play button (PLAY)
5 Rewind (REW)
6 Fast forward (F.FWD)
7 Stop/eject button (STOP/EJECT)
8 RECORD LED
9 POWER led
10 Microphone
11 On/off switch (microphone)
12 Loudspeaker
13 Mains appliance plug (mains appliance not supplied)
14 Headphone socket
15 Battery compartment
Insert Batteries
A battery compartment is located on the back of the device. Remove both screws (indicated with a screwdriver symbol) to open it. A small Phillips screwdriver is needed. Once the screws have been removed, press on the hatched surface of the battery compartment lid (OPEN) and simultaneously pull the lid downwards.
Insert 4 1.5V UM2 or R 14 type batteries as shown on inside the battery compartment. Pay attention to the battery polarities! Incorrectly inserted batteries may damage the device.
GB
Using the device
Playing
- Open the cassette deck with the red button (STOP/EJECT).
- Insert a cassette with the side to be played facing outwards and the cassette opening facing upwards.
- Close the cassette vane.
- The following functions can be activated:
Red button (STOP/EJECT) = stop and eject cassette
Yellow button (REW.) = rewind the cassette
Yellow button (F.FWD) = send the cassette forward
Blue button (PLAY) = play the cassette
Green button (record) = start to record
- Set the desired volume with the red knob (to the right of the green record button).
- While playing a cassette shift the switch of one of the microphones to ON. Now you can sing in the microphone as the music plays. Your voice and the music are heard simultaneously through the loudspeakers.
- Once the cassette finishes, press the red button. The playing stops and the device is switched off.
Recording
- Use the green button (REC) to record your voice or song through one or both of the microphones. Make sure that the erase protection flaps of the cassette are not broken. If this is not the case, the green button cannot be pressed!
- The recording is stopped with the red button (STOP/EJECT).
Cleaning and storage
- Clean the device only with a moist cloth.
- Do not use abrasive detergents.
- If the device is not for long periods of time (a few months), remove the batteries from the battery compartment to avoid leakage of acid from the batteries.
This appliance conforms with the CE directives for radio interference suppression and low-voltage safety and has been built to meet current safety requirements.
Subject to technical changes without prior notice!
Warranty
We undertake to guarantee the appliance sold by our company for 24 months as of the date of purchase (cash receipt).
During the life of the warranty we shall provide for the repair or replacement of the appliance owing to material or manufacturing defects absolutely free of charge.
Proof for the warranty is provided by the purchase document. The replacement and repair will not be performed free of charge without this proof of purchase.
GB
Should the warranty be valid, please consign the complete appliance in its original packing together with the cash receipt to your local dealer.
You are not entitled to the replacement of the appliance owing to broken glass parts and faulty accessories. However, said parts will be replaced free of charge. In this case only the faulty accessory needs to be ordered without sending back the whole appliance!
The cleaning, servicing and replacement of wear parts are not covered by this warranty and hence are to be paid for.
The warranty is terminated in case of handling on the part of Third parties.
After the warranty
Once the warranty has expired, repairs can be carried out by specialized technicians or repair services against the payment of the service.
PL
Ogólne wskazówki związane z bezpiecznych obstugy
Urzejdenie chronie danezy przy deszczem i wolgocia, aby zapobiec grobie pozaru lub porazeniu pradem. Nie daneły go wiec uzywac w povlizu wodya, a weary przydekadowo w povlizu wanny, basenu lub w zawilgoconeji piwnicy.
Urzadzenie nalezy uzywac tylko zgodnie z loro przyznaczenia.
Urzadzenie nalezy podączyc tylko i wyłącznie do przysepowo zamontowanego gniazdka.
Prosze zworcić uwage na to, zeby podane napięcie zgadzało są z napiȩciem w gniażdku.
W przypadku uzywania oddzielnych zasilaczyNSE wrocić uwage na biegunowość i napiecie, baterie musz zostac wtozone do uradzenia zgodnia z oznaczone biegunowość.
Urzadzenia naleź w taki sposob ustawic, zȩby istniejeść otwory wentylacyjne nie zostymi przykryte.
Nigdy nie wolno owierac obudowy urzadzenia. Niefachowo przejrowadzone naprawy moga byc gorne w skukt cach da uzytkownika. Przy uszkodzeniu urzadzenia, w szcegolnosci kabla sieciowego, urzadzenia nie maye byc uzywane dopoki ne zostanie naprawione przy osobe z wymaganyimi uprawieniama. Kabel sieciowy nalezy regularnie sprawdza,czy nie jest uszkodzony.
W celu unikniecia niebepieczeneistwa, uszkodzony kabel podaczenia do sieci moze bye wymieniana na kabel te的同时 jakosi wyacznie przyez producenta, nasz serwis lub inna osobe o odowiednich kwalifikacjach.
Ježeli urzadzenie nie bedzie przy dłuźsy czas uzywane,NSEWy wciąnac wyczke z gniażdka lub wyjac baterie.
Zestawienie elementów obsługi
1 Kieszen na kasete
2 Regulacja gólnosci (VOLUME)
3 Przycisk nagrywania (RECORD)
4 Przycisk odtwarzania (PLAY)
5 Szybkie przewijanie do tyfu (REW)
6 Szybkie przewijanie do przodu (F.FWD)
7 Przycisk zatrzymania taśmy i wyrzutu kasety (STOP/EJECT)
8 Lampka funkci nagrywania
9 Lampka POWER
10 Mikrofon
11 Węącznik / wymićznik mikrofonu.
12 Gósnik
13 Wyczka zasilacza sieleiwoego (zasilacz nie wchodzi w zakres dostawy)
14 Przyęcze stuchawkowe
15 Kieszen na baterie
Wkladanie baterii
Na tylnej sciance urzadzenie znajduje sie kieszen na baterie. Aby ja otworzyc nalezy wykreci ocie srbuki (ktore oznaczone sa symbole srbokreta).
Potrzebny jest do体系建设 strubokret z rowkiem krzyżowym. Po wykręceniu
Śrubek naleź nacisność kreskowaną sukrywo kieszeni na baterie (OPEN) i sądćcieść naleź pociąnȩc国家标准 wę dołowy.
Wtóz 4 baterie x 1,5 V, typ UM 2 wzgl. R 14; sposob podęczenia bateri przystawiono na spodzie kieszeni na baterie. Prosze zwrócić uwage na biegu nowość baterii. Nieprawidówto wtozone baterie mogą byc przyczyna uzzkodzenia urzędzenia.
Korzystanie z urzadzenia
Odtwarzanie
- Otwórz kieszen kasety za pomocć czerwonego przycisku (STOP / EJECT)
- Włód zasety kasetę odgrywna stroną ku przodowy i otworem z taśmą skierawaną ku goźne.
- Zamkij kieszen na kasete.
- Można teraz wączyc nastepujuć czynnosci:
czerwony przycisk
(STOP / EJECT) = stop i wyrzut kasety
ófthy przycisk (REW) = przewijanie taśmy do tyłu
óty przycisk (F.FWD) = przewijanie taśmy do przyodu
niebieski przycisk (PLAY) = odtwarzanie taśmy
zielony przycisk (nagrywanie) = uruchamianie nagrywania
- Wymagan glosnoc ustaw za pomocz czerwonego regulatora (umieszczono z sprawej strony zielonego przycisku funkosci nagrywania).
- W trakcie odwartzania taśmy przystaw przyȩćznik jegno lub obu mikrofonów na „ON". Teraz moźysz spiewać do mikrofonu na tie odwartznej muzyki. W gośniku bezdie jegnosześć stychać muzykę i gótos osoby spiewaźewajacej przyzmikofoń.
- Po zakończeniu odtwarzania wciśnij czerwony klawisz. Odtwarzanie jest zatrzymywnie, zaś urzadzenia jest wyłącze.
Nagrywanie
- Po wciśnięciu zielonego przycziscu (REC)MZa, za posrechnictwem jegneno lub dwoch mikrofonow, nagrywać swoJ gfoz wzgl. spiew. Nalewy przy tym zworciu uwage, aby wtożona kaseta nie bye zazejpieczona przyded kasowaniem. W przechiwym razieNie bedzie moza wciśnac zielonego przycziscu!
- Wcisniecie czerwonego przycisku (STOP/EJECT) konczy nagrywanie.
Czyszczenie i przechowywanie
- Urzadzenie nalezy czyscić wyłacznie za pomocą wilgotnej szmatki.
- Nie naleź uzywać zadnych szorstkich srodków czyszcząchyc.
- Jezeli urzadzenie ne bedzie uzywane przy dufuszcy okres czasu (kilka miesicy), nalewy woczas wjać baterie z kieszeni na baterie,ȩcki czemu zapobiegniemy wypłnicyi elektrólity z baterii.
PL
Niniejsze uradzadenie odpowiada normom CE sieci radiowo-telewizynej i bezpieczecnstwa niskonapięciwogo oraz zbudowane jest według najnowszej techniki bezpieczecnstwa pracy.
Zastrzega sie sprawo do zmian technicznych!
WARUNKI GWARANCJI
Przyznajemy 24 mieszecy gwarancji na produkt liczac od DATY zakupu.
W tym okresie bedziemy bezpłatnie uswuć w terminie 14 dni oddating dostarczenia wadliwo go spręt u karta gwarancyjna dojejka zakupu wszystkie uzzkodzenia powsta—we tym urzadzeniu na skutek wady materiały lub wadliwo wykonania, naprawiaznej oraz wymieniajac wadliwe czeci lub (jesli uznama za stosowne) wymieniajac czte urzadzionie na nowe.
Sprzêt do naprawy powinien byc dostarczony w komplecie wraz z dowodem zakupu oraz z wazna karta gwarancyjna do sprewdawy w miäreMZIwiCsWi oryginalnym opakowaniu lub innym odpowiednim dla zabepezciezenia przy uzkodzienium. W razine braku kompletné opakowania fabrczneo, ryzyko uszkodzenia sprzêtu podczas transporte do i z.),
Naprawa gwarancjna nie dotyczy czynosci przywidzianych w instruktji obstugi, do wykonania ktorych zobowiazny jest uzytkownik we wąsnych zakresie i na wąsny koszt.
Gwarancja nie obejmujee:
- mechanicznych, termicznych, chemicznych uszkodzen sprzętu i wywołyanych nimi wad,
- uszkodzen powstałych w wyniku dziatania sǐt zewétrznych takich jak wyładowania atmosferyczne,zmiana napiecia zasilania i innych zdarzen losowych,
- nieprawidówego ustawienia wartosci napięcia elektrycznych, zasilanie z niedopowieciegniazda zasilania,
sznurów połaczeniowych, sieciowych, zarowek, baterii, akumulatorów, - uzkodzeń wyrobu powstałych w wyniku niedzciwego lub niedzgodnego z instrukcacja为其 uzytkowania, przechowywnia, konserwacje, samowolné zrywnian plomb oraz wszelichek przeróbek i zmian konstrukcyjnych dokonanych przy beztykownika lub osoby niedzozne,
- roszczenia z tytuło parametrów technicznych wyrobu, o ile są one zgodne z podanyymi przyez produkta,
- prawidówego zuźycia iuszkidzén, króre majornieistotny wptyw na wartosć lub dziatanie tego urzadzenia.
Karta gwarancyjna bez pieczatki sklepu, daty sprezedazy,Nie wypetniona, zle wypefniona, ze sladami popraweik, nieczytelna wskutek zniszczenia, bez moziwosci ustanalia.),mejsca sprezedazy oraz dozaczonego dowodu zakupu jest nieważna.
Korzystanie z uslug gwarancyinych nie jest möglichwe po uphywie daty zańsci gwarancji. Gwarancja na czeci lub cate urzadzenia, króte są wymiene ićczy sie, wraz z koncem gwarancji na to urzadzenia.
Wszystkie inne rosczzenia, wiccajac w to odszkodowania są wykluczone chyba, ze prawo przydwuju inaczej. Rozczenia wykraczejace poza ta umoweNie są uwzględniane przy tą gwarancje.
PL
Gwarancja oraz zawarte w nied warunki obowiazuju na terenie Rzeczpospolitej Polskiej.
E
Indicaciones generales para su seguridad
Vd. no deben dejar expuesto el aparato ni a la lluvia ni a la humedad, a fin de disminuir asi el riesgo de incendio o de sacudida electrica.
Por tanto, no debe utilizes el aparato circa de agua - por exemple, circa de la bañera, de una piscina o de un sotano humedo.
Utilice el aparato únicamente para la finalidad para la que ha sido construido.
El aparato se ha de connectar únicamente a una caja de toma de corriente instalada reglamentariamente. Cerciórese de que la tensión indica concuerda con la tensión de la caja de enchufe.
Preste atencion a que sea correcta la polaridad cuando se empleen fuentes de alimentacion externas. Las pilas se han de introduir siempre correctamente.
El aparato se ha deantar puesto de modo que no se tapen los orificios de aireacion existentes.
Jamás se Arrivala la carcaja del cuerpo del aparato. Las reparaciones mal hechasSEOuen generar considerables peligos para el usuario.
En caso de estar deteriorado el aparato, en especial el cable de conectar a red, ya no se ha deponer más en service el aparato, sino que se hara que lo repare un especialista. Controle periodically el cable de connexion a red para ver si se ha deteriorado.
Só el fabricante, nuestro serviceo posventa o un"How do?" con una calidad similar coulden携带 un cable defectuoso por otherwise similar, para evaporar todo tipo de riesgo.
Saque de la toma de corriente la clavija de conectar a la red o bien quite las pilas cuando no se vaya a usar el aparato durante长大o tiempo.
Indicación de los elementos de manejo
1 Compartimento para las baterías
2 Regulador de volumen (VOLUME)
3 Botón de grabación (RECORD)
4 Botón de reproducción (PLAY)
5 Rebobinado rápido (REW)
6 Bobinado rápido (F.FWD)
7 Botón de pausa / expulsion (STOP / EJECT)
8 Lamparita
9 Lámpara de alimentación
10 Micrófono
11 Conector / desconector (microfonos)
12 Altavoz
13 Clavija para el aparato conecable a la red (aparato conecable a la red no se entrega)
14 Conector para auriculares
15 Compartimiento para las baterías
Introducir baterias
En la parte trasera del aparato se enquiryra el compartmentario para las baterias. Para partirlo, tiene que quitar los dos tornillos (marcados con un*simbolo de destornllador). Para this necessita un destornllador微量元素 en cruz. Despues de haber
quitado los tornillos, presione sobre la superficie rayada de la tapadora del compartmento para las baterias (OPEN) y tire a la vez la tapadora hacía bajo.
Introduzca 4 x 1,5 V baterias tipo UM 2 o R14, como indicace en el fondo del compartmento de baterias. Tenga atencion con la polaridad de las baterias!
Baterias mal introducidas peuvent darar al aparato.
E
Poner en marcha el aparato
Reproducción
- Abra con el botón rojo (STOP / EJECT) el portacasetes.
- Introduzca una cinta con la cara a reproducir hacía adelante y la aperture de cinta hacía arriba en el alojamiento de la casing.
- Cierre el alojamento de la casette.
- Puede elegir entre作為esesiones:
Botón rojo (STOP / EJECT) = Pausa y sacar la casete
Botón amarillo (REW) = Rebobinar la casete
Botón amarillo (F.FWD) = Bobinar rápidó la casete
Boton azul (PLAY) = Reproducir la casete
Botón verde (Grabación) = Iniciar la grabación
- Ajuste con el regulatoro rojo (que se encuesta a la referencia del boton de grabacion) el volumen deseado.
- Mientras que la casa se está reproduciendo, conecte el interruptor de uno o de todos microfONos en posicion "ON". Ahora peutecantar por microfono y con la musica que se está reproduciendo. Su voz y la música resuyenan al misismo tiempo del alvazo.
- Después de la reproducción presione el botón rojo. La reproducción se para y el aparato esta ahora desconectado.
Grabación
- Con el botón verde (REC) Tiene la posibidad de grabar su voz o su canción a traverses de uno or de ambos microfones. Referente a la casa introducida,onga atencion que las lenguetas que protegen a que no se borre la grabacion, no estén quebradas. iEl botón verde no sedea presionar!
- Con el botón rojo (STOP / EJECT) finaliza la grabación.
Limpieza y almacenimiento
- Limpie el aparato solamente con un paño humedecido.
Noutilicedetergentefuertes. - Si no va a usar el aparato durante un tiempo很长o (unos这几个), deben SACAR las baterías del compartmento para evaporar un derrame del ácido de las baterías.
E
Este aparato response a las directivas de CE para la supresión de interferencias y la seguridad de baja tensión y ha sido Construido según las ultimas prescrições de seguidad技术水平.
No reservamos el derecho de efectuar modificaciones sociales.
Garantía
Este producto está garantizo por nosotros durante 24 días a partir de la Fecha de配音ación (factura de compra).
En el tiempo de garantía nos hacemos cargo de eliminar gratuityamente mediante reparación o cambio todos los defectos del aparato debidos a una imperfecta fabricación o a los materiales.
La garantía tendrá validez con la factura de compra. Si no dispone de la factura no seouldarivar el Cambio o la reparacion de forma Gratisia.
En caso de garantíaDebe落户 el productocomplete con el embalaje original y la factura de compra a su establishimiento de adquisión.
En caso de rotura de cristal y defectos en los accesos no se cambia el aparato, sino se recambiarlos accesos en envio Gratis. En este caso no envie todo el aparato, sino encargue solamente la pieza defecta!
La limpieza, el mantenimiento o el cambio de piezas que se desgastan no entran en la garantía y deben ser abonados por usted.
La garantía no tendrá validez si el defecto es occasionado por tercera personas.
Después de la garantía
Cuando se haya expirado la garantía las reparaciones se realizan por el commercio especializzato o el service al cliente y serán abonados por usted.
Generelle sikkerhedshenvisninger
DK
Undgå brandfare eller risiko for elektrisk stød ved ikke at udsætte apparatet for regn eller fugt. Apparatet på derfor ikke bruges tät ved vand - eksempelvis iærheden af badekar, svømmebassiner eller i en fugtig kælder.
Brug kun apparatet til det beregnede formal.
Apparatet mä kun tilstluttes en korrekt installereret stikkkontakt. Kontrollér, at den angivne spænding svarer til speändingen på stikkkontakten. Vær sikker på korrekt polaritet og speænding ved brug af eksterne netdele, placér altid batterierne i den rigtige retting.
Opstil apparatet, sáledes at eksisterende ventilationsåbninger ikke tildækkes.
Apparatets cabinet má aldrig abnes. Ukyndig reparation kan medfrole betydelige risici for brugeren. Har apparatet og især netledningen taget skade, ma apparatet违法犯罪 ibrug.Fa det repareret af en fagmand. Kontroller netledningen for beskapadigelsem med javenta mellerum.
For at undgå risici ma en defekt netledning kun udskiftes med en ækvivalent led- ning af fabrikanten, vores kundeservice eller en tilsvarende kvaliferet person.
Trak hvh. netstikket ud af stikkontakten aller fjern batterierne, his apparatet ikke bruges i længere tid.
Oversigt over betjeningsanordningerne
1 Kassetterum
2 Lydstyrkeregulator (VOLUME)
3 Indspilningsknap (RECORD)
4 Afpilningsknap (PLAY)
5 Hurtig tilbagespoling (REW)
6 Hurtig fremspoling (F.FWD)
7 Stop-/udkastnings-knap (STOP/EJECT)
8 RECORD-lampe
9 POWER-lampe
10 Mikrofon
11 Taend-/sluk-knap (mikrofoner)
12 Hojttaler
13 Stik til netdel (netdel folger ici med)
14 Tilslutting til hovedtelefon
15 Batterirum
Isaeling af batterier
Pá apparatets bagside er batterirummet anbragt. For at abne det skal de to skruer (markeret med et skruetrækkersymbol) fjernes. De fjernes ved hjælp af en lille krydskærvskruetrækker. Tryk afterfolgende pa den skrarede overflade pa laget af batterirummet (OPEN) og træk samtidigt laget i nedadgaende retning.
Læg 4x 1,5 V batterier, type UM 2 aller R 14, i som beskretet på bunden af batterirummet. Vær opmaerkoms på batteriernes polaritet. Ukorrekt isatte batterier kan foråsage beskadigelse at apparatet.
DK
Brug af apparatet
Afpilning
- Abn kassetterummet med den rode knap (STOP/EJECT).
- Placér en kassette med sider, der skal afspilles, fremad og bandabningen opad i kassetterummet.
- Luk kassetterummet.
- Herefter kan folsfende Funktioner udfores:
Rod knap (STOP/EJECT) = Stop + udkastning af kassette
Gul knap (REW) = Tilbagespoling af kassette
Gul knap (F.FWD) = Fremspoling af kassette
Blå knap (PLAY) = Afpilning af kassette
Grøn knap (indspilning) = Start på optagelse
- Indstil den onskede lydstyrke med den rode regulator (til hore ved sider auf den gronne indspilningsknap).
- Stil under afspilingen af en kassette functionsvælgeren pa en af mikrofererne eller pa begge mikrofoner pa "ON". Nu kan du samtidigt synge til den afspillede musik via mikrofererne. Din stemme og musiken hores pa samme tid gennem højttaleren.
- Tryk på den rode knap after afspilningen. Herved stoppes afspilningen, og der slukkes for afspilleren.
Optagelse
- Ved hjælp af den grønne knap (REC) er det muligt at optage sin egen stemme og sang via en mikrofon eller begge mikrofoner. Vaer opmærskom på, at de to tapper i kassetten, som sikrer mod sletting, ikke brækkekaf. Det vil ellers��e umuligt at trykke den grønne knap ned.
- Optagelsen stoppes med den rode knap (STOP/EJECT).
Rengoring og opbevaring
- Afspilleren mä kun gores rent med en fugtig klud.
- Brug/DD: aggressive rengöringsmidler.
- Hvis afspilleren ikke benyttes i en længereperiode (nogle maneder), skal batterierne fjernes fra batterirummet, for at undgå at syren fra batterierne lober ud.
Ovnen er i overensstemmelse med gældende EF-direktiver og konstrueret i hén-hold til nyeste sikkerhedstkniske forskritter.
Tekniske ændringer forbeholds!
Garanti
DK
Vi yder en garanti pà det af os solgte apparat i 24 maneder fra købsdatoen (kasse-bon).
Via reparation aller ombytning afhjælper vi vederlagsfrit mangler på apparatet i garantiperioden, som skyldes materiale- eller fabrikationsfejl.
Köbsnoten gelaider som garantibevis. Uden ditte bevis er det ikke muligt at ombytete eller reparere apparatet.uden beregnig.
Det komplette apparat i originaleballagen bedes overgivet til forhandleren sammen med kassebonen, hvis der gores brug af garantien.
Apparatet omyttes ikke ved glasbrud og fejl på tilbehör. Disse dele udskiftes og til-sendes,uden beregning.I dette tilfædle skal apparatet ikke indsendes.Derimod bestilles den,enkelte defekte del af tilbehoret!
Garantien omfatter不解 rengoring, service aller udskiftning af sliddele og vil derfor blive beregnet.
Garantien ophoer ved ukyndig behandling.
After garantiens udlob
After udlobet af garantiperioden kan reparacioner udfores af den tilsvarende forhandler eller reparationservice mod beregning.
Avvertenze generali per la sicurezza
Per evitare il rischio di incendio o di scosse, non si deve mai tenere l'apparecchio sulla pioggia o in ambienti umidi. Quindi non usare l'apparecchio nelle immeditate vicinane di acqua, per esempio in prossimità di una vasca, di una piscina o in una cantina umida.
Utilizzato l'apparecchio solo per l'uso previsto.
Collegare l'apparecchio esclusivamente ad una presa installata a norma. Fare attenzione a che la tensione indica corrisponda alla tensione della presa. Se si impiegano alimentatori esterni, fare attenzione all'esattezza di polarità e di tensione, inseire le batterie sempre correttamente.
Collocare l'apparecchio in modo che le aperture per l'airazione esistenti non ven-gano coperte.
Non togliere mai la protezione dell'apparecchio. Riparazioni non a regola d'arte possono causare notevoli pericoli per l'utente. Se l'apparecchio presenta danni, soprattutto nella zona del cavo di collegamento, non metterlo più in funzione, ma farlo riparare prima da un esperto. Esaminare regolarmente il cavo di collegamento alla rete per verificare che non ci siano danni.
Un cavo di collegamento difettoso più essere sostituito con un cavo equivalente solo dal produttore, dal quello servizio assistenza o da persona similmente qualificale, al fine di evitare pericoli.
Se l'apparecchio non viene usato per un periodo di tempo prolongato, togliere il blocchetto alimentatore alla presa ovvero estrarre le batterie.
Elementi di lavoro
1 Vano cassette
2 Manopola per la regolazione del volume (VOLUME)
3 Tasto di registrazione (RECORD)
4 Tasto per la riproduzione (PLAY)
5 Riavvolgimento veloc (REW)
6 Avanzamento veloce (FFWD)
7 Tasto stop/espulsione (STOP/EJECT)
8 Indicatore luminoso RECORD
9 Indicatore luminoso POWER
10 Microfoni
11 Tasto On/Off (microfoni)
12 Altoparlanti
13 Spina blocco alimentatore (blocco alimentatore escluso alla fornitura)
14 Collegamento cuffie
15 Vano batterie
Inserimento delle batterie
Sul retro dell'apparecchio si trova un vano batterie. Per aprirlo si devono rimuovere entrambé le viti (contrassegnate dal significolo del cacciavite). A quello scopo servira un piccolo cacciavite a stella. Dop o aver rimosso le viti, premere la superficie trat-teggiata del coperchio del vano batterie (OPEN) e contemporaneamente premere il coperchio verso il basso.
Inserire 4 batterie da 1,5 V tipo UM 2 o R 14, come stampato sul fondo del vano batterie. Fare attentione alla polarità delle batterie! Batterie nella posizione errata possono causare danni all'apparechio.
Uso dell'apparecchio
Riproduzione
- Con il tastingo rosso (STOP/EJECT) aprire il vano cassette.
- Inserire una cassetta nel vano cassette con il lato da riproduire rivolto in avanti e l'apertura del nastro verso l'alto.
- Chiudere il vano cassette.
- Ora si possono eseguire le seguenti funzioni:
tasto rosso (STOP/EJECT) = Stop ed espulsione cassetta
tastogiallo (REW) = Riavolgimento nastro
tasto giallo (F.FWD) = Avanzamento veloce
tastoblu (PLAY) = Riproduzione cassetta
tasto verde (registrazione) = Avvio registrazione
- Con la manopola di regolazione rossa (a destra accanto al tasto di registrazione verde) regolare il volume desiderato.
- Durante la riproduzione della cassettaMETTARE l'interruttore di uno o di entrambi i microfoni su "ON". Ora e possible cantare al microfono durante la riproduzione della musica. La vostra voce e la musica risuoneranno contemporaneamente dagli alto parlanti.
- Dopo la riproduzione premere il tasto rosso. La riproduzione si blocca e l'apparecchio si spegne.
Registrazione
- Con il tasto verde (REC) avete la possibilità di registrar la vostra voce o il vosto cantotramite uno o entrambi i microfoni. Fare attenzione che la linguetta di protezione della cassetta inserta non sa rota. In tal caso non è possibile premere l tasto verde!
- Con il tastingo rosso (STOP / EJECT) si pone termine alla registrazione
Pulizia e conservazione
- Pulire l'apparecchio solo con un panno leggermente inumidito.
Non usare detergenti abrasivi. - Se non si usa l'apparecchio per un po'di tempo (qualche mese), è meglio togliere le batterie dal loro vano per evitarne l'ossidazione.
Questo appearechio correponde alle norme CE per i disturbi radio e la sicurezza contro le correnti a basso voltaggio ed è stato costruito in base alle più recenti norme teciche di sicurezza.
Con riserva di apportare modifiche tecniche.

Garanzia
A partire alla data di acquisito, quello prodotto è garantito dal produttore per un periodo di 24 mesi (scontrino).
Durante la durata della garanzia, il produttore eliminare gratuiteamente difetti dell'apparecchio dovuti a imperfezioni di produzione o di materiale, eventualmente cam-biando l'unità oppure procedendo con le dovutre riparazioni.
La garanzia è valida solo con lo scontrino. Senza l'esibizione dello scontrino non è possiblefare svolgerele the riparazioni gratuitoamente.
In caso di riparazioni con garanzia, è necessario ritornare al produttore l'apparecchio intero, nell'imballaggio originale, accompagnato dallo scontrino.
In caso di rottrura dietro v eti difetti agli accessori, i pezzi necessari verranno spediti inchio Gratismente. In quello c è necessario di non spedire l' intero apparecchio, ma ordinare solo l'accessorio difettoso!
Pulizia, manutenzione e scambio non fanno parte della garanzia e sono perciò sono soggetti a spese.
La garanzia perde la sua validità se l'apparecchio è sottomesso all'intervento di terzi.
Dopo la garanzia
Quando la garanzia è scaduta, le riparazioni devono essere effettuate da un negozio od un servizio specializzato, contro pagamento.
Technische Daten
Modell:
CR 465
Spanningsversorgung: Batterien/Akkus
4x 1,5 V,Typ UM2
Dieses Gerät entspricht den CE-Richtlinien.
Bitte führen Sie das ausgediente Gerät einer umweltgerechten Entsorgung zu.
Ausgediente Akkus/Batterien gehoren nicht in den Hausmull!itte führn Sie.
diese zur Entsorgung/Wiederverwertung einer Annahmestelle zu.


CHATRONICINTERNATIONAL GMBH
D-47906 Kempen/Germany · Industriering Ost 40 Internet: http://www.clatronic.de · email: clatronic@t-online.de